1
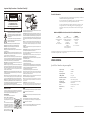
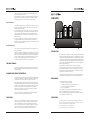
Quad II Classic
Monobloc Valve Power Amplifier
KT66
KT66
Classic
Quad Electroacoustics Ltd, IAG House,
Sovereign Court, Ermine Business Park,
Huntingdon PE29 6XU
England
www.quad-hifi.co.uk
Tel: 01480 447700 Fax: 01480 431767
Owner’s Manual
Important Safety Precautions - Please Read Carefully!
CAUTION!
Example of Antenna Grounding
as per National Electrical Code
RISK OF ELECTRIC SHOCK
DO NOT OPEN
Ground clamps
TO REDUCE THE RISK OF ELECTRIC SHOCK
DO NOT REMOVE COVER (OR BACK)
NO USER-REMOVEABLE PARTS INSIDE
REFER SERVICING TO QUALIFIED PERSONNEL
Antenna discharge unit
(NEC Section 810-20)
Electric service
equipment
ADVERTISSEMENT: RISQUE DE CHOC ELECTRIQUENE PAS OUVRIR
The lightning flash with arrowhead symbol, within an equilateral triangle, is
intended to alert the user to the presence of uninsulated dangerous voltage within
the product’s enclosure that may be of sufficient magnitude to constitute a risk of
electric shock to persons.
The exclamation point within an equilateral triangle is intended to alert the user to
the presence of important operating and maintenance (servicing) instructions in
the literature accompanying the appliance.
Read Instructions: All the safety and operating instructions should be read before the product is operated.
Retain Instructions: The safety and operating instructions should be retained for future reference.
Heed Warnings: All warnings on the product and in the operating instructions should be adhered to.
Follow Instructions: All operating and use instructions should be followed.
Cleaning: Unplug this product from the wall outlet before cleaning. Do not use liquid cleaners or aerosol cleaners.
Use a damp cloth for cleaning.
Attachments: Do not use attachments not recommended by the product manufacturer as they may cause hazards.
Water and Moisture: Do not use this product near water - for example, near a bath tub, wash bowl, kitchen sink,
or laundry tub, in a wet basement; or near a swimming pool; and the like.
Accessories: Do not place this product on an unstable cart, stand, tripod, bracket, or table. The product may fall,
causing serious injury to a child or adult, and serious damage to the product. Use only with a cart, stand, tripod, bracket
or table recommended by the manufacturer, or sold with the product. Any mounting of the product should follow the
manufacturer's instructions, and should use a mounting accessory recommended by the manufacturer.
Moving the Product: A product and cart combination should be moved with care. Quick stops, excessive force, and
uneven surfaces may cause the product and cart to overturn.
Ventilation: Slots and openings in the cabinet are provided for ventilation and to ensure reliable operation of the
product and to protect it from overheating, and these openings must not be blocked or covered. The openings
should never be blocked by placing the product on a bed, sofa, rug, or other similar surface. This product should not
be placed in a built-in installation such as a bookcase or rack unless proper ventilation is provided or the
manufacturer's instructions have been adhered to.
Power Supply Cords: Power supply cords should be routed so that they are not likely to be walked on or pinched by
items placed upon or against them, paying particular attention to cords at plugs, convenience receptacles, and the
point where they exit from the product.
Power Sources: This product should be operated only from the type of power source indicated on the marking
label. If you are not sure of the type of power supply to your home, consult your product dealer or local power
company. For products intended to operate from battery power, or other sources, refer to the operating instructions.
Polarisation: This product is equipped with a polarized alternating-current line plug (a plug having one blade
wider than the other). This plug will fit into the power outlet only one way. This is a safety feature. If you are unable
to insert the plug fully into the outlet, try reversing the plug. If the plug should still fail to fit, contact your electrician
to replace your obsolete outlet. Do not defeat the safety purpose of the polarized plug.
Lightning: For added protection for this product during a lightning storm, or when it is left unattended and unused
IMPORTANT NOTICE TO UK USERS
The appliance cord is terminated with a UK approved mains plug fitted with a 5A fuse. If the fuse needs to be
replaced, an ASTA or BSI approved BS1362 fuse rated at 5A must be used. If you need to change the mains plug,
remove the fuse and dispose of this plug safely immediately after cutting it from the cord.
Connecting a Mains Plug
The wires in the mains lead are coloured in accordance with the code:
Blue: NEUTRAL Brown: LIVE Green & Yellow: EARTH.
As these colours may not correspond to the coloured GREEN
markings identifying the terminals in your plug, proceed as
&
follows:
YELLOW
The wire coloured BLUE must be connected to the terminal (EARTH)
marked with the letter N or coloured BLUE or BLACK. The wire
coloured BROWN must be connected to the terminal marked
BLUE
with the letter L or coloured BROWN or RED. The wire
(NEUTRAL)
coloured GREEN & YELLOW must be connected to the
terminal marked with the letter E or coloured GREEN or
GREEN & YELLOW or marked with the Earth Symbol
Service & Information
Antenna lead in wire
FUSE
(5 A)
BROWN
(LIVE)
Grounding Conductors
(NEC Section 810-71)
Ground clamps
Power service grounding electrode system
(NEC ART 250, Part H)
for long periods of time, unplug it from the wall outlet and disconnect the antenna or cable system. This will prevent
damage to the product due to lightning and power-line surges.
Antenna Grounding: If an outside antenna or cable system is connected to the product, be sure the antenna or cable
system is grounded so as to provide some protection against voltage surges and built-up static charges. Article 810 of
the National Electrical Code, ANSI/NFPA 70, provides information with regard to proper grounding of the mast and
supporting structure, grounding of the lead-in wire to an antenna discharge unit, size of grounding conductors, location
of antenna-discharge unit, connection to grounding electrodes, and requirements for the grounding electrode. (Refer to
diagram)
Power Lines: An outside antenna system should not be located in the vicinity of overhead power lines or other
electric light or power circuits, or where it can fall into such power lines or circuits. When installing an outside
antenna system, extreme care should be taken to keep from touching such power lines or circuits as contact with
them might be fatal.
Overloading: Do not overload wall outlets, extension cords, or integral convenience receptacles as this can result
in a risk of fire or electric shock.
Object and Liquid Entry: Never push objects of any kind into this product through openings as they may touch
dangerous voltage points or short-out parts that could result in a fire or electric shock.
Heat: The product should be situated away from heat sources such as radiators, heat registers, stoves, or other
products (including amplifiers) that produce heat.
Servicing: Do not attempt to service this product yourself as opening or removing covers may expose you to
dangerous voltage or other hazards. Refer all servicing to qualified service personnel.
Damage Requiring Service: Unplug this product from the wall outlet and refer servicing to qualified service
personnel under the following conditions:
a) When the power supply-cord or plug is damaged
b) If liquid has been spilled, or objects have fallen into the product
c) If the product has been exposed to rain or water.
d) If the product does not operate normally by following the operating instructions. Adjust only those controls that are
covered by the operating instructions as an improper adjustment of other controls may result in damage and will often
require extensive work by a qualified technician to restore the product to its normal operation.
e) If the product has been dropped or damaged in any way.
f) When the product exhibits a distinct change in performance - this indicates a need for service.
Replacement Parts: When replacement parts are required, be sure the service technician has used replacement
parts specified by the manufacturer or have the same characteristics as the original part. Unauthorised
substitutions may result in fire, electric shock, or other hazards.
Safety Check: Upon completion of any service or repairs to this product, ask the service technician to perform
safety checks to determine that the product is in proper operating condition.
Warning: To resist the risk of fire or electrical shock, do not expose this product to rain or moisture. The product
must not be exposed to dripping and splashing and no object filled with liquids - such as a vase of flowers - should
be placed on the product.
No naked flame sources - such as candles - must be placed on the product.
Service: Equipment for sevicing should be returned to the suplying dealer, or to the appointed service agents for
your area. The addresses of Service Agents for the UK , USA and Canada are listed on the rear cover of this manual.
WARNING
The mains power switch for this appliance is located on the rear panel. To permit free access to this switch the
apparatus must be located in an open area without any obstructions.
If your QUAD equipment requires servicing (including valve replacement) you should return
it to the dealer from whom the equipment was purchased.
If you are abroad and there is no suitable dealer in your area, please contact the distributor
for the country in which it was purchased or QUAD Electroacoustics Ltd.
It is user's responsibility, whether the equipment is under warranty or otherwise, to ensure
that equipment for service is returned carriage paid and in the original packaging. You
should enclose a brief note with your name and address and the reason for returning the
equipment.
Authorised QUAD Service Centres in the U.K. and North America
USA
IAG America, Inc.
15 Walpole Park South
Walpole
MA 02081
Tel: +1 508 850 3950
U.K.
QUAD Electroacoustics Ltd.
IAG House, Sovereign Court,
Ermine Business Park,
Huntingdon,
Cambs PE29 6XU,
England.
Tel:+44 (0)1480 447700
Fax:+44 (0)1480 431767
CANADA
Korbon Trading Ltd
6800 Kitimat Road
Units 19-20
Mississauga
Ontario
Tel: +1 905 567 1920
For information on authorised service centres worldwide contact QUAD Electroacoustics Ltd. A worldwide distributor
list is available on the QUAD website: www.quad-hifi.co.uk
SPECIFICATIONS
Quad II Classic Monobloc valve power amplifier
Input sensitivity
Power output
Output Impedance
THD @ 700 Hz
Residual hum and noise
Frequency response
Damping factor
Power consumption
Valves
Dimensions (mm)
Weight
1.4V RMS
15W RMS
8 Ohms
0.3% @ 12w
Better than -90 dB
10 Hz - 20 kHz (± 0.2 dB)
11.75 @ 700 Hz (referred to 8 Ohms)
90VA maximum
2 x EF86, 2 x KT66, 1 x GZ34
335 x 121 x 171
8.3 Kg
CAUTION
Use of controls or adjustments, or the performance of procedures other than those specified may result in hazardous
radiation exposure.
IMPORTANT NOTICE
The IEC socket which fits into the mains connector located on the rear panel of this unit is a moulded unit.
If this unit becomes damaged in any way do not attempt to repair or connect a replacement plug to the cord.
Consult your dealer to purchase a suitable replacement.
WARNING
This equipment uses valves (tubes) which get hot. Do not touch the glass envelopes of the valves while the
equipment is in use or within 30 minutes after the equipment has been switched off.
QUADII Classic Manual 0405 Issue 2
As the valves start to wear out the sound will become less well defined and a lack of
dynamics and power will become evident.
When replacing valves it is essential to use the highest quality available. Poor quality valves
will adversely affect the sound quality and may in extreme cases damage the amplifier.
When replacing the valves do so as pairs, and for best results use matched pairs.
USER GUIDE
Output Transformer
After installing or changing the wiring to your speakers keep the volume control at zero, let
the amplifier warm up and turn up the main volume gradually. If you don't hear sound,
switch off immediately and investigate.
The output transformer is the most expensive component in a valve power amplifier. It is
designed to match the high voltage, low current conditions in which output valves operate
to the low voltage high current requirements of a loudspeaker. Although robust and
capable of lasting a lifetime, an output transformer can be damaged and, in extreme cases
wrecked, by careless use.
If you play a valve amplifier into a short circuit, the output transformer will soak up a lot
of energy before failing but if the short persists the transformer could be damaged.
Remember, operating a valve amplifier at high output levels with no loudspeaker connected
can also damage an output transformer.
KT66
KT66
Overall Volume Levels
Always turn the volume control down before changing sources as the resulting surge could
damage your loudspeakers.
Output levels from different source components in a high fidelity system can vary widely.
A CD player can produce levels significantly higher (>18 dB ) than an FM tuner. It follows
that the position of the volume control is not a guide as to 'how loud' the equipment will
go. Though the overload characteristics of the QUAD II Classic are such that you will be
able to play your music at surprisingly high levels, if the sound is distorted, you are
overloading your equipment whatever the position of the volume control.
INTRODUCTION
The QUAD II Classic power amplifier is a re-creation of the legendary QUAD II amplifier
designed by Peter Walker, founder of QUAD and one of the guiding lights of early Hi-Fi
reproduction. Like the QUAD II, the QUAD II Classic uses the uniquely simple and timeless
circuit topology developed by Walker. To comply with modern international manufacturing
and other standards certain aspects of the original amplifier have had to be changed but these
are almost entirely superficial. The fundamentals are as they were when the original Quad II
first saw the light of day, fifty years ago.
CARE AND CLEANING
The QUAD II Classic is designed for the music lover. We make no exaggerated
performance claims and are content to let the results speak for themselves. Thank you for
purchasing this QUAD equipment. We can only hope that it will bring you many years of
listening pleasure, and that, like its illustrious predecessor, it will be a treasured possession
for you and for future generations of music lovers.
The surface of the equipment may be cleaned with a damp cloth provided that the power
has been removed first. Solvent based cleaning materials should not be used as they may
damage the paint finish.
GUARANTEE AND PRODUCT REGISTRATION
Your QUAD equipment is guaranteed against any defect in material and workmanship for
a period of one year from the date of purchase with the exception of the valves, which are
warranted for three months. Proof of purchase is required for warranty claims.
Although this equipment has primarily been designed for use with QUAD components, it
may be connected to any high quality audio source component and loudspeaker system.
PRELIMINARIES
The QUAD II Classic amplifier carton contains:
! QUAD II Classic valve power amplifier
! One IEC mains lead fitted with an appropriate mains connector
! Instruction Manual and Warranty Registration form
! One set of packing materials.
Consult the dealer from whom you purchased the equipment if any item is missing.
Please retain the packing materials for future transportation of the product.
Please read this manual in full before installing your new amplifier and retain the manual
and your purchase receipt for future reference.
Please complete and return the enclosed Warranty registration form. Within the warranty
period QUAD will undertake replacement of defective parts free of charge provided that
the failure was not caused by misuse, accident or negligence. Your statutory rights within
the territory in which you purchased the equipment are not affected by this warranty.
QUAD carries out a regular review of its products and reserves the right to adjust the
specifications and performance from time to time.
There are no user replaceable or serviceable parts inside this equipment. Unauthorised
attempts to service or modify this product will void the warranty.
CONCLUSION
INSTALLATION
Apart from a few very specialised fields, the valve has been obsolete in almost every walk
of life for at least thirty years yet it remains the equipment of choice for thousands of
music lovers and audiophiles the world over. Audio amplification has been with us for
ninety years and for over fifty of those ninety, the name of QUAD has been synonymous
with the best the world has to offer. In producing the QUAD II Classic, we have revisited our very roots. We hope the result lives up to your highest expectations.
4
The mains operating voltage of the unit is indicated on the rating plate attached to the
unit. If this voltage does not match the mains voltage in your area, consult your QUAD
dealer about converting the unit. The fuse rating should be:
220 - 240V (UK, Korea, etc.) T 1AL 20mm Slow Blow
100 - 120V (USA, Japan, etc) T 2AL 20mm Slow Blow
1
If this is your first valve amplifier please familiarise yourself with some important issues
surrounding the safe use of the QUAD II Classic.
Valves Get Hot
Loudspeaker Connections
Strip any outer sleeve from the cable to a depth of around 40 mm (1.5”).
Strip the top 7mm of sleeving to expose the bare wire.
If you are using stranded cable, lightly twist the strands to gather any loose ends.
!
!
Valve power amplifiers generate a lot of heat even with no input so it is vital to ensure
adequate ventilation for your power amplifiers. QUAD II Classic power amplifiers should
not be placed on a rack; each unit should be on a stable solid well-ventilated surface with at
least 1m (3ft.) of free space above.
Although the protective cage over the QUAD II Classic gets hot it is very unlikely to cause
a burn. For absolute safety the units should be placed out of the reach of children and
pets and away from heat-sensitive objects.
!
Partially unscrew the knurled portion of the terminal to expose the cross hole at the
terminal base.
Push the bare end of the cable into the hole. Ensure that the polarity is correct and there
are no loose strands which could touch adjacent terminals.
Tighten securely.
!
!
!
-VE
+VE
!
!
Connect the Red (Positive) terminal of the loudspeaker to the +ve terminal of the
amplifier. Connect the Black (Negative) terminal of the loudspeaker to the -ve terminal of
the QUAD II Classic amplifier.
Ensure that the Left and Right loudspeakers are connected to the Left and Right amplifiers
respectively.
!
Valve Amplifiers Work at High Voltages
Valves require a high voltage to function. Do not open any of the cases. Also ensure that
nothing is poked, dropped or poured into an amplifier's case.
The environment should be dry and free from litter. Do not place magnetically or
thermally sensitive objects (i.e. credit cards or optical discs) close to these QUAD units.
!
To
Speaker
Final System Connections
Valves are Microphonic
Because valves are constructed from fine wires and tiny metal parts they can pick up
external vibrations. If you place the power amplifiers too close to the speakers the direct
loud sound may vibrate the valves. 1 metre (3ft) to the side of each speaker should be
considered a sensible minimum.
Ensure that the mains switches on the power amplifiers are switched OFF and that the
pre-amplifier volume control is at minimum. Connect the IEC mains leads from the wall
sockets to the mains inputs on each amplifier. Plug in the mains leads to the other units.
OPERATION: Read this section to maximise the performance and lifespan of your Quad II Classic.
Switch on the power at the wall. Switch on the power amplifiers and other source units.
When the amplifiers have warmed up, the system may be safely used (see below). Warming
up (or running in) should always be done with the volume control at zero.
Always remember to switch the power amplifiers off when they are not in use
Interconnects and Cables
The signal input to the amplifier is via an RCA phono connector. As valve equipment
works at high impedances, the phono interconnect from the pre-amplifier should be
screened and of a low-noise, low-capacitance construction. To minimise capacitance and
other effects, signal interconnects should be kept as short as possible.
Running In New Equipment
Choose good quality loudspeaker cable designed for the purpose rather than general
purpose ‘zip’ or ‘bell’ wire. It should be of adequate gauge to maximise bass performance.
Most high fidelity equipment works better after it has been run in. With valve amplifiers
running in is very important. Valve components work at high voltages and temperatures
and when new they should spend an extended period at those temperatures to bed in. This
is especially the case with the output valves and the output transformer.
We recommend a running in period of at least four and preferably twelve hours before you
first use the equipment. If you decide to run in your equipment for this extended period,
make doubly sure that all the safety conditions covered in this manual are fully met.
Supervise the equipment for the first hour or so and if you have to leave the equipment
unattended thereafter, have someone look in every so often to make sure all is well.
CONNECTIONS
Note: Before connecting your amplifiers all components in the system must be unplugged
at the mains and the master system volume control set at zero.
Input Connections
230V~50Hz T1AL FUSE
115V ~60Hz T2AL FUSE
-VE
Switched Mains
Socket with
Integral Fuse
+VE
Loudspeaker
Terminals
INPUT
RCA Phono
Input Socket
2
The Quad II Classic must be connected to a preamplifier line output, or to the line output of a source
component which has a variable volume control. You
must not connect the amplifiers to any source which
has only a fixed output.
Decide which of the two power amplifiers is to be the
left channel and which the right channel and place the
units in their intended locations.
Using an appropriate screened RCA phono cable,
connect the input socket of each QUAD II Classic
amplifier to the requisite line output socket of your
pre-amplifier. As a general rule, the Right channel of
the pre-amplifier will be colour coded Red, the Left
channel White or Black. The input interconnects to the
power amplifiers should be the same length.
When running signal cables, keep them away from
sources of interference. Do not run signal cables
parallel to cables carrying mains or digital traffic.
!
Warming Up Before Use
Allow at least fifteen minutes for the amplifiers to 'warm up' before use.
Valve amplifiers need time to reach their correct operating temperature. If you play loud
music while the system is cold the output valves will not be fully operational and the
amplifier will be starved of both voltage and current. The resulting distortion is unpleasant
to listen to and potentially damaging to the amplifiers' valves and your loudspeakers.
Valve Lifetimes
The valves in the Quad II Classic will perform to specification for years if used properly.
Valves contain a heating element. This heats up the valve's cathode, which is coated to give
off a steady stream of electrons. After a few years this coating will begin to wear out and
performance will start to deteriorate. In the QUAD II Classic amplifier the KT66 output
valves are likely to deteriorate first but the EF86 driver valves will also eventually wear out.
Do not leave the amplifiers permanently switched on or you will seriously shorten
the lifespan of your valves. Always switch the amplifiers off when not in use.
Intensive use of the equipment before it has warmed up will also shorten valve life.
3