1
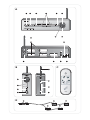
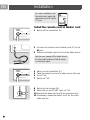
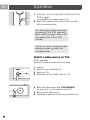
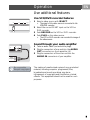
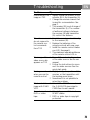
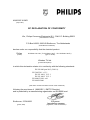
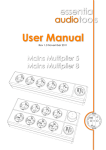
Wireless TV Link
User Manual
SLV5400
A
1
2
3
4
5
6
8
9
7
10
11
IR
15
14
B
12
C
20
19
13
21
18
22
17
16
23
WIRELESS TV LINK RECEIVER
G
24
25
25
25
25
EN
Contents
Page
Overview
4
Control and display elements
4
Your Wireless TV Link
5
Safety
5
Installation
6
Operation
7
Enjoy your Wireless TV Link
Use additional features
7
9
Troubleshooting
10
Information
12
Health and safety
Maintenance and service
Recycling and disposal
Warranty
Glossary
12
12
12
13
13
3
EN
Overview
Control and display elements
A Transmitter
1 On/off switch
2 Power light:
> red: standby
> green: on
> blinking: remote control signalling
3 RECORD SOURCE button
4 Link source indication lights
5 TV1 SOURCE button
6 AUTO light
7 Integrated remote control blaster light
8 TV1 source indication display
9 Antenna
10 SCART ports:
> 1-SAT/STB
> 2-AUX
> 3-DVD (for RGB signals)
> 4-VCR/DVD recorder (for RGB signals)
11 Wireless channel selection switch
12 Power input connector (DC 12V)
13 AUDIO OUT connectors (red/white)
14 SCART port for TV1
15 Remote control blaster cord port
B Receiver
16 On/off switch
17 Power light
> red: standby
> green: on
> blinking: remote control signalling
18 Source selector buttons (+/-)
19 Integrated remote control blaster light
20 Antenna
21 Wireless channel selection switch
22 SCART port for TV2
23 Power input connector (DC 12V)
C Remote control
G Remote control blaster cord
24 Connector
25 Blaster light
4
Your Wireless TV Link
EN
You can say good-bye to wires. With your Wireless TV
Link you can now wirelessly connect a second TV and
choose between four devices to watch on your second
TV.
Safety
•
•
•
•
•
•
•
•
•
Read the instructions in this manual carefully before
you connect, install and use the product.
Keep this manual for future reference.
The product is for indoor use only.
Do not use the product close to water.
Do not expose the product to extreme heat.
In case of technical difficulties, do not open the
product. Bring it to your Philips dealer.
Do not cover the product.
Connect the power adapters only to a
220-240 V AC/50 Hz power supply.
The product can cause interference to other
equipment. Check if any equipment near the product
can be affected before you start using it.
5
EN
Installation
For basic installation, see
the quick start guide that
came with your Wireless
TV Link.
Install the remote control blaster cord
1 Switch off the transmitter (A).
STANDBY
SELECT
SLV5400 WIRELESS TV LINK TRANSMITTER
IR
2 Connect the remote control blaster cord (G) to the
IR port.
3 Position the blaster light in front of the video source.
See the user manual of the video source
for the exact location of the IR sensor
on the front panel.
STANDBY
SLV5400 WIRELESS TV LINK TRANSMITTER
WIRELESS TV LINK RECEIVER
6
SELECT
4
5
6
7
Switch on the transmitter (A).
Take the remote control of a video source with you.
Go to TV2.
Switch on TV2.
8
9
10
11
Switch on the receiver (B).
Select the correct SCART input on TV2.
Operate the video source with its remote control.
If necessary, repeat the steps 3 to 10 for the other
video sources.
Installation
EN
Remove interference on TV2
1 Find the CHANNEL switch on the transmitter (A).
2 Set the CHANNEL switch to different number.
L
R
DC 12V
Channel
1234
3 Find the CHANNEL switch on the receiver (B).
4 Set the CHANNEL switch to the same number as
on the transmitter.
CHANNEL
1
2
3
4
Operation
Enjoy your Wireless TV Link
For basic operation, see
the quick start guide that
came with your Wireless
TV Link.
Watch a cable TV program on TV2
Your VCR or DVD recorder needs to
be connected to the transmitter (A) of
the Wireless TV Link and connected to
the Cable-TV signal.
STANDBY
SLV5400 WIRELESS TV LINK TRANSMITTER
SELECT
1 Switch on the transmitter (A).
2 Switch on the VCR or DVD recorder.
3 Take the remote control of the VCR or DVD
recorder with you.
4 Go to TV2.
5 Switch on TV2.
6 Switch on the receiver (B).
WIRELESS TV LINK RECEIVER
7
EN
Operation
7 Press + or - on the receiver (B) to select the VCR or
DVD recorder;
or: press 4 on the remote control (C).
8 Select the channel on the VCR or DVD recorder
with its remote control.
Turn off the auto standby mode when
you use the VCR or DVD recorder to
watch a cable tv program. Refer to the
user manual of the VCR or DVD
recorder.
If the VCR or DVD recorder records a
television program, you watch the
recorded channel.
Watch a video source on TV1
Either: automatic
Operate TV1 and the video source as usual.
STANDBY
SELECT
Or: manual
1 Switch on the transmitter (A).
2 Switch on TV1.
3 Select the correct SCART input on TV1.
SLV5400 WIRELESS TV LINK TRANSMITTER
TV1 SOURCE
8
4 Select the video source with TV1 SOURCE;
or: press + or - on the remote control (C).
5 Switch on the video source.
6 Operate the video source with its remote control.
Operation
EN
Use additional features
Use VCR/DVD recorder features
SELECT
SAT/STB
AUX
DVD PLAYER
1
2
3
CONNECT 4-VCR/DVD RECORDER
1 Select a video source with SELECT.
> The signal of the video source is connected to the
VCR/DVD recorder.
2 Select the correct SCART input on the VCR or
DVD recorder.
3 Push RECORD on the VCR or DVD recorder.
4 Push PLAY on the video source.
> The VCR or DVD recorder now records the image of
the video source.
Sound through your audio amplifier
AUDIO
OUT
TV1
L
R
Audio
Amplifier
Be responsible
Respect copyrights
1 Take an audio cable (red and white plugs).
2 Plug the connectors of one end into the AUDIO
OUT connectors on the transmitter (A).
3 Plug the connectors of the other end into the
AUDIO IN connectors of your amplifier.
The making of unauthorised copies of copy-protected
material, including computer programmes, files,
broadcasts and sound recordings, may be an
infringement of copyrights and constitute a criminal
offence. This equipment should not be used for such
purposes.
9
EN
Troubleshooting
Problem
Tip
No image or wrong • Make sure video sources are
connected to the transmitter (A).
image on TV1
• Make sure the transmitter (A) is
connected to TV1.
• Make sure SCART cables are
firmly inserted.
• Make sure the video source is
switched on.
• Make sure the correct SCART
input on TV1 is selected.
• Select the correct video source
with TV1 source. See page 8.
No image or wrong • Make sure SCART cables are
firmly inserted.
image on TV2
• Make sure the receiver (B) is
connected to TV2.
• Make sure both receiver (B) and
transmitter (A) are switched on.
• Make sure the video source is
switched on.
• Make sure the correct SCART
input on TV2 is selected.
• Select the correct video source
with +/- on the receiver (B).
• If the video source gives proper
image on TV1:
Make sure the video source gives
video signal in CVBS mode. See
its user manual
• Change the wireless channel that
is used for communication. See
page 7.
• The receiver (B) is out of range
of the transmitter (A). The number of walls and ceilings in
between the receiver (B) and
transmitter (A) restrict the distance.
10
Troubleshooting
EN
Problem
Tip
Interference in the • Slightly change the position of the
receiver (B) or the transmitter (A).
image on TV2
• Change the wireless channel that
is used for communication. See
page 7.
• The receiver (B) is out of range of
the transmitter (A). The number
of walls and ceilings in between
the receiver (B) and transmitter
(A) restrict the distance.
The video sources • Point the remote control directly
to the receiver (B).
do not respond to
the remote con- • Replace the batteries of the
remote controls with new ones.
trol commands
•
Install the remote control blaster
from TV2
cord (G). See page 6.
• The maximum operating distance
of the remote control is 5 m.
The image of the • Turn off the auto standby mode
of the video source. See its user
video source dismanual.
appears on TV2
• Follow the instructions to reconnect the video sources. See the
quick start guide.
• Slightly change the position of the
Buzzing sound
receiver or the transmitter until
when you use the
the buzzing sound stops.
remote control.
• Sometimes it is not possible to
solve the problem.
Black and white • Check if the SCART connector of
the S-VHS VCR gives signal in
image with S-VHS
CVBS. See its user manual.
VCR.
Cannot record a
DVD or video
tape.
•
•
Check if you used full-wired
SCART cables.
DVD or video tape is copyright
protected.
11
EN
Information
Health and safety
The product transmits and receives radio waves when it
is switched on. The product complies with the standards
that are defined for it.
The quality of the image can be influenced by the use of
microwave ovens. Other wireless systems (Bluetooth,
wireless networks etc.) can also have influence on the
quality of the image.
The product is based on RF technology. Therefore the
product can suffer from the same kinds of interference
as GSMs, portable radios and other RF-based products.
Maintenance and service
If your product is defective and needs repair, but your
warranty period has expired, you can consult our
specialists (see the rear page)
Recycling and disposal
All redundant packaging material has been omitted. Your
set consists of materials that can be recycled if
disassembled by a specialized company. Please observe
the local regulations regarding the disposal of packaging
materials, batteries and old equipment.
Disposal of your old product
Your product is designed and manufactured with high
quality materials and components, which can be recycled
and reused.
When this crossed-out wheeled bin symbol is attached
to a product it means the product is covered by the
European Directive 2002/96/EC.
Please inform yourself about the local separate collection
system for electrical and electronic products.
Please act according to your local rules and do not
dispose of your old products with your normal
household waste. The correct disposal of your old
product will help prevent potential negative
consequences for the environment and human health.
12
Information
EN
Warranty
One year limited warranty
For 12 month from the date of purchase the
manufacturer repairs or replaces any faulty product free
of charge, subject to proof of purchase, provided the
fault has not been caused by improper handling or use,
and provided the product has not been damaged,
whether as a result of an accident or of repair by others
than the manufacturer.
Glossary
CVBS
Easylink
RCA
RF
technology
SCART
Video standard for showing colors on a
TV.
Gives a VCR or DVD recorder the
possibility to automatically take over the
preset programming of the TV.
Separate connectors to connect audio or
video equipment.
Technology based on radio frequency,
used for wireless connections.
Single connector to easily connect audio
and video equipment.
13
AQ95-56F-613KR
(report No.)
EC DECLARATION OF CONFORMITY
We , Philips Consumer Electronics B.V., P&A CC: Building SBP6
(manufacturer's name)
P.O.Box 80002, 5600 JB Eindhoven, The Netherlands
(manufacturer's address)
declare under our responsibility that the electrical product:
Philips
(name)
SLV5400 -/00 -/05 ( Tx: SLV5400 -/00-T ; Rx: SLV5400 -/00-R )
(type or model)
Wireless TV link
(product description)
to which this declaration relates is in conformity with the following standards:
EN 300 440 part 1&2, (2001-9).
EN 300 220-1 v1.3.1
EN 301 489-1 V1.2.1
EN 301 489-3 V1.2.1
EN 60065:1998 ed.6
EN 60950:2000
(title and/or number and date of issue of the standards)
following the provisions of 1999/5/EC ( R&TTE Directive)
and is produced by a manufacturing organisation on ISO 9000 level.
Eindhoven, 27/06/2005
(place, date)
K.Rysman
Approbation manager
(signature, name and function)
Need help?
Troubleshooting
See page 10
Online help: www.philips.com/support
Helpline
België/Belgique/Belgien
Danmark
Deutschland
España
France
ÅëëÜäá
Ireland
Italia
Luxemburg/Luxembourg
Nederland
Norge
Österreich
Portugal
Schweiz/Suisse/Svizzera
Suomi
Sverige
UK (United Kingdom)
070 222 303 (€ 0.17)
3525 8759
0900 1101211 (€ 0.12)
902 888 784 (€ 0.15)
08 9165 0005 (€ 0.23)
0 0800 3122 1280
01 764 0292
899 23 45 06 (€ 0.25)
40 6661 6544
0900 8407 (€ 0.20)
2270 8111
0900 060 827 (€ 0.20)
2 1359 1442
0900 001 600
0600 412 001
08 5792 9100
0906 1010 016 (£ 0.15)
Specifcations are subject to change without notice.
Trademarks are the property of Koninklijke Philips Electronics N.V. or their respective owners.
2005 © Koninklijke Philips Electronics N.V. All rights reserved.
www.philips.com
DFU-SLV5400-AEN-V1.0