1
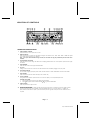
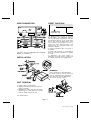
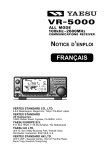
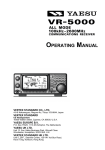
OWNER'S MANUAL
COMPACT DISC PLAYER WITH
SUPER POWER OUTPUT
FACE DETACHABLE PANEL
FM-AM FM-MPX RADIO RECEIVER
MODEL :
PLCD52/PLCG53
Page. 1
P / N : 570-931612-03
LOCATION OF CONTROLS
OPERATING INSTRUCTIONS
1.
POWER ON/OFF CONTROL
Press this button to turn the power "ON" or "OFF".
2.
BAND SELECTOR
Each time this button is pressed, the radio band is changed. The indication "FM1", "FM2", "FM3", "MW1" or "MW2" will appear
on the display panel according to your selection.
Note : If you press the band button during CD mode, the CD mode will stop play automatically and the radio will be
activated.
3.
LOCAL/DISTANT SELECTOR
Press this button to prevent strong local stations from overlapping weaker stations. For normal operation, press this button again
for distance.
4.
SEEK CONTROL
Press this button seeks to next higher receivable station.
5.
CD SLOT
Holding the disc to insert into the disc slot. The disc mechanism will automatically engage into CD play mode.
6.
LCD DIGITAL DISPLAY
The unit utilizes a digital type display which shows numerical indication of station FREQUENCY and other FUNCTIONS.
7.
DSP CONTROL
Press this button to select the sound effect (Pop, Rock, Classic, Flat).
8.
CLOCK CONTROL
During radio and CD operation, press this button to call the time display on the incorporated quartz clock.
SETTING CLOCK TIME
1.
Press CLOCK button and hold until the display flash and release.
2.
Press
tuning button to set the HOUR and Press
tuning button to set MINUTES.
9.
10.
EJECT BUTTON
Press the eject button will eject the disc.
PANEL RELEASE BUTTON
This button is used to release the panel that holds the front panel to the chassis. To detach the front panel, press the button
so that the right side of the panel is released. Grasp the released side and pull it off of the chassis. To re-attach the
panel, position the left side of the panel in place first and then press the right side of the panel until the mechanism locks it
into place.
Page. 2
P / N : 570-931612-03
11.
CD CONTROL
Press this button to activate the CD mode.
Note : If you press this button during radio mode, the radio mode will stop play automatically and the CD mode will
be activated.
CD PAUSE (OPTIONAL)
During the CD is playing, press this button again will pause the CD playing.
12.
PRE-SCAN/AUTO-STORE BUTTON
This button allows you to enjoy "Preset Memory Scan" function by pushing it within 2 seconds, and allows you enjoy "Auto-Store
Memory" function at pushing it continuously more than 2 seconds.
*PS (PRESET MEMORY SCAN )
It calls the memorized station frequencies ( from 1-6 ) automatically every 5 seconds.
*AS (AUTO-STORE MEMORY )
It searches all station frequencies upward and memorize automatically 6 stations by catching the frequency which has scanstop level, the memorized station is shown on LCD as "CH1...6". After memorizing, auto-store memory function will be
changed to "Preset Memory Scan" function automatically.
13.
LOUD CONTROL
Press this button to activate the loudness circultry which compensates for loss of high and low frequencies during low volume
levels.
14.
MUTE CONTROL
Press this button to mute the volume control and "MUT" will appear on LCD display.
15.
AUDIO SELECTOR
Press this button to select "VOLUME/BASS/TREBLE/BALANCE/FADER" adjustment modes. Each time button is pressed,
acessed selection is displayed. While selection is being displayed, press (within 5 sec.) AUDIO CONTROL buttons + or - to
adjust level as desired.
16/17 AUDIO LEVEL Down Control ( - Button ) / AUDIO LEVEL Up Control ( + Button )
With the exception of VOLUME, to access all other adjustment modes "BASS/TREBLE/BAL/FADER", first press SEL button then the
+ or - button . Press and release to change level slightly, repeatedly for slow adjustments, or press and hold to adjust rapidly. Display will
show level increments.
• VOLUME - Press the AUDIO CONTROL + button to increase, or - button to decrease sound level.
• BASS - While "BAS" is being displayed, press the AUDIO CONTROL + button to increase or - button to decrease the bass level.
• TREBLE - While "TRE" is being displayed, press the AUDIO CONTROL + button to increase or - button to decrease the treble level.
• BALANCE - While "BAL" is being displayed, press the AUDIO CONTROL + or - button to level balance of speaker right and left.
• FADER - While "FAD" is being displayed, press the AUDIO CONTROL + or - button to level balance of front speakers and rear
speakers /LINE OUT jacks.
REMARK : BASS AND TREBLE CONTROLS CAN NOT BE USED WHEN DSP MODE IS SELECTED ( ROCK, POP, CLASSIC,
FLAT ).
18/19. MANUAL UP/DOWN TUNING / TRACK SEEK UP/DOWN CONTROL
On radio mode, press this button will tune one frequency step higher or lower. On CD mode, press this button will locate the
beginning of the track being played or will locate the beginning of the next track. When pressing more than 2 seconds, it will
move fast forward or fast backward to a specific position of a CD track.
20.
STATION PRESET BUTTON (30 STATION PRESET BUTTON)
The PRESET BUTTONS on the unit are used to store station frequencies which you may wish to recall. Each preset button can
store FM1, FM2, FM3, MW1, MW2 station frequency. Pressing the button momentarily recalls the station frequency which was
memorized. There are 6 preset buttons, giving you capability of storing 18FM/12MW.
NOTE: When the preset button to be memorized is kept pressed for more than 2 seconds, the receiving station
frequency will be stored in the button pressed. After this, the memorized station can be recalled by pressing the
button once.
On CD Mode
Preset knob 1, press this button to play the first track of the disc
Preset knob 2, press this button to repeat the specific track of the disc.
Preset Knob 3, press this button to scan the first 10 seconds of all the tracks on the currently selected disc. "INT" will indicate
on LCD display.
Preset knob 4, press this button to play the disc at random order.
Page. 3
P / N : 570-931612-03
WIRE CONNECTION
RESET FUNCTION
CAUTION : DO NOT GROUND ANY SPEAKER
WIRES TO CHASSIS (-).
INSTALLATION
The RESET button is located on the front
of main panel. It is recessed in order to
prevent accidental engagement, and can
be activated with the tip of a ball-point
pen or any similar pointed object. This
reset circuitry is provided in order to
protect the unit's microprocessor, and
should only be activated under the
following conditions :
a) Initial installation after all wiring is
completed.
b) Abnormal operation is encountered
such as numerical indication on display
is erratic.
c) Whenever the reset button is
activated, all preset memory content will
be erased and must be reprogrammed.
WARNING!!
Due to protection of CD Mechanism,
two small screws on the top of the unit
must be released before operate the
unit. Otherwise, the CD Mechanism
can not be working properly.
UNIT REMOVAL
1. Remove Front Control Panel.
2. Slightly insert the key into the slot and
gently to release.
3. Separate the sleeve from the unit. Keep
release key in a safe place as you may
need for future removal of unit.
P / N : 570-931612-03
Page. 4
P / N : 570-931612-03