1
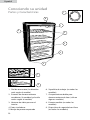
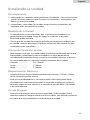
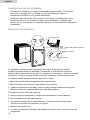
Beverage
Center
User Manual
Model: PS72001
English
IMPORTANT SAFEGUARDS
When using this appliance, always exercise basic safety
precautions, including the following:
1) Read all of the instructions before using this appliance.
2) U
se this appliance only for its intended purpose as described in this use and
care guide.
3) T his entertainment center must be properly installed in accordance with the
installation instructions before it is used. See grounding instructions in the
installation section.
4) N
ever unplug your entertainment center by pulling on the power cord. Always
grasp the plug firmly and pull straight out from the outlet.
5) R
epair or replace immediately, all electric service cords that have become
frayed or otherwise damaged. Do not use a cord that shows cracks or
abrasion damage along its length, the plug or the connector end.
6) U
nplug your entertainment center before cleaning or before making any
repairs. Note: If for any reason this product requires service, we strongly
recommend that a certified technician performs the service.
7) If your old entertainment center is not being used, we recommend that you
remove the doors and leave the shelves in place. This will reduce the
possibility of danger to children.
8) T his entertainment center should not be recessed or built-in in an enclosed
cabinet. It is designed for freestanding installation only.
9) Do not operate your entertainment center in the presence of explosive fumes.
10) Y
our entertainment center was NOT designed to store perishable foods.
Store only bottled or canned beverages.
SAVE THESE INSTRUCTIONS
DANGER
Risk of child entrapment. Before you throw away your old
appliance, take off the doors. Leave the shelves in place so
that children may not easily climb inside.
1
English
Table Of Contents
PAGE
IMPORTANT SAFEGUARDS
1
PARTS AND FEATURES
3
INSTALLING YOUR ENTERTAINMENT CENTER
Unpacking your Entertainment Center
Leveling your Entertainment Center
Proper Air Circulation
Electrical Requirements
Use of Extension Cords
Installation Limitations
Door Reversal
4-5
4
4
4
4
4
5
5
ENTERTAINMENT CENTER FEATURES AND USE
General Features
Adjustable Temperature Dial
Entertainment Center Interior Shelves
Using the lock
6
6
6
6
6
PROPER ENTERTAINMENT CENTER CARE AND CLEANING
Cleaning and Maintenance
Defrosting
Power Interruptions
Vacation & Moving Care
Normal Operating Sounds
7
7
7
7
7
8
TROUBLESHOOTING
8
2
English
Knowing Your Entertainment Center
Parts and Features
1
6
1
5
2
3
9
4
7
8
1. Thermostat Dial
(location varies by model)
5. Recessed Door Handle
2. Coated Storage Shelves (style and
quantity vary by model)
7. Dual Dispense Can Storage
(On some models only)
3. See-through Glass Door
8. Flip Shelf (Not on all models)
4. Leveling Legs
3
9. Lock with Key (Not on all models)
6. Work Top (Not on all models)
English
Installing Your Entertainment Center
Unpacking your Entertainment Center
1. R
emove all packaging material. This includes the base and all adhesive tape
holding the entertainment center accessories inside and outside.
2. Inspect and remove any remains of packing, tape or printed materials before
powering on the entertainment center.
Leveling your Entertainment Center
•Y
our entertainment center has 2 leveling legs which are located at the
bottom front corners of your entertainment center. After properly placing
your entertainment center in its final position, you can level your
entertainment center.
• L eveling legs can be adjusted by turning them counterclockwise to raise your
entertainment center or by turning them clockwise to lower your entertainment
center. The entertainment center door will close easier when the leveling legs
are extended.
Proper Air Circulation
• T o ensure that your entertainment center works at the maximum efficiency it
was designed for, you should install it in a location where there is proper air
circulation and electrical connections.
• The following are recommended clearances around the entertainment center:
Sides……………3/4 “(19mm)
Top....................2” (50mm)
Back..................2” (50mm)
Electrical Requirement
•M
ake sure there is a suitable power Outlet (115 volts, 15 amps outlet) with
proper grounding to power the entertainment center.
•A
void the use of three plug adapters or cutting off the third grounding in
order to accommodate a two plug outlet. This is a dangerous practice since it
provides no effective grounding for the entertainment center and may result in
shock hazard.
Use of Extension Cords
•A
void the use of an extension cord because of potential safety hazards under
certain conditions. If it is necessary to use an extension cord, use only a 3-wire
extension cord that has a 3-blade grounding plug and a 3-slot outlet that will
accept the plug. The marked rating of the extension cord must be equal to or
greater than the electrical rating of the appliance.
4
English
Installation Limitations
• Do not install your entertainment center in any location not properly insulated or
heated e.g. garage etc. Your entertainment center was not designed to operate
in temperature settings below 55˚ Fahrenheit.
• Select a suitable location for the entertainment center on a hard, even surface
away from direct sunlight or heat source, e.g. radiators, baseboard heaters,
cooking appliances etc. Any floor unevenness should be corrected with the
leveling legs located at the bottom.
Door Reversal Instructions
Your entertainment center is built with a reversible door. You have the choice
of either opening it from the left or the right side. In order to reserve the opening
direction of your door, please follow these simple instructions. Tilt the
entertainment center backwards. Secure the rear from sliding. Tape the door to
the cabinet to prevent from falling.
1. Remove the 3 hexagonal screws from base bracket.
2. Remove the pivot holding the bottom of the door.
3. Separate the door from the cabinet and remove the pivot axle from the upper
side of the door. Remove and reinstall upper and lower axle door inserts to
opposite side.
4. Install the pivot axle to the opposite side.
5. Re-attach the door to the cabinet and secure with tape.
6. Attach the base bracket to the opposite side
7. Install the bottom pivot aligning with the lower pivot insert on the door. Attach
the 3 hexagonal screws to base bracket.
8. Remove tape.
9. As the unit was tilted, wait 24 hours before plugging it in.
5
English
Entertainment Center Features & Use
General Features
Adjustable Temperature Dial:
(location varies per model)
Your entertainment center will automatically maintain the
temperature level you select. The temperature control dial has 3
settings plus off. MIN is the warmest. MAX is the coldest. Turning the dial to OFF
stops cooling in the entertainment center. At first, set the dial to MED and allow
24 hours to pass before adjusting the temperature to your needs.
(Note: If the entertainment center has been placed in a horizontal or tilted position
for any period of time wait 24 hours before plugging the unit in.)
Entertainment Center Interior Shelves
(Shelves will vary per model purchased)
To remove or replace a full-width slide-out shelf:
1. Gently tilt the shelf up and slide forward until the shelf has been
completely removed.
2. To replace the shelf, gently slide the shelf back.
3. Dual Dispense Can Rack (HBCND05EB Only)
For easy access to cans.
4. Flip rack (Not on all models)
To help store tall and big size bottles only.
Using the Lock
(not on all models)
• Your entertainment center is equipped with a lock and key (located at the
bottom center of the door) for optional security, should you choose. Simply
close the refrigerator door, insert the key and turn. To open, insert the key
and turn in the opposite direction.
6
English
Proper Entertainment Center Care & Cleaning
Cleaning and Maintenance
Warning:To avoid electric shock, always unplug your entertainment center
before cleaning. Ignoring this warning may result in death or injury.
Caution:Before using cleaning products, always read and follow
manufacturer’s instructions and warnings to avoid personal injury or
product damage.
General: • P
repare a cleaning solution of 3-4 tablespoons of baking soda
mixed with warm water. Use sponge or soft cloth, dampened with
the cleaning solution, to wipe down your entertainment center.
• Rinse with clean warm water and dry with a soft cloth.
•D
o not use harsh chemicals, abrasives, ammonia, chlorine bleach,
concentrated detergents, solvents or metal scouring pads. Some
of these chemicals may dissolve, damage and/or discolor your
entertainment center.
Door Gaskets:• C
lean door gaskets every three months according to general
instructions. Gaskets must be kept clean and pliable to assure
a proper seal.
•P
etroleum jelly applied lightly on the hinge side of gaskets
will keep the gasket pliable and ensure a good seal.
Defrosting Your Entertainment Center
Your entertainment center is designed with a manual defrost system. The
entertainment center surfaces will defrost, when the temperature control is turned
to ‘Off”. Water from the unit is disposed of automatically, by means of being
channeled onto a drip tray located on the compressor. Heat transfer from the
compressor causes this water to evaporate.
Power Interruptions
•O
ccasionally there may be power interruptions due to thunderstorms or other
causes. Remove the power cord from AC outlet when a power outage occurs.
When power has been restored, replug power cord to AC outlet.
Vacation and Moving Care
• F or long vacations or absences, empty contents from entertainment center,
move the temperature DIAL to the OFF position and clean the entertainment
center and door gaskets according to “General cleaning” section. Prop
doors open, so air can circulate inside. When moving, always move the
entertainment center vertically. Do not move with the unit lying down. Possible
damage to the sealed system could occur.
7
English
Normal Operating Sounds You May Hear
•B
oiling water, gurgling sounds or slight vibrations that are the result of the
refrigerant circulating through the cooling coils.
• The thermostat control will click when it cycles on and off.
Troubleshooting
Entertainment Center Does Not Operate
• Check if thermostat control is not in the “OFF” position.
• Check if entertainment center is plugged in.
• Check if there is power at the ac outlet, by checking the circuit breaker.
Temperature appears too warm
• Frequent door openings.
• Allow time for recently added beverages to reach proper temperature.
• Check gaskets for proper seal.
• Adjust temperature control to cooler setting.
Temperature is too cold
• If temperature control setting is too cold, adjust to a warmer setting and allow
several hours for temperature to adjust.
Entertainment Center runs too frequently
• T his may be normal to maintain constant temperature during high temperature
and humid days.
• Doors may have been opened frequently or for an extended period of time.
• Check gasket for proper seal.
• Check to see if doors are completely closed.
Moisture build up on interior or exterior of the
entertainment center
• This is normal during high humidity periods.
• Prolonged or frequent door openings.
• Check door gaskets for proper seal.
Entertainment Center door does not shut properly
• Level the entertainment center.
• Check for blockages.
8
Centro
para Bebidas
Manual de Uso
Modelo: PS72001
Español
IMPORTANTES MEDIDAS DE SEGURIDAD
Cuando utilice esta unidad siempre siga las precauciones básicas
de seguridad incluyendo las siguientes:
1) Lea todas las instrucciones antes de utilizar esta unidad.
2) Utilice esta unidad solo para su entendido uso como se describe en este
manual.
3) Esta unidad debe estar correctamente instalada antes de su
utilización de acuerdo a las instrucciones brindadas en la sección de
instalación de este manual. Ver instrucciones de conexión a tierra.
4) Nunca desenchufe la unidad tirando del cable de corriente. Siempre agarre
y sostenga el enchufe firmemente y tire hacia fuera de la toma de corriente.
5) Desenchufe antes de limpiar o antes de hacer algún tipo de reparación.
Nota: si por alguna razón es necesario llamar al service nosotros
recomendamos que un técnico calificado se encargue del mismo.
6) Reemplaze o repare inmediatamente todos aquellos cables que esten
dañados o rasgados. No utilice cables que presenten abrasiones o daños a
lo largo del mismo, en el enchufe o en el final de la conexión.
7) Esta unidad no debe ser ubicada en un gabinete o lugar cerrado. Está
diseñada para la instalación en lugares abiertos.
8) Si la esta unidad no está siendo utilizada, recomendamos que retire la
puerta y los estantes de la misma, de modo de reducir el posible daño a
chicos.
9) No opere en presencia de gases explosivos.
10) No almacene alimentos ya que la temperatura no es adecuada como para
mantener el estado de los mismos.
GUARDE ESTAS INSTRUCCIONES
PELIGRO
Riesgo de niños. Antes de tirar su unidad anterior asegúrese
de retirar las puertas de la misma. Deje los estantes en el
interior para evitar que un niño pueda entrar.
21
Español
Indice
PAGE
PRECAUCIONES DE SEGURIDAD
21
PARTES Y CARACTERISTICAS
23
INSTALACION DE LA UNIDAD
Desempacando la unidad
Nivelando la unidad
Circulacion de aire adecuada
Requerimientos electricos
Uso de Alargues
Limitaciones en la instalacion
Revirtiendo la puerta
24-25
24
24
24
24
24
25
25
CARACTERISTICAS Y USO
Caraterísticas generales
Ajuste de temperatura
Estantes internos
Uso del Cierre
26
26
26
26
26
CUIDADO Y MANTENIMIENTO ADECUADO
Limpieza y mantenimiento
Descongelado
Interrupciones de energia
Vacaciones y traslados
Sonidos de la operación normal
27
27
28
28
28
28
PROBLEMAS GENERALES
29
22
Español
Conociendo su unidad
Partes y Caracteristicas
1
6
1
5
2
3
9
4
7
8
1. Dial de termostato (la ubicación
varía según el modelo)
2. Estantes de almacenamiento
recubiertos (la cantidad y el estilo
varían según el modelo)
3. Ventana de vidrio para ver el
interior
4. Patas niveladoras
5. Manija de puerta empotrada
23
6. Superficie de trabajo (no todos los
modelos)
7. Compartimiento doble para
almacenamiento de latas (sólo en
algunos modelos)
8. Estante movible (no todos los
modelos)
9. Dispositivo de seguridad con llave
(no todos los modelos)
Español
Instalando la unidad
Desempacando
1. Retire todos los materiales correspondientes al embalaje. Esto incluye la base
y todas las cintas adhesivas que sostienen los accesorios y el compresor por
dentro y fuera de la unidad.
2. Inspeccione y retire todos los posibles restos de cintas o materiales del
empaque antes de enchufar la unidad.
Nivelado de la Unidad
• Su unidad posee 2 pies niveladores que se encuentran ubicados en la
parte trasera de la unidad. Luego de ubicar la unidad en su posición
final usted puede nivelarla.
• Gire los pies en sentido de las agujas del reloj para levantar la unidad o gire
en sentido contrario para bajar. La puerta cerrará más fácil cuando los pies
niveladores estén extendidos.
Adecuada Circulación de Aire
• Para asegurarse de que su unidad trabaje al máximo de eficiencia para el que
fue diseñado, usted debe instalar la unidad en un lugar donde exista
una adecuada circulación de aire y esten las conexiones eléctricas al alcance.
• Se recomienda dejar los siguientes espacios alrededor de la unidad:
Laterales ......................
3/4 “(19mm)
Arriba .........................
2” (50mm)
Abajo ..........................
2” (50mm)
Requerimientos Eléctricos
• Asegúrese de que haya una adecuada toma de corriente (115 Volt, 15amp)
con la correcta conexión a tierra.
• Evite el uso de adaptadores y no corte el cable a tierra para poder hacer
una conexión a una toma de dos patas. Esto puede ser peligroso ya que la
conexión a tierra no será efectiva y se correrán riesgos de daños a la unidad
y de shock eléctrico.
Uso de Alargues
• Evite el uso de alargues para su mayor seguridad y la del equipo.Si fuese
necesario utilizar un alargue utilice uno de tres cables, con enchufe y toma de
tres patas que sea compatible con el enchufe de la unidad.
24
Español
Limitaciones de la Instalación
• No instale la unidad en un lugar no adecuadamente aislado o de mucho
calor, por ej, garage, etc. Su unidad no fue diseñada para operar a
temperaturas inferiores a 55 grados fahrenheit.
• Seleccione una ubicación sobre una base resistente y nivelada, lejos de la
luz directa del sol u otra fuente de calor como radiadores, artefactos de
cocina, etc. En caso de que la superficie del piso no esté nivelada utilice patas
niveladoras.
Reversión de la Puerta
Eje del Pivote
Inserto del eje de la puerta
Clavija de la base
Pivote
Su unidad fue diseñada con una puerta reversible. Usted tiene la opción
de abrir la puerta desde la izquierda o la derecha. Si usted desea revertir la
apertura de la puerta por favor siga las siguientes instrucciones. Incline la unidad
hacia atrás. Asegure la parte inferior para que no deslice. Encinte la puerta de
la unidad al gabinete para prevenir que ésta se caiga.
1. Retire los tres tornillos hexagonales del soporte base
2. Retire la clavija que sostiene el eje inferior de la puerta.
3. Separe la puerta de la unidad y retire la clavija del eje superior de la puerta.
Retire e instale los soportes de los ejes del lado opuesto.
4. Instale las clavijas del lado opuesto
5. Pegue la puerta al gabinete y asegure nuevamente con cinta adhesiva.
6. Ate el soporte base del lado opuesto
7. Coloque la clavija inferior alineando con el orificio inferior de la puerta.
Ate los tres tornillos hexagonales al soporte.
8. Retire la cinta adhesiva
9. Como la unidad fue inclinada recomendamos esperar unas 24 horas antes de
enchufarla.
25
Español
Caracteristicas y Uso
Caraterísticas Iniciales
Ajustes de la Temperatura:
(la ubicación varía según el modelo)
Su unidad mantendrá automáticamente el nivel de
temperatura que usted elija. El control de temperatura posee
3 opciones y la opción OFF. MIN es la más cálida y MAX es
la más fría. Si lleva el dial a Off la unidad deja de enfriar.
En principio elija la opción MED y deje pasar unas 24 horas
antes de ajustar la temperatura a sus necesidades.
(Nota: Si la unidad ha sido inclinado o colocada horizontalmente por algún
período de tiempo siempre deje pasar unas 24 horas antes de enchufar.)
Estantes Interiores
(Los estantes varían por modelo)
Para retirar o ubicar nuevamente el estante
deslizable:
1. Para retirar el estante levante y deslice el
mismo hacia afuera hasta removerlo por
completo.
2. Para colocar el estante en su lugar deslice hacia adentro nuevamente.
3. Estante de doble ocupación (Solo en algunos modelos)
4. Anaquel con espacio en la parte superior (No todos los modelos)
Para facilitar el almacenamiento de botellas altas y grandes.
26
Español
Cuidado y Mantenimiento Adecuado
Limpieza y Mantenimiento
Cuidado:
Para evitar los riesgos de un shock eléctrico siempre
desenchufe la unidad antes de la limpieza. No
ignore nunca esta advertencia.
Precaucion:
Antes de utilizar productos de limpieza lea y siga
siempre las instrucciones del fabricante para evitar
daños a la unidad o lesiones físicas.
General:
• Prepare una solución de 3 o 4 cucharadas de
bicarbonato y agua tibia. Utilice una esponja o un
paño suave humedecido con la solución anterior
para repasar todas las superficies de la unidad.
• Lave con agua tibia y seque con un paño seco.
• No utilice químicos, abrasivos, amoníaco, cloro,
detergentes concentrados o esponjitas de metal.
Algunos de estos productos pueden dañar o
decolorar las superficies de la unidad.
Juntas de las puertas:
• Limpie las juntas de la puerta cada tres meses
mínimo de acuerdo a las instrucciones generales.
Los bordes y juntas deben mantenerse limpios para
lograr un completo sellado de la puerta al cerrarse.
• La aplicación de vaselina en los pliegues asegurará
la flexibilidad de las juntas y un correcto sellado.
27
Español
Descongelado de la unidad
• Su centro de bebidas está diseñado con un sistema de
descongelamiento manual. Las superficies del centro de entretenimiento se
descongelarán cuando el control de temperatura esté en posición “Off”
(“apagado”). El agua de la unidad se desecha automáticamente en una
bandeja para goteo ubicada en el compresor. El calor que se transfiere del
compresor hace que esta agua se evapore.
Interrupciones de Energia
• Ocasionalmente pueden ocurrir cortes de energía debido a tormentas y otras
causas. Desenchufe la unidad cuando esto ocurra. Cuando la corriente eléctrica
se reestablezca, enchufe nuevamente.
Vacaciones y Mudanzas
• Cuando vaya de vacaciones o esté ausente por un tiempo largo apague la unidad
llevando el dial a OFF, desenchufe, vacíe la unidad y limpie de acuerdo a
las reglas generales de limpieza. Deje la puerta abierta asi el aire circula en el
interior. Cuando tenga que transportar la unidad siempre mantengala
en posición vertical, nunca mueva la unidad en posición horizontal. (puede
causar daños al sistema).
Sonidos de la Operacion Normal
• Sonidos como de agua hirviendo, pequeñas vibraciones pueden ser
el resultado de la refrigeración circulando a través de las bovinas de
enfriamiento.
28
Español
• El termostato puede producir un “click”cuando enciende y apaga.
Problemas Generales
El centro de bebidas no opera
• Verifique si la unidad está en posición OFF
• Controle que la unidad esté enchufada correctamente
• Controle si hay electricidad en la toma de corriente.
La temperatura parece demasiado alta
• No abra la puerta tan frecuentemente
• De tiempo a que los articulos recien almacenados a alcancen la temperatura deseada.
• Controle que la puerta selle correctamente al cerrarla
• Ajuste a un nivel de temperatura más frio.
La temperatura es muy Fria
• Ajuste el nivel de temperatura a una posición mas cálida y deje pasar unas
horas para alcanzar la misma.
El centro de bebidas trabaja muy seguido
• Esto puede ser normal en orden de mantener la temperatura establecida en
días de extrema humedad o calor.
• La puerta puede haber estado abierta por un período largo de tiempo.
• Limpie las bobinas del condensador
• Controle que la puerta selle correctamente al cerrar
• Limpie las juntas y bordes de la puerta
Formación de vapor y humedad en el interior o exterior
• Esto es normal durante períodos de gran humedad.
• La puerta se abre por períodos de tiempo prolongado.
• Controle que la puerta selle correctamente al cerrar
La puerta no cierra correctamente
• Nivele la unidad.
• Controle que nada esté bloqueando o obstruyendo al cerrar.
29