1
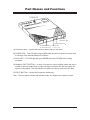
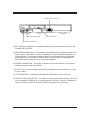
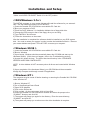
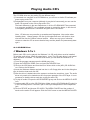
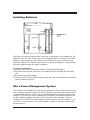
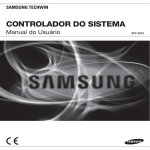
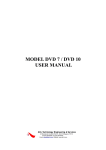
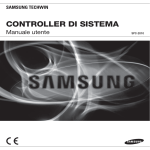
Port, Inc.
Portable 24X CD-ROM
ST24XCDR
User Manual
Copyright © 1998, Port. All rights reserved.
This document may not, in whole or part, be copied, photocopied, reproduced, translated
or reduced to any electronic medium or machine-readable form without prior consent, in
writing, from Port.
In no event will Port be liable for direct, special, incidental or consequential damages
arising out of the use or inability to use this product or documentation even if advised of
the possibility of such damages. In particular the manufacturer shall not have liability for
any hardware, software or data stored or used with the product including any costs of
repairing, replacing or recovering such hardware, software or data. Product names mentioned in this user guide are trademarks of their respective companies.
*All specifications are subject to change without notice.
MS-DOS, Windows 3.1, Windows 95, Windows 98, and Windows NT are trademarks of
Microsoft Corporation, all right reserved. All other trademarks belong to their respective
owners.
Table of Contents
Introduction
............... E-4
System Requirements
Contents List
E-4
E-4
Part Names and Functions ............... E-5
Installation and Setup
............... E-8
Playing Audio CD's
............... E-9
CD-ROM Power Options
............... E-11
Connecting the AC Adapter
Installing Batteries
Micro Power Management System
Troubleshooting
............... E-14
Warranty
............... E-16
E-11
E-12
E-12
Introduction
Congratulations on your purchase of the Portable 24X CD-ROM drive. We hope you
enjoy our product for its great features, performance and value. This user guide is
designed to help you get your new CD-ROM drive installed and running in the shortest
amount of time. It should also help you to become familiar with all the various features
and controls of the unit.
Port CANNOT be held liable if you damage your computer due to misuse or mishandling
of equipment.
Please take the time to read the installation guide and inspect the contents.
If anything is missing or damaged call your supplier or local distributor.
System Requirements
-
PC or AT compatible system
386, 486, Pentium, or higher processor
DOS, Windows 3.1x, Windows 95, Windows 98, or Windows NT
Type II PC Card slot
Contents List
Make sure you have the following items in your Portable 24X CD-ROM package:
- Portable 24X CD-ROM Unit
- PC Card cable
- Driver diskette
- User's Manual
- Warranty Card
Part Names and Functions
B) POWER LED
D) MANUAL
EJECT BUTTON
E) EJECT BUTTON
A) LOADING TRAY
C) BUSY LED
A) LOADING TRAY -- Opens and closes to allow loading of CD discs.
B) POWER LED -- This LED light will glow RED when the drive is powered on and when
the charge of the internal batteries is sufficient.
C) BUSY LED -- This LED light will glow GREEN when the CD-ROM drive is being
accessed.
D) MANUAL EJECT BUTTON -- In case of no power or other condition where the user is
unable to open the loading tray, a paper clip may be inserted into the hole which will
open the tray slightly. The tray may then be pulled out fully to remove the CD disc.
E) EJECT BUTTON -- Opens and closes the loading tray.
Note : The front panel controls and indicators may vary slightly from model to model.
A) PREVIOUS
TRACK/RR
BUTTON
B) PLAY/
PAUSE BUTTON
C) NEXT TRACK/
FF BUTTON
D) VOLUME
DOWN CONTROL
E) VOLUME
UP CONTROL
NOTE: Audio CD controls are only functional when the AUDIO switch is set to “ON” and
the CD-ROM is NOT inserted into a PC Card slot.
A) PREVIOUS TRACK/RR BUTTON - Pushed once, this control will jump to the beginning of the current song, each subsequent push will cause the unit to jump the beginning of the previous song. If pushed and held down, the CD Player will quickly move
scan through the current track.
B) PLAY/PAUSE BUTTON - Push this button to start playing an audio CD. Once play is
in progress, pushing this button will cause the CD to pause. Push the button once
more to resume play. A long push resets the CD to the 1st track.
C) NEXT TRACK/FF BUTTON - Pushed once, this control will jump to the beginning of
the next song, each subsequent push will cause the unit to jump the beginning of the
following song. If pushed and held down, the CD player will quickly move forward
through the current track.
D) VOLUME DOWN CONTROL - This control allows the user to lower the volume when
playing an audio CD while listening privately with a pair of mini style headphones connected to the 1/8" headphone jack.
E) VOLUME UP CONTROL - This control allows the user to increase the volume when
playing an audio CD while listening privately with a pair of mini style headphones connected to the 1/8" headphone jack.
D) AUDIO ON/OFF SWITCH
A) MINI HEADPHONE JACK
C) I/O CONNECTOR
B) POWER CONNECTOR
NOTE: Ministyle headphones or amplified speakers are recommended for use with the
Portable 24X CD-ROM
A) MINI HEADPHONE JACK - This standard mini headphone jack provides amplified CD
audio output for connection to a pair of headphones, a pair of amplified speakers, or a
stereo amplifier. You can also connect a stereo to stereo cable from the mini headphone jack on the CD-ROM to a LINE-IN jack on your sound card (if applicable) for
playing CD audio directly from your sound card speakers.
B) POWER CONNECTOR - The power connector may be connected to a 5 Volt power
adapter provided by the manufacturer.
CAUTION - Do not use an adapter other than that supplied by the manufacturer, or refer
to your vendor.
C) I/O CONNECTOR - Interfaces the Portable 24X CD-ROM to the PC Card unit.
D) AUDIO CD ON/ OFF SWITCH - This switch is used to change the function of the drive
from a portable CD-ROM drive to a personal audio CD player. Switch to ON when listening to music and OFF when the CD-ROM is connected to the computer.
Installation and Setup
* Make sure AUDIO CD ON/OFF Switch is in the OFF position.
< DOS/Windows 3.1x >
The INSTALL program on your master diskette will install the software for you automatically. Use the following procedure to run INSTALL:
1) Insert the Portable 24X CD-ROM into an available PC Card slot.
2) Boot your computer to DOS.
3) Place the DOS, Windows 3.1x installation diskette into a floppy disk drive.
4) Change the DOS prompt to that of the floppy drive you are using.
5) Type "INSTALL" and hit enter.
6) Follow the instructions on the screen.
After the installation is completed the software should be installed on your DOS system
disk. You need to restart your system in order to make the installation effective. Remove
your master diskette and press CTRL+ALT+DEL to restart your computer.
< Windows 95/98 >
1) Insert the Portable 24X CD-ROM into an available PC Card slot.
2) Boot to Windows
3) Upon bootup, Windows should automatically detect the CD-ROM and start up the
Hardware Wizard. (If this does not happen, refer to the Troubleshooting section)
4) Accept ALL default choices. The driver that should load up is the “STANDARD
IDE/ESDI HARD DISK CONTROLLER”.
NOTE: A driver diskette is NOT necessary since all drivers are located within Windows
itself.
5) Upon completion of the Hardware Wizard, your CD-ROM should be accessable
through My Computer and through normal CD applications.
< Windows NT >
The computer must be turned off before inserting or removing the Portable 24X CD-ROM
under WIndows NT.
1) Boot to Windows NT
2) Go to Start/Settings/Control Panel
3) Open SCSI Adapters
4) Click on the Drivers tab
5) Click on Add. On the next screen, click on Have Disk
6) Insert the Portable 24X CD-ROM Driver Diskette and direct the prompt to the
“A:\WINNT” directory and click OK
7) The system will prompt you again for the directory. Enter the same directory,
“A:\WINNT” and click OK.
8) The system will prompt you to reboot once the driver installation is complete.
Playing Audio CD's
The CD-ROM drive can play audio CDs two different ways;
1) Connected to a computer as a CD-ROM drive, you can run an Audio CD software program to play music CDs.
2) Independent from your computer (although is may be left connected) you can use the
audio CD controls on the unit to play music CDs.
The basic difference in the two methods are; in #1 the CD-ROM MUST be connected
to a computer and MUST use a software program to control the player; in # 2 the unit
is completely portable and is controlled using the audio CD buttons.
Note: CD discs are very sensitive to scratches and fingerprints. Use caution when
handling them. Always grasp a CD disc by it's edges and use a soft cloth to clean
dust and lint from the rainbow colored surface. Never use any type of chemical
cleaner to clean the CD as some chemical may melt the plastic and permanently damage it.
As A CD-ROM Drive:
< Windows 3.1x >
Before audio CD's can be played, the Windows 3.1x CD audio driver must be installed.
To load the audio driver, follow the steps below. (note: The CD audio driver is not loaded
when Windows is installed. To load the audio driver you will need the Windows 3.1x
diskettes).
1) From the program manager open the MAIN group icon.
2) Open the CONTROL PANEL icon and open the DRIVERS icon.
3) Click on the ADD button and from the list of drivers click on the (MCI) CD AUDIO driver. Click on the OK button.
4) Insert the Windows diskette required into the A: or B: floppy drive and in the dialog box
type in the drive letter and click OK.
5) After the driver is loaded reboot the system to activate the new driver. (note: The audio
driver only needs to be loaded one time for proper operation of the CD Player. It is not
necessary to load the driver each time to play an audio CD).
6) To play an audio CD open the ACCESSORIES group and click on the MEDIA PLAYER
icon.
7) Load an audio CD in to the CD-ROM drive. Make sure the CD-ROM/AudioCD switch is
in the CD-ROM position. Connect a pair of mini style headphones to the headphones
jack.
8) Click on DEVICE and choose CD AUDIO. The MEDIA PLAYER and the number of
tracks on the audio CD will appear. Click the PLAY button to start the MEDIA PLAYER.
< Windows 95/98/NT >
1) Before starting the Windows 95/98/NT CD Player connect a pair of mini style headphones to the headphones jack and make sure the CD-ROM/AudioCD switch is in the
CD-ROM position.
2) Start the Windows 95/NT CD Player from the Desktop by clicking on START and
choosing PROGRAMS/ACCESSORIES/MULTIMEDIA. Click on the CD PLAYER icon.
3) The CD PLAYER will appear and automatically start playing the first track of the Audio
CD. (note: For specific instructions on how to use the CD Player, consult the Windows
Help Menus).
As A Personal Music CD Player:
1) Connect a pair of mini style headphones to the headphones jack and make sure the
AUDIO CD switch on the rear panel is in the ON position and that your Portable 24X
CD-ROM drive is not connected to the computer. Remove the PC Card cable from the
computer's PC Card slot.
2) Load an audio CD in the player.
3) Use the Music Control Buttons on the top of the Portable 24X CD-ROM to listen to
your favorite music CDs.
<< PREVIOUS TRACK/RR BUTTON
Pushed once, this control will jump to the beginning of the current song, each subsequent push will cause the unit to jump the beginning of the previous song. If
pushed and held down, the CD player will quickly scan backward through the current track.
>| PLAY/PAUSE BUTTON
Push this button to start playing an audio CD. Once play is in progress, pushing
this button will cause the CD to pause. Push the button once more to resume play.
Along push resets the drive back to the first track
>> NEXT TRACK/FF BUTTON
Pushed once, this control will jump to the beginning of the next song, each subsequent push will cause the unit to jump the beginning of the following song. If
pushed and held down, the CD player will quickly scan through the current track.
+ - VOLUME CONTROLS
These controls raise and lower the volume.
CD-ROM Power Options
There are three power source options available: The PC Card slot, the AC Power
Adapter (sold separately) and the internal rechargeable batteries.
NOTE: The PC Card slot is only available when using the Portable 24X CD-ROM as a
CD-ROM drive, not as a personal audio CD player.
The Audio ON/OFF switch at the back of the Portable 24X CD-ROM is used for selecting
the power source and for changing from a CD-ROM drive for use with your computer to a
stand-alone audio music CD player.
Set the switch to OFF when using with your computer and to ON for use as a Music CD
player.
When the switch is set to OFF, the CD-ROM will obtain power from the PC Card socket
of your computer. No external power will be required (See section covering the 'Micro
Power Management System').
When the Audio ON/OFF switch is set to ON, external power is selected either in the
form of the internal batteries or an external AC Adapter. The Portable 24X CD-ROM PC
Card should be disconnected before switching to this mode.
*The AC Adapter takes priority over the batteries in powering the CD-ROM drive whether
or not they are installed.
Connecting the AC Adapter
1) Turn off the CD-ROM (disconnect the Portable 24X CD-ROM PC Card from your computer).
2) Connect the AC Adapter; plug to the DC input jack at the rear panel of the CD-ROM.
3) Attach the AC Adapter to the nearest AC outlet.
CAUTION: Only use the AC adapter supplied with this unit, or refer to your vendor. Using
the incorrect AC Adapter will cause damage to your unit.
Installing Batteries
There are four batteries located under a trap door in the bottom of the Portable 24X CDROM drive. The PC Card version uses four rechargeable NiCd 1.2V 650m Ah AA sized
batteries. Under normal use, these batteries should last a full year at which time they
should be replaced. The Parallel version uses four regular AA batteries. These batteries
should be replaced when the charge is depleted.
To install new batteries:
1) Remove any CD Disc from the Portable 24X CD-ROM CD-ROM drive.
2) Disconnect the interface cable from your computer and the Portable 24X CD-ROM
unit.
3) Disconnect the Power Adapter.
4) Turn the drive over, slide open the battery trap door, remove and replace the batteries,
close the battery trap door.
Micro Power Management System
The Portable 24X CD-ROM PC Card has been designed to draw sufficient power directly
from a portable computer's battery via the PC Card slot, with the assistance of four builtin rechargeable batteries. Prior to use, the rechargeable NiCd batteries should be fully
charged. To do this, connect the Portable 24X CD-ROM to your portable computer and
run the software installation program (to ensure the drivers are installed). With the
Portable 24X CD-ROM connected, keep the portable computer up and running for 1 1/2
to 2 hours. For best results, connect the portable computer to AC power and DO NOT
access the drive.
Prior to use, the four rechargeable NiCd batteries should be recharged for 1 1/2 to 2
hours. The computer must be powered on, the driver software installed and the Portable
24X CD-ROM PC Card inserted into a PC Card slot. Connect your computer to AC power
for more efficient recharging.
When operating the Portable 24X CD-ROM, the red LED on the top panel should be on.
If this is not the case it may mean that the software drivers have not been correctly
installed in which case you should refer to the section covering SOFTWARE INSTALLATION in this guide
or to your vendor.
If during use and after correct installation of the software drivers the red LED starts to
blink during use, that indicates that the batteries have become low in charge and will
need to be recharged fully (1 1/2 to 2 hours *recommended*) or partially (5 to 10 minutes).
Failure to do this will eventually cause the Portable 24X CD-ROM unit to go into an automatic charging mode, this will be indicated by the red LED which will suddenly switch off
completely. During this charging mode you may not access your CD-ROM for at least 5
to 10 minutes while a partial recharge is performed.
With normal use the batteries will not require recharging, however under intensive use, or
after a long period of storage they may require a recharge. NiCd batteries wear out in
time and may require replacement about once a year.
Troubleshooting
After connecting the CD-ROM drive to my computer the loading tray will not open
when I press the EJECT button.
- On many computers the parallel port device is not reset or initialized until the
Operating System is loaded. If the system has not been started, disconnect the
parallel cable from the rear of the CD-ROM drive.
During installation or after the drivers were loaded the computer hangs up.
- Most likely there are other device drivers already loaded into the computer such
as Network Card drivers, SCSI drivers, Sound Card drivers or other Parallel Port
Device drivers which are interfering with the drivers. Please perform a system
check of the status of all installed devices through the Control Panel and System
Configuration Screens. Sometimes driver conflicts can be resolved very easily by
fine tuning the drivers settings.
The CD-ROM drive is not recognized after software installation.
- Verify step by step that you have followed the instructions in this manual concerning Hardware and Software installation.
- Verify the installation and the configuration of the PC Card software supplied with
the computer.
The red LED is off on the top of the CD-ROM drive.
- Refer to the IMPORTANT NOTICE on page 10 of this manual concerning the
recharging of the internal batteries supplied with the unit and follow the procedures.
The PC Card will not fit into my Compaq Presario Computer.
- There is a modified PC Card to fit into the Presario 16xx series computers.
Contact customer service to request this modified PC Card. The Presario 10xx
and 12xx series are not compatible with this PC Card.
There is not enough power to power the CD-ROM unit.
- There is an optional PS/2 power cable available for use with your notebook computer to supply additional power to the CD-ROM drive. Some notebooks do not
supply enough power through the PC Card slot to power the drive unit. Contact
customer service for the optional PS/2 power cable.
Want to run the CD-ROM standalone.
- The CD-ROM unit will power off of batteries, but can also run off of an optional AC
Adapter available through customer service.
Need to use my notebook computer Recovery CD but can’t get access to the CDROM.
- In the instance of Hard Disk Drive replacement due to failures, Recovery CDs
used to restore your original OEM Software image to your notebook HDD can be
used with the ST24XCD. However, if your HDD is not bootable to DOS, you will
need to contact Port Technical Support for additional information or for certain systems to request a Diskette so that you can then access your CD-ROM and utilize
the recovery CD. If your system is bootable to DOS, you will need to make sure
your Notebook’s card and socket services are installed and loaded then follow the
DOS installation procedures in this manual to install the CD-ROM DOS driver.
For issues not covered in this manual or for general questions, you can contact
Port:
Technical Support and Customer Service for Port Accessories: (503) 684-3147 5am-5pm EST
Email: [email protected]
Web General: http://www.port.com
Web Updated Driver Files: http://www.port.com/support/files.htm
Warranty
Warranty Limitations
The limited warranty period should appear on your warranty card. If not contact your
retailer for any information about the limited warranty.
The warranty does not apply to:
- Batteries
- Damaged front panel and loading tray
- The damages or problems resulting from misuse, abuse, accident,
alteration or incorrect electrical current or voltage.
- Any product without warranty or serial number label, or shipped without it's
warranty card
FCC Compliance
This equipment has been tested and found to comply with the limits for a Class B digital
device, pursuant to Part 15 of the FCC Rules. These limits are designed to provide reasonable protection against harmful interference when the equipment is operated in a residential installation. This equipment generates, uses, and can radiate radio frequency
energy and if not installed and used in accordance with the instruction manual may cause
harmful interference to radio communications. However, there is no guarantee that interference will not occur in a particular installation. If this equipment does cause interference
to radio or television reception, which can be determined by turning the equipment off
and on, try to correct the interference by one or more of the following measures:
• Relocate the receiving antenna.
• Increase the separation between the equipment and the receiver.
• Connect the equipment into an outlet of a circuit different from that to which the receiver
is connected.
• Consult the dealer or an experienced radio/TV technician for help.
CAUTION: Any changes or modifications not expressly approved by the grantee of this
device could void the user's authority to operate the equipment.
FCC Part 15
Operation is subject to the following two conditions:
(1) This device may not cause harmful interference.
(2) This device must accept any interference received including interference that may
cause undesired operation.
Warning
Safety :
Never attempt to disassemble, adjust or repair the CD-ROM drive as exposure to laser
light or other safety hazards may result.
This is a Class 1 Laser Product. This product complies with all applicable safety standards, DHHS Rules 21 CFR Chapter 1, Subchapter. The laser beam generated is totally
enclosed during all modes of normal operation, and no hazardous laser light is emitted
from the drive.
www.port.com