1
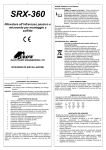
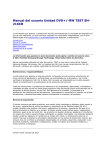
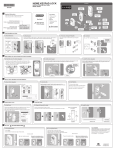
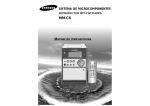
3107115B
Contents
o Precaution / Care and Storage
o Nomenclature (Description of parts)
o Operations:
Attaching the strap / Loading the batteries
Power On/Off / Battery check
Date / Time adjustment
Loading the film
o Taking picture
©Auto Focus
©Mode selection
Auto Flash mode / Fill-in flash / Flash off
Landscape / Night scene
Red-eye Reduction / Self-timer
©Rewinding the film
o Specifications
2
P3
P4~7
P8
P9
P10
P11
P12
P13
P14
P15
P16
P17
P18~19
Red-eye reduction
DX setting
Self-timer
Night scene mode
Date Imprinting
Film winding
Film rewinding
Power Source
Dimension
Weight
High light LED
ISO 50 - ISO 3200
10 seconds delay
Yes
Built-in type
Automatic winding
(1) Automatic rewinding
(2) Power mid-roll rewinding
AA Alkaline battery x 2 pcs
115mm (W) x 67mm (H) x 38mm (D)
185g
Specifications and designs are subject to change without notice.
19
Introduction
Thanks for buying this 2.4x zoom camera. Before using the camera, please
read this instruction manual thoroughly to ensure correct use.
This camera is confirmed to comply with the requirements set out in the
council directive 89/336/EEC on the Approximation of the laws of the
Member States relating to Electromagnetic Compatibility..
1
Specifications
Type
Film format
Focusing
Focusing range
Lens
Exposure control
Viewfinder
Shutter speed
Flash
Precaution / Care and Storage
In order to get the best performance from this sophisticated designed
camera and keep safe-use of it, the following needs to be specially noticed:
135mm (38-90mm) (effective zoom range 38mm~85mm)
with LCD display
24 x 36mm
Active infrared auto focus system
Auto mode----- Wide: 0.9m~infinity
Tele: 0.9m~infinity
38mm (F7.0) to 90mm (F10.5) (effective zoom range
38mm~85mm) 4 element 4 groups zoom lens
"5 steps Zoom, 2 retractable barrel sections"
Programmed AE shutter
Real image zoom finder with AF marks
1/1.4~ 1/360 second
Three-way Flash Recycle time arround 7 seconds
Flash range W:0.9-2.7m T:0.9-2.3m GNO W:11.5 T:15
1. The camera is not water resistant, and should not be used outdoors if it's raining or
snowing.
2. Protect the camera from dust, moisture, sudden impact, and excessive heat.
3. Don't attempt to disassemble the camera yourself, since there is high-voltage
circuitry inside.
4. Please use a lintless cloth to clean gently in one direction on the sur
cleaning. Do not use chemically treated tissues intended for cleaning eyeglasses.
5. The battery may be shorted when exposed to high temperature, or disposed of in
fire.
6. Remove the battery when the camera is not used in a long time.
7. Keep batteries away from children.
8. Keep the auto-focus windows clean to ensure accurate focusing. If they get dirty,
wipe them clean with soft cloth.
9. Pad the button of the camera with foam-rubber when traveling in a car, ship, or
airplane. Violent vibration could cause damage to the camera.
10. Make sure the tripod screw fits the camera before installing.
3
18
face of lens when
Red-Eye reduction - Built-in, lamp will light for a period 1.0 seconds before the flash.
1. Press mode button until red-eye reduction mark "
" shown on LCD panel
2. Shooting with flash mode in dark places, the subject's eyes may appear red in the
picture. This phenomenon is known as "red-eye" and occurs when flash reflects back
from the retina. This mode can contract the pupils of the subject and reduce the
chances of red-eye.
3. As there is a delay effect for the red-eye reduction lamp to function, please press the
button and hold the camera steady until shutter releases.
Self-timer
1. Press the "
" button until the "
" mark appears on the LCD. This mode allows
you to join the picture you are taking with the camera on a steady support.
2. Press the shutter release button.
3. The self-timer lamp will light up for approx. 7 seconds, then blink for approx. 3
seconds. After that, the shutter will release. It could combine with all kinds of the flash
modes.
4. If you wish to stop the self-timer operation once it has been activated, press the power
or
button again.
16
Zoom button
(Wide / Tele)
Back cover
Film pressure plate
AF Lamp
Finder eyepiece
Film check window
Film cartridge
chamber
Battery cover
Spool
Film Tip
DX contacts
Back cover
switch
Tripod socket
5
Multi-Mode Operation
1. Auto flash (no any symbol)
3. Fill-in flash mode
5. Landscape mode
Viewfinder
2. Red-eye reduction mode
4. Flash off mode
6. Night Scene mode
Auto Flash - The camera will flash automatically when in a low light.
Picture Frame
Fill-in Flash mode: Press the Mode button until "
" is displayed on the LCD. The
flash will fire whenever taking pictures. In backlit situations, it is recommended to use this
mode.
Flash off mode: Press the Mode button until "
" is displayed on the LCD. The flash
will not fire even in a low light. When you don't want to use flash for a more nature
effect or when the use of flash is forbidden in some places.
AF (Auto Focus lock) frame mark
AF frame mark: Place the AF frame over the subjects you want to take.
* It is recommended to use a tripod (tripod socket) or place the camera on another firm
support when taking pictures in dark places.
14
7
ess the power button. When power is on, the lens cap will open and LCD is set to
Taking pictures
1. Turn on the power. When you turn the camera on, the lens cover automatically opens.
2. Hold the camera steady with both hands, and be sure not to block the flash, autofocus
window or lens with your fingers.
3. If you want to enlarge the subjects, press the zoom Tele (T) button, and press Wide (W)
button to take wide-angle shots. The lens can be zoomed out and in at 5 positions
between Tele and Wide freely subject to user's selection.
* Focus range: 0.9m~°¤
4. Look through the finder eyepiece and compose your subjects
within the AF frame mark.
5. Press the shutter release button halfway, and the AF (green)
lamp will light up in the same time, then fully press it to take a picture.
Note:
When "
" on the LCD panel is blinking, which indicates the flash is charging.
After the blinking stops, you can continue taking the next picture.
* DX setting:
Method: Automatically setting by reading DX code (when using DX film)
Film sensitive setting: ISO 50~ISO 3200.
12
Power on/off
Pr
auto mode.
Note:
The power will be turned off automatically after being idle for 7 minutes.
Checking the battery power
The battery power shows on the LCD by the
indicator anytime.
1
: Battery in good condition
2
: Replace battery with a new one
3
: The battery has run out. No function can be used except the film rewinding.
* Battery can be replaced if there is a film inside.
9
Date and Time Adjustment (For Date model only)
Loading the film
1
DATE
DATE
DATE
3
4
5
5
DATE
FILMTIP
MODE
MODE
MODE
MODE
2
1
2
1.Check through the film cartridge confirmation window to make sure there is no film in
the camera.
2.Slide the back cover opening latch upward to open the back cover.
3.Load the film cartridge and pull the film tip across to the film tip mark.
4.Make sure that the film lies flat and is positioned between the film guides.
5.Close the back cover, and check if the film counter on the LCD panel automatically
advances to the first frame, then "1" displays on the LCD panel.
Note:1. Be sure not to open the film cover after you start taking pictures, or you will ruin
the film.
2.If "1" does not appear on the LCD after loading the film, it means that the film is
not loaded properly. Please reload the film correctly.
4
3
1. Turn on the power.
02 " figure is blinking,
2. For date/time adjustment, press "DATE " button until the "
and then press the "
" button to set the desired date. (The date will run through
quickly if you press the "
" button continuously.) When the date is adjusted as
desired, press the "DATE" button to set the date.
3. Repeat (2) step until the "hour", Minute", "year", "month" are set all correct.
4. After you finish, press "DATE" button to exist the adjustment mode.
5. If the date imprinting is not desired, press "DATE" button to select "------" mode.
* Calendar year: 2002~2032 are stored in memory.
10
11
ough the loop and
Auto Focus (Focus Lock)
Attaching the strap
Slide the small loop end of the strap
through the strap eyelet (Fig.1) and then
pass the other end thr
tie the strap onto the strap eyelet (fig.2)
Fig.1
Fig.2
Loading the battery
1. Turn off the power
2. Open the battery chamber cover
3. Insert two AA batteries with the
correct positive (+) and negative (-) polarity.
Note:
1. Before shooting, please check the battery power at first.
2. Be sure to check the date after changing new batteries (For date model only).
3. When traveling or planning to take many pictures, it is recommended to bring
spare batteries just in case.
8
1. Aim the subjects through the finder eyepiece.
2. Center the auto-focus frame mark over the main subjects, and then press the release
button halfway down to lock the focus.
3. While still pressing the button halfway down, move the camera until your subjects are
where you want them within the frame.
4. Press the shutter button completely down to take the picture.
13
LCD Indicators
Landscape
Battery check
Landscape mode: Press the Mode button until the "
"mark appears on the LCD.
This is used for taking clear landscape picture or photographing remote scenes through
glass. The flash does not fire in this mode, so the flash off is set automatically.
Note:
The mode function will be cancelled automatically after each time shooting.
Red-eye reduction
Film counter
Flash indicator
(on/off/charging)
Self-timer
Night scene
Night Scene mode: Press the Mode button until the "
" mark appears on the LCD.
This mode is effective when taking pictures of people with an evening or nocturnal
background.
A slower shutter speed is set in this mode. The use of a tripod is recommended to prevent
the camera from shaking when Night scene mode is selected.
Date / Time imprinting
(Date model only)
6
15
Nomenclature
Rewinding the Film
Power button
Mode button
Self-timer button
Shutter release button
Mid-roll rewinding
button
Date (For date model
only)
CDS window
LCD panel
Self-timer indicator
Red-eye reduction
AF window
Lens / Lens cap
Flash
Auto film re-wind
Automatic start at end of film, automatically stop upon completion of rewinding. The
power will shut off automatically
1. After the end of the film has been reached, the film will automatically rewind.
2. When the film starts to rewind, the frame counter starts to counter down and "E" will
display on the LCD panel when the film rewinding is completed.
3. Open the back door to unload the film.
Mid-roll rewind
The film may be rewound before the roll of the film is finished. Press the "
" button
to mid-roll rewind the film if you don't want to continue taking the remaining film.
Back cover switch
4
17
35mm Fully Automatic Camera
With LCD
Instruction Manual
3107112A
Introducción
Gracias por comprar ésta cámara 2.4x zoom. Antes de usar la cámara, por
favor, lea éste manual atentamente para garantizar un correcto uso de la
misma.
Ésta cámara satisface los requisitos establecidos en el concilio directivo
89/336/CEE sobre la Aproximación de leyes de los Estados Miembros
relacionadas con la Compatibilidad Electromagnética.
1
Especificaciones
Tipo
Formato de la película
Enfoque
Lente
Alcance de enfoque
Control de exposiciones
Visor
Velocidad del disparador
Flash
Precauciones / cuidados y almacenamiento
Para conseguir la mejor exposición de ésta sofisticada cámara de diseño y
hacer un uso seguro de la misma, debe tener especialmente en cuenta lo
siguiente:
135mm (38-90mm) (alcanca efectiveo del zoom de
38mm~85mm) con pantalla LCD
24 x 36
Sistema de enfoque activo automático de infrarrojos
38mm (F7.0) a 90mm (F10.5) (alcanca efectiveo del zoom de
38mm~85mm) 4 elementos 4 grupos de lentes de zoom 5
pasos de zoom, 2 secciones retractables
Modo automático - Amplio: 0.9- infinito
Tele: 0.9 - infinito
Disparador programado AE
Zoom de visor real con marcas de AF
1 / 1.4 - 1 / 360 segundos
3 modos de flash y tiempo de reciclaje de 7 segundos
aproximadamente. Amplitud de flash W: 0.9 - 2.7m T: 0.9 2.3m GNO W: 11.5 T: 15
1. Ésta cámara no es resistente al agua, y no debería utilizarse al aire libre si llueve ó
nieva.
2. Proteja la cámara del polvo, impactos repentinos, y un excesivo calor.
3. No intente desmontar la cámara, ya que contiene un circuito de alto voltaje.
4. Por favor utilice un trapo sin pelusas para limpiar la lente, en una dirección. No
utilice pañuelos tratados químicamente para limpiar gafas de ver.
5. La duración de la pila se verá reducida si es expuesta a altas temperaturas ó si está
cerca del fuego.
6. Cuando no vaya a utilizar la cámara durante un largo período de tiempo, saque las
pilas.
7. Mantenga las pilas alejadas de los niños.
8. Mantenga limpias las ventanas del enfoque automático para asegurar un correcto
enfoque. Si se ensucian, límpielas con un suave trozo de tela.
9. Cuando viaje en coche, tren ó avión, resguarde los botones de la cámara. Una
vibración violenta podría dañar la cámara.
10. Asegúrese de que el agujero del trípode encaja con la cámara, antes de instalarlo.
3
18
Reducción de efecto ojos rojos
la luz de llenado se iluminará 1.0 segundos antes que el flash.
1. Presione el botón
de modo hasta que la marca de reducción de efecto ojos rojos se
muestre en el panel LCD.
2. Cuando haga fotografías con flash en lugares oscuros, los ojos de la gente pueden
aparecer rojos. Éste fenómeno se conoce como "ojos rojos" y aparece porque el flash se
refleja en la retina. Éste modo puede contraer las pupilas de los sujetos y así reducir las
posibilidades de ojos rojos.
3. Como hay un efecto retardado de la función de la luz de reducción de ojos rojos, por
favor, presione el botón y sujete la cámara firmemente hasta que el disparador se active.
Reloj automático
1. Presione el botón
hasta que aparezca en el panel LCD la marca
. Éste modo le
permite incluirse en la fotografía dejándola en un soporte firme.
2. Presione el disparador.
3. La luz del reloj automático se encenderá aproximadamente unos 7 segundos, y luego
parpadeará aproximadamente 3 segundos. Después, el disparador se activará. Se podría
combinar con cualquier modo de flash.
4. Si desea parar la operación del reloj automático cuando esté activada, presione el botón
de encendido otra vez.
16
Botón de zoom
(amplio / Tele)
Cubierta trasera
Plato de presión de
película
Luz AF
Visor
Ventana de verificación
de película
Compartimento de
carrete de película
Cubierta de pilas
Carrete
Borde de la
película
Contactos DX
Botón de
cubierta trasera
Zapata del trípode
5
Modo multi operaciones
1. Flash automático (ningún símbolo)
3. Modo de llenado de flash
5. Modo paisaje
Visor
2. Modo de reducción ojos rojos
4. Modo de apagado de flash
6. Modo escena nocturna
Flash automático: el flash se activará automáticamente cuando haya poca luz.
Formato de
fotografía
Modo de llenado de flash: presione el botón de modo hasta que
aparezca en el
panel LCD. El flash se activará cuando tome fotografías. Éste modo es especialmente
recomendado en situaciones con escasa luz de fondo.
Modo de apagado de flash: presione el botón de modo hasta que
aparezca en el
panel LCD. El flash no se activará ni con escasa luz. Cuando no quiera utilizar el flash para
conseguir un efecto más natural ó cuando esté prohibido el uso del flash.
* Se recomienda usar un trípode (zapata de trípode) ó poner la cámara en algún otro
soporte firme, cuando tome fotografías en lugares oscuros.
Marca del formato de la fotografía AF (cierre del Enfoque Automático)
Marca del formato de la fotografía AF: sitúe el formato AF sobre los sujetos que
quiere fotografiar.
14
7
esione el botón de encendido. Cuando la cámara esté encendida, se abrirá la tapa
Tomando fotografías
1. Encienda la cámara. Cuando enciende la cámara, se abre la cubierta de la lente.
2. Coja la cámara firmemente con ambas manos, y asegúrese de que no bloquea el flash,
la ventana del enfoque automático o la lente con sus dedos.
3. Si quiere acercar los sujetos, presione el botón de zoom Tele (T), y presione el botón
Amplio (W), para ampliar el ángulo fotográfico. Las lentes
poseen 5 posiciones de flash entre Tele y Amplio que se
pueden aplicar libremente según lo desee el usuario.
* Alcance de enfoque: 0.9m - infinito.
4. Mire por el visor y componga su fotografía con la ayuda del
formato de fotografía AF.
5. Presione el disparador a la mitad, y la luz verde del enfoque automático (verde) se
encenderá al mismo tiempo, luego, presiónelo completamente para tomar la fotografia.
Nota:
Cuando
parpadee en el panel LCD, lo que indica que el flash está cargando.
* Ajuste DX:
Método: Ajuste automático leyendo el código DX (cuando utilice una película DX).
Sensibilidad de ajuste de película: ISO 50 - ISO 3200.
12
Encendido / apagado
Pr
de la lente y el panel LCD se ajustara en modo automático.
Nota:
Cuando la cámara esté 7 minutos inactiva, ésta se apagará automáticamente.
Verificando la duración de las pilas
La duración de la pila se muestra en el panel LCD siempre con el símbolo.
1
: Pilas en buenas condiciones.
2
: Ponga pilas nuevas.
3
: Las pilas estan agotadas. Sólo funciona la función de rebobinado de
pelicula.
* Las pilas se pueden cambiar con una película en la cámara.
9
Ajuste de fecha y hora (sólo para el modelo de fecha)
Insertando la película
1
DATE
DATE
DATE
3
4
5
5
DATE
FILMTIP
MODE
MODE
MODE
MODE
2
4
2
1
3
1. Encienda la cámara.
2. Para ajustar fecha / hora, presione el botón "FECHA" hasta que la figura
parpadee, y luego presione el botón
02 para introducir la fecha deseada. ( Si
presione el botón
continuamente, la fecha correrá rápidamente ). Cuando la fecha
esté ya ajustada, presione el botón "FECHA" para fijarla.
3. Repita el paso (2) hasta que la "hora", "minuto", "año", "mes" estén correctamente
fijados.
4. Cuando haya terminado, apriete el botón "FECHA" para salir del modo de ajuste.
5. Si no desea la impresión de la fecha, presione el botón "FECHA" para seleccionar el
modo "- - -".
* Calendario de años: en la memoria encontrará desde el 2002 hasta el 2032.
1.Verifique a través de la ventana de confirmación de película, que no hay ninguna
película en el interior de la cámara.
2.Mueva el botón de apertura de la cubierta trasera hacia arriba, para abrirla.
3.Inserte la película y ajústela.
4.Asegúrese de que la película está plana y que está puesta correctamente entre las guías
de película.
5.Cierre la cubierta trasera, y verifique si el contador de fotografías del panel LCD avanza
automáticamente a la primera fotografía, y el "1" se ve en el panel LCD.
Nota:
1.No abra la cubierta trasera cuando haya empezado a tomar fotografías, o echará a
perder la película.
2.Si no aparece el "1" cuando haya insertado la película, significa que no ha insertado la
película correctamente. Por favor vuelva a insertar la pelicula correctamente.
10
11
(fig.1) y luego haga lo mismo con el otr
Enfoque automático (cierre de enfoque)
Insertando la correa
Pase un lado de la correa por su agujero
o
lado y átelo (fig.2).
Fig.1
Fig.2
Insertando las pilas
1. Apague la cámara.
2. Abra la cubierta del compartimiento de las pilas.
3. Inserte dos pilas AA con su correcta polaridad (+) (-).
Nota:
1. Antes de disparar, por favor, verifique el estado de las pilas.
2. Asegúrese de verificar la fecha antes de poner pilas nuevas (sólo para el modelo de
fecha).
3. Cuando viaje ó haya planeado tomar muchas fotografías, se recomienda llevar pilas
de sobra por si acaso.
8
1. Encuadre los sujetos a través del visor.
2. Sitúe sobre los sujetos principales la marca de fotografía del enfoque automático, y
luego presione el botón disparador a la mitad para cerrar el enfoque.
3. Cuando esté presionando el botón a la mitad, mueva la cámara hasta que los sujetos
estén en el lugar deseado de la fotografía.
4. Para tomar la fotografía presione el disparador completamente.
13
Indicadores LCD
Paisaje
Verificador de pilas
Reducción ojos
rojos
Contador de
fotografías
Indicador de flash (
encendido /
apagado /
cargando )
Reloj automático
Impresión fecha / hora
(únicamente en el
modelo de fecha)
Escena nocturna
Modo paisaje: presione el botón de modo hasta que la marca
aparezca en el panel
LCD. Se utiliza para fotografiar paisajes claros ó escenas remotas a través del cristal. El
flash no se activa en éste modo, con lo que el modo de apagado de flash se activa
automáticamente.
Nota:
El modo función se apagará tras cada disparo.
Modo de escena nocturna: presione el botón de modo hasta que la marca
aparezca en el panel LCD. Éste modo es efectivo cuando fotografíe personas de noche ó
con una escena nocturna natural.
Se fija una velocidad del disparador reducida. Se recomienda el uso de un trípode para
evitar que la cámara se mueva al seleccionar un modo de escena nocturna.
6
15
Nomenclatura (descripción de las partes)
Rebobinando la película
Botón de encendido
Botón de modo
Botón disparador
Botón de reloj
automático
Botón de rebobinado
de medio rollo
Fecha ( sólo para el
modelo con fecha )
Ventana CDS
Panel LCD
Indicador de reloj automático
Reducción ojos rojos
Ventana AF
Lente / cubierta de la
lente
Botón de cubierta
trasera
Flash
4
Rebobinado automático
Inicio y final de pelicula automáticos, parada automática una vez que la película haya
terminado de rebobinarse. La cámara se apagará automáticamente.
1. Una vez que haya llegado al final de la película, ésta se rebobinará automáticamente.
2. Cuando la película comience a rebobinarse, el contador de fotografías empezará a ir
hacia atrás y "E" aparecerá en el panel LCD una vez finalizado el rebobinado de la
película.
3. Abra la cubierta trasera para sacar la película.
Rebobinado de medio rollo
La película puede rebobinarse antes de que se termine. Presione el botón
para
activar el rebobinado de medio rollo si no quiere seguir tomando fotografías con la
película que hay en la cámara.
17
Contenidos
o Precauciones / cuidados y almacenamiento
Pág. 3
o Nomenclatura (descripción de las partes)
Pág. 4~7
o Operaciones:
Insertando la correa / insertando las pilas
Pág. 8
Encendido / apagado / verificador estado pilas
Pág. 9
Fecha / ajuste hora
Pág. 10
Insertando la película
Pág. 11
o Tomando fotografías
Pág. 12
©Enfoque automático
Pág. 13
©Modo selección
Modo flash automático/ flash de llenado/ flash apagado Pág. 14
Paisaje / escena nocturna
Pág. 15
Reducción ojos rojos / reloj automático
Pág. 16
©Rebobinando la película
Pág. 17
o Especificaciones
Pág. 18~19
Reducción ojos rojos
Ajuste DX
Reloj automático
Modo de escena nocturna
Impresión de fecha
Bobinado de película
Rebobinado de película
Fuente de energía
Dimensiones
Peso
Alta luz LED
ISO 50 - ISO 3200
Retraso de 10 segundos
Si
Modo de llenado
Bobinado automático
(1) rebobinado automático.
(2) Encendido de rebobinado de medio rollo
Pilas alcalinas AA x 2 piezas
115mm (W) x 67mm (H) x 38mm (D)
185gr
Las especificaciones y los diseños están sujetos a cambios sin pr
aviso.
2
19
evio