1
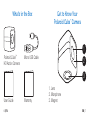
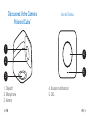
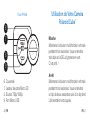
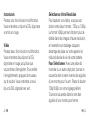
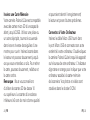
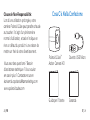
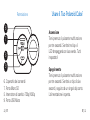
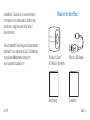
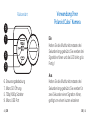
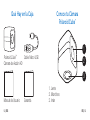
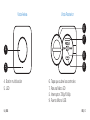
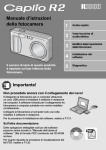
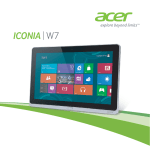
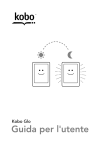
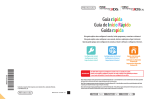
USER GUIDE
GUIDE D’UTILISATION
GUIDA PER L’UTENTE
BEDIENUNGSANLEITUNG
MANUAL DE USUARIO
HD Action Camera
Caméra d’Action HD | Action Camera HD
HD Action Kamera | Cámara de Acción HD
EN Hello and welcome to the Polaroid
Cube™ camera. Let’s get started.
FR Bonjour, et bienvenue dans l'univers de
la caméra Polaroid Cube™. Démarrons.
IT
Ciao e benvenuto nella fotocamera
Polaroid Cube™. Comiciamo.
DE Hallo und Willkommen bei der
Polaroid Cube™ Kamera. Lassen Sie
uns anfangen.
ES Hola y bienvenido a la familia cámara
Polaroid Cube™. Empecemos.
Table of Contents
EN
What’s in the Box
6
Get to Know Your Polaroid Cube Camera 7
Using Your Polaroid Cube Camera
10
FR
Que Trouve-t-on Dans la Boîte
17
Découvrez Votre Caméra Polaroid Cube 18
Utilisation de Votre Caméra Polaroid Cube 21
IT
Cosa C’è Nella Confezione
Conoscere il Tuo Polaroid Cube
Usare il Tuo Polaroid Cube
29
30
33
DE
Was ist in der Box
41
Lernen Sie Ihre Polaroid Cube Kamera 42
kennen
Verwendung Ihrer Polaroid Cube Kamera 45
ES
Qué Hay en la Caja
Conoce tu Cámara Polaroid Cube
Usando tu Cámara Polaroid Cube
54
55
58
What’s in the Box
Get to Know Your
Polaroid Cube Camera
™
1
Polaroid Cube™
HD Action Camera
Micro USB Cable
2
3
User Guide
6 | EN
Warranty
1. Lens
2. Microphone
3. Magnet
EN | 7
Top View
Back View
6
7
4
8
9
5
4. Multifunction Button
5. LED
8 | EN
6. Controls Cover
7. Micro SD Slot
8. 720p/1080p Switch
9. Micro USB Port
EN | 9
Using Your
Polaroid Cube Camera
™
On
Hold the multifunction button for three
seconds. You’ll hear three beeps and
the LED will blink green. All set!
Off
Hold multifunction button for three seconds.
You’ll hear a two second beep, followed by
a single short beep. Power is off.
10 | EN
Still Photos
Press the multifunction button once. You’ll
hear a beep and the LED will blink red once.
Video
Double press the multifunction button.
You’ll hear two beeps and the LED will
blink red until you stop recording. To stop
recording, press the button once again.
You’ll hear a single beep and the LED will
blink green.
Select Your Resolution
You have the option of capturing video
at either 720p or 1080p. 1080p gives you
EN | 11
more detail in a higher resolution image,
but uses more storage space on your
camera and shortens the battery life.
To Select: Using a coin or other flat object,
turn the controls cover counterclockwise
to open. Set the 720p/1080p switch to your
preferred setting. Turn the controls cover
clockwise to close.
Insert a Memory Card
Your Polaroid Cube camera can
accommodate micro SD cards with storage
capacities up to 32GB. Using a coin or
other flat object, turn controls cover
counterclockwise to open. Insert card
12 | EN
into slot and gently push in until you hear
a click. Turn the cover clockwise to close.
To remove a card, gently push the card in,
release and the card will slide back out.
Note: We suggest using SD cards
Class 10 and above. Cards lower than
Class 6 are of a lesser quality and may
cause slower recording/reading speed
as well as other unexpected issues.
Connect to Your Computer
Insert the included Micro USB cable into
the Micro USB port and the other end into
your computer. Double-click the Polaroid
Cube camera when it appears on the
EN | 13
desktop. The indicator will blink orange
to show that your computer is accessing
the camera's memory card. Your still photos
and videos are located in the DCIM folder.
Launch Your Settings Application a) Windows users: Double-click on the
PolaroidCube.exe file.
b) Mac users: Double-click the
PolaroidCube.app.zip file, then double-click
the Polaroid Cube icon.
In the application, you can change the
settings for Light Frequency, Timestamp,
Cycle Recording, Date & Time and Buzzer
Volume.
14 | EN
Note: QuickTime player is required for
video files to play back audio correctly.
Charging
When battery reaches 10%, four beeps
will sound and the LED will turn orange.
If battery reaches 0%, you’ll hear a two
second beep followed by a short beep,
just before the camera shuts down.
To recharge, plug one end of the included
Micro USB cable into the Micro USB port
and the other into either a computer or
into a wall plug (using a wall adaptor).
The camera can be used while charging
with a wall adapter. When plugged into
EN | 15
a computer, the LED will glow bright
green when your Polaroid Cube camera
is fully charged.
Disclaimer: During extended use, your
Polaroid Cube camera may feel warm to the
touch. This is a normal operating occurrence
and does not indicate any product defect or
reason to slow down the fun.
Have questions? Need technical support?
Want to know more? Get in touch at:
[email protected]
www.polaroidcube.com
16 | EN
Que Trouve-t-on Dans la Boîte
Polaroid Cube™
Caméra d’Action HD
Câble Micro USB
Guide d’Utilisation
Garantie
FR | 17
Découvrez Votre Caméra
Polaroid Cube
Vue de Dessus
™
1
4
2
5
3
1. Objectif
2. Microphone
3. Aimant
18 | FR
4. Bouton multifonction
5. DEL
FR | 19
Vue Arrière
Utilisation de Votre Caméra
Polaroid Cube
™
6
7
8
9
6. Couvercle
7. Lecteur de carte Micro SD
8. Bouton 720p/1080p
9. Port Micro USB
20 | FR
Marche
Maintenez le bouton multifonction enfoncé
pendant trois secondes. Vous entendrez
trois bips et la DEL clignotera en vert.
C'est prêt !
Arrêt
Maintenez le bouton multifonction enfoncé
pendant trois secondes. Vous entendrez
un bip de deux secondes suivi d’un bip bref.
L'alimentation est coupée.
FR | 21
Instantanés
Pressez une fois le bouton multifonction.
Vous entendrez un bip et la DEL clignotera
une fois en rouge.
Vidéo
Pressez deux fois le bouton multifonction.
Vous entendrez deux bips et la DEL
clignotera en rouge jusqu’à ce que
vous arrêtiez d’enregistrer. Pour arrêter
l'enregistrement, appuyez de nouveau
sur la touche. Vous entendrez un seul
bip et la DEL clignotera en vert.
22 | FR
Séléctionnez Votre Résolution
Pour capturer vos vidéos, vous pouvez
choisir entre deux formats : 720p ou 1080p.
Le format 1080p permet d'obtenir plus de
détails dans des images à haute résolution,
en revanche leur stockage occupera
davantage de place sur votre appareil et
réduira la durée de vie de votre batterie.
Pour Sélectionner: Avec une pièce de
monnaie ou un autre objet plat, tournez le
couvercle dans le sens inverse des aiguilles
d’une montre pour l’ouvrir. Placez le bouton
720p/1080p sur votre réglage préféré.
Tournez le couvercle dans le sens des
aiguilles d’une montre pour fermer.
FR | 23
Insérez une Carte Mémoire
Votre caméra Polaroid Cube est compatible
avec des cartes micro SD d'une capacité
allant jusqu'à 32GB. Utilisez une pièce ou
un autre objet plat, tournez le couvercle
dans le sens inverse des aiguilles d'une
montre pour ouvrir. Insérez la carte dans
le lecteur et poussez doucement jusqu'à
ce que vous entendiez un clic. Pour retirer
la carte, poussez doucement, relâchez et
la carte sortira.
Remarque : Nous vous conseillons
d'utiliser des cartes SD de classe 10
ou supérieure. Les cartes d'une classe
inférieure à 6 sont de moins bonne qualité
24 | FR
et pourraient ralentir l'enregistrement/
la lecture et poser d'autres problèmes.
Connectez à Votre Ordinateur
Insérez le câble Micro USB fourni dans
le port Micro USB et connectez son autre
extrémité à votre ordinateur. Double-cliquez
la caméra Polaroid Cube lorsqu’elle apparaît
sur le bureau de votre ordinateur. L’indicateur
clignotera en orange pour indiquer que votre
ordinateur accède à la carte-mémoire
de la caméra. Vos photos et vidéos sont
stockées dans le dossier DCIM.
FR | 25
Lancez Votre Programme de Paramètres
a) Utilisateurs de Windows : double-cliquez
sur le fichier PolaroidCube.exe.
b) Utilisateurs de Mac : double-cliquez
sur le fichier PolaroidCube.app.zip, puis
double-cliquez sur l'icône Polaroid Cube.
Dans ce programme, vous pouvez modifier
les paramètres de la fréquence lumineuse,
l'horodatage, l'enregistrement de cycles,
la date et l'heure, et le volume sonore
du buzzer.
Remarque : QuickTime player est
nécessaire pour que l'audio des fichiers
vidéo soit lu correctement.
26 | FR
Chargement
Lorsque la batterie atteindra 10%, vous
entendrez quatre bips et la DEL passera
à l’orange. Si la batterie atteint 0%, vous
entendrez un bip de deux secondes suivi
d’un bip bref, juste avant que la caméra
s'éteigne. Pour recharger, branchez une
extrémité du câble USB Micro fourni sur le
port Micro USB et l’autre sur un ordinateur
ou sur une prise murale (en utilisant un
adaptateur mural). L'appareil peut être utilisé
pendant la recharge avec un adaptateur
secteur. Lorsqu'il est connecté à un
ordinateur, la DEL s’illuminera en vert quand
votre caméra sera totalement chargée.
FR | 27
Clause de Non-Responsabilité :
Lors d'une utilisation prolongée, votre
caméra Polaroid Cube peut paraître chaude
au toucher. Il s'agit d'un phénomène
normal d'utilisation, et cela n'indique en
rien un défaut du produit ni une raison de
mettre un frein à votre divertissement.
Vous avez des questions ? Besoin
d’assistance technique ? Vous voulez
en savoir plus ? Contactez-nous en
écrivant à [email protected]
www.polaroidcube.com
28 | FR
Cosa C’è Nella Confezione
Polaroid Cube™
Action Camera HD
Cavetto USB Micro
Guida per l’Utente
Garanzia
IT | 29
Conoscere il Tuo Polaroid Cube
™
Visione in Piano
1
2
4
3
5
1. Lenti
2. Microfono
3. Magnete
30 | IT
4. Pulsante multifunzione
5. LED
IT | 31
Retrovisione
6
7
8
9
6. Coperchio dei comandi
7. Porta Micro SD
8. Interruttore di cambio 720p/1080p
9. Porta USB Micro
32 | IT
Usare il Tuo Polaroid Cube
™
Accensione
Tieni premuto il pulsante multifunzione
per tre secondi. Sentirai tre bip e il
LED lampeggerà con luce verde. Tutti
impostato!
Spegnimento
Tieni premuto il pulsante multifunzione
per tre secondi. Sentirai un bip di due
secondi, seguito da un singolo bip corto.
L'alimentazione è spenta.
IT | 33
Foto Statiche
Premi il pulsante multifunzione una volta.
Sentirai un bip e il LED lampeggerà con
luce rossa una volta.
Video
Premi due volte il pulsante multifunzione.
Sentirai due bip e il LED lampeggerà
con luce rossa fino a quando fermerai la
registrazione. Per fermare la registrazione,
premi il tasto di nuovo. Sentirai un singolo
bip e il LED lampeggerà con luce verde.
Seleziona la Tua Risoluzione
Hai l'opzione di catturare video a 720p oppure
34 | IT
1080p. 1080p ti dà maggiore dettaglio in
una immagine a più alta risoluzione, ma usa
più spazio sulla tua fotocamera e accorcia
la durata della batteria.
Per Selezionare: Con una moneta o
un altro oggetto piatto, gira in senso
antiorario il coperchio dei comandi per
aprire. Posiziona l’interruttore di cambio
720p/1080p sull’impostazione desiderata.
Per chiudere, gira il coperchio dei comandi
in senso orario.
Inserisci una Scheda di Memoria
La tua fotocamera Polaroid Cube può
ospitare schede micro SD con capacità
IT | 35
di memoria fino a 32GB. Utilizzando una
moneta o un altro oggetto piatto, gira i
controlli del contatore in senso antiorario
per aprire. Inserisci la scheda nello slot
e spingi delicatamente finché non senti
un clic. Ruota il coperchio in senso orario
per chiudere. Per rimuovere una scheda,
spingi delicatamente la scheda, rilasciala
e la scheda scivolerà indietro.
Nota bene: Consigliamo di utilizzare
Schede SD di Classe 10 e superiori.
Le schede di classe inferiori alla Classe 6 sono di qualità minore e possono causare
una più lenta velocità di registrazione/lettura
così come altri problemi imprevisti.
36 | IT
Connessione al Computer
Inserisci il cavo USB Micro in dotazione
nella porta USB Micro e l’altro capo nel
tuo computer. Clicca due volte (doppio
clic) su fotocamera Polaroid Cube quando
apparirà sul desktop del tuo computer.
L’indicatore lampeggerà con luce arancione
per mostrare che il tuo computer sta
accedendo alla scheda di memoria di
fotocamera. Le tue foto e video si trovano
dentro la cartella DCIM.
Lancia le Impostazioni dell'Applicazione
a) Utenti Windows: fai doppio clic sul file
PolaroidCube.exe.
IT | 37
b) Utenti Mac: fai doppio clic sul file
PolaroidCube.app.zip, quindi doppio clic
sull'icona Polaroid Cube.
Nell'applicazione puoi cambiare le
impostazioni per la frequenza della luce,
il marcatore orario, il ciclo di registrazione,
la data e orario e il volume dell'allarme.
Nota bene: Il lettore QuickTime è
richiesto per la corretta riproduzione
dell'audio nei file video.
Ricaricare
Quando la batteria raggiunge il 10% di
carica residua, suoneranno quattro bip
e il LED diventerà di luce arancione.
38 | IT
Se la batteria raggiunge lo 0%, sentirai un
bip di due secondi seguito da un bip corto,
appena prima che la fotocamera si spenga.
Per ricaricarla, inserisci un capo del cavetto
USB Micro nella porta USB Micro e l’altro
nel computer o in una presa a muro
(usando un adattatore). La fotocamera
può essere usata durante la ricarica con
unadattatore a muro. Quando collegata
d un computer, il LED si accenderà di un
verde brillante quando la tua fotocamera
Polaroid Cube sarà completamente carico.
Avvertenza: Durante l'uso esteso,
la tua fotocamera Polaroid Cube potrebbe
IT | 39
Was ist in der Box
riscaldarsi. Questo è un avvenimento
normale e non indica alcun difetto del
prodotto o ragione per diminuire il
divertimento.
Hai domande? Hai bisogno di assistenza
tecnica? Vuoi saperne di più? Contattaci
a [email protected]
www.polaroidcube.com
40 | IT
Polaroid Cube™
HD Action Kamera
Micro USB-Kabel
Anleitung
Garantie
DE | 41
Lernen Sie Ihre Polaroid Cube
Kamera kennen
™
Draufsicht
1
4
2
5
3
1. Objektiv
2. Mikrofon
3. Magnet
42 | DE
4. Multifunktionstaste
5. LED
DE | 43
Rückansicht
Verwendung Ihrer
Polaroid Cube Kamera
™
6
7
8
9
6. Steuerungsabdeckung
7. Micro SD Öffnung
8. 720p/1080p Schalter
9. Micro USB Port
44 | DE
Ein
Halten Sie die Multifunktionstaste drei
Sekunden lang gedrückt. Sie werden drei
Signaltöne hören und die LED blinkt grün.
Fertig!
Aus
Halten Sie die Multifunktionstaste drei
Sekunden lang gedrückt. Sie werden für
zwei Sekunden einen Signalton hören,
gefolgt von einem kurzen einzelnen
DE | 45
Piepton. Die Kamera ist nun ausgeschaltet.
Standfotos
Drücken Sie einmal die Multifunktionstaste. Sie werden ein Klicken hören und
die LED blinkt einmal rot auf.
Video
Drücken Sie zweimal die Multifunktionstaste.
Sie werden zwei Signaltöne hören und
die LED blinkt rot, bis Sie die Aufnahme
beenden. Um die Aufnahme zu beenden,
drücken Sie die Taste nochmals. Sie hören
einen einzelnen Signalton und die LED
pulsiert grün.
46 | DE
Wählen sie die Auflösung
Sie haben die Möglichkeit Videos entweder
mit 720p oder 1080p aufzunehmen. 1080p
sorgt aufgrund einer höheren Bildauflösung
für mehr Details, aber benötigt mehr
Kamera-Speicherplatz und verkürzt die
Akkulaufzeit.
Auswahl: Drehen Sie mit einer Münze
oder einem anderen flachen Gegenstand
die Steuerungsabdeckung gegen den
Uhrzeigersinn auf. Stellen Sie den
Schalter 720p/1080p auf Ihre bevorzugte
Einstellung. Drehen Sie die Abdeckung der
Bedienelemente im Uhrzeigersinn um Sie
zu schließen.
DE | 47
Einlegen der Speicherkarte
In Ihrer Polaroid Cube-Kamera können Sie
Mikro-SD-Karten mit Kapazitäten von bis zu
32 GB verwenden. Zum Öffnen drehen Sie
den Kontrolldeckel mit einer Münze oder
einem anderen flachen Objekt entgegen
dem Uhrzeigersinn. Legen Sie die Karte
in den Öffnung und drücken Sie die Karte
vorsichtig nach unten, bis Sie einen Klick
hören. Zum Schließen den Deckel im
Uhrzeigersinn drehen. Zum Entfernen die
Karte vorsichtig runterdruecken, loslassen
und die Karte gleitet heraus.
Hinweis: Wir empfehlen, SD-Karten der
Klasse 10 und höher zu benutzen. Karten
48 | DE
der Klasse 6 oder niedriger sind von
minderer Qualität und können langsamere
Aufnahme-/Lesegeschwindigkeiten sowie
andere ungewöhnliche Schwierigkeiten
verursachen.
Verbindung mit Ihrem Computer
Stecken Sie das eine Ende des mitgelieferten
Micro-USB-Kabels in den Micro-USBAnschluss Ihrer Kamera und das andere
Ende in Ihren Computer. Klicken Sie
doppelt auf das Polaroid Cube Symbol
sobald es auf dem Desktop erscheint.
Die Anzeige blinkt orange, um anzuzeigen,
dass Ihr Computer auf die Speicherkarte
DE | 49
zugreift. Deine Standfotos und Videos
kannst Du in der DCIM Ablage finden.
Starte Deine Einstellungs App
a) Windows: Klicken Sie zwei mal auf
die PolaroidCube.exe-Datei.
b) Mac: Klicken Sie zwei mal auf die
PolaroidCube.app.zip-Datei und danach
zwei mal auf das Polaroid Cube-Symbol.
In der App kannst Du Einstellungen
für Lichtfrequenz, Zeitstempel,
Aufnahmezyklus, Datum und Zeit sowie
die Lautstärke des Signaltons ändern.
Hinweis: es wird der QuickTime-Player
benötigt, damit Video-Dateien das Audio
50 | DE
korrekt zurückspulen können.
Laden
Wenn der Akku 10% erreicht erklingen vier
Signaltöne und die LED leuchtet orange.
Wenn der Akku 0 % erreicht hören Sie
einen 2 Sekunden langen Signalton, gefolgt
von einem kurzen Signalton, kurz bevor sich
die Kamera ausschaltet. Zum Laden stecken
Sie das eine Ende des mitgelieferten
Micro-USB-Kabels in den Micro-USBAnschluss Ihrer Kamera und das andere Ende
entweder in einen Computer oder in eine
Netzsteckdose (mit Hilfe eines Netzadapters).
Die Kamera kann während des Ladevorgangs
DE | 51
mittels eines Netzadapters benutzt werden.
Wenn Ihre Polaroid Cube Kamera an einen
Computer angeschlossen ist leuchtet die
LED grün auf, sobald der Ladevorgang
abgeschlossen ist.
Haben Sie Fragen? Brauchen Sie
technische Unterstützung? Wollen Sie
mehr erfahren? Nehmen Sie Kontakt
auf mit [email protected]
www.polaroidcube.com
Gegenerklärung: Bei längerem
Gebrauch kann sich Ihre Polaroid Cube
bei Berührung warm anfühlen. Die ist ein
normales Betriebsvorkommnis und ist kein
Produktdefekt oder Grund, sich den Spaß
nehmen zu lassen.
52 | DE
ES | 53
Qué Hay en la Caja
Conoce tu Cámara
Polaroid Cube
™
1
Polaroid Cube™
Cable Micro USB
Cámara de Acción HD
2
3
Manual de Usuario
54 | ES
Garantía
1. Lente
2. Micrófono
3. Imán
ES | 55
Vista Aérea
Vista Posterior
6
7
4
8
9
5
4. Botón multifunción
5. LED
56 | ES
6. Tapa que cubre los controles
7. Ranura Micro SD
8. Interruptor 720p/1080p
9. Puerto Micro USB
ES | 57
Usando tu Cámara
Polaroid Cube
™
Encender
Mantén pulsado el botón multifunción
durante tres segundos. Oirás tres pitidos
y el LED parpadeará con luz verde.
¡Todo preparado!
Apagar
Mantén pulsado el botón multifunción
durante tres segundos. Oirás un pitido de
dos segundos, seguido de un pitido único
y corto. La energía está apagada.
58 | ES
Fotos Inmóviles
Pulsa el botón de multifunción una vez.
Oirás un pitido y el LED parpadeará con
luz roja una vez.
Vídeo
Pulsa dos veces el botón multifunción.
Oirás dos pitidos y el LED parpadeará
con luz roja hasta que dejes de grabar.
Para detener la grabación, pulsa el botón
otra vez. Oirás un solo pitido y el LED
parpadeará con luz verde.
Selecciona tu Resolución
Tienes la opción de capturar vídeo a 720p
ES | 59
o 1080p. 1080p te da más detalle en una
imagen de mayor resolución, pero utiliza
más espacio de almacenamiento en tu
cámara y reduce la duración de la batería.
Para Seleccionar: Usando una moneda
o otro objeto plano, gira la tapa de los
controles en sentido contrario a las agujas
del reloj para abrirla. Ajusta el interruptor
de 720p/1080p a lo que prefieras. Gira la
tapa de los controles en el sentido de las
agujas del reloj para cerrarla.
Inserta la Tarjeta de Memoria
Tu cámara Polaroid Cube admite tarjetas
micro SD con capacidad de almacenamiento
60 | ES
de hasta 32 GB. Con una moneda u otro
objeto plano, gira la cubierta de controles
para abrir la cámara. Inserta la tarjeta en
la ranura y presiona ligeramente hasta
que oigas un "clic". Gira la cubierta hacia la
derecha para cerrar la cámara. Para extraer
la tarjeta, empuja ligeramente la tarjeta,
suéltala y la tarjeta saldrá.
Nota: Sugerimos usar tarjetas SD de Clase
10 o superior. Las tarjeta de Clase 6 o
inferiores son de peor calidad y pueden
ocasionar lentitud en la grabación o lectura,
así como otros problemas imprevistos.
ES | 61
Conectar al Ordenador
Inserta el cable Micro USB en el puerto
Micro USB y el otro extremo a tu
ordenador. Haz doble clic en la cámara
Polaroid Cube cuando aparezca en el
escritorio de tu ordenador. El indicador
parpadeará con luz naranja para mostrar
que tu ordenador está accediendo a la tarjeta
de memoria de la cámara. Sus fotos fijas y
vídeos se encuentran en la carpeta DCIM.
Ejecutar su Aplicación de Ajustes
a) Usuarios de Windows: haz doble clic en
el archivo PolaroidCube.exe.
b) Usuarios de Mac: haz doble clic en el
62 | ES
archivo PolaroidCube.app.zip y luego haz
doble clic en el icono Polaroid Cube.
En la aplicación podrá cambiar los ajustes
de frecuencia de luz, marca de tiempo,
grabación de ciclos, fecha, hora y volumen
de timbre.
Nota: Se necesita el reproductor
QuickTime para que los archivos de vídeo
reproduzcan el sonido correctamente.
Carga
Cuando la batería llegue al 10 %, sonarán
cuatro pitidos y el LED se volverá naranja.
Si la batería llega al 0 %, oirás un pitido de
dos segundos, seguido de un pitido corto,
ES | 63
justo antes de que la cámara se apague.
Para recargar, conecta un extremo del cable
Micro USB incluido al puerto Micro USB
y el otro al ordenador o a un enchufe de
la pared (usando un adaptador de pared).
La cámara puede usarse mientras se carga
con un adaptador de pared. Cuando se
enchufa a un ordenador, el LED brillará
con luz verde cuando tu cámara esté
completamente cargada.
no indica ningún defecto en el producto ni
razón para estropear la diversión.
¿Tienes preguntas? ¿Necesitas asistencia
técnica? ¿Quieres saber más? Contacta con
nosotros en [email protected]
www.polaroidcube.com
Descargo de Responsabilidad: Durante el
uso prolongado, tu cámara Polaroid Cube
puede notarse caliente al tacto. Esta es
una situación de funcionamiento normal y
64 | ES
ES | 65
FCC Statement
This device complies with Part 15 of the FCC Rules.
Operation is subject to the following two conditions:
(1) This device may not cause harmful interference.
(2) This device must accept any interference received,
including interference that may cause undesired operation.
This equipment has been tested and found to comply
with the limits for Class B digital devices, pursuant to Part
15 of the FCC rules. These limits are designed to provide
reasonable protection against harmful interference in a
residential installation. This equipment generates uses and
can radiate radio frequency energy and, if not installed and
used in accordance with the instructions, may cause harmful
interference to radio communications. However, there is
no guarantee that interference will not occur in a particular
installation. If this equipment does cause harmful interference
to radio or television reception, which can be determined
by turning the equipment off and on, the user is encouraged
to try to correct the interference by one or more of the
following measures:
Re-orient or relocate the receiving antenna.
Increase the separation between the equipment and receiver.
Connect the equipment into an outlet on a circuit different from
that to which the receiver is connected.
Consult the dealer or an experienced radio/TV technician for help.
Use of shielded cable is required to comply with Class B limits
in Subpart B of Part 15 of the FCC rules.
Do not make any changes or modifications to the equipment
unless otherwise specified in the manual. If such changes or
modifications should be made, you could be required to stop
operation of the equipment.
Notice: If static electricity or electromagnetism causes data
transfer to discontinue midway (fail), restart the application
or disconnect and connect the communication cable (USB,
etc.) again.
Electronic Waste
PLR IP Holdings, LLC, its licensees and affiliates, fully supports
all electronic waste initiatives. As responsible stewards of
the environment, and to avoid violating established laws, you
should properly dispose of this product in compliance with all
applicable regulations, directives or other governances in the
area where you reside. Please check with local authorities
or the retailer where you purchased this product to determine
a location where you can appropriately dispose of the product.
You may also go to www.polaroid.com and reference Social
Responsibility www.polaroid.com/social-responsibility to learn
more about the specific laws in your area and to locate a
collection facility near your home.
If your electronic device has internal memory on which
personal or other confidential data may be stored, you may
want to perform a data sanitization process before you dispose
of your device to assure another party cannot access your
personal data. Data sanitization varies by the type of product
and its software, and you may want to research the best
sanitization process for your device before disposal. You may
also check with your local recycling facility to determine their
data sanitization procedures during the recycling process.
EN | Polaroid, Polaroid & Pixel, Polaroid Classic Border Logo,
Polaroid Color Spectrum, and Polaroid Cube are trademarks of
PLR IP Holdings, LLC, used under license. All other trademarks
are the property of the respective owner, who has not sponsored,
endorsed or approved this product. PLR IP Holdings, LLC does
not manufacture this product or provide any Manufacturer’s
Warranty or support.
FR | Polaroid, Polaroid & Pixel, Polaroid Classic Border Logo,
Polaroid Color Spectrum et Polaroid Cube sont des marques
de PLR IP Holdings, LLC, utilisées sous licence. PLR IP Holdings,
LLC n’est pas le fabricant de ce produit et n’assure aucune
garantie ni assistance du constructeur.
IT | Polaroid, Polaroid & Pixel, Polaroid Classic Border Logo,
Polaroid Color Spectrum e Polaroid Cube sono marchi registrati
di PLR IP Holdings, LLC, usati dietro concessione di licenza.
PLR IP Holdings, LLC non fabbrica questo prodotto né fornisce
Garanzia o assistenza del produttore.
DE | Polaroid, Polaroid & Pixel, Polaroid Classic Border Logo,
Polaroid Color Spectrum und Polaroid Cube sind Marken von
PLR IP Holdings, LLC und werden unter Lizenz verwendet.
PLR IP Holdings, LLC ist nicht der Hersteller dieses Produkts
und bietet keine Herstellergarantie oder Herstellerunterstützung
für dieses Produkt.
ES | Polaroid, Polaroid & Pixel, Polaroid Classic Border Logo,
Polaroid Color Spectrum y Polaroid Cube son marcas
comerciales de PLR IP Holdings, LLC, usadas bajo licencia.
PLR IP Holdings, LLC no fabrican este producto ni proporcionan
ninguna garantía y servicio del fabricante.
Distributed by: | Distribué par: | Distribuito da: |
Vertrieb: | Distribuido por: C&A Licensing, LLC
2 Bergen Turnpike, Ridgefield Park, NJ 07660, USA
www.polaroid.com
© 2014 All Rights Reserved | Tous droits réservés |
Tutti i diritti riservati | Alle Rechte vorbehalten |
Reservados todos los derechos
Patent Pending