1
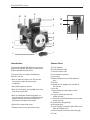
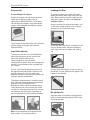
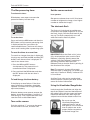
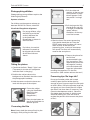
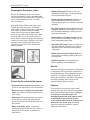
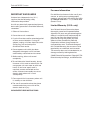
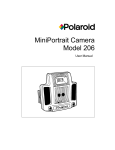
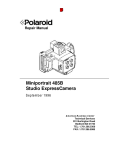
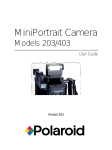
M209 User Guide
1
Polaroid M209 Camera
A
M
N
B
C
O
P
D
E
F
L
Q
G
H
K
J
I
Introduction
Camera Parts
The Polaroid Model 209 Miniportrait camera
produces 2 identical portraits on each sheet
of Polaroid 690 color pack film.
A. Flash reflector
B. Flash reflector knob
C. Electronic flash unit
D. Lens aperture selector
E. Hand grip
F. Battery compartment (inside the hand
grip)
G. Lenses
H. Socket for AC adapter (on the side of
the camera
I. Lens cap
J. Tripod socket (on the bottom of the
camera)
K. X (sync) socket (on the side
of the camera)
L. LCD Panel with Reset button (on the side
of the camera)
M. Viewfinder / Rangefinder
N. Shutter button
O. Flash “Ready“ indicator light (LED on the
back of the flash unit)
P. Camera on/off switch (on the hand grip)
Q. Timer
The camera has a number of additional
features such as:
• Built-in electronic flash unit. The camera
can also be used with other types
of lighting.
• Adjustable aperture control
• Built-in LCD display and audible alarm that
tells when to pull film
• Built-in Viewfinder reference graphic, to
ensure that the camera is positioned at the
proper distance to produce sharp focus
and correct passport size images.
• Digital film processing timer.
• Protective lens cover with tether strap.
2
Polaroid M209 Camera
Accessories
Loading the film
Universal Digital AC adapter:
To unlock and open the camera film door,
rotate the camera door latch away from the
door. Before loading the film, check that the
developer rollers are clean (see Clean the
developer rollers).
Enables the camera to use electrical power
rather than batteries in high volume
applications. IMPORTANT the use of other
non-Polaroid AC adapters may damage the
camera. (PID # 649424) 100-240 volt supply.
Accessories are available from your Polaroid
camera dealer, or contact your nearest
Polaroid Office.
Load the batteries
Always hold the film pack by the edges, not
in the center. Slide the pack in at an angle,
and then push it down into place.
Check that the white tabs are straight, all the
way out of the holder. Close and latch the
door, with the end of the black tab sticking
out.
The camera uses four 1.5 volt AA batteries,
which provide power for the shutter and
flash unit. Alkaline batteries are
recommended. Do not use Nicad
rechargeable batteries; they may damage the
camera. A set of batteries are included with
the camera.
A fresh set of alkaline batteries should last
for approximately 80 flashes. The flash unit
should recharge in 10-12 sec with fresh
batteries; when the recharge time reaches 30
seconds, replace the batteries.
The battery compartment is inside the hand
grip. Open the lid on the bottom of the hand
grip and insert the batteries in the
orientation shown inside the compartment.
Then close the lid. If the camera will not be
used for an extended period of time, remove
the batteries and store them separately to
prevent damage caused by leaking batteries.
Pull the black tab straight, all the way out of
the holder. A small white tab will appear. The
holder is now loaded.
No white tab?
Open the door and without moving the film
pack, push the top white tab out. Then close
and latch the door.
Note: An AC adapter may be preferred for
high volume use (see Accessories).
3
Polaroid M209 Camera
The film processing timer
Set the camera controls
To activate the timer:
Lens aperture:
Slide battery cover open to remove the
protective battery insulator strip.
Set aperture selector lever to 16. (Use lower
number to brighten the image, use a higher
number to darken the image.)
The electronic flash
+
To set the timer:
The flash unit is designed to provide even
illumination and proper exposure. To turn on
the flash, simply raise the flash head all the
way up. The flash automatically turns off
when the head is tilted fully down.
Press and hold the MIN button and then the
SEC button until the correct processing time
is displayed (see film instructions for
recommended times). The timer will always
return to this setting after a processing cycle.
To reset the timer to a new time:
To reset it to a longer time than is displayed,
simply press and hold the MIN and then SEC
buttons until the new time is displayed. To
reset it to a shorter time:
1. Press the MIN and SEC buttons
simultaneously. The present time is
cancelled and zero is displayed.
2. Press and hold the MIN button and then
the SEC button until the new time is
displayed.
To load/change the timer battery:
If the display or tone fade, or if the timer
stops functioning, the battery should be
replaced. The timer uses a single LR44 (or
equivalent) battery.
Slide the battery cover open to remove the
battery. Insert the new battery “positive” (+)
side facing up. Then, replace the cover and
reset the timer as described above.
Turn on the camera
Push the switch to “I” to turn on the power
for the camera’s shutter, and flash unit.
IMPORTANT: When the flash unit is in the
fully raised position make sure the Flash
Reflector is pointing directly toward the
subject. If the flash reflector is pointing in
the wrong direction rotate the Flash
Reflector Knob so that the flash is pointing in
the direction of the subject.
Note: The camera’s shutter will not work
while the flash is recharging. The shutter will
work only if the flash “Ready” indicator LED
is illuminated.
Auxiliary flash units can be synchronized
with the camera. Contact your local service
center for further information.
Using the Viewfinder/Rangefinder
Look through the Viewfinder and align the
top of the subject’s head and the bottom of
the subject’s chin with the upper and lower
horizontal reference lines, then align the
subject’s nose with the dotted vertical line.
Be sure to use the
Viewfinder/Rangefinder
reference lines to “set up“
each portrait. This will ensure
that all subjects are at the
proper distance to produce
the desired image size.
4
Polaroid M209 Camera
Photographing children
Photographing young children requires the
following adjustments.
Aperture selection:
For children set the aperture selector to
between f22-f32. For infants, select f32.
Viewfinder/Rangefinder alignment:
For young children, align
the child’s eye with the
vertical reference line
in the Viewfinder/
Rangefinder as shown in
the illustration.
For infants, the vertical
reference line needs to
be aligned with the side
of the infant’s face as
shown.
Taking the picture
1. Check that the flash “Ready” light is on.
(The camera’s shutter will not operate
while the flash is charging.)
2. Position the subject close to the
background so that their shoulders touch
the photographic backdrop.
3. Hold the camera so that the lenses are
level with the eyes of the subject.
4. Frame the subject
using the Viewfinder.
(See Using the
Viewfinder /
Rangefinder.)
5. Press shutter button on
top of the Viewfinder to
take the picture.
Processing the film
Note: Always hold the camera firmly by the
handgrip, while pulling the film tabs.
1. Pull the white tab
straight, all the way out
of the camera. A large
tab will appear. If not,
see section “no large
tab”.
2. Pull the large tab: Grip
the tab firmly and pull
it straight, at moderate
speed, without
hesitation, all the way
out of the camera.
3. Start the timer. The correct processing
time should already be set. Press the
START button once; the timer will count
down to zero. At the end of the
processing time, a series of short tones
will sound. The timer will automatically
reset for the next picture.
4. Process the picture for
the full time
recommended in the
film instructions. Then
separate the print from
the negative, starting
at the end nearest the
large tab. Information
handling the negatives is in the film
instructions. (See caution notice at the end.)
Processing tips: No large tab?
Do not pull another white tab. Instead
carefully open the film holder door far
enough to get a finger on top of the film pack
to hold it down. Grasp the topmost large tab,
and gently pull it out and discard it. Inspect
the rollers and clean them if necessary. (see
Clean the development rollers). Close the
film holder door and latch it, with the next
white tab sticking out. (You will have to
reshoot the portraits that were on that piece
of film.)
5
Polaroid M209 Camera
Cleaning the Developer rollers
Dirt on the Developer rollers can cause a
variety of problems such as repeated spots
on the pictures and jammed film. Inspect the
rollers when loading the film, and clean
them as follows.
With both hands, lift the steel hoops, and
remove the roller assembly. Clean both
rollers with a soft, lint free cloth, dampened
with water. Or hold the roller assembly
under clean running water. Rotate both
rollers as you clean and inspect them. Note
that one roller turns more easily than the
other. Never scrape the rollers with anything
metallic, nor with your fingernail, and never
attempt to disassemble the rollers. Also
clean the film tab slot. Then reinstall the
roller assembly.
• Muddy looking print: The print was not
processed long enough. Under-processed
film may be brownish pink.
• Image slightly overexposed: Subject may
have leaned forward when picture was
taken or higher aperture number should be
selected.
• Very light image or none at all: The film was
fogged or extremely over-exposed. Do not
pull the black tab before inserting the film
pack into the holder.
• Nearly black or solid black image: Caused
by insufficient or no exposure. Be sure you
have removed the dark slide.
• Extremely dark image: Check to make sure
the flash reflector is aimed at the subject.
(Rotate the flash reflector control knob if
necessary.)
• Broad streak or curtain shaped mark: Due
to hesitation or stopping while pulling out
the large tab.
• Double exposure: Film not processed
before shooting next photograph.
Service
Picture faults and probable causes
• Repeated evenly spaced spots or lines: Due
to dirt on the steel rollers in the film holder.
• Missing corners or orange-red marks along
edges: Caused by pulling the large tab out
at an angle.
• Oblong print: The white tab was not pulled
all the way out. When the large tab was
pulled, that white tab was pulled back into
the camera.
• Many small white specks: Caused by
pulling the large tab too fast. This can also
cause pink lines, streaks or blotches on
color prints.
Cameras damaged by accident, mishandling
or tampering will be promptly repaired at a
reasonable charge. Please pack the camera
carefully in its original shipping carton or
other solid container, with plenty of padding
and ship it prepaid and insured to the
nearest Polaroid Service Center.
Caution
This process uses a caustic paste. Avoid
contact with skin, eyes and mouth and keep
away from children and animals. If you get
some paste on your skin, wipe it off
immediately and wash with water to avoid
an alkali burn. If eye or mouth contact
occurs, quickly wash the area with plenty of
water and see a doctor. Keep discarded
materials away from children, animals,
clothing and furniture.
6
Polaroid M209 Camera
For more information
IMPORTANT SAFEGUARDS
Underwriters Laboratories Inc. (U.L.)
requires that the following safety
information be provided
As with any electrically operated equipment,
basic safety precautions should be observed,
remember:
1. Follow all instructions.
2. Do not leave unit unattended.
3. If unit will not be used for extended period
of time, remove batteries: if using AC
adapter, unplug unit from electrical outlet.
Grasp plug, not cord and pull to
disconnect from outlet.
4. Do not operate unit which has been
dropped or damaged until it has been
examined by authorized service center.
5. Before storing, allow unit to cool
completely.
6. To avoid electrical shock hazards, do not
immerse unit in water or other fluids. Do
not operate unit near water or with wet
hands. If service or repair work is
required, contact authorized service
center. Incorrect reassembly can cause
electric shock when unit is used
subsequently.
7. Close supervision is necessary when unit
is used by or near children.
8. The use of accessories other than those
recommended may cause risk of fire,
electric shock or injury.
PLEASE KEEP THESE INSTRUCTIONS.
For additional assistance in the use of your
camera, or advice on any photographic
problem, call toll-free from within the U.S.A.
at 1-800-225-1618. Mon. – Fri., 8 AM to 8PM
(Eastern Time).
Limited Warranty (U.S.A. only)
Your Polaroid Instant Camera has been
thoroughly tested and inspected before
shipment. All parts are guaranteed against
defects in materials and workmanship for
one full year from the date of original
purchase. During this period any such
defects will be remedied by Polaroid
Corporation without charge except for
transportation costs. To take advantage of
this Limited Warranty, the camera must be
repaired by an authorized service center.
The warranty does not include batteries, or
damage caused by leaking batteries.
©2005 Polaroid Corporation. Polaroid®; TM:
Polaroid and pixel design, and MiniPortrait.
©2005 Polaroid Corporation. Polaroid®;
TM: Polaroid and pixel design, and MiniPortrait