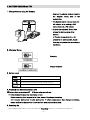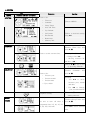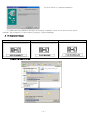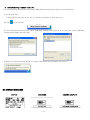
1
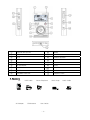
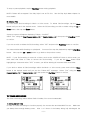
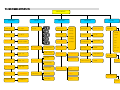
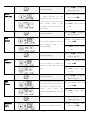
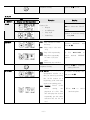
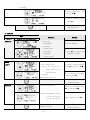
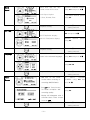
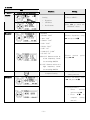
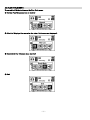
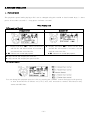
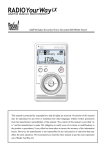
AM/FM Radio Recorder/Voice Recorder/MP3, WMA Player
This manual is protected by copyright laws and all rights are reserved. No portion of this manual
may be reproduced in any form or translated into other languages without written permission
from the manufacturer and publisher of this manual. The content of this manual is provided “as
is” and the manufacturer is under NO obligation to notify users of revisions or modifications to
the product or procedures. Every effort has been taken to ensure the accuracy of the information
herein. However, the manufacturer is not responsible for any inaccuracies or omissions that may
affect the units operation. We recommend you read the entire manual to get the most enjoyment
out of your new Radio YourWay LX.
TABLE OF CONTENTS
I. COMPONENT and LCD DISPLAY
1. SET
2. Accessories
3. LCD Display
II. BATTERY CHARGE and USE
1. Charge battery using AC Adapter
2. Charging Status
3. Battery Level
4. Battery Life
5. Powering on
III. MEMORY CARD and RESET
1. Memory Card
2. Maximum Recording Time
3. Precautions
4. Inserting a memory Card
5. Reset Unit
IV. RADIO YOURWAY LX MODES
1. Music mode
2. Voice mode
3. AM mode
4. FM mode
V. RECORDING, PLAYBACK, and DELETING
1. AM and FM
2. Record and Playback Voice
3. Deleting Files
VI. TIMER-RECORDING
1. Setting Current Time
2. Setting Current Date
3. Setting a Timer-Recording
4. Reviewing a Timer-Recording
5. Deleting a Timer-Recording
-1-
VII. BASIC BUTTON OPERATIONS
VIII. MAIN MENU STRUCTURE
1. System
2. Play
3. Recording
4. Display
5. Sound
IX. PLAY STYLE MENU
X. FURTHER OPERATION
1. Playback Speed
2. AM/FM Radio
3. Formatting
4. Complete Format
XI. COMPUTER CONNECTION
1. Win XP, 2000, ME, and Mac OSX+
2. Driver Installation for Win98SE
3. PC Connection Display
4. Safely Removing Hardware from a PC
XII. DISPLAY MESSAGES
General Specification
Warranty
I. COMPONENT and LCD DISPLAY
1. SET
-2-
①
Internal Microphone
⑩
MENU
②
LED
⑪
SPEED
③
LCD
⑫
External Speaker
④
REC
⑬
USB/POWER Terminal
⑤
ERASE
⑭
Volume +/-
⑥
A↔B/Repeat
⑮
HOLD
⑦
MODE
RESET
⑧
TIMER
LINE IN
⑨
SD/MMC Card Slot
Earphone Jack
2. Accessory
Set
AC Adapter
USB Cable
FM Antenna
Stereo Earphone
User Guide
-3-
Neck Strap
Audio Cable
3. LCD Display
▣ POWER ON
▣ POWER OFF
▣ AM Display
① : Radio band
② : Memory( Internal/External)
③ : Month(Calendar)
④ : Date(Calendar)
⑤ : Battery Level
⑥ : Day(Calendar)
⑦ : Preset Frequency NO
⑧ : Frequency
⑨ : Present Time
⑩ : Remaining memory status
▣ FM Display
① : Radio band
② : Memory( Internal/External)
③ : Month(Calendar)
④ : Date(Calendar)
⑤ : Battery Level
⑥ : Day(Calendar)
⑦ : Preset Frequency NO
⑧ : Frequency
⑨ : Present Time
⑩ : Remaining memory status
▣ MUSIC Initial Display
-4-
① : MUSIC Mode
② : Memory( Internal/External)
③ : Month(Calendar)
④ : Date(Calendar)
⑤ : Battery Level
⑥ : Day(Calendar)
⑦ : Navigation (Music list up)
▣ MUSIC Playback Display
① : Music band
② : Memory( Internal/External)
③ : Recording bit rate
④ : Sound effect
⑤ : Repeat
⑥ : Battery level
⑦ : Playing music NO/Total music No
⑧ : Playing time
⑨ : Play Status
⑩ : Music File Information
⑪ : Present time
⑫ : L/R Sound Level
▣ VOICE Initial Display
① : VOICE Mode
② : Memory( Internal/External)
③ : Month(Calendar)
④ : Date(Calendar)
⑤ : Battery Level
⑥ : Day(Calendar)
⑦ : Navigation
-5-
II. BATTERY CHARGE and USE
1. Charge battery using AC Adapter
- Connect the adaptor jack as shown in
the diagram;
taking note of the
correct side.
- The battery can be charged using the
AC adaptor, or by making a USB
connection with a PC or MAC.
- It takes approximately 4hrs to fully
charge the battery using either
method.
☞ The 4hr charge time (for a full
charge) is an estimate only. Actual
time may vary depending on charging
conditions.
2. Charging Status
Charging
Charge Complete
3. Battery Level
Full charge
Some power consumed
Power almost drained, should charge battery
No power, charge battery
4. Playback and Recording Battery Life
LX battery lasts an average of 7 – 10 hours under normal use.
☞ Actual battery life may vary depending on use.
Before recording for a long period of time, please fully charge the battery.
A Li-polymer battery has its own battery life. If battery consumption has changed drastically,
please replace the battery with a new one from www.pogoproducts.com
5. Powering On
After charging the battery, press and hold the Play/Stop button for 3 seconds to power on.
-6-
III. MEMORY CARD and RESET
1. Memory Card
1) Memory Card Type: SD/MMC Card
2) Compatible Capacity: 32MB/64MB/128MB/256MB/512MB/1GB
☞ An external memory card is not provided. You can buy one from just about any electronics
store in your area.
* Radio YourWay LX only supports STANDARD SD cards. High-Speed cards will NOT work.
2. Maximum Recording Time
128MB: 85hrs at 32Kbps
256MB: 17hrs at 32Kbps
512MB: 34hrs at 32Kbps
1GB: 68hrs at 32Kbps
3. Precaution
1) Do not take the memory card out while the unit is playing back or recording a file.
2) When using a new memory card, format the card inside the unit BEFORE using it.
3) If the memory card has been used in any device, (Digital Camera, MP3 Player, etc) you must
format the
card in Radio YourWay LX before use. Memory cards must be formatted
in FAT.
4) We do not recommend using a memory card in multiple devices.
5) Only insert or remove card when unit is powered off.
4. Inserting a Memory Card
☞ When inserting a memory card in the unit, be careful and insert the card properly as shown in
the diagram (taking note of the correct side up) or you may damage the card and/or Ext card
slot.
Press the A/B – Repeat button to switch from Internal to External memory, or vice-versa.
-7-
5. Reset
If the unit is not responding, please reset by pushing the Reset button (found on the right side of
the unit) gently with a thin object for 1 second.
IV. RADIO YOURWAY LX MODES
* Display for Modes
Music Mode
Voice Mode
AM Mode
FM
Mode
① Music mode
All recordings done manually (see Chapter V for more details) will be found in the Music mode.
By
default, the Radio YourWay LX organizes the recordings by creating specific folders.
For example, an AM folder will be created under the Root when an AM recording is made. All further
AM recordings will be stored in that folder.
Music mode will also store MP3’s and WMA files that you download from a computer.
NOTE: Folders will not appear if the Play Style is set to File List. See the Play Style Menu chapter for
more details.
② Voice mode
NOTE: For more on Timer-Recordings, please refer to Chapter VI – Timer-Recording.
All recordings made by the Timer-Recording feature will be found in Voice mode. When a TimerRecording is made, a Schedule folder will appear underneath Root.
Folders will not appear if the Play Style is set to File List.
details.
③ AM mode
You can listen to AM radio in AM mode.
④ FM mode
-8-
See the Play Style Menu chapter for more
You can listen to FM radio in FM mode.
V. RECORDING, PLAYBACK, and DELETING
1. AM and FM
Switch to the desired mode by tapping the Mode button. Once you are in the desired mode (AM or
FM), tune in to the station you would like to record by pressing the Fast Forward button (>>) or Rewind
button (<<). To scan for stations, press and hold the Fast Forward button (>>) or Rewind button (<<)
for 3 seconds.
Once you have tuned into your desired station, press the REC button to begin recording. To pause
the recording, simply tap the REC button.
PAUSE will display on the screen.
Tap the REC button
again to resume recording. The recording light will be solid red while recording.
To stop the recording, tap the Play/Stop button.
To playback the recording, tap the Mode button until you are in Music mode. Select the AM or FM
folder using the Up or Down button, then press the Play/Stop button to access it. Once you are in the
folder, select your recording using the Up or Down button.
Press the Play/Stop button to begin
playback.
To stop or pause playback, tap the Play/Stop button during playback.
NOTE: To go back to the root of the LX, tap the Play/Stop button during playback to stop the playback.
Tap the Up or Down button to go to the previous screen. Next, tap the Rewind button (<<) until you
are at the root. Use this method to access files located in other folders.
NOTE: Folders will not appear if the Play Style is set to File List. See the “Play Style” section in the
Main Menu chapter for more details.
2. Record and Playback Voice
Switch to Music or Voice mode by tapping the Mode button. Once you are in Music or Voice mode,
tap the REC button to begin recording. To pause the recording, simply tap the REC button. PAUSE
will display on the screen.
Tap the REC button again to resume recording.
The recording light will be
solid red while recording.
To stop the recording, tap the Play/Stop button. You will automatically be taken into the MIC folder
(where all voice recordings will be stored) in Music mode.
To playback the recording, select the file using the Up or Down button. Press the Play/Stop button to
begin playback.
-9-
To stop or pause playback, tap the Play/Stop button during playback.
NOTE: Folders will not appear if the Play Style is set to File List.
See the Play Style Menu chapter for
more details.
3. Deleting Files
You can delete files/recordings in Music or Voice mode.
To delete files/recordings, tap the Mode
button until you are in the desired mode. Select the file/recording you wish to delete using the Up or
Down button, then tap the Erase button.
A pop-up screen will appear displaying “Delete – Yes/NO?”
Select “Yes” using the Fast Forward button (>>) or Rewind button (<<), then press the Play/Stop button
to confirm.
If you do not wish to delete the file/recording, select “NO” and press the Play/Stop button to confirm.
You cannot delete while listening to a playback. You must first stop the playback by tapping Play/Stop
button. Next, tap the Up or Down button to go back to the previous screen.
NOTE: If your file/recording is stored in a folder, such as the SCHEDULE folder in Voice mode, you
must enter that folder in order to access the file/recording.
If you tap the Erase button while
highlighting a folder and select “YES” to erase, you will be deleting all contents within that folder.
If you wish to delete all files/recordings within the Music or Voice mode, press and hold the Erase
button in the desired mode until you see the “Delete All?” message.
Select “Yes” using the Fast
Forward button (>>) or Rewind button (<<), then press the Play/Stop button to confirm.
VI. TIMER RECORDING
The Timer-Recording feature allows Radio YourWay LX to record unattended.
1. Setting Current Time
In order for Timer Recordings to function properly, the current time and date MUST be set.
Make sure
you always have enough battery power. After 1 or 2 hours of the battery being fully discharged, the
- 10 -
year/day/hour settings will not be able to stay current.
Tap the Menu button to go into the Menu System.
With Time Set highlighted, tap the Play/Stop button.
You will now see the Time Set screen, just like the example picture.
To change the Hour/Minutes, use the Up or Down button. To move between the Hour and Minute
fields, use the Fast Forward button (>>) or Rewind button (<<).
Push the Play/Stop button to confirm
when you are finished.
2. Setting Current Date
Tap the Menu button to go into the Menu System. Highlight Calendar using the Up or Down button, the
press the Play/Stop button to enter.
To change the Year, Month, or Day, use the Fast Forward button (>>) or Rewind button (<<). To move
between the Year, Month, or Day fields, use the Up or Down button. Push the Play/Stop button to
confirm when you are finished.
Once you have set the current date and time, press the Menu button to exit Menu System.
3. Setting a Timer-Recording
Tap the Timer button in Music, Voice, AM, or FM mode. A pop-up will appear displaying “Set” and
“Review.”
Select “Set” using the Fast Forward button (>>) or Rewind button (<<), then press the Play/Stop button.
- 11 -
NOTE: You cannot set a timer recording when the unit is playing back a file, recording, or in the Menu
mode.
Once you are in the Schedule Set screen, use the Up or Down button to move through the fields. Use
the Fast Forward button (>>) or Rewind button (<<) to change the field setting.
A.
The first field is SCHEDULE SET. Select a schedule using the Fast Forward button (>>) or Rewind
button (<<).
There are 20 scheduling sets available.
B. The next field is TYPE. Use the Fast Forward button (>>) or Rewind button (<<) to select RECORD,
PLAY, or DELETE.
RECORD – Record on a set time and date. (Timer Recording)
PLAY – Play music or radio on a set time and date.
(Alarm Function)
DELETE – Select this to delete the schedule made.
C. The next field is MEMORY. Select the memory you wish to record on or play from (INTERNAL or
SD CARD) using the Fast Forward button (>>) or Rewind button (<<). Note that you may only select
SD CARD if you have an external memory card inserted.
D.
The next field is DATE SET.
You may set the schedule to work on a weekly basis or on a specific
date. Use the Fast Forward button (>>) or Rewind button (<<) to select WEEK or DATE.
E. The next field is WEEK if the previous field is set to WEEK. You may select EVERY DAY, MON –
SAT, MON – FRI, or individual days of the week. Use the Fast Forward button (>>) or Rewind button
(<<) to select the days.
Note that this field will be DATE if the previous field is set to DATE.
With the Month highlighted, use
the Fast Forward button (>>) or Rewind button (<<) to select the desired month to record. Next, press
the Down button to switch to the day. Use the Fast Forward button (>>) or Rewind button (<<) to
select the desired day to record.
To go back to the month, press the Up button.
To move to the next field, press the Down button.
F. The next field is SOURCE. You may select from which source you would like to record from (AM,
FM, MIC, or LINE-IN) using the Fast Forward button (>>) or Rewind button (<<).
Note that MUSIC, AM, or FM will be the only choices if the TYPE field is set to PLAY.
- 12 -
If you set the source to MUSIC, you must select a file to play.
Press the Down button to highlight the
folder underneath SOURCE. Select the desired folder that contains your file using the Fast Forward
button (>>) or Rewind button (<<). If you do not have any folders stored in Radio YourWay LX, then
Root will be the default folder selected.
Once you have selected the folder, press the Down button to highlight the file. Select your desired file
to play using the Fast Forward button (>>) or Rewind button (<<).
To go back to the folder or Source selection, press the Up button.
To move to the next field, press
the Down button.
G. The next field is PRESET. You may select a preset radio station using the Fast Forward button
(>>) or Rewind button (<<).
This field is unavailable if the SOURCE field is set to MIC or LINE-IN.
This field is also unavailable if the TYPE field is set to PLAY, with SOURCE set to MUSIC.
H. The next field is FREQ.
You may select a radio station using the Fast Forward button (>>) or
Rewind button (<<).
This field is unavailable if the SOURCE field is set to MIC or LINE-IN.
This field is also unavailable if the TYPE field is set to PLAY, with SOURCE set to MUSIC.
I.
The next field is BITRATE. Bit-rate determines the quality of the recording. The higher the bit-
rate, the higher the quality will be. Please note that higher bit-rates will reduce the overall amount of
recording time.
Select the desired bit-rate using the Fast Forward button (>>) or Rewind button (<<). Recommended
bit-rates when recording voice or talk shows are 32KBPS and 64KBPS.
Recommended bit-rates
when recording music are 128KBPS and above.
This field is unavailable if the TYPE field is set to PLAY.
J.
The next field is START.
Set the hour you wish to start the automatic recorder using the Fast
Forward button (>>) or Rewind button (<<).
You can change AM to PM, or vice-versa, by continuously
tapping the Fast Forward button (>>) or Rewind button (<<).
Once you have set the starting hour, tap the Down button to select the starting MINUTES. Use the
Fast Forward button (>>) or Rewind button (<<) to set the starting minutes.
You can go back to the starting hour by tapping the Up button.
- 13 -
K. The next field is END. Set the hour you wish to end the automatic recorder using the Fast Forward
button (>>) or Rewind button (<<). You can change AM to PM, or vice-versa, by continuously tapping
the Fast Forward button (>>) or Rewind button (<<).
Once you have set the ending hour, tap the Down button to select the ending MINUTES. Use the Fast
Forward button (>>) or Rewind button (<<) to set the ending minutes.
You can go back to the ending hour by tapping the Up button.
Once you’ve set the ending time, tap the Play/Stop button. A pop-up showing “DATA SAVE?
YES /
NO” will appear.
Select “YES” using the Fast Forward button (>>) or Rewind button (<<), then tap the Play/Stop button
to confirm.
The recording light will blink during a Timer-Recording session.
If you try to save the schedule without entering an ending time, you’ll get an error message “NOT
USED END TIME.”
If you try to create another schedule with overlapping times and/or dates, you’ll get an error message
“OVERLAP SCHEDULE.”
To exit the Schedule Screen without saving, tap the Erase button to bring up the Exit screen. Select
“YES” using the Fast Forward button (>>) or Rewind button (<<), then tap the Play/Stop button to exit
4. Reviewing a Timer-Recording
To review Timer-Recordings you’ve made, tap the Timer button in Music, Voice, AM, or FM mode. A
pop-up will appear displaying “Set” and “Review.”
Select “Review” using the Fast Forward button (>>) or Rewind button (<<), then press the Play/Stop
button.
Once you are in the Schedule Review screen, use the Up or Down button to view the fields.
The first field, Schedule REVIEW, will display the Schedule number out of how many schedules you’ve
made. For example, Schedule REVIEW 3/6 indicates that you are reviewing Schedule #3, out of six
schedules made.
- 14 -
Tap the Erase button to exit Schedule Review screen.
5. Deleting a Timer-Recording
Tap the Timer button in Music, Voice, AM, or FM mode. A pop-up will appear displaying “Set” and
“Review.”
Select “Set” using the Fast Forward button (>>) or Rewind button (<<), then press the Play/Stop button.
Use the Up or Down button to highlight the TYPE field.
Use the Fast Forward button (>>) or Rewind
button (<<) to select DELETE.
Tap the Play/Stop button. A pop-up showing “DATA SAVE? YES / NO” will appear.
.
Select “YES” using the Fast Forward button (>>) or Rewind button (<<), then tap the Play/Stop button
to confirm.
The schedule is now deleted.
VII. BASIC BUTTON OPERATIONS
☞ Please study the chart below “━” means holding the specified key for 1second and
means holding the specified key for 2-3seconds. Please make a note of this.
Key
Power On/Off
Hold
Function
Power On: Hold
button for 2-3 seconds.
Power Off: Hold
button for 2-3 seconds.
Hold Off.
- 15 -
“━━”
Hold On. Will disable button use.
Power ON/OFF
━━ : Power On/Off.
MUSIC/VOICE Mode
━: Select/Play back file and stop/Pause a file.
During a recording and paused recording.
━: Stop recording.
Playback
Selecting a folder in file display mode.
and
Stop
━: Select Directory/File.
Play style/Main Menu
━: Confirm the menu selection.
Timer-Recorder (Timer Reservation)
━: Save the Timer-Recording.
During a timer recording.
━: Stop the timer recording.
MUSIC/VOICE Mode
① In selecting file
━: Scroll up through available files.
━━: Scroll up through available files faster.
② During Play back
━: Skip to the beginning of the current file.
━━: Scroll through available files.
FILE UP
③ Player Stopped
━: Select a different file/directory or option.
AM/FM Mode
━: Search for a preset station
Play style/Main Menu/ Timer-Recording
━: Move up to another directory/option/item
Key
Function
MUSIC/VOICE Mode
① Selecting a file.
━: Scroll through available files.
━━: Scroll through available files faster.
FILE DOWN
② During Play back
━: Skip to the beginning of the next file.
━━: Scroll through available files.
③ Player Stopped
━: Return to previous directory.
AM/FM Mode
- 16 -
━: Search for a preset station.
Play style/Main Menu/ Timer-Recording
━: Move up to another directory/option/item.
MUSIC/VOICE Mode
① During Play back
━: 10 Seconds a second fast forward.
━━: 1 minute a second fast forward.
② Player Stopped
━: 10 Seconds a second fast forward.
━━: 1 minute a second fast forward.
FF
③ Selecting Folder in file display mode
━: Return to previous directory.
AM/FM Mode
━: Tuning to Next (higher frequency) Station.
━━: Search through stations.
Play style/Main Menu/ Timer-Recording
━: Move up to another directory/option/item.
MUSIC/VOICE Mode
① During Play back
━: 10 Seconds a second rewind.
━━: 1 minute a second rewind.
② Selecting a Folder in file display mode
REW
━: Return to previous directory.
AM/FM Mode
━: Tuning to previous (lower frequency) Station.
━━: Search through stations.
Play style/Main Menu/ Timer-Recorder (Reservation)
━: Move up to another directory/option/item.
Key
Function
━: Display Main Menu
MENU
Setup System/Play/Record/Display/Sound options.
NOTE: Pressing menu in the Display Main Menu will
exit the Display Main Menu.
MUSIC/VOICE Mode
① During Playback
SPEED
━: Change Playback speed.
Each Press will change playback speed as
follows:
X1.3spd, X1.5spd, X0.5spd, X0.7spd
━━: Change EQ
- 17 -
② Selecting a file
━: Bookmark
☞ Only applicable for MP3 files.
MUSIC/VOICE Mode
① Selecting a file
━: Erase the selected file or folder.
━━: Erase all files and folders
ERASE
Main Menu
━: Escape from the main menu.
Timer Recording
━: Exit Timer-Recording.
MUSIC/VOICE Mode
① Player Stopped (Except in Display Main Menu)
━: Select Internal or External Memory.
A↔B/Repeat
② During Playback
━: Select “A-B Repeat” or “One touch Repeat”
━━: Change File Repeat Option.
━: MUSIC,VOICE,AM,FM Mode Selection.
Mode
MUSIC/VOICE Mode
━━: Select the play style.
Volume Up and Down
━: Increase/decrease the Volume.
Volume
━━: Increase/decrease the Volume faster.
Key
TIMER
Function
━: Display Timer Recording SET/REVIEW.
MUSIC/VOICE Mode
① In file selection
REC
━:Record through internal or external Microphone.
AM/FM Mode
━: Record AM/FM Radio.
② Recording
- 18 -
━: Pause recording.
--: Setting Quick Timer Recording (0, 15min, 30min,
45min, OFF)
③ Paused
━: Restart recording.
④ Timer-Recording
━: Pause Timer-Recording.
⑤ During a paused Timer-Recording
━: Restart Timer-Recording.
LED LAMP
LED LAMP
During a recording the LED will light up red.
Internal
Highly
sensitive
Microphone
recording.
internal
microphone
used
- If the unit does not respond to any button presses,
insert a thin object into the reset hole and gently
push. After the reset, the unit will operate normally
RESET
and no settings are lost.
- Do not use a sharp object to reset the unit.
- 19 -
for
VIII. MAIN MENU STRUCTURE
MAIN MENU
SYSTEM
Time Set
PLAY
Hr / Min
RECORD
Repeat
AM record
SOUND
DISPLAY
32Kbps
Back light
Off,01~30,con
Equalizer
64Kbps
Calendar
FM record
Y/M/D
normal
96Kbps
Contrast
01~10
classic
128Kbps
rock
192Kbps
Sleep Timer
LINE-In Rec
Off,15~120min
256Kbps
Scroll Speed
jazz
Slow/n/fast
pop
live
AutoOff Time
Off,1,3,5,min
A-B Rep. Set
A-B BUTTON
MIC Recprd
ID3 Tag
On/off
low-cut
hi-cut
ONE TOUCH
Sys. Default
YES
NO
Line-in/Mic
Mic/Ext-Mic
Language
English/Korea
3D Effect
File list
Mic/Line-In
Int. Format
YES
NO
Play Style
Tuner Screen
On/Off
On/Off
Normal style
Ext. Format
Band Area
YES
NO
Book mark
USA,EUROPE
Index Play
Index set
Auto Sync
OFF
ONCE
Def. Volume
Index play
Memory Info
Total/fr/ver
AUTO
10~25
1. SYSTEM
Key
MENU
SYSTEM
Function
Display and Key operation
Setting
Used to Set:
-
Time set
-
Calendar
-
Sleep Timer
-
Auto Off Time
-
Sys Default
-
Int Format
②Move to desired setting
-
Ext Format
using ▲▼
-
Band Area
-
Memory Info.
TIME SET
①Press “MENU”
③Select “Time Set” and
press ▶/■
Used to set the current time.
④Setting Hour/Minute
- Change time: ▲▼
- Moving between Hr
and Min:〈◀▶〉
⑤Press ▶/■ to set or exit
by pressing “ERASE”.
CALENDAR
③Select
Used to Set:
-
Present year
-
Present month
-
Present date
“Calendar”
and
press ▶/■
④Setting
-
Use
▲▼
to
move
between year, month
☞ Up to 2099
and date.
- Use ◀▶ to Change
year, month and date
Complete Setting
SLEEP
TIMER
⑤Press ▶/■ to complete
setting and exit.
③Select “Sleep Timer” and
Set unit to turn off after a
press ▶/■
designated time (15, 30, 45, 60,
75, 90, 105, 120 min)
④Use◀▶to select desired
time.
⑤Press ▶/■ to complete
Complete Setting
setting and exit.
AUTO
Unit will turn off when there are
OFF Time
no
button
presses
for
the
specified amount of time. (1, 3,
③Select “Auto Off Time”
and press ▶/■
5 Min). Auto off doesn’t work
when
playing
back
a
file,
recording, or when receiving a
④Use◀▶to select desired
time.
radio station
⑤Press ▶/■ to complete
Complete Setting
setting and exit.
SYS
Default
③Select “SYS Default” and
Use System Default to restore
Menu
settings
back
to
press ▶/■
its
factory settings.
④Use◀▶to select “YES”
or “NO”
⑤Press ▶/■ to complete
Complete Setting
setting and exit.
INT
FORMAT
③Select “Int format” and
Use Int Format to format the
press ▶/■
internal memory and erase all
files.
④Use◀▶to select “YES”
or “NO”
⑤Press ▶/■ to complete
Complete Setting
setting and exit.
EXT
Use Ext Format to format an
Format
external memory card and erase
all its files. You must format a
memory
card
(using
this
method) BEFORE using it in the
unit.
Complete Setting
③ Select “Ext format” and
press ▶/■
④Use◀▶to select “YES”
or “NO”
⑤Press ▶/■ to complete
setting and exit.
③Select
MEMORY
INFO
Used to see available memory.
- 15 -
“Memory
and press ▶/■
info”
Complete Setting
⑤Press ▶/■ to exit
2. PLAY
Key
MENU
PLAY
Function
Display and Key operation
Setting
①Press “MENU” and use
Used to Set
◀▶ to select the “PLAY”
-
Repeat
-
A↔B/Repeat
-
Play style
-
Index Play
REPEAT
menu.
②Move to desired setting
using ▲▼
:Play all files in order
“REPEAT”
③Select
and stop.
and
press ▶/■
:Play only 1 file and
stop.
:Play 1 file repeatedly.
④
Use
:Play files repeatedly
select
in order. (5,4,3,2,1
Option.
▲▼and◀▶
desired
to
REPEAT
etc)
:Randomly play all files.
⑤Press ▶/■ to complete
Complete Setting
A↔B/Rep
setting and exit.
A↔B Button: Repeatedly play a
designated section of a
file you select by pressing
③ Select “A↔B/Rep Set”
and press ▶/■
the (A-B) button at a
beginning point and then
again at an ending point
ONE
TOUCH:
Press
(A-B)
button
during
the
playback of a file. The
unit will play the section
repeatedly per the value
selected (02, 04, 08, 16
sec)
- 16 -
④Use
▲▼
to
desired option.
select
⑤ If using ONE TOUCH
option, select desired time
(02, 04, 08 and 16 sec) by
using ◀▶
⑥Press ▶/■ to complete
Complete Setting
setting and exit
PLAY
STYLE
③ Select “Play Style” and
Use to set playback settings
-
File List
-
Normal Style
-
Book-Mark List
press ▶/■
④Use▲▼ to select desired
option and press ▶/■
“FILE LIST” will show all files
regardless of directory.
In this mode, select the
“NORMAL
STYLE”
(Directory
View) view folders and/or files.
desired folder by pressing
▶.
Go back to previous
folder by pressing ◀
“BOOK MARK” will only show
bookmark files, max 10.
: In any
play
style
mode,
select
a
desired file to BOOKMARK &
the file will now be marked by a
Use the “SPEED” button to
star icon (shown above). If you
bookmark, or
press “SPEED” when a file has a
bookmark.
release a
star icon, it will release the
bookmark and change the star
icon back to a music icon. To
see and listen to your bookmark
files, select BOOK-MARK LIST
from the PLAY STYLE menu.
INDEX
Used to select a starting point
③While listening to a file,
PLAY
that a file will begin playback
select “INDEX PLAY”
from.
and press ▶/■
- 17 -
④ Press ◀▶ to set index
and press ▶/■
An index file plays from the
selected point of the file.
Only
one
point
per
You can play index file by
selecting “Index Play”
file
and pressing ▶/■
is
applicable and if another file is
indexed, the previous index is
released.
Index file can be played by
pressing ▲▼ to select “Index
Play” and pressing ▶/■
3. RECORDING
☞ Precaution before recording
Please make sure of the following before recording:
-
Select the internal or external memory.
-
Check the amount of available memory.
-
Select a bit rate.
-
Check the battery life.
We recommend using the default bit-rates.
Key
MENU
Function
Display and Key operation
Setting
Memory
Type
: Internal Memory
: External memory
Select Int memory or Ext
memory by pressing the A-
If you press “A-B/REPEAT”
B/REPEAT button in AM,
without a memory card in the
FM,
external
mode.
memory
slot,
the
error “NOT INSERTED CARD”
will appear.
- 18 -
MUSIC
or
VOICE
The memory remain icon is only
displayed in AM/FM Mode.
RECORD
Same procedure is used to set:
-
AM Record
-
FM Record
-
Line In Rec
-
Mic Record
-
Line-In/Mic
-
Auto Sync
Press “MODE” to select AM
or FM in order to view how
much memory remains.
①Press “MENU” and use
◀▶
to
select
the
“RECORD” menu.
②Select “AM, FM, Line-in
or Mic Record” using
▲▼
SELECTING
The higher the bit rate the
BIT RATE
better quality the recording will
③Press ▶/■
be. However, the recording will
use more memory space. Before
recording, Please make sure
you
have
enough
memory
④Select desired “bit rate”
using ▲▼◀▶
available.
Complete Setting
Setting
LINE-In/Mic
☞ When connecting the unit to
an external device (lapel mic
⑤Press ▶/■ to complete
setting and exit.
①Select “line-In/Mic” and
press ▶/■
etc), the unit must be off.
NOTE: MIC/Line-In option is
used
for
LINE-IN/MIC-IN
②Use▲▼ to select desired
option and press ▶/■
recording.
Recording
AM/FM
Radio
- Recording format: MP3
During a recording (“REC”)
-
RED LED is ON
-
MP3 File automatically
created.
- 19 -
② Press “ REC” button to
record.
③ Press” REC” button to
-
Record up to 999 files.
-
A file recorded from AM
Radio, will be saved in
the AM Folder. A file
Pause.
④ Press “▶/■” to Stop
recording.
recorded from FM radio,
will be saved in the FM
folder.
☞ To view folders, make sure
you
set
“PLAY
STYLE”
to
NORMAL under the PLAY MENU
Recording by External Microphone/Line-in
When trying to record using the External Mic/Line-in, make sure an external microphone and/or Line in
cable is securely connected to the LINE/MIC jack (External Input Terminal) and make sure you set “Mic/ExtMic to MIC/Line-In” under the RECORD MENU.
☞ If an external microphone (lapel Mic etc) is connected, the internal microphone will not work.
Recording thru Ext Device
Connect one end of the Line-in cable to the
headphone/line-out jack of your external device
and the other end to the LINE/MIC jack of the
set.
☞ When recording from an external device, adjust
the volume of the source to avoid distorting the
recording.
AUTO SYNC
AUTO SYNC REC: This separates a line-in recording into files by detecting the end of a file and creating a
new file automatically while continuing or stopping the recording. You have 3 options:
① AUTO SYNC “OFF”
The file from the external device is recorded as one file only Simply press RECORD to
start the recording and PLAY to stop it.
② AUTO SYNC “ONCE”
Only ONE file from the external device will be recorded Simply press RECORD and once
the unit detects the end of the file, it will stop recording.
③ AUTO SYNC “AUTO”
This separates the recording into individual files (one by one) by detecting the end of a
file and creating new files until all the files from the external device are recorded. Simply
press RECORD and once the unit detects that all files have been recorded, it will stop
- 20 -
recording.
④ Select “Auto Sync” and
press ▶/■
⑤ Select desired option
using ▲▼
Complete Setting
Press ▶/■ to complete
setting and exit.
4. DISPLAY
Key
MENU
DISPLAY
Function
Display and Key operation
Setting
Use to set
- Back Light
① Press “MENU”
- Contrast
- Scroll Speed
- ID3 TAG
- Language
② Use ◀▶ to select the
“DISPLAY” menu.
- Tuner Screen
BACK
LIGHT
Select Backlight on time
- OFF : Always off
③ Select “BACK LIGHT”
- 01, 03, 05, 10, 20, 30 :
using ▲▼ and press ▶/■
Back Light on per
selected time
- Continue:
Back Light always on.
Complete Setting
④ Set desired backlight
time by using◀▶
Press ▶/■ to complete
setting and exit.
Contrast
Adjust LCD Contrast
③Select CONTRAST using
▲▼ and press ▶/■
Contrast
Brightness Level
01, 02, 03, 04, 05,
06, 07, 08, 09, 10
Complete Setting
- 21 -
④Set Contrast using◀▶
Press ▶/■ to complete
setting and exit.
Scroll
Select how fast file info
③Select “SCROLL SPEED”
Speed
scrolls on the LCD screen.
using ▲▼ and press ▶/■
Scroll Speed Option:
- Slow, Normal, Fast
Complete Setting
ID3 TAG
Display file information.
④ Select desired option
using◀▶
Press ▶/■ to complete
setting and exit
③ Select “ID3 TAG” using
▲▼ and press ▶/■
ON: Title/Artist display.
Off: No Title/Artist display.
④Select
option
desired
using◀▶
Complete Setting
Language
Press ▶/■ to complete
setting and exit
“LANGUAGE”
Display information on the LCD
③
screen in the selected language.
using ▲▼ and press ▶/■
Select
④Select
desired
option
using▲▼◀▶
Complete Setting
Press ▶/■ to complete
setting and exit.
Tuner
Screen
- Will turn off the Tuner
③
Select
“TUNER
Screen when receiving or
SCREEN” using ▲▼ and
recording AM/FM Radio.
press ▶/■
- Turn OFF the Tuner Screen
for better reception and
④Select desired option
using◀▶
recording quality.
- Display will disappear after 5
seconds when Tuner Screen
is set to OFF.
Complete Setting
Press ▶/■ to complete
setting and exit
- 22 -
5. SOUND
Key
MENU
Function
Display and Key operation
Setting
SOUND
Setting
Equalizer
-
Equalizer
-
3D Effect
-
Def Volume
① Press “MENU”
②Use ◀▶ to select the
“DISPLAY” menu.
8 Equalizer
- Normal: “NOR”
③Select “Equalizer” using
- Jazz: “JAZ”
▲▼ and press ▶/■
- Classic: “CLA”
- POP: “POP”
- ROCK: “ROC”
- LIVE: “LIV”
- LOW-CUT: “LOW”
- Hi-CUT: “HI”
LOW-CUT: Remove noise at
a low frequency. Good
④Select
desired
option
using▲▼◀▶
for recording AM/FM
Hi-CUT: Remove noise at a
high frequency. Good
for recording AM/FM
Complete Setting
Press ▶/■ to complete
setting and exit.
③Select “3d Effect” using
3D Effect
▲▼ and press ▶/■
④ Setting3D Effect
-
Select
desired
option using◀▶
-
Press
complete
and exit.
- 23 -
▶/■
to
setting
⑤
3D
Icon
will
be
displayed.
Def Volume
“Def
Set the default volume you want
③Select
Volume”
the unit to use.
using ▲▼ and press ▶/■
Def volume options:
10,11,12,13,14,15,16,17,
④Select
18,19,20,21,21,22,23,24,25
using◀▶
Complete Setting
- 24 -
desired
option
Press ▶/■ to complete
setting and exit.
IX. PLAY STYLE MENU
Press and hold Mode to bring up the Play Style menu.
① Normal Play (Organizes files in folders)
② File List (Displays files one after the other. Folders are not displayed)
③ Book Mark Play (Displays your play list)
④ Exit
- 25 -
X. FURTHER OPERATION
1. Playback Speed
The playback speed (while playing a file) can be changed using the rewind or fast forward keys. (- short
press; 10 seconds a second) (- - long press; 1 minute a second)
While Playing back
1) Forward and Rewind
Forward (▶>)
▶〉: Display will show
Rewind(<◀)
(- Short) on the LCD
〈◀: Display will show
(- short) on the LCD
and the file will fast-forward 10 seconds a
and the file will rewind 10 seconds a second
second until the end of the file.
until the end of the file.
▶/■ : Return to a normal play speed.
▶/■ : Return to a normal play speed .
▼: Skip current file and play the next file.
▲: Skip current file and play the previous file.
2) Playback Speed
You can change the playback speed of a file by pressing the “SPEED” button. Each press will speed up
or slow down the file as follows: x1.3, x1.5, x0.5, x0.7 and back to normal. This function only
works with MP3 files.
- 26 -
2. AM/FM Radio
1) FM Radio Reception
① Stereo Earphone
② External Antenna
Stereo earphone acts as the antenna for the
Plug in the provided Ext Antenna into the phones
FM radio.
jack; in order to listen to FM broadcasts using
the speaker.
2) AM Radio Reception
The AM antenna is embedded in the unit. You are not required to plug in an external antenna in
order to listen to AM radio. Please avoid placing the unit near electrical devices such as a computer,
an iron structure building, a TV, or in a closed environment as this can interfere with your ability to get
good reception. Place the unit near a window to get the best reception.
☞ If you set “TUNER SCREEN OFF” in the DISPLAY MENU, reception will be better.
Noise from LCD operation is decreased by turning the LCD off.
When the tuner screen is set off, pressing any button will allow you to view the display.
Auto Seek: If you press and hold <◀ or ▶> about 1 second, the unit will attempt to find an audible
broadcast channel. This will save you time in an unfamiliar area. After finding a station,
Auto Seek will stop. When using Auto Seek to find a station, precise TUNING may not be
available, in that case please perform a fine adjustment using the REW or FF key.
Preset: User can save (preset) up to 10 desired radio stations for quick access:
① Select a desired station to preset.
② Press “▶/■”, and “Preset” will display and flicker on the LCD screen.
③ Select a desired preset No (1-10) using ▲▼ and save the preset by pressing ▶/■
Note: If you take too long (4 seconds) to confirm (i.e. push a button during the process) you
will have to start all over again.
☞ Selecting a preset radio station
To quickly select a preset station press ▲▼ when in AM/FM mode.
- 27 -
To go back to normal tuning, use ◀▶
3. Formatting memory
①Press “MENU”
②Move to desired setting (INT/EXT Format) using ▲▼
③Select “Int Format” and press ▶/■
④Use◀▶to select “YES”
⑤Press ▶/■ to complete setting and exit.
③ Select “Ext Format” and press ▶/■ to format card
④Use◀▶to select “YES” or “NO”
☞ All files are lost when performing a format.
4. Complete Format
If you wish to return the Radio YourWay LX back to its factory settings, you may perform a complete format.
1. With the Radio YourWay LX powered on, enable the Hold switch on the side
2. Press and hold the Erase button for 10 seconds, then gently press the Reset button
3. Keep holding Erase until you see “Format Please Wait” on the display
4. Release Erase, disable the Hold switch
Restart the LX
XI. COMPUTER CONNECTION
1 Win XP, 2000, ME, and Mac OSX +
You can connect the unit to a computer using the provided USB cable.
No special application is required unless you use Win98SE.
- 28 -
When you connect the unit to a USB port, it will be recognized as a “Removable Disk” in Win XP, 2000, ME.
Mac users will see it as a nameless drive.
2 Install Driver for Win98SE
① Connect device to USB port
② Click “Unknown Device” window
- 29 -
③ Check ‘Search for the best driver for your device’
and click ‘next’
④ Check ‘Specify a location’
⑤ Insert Driver CD inside your computer’s CDROM
⑥ Click “Next” button
⑦ Click your CDROM drive (D: in most cases) and click
“OK”
⑧ Click ‘Next”
- 30 -
⑨ Click ‘Finish’ to complete installation
☞ To make sure the installation has been successfully completed, check for the device in the device
manager: [My Computer]-[Control Panel]-[System]-[Device Manager]
3. PC Connection Display
“USB CONNECT”
z
“FILE UPLOAD”
Transfer File From PC to Set
- 31 -
“FILE DOWNLOAD”
4. Safely Removing Hardware from a PC
You are required to safely remove this device BEFORE disconnecting the device from the USB port.
① Close open files
If there are any open files in the unit, you should close them to avoid any errors.
②Click (
), in the tool bar:
③ The following window will show, select USB Mass Storage Device and click ok. After that, select USB Mass
Storage device again and click stop.
④ When you get the message below, it is safe to disconnect the USB cable from the PC.
XII. DISPLAY MESSAGES
NO FILE
CHARGING
- 32 -
CHARGE COMPLETE
CHARGE NEEDED
CONNECTING USB TO PC
UPLOADING FILE TO PC
DOWNLOADING FILE TO SET
BOOKMARK ADDED
BOOKMARK FAILED
DELETE COMPLETE
NO TIMER RECORDING
INITALIZING
SEARCHING FILE
MEMORY IS FULL
INDEX IS FULL
NO MEMORY CARD FOUND
CAN’T READ SD-CARD
NOT ENOUGH MEMORY SPACE
OVERLAPPING SCHEDULE
NEED SETTING TIME
NO BOOKMARK
FAILED INITALIZING
FAILED to DELETE FILE
FAILED UPGRADING
- 33 -
NO INDEX
END TIME NOT SET
General Specification
MODEL
RECORD TIME
128MB: 510Min / 512MB: 2040Min at 32Kbps
MODE
MP3 FORMAT
FILE
VOICE : 999pcs
FM Record
AM Record
Timer Record
VOICE
RadioYourWay LX
MP3
Stereo (87.5MHz~108MHz)
530 ~ 1710KHz
Date / Week
Mic
Built-in Mic / Line (External Mic)
Record Device
Built-in Flash Memory / EXT (MMC/ SD CARD )
S/N
45db (62dB input 1KHz, speaker output 200mW)75KHz
Distortion
3%±0.2 (62dB input 1KHz , speaker output 100mW )
Freq, Response
400Hz~32KHz (-6dB)
Output Power
Max 8mW (stereo earphone 16ohm)
Repeat play
One message repeat / Continue message repeat / A-B repeat / Random
Timer Record
20 Timer Recording Slots
S/N
45dB at 1mV 98.1MHz
Distortion
0.8%(max) at 1mv 98.1MHz ∆f=22.5KHz
FM
Freq, Response
350Hz±30Hz, 3KHz±25KHz (150Hz~25KHz,60dBuV)
RADIO
Sensitivity
5uV at S/N=26dB
(stereo)
Frequency
RECORD/
PLAY
87.5 ~ 108MHz
Cover range
Preset Mode
10 Radio station
AM
S/N
35dB
RADIO
Distortion
3%
- 34 -
Freq, Response
150Hz – 15KHz at 0dB
Sensitivity
68dbuV at 1KHz
Frequency
530 ~ 1710KHz
Cover range
Preset Mode
10 Radio station
Bit/rate
32Kbps~256Kbps (MPEG 1/2 LAYER 3)
S/N
85dB up (1KHz input 0dB)
Distortion
0.3%±0.05 (1KHz input 0dB)
Freq, Response
20Hz~20KHz
Earphone
Max 8mW (16ohm)
EQ
EQ : NORMAL, ROCK, POP, CLASSIC, LIVE, JAZZ, Low-Cut, Hi-Cut
Repeat play
NOR/ NOR1/ 1ALL/ ALL/Random
Sound
3D Sound
communication
USB 1.1
System
CPU: more than 200MHz , RAM: more than 64MB
OS
Windows98SE , Windows2000 , Windows ME , Windows XP, MAC OS 9.2 & later, OS X
Sound card
Sound Blaster 16 compatible
Display
more than 640X480
Ext mic/line in
∮3.5 plug-in power microphone(mini plug / stereo) IMP less than 3KΩ
IN/OUT
Earphone
∮3.5 earphone(mini plug / stereo) IMP less than 16Ω
JACK
DC JACK
Mini B Type
USB
Mini B type (PC : A TYPE)
Diameter
∮16(IMP 8Ω)
Max output
200mW (volume max)
MP3
PC
interface
SPEAKER
VOLUME
Digital volume (30 step)
MEMORY
Nand Flash Memory
LED
Recording display LED (RED)
MODE
Messages
VOICE/AM/FM/MP3
01~999(INDEX)
LCD
EQ
NORMAL, ROCK, POP, CLASSIC, LIVE, JAZZ, Low-Cut, Hi-Cut
Repeat
NOR/ NOR1/ 1ALL/ ALL/Random
CLOCK
CLOCK
(FSTN)
ADAPTOR
DC5V / 500mA(cUL)
FF/ PLAY/ STOP/ REW/ FSEARCH/ RSEARCH/ REC/ REPEAT/
KEY FUNCTION
MODE/ ERASE/ EQ/ A-B/ TIMER/ VOL+/ VOL-/HOLD/SPEED
POWER requirement
RECHARGEABLE Li-polymer
3.7V/1000mA
Battery
MP3 PLAY
Approx 15hour during the mp3 play (earphone output: volume middle position)
life
VOICE PLAY
Approx 15hour during the voice play (earphone output: volume middle position)
RADIO RECIEVING
Approx 15hour during the radio play (earphone output: volume middle position)
- 35 -
RADIO/VOICE REC
Approx 9hour during the radio play (earphone output: volume middle position)
Operating Temp
0℃ - +40℃
Line in cable(1)/ Win 98SE Driver CD (1)/
Accessory
Neck strap (1)/ stereo earphone (1) / FM EXT ANT (1)/
AC/DC adapter(1) / USB cable (1)/ manual (1)
SIZE
2.36” (W) X 3.93” (H) X 0.78” (D)
Warranty
● If any defect or error occurs, stop using the product and contact PoGo! Products, Inc.
General Directory Number: (714) 671-1854
● Warranty (Warranty Regulation)
PoGo! Products will guarantee a repair or service for a period of one year from the original date of purchase.
If
any
defect
or
error
occurs
during
the
warranty
period,
please
contact
us
directly
at
[email protected].
A dated order/receipt is REQUIRED for all warranty claims. Ensure the above information is provided and if it
not, consult with the shop you purchased the unit from to obtain it
(Repair or Service)
A. This product is manufactured under a strict quality control and inspection process
B. If any defect or error occurs under normal operation, in accordance with the caution or notes in this
manual during the warranty period, you are entitled to a repair or exchange from our company
C. The repair/service does NOT include shipping charges
● There will be a charge for the following:
1) Without a dated purchase order/receipt
2) If the original date of purchase is passed the warranty period or the dated purchase order/receipt
- 36 -
is modified in any way
3) For any defect or damage resulting from misuse, abnormal use, abnormal condition, improper
storage and/or exposure to direct sunlight or moisture
4) For any defect or damage resulting from any unauthorized modification or repair
5) For any defect or damage resulting from disasters such as fire, air pollution, earthquake or war
6) For any defect or damage resulting from a leak of the battery
7) Consumable item such as the battery
● The warranty is only valid for service in the USA.
(CAUTION: When Shipping The Product For Warranty Service)
● If you need to ship the product for warranty service, please do the following:
1. Contact us at [email protected] for a return authorization number.
2. Enclose the original dated purchase order/receipt with the product during the warranty period
3. Avoid damage to the product during shipping/transportation using proper packing materials
4. Use registered and/or insured mail to prevent a loss
● The customer shall bear all costs of shipping the product properly.
● If any defect occurs during the use of this product, contact the shop you purchased or PoGo! Products, Inc.
● Replacement, repairs, or refunds must be in accordance with our policy and can be found at:
http://www.pogoproducts.com/support.html
● If you have any further questions about this product, please contact PoGo! Products, Inc.
- 37 -
PoGo! Products Inc
590 W Central Ave Suite E
Brea, CA 92821
Phone: 714-671-1854
The warranty may only be used in the USA. Please keep your dated purchase order/receipt safely as it is
required for any warranty service.
- 38 -