1
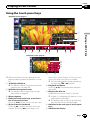
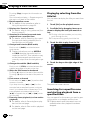
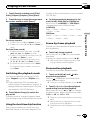
Upgrade Instructions and
Operation Manual Addendum
2011 NAVIGATION UPGRADE microSDHC-CARD
CNSD-210FM
This software upgrade will result in changes to certain
features and availability of information. While the
changes are intended to improve the overall user
experience for most users, Pioneer and its licensors
disclaim any warranty or liability for damages in
connection with such changes.
English
2
Engb
Engb
3
4
Engb
Engb
5
6
Engb
Contents
Thank you for buying this Pioneer product.
Please read through these operating instructions so you will know how to operate
your model properly.
Important
! The screens shown in the examples may
differ from actual screens.
! Actual screens may be changed without
notice for performance and function improvements.
Precaution
In case of trouble 8
Visit our website 8
“microSD card” 8
Models to be upgraded 8
Manual overview 9
– Unchanged functions on the upgraded
programme 9
Setting items to be deleted and initialised by
upgrade 9
Functions disabled by upgrade (for AVICF10BT) 9
Functions disabled by upgrade (for AVICF20BT and CNSD-110FM) 10
Conventions used in this manual 10
Licence agreement
PIONEER CNSD-210FM 11
TERMS AND CONDITIONS FOR THE TELE
ATLAS DATA 13
– End User Licensing Terms 13
About the database
About the data for the map database 18
Instructions for upgrading
The navigation system upgrade process 19
Preparation for upgrade 19
– Checking the device number 19
– Getting the password for
authentication 19
Upgrade procedures 20
– Upgrading the software programme
and the map database 20
– Checking whether the upgrade was
done properly 21
– Updating the Bluetooth wireless
technology software (for AVICF10BT) 21
– Updating the Bluetooth wireless
technology software (for AVIC-F20BT
and CNSD-110FM) 23
Changes on the upgraded programme
For customers using AVIC-F10BT 25
– Eco-friendly driving functions 25
– Displaying tick marks on the “Overlay
POI (Main Category)” screen 25
– Interruption icon status 25
– Setting the illumination colour 25
– Searching for a name by entering
characters 25
– AV functions 25
For customers using AVIC-F20BT or CNSD110FM 25
– Searching for a name by entering
characters 25
Playing a DVD-VR disc
Starting procedure 26
Reading the screen 26
Using the touch panel keys 27
– Playing by selecting from the title
list 28
– Searching for a specific scene and
starting playback from a specified
time 28
– Switching the playback mode 29
– Using the short-time skip function 29
– Frame-by-frame playback 29
– Slow motion playback 29
– Using the equaliser 30
Using advanced functions 31
Troubleshooting
Problems in the procedures for updating 32
Messages in the procedures for
updating 32
Engb
7
Chapter
01
Precaution
! Read the entire manual before upgrading
the programme of your navigation system.
! This package is unique, and cannot be installed on more than one unit.
! Web-connected computer is required for
online issuance of password.
In case of trouble
! Should the navigation system fail to operate properly, contact your dealer or nearest
authorised Pioneer Service Station.
! Do not lose the supplied Media Number
Card (MEDIA NUMBER CARD). If the
Media Number Card is lost, reissue of the
Media Number (MEDIA NUMBER) is not
possible. Also you must submit the Media
Number Card when repairs are needed.
The card is necessary as proof of authenticity if service is required (including recovery).
Visit our website
Visit us at the following site:
http://www.pioneer.eu
! Register your product. We will keep the details of your purchase on file to help you
refer to this information in the event of an
insurance claim such as loss or theft.
! We offer the latest information about
PIONEER CORPORATION on our
website.
“microSD card”
The microSD card and microSDHC card are
collectively referred to as the “microSD card”.
p Keep the microSD card out of the reach of
small children to prevent them from accidentally swallowing it.
p Do not store the microSD card in high temperatures or direct sunlight.
8
Engb
p Do not subject the microSD card to shock
or impact.
p Do not allow the microSD card to come
into contact with liquids. Damage to the
microSD card and your products could result from contact with liquids.
p Be careful not to touch terminals on the
microSD card. Doing so may cause connection failures. If any terminals are dirty,
wipe them with a clean dry cloth.
p microSD Logo is a trademark of SD-3C,
LLC.
p microSDHC Logo is a trademark of SD-3C,
LLC.
Models to be upgraded
This package can upgrade the software programme and database of the following models:
! AVIC-F10BT
! AVIC-F20BT
! CNSD-110FM
p In this manual, CNSD-110FM indicates the
navigation system that is upgraded from
AVIC-F10BT using the software upgrade
CNSD-110FM.
Chapter
Precaution
This manual describes how to get the password and activate the upgrade. It also provides
an overview of how functions change after the
upgrade.
By upgrading AVIC-F10BT, AVIC-F20BT or
CNSD-110FM with this product, functions and
operations will be nearly equivalent to AVICF930BT. Therefore, obtain Operation Manual
for AVIC-F930BT and use it as your primary reference.
http://www.pioneer.eu
Unchanged functions on the
upgraded programme
Even if you upgrade AVIC-F10BT, AVIC-F20BT
or CNSD-110FM with this product, the following functions do not become the same as
AVIC-F930BT.
Therefore, refer to Operation Manual included
in the package of your navigation system for
operation procedures.
! Using the equaliser
! Setting the simulated sound stage
! Switching the auto aerial setting (for AVICF10BT and CNSD-110FM)
! Changing the voice output of the navigation guidance (for AVIC-F10BT and CNSD110FM)
Even if you upgrade AVIC-F10BT, AVIC-F20BT
or CNSD-110FM with this product, the following functions are unavailable.
! Displaying your DivX VOD deregistration
code
! Using sonic centre control
! Adjusting the equaliser curve automatically
(Auto EQ)
Setting items to be deleted
and initialised by upgrade
The following data and settings will be cleared
and reset to default values. Other items will be
retained. However, some items are not listed
because the setting can be easily recovered by
users, such as the last cursor position on the
map screen.
Precaution
Manual overview
01
Route setting
! Current route
! Learning route data
Map function
Setting of “Overlay POI”
The user data stored in the internal memory of
the unit may be erased if an unexpected error
occurs during software installation. Pioneer is
not responsible for any data loss or unavailability of user data.
Functions disabled by
upgrade (for AVIC-F10BT)
Upgrading disables the following functions.
Displaying power voltage
“Power Voltage” on the “Status” screen will
no longer appear.
Searching for a name by entering
multiple keywords
The function of searching by entering multiple
keywords will be unavailable.
When you enter characters, the system will
automatically search the database for all possible options. Only the characters you enter
are active.
Displaying the “AV Source” menu
The “AV Source” menu to select the audio and
visual source will no longer appear.
Engb
9
Chapter
01
Precaution
Functions disabled by
upgrade (for AVIC-F20BT
and CNSD-110FM)
p In this manual, CNSD-110FM indicates the
navigation system that is upgraded from
AVIC-F10BT using the software upgrade
CNSD-110FM.
Upgrading disables the following functions.
Searching for a name by entering
multiple keywords
The function of searching by entering multiple
keywords will be unavailable.
When you enter characters, the system will
automatically search the database for all possible options. Only the characters you enter
are active.
Conventions used in this
manual
Before moving on, take a few minutes to read
the following information about the conventions used in this manual. Familiarity with
these conventions will help you greatly as you
learn how to use your new equipment.
! Buttons on your navigation system are described in ALL CAPITAL, BOLD lettering:
e.g.)
Press the MODE button or the HOME button.
! Menu items, screen titles, and functional
components are described in bold with
double quotation marks “ ”:
e.g.)
The “System Settings” screen appears.
! Touch panel keys that are available on the
screen are described in bold in brackets [ ]:
e.g.)
Touch [Settings].
! Extra information, alternatives and other
notes are presented in the following format:
e.g.)
10
Engb
p If the home location has not been stored
yet, set the location first.
! Functions of other keys on the same screen
are indicated with # at the beginning of the
description:
e.g.)
# If you touch [OK], the entry is deleted.
! References are indicated like this:
e.g.)
= For details of the operation, refer to
Checking the device number on page
19.
Chapter
Licence agreement
PIONEER CNSD-210FM
1 GRANT OF LICENCE
Pioneer grants to you a non-transferable, nonexclusive licence to use the software installed
on the Pioneer products (the “Software”) and
the related documentation solely for your own
personal use or for internal use by your business, only on such Pioneer products.
You shall not copy, reverse engineer, translate,
port, modify or make derivative works of the
Software. You shall not loan, rent, disclose,
publish, sell, assign, lease, sublicence, market
or otherwise transfer the Software or use it in
any manner not expressly authorised by this
agreement. You shall not derive or attempt to
derive the source code or structure of all or
any portion of the Software by reverse engineering, disassembly, decompilation, or any
other means. You shall not use the Software to
operate a service bureau or for any other use
involving the processing of data for other persons or entities.
Pioneer and its licensor(s) shall retain all copyright, trade secret, patent and other proprietary ownership rights in the Software. The
Software is copyrighted and may not be copied, even if modified or merged with other products. You shall not alter or remove any
copyright notice or proprietary legend contained in or on the Software.
You may transfer all of your licence rights in
the Software, the related documentation and a
copy of this Licence Agreement to another
party, provided that the party reads and agrees
to accept the terms and conditions of this Licence Agreement.
Licence agreement
THIS IS A LEGAL AGREEMENT BETWEEN
YOU, AS THE END USER, AND PIONEER
CORP. (JAPAN) (“PIONEER”). PLEASE READ
THE TERMS AND CONDITIONS OF THIS
AGREEMENT CAREFULLY BEFORE USING
THE SOFTWARE INSTALLED ON THE
PIONEER PRODUCTS. BY USING THE SOFTWARE INSTALLED ON THE PIONEER PRODUCTS, YOU AGREE TO BE BOUND BY THE
TERMS OF THIS AGREEMENT. THE SOFTWARE INCLUDES A DATABASE LICENCED BY
THIRD PARTY SUPPLIER(S) (“SUPPLIERS”),
AND YOUR USE OF THE DATABASE IS COVERED BY THE SUPPLIERS’ SEPARATE
TERMS, WHICH ARE ATTACHED TO THIS
AGREEMENT (refer to page 13). IF YOU DO
NOT AGREE WITH ALL OF THESE TERMS,
PLEASE RETURN THE PIONEER PRODUCTS
(INCLUDING THE SOFTWARE, AND ANY
WRITTEN MATERIALS) WITHIN FIVE (5) DAYS
OF RECEIPT OF THE PRODUCTS, TO THE
AUTHORISED PIONEER DEALER FROM
WHICH YOU PURCHASED THEM.
02
2 DISCLAIMER OF WARRANTY
The Software and related documentation are
provided to you “AS IS”. PIONEER AND ITS LICENSOR(S) (for the purpose of provisions 2
and 3, Pioneer and its licensor(s) shall be collectively referred to as “Pioneer”) MAKES AND
YOU RECEIVE NO WARRANTY, WHETHER EXPRESS OR IMPLIED, AND ALL WARRANTIES
OF MERCHANTABILITY AND FITNESS FOR
ANY PARTICULAR PURPOSE ARE EXPRESSLY EXCLUDED. SOME COUNTRIES DO
NOT ALLOW EXCLUSION OF IMPLIED WARRANTIES, SO THE ABOVE EXCLUSION MAY
NOT APPLY TO YOU. The Software is complex
and may contain some nonconformities, defects or errors. Pioneer does not warrant that
the Software will meet your needs or expectations, that operation of the Software will be
error free or uninterrupted, or that all nonconformities can or will be corrected. Furthermore, Pioneer does not make any
representations or warranties regarding the
use or results of the use of the Software in
terms of its accuracy, reliability or otherwise.
Engb
11
Chapter
02
Licence agreement
3 LIMITATION OF LIABILITY
IN NO EVENT SHALL PIONEER BE LIABLE
FOR ANY DAMAGES, CLAIM OR LOSS INCURRED BY YOU (INCLUDING, WITHOUT LIMITATION, COMPENSATORY, INCIDENTAL,
INDIRECT, SPECIAL, CONSEQUENTIAL, OR
EXEMPLARY DAMAGES, LOST PROFITS, LOST
SALES OR BUSINESS, EXPENDITURES, INVESTMENTS, OR COMMITMENTS IN CONNECTION WITH ANY BUSINESS, LOSS OF
ANY GOODWILL, OR DAMAGES) RESULTING
FROM THE USE OF OR INABILITY TO USE
THE SOFTWARE, EVEN IF PIONEER HAS
BEEN INFORMED OF, KNEW OF, OR SHOULD
HAVE KNOWN OF THE LIKELIHOOD OF
SUCH DAMAGES. THIS LIMITATION APPLIES
TO ALL CAUSES OF ACTION IN THE AGGREGATE, INCLUDING WITHOUT LIMITATION
BREACH OF CONTRACT, BREACH OF WARRANTY, NEGLIGENCE, STRICT LIABILITY, MISREPRESENTATION, AND OTHER TORTS. IF
PIONEER’S WARRANTY DISCLAIMER OR
LIMITATION OF LIABILITY SET FORTH IN THIS
AGREEMENT SHALL OR FOR ANY REASON
WHATSOEVER BE HELD UNENFORCEABLE
OR INAPPLICABLE, YOU AGREE THAT
PIONEER’S LIABILITY SHALL NOT EXCEED
FIFTY PERCENT (50 %) OF THE PRICE PAID BY
YOU FOR THE ENCLOSED PIONEER PRODUCT.
Some countries do not allow the exclusion or
limitation of incidental or consequential damages, so the above limitation or exclusion
may not apply to you. This warranty disclaimer
and limitation of liability shall not be applicable to the extent that any provision of this
warranty is prohibited by any country or local
law which cannot be pre-empted.
4 EXPORT LAW ASSURANCES
You agree and certify that neither the Software
nor any other technical data received from
Pioneer, nor the direct product thereof, will be
exported outside the country or district (the
“Country”) governed by the government having
jurisdiction over you (the “Government”) except as authorised and as permitted by the
12
Engb
laws and regulations of the Government. If the
Software has been rightfully obtained by you
outside of the Country, you agree that you will
not re-export the Software nor any other technical data received from Pioneer, nor the direct product thereof, except as permitted by
the laws and regulations of the Government
and the laws and regulations of the jurisdiction in which you obtained the Software.
5 TERMINATION
This Agreement is effective until terminated.
You may terminate it at any time by destroying
the Software. The Agreement also will terminate if you do not comply with any terms or
conditions of this Agreement. Upon such termination, you agree to destroy the Software.
6 MISCELLANEOUS
This is the entire Agreement between Pioneer
and you regarding its subject matter. No
change in this Agreement shall be effective
unless agreed to in writing by Pioneer. If any
provision of this Agreement is declared invalid
or unenforceable, the remaining provisions of
this Agreement shall remain in full force and
effect.
Chapter
Licence agreement
02
The current copyrights are to be referred Section 12 below.
End User Licensing Terms
3 Limitation of Liability.
NEITHER TELE ATLAS, PIONEER AND THEIR
SUPPLIERS SHALL NOT BE LIABLE TO ANY
END USERS FOR ANY INCIDENTAL, CONSEQUENTIAL, SPECIAL, INDIRECT OR EXEMPLARY DAMAGES ARISING OUT OF THIS
AGREEMENT, INCLUDING LOST PROFITS OR
COSTS OF COVER, LOSS OF USE OR BUSINESS INTERRUPTION OR THE LIKE, REGARDLESS OF WHETHER THE PARTY WAS
ADVISED OF THE POSSIBILITY OF SUCH DAMAGES.
NOTWITHSTANDING ANYTHING TO THE CONTRARY CONTAINED HEREIN, TELE ATLAS
AND PIONEER AND THEIR SUPPLIERS
SHALL HAVE NO MONETARY LIABILITY TO
ANY END USERS FOR ANY CAUSE (REGARDLESS OF THE FORM OF ACTION) UNDER OR
RELATING TO THIS AGREEMENT.
THIS IS A LEGAL AGREEMENT (THE “AGREEMENT”) BETWEEN YOU, THE END USER, AND
PIONEER and its licensors of Data product
(sometimes collectively “Licensors”). BY
USING YOUR COPY OF THE LICENSED DATA,
YOU AGREE TO THE TERMS AND CONDITIONS OF THIS AGREEMENT.
1 Grant of License.
Licensors grant you a non-transferable, nonexclusive license to use the map data and business points of interest information (the “POIs”)
owned by Tele Atlas, (together, the “Data”) contained on these discs, solely for personal, noncommercial use and not to operate a service
bureau or for any other use involving the processing of data of other persons or entities.
You may not copy, reproduce, modify, make
derivative works, derive the structure of or reverse engineer the Data. The Data is restricted
for use with the PIONEER Product(s). The
Data contains confidential and proprietary information and materials, and may contain
trade secrets, so you agree to hold the Data in
confidence and in trust and not to disclose the
Data or any portions in any form, including by
renting, leasing, publishing, leasing, sublicensing or transferring the Data to any third party.
You are explicitly prohibited from downloading
the digital maps and programmes contained
in the Data or from transferring these to another data carrier or computer. You are prohibited from removing or obscuring any
copyright, trademark notice or restricted legend.
Licence agreement
TERMS AND CONDITIONS
FOR THE TELE ATLAS DATA
2 Ownership.
The Data is copyrighted by Tele Atlas and its Licensors and they retain all ownership rights in
the Data. You agree not to alter, remove, obliterate, or obscure any copyright notice or proprietary legend contained in or on the Data.
Engb
13
Chapter
02
Licence agreement
4 Warranty Disclaimer.
THE DATA IS PROVIDED ON AN “AS IS” AND
“WITH ALL FAULTS BASIS” AND TELE ATLAS,
PIONEER, ITS LICENSORS, AND ITS LICENSED DISTRIBUTORS AND SUPPLIERS
(COLLECTIVELY, “SUPPLIERS”) EXPRESSLY
DISCLAIM ALL OTHER WARRANTIES, EXPRESS OR IMPLIED, INCLUDING BUT NOT
LIMITED TO, THE IMPLIED WARRANTIES OF
NON-INFRINGEMENT, MERCHANTABILITY, EFFECTIVENESS, COMPLETENESS, ACCURACY,
TITLE AND FITNESS FOR A PARTICULAR PURPOSE. TELE ATLAS, PIONEER, ITS LICENSORS
AND SUPPLIERS DO NOT WARRANT THAT
THE DATA WILL MEET YOUR REQUIREMENTS
OR THAT THE OPERATION OF THE DATA
WILL BE UNINTERRUPTED OR ERROR FREE.
NO ORAL OR WRITTEN ADVICE GIVEN BY
TELE ATLAS, PIONEER, ITS LICENSORS, SUPPLIERS OR ANY OF THEIR RESPECTIVE EMPLOYEES CREATES A WARRANTY OR IN ANY
WAY INCREASES TELE ATLAS’, PIONEER’S,
ITS LICENSORS’ OR SUPPLIERS’ LIABILITY,
AND YOU MAY NOT RELY ON ANY SUCH INFORMATION OR ADVICE. THIS DISCLAIMER
IS AN ESSENTIAL CONDITION OF THIS
AGREEMENT AND YOU ACCEPT THE DATA
ON THIS BASIS.
5 Termination.
This Agreement will terminate immediately
and automatically, without notice, if you
breach any term of this Agreement. You agree
that in the event of termination of the Agreement, you shall return the Data (including all
documentation and all copies) to PIONEER
and its suppliers.
6 Indemnity.
You agree to indemnify, defend and hold
PIONEER, its Licensors, and its suppliers (including their respective licensors, suppliers,
assignees, subsidiaries, affiliated companies,
and the respective officers, directors, employees, shareholders, agents and representatives)
free and harmless from and against any liability, loss, injury (including injuries resulting in
14
Engb
death), demand, action, cost, expense, or
claim of any kind or character, including but
not limited to attorney’s fees, arising out of or
in connection with any breach by you of any
term of this Agreement.
7 Additional Provisions with respect to
the Great Britain Data and Northern Ireland data of Ordnance Survey only.
1 You shall be prohibited from removing or
obscuring any copyright, trademark or restrictive legend belonging to Ordnance Survey.
2 All warranties of Ordnance Survey, whether
express or implied, including but not limited to, the implied warranties of non-infringement, merchantability, completeness,
accuracy, and fitness for a particular purpose shall be disclaimed. You shall acknowledge that Ordnance Survey makes no
warranty and gives no representation that
the Tele Atlas® MultiNet® data of the United
Kingdom is complete, accurate and/or up
to date and it is an essential condition of
the Terms of Use that you accept the Tele
Atlas® MultiNet® data of the United Kingdom on that basis. The Data may include
the data of licensors, including Ordnance
Survey.
3 All liability of Ordnance Survey with respect
to the Tele Atlas® MultiNet® data of the United Kingdom shall be disclaimed.
4 The use of the Tele Atlas® MultiNet® data of
the United Kingdom shall be prohibited in
any printed, published form that results in
Value Added Product to be distributed freely
or sold to the public without the prior permission of Ordnance Survey.
5 End User shall indemnify Ordnance Survey
from and against all claims, demands or actions, irrespective of the nature of the cause
of the claim, demand or action alleging
loss, costs, expenses, damages or injuries
(including injuries resulting from death)
arising out of the use of the Tele Atlas® MultiNet® data of the United Kingdom.
Chapter
Licence agreement
Regarding audits
Ordnance Survey and/or the National Audit
Office shall have the right to audit End Users
books or accounts directly so that Ordnance
Survey has the right of audit in respect of any
provider of products and/or services containing and/or derived from Licensed Tele Atlas
Products.
8 Additional Provisions with respect to
the Norway Data only.
End User is prohibited from using the Tele
Atlas® MultiNet® data of Norway to create
commercial general purpose printed or digital
maps, which are similar to the basic national
products of the Norwegian Mapping Authority.
9 Additional provisions for Tele Atlas®
Premium Points of Interest (the “POIs”).
With respect to the POI Licensed Tele Atlas
Products:
(The following provisions only refer to the products which contain Tele Atlas® Premium
Points of Interest.)
End User specifically agrees that it shall not:
(a) except as otherwise specifically set forth
herein, license or otherwise provide the POI Licensed Tele Atlas Products to any third party
for the purposes of resale, sublicensing, redistribution or for the purpose of compiling, enhancing, verifying, supplementing, adding to
or deleting from any mailing list, geographic
or trade directories, business directories, classified directories, classified advertising which
is sold, rented, published, furnished or in any
manner provided to a third party;
(b) make the POI Licensed Tele Atlas Products
available in an on-line environment unless
properly secured and/or encrypted to prevent
unauthorized access to the POI Licensed Tele
Atlas Products; and
(c) use the POI Licensed Tele Atlas Products,
either in whole or in part, as a factor in (i) establishing an individual’s eligibility for credit
or insurance; (ii) connection with underwriting
individual insurance; (iii) evaluating an individual for employment or promotions, reassignment or retention as an employee; (iv) in
connection with a determination of an individual’s eligibility for a license or other benefit
granted by a governmental authority; or (v) for
soliciting survivors of deceased persons.
(d) create mailing or telemarketing lists unless
authorized in this Agreement.
(e) End User will house the POI Licensed Tele
Atlas Products on the Internet behind firewalls
and will implement a system of controls that
will (i) protect the integrity of the POI Licensed
Tele Atlas Products; (ii) control access to the
POI Licensed Tele Atlas Products and (iii) prevent unauthorized usage or copying of the POI
Licensed Tele Atlas Products.
Licence agreement
6 End User accepts the obligation to, on request, provide Ordnance Survey with information on what products and/or services
containing and/or derived from the licensed
Tele Atlas Products they produce.
7 End User is liable to Ordnance Survey in
the event of discovery of breach of the
aforementioned contractual terms.
02
10 Additional provisions for Tele Atlas®
Brand Icon Licensed Tele Atlas Product (the
“Brand Icon Licensed Tele Atlas Product”):
(The following provisions only refer to the products which contain Tele Atlas® Brand Icon Licensed Tele Atlas Product.)
Engb
15
Chapter
02
Licence agreement
a End User’s use of the Brand Icon Licensed
Tele Atlas Product and any portion thereof,
is limited to use solely for the purpose of enhancing the value and/or use of the spatial
vector data furnished or made by Tele Atlas.
Notwithstanding anything to the contrary
herein, or in any attachment or exhibit hereto, in no event shall End User use the
Brand Icon Licensed Tele Atlas Product or
any portion thereof in connection with or in
conjunction with spatial street vector data
furnished or made by a party other than
Tele Atlas. End User may only use the
icons, brand names, logos, trademarks or
other features within (and not separate
from) the map data. In addition, End User
shall not modify or alter the color, shape,
size, and orientation of the Brand Icon Licensed Tele Atlas Product as provided to
End User without Tele Atlas’s prior written
approval.
b End User agrees that the use of Brand Icon
Licensed Tele Atlas Product subject to the
terms and conditions set forth in this Agreement and that there may be additional third
party terms, conditions and restrictions to
which the use of the Brand Icon Licensed
Tele Atlas Product will be subject provided
to the End User from time to time in the release notes applicable to the Value Added
Product.
11 Copyright Notices.
End User shall allow the display of the then
current copyright notice for the Licensed Tele
Atlas Products on the initial splash screen, in
the code, on the storage medium, on the
packaging, in the “Help/About” section, in the
operator’s manual, and in any displayed or
printed map image, for each Value Added Product that is based upon:
1 Tele Atlas® MultiNet® Europe. As of the Effective Date, the copyright notice is: “Data
Source © 2011 Tele Atlas B.V.”; and, in addition, “based on”:
16
Engb
a Tele Atlas® MultiNet® data of Austria. As
of the Effective Date, the copyright notice is: “© BEV, GZ 1368/2003.”
b Tele Atlas® MultiNet® data of Denmark.
As of the Effective Date, the copyright
notice is: “© DAV, violation of these
copyrights shall cause legal proceedings.”
c Tele Atlas® MultiNet® data of France. As
of the Effective Date, the copyright notice is: “© IGN France.”, “Michelin data
© Michelin 2011”
d Tele Atlas® MultiNet® data of the United
Kingdom (excluding Northern Ireland). As
of the Effective Date, the following applies: This product includes mapping
data licensed from Ordnance Survey
with the permission of the Controller of
Her Majesty’s Stationery Office.
© Crown copyright and/or database
right 2011. All rights reserved. Licence
number 100026920.
e Tele Atlas® MultiNet® data of Northern
Ireland. As of the Effective Date, the
copyright notice is: “Ordnance Survey of
Northern Ireland.”
f Tele Atlas® MultiNet® data of Norway. As
of the Effective Date, the copyright notice is: “© Norwegian Mapping Authority, Public Roads Administration /
© Mapsolutions.”
g Tele Atlas® MultiNet® data of Russia: As
of the Effective Date, the copyright notice is: “© Roskartographia”
h Tele Atlas® MultiNet® data of Switzerland.
As of the Effective Date, the copyright
notice is: “© Swisstopo.”
i Tele Atlas® MultiNet® data of The Netherlands. As of the Effective Date, the copyright notice is: “Topografische
onderground Copyright © dienst voor
het kadaster en de openbare registers,
Apeldoorn 2006.”
Chapter
Licence agreement
02
Licence agreement
12 Miscellaneous.
This is the exclusive and complete Agreement
between the Licensors and you regarding its
subject matter. Nothing in this Agreement
shall create a joint venture, partnership or
principal-agent relationship between the Licensors and you. The internal laws of the Belgium shall govern this Agreement and you
consent to the jurisdiction of Belgium. Sections 2, 5 and 6 - 11 shall survive the expiration
or termination of this Agreement. This Agreement may be amended, altered, or modified
only by PIONEER. You may not assign any part
of this Agreement without PIONEER’s prior
written consent. You acknowledge and understand that the Data may be subject to restrictions on exportation and agree to comply with
any applicable export laws. In the event that
any provision or part of a provision of this
Agreement is determined to be invalid, illegal,
or unenforceable, such provision or part thereof shall be stricken from this Agreement and
the remainder of this Agreement shall be
valid, legal, and enforceable to the maximum
extent possible. Any notice under this Agreement shall be delivered by courier to
PIONEER, Attention Legal Department,
PIONEER EUROPE NV, Haven 1087, Keetberglaan 1, 9120 Melsele, Belgium.
Engb
17
Chapter
03
About the database
About the data for the map
database
! Modifications related to roads, streets/highways, terrain, construction and other things
before/during the development period may
not be reflected in this database. Inevitably,
those modifications after that period are
not reflected in this database.
! Regardless of existing and newly-built
things, the data may be different from the
actual condition.
! For details about the map coverage of this
navigation system, refer to the information
on our website.
! It is strictly prohibited to reproduce and use
any part or the whole of this map in any
form without permission from the copyright
owner.
! If the local traffic regulations or conditions
deviate from this data, follow the local traffic regulations (such as signs, indications,
etc.) and conditions (such as construction,
weather, etc.).
! The traffic regulation data used in the map
database applies only to standard sized
passenger vehicles. Note that regulations
for larger vehicles, motorbikes, and other
non-standard vehicles are not included in
the database.
! Map Version, Tele Atlas. Rel. 06/2010.
! © 2011 INCREMENT P CORP. ALL RIGHTS
RESERVED.
18
Engb
Chapter
Instructions for upgrading
The navigation system
upgrade process
j
2 Get the password for authentication.
= For details, refer to Getting the password
for authentication on this page.
j
3 Upgrade the software programme of your
navigation system.
= For details of the operation, refer to Upgrading the software programme and the
map database on the next page.
j
4 Check whether the upgrade was done properly.
= For details of the operation, refer to
Checking whether the upgrade was done
properly on page 21.
j
5 Update the Bluetooth firmware.
= For details of the operation, refer to Updating the Bluetooth wireless technology
software (for AVIC-F10BT) on page 21.
= For details of the operation, refer to Updating the Bluetooth wireless technology
software (for AVIC-F20BT and CNSD110FM) on page 23.
Preparation for upgrade
Checking the device number
First, check your device number
(DEVICE NUMBER, displayed such as
Device # or Device Number) of your navigation system for later procedures. To display the
device number, do the following.
1 Press the HOME button to display the
“Top Menu” screen.
2 Touch [Settings].
The “Settings Menu” screen appears.
3 Touch [System Settings].
The “System Settings” screen appears.
4 Touch [Service Information].
The “Service Information Screen” screen appears.
Instructions for upgrading
1 Check the device number of your navigation system.
= For details of the operation, refer to
Checking the device number on this
page.
04
5 Write down your device number
(Device Number) onto the supplied Media
Number Card (MEDIA NUMBER CARD) to
avoid mistakes.
p Also write down “Version” information
which would be used to confirm completion
of the update.
Getting the password for
authentication
For upgrade, a unique password issued online
is necessary. Access the website with your PC
and get your password.
The following information is required.
! Media Number (MEDIA NUMBER) printed
on supplied Media Number Card
(MEDIA NUMBER CARD)
! Device Number (DEVICE NUMBER) of your
navigation system
1 Access on the following website to
issue your password.
http://www.pioneer-rus.ru/UnlockNavgate
For issuing the password, follow the instruction on the website.
Engb
19
Chapter
04
Instructions for upgrading
2 Record the password that you received.
You need to input this password accurately.
Write down your password to avoid mistakes.
4
Touch [Yes].
Upgrade procedures
! NEVER stop the engine of your vehicle or
turn off the power supply to the navigation
system until the installation is completed.
Turning the power off during upgrade process causes a malfunction or failure of the
navigation system.
! No functions are available during upgrade
process.
The message confirming whether or not to
enter the password will appear.
5
Touch [Yes].
Upgrading the software
programme and the map database
This section describes the upgrade procedures for your navigation system.
p The upgrade takes approximately 30 minutes in total.
1 Park your vehicle in a safe place and
apply the handbrake.
2 Insert the upgrade microSD card #1
(8 GB) into the SD card adapter.
3 Insert the upgrade microSD card #1
(8 GB) into the SD card slot.
The message confirming whether or not to
start the update will appear.
20
Engb
After a short pause, the keyboard for entering
the password will appear.
# If you touch [No], the device number
(Device #) of your navigation system will appear.
# If you touch [Cancel], the update will be cancelled.
6 Enter the password for authentication
that you obtained, then touch [OK].
A message confirming whether to restart the
navigation system appears.
7 Touch [OK].
The navigation system restarts and then the installation begins.
Chapter
Instructions for upgrading
8 Wait until the upgrade process is complete.
04
Updating the Bluetooth
wireless technology software
(for AVIC-F10BT)
Access the Pioneer website to check your
phone’s compatibility. If your phone is on the
list and you wish to update, manually update
the Bluetooth firmware after the automatic upgrade is finished.
http://www.pioneer.eu
After the installation is complete, the navigation system restarts.
Checking whether the upgrade
was done properly
Display “Service Information Screen” screen
to compare the current version number with
the previous one.
1 Press the HOME button to display the
“Top Menu” screen.
2 Touch [Settings].
The “Settings Menu” screen appears.
3 Touch [System Settings].
The “System Settings” screen appears.
4 Touch [Service Information].
The “Service Information Screen” screen appears.
5
Check the version information.
6 Eject the upgrade microSD card #1
(8 GB).
Instructions for upgrading
p This update is for customers updating the
Bluetooth firmware of AVIC-F10BT for the
first time.
p For customers who upgraded the software
of AVIC-F10BT with CNSD-110FM, refer to
Updating the Bluetooth wireless technology
software (for AVIC-F20BT and CNSD-110FM)
on page 23.
CAUTION
! Be sure to upgrade your navigation system
first.
! Be careful to follow the update procedure correctly. If you make a mistake, Bluetooth wireless technology functions will become
unavailable.
p Consult your authorised dealer if you are
unable to use Bluetooth wireless technology functions.
! Be sure to complete the Bluetooth firmware
update procedure without interruption.
p Registered phones that are listed on the
“Connection List” screen are cleared by
the software update.
1 Insert the upgrade microSD card #1
(8 GB) into the SD card adapter.
2 Insert the upgrade microSD card #1
(8 GB) into the SD card slot.
3 Press the HOME button to display the
“Top Menu” screen.
Engb
21
Chapter
04
Instructions for upgrading
4 Touch [Settings].
The “Settings Menu” screen appears.
13 Eject the upgrade microSD card #1
(8 GB).
5 Touch [Bluetooth Settings].
The “Bluetooth Settings” screen appears.
14 Eject the upgrade microSD card #1
(8 GB) from the SD card adapter.
6 Touch [Firmware update].
The current version is displayed.
7 Confirm the Bluetooth firmware version.
Make sure that the current version is 2.50.
15 Insert the upgrade microSD card #2
(2 GB) into the SD card adapter.
16 Insert the upgrade microSD card #2
(2 GB) into the SD card slot.
17 Repeat steps 3 through 6.
8 Touch [Firmware update].
The message confirming whether or not to
start the update will appear.
18 Confirm the Bluetooth firmware version.
Make sure that the current version is 3.10.
p If the current version is 2.50, return to step
1.
9 Make sure that the current Bluetooth
firmware version is 2.50 and the new
Bluetooth firmware version is 3.10.
10 Touch [Yes].
Update starts.
11 Wait until the upgrade process is complete.
A message will appear after the update is
complete.
12 Touch [OK].
The message disappears, and the map screen
returns.
22
Engb
19 If the current version is 3.10, touch
[Firmware update].
The message confirming whether or not to
start the update will appear.
Chapter
Instructions for upgrading
20 Make sure that the current Bluetooth
firmware version is 3.10 and the new
Bluetooth firmware version is 3.22.
04
Updating the Bluetooth wireless
technology software (for AVICF20BT and CNSD-110FM)
21 Touch [Yes].
Update starts.
22 Wait until the upgrade process is complete.
A message will appear after the update is
complete.
23 Touch [OK].
The message disappears, and the map screen
returns.
24 Eject the upgrade microSD card #2
(2 GB).
Update is completed.
Access the Pioneer website to check your
phone’s compatibility. If your phone is on the
list and you wish to update, manually update
the Bluetooth firmware after the automatic upgrade is finished.
http://www.pioneer.eu
CAUTION
! Be sure to upgrade your navigation system
first.
! Be careful to follow the update procedure correctly. If you make a mistake, Bluetooth wireless technology functions will become
unavailable.
p Consult your authorised dealer if you are
unable to use Bluetooth wireless technology functions.
! Be sure to complete the Bluetooth firmware
update procedure without interruption.
Instructions for upgrading
p In this manual, CNSD-110FM indicates the
navigation system that is upgraded from
AVIC-F10BT using the software upgrade
CNSD-110FM.
p Registered phones that are listed on the
“Connection List” screen are cleared by
the software update.
1 Insert the upgrade microSD card #2
(2 GB) into the SD card adapter.
2 Insert the upgrade microSD card #2
(2 GB) into the SD card slot.
Engb
23
Chapter
04
Instructions for upgrading
3 Press the HOME button to display the
“Top Menu” screen.
4 Touch [Settings].
The “Settings Menu” screen appears.
5 Touch [Bluetooth Settings].
The “Bluetooth Settings” screen appears.
6 Touch [Firmware update].
The current version is displayed.
7 Confirm the Bluetooth firmware version.
Make sure that the current version is 3.11.
8 If the current version is 3.11, touch
[Firmware update].
The message confirming whether or not to
start the update will appear.
9 Make sure that the current Bluetooth
firmware version is 3.11 and the new
Bluetooth firmware version is 3.22.
10 Touch [Yes].
Update starts.
11 Wait until the upgrade process is complete.
A message will appear after the update is
complete.
24
Engb
12 Touch [OK].
The message disappears, and the map screen
returns.
13 Eject the upgrade microSD card #2
(2 GB).
Update is completed.
Chapter
Changes on the upgraded programme
If you upgrade your navigation system using
this product, the system will have the following changes.
For customers using AVICF10BT
! The eco-friendly driving functions are an estimate of the real time fuel consumption to
average fuel consumption ratio and is not
an actual value.
! The eco-friendly driving functions and calculations take into consideration the location of the GPS position and speed of the
vehicle in determining a value.
! Indications of the navigation system may
be different from the actual value.
! Some of the features of the navigation system do not take in to consideration the type
of vehicle it is installed into.
Upgrading enables the Eco-driving function,
which supports environmentally-friendly driving.
! Displaying Eco-Meter on the map
! Checking the eco-friendly driving status
! Displaying Eco Drive Level guidance
! Sudden start alert
Searching for a name by
entering characters
When you enter characters on a search
screen, the system will automatically search
the database for all possible options. Only the
characters you enter are active.
AV functions
The AV source screen design and operation
procedure will be changed.
p Refer to this manual for DVD-VR operation
procedures.
= For details of the operation, refer to Playing
a DVD-VR disc on the next page.
For customers using AVICF20BT or CNSD-110FM
p In this manual, CNSD-110FM indicates the
navigation system that is upgraded from
AVIC-F10BT using the software upgrade
CNSD-110FM.
Searching for a name by
entering characters
Changes on the upgraded programme
Eco-friendly driving functions
05
When you enter characters on a search
screen, the system will automatically search
the database for all possible options. Only the
characters you enter are active.
Displaying tick marks on the
“Overlay POI (Main Category)” screen
A tick mark appears next to the main category
containing the selected sub-category.
Interruption icon status
The display status for the TRFC indicator and
NEWS indicator will be changed.
Setting the illumination colour
“Memory 3” will be changed to “Eco”.
Engb
25
Chapter
06
Playing a DVD-VR disc
p This function is available for AVIC-F10BT
and CNSD-110FM.
You can play a DVD-VR (DVD Video Recording
Format) disc using the built-in drive of the navigation system. This section describes operations for DVD-VR discs.
Starting procedure
1 Press the MODE button to display the
AV operation screen.
2 Insert the disc you want to play into
disc-loading slot.
The source changes and then playback will
start.
p If the disc is already set, tap [Disc] on the
left edge of the screen.
Shows the title number currently playing.
2 Audio track indicator
Shows the audio track number currently selected.
3 Chapter number indicator
Shows the chapter number currently playing.
4 Audio channel indicator
Shows the current audio channel type, such
as “Mch” (Multi-channel).
5 Play mode indicator
Shows the current play mode.
= For details, refer to Switching the playback mode on page 29.
6 NEWS indicator
Shows the status of news programmes.
7 TRFC indicator
Shows the status of traffic announcements.
8 Mixing condition indicator
Shows the current mixing condition.
= For details, refer to Selects audio output on page 31.
3 Use the touch panel keys on the screen
to control the disc.
= For details, refer to Using the touch panel
keys on the next page.
Reading the screen
123 4 5
67 8 9
a
c
b
1 Title number indicator
26
Engb
9 Current time
a Digital sound format indicator
Shows which digital sound format (surround
sound format) has been selected.
b Play time indicator
Shows the elapsed playing time within the
current title.
c Source icon
Shows which source has been selected.
Chapter
Playing a DVD-VR disc
06
Using the touch panel keys
Playback screen (page 1)
1
b
a
9
8
7
6
5
4
Playback screen (page 2)
Playing a DVD-VR disc
2
3
c
d
e
f
h
p With some discs, the icon 9 may be displayed, meaning that the operation is invalid.
1 c CM Skip/CM Skip d
= For details, refer to Using the short-time
skip function on page 29.
2 Switches the playback mode
= For details, refer to Switching the playback mode on page 29.
3 Stops playback
4 Hides the touch panel keys and information of the current video
Touching [Hide] shows only the current video.
5 Skips forward or backward
Touching [p] skips to the start of the next
chapter. Touching [o] once skips to the
g
start of the current chapter. Touching it twice
quickly will skip to the previous chapter.
p You can also perform these operations
by using the TRK (c/d) button.
6 Playback and Pause
Touching [f] switches between playback
and pause.
7 Displays the title list
Displays the title list recorded on the disc.
p A dash (–) is displayed if there is no corresponding information.
= For details, refer to Playing by selecting
from the title list on the next page.
8 Switches to the next page of touch panel
keys
9 Switches the display
Engb
27
Chapter
06
Playing a DVD-VR disc
Touching [Disp] changes the information as
follows:
Disc information display — Repeat range display and on-off state of the subtitle
a Recalls equaliser curves
= For details of the operations, refer to
Using the equaliser on page 30.
b Displays the “Function” menu
= For details, refer to Using advanced functions on page 31.
Playing by selecting from the
title list
You can select and play the title you want from
the list.
1
2 Scroll the list by dragging items up or
down to display the item you want to select.
p Flicking a list item enables you to quickly
scroll through the list.
p To stop scrolling, gently touch the list.
c Searches for a desired scene and starts
playback from a specified time
= For details, refer to Searching for a specific scene and starting playback from a
specified time on this page.
Touch [List] on the playback screen.
3
Touch the title to play from the list.
d Changes audio tracks (Multi-audio)
Each touch of [Audio] switches between
audio tracks.
p Display indications such as MPEG-A
and Mch describe the audio track recorded on the DVD. This indication may
not be the same as the actual sound
currently output from the navigation system.
e Changes the subtitle (Multi-subtitle)
Each touch of [S.Title] switches between the
subtitle languages recorded on the disc.
f Skips the title forward or backward
Touching [d] skips to the start of the next title.
Touching [c] skips to the start of the previous
title.
g Fast reverse or forward
Touch and hold [m] or [n] to perform fast
reverse or forward.
If you keep touching [m] or [n] for five
seconds, fast reverse/fast forward continues
even if you release either of these keys. To resume playback at a desired point, touch
[f] or opposite key of [m] or [n] which
you touched.
h Frame-by-frame playback (or slow-motion
playback)
= For details, refer to Frame-by-frame playback on the next page.
= For details, refer to Slow motion playback
on the next page.
28
Engb
4 Touch the key on the right edge of the
screen.
The previous screen returns.
Searching for a specific scene
and starting playback from a
specified time
You can search for the scene you want by specifying a title or a chapter, and the time.
p Chapter search and time search are not
available when disc playback has been
stopped.
Chapter
Playing a DVD-VR disc
06
is useful to skip commercials on your recorded
DVD-VR disc.
2 Touch the keys to input the target number or time and then touch [Enter].
% To skip progressively backward or forward, touch [c CM Skip] or [CM Skip d].
Each touch of [c CM Skip] or [CM Skip d]
changes steps in the following order:
c CM Skip
5 sec. — 15 sec. — 30 sec. — 1 min. — 2 min.
— 3 min. — 0 sec.
CM Skip d
30 sec. — 1 min. — 1.5 min. — 2 min. — 3 min.
— 5 min. — 10 min. — 0 sec.
For titles, chapters
! To select 3, touch [3] and [Enter] in order.
! To select 10, touch [1] and [0] and [Enter] in
order.
For time (time search)
! To select 5 minutes 3 seconds, touch [5],
[min], [3], [sec] and [Enter] in order.
! To select 71 minutes 00 seconds, touch [7],
[1], [min] and [Enter] in order.
! To select 100 minutes 05 seconds, touch
[1], [0], [0], [5], [sec] and [Enter] in order.
p To cancel an input number, touch [Clear].
To cancel the input numbers, touch and
hold [Clear].
Frame-by-frame playback
This lets you move ahead one frame at a time
during playback.
% Touch [r] during playback.
Each time you touch [r], you move ahead
one frame.
To return to normal playback, touch [f].
Playing a DVD-VR disc
1 Touch [Search] and then touch [Title]
(title), [Chapter] (chapter), [Time] (time).
p With some discs, images may be unclear
during frame-by-frame playback.
Slow motion playback
This lets you slow down playback speed.
Switching the playback mode
You have two methods for playing DVD-VR
discs; Original (original) and Playlist (playlist).
p Titles created with DVD recorders are
called original. Those based on original, rearranged titles are called playlist. Playlists
are created on DVD-R/-RW discs.
% Touch [Mode Change] to switch the
play mode.
If the play mode is changed, playback starts
from the beginning of the selected play mode.
Using the short-time skip function
This function enables you to skip over your
specified interval on the video playback. This
1 Touch and hold [r] until
is displayed during playback.
is displayed, and forward slow
The icon
motion playback begins.
p To return to normal playback, touch [f].
2 Touch [q] or [r] to adjust playback
speed during slow motion playback.
Each time you touch [q] or [r] it changes
the speed in four steps in the following order:
1/16 f 1/8 f 1/4 f 1/2
p There is no sound during slow motion playback.
p With some discs, images may be unclear
during slow motion playback.
p Reversed slow motion playback is not possible.
Engb
29
Chapter
Playing a DVD-VR disc
06
Using the equaliser
The equaliser lets you adjust equalisation to
match vehicle interior acoustic characteristics
as desired.
Recalling equaliser curves
There are seven stored equaliser curves that
you can easily recall at any time. Here is a list
of the equaliser curves:
You can adjust the effect of the preset equaliser curves.
The following equaliser curves can be adjusted:
! S.Bass
! Powerful
! Natural
! Vocal
Equaliser curve
1
Touch [EQ].
S.Bass (Super Bass) is a curve in which only lowpitched sound is boosted.
2
Touch the equaliser you want.
Powerful is a curve in which low-pitched and highpitched sounds are boosted.
3
Natural is a curve in which low-pitched and highpitched sounds are slightly boosted.
Vocal is a curve in which the midrange, which is the
human vocal range, is boosted.
Touch [+] or [–] next to “Nuance”.
p The level can be adjusted in the range of –6
to +6.
p If “Natural” is selected, the level can be adjusted in the range of –4 to +6.
Flat is a flat curve in which nothing is boosted.
Customising the equaliser curves
Custom1 is an adjusted equaliser curve that you create. A separate custom curve can be created for each
source.
You can adjust the currently selected equaliser
curve setting as desired. Adjustments can be
made with a 7-band graphic equaliser.
Custom2 is an adjusted equaliser curve that you create. If you select this curve, the effect is applied to all
AV sources.
p When “Flat” is selected, no supplement or
correction is made to the sound. This is
useful to check the effect of the equaliser
curves by switching alternatively between
“Flat” and a set equaliser curve.
30
Adjusting the preset equaliser curve
effect
1
Touch [EQ].
2
Touch the equaliser you want.
Engb
The difference between “Custom1” and
“Custom2”
! A separate “Custom1” curve can be created for each source. If you make adjustments when a curve “S.Bass (Super Bass)”,
“Powerful”, “Natural”, “Vocal”, “Flat”, or
“Custom1” is selected, the equaliser curve
settings will be memorised in “Custom1”.
! A “Custom2” curve can be created common to all sources. If you make adjustments when “Custom2” curve is selected,
the “Custom2” curve will be updated.
! The “Custom1” curve is applied to each of
the source selected, but you can apply the
same curve to the following sources.
— CD, ROM, DVD-V, DVD-VR, DivX
— AM and FM
— EXT1 and EXT2
— AV1 and AV2
— SD and USB
Chapter
Playing a DVD-VR disc
p The different curve can be memorised between iPod and USB.
1
Touch [EQ].
2 Touch one of the keys to select a curve
that you want to use as the basis of customising.
3
Touch [Customize].
5 Touch [a] or [b] to adjust the level of
the equaliser band.
Each time you touch [a] or [b], the level of
the equaliser band increases or decreases.
p If you perform chapter (title) search, fast
forward, fast reverse or slow motion
playback, the repeat play range changes
to “Disc”.
p This function is not available when disc
playback has been stopped.
2 Selects audio output
When playing DVDs that both channels are
recorded in monaural, you can switch the
audio output. Touch [L/R Select] repeatedly
until the desired audio output appears in
the display.
Each touch of [L/R Select] changes the settings as follows:
! L: Left
! R: Right
! Mix: Mixing left and right
! L+R: Left and right
p This function is not available when disc
playback has been stopped.
3 DVD setup adjustments
= For detailed operations, refer to Operation Manual for AVIC-F930BT.
Playing a DVD-VR disc
4 Touch the frequency that you want to
adjust the level.
06
Using advanced functions
% Touch on the “DVD-VR” screen.
The “Function” menu appears.
1
2
3
1 Changes the repeat range
Each touch of [Repeat] changes the setting
as follows:
! Disc: Plays throughout the current disc.
! Chapter: Repeats just the current chapter.
! Title: Repeats just the current title.
Engb
31
Appendix
Troubleshooting
Problems in the procedures for updating
Symptom
Cause
Action
The upgrade process doesn’t
start and the navigation system
boots up as usual.
An incorrect microSD card has
been inserted.
Eject the inserted microSD card and insert
the correct upgrade microSD card.
Upgrade has been already done.
Check whether the upgrade was done properly. If the upgrade has not been done yet,
consult the nearest authorised service station.
The screen that cannot begin the
upgrade process is displayed.
Eject the upgrade microSD card #1 (8 GB),
and display the map of your current position,
and then reinsert the upgrade microSD card
#1 (8 GB).
The engine of your vehicle was
stopped or the power supply to the
navigation system was turned off
during upgrade process.
Consult the nearest authorised service station.
Upgrade microSD card was pulled
out during upgrade process.
Consult the nearest authorised service station.
The navigation system does not
work properly after upgrade.
Messages in the procedures for updating
The following messages may be displayed by your navigation system. Refer to the table below to
identify the problem, then take the suggested corrective action.
There are occasions when you may see error messages other than those shown here. In such a
case, follow the instructions given on the display.
Message
When
An error occurred and the up- Unexpected error occurred in the
date failed.
update process.
32
Engb
What to do
Consult your local Pioneer dealer if this message persist.
Engb
33
34
Engb
Engb
35
PIONEER CORPORATION
1-1, Shin-ogura, Saiwai-ku, Kawasaki-shi,
Kanagawa 212-0031, JAPAN
PIONEER ELECTRONICS (USA) INC.
P.O. Box 1540, Long Beach, California 90801-1540, U.S.A.
TEL: (800) 421-1404
PIONEER EUROPE NV
Haven 1087, Keetberglaan 1, B-9120 Melsele, Belgium/Belgique
TEL: (0) 3/570.05.11
© 2011 PIONEER CORPORATION.
All rights reserved.
<KYTZX> <11E00000>
<CRB3664-A> UW