1
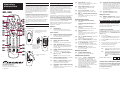
Operating
Instructions
REMOTE CONTROL
BR-360
What it does
BR-360 keypad
The BR-360 operates all Pioneer Voyager BDV1000/BD-V3000 series Digital Home Terminals, as
well as some home terminal models from other
manufacturers. You need the BR-360 to experience
all the viewing options Voyager offers, because
you can’t access all Voyager functions from the
Home Terminal front panel keys or from other
brand remotes.
The BR-360 operates your Voyager Home Terminal,
TV, VCR, and audio equipment (stereo receiver/
amplifier). Certain keys only operate certain
devices. Keys that work together are clustered to
make them easier to locate.
The BR-360 also supports basic remote control
functions for nearly all TVs, VCRs, stereo receivers/
amplifiers, and some DVD players. You don’t have
to remember to switch “modes” with the BR-360 —
each key always transmits to one device.
This instruction sheet contains setup instructions
and device codes. Keep this sheet in case you
need to set up the BR-360 remote again in the
future.
Batteries
Each key is described below. These are basic
descriptions only. Refer to the manual(s) that
came with your Home Terminal to learn how to
use the keys.
The device(s) in parentheses are those the key will
operate. For example, note that item 18 below
(CH +/–) will change the channel on the Voyager
terminal only, not on the TV or the VCR. Before
you can use the BR-360 to operate your TV and
other equipment, see Programming your BR-360
below to learn how to set up the BR-360.
Indicator
To install batteries:
(1)
Push the battery cover tab
toward the center, and lift
the cover off.
AUD, TV, CBL, VCR: Device power keys
(Audio, TV, Voyager, VCR/DVD player)
Turn power of these devices on/off.
AA
+
–
+
–
Displays the menu of Voyager features.
–
AA
–
+
Insert two fresh AA
batteries, in the
directions shown
inside the battery
compartment.
MENU: Main menu access key
(Voyager)
(4)
(5)
GUIDE: Interactive program guide key
(Voyager)
Displays the program guide listings.
(6)
3
AA
+
‹C 029 AACA›
5 , 4 , 6 , 3: Display navigation
keys (Voyager)
Replace the battery
cover.
(7)
Skip forward or backward a whole day in
the program guide.
(26) BYPASS: RF Bypass key (Voyager)
Displays the menu of preferences for your
Voyager home terminal.
2
Press and hold SETUP. The indicator light
comes on. Keep holding until the light
goes off.
3
Release SETUP. The indicator light blinks
once.
4
Press VCR.
5
Enter the three-digit code. Indicator light
blinks twice to confirm acceptance.
6
Point the BR-360 toward the VCR.
7
Press VCR. Did the VCR turn off?
Yes:
Toggles the Voyager’s optional RF Bypass
switch.
No:
Channel/volume control
(14)
FAV: Favorite channel recall key
(Voyager)
Tunes channels previously stored in the
Voyager terminal’s favorite channel
memory.
(15)
LAST: Last channel recall key
(Voyager)
Accesses the previously tuned channel.
(16)
MUTE: Mute key (Audio, TV, or
Voyager)
Silences the audio. Press to activate. Press
this key again to restore sound to the
previous level.
(17)
Programming your BR-360
Setup for Voyager Home Terminal
No setup is required. The BR-360 is ready to run
the Voyager Home Terminal.
Setup for TV operation
Find your TV brand and its three-digit codes under
TV setup codes on the back of this sheet. If your
brand is not listed, go to Searching the code
library instead.
1
Turn on the TV.
2
Press and hold SETUP. The indicator light comes
on. Keep holding until the light goes off.
3
Release SETUP. The indicator light blinks once.
Selects the next higher or lower channel.
4
Press TV.
0 – 9: Numeric keys (Voyager)
5
Enter the three-digit code. Indicator light
blinks twice to confirm acceptance.
VOL +/–: Volume rocker key (Audio, TV,
or Voyager)
Raises or lowers the sound level.
(18)
(19)
CH +/–: Channel rocker key (Voyager)
Directly tune channels by number. Also
make numeric entries in on-screen menus.
(20) ENTER: Enter key (Voyager)
6
Point the BR-360 toward the TV.
7
Press TV. Did the TV turn off?
Immediately tunes the channel number
you’ve just entered.
Yes:
BR-360 programming
(21)
No:
SETUP: BR-360 setup key
Starts programming your BR-360.
(22) 7,4, 8, <, ;: Transport keys
SETTINGS: Voyager settings menu key
(Voyager)
Toggles the VCR’s TV/VCR switch.
RF Bypass control
SELECT: Display action key (Voyager)
PAGE +/–: Page rocker key (Voyager)
(25) TV/VCR: TV/VCR key (VCR)
DAY +/–: Program guide day skip keys
(Voyager)
VCR/DVD/VOD operations
Accesses pages above or below the
information currently displayed.
(9)
A, B, C: Function keys (Voyager)
Highlight an item from the on-screen
choices.
Activates the highlighted item.
(8)
© 2001, Pioneer New Media Technologies, Inc.
2265 East 220th Street
Long Beach, CA 90810 USA
telephone: (310) 952-2111
http://www.pioneerbroadband.com
(13)
INFO: Information key (Voyager)
Displays information about the program
currently playing or highlighted in the
program guide.
Selects the device to which the BR-360
transport keys (22) transmit. Slide to
“VCR” to send transport/pause commands
to your VCR or DVD player. Slide to “VOD”
to pause, scan forward/backward, stop,
and resume play of a current Video-OnDemand program.
HELP: Help access key (Voyager)
Make direct selections from on-screen
menus.
On-screen operations
(3)
2
(12)
+
AA
(24) VCR/VOD: VCR/VOD toggle switch
Displays helpful information about
Voyager operation.
Power control
(2)
AA
(11)
Indicator light
Blinks when the remote transmits a
command. Also helps you during setup.
EXIT: Exit key (Voyager)
Hides all on-screen graphics and returns
you to regular TV viewing.
Note: Some keys designated “Voyager” may not
operate with some versions of home terminal
hardware or software.
Two AA batteries power the BR-360.
1
(10)
(VCR, DVD player, or Voyager)
Activate play (4), rewind (7), fastforward (8), stop (<), and pause (;)
functions of your VCR or DVD player. Take
the same actions on Video-On-Demand
programming through the Voyager
terminal. Determined by position of VCR/
VOD toggle switch (24).
(23) = : Record key (VCR)
Starts recording on your VCR.
Setup complete. Write down the threedigit setup code below for future
reference.
Try setup again starting from step 2,
using the next code listed for your
brand. If you’ve tried all codes for your
brand without success, use the
method under Searching the code
library.
My TV setup code is:
Setup for VCR or DVD player operation
You can choose to control either your VCR or your
DVD player. For VCR setup, find the VCR brand and
its three-digit codes under VCR setup codes on the
back of this sheet. If your brand is not listed, go to
Searching the code library.
1
Turn your VCR on.
Setup complete. Write down the
three-digit setup code below for
future reference.
Try setup again starting from step 2,
using the next code listed for your
brand. If you’ve tried all codes for
your brand without success, try the
method under Searching the code
library.
For DVD player setup, find your DVD player
brand and its three-digit codes under DVD
player setup codes on the back of this sheet.
Then follow the above VCR instructions using
your DVD player and code.
My VCR or DVD
player setup code is:
Setup for stereo receiver/amplifier
operation
Find the audio equipment brand and its threedigit codes under Stereo receiver/amplifier
setup codes on the back of this sheet. If your
brand is not listed, go to Searching the code
library.
1
Turn your receiver (or amplifier) on.
2
Press and hold SETUP. The indicator light
comes on. Keep holding until the light
goes off.
3
Release SETUP. The indicator light blinks
once.
4
Press AUD.
5
Enter the three-digit code. Indicator light
blinks twice to confirm acceptance.
6
Point the BR-360 toward the receiver.
7
Press AUD. Did the receiver turn off?
Yes:
No:
Setup complete. Write down the
three-digit setup code below for
future reference.
Try setup again starting from step
2, using the next code listed for
your brand. If you’ve tried all
codes for your brand without
success, try the method under
Searching the code library.
My receiver/amplifier
setup code is:
Searching the code library
To get the VCR/DVD or stereo receiver/amplifier
code:
If none of the codes on this sheet seem to work,
or your brand is not listed, you can search the BR360 code library for one that works. The BR-360
automatically selects the proper code for your TV,
VCR, or receiver/amplifier. Make sure the equipment is turned on before you program the BR-360.
Follow the steps above, but substitute “VCR” or
“AUD” for “TV” in step 3. Write down the code for
future reference, under Setup for VCR or DVD
player operation, or Setup for stereo receiver/
amplifier operation.
To search the library of TV codes:
1
Turn on the TV.
2
Press and hold SETUP. The indicator light
comes on. Keep holding until the light
goes off.
3
Release SETUP. The indicator light blinks
once.
4
Press TV.
5
Point the remote control at your TV and
press SELECT. The indicator light stays on.
Did the TV turn off?
Yes:
No:
Immediately press TV. The light
goes out and then blinks twice.
Setup is complete. To make sure
programming was done correctly,
aim the remote at the TV and press
TV. The TV should turn back on.
Note: Now, be sure to follow
Getting your code, to find out the
three-digit setup code. Write it
down so you can use the direct
setup method in the future.
Repeat step 5 until the TV turns off.
You may need to do this over 100
times to go through the entire code
library. Pause one second between
each SELECT keypress.
Note: If you accidentally went past
the right code, press 6 to go
backward through the library.
To search the library of VCR, DVD, or stereo
receiver/amplifier codes:
Follow the steps above, but substitute “VCR”
or “AUD” for “TV” in each step.
Getting your code
If you’ve used the Searching the code library
method to program your BR-360, or if you’ve
misplaced your setup code, you can find out
the loaded TV, VCR/DVD and AUD codes.
To get the TV code:
Setting up volume control
The BR-360 comes to you ready to control volume
and mute functions through the Voyager Home
Terminal. You can set up the BR-360 to do these
through the TV or stereo receiver/amplifier instead.
To switch volume/mute control to the TV, the
receiver/amplifier, or back to the Voyager Home
Terminal:
1
Press and hold SETUP. The indicator light comes
on. Keep holding until the light goes off.
2
Release SETUP. The indicator light blinks once.
3
Press VOL+ or VOL–. The light blinks.
4
Press the key for the device on which you
want to control volume:
AUD: receiver/amplifier
CBL: Voyager
TV:
TV set
The indicator light blinks twice. The BR-360
volume and mute keys now control volume
on the new device.
5
To make sure programming was done
correctly, aim the BR-360 at the device and
press VOL +, VOL –, or MUTE. The volume
setting on the device should change.
Helpful hints
Setup
If the BR-360 does not operate the TV, VCR/DVD
player, or stereo receiver properly:
1
Try all the codes listed for the device.
2
Try the search method.
Many devices use similar remote control codes.
You may have selected a similar code for which
only some commands work. Select another code
from the list, or start the Searching the code
library method over. Repeat the process until you
find the correct code that operates all applicable
functions for your equipment.
1
Press and hold SETUP. The indicator light
comes on. Keep holding until the light
goes off.
2
Release SETUP. The indicator light blinks
once.
3
Press TV.
Operation
4
Press INFO. The indicator light blinks out
the code number in sequence. Count the
number of blinks for each digit. The
indicator light pauses between each digit.
If the red indicator light does not blink when you
press a key, or if the operation is intermittent:
Note: A long blink means the digit is 0 (zero).
Replace both batteries with two new AA batteries.
Write down the code for future reference
under Setup for TV operation.
Always replace both batteries at the same time.
5
Note: Remember, each key transmits to only one
device. See the BR-360 keypad section.
Make sure the batteries are inserted correctly.
TV setup codes
Akai — 030, 068, 071
Alba — 111
A-Mark — 118
Amstrad — 031
Anam — 009, 039, 118, 119, 135
Anam National — 142
AOC — 005, 006, 018, 019, 118,
139, 156
Archer — 118
Audiovox — 118
Bauer — 109
Baycraft — 034
Brockwood — 139
Broksonic — 060, 135
Candle — 006, 020, 021, 023,
034, 139
Candle/Citizen — 135, 156
Capehart — 018, 139
Circuit City — 139
Citizen — 006, 015, 020, 021,
022, 023, 024
Colortyme — 071, 139
Concerto — 021
Contec — 025, 026, 039, 089
Contec Cony — 135
Craig — 034, 039, 135, 138
Crown — 024, 034
Curtis Mathes — 006, 015, 024,
071, 147, 156
CXC — 039, 135
Daewoo — 005, 022, 024, 027,
028, 029, 030, 142, 156,
163
Daytron — 024, 139
Dixi — 030, 086, 118
Dumont — 139
Electrohome — 024, 071, 153,
157
Elta — 030
Emerson — 024, 025, 026, 031,
032, 033, 034, 035, 036,
037, 038, 039, 071, 120,
135, 136, 139, 140, 143,
164
Envision — 006, 156
Etron — 030
Fisher — 040, 088
Formenti — 109
Fortress — 071, 103
Fujitsu — 032, 138
Funai — 032, 039, 135, 138
Futuretech — 039, 135, 138
GE — 003, 008, 009, 014, 038,
041, 042, 128, 139, 142,
145, 158, 159, 160
Genexxa — 111
Goldstar — 005, 021, 024, 043,
044, 071, 086, 137, 156
Gradiente — 155
Granada — 139, 155
Grand — 139
Grundig — 045
Hallmark — 139
Harman/Kardon — 059
Hinari — 032
Hitachi — 021, 024, 046, 047,
048, 049, 050, 051, 052,
053, 083, 095, 124, 146,
162
Infinity — 064
JBL — 064
JC Penney — 003, 005, 006,
015, 024, 029, 041, 094,
145, 158
Jensen — 054, 071
JVC — 055, 056, 057, 058
Kawasho — 046, 059, 156
Kenwood — 006, 071, 156
Kloss — 020, 059, 108
Kloss Novabeam — 142
KTV — 024, 037, 038, 039, 135,
140, 156
Lloyds — 139
Lloytron — 024
Loewe — 086
Logik — 017
Luxman — 021
LXI — 003, 061, 064, 088, 093,
115, 123, 145
Magnasonic — 071
Magnavox — 006, 019, 023,
034, 062, 063, 064, 065,
066, 067, 071, 073, 108,
154, 156
Marantz — 006, 064, 071, 086,
156
Matsui — 030, 107
Megatron — 139
Memorex — 017, 030, 088, 139
MGA — 004, 005, 006, 069,
071, 139
Mitsubishi — 004, 005, 068,
069, 070, 095, 121, 139,
149, 151, 156
Montgomery Ward — 005, 006,
014, 017, 032, 034, 041,
062, 063, 065, 066, 105,
117, 156, 158, 159
MTC — 005, 006, 015, 021, 029,
139, 156
NAD — 000, 115, 139
National — 009, 141
National Quenties — 141
NEC — 005, 006, 007, 016, 021,
071, 125, 156
Nikkai — 110, 111, 116
Nordmende — 049
Normandic — 161
Novabeam — 059
Nyon — 145
Onwa — 039, 135
Optonica — 103, 105
Orion — 138
Osaki — 110
Panasonic — 008, 009, 010, 011,
012, 064, 072, 133, 141,
142, 144, 150, 158, 160
Philco — 005, 006, 023, 034,
062, 063, 066, 071, 108,
156
Philips — 064, 086
Pioneer — 000, 046, 049, 074,
152
Portland — 005, 024, 156
Proscan — 003
Proton — 013, 018, 024, 034,
083, 122, 139
Pulsar — 002
Quasar — 008, 009, 075, 142,
144
Radio Shack — 024, 039, 105,
110, 135, 142
RCA — 003, 005, 014, 046, 077,
078, 079, 080, 081, 082,
084, 085, 123, 131, 132,
135, 142, 145, 152, 158,
159, 160
Realistic — 088
Saba — 049
Saisho — 030, 031, 107
Sampo — 006, 018, 142
Samsung — 005, 006, 015, 021,
024, 030, 086, 110, 139,
148, 156, 165
Samwon — 118
Sanyo — 040, 087, 088, 089,
090, 107
SBR — 086
Schneider — 086
Scott — 024, 032, 035, 039,
091, 098, 135, 140, 145
Sears — 003, 021, 032, 040,
061, 087, 088, 092, 093,
094, 096, 097, 099, 100,
101, 102, 115, 139, 147
Seimitsu — 139
Sharp — 024, 083, 089, 103,
104, 105, 106, 126, 127
Siemens — 089
Signature — 017
Silver — 071
Solavox — 110
Sony — 001, 076, 107, 117, 120,
134
Soundesign — 023, 034, 039,
135, 139
Spectricon — 019, 118
Squareview — 138
SSS — 005, 039, 071, 135, 156
Supra — 021
Supre-Macy — 020
Sylvania — 006, 023, 034, 062,
063, 064, 066, 071, 073,
098, 108, 109, 156
Symphonic — 130, 136, 138
Tandy — 103, 111
Tatung — 009, 142
Technics — 008
Techwood — 021, 071
Teknika — 004, 005, 015, 017,
020, 021, 022, 023, 024,
032, 034, 039, 112, 113,
135, 156
Teleavia — 049
Telefunken — 049
Teletech — 030
Tera — 013
Thomas — 139
Thomson — 049, 114, 153
TMK — 021, 071, 139
Toshiba — 015, 088, 094, 115,
116, 129
Tosonic — 026
Totevision — 024
Toyomenko — 139
Universal — 041
Vector Research — 006
Victor — 055
Video Concepts — 068, 135
Vidtech — 005, 139, 156
Viking — 020
Yamaha — 005, 006, 156
York — 139
Zenith — 002, 017, 137
Zonda — 118
VCR setup codes
Aiwa — 088, 119, 120, 121
Akai — 017, 018, 019, 020, 021,
022, 023, 024, 072
Alba — 050
Amstrad — 088
ASA — 069
Audio Dynamics — 094, 100
Broksonic — 063
Bush — 089
Candle — 080, 092, 093
Canon — 046, 057, 058
Capehart — 047, 050
Citizen — 091, 092, 093
Craig — 091, 108
Crosley — 057
Curtis Mathes — 058, 092, 105
Daewoo — 038, 049, 050, 051,
093
Daytron — 050
DBX — 094, 100
Dumont — 053
Dynatech — 088
Electrohome — 109
Emerson — 009, 010, 011, 012,
013, 014, 015, 016, 063,
072, 088, 090, 109, 116
Finlandia — 053
Finlux — 053, 069, 088
Fisher — 052, 053, 084, 088,
108, 110
GE — 054, 055, 056, 058, 076,
091, 105
Go Video — 061, 062, 117
Goldstar — 034, 059, 092, 112,
113
Goodmans — 085, 089
Granada — 053, 081
Grundig — 069
Harman Kardon — 034, 073
Hinari — 089
Hitachi — 040, 041, 042, 043,
044, 045, 057, 088, 095,
096, 097
Instant Replay — 057
ITT — 022
JC Penney — 034, 058, 080,
091, 094, 100, 101
Jensen — 064
JVC — 065, 066, 067, 068, 092,
094, 100, 101
Kenwood — 066, 081, 092, 094,
100, 101
Lloyds — 088
Logik — 089
Luxor — 022
Magnavox — 031, 057, 058, 060,
069, 111
Marantz — 034, 058, 069, 085,
092, 094, 100, 101, 103
MEI — 058
Memorex — 037, 053, 058, 070,
081, 085, 088, 108
MGA — 071, 072, 109
Mitsubishi — 066, 071, 072,
073, 074, 075, 109
Montgomery Ward — 031, 058,
080, 085, 088, 089, 090,
091, 107, 108, 109
MTC — 048, 080, 088
Multitech — 088, 089, 091
NAD — 000
NEC — 034, 035, 036, 066, 092,
094, 099, 100, 101, 102,
103, 104
Olympic — 057
Optonica — 085
Orion — 010, 011
Panasonic — 025, 026, 027, 028,
030, 057, 058, 098, 114,
123
Pentax — 041, 092
Perdio — 088
Philco — 057, 058, 111
Philips — 057, 058, 069, 085
Pioneer — 000, 001, 002, 003,
057, 066, 100
Portland — 050, 093
Proscan — 057, 105
Pulsar — 037
Quartz — 081
Quasar — 057, 058, 077, 078
Radio Shack — 107, 108, 109,
110
RCA — 029, 030, 031, 032, 033,
041, 091, 105, 106, 115,
124, 125
Realistic — 053, 058, 080, 081,
084, 085, 088
Ricoh — 006
Saisho — 010, 011
Salora — 071, 081
Samsung — 021, 038, 079, 080,
091
Sansui — 036, 048, 066, 100,
118
Sanyo — 053, 081, 082, 083,
108, 126
SBR — 069
Schneider — 089
Scott — 012, 063, 090
Sears — 052, 053, 081, 084,
108, 110
Sentra — 050
Sharp — 085, 107, 109, 122
Shintom — 089
Sony — 004, 005, 006, 007, 008
Sylvania — 057, 058, 060, 071,
088, 111
Symphonic — 088, 094
Tandy — 088
Tashiko — 088
Tatung — 086, 094, 101
Teac — 088, 094, 101
Technics — 057, 058
Teknika — 058, 087, 088
TMK — 010
Toshiba — 038, 039, 071, 090
Totevision — 080, 091
Unitech — 080
Vector Research — 034, 100
Victor — 065, 066, 100
Video Concepts — 072, 100
Videosonic — 091
Yamaha — 034, 092, 094, 100,
101
Zenith — 004, 005, 037
DVD player setup
codes
Hitachi — 132
Magnavox — 130
Mitsubishi — 133
Pioneer — 129
RCA — 131
Sony — 128
Toshiba — 127
Stereo receiver/
amplifier setup
codes
Aiwa — 004, 032, 033, 034,
035, 036, 037, 038
Carver — 020
Citizen — 023
Fisher — 020
GE — 025
Goldstar — 006
Hitachi — 031
JVC — 018, 039
Kenwood — 007, 040
Luxman — 003
Marantz — 022
Memorex — 008
NAD — 012
Nakamichi — 010
NEC — 030
Onkyo — 005, 015, 016
Optimus — 013
Panasonic — 021
Pioneer — 000, 001, 008, 046,
047
Proton — 028
Quasar — 021
RCA — 019, 027, 041
Scott — 017
Sharp — 026, 029
Sherwood — 011
Sony — 004, 009, 042, 043
Technics — 021
Toshiba — 024
Victor — 018
Yamaha — 002, 014, 044, 045