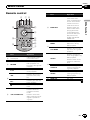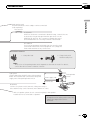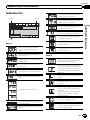
1
Owner’s Manual DVD RDS AV RECEIVER AVH-P2300DVD English Contents Thank you for purchasing this PIONEER product. To ensure proper use, please read through this manual before using this product. It is especially important that you read and observe WARNINGs and CAUTIONs in this manual. Please keep the manual in a safe and accessible place for future reference. Be sure to read this ! DVD video disc region numbers 7 ! Handling guidelines 76 Precautions IMPORTANT SAFEGUARDS 4 To ensure safe driving 4 To avoid battery exhaustion 5 Before you start Information to User 6 For Canadian model 6 The Safety of Your Ears is in Your Hands 6 About this unit 6 About this manual 7 Operating environment 7 After-sales service for Pioneer products 7 Visit our website 7 Resetting the microprocessor 8 Demo mode 8 Adjusting the response positions of the touch panels (Touch Panel Calibration) 8 Use and care of the remote control 8 What’s what Head unit 10 Remote control 11 Basic operations Basic operations 12 Operating the scroll bar and the scrubber bar 13 Activating the touch panel keys 13 Common operations for menu settings/ lists 14 Ejecting a disc 14 Setting the clock 14 Tuner Introduction of tuner operations 15 2 En Playing moving images Introduction of video playback operations 16 Playing audio Introduction of sound playback operations 19 Playing still images Introduction of still image playback operations 21 Introduction of still image playback as a slideshow operations 22 XM/SIRIUS tuner Introduction of XM/SIRIUS tuner operations 23 HD Radioä tuner Introduction of HD Radioä tuner operations 25 Using Bluetooth wireless technology Introduction of Bluetooth telephone operations 26 Bluetooth audio operations 27 Detailed instructions Storing and recalling stations 29 Storing the strongest stations 29 Tuning in to strong signals 29 Tuning in to strong HD Radio signals 29 Switching the media file type 30 Operating the DVD menu 30 Operating this unit’s iPod function from your iPod 30 Random play (shuffle) 31 Playing all songs in random order (shuffle all) 31 Repeating playback 31 Playing videos from your iPod 31 Browsing for a video/music on the iPod 32 Contents Resume playback (Bookmark) 33 Frame-by-frame playback 33 Slow motion playback 33 Searching for the part you want to play 33 Changing audio language during playback (Multi-audio) 33 Changing the subtitle language during playback (Multi-subtitle) 34 Changing the viewing angle during playback (Multi-angle) 34 Return to the specified scene 34 Selecting audio output 34 PBC playback 34 Selecting tracks from the track title list 35 Selecting files from the file name list 35 Using sound retriever 35 Changing audiobook speed 35 Displaying lists related to the currently playing song (Link Search) 35 Playing DivXâ VOD content 35 Capture an image in JPEG files 36 Changing the wide screen mode 36 Switching the XM/SIRIUS channel selection mode 37 Selecting an XM/SIRIUS channel directly 37 Using the MyMix function 38 Using the Game Alert function 40 Displaying the Radio ID 41 Switching the SIRIUS display 41 Using the Instant Replay function 41 Switching the seek mode 42 Switching the reception mode 42 Using the missed, received and dialed call lists on the optional Bluetooth adapter 42 Setting automatic answering 42 Switching the ring tone 42 Using a cellular phone to initiate a connection 43 Registering a connected cellular phone 43 Voice recognition 43 Connecting a Bluetooth audio player 43 Connecting to a Bluetooth device automatically 43 Displaying Bluetooth Device address 44 Menu operations Introduction of menu operations 45 Audio Adjustments 46 Setting up the DVD player 48 System settings 52 Entertainment settings 55 Customizing menus 56 Other Functions Changing the picture adjustment 57 Adjusting the response positions of the touch panels (Touch Panel Calibration) 57 Using an AUX source 58 Using an external unit 58 Installation Connecting the units 60 Installation 68 Additional Information Troubleshooting 69 Error messages 71 Understanding messages 74 Indicator list 75 Handling guidelines 76 Compressed audio compatibility (disc, USB) 78 iPod compatibility 80 Sequence of audio files 80 Using the display correctly 80 Copyright and trademark 82 Language code chart for DVD 84 Specifications 85 En 3 Section 01 Precautions IMPORTANT SAFEGUARDS Please read all of these instructions regarding your display and retain them for future reference. 1 Read this manual fully and carefully before operating your display. 2 Keep this manual handy as a reference for operating procedures and safety information. 3 Pay close attention to all warnings in this manual and follow the instructions carefully. 4 Do not allow other persons to use this system until they have read and understood the operating instructions. 5 Do not install the display where it may (i) obstruct the driver’s vision, (ii) impair the performance of any of the vehicle’s operating systems or safety features, including air bags, hazard lamp buttons or (iii) impair the driver’s ability to safely operate the vehicle. 6 Do not operate this display if doing so in any way will divert your attention from the safe operation of your vehicle. Always observe safe driving rules and follow all existing traffic regulations. If you experience difficulty in operating the system or reading the display, park your vehicle in a safe location and make necessary adjustments. 7 Please remember to wear your seat belt at all times while operating your vehicle. If you are ever in an accident, your injuries can be considerably more severe if your seat belt is not properly buckled. 8 Never use headphones while driving. 9 To promote safety, certain functions are disabled unless the parking brake is on, and the vehicle is not in motion. 10 Never set the volume of your display so high that you cannot hear outside traffic and emergency vehicles. 4 En WARNING ! Do not attempt to install or service your display by yourself. Installation or servicing of the display by persons without training and experience in electronic equipment and automotive accessories may be dangerous and could expose you to the risk of electric shock or other hazards. To ensure safe driving WARNING ! LIGHT GREEN LEAD AT POWER CONNECTOR IS DESIGNED TO DETECT PARKED STATUS AND MUST BE CONNECTED TO THE POWER SUPPLY SIDE OF THE PARKING BRAKE SWITCH. IMPROPER CONNECTION OR USE OF THIS LEAD MAY VIOLATE APPLICABLE LAW AND MAY RESULT IN SERIOUS INJURY OR DAMAGE. ! To avoid the risk of damage and injury and the potential violation of applicable laws, this unit is not for use with a video screen that is visible to the driver. ! To avoid the risk of accident and the potential violation of applicable laws, no viewing of front seat video should ever occur while the vehicle is being driven. ! In some countries or states the viewing of images on a display inside a vehicle even by persons other than the driver may be illegal. Where such regulations apply, they must be obeyed and this unit’s DVD features should not be used. When you attempt to watch a video image while driving, the warning Viewing of front seat video source while driving is strictly prohibited. will appear on the front display. To watch a video image on the front display, park your vehicle in a safe place and apply the parking brake. Section Precautions Certain functions (Video viewing and certain touch panel keys) offered by this unit could be dangerous and/or unlawful if used while driving. To prevent such functions from being used while the vehicle is in motion, there is an interlock system that senses when the parking brake is set. If you attempt to use the functions described above while driving, they will become disabled until you stop the vehicle in a safe place, and (1) apply the parking brake, (2) release the parking brake, and then (3) apply the parking brake again. Please keep the brake pedal pushed down before releasing the parking brake. When using a display connected to V OUT This unit’s V OUT is for connection of a display to enable passengers in the rear seats to watch the DVD or Video CD. backing up. Do not use for entertainment purposes. ! Please note that the edges of the rear view camera images may differ slightly according to whether full screen images are displayed when backing up, and whether the images are used for checking the rear when the vehicle is moving forward. Precautions Parking brake interlock 01 To avoid battery exhaustion Keep the vehicle engine running when using this unit to avoid draining the battery power. ! When no power is supplied to this unit, such as when the vehicle battery is being replaced, the microcomputer of this unit returns to its initial condition. We recommend that you transcribe the audio adjustment data. WARNING Do not use with vehicles that do not feature an ACC position. WARNING NEVER install the rear display in a location where the driver can watch a DVD while driving. When using the rear view camera With an optional rear view camera, this unit can be used as an aid to keep an eye on trailers, or when backing into a tight parking spot. WARNING ! SCREEN IMAGE MAY APPEAR REVERSED. ! USE INPUT ONLY FOR REVERSE OR MIRROR IMAGE REAR VIEW CAMERA. OTHER USE MAY RESULT IN INJURY OR DAMAGE. CAUTION ! The rear view camera function is to be used as an aid to keep an eye on trailers, or while En 5 Section 02 Before you start This device complies with part 15 of the FCC Rules. Operation is subject to the following two conditions: (1) This device may not cause harmful interference, and (2) this device must accept any interference received, including interference that may cause undesired operation. Information to User Alteration or modifications carried out without appropriate authorization may invalidate the user’s right to operate the equipment. For Canadian model This Class B digital apparatus complies with Canadian ICES-003. The Safety of Your Ears is in Your Hands Get the most out of your equipment by playing it at a safe level—a level that lets the sound come through clearly without annoying blaring or distortion and, most importantly, without affecting your sensitive hearing. Sound can be deceiving. Over time, your hearing “comfort level” adapts to higher volumes of sound, so what sounds “normal” can actually be loud and harmful to your hearing. Guard against this by setting your equipment at a safe level BEFORE your hearing adapts. ESTABLISH A SAFE LEVEL: ! Set your volume control at a low setting. ! Slowly increase the sound until you can hear it comfortably and clearly, without distortion. 6 En ! Once you have established a comfortable sound level, set the dial and leave it there. BE SURE TO OBSERVE THE FOLLOWING GUIDELINES: ! Do not turn up the volume so high that you can’t hear what’s around you. ! Use caution or temporarily discontinue use in potentially hazardous situations. ! Do not use headphones while operating a motorized vehicle; the use of headphones may create a traffic hazard and is illegal in many areas. About this unit The tuner frequencies on this unit are allocated for use in North America. Use in other areas may result in poor reception. WARNING Handling the cord on this product or cords associated with accessories sold with the product may expose you to chemicals listed on proposition 65 known to the State of California and other governmental entities to cause cancer and birth defect or other reproductive harm. Wash hands after handling. CAUTION: USE OF CONTROL OR ADJUSTMENT OR PERFORMANCE OF PROCEDURES OTHER THAN THOSE SPECIFIED HEREIN MAY RESULT IN HAZARDOUS RADIATION EXPOSURE. CAUTION: THE USE OF OPTICAL INSTRUMENTS WITH THIS PRODUCT WILL INCREASE EYE HAZARD. Section Before you start CAUTION Important (Serial number) The serial number is located on the bottom of this unit. For your own security and convenience, be sure to record this number on the enclosed warranty card. DVD video disc region numbers Only DVD video discs with compatible region numbers can be played on this player. You can find the region number of the player on the bottom of this unit and in this manual (refer to Specifications on page 85). About this manual This unit features a number of sophisticated functions to ensure superior reception and operation. All the functions have been designed for the easiest possible use, but many are not self-explanatory. This operation manual will help you benefit fully from this unit’s potential and to maximize your listening enjoyment. We recommend that you familiarize yourself with the functions and their operation by reading through the manual before you begin using this unit. It is especially important that you read and observe WARNINGs and CAUTIONs in this manual. Operating environment This unit should be used within the temperature ranges shown below. Operating temperature range: –10 °C to +60 °C (14 °F to 140 °F) EN300328 ETC test temperature: -20 °C and +55 °C (-4 °F and 131 °F) After-sales service for Pioneer products Before you start ! Do not allow this unit to come into contact with liquids. Electrical shock could result. Also, damage to this unit, smoke, and overheating could result from contact with liquids. ! Keep this manual handy for future reference. ! Always keep the volume low enough to hear outside sounds. ! Avoid exposure to moisture. ! If the battery is disconnected or discharged, any preset memory will be erased. 02 Please contact the dealer or distributor from where you purchased this unit for after-sales service (including warranty conditions) or any other information. In case the necessary information is not available, please contact the companies listed below: Please do not ship your unit to the companies at the addresses listed below for repair without advance contact. U.S.A. Pioneer Electronics (USA) Inc. CUSTOMER SUPPORT DIVISION P.O. Box 1760 Long Beach, CA 90801-1760 800-421-1404 CANADA Pioneer Electronics of Canada, Inc. CUSTOMER SATISFACTION DEPARTMENT 300 Allstate Parkway Markham, Ontario L3R 0P2 1-877-283-5901 905-479-4411 For warranty information please see the Limited Warranty sheet included with this unit. Visit our website Visit us at the following site: En 7 Section Before you start 02 http://www.pioneerelectronics.com 1 Register your product. We will keep the details of your purchase on file to help you refer to this information in the event of an insurance claim such as loss or theft. 2 Receive updates on the latest products and technologies. 3 Download owner’s manuals, order product catalogues, research new products, and much more. 4 Your feedback is important in our continual effort to design and build the most advanced, consumer-focused product in the industry. Serial number Resetting the microprocessor By pressing RESET, you can reset the microprocessor to its initial settings without changing the bookmark information. The microprocessor must be reset in the following situations: ! Before using this unit for the first time after installation ! If the unit fails to operate properly ! When strange or incorrect messages appear on the display 1 Turn the ignition switch OFF. 2 Press RESET with a pen tip or other pointed instrument. Note Switch your engine ON or set the ignition switch to ACC ON before pressing RESET in the following situations: ! After completing connections ! When erasing all stored settings ! When resetting the unit to its initial (factory) settings Demo mode The feature demo automatically starts when you select Off for the source and continues while the ignition switch is set to ACC or ON. To cancel the feature demo, press and hold MUTE. Press and hold MUTE again to restart. Operating the feature demo while the car engine is turned off it may drain the battery power. Important Failure to connect the red lead (ACC) of this unit to a terminal coupled with ignition switch on/off operations may lead to battery drain. Adjusting the response positions of the touch panels (Touch Panel Calibration) If you feel that the touch panel keys on the screen deviate from the actual positions that respond to your touch, adjust the response positions of the touch panel. Refer to Adjusting the response positions of the touch panels (Touch Panel Calibration) on page 57. Use and care of the remote control Installing the battery RESET button 8 En Slide the tray on the back of the remote control out and insert the battery with the plus (+) and minus (–) poles aligned properly. Section Before you start ! When using for the first time, pull out the film protruding from the tray. 02 Before you start ! The remote control may not function properly in direct sunlight. ! Do not let the remote control fall onto the floor, where it may become jammed under the brake or accelerator pedal. WARNING ! Keep the battery out of the reach of children. Should the battery be swallowed, consult a doctor immediately. ! Batteries (battery pack or batteries installed) must not be exposed to excessive heat such as sunshine, fire or the like. CAUTION ! Use one CR2025 (3 V) lithium battery. ! Remove the battery if the remote control is not used for a month or longer. ! There is a danger of explosion if the battery is incorrectly replaced. Replace only with the same or equivalent type. ! Do not handle the battery with metallic tools. ! Do not store the battery with metallic objects. ! If the battery leaks, wipe the remote control completely clean and install a new battery. ! When disposing of used batteries, comply with governmental regulations or environmental public institutions’ rules that apply in your country/area. ! “Perchlorate Material – special handling may apply. See www.dtsc.ca.gov/hazardouswaste/ perchlorate. (Applicable to California, U.S.A.)” Using the remote control Point the remote control in the direction of the front panel to operate. Important ! Do not store the remote control in high temperatures or direct sunlight. En 9 Section 03 What’s what Head unit 2 1 Note When the navigation system is connected, press MODE to switch to the navigation display. Press MODE and hold to turn the display off. Press MODE again to turn the display on. 3 4 5 76 8 9 a b Part Part 1 RESET 7 MUTE 2 h (eject) 8 MODE Turning the information display off. 3 Disc loading slot 9 MENU Displaying the menu. Returning to the normal display. 4 +/– (VOLUME/ VOL) a USB port When connecting, open the USB connector lid. 5 c/d (TRACK/ SEEK) b AUX input jack (3.5 mm stereo/ video jack) Use to connect an auxiliary device. 6 SRC/OFF CAUTION ! Use an optional Pioneer USB cable (CD-U50E) to connect the USB audio player/USB memory as any device connected directly to the unit will protrude out from the unit and may be dangerous. ! Do not use unauthorized products. ! For details on how to operate a navigation system from this unit, refer to its operation manual. 10 En Section What’s what 03 Remote control 4 Operation BAND/ESC Press to select the tuner band when tuner is selected as a source. Also used to cancel the control mode of functions. Press to switch between modes when playing discs with compressed audio and audio data (CDDA) such as CDEXTRA and MIXEDMODE CDs. MENU Press to display the DVD menu during DVD playback. TOP MENU Press to return to the top menu during DVD playback. AUDIO Press to change the audio language during DVD playback. Press to switch audio output for Video CD/ DivX. SUBTITLE Press to change the subtitle language during DVD playback. ANGLE Press to change the viewing angle during DVD playback. REAR SRC Not used. 7 6 j h g c d e f i g 5 Part Operation c Thumb pad Use to select a menu on the DVD menu. d RETURN Press to display the PBC (playback control) menu during PBC playback. f Press to pause or resume playback. o Press to return to the previous track (chapter). p Press to go to the next track (chapter). g Press to stop playback. a/b(FOLDER/P.CH) Press to select the next/previous disc/ folder. Press to recall radio station frequencies assigned to preset tuning keys. e f h i j En What’s what Part 11 Section 04 Basic operations Basic operations 1 2 Wed 28 May 12:45 PM 3 4 Radio 5 Rear View Disc iPod AUX Selecting a source using the buttons 1 Press SRC/OFF to cycle through the sources listed below: Selecting a source using the touch panel keys 1 Touch the source icon and then touch the desired source name. ! XM – XM tuner ! Sirius – SIRIUS tuner ! Radio/HD Radio – Radio/Digital Radio tuner ! AV – AV input ! Disc – Built-in DVD player ! USB/iPod – USB/iPod ! EXT1 – External unit 1 ! EXT2 – External unit 2 ! AUX – AUX ! TEL/Audio – Bluetooth telephone/audio ! When the source icon is not displayed, it can be displayed by touching the screen. Adjusting the volume 1 Press +/– (VOLUME/VOL) to adjust the volume. ! Touch panel keys 1 2 Displaying the source menu. Wed 28 May 12:45 PM Switching to clock adjustment display. Refer to Setting the clock on page 14. 3 Radio Source icon Selecting a favorite source. When the source icon is not displayed, it can be displayed by touching the screen. 4 Rear View Switching the rear view image on or off. 5 Turning the unit off. Turning the unit on using the buttons 1 Press SRC/OFF to turn the unit on. Turning the unit off using the buttons 1 Press SRC/OFF and hold until the unit turns off. 12 En Notes ! In this manual, iPod and iPhone will be referred to as “iPod”. ! The USB/iPod icon will change as follows: — USB is displayed when a USB storage device is connected. — iPod is displayed when an iPod is connected. — USB/iPod is displayed when no device is connected. ! When appropriately set up, the image from the rear view camera can be displayed automatically. For details, refer to Setting the rear view camera (back up camera) on page 54. ! An external unit refers to a Pioneer product, such as those which will be available in the future. Although incompatible as a source, the basic functions of up to two external units can be controlled with this unit. When two external units are connected, the external units are automatically allocated to external unit 1 or external unit 2. ! If the HD Radio tuner is connected to this unit, tuner source is skipped. Section Basic operations 04 Operating the scroll bar and the scrubber bar Activating the touch panel keys 1 1 12 Audio F/R 0 L/R 0 Graphic EQ Super Bass Loudness High Subwoofer Off Bass Booster Wed 28 May 12:45 PM 1 01 L+R 1 Abcdeabcdeabcdeabcdeab 0 High Pass Filter Basic operations Fader/Balance 8 12 Off 01:45 21 1 -02:45 22 1 Wed 28 May 12:45 PM 1 01 Return L+R 1 3 2 Abcdeabcdeabcdeabcdeab 8 12 01:45 -02:45 2 1 Scroll icon Appears when selectable items are hidden. 2 Scrubber bar Appears when the playback point can be specified or set by dragging. Viewing the hidden items 1 Touch the scroll icon or drag the scrubber bar to view any hidden items. Specifying the playback point 1 Drag the scrubber bar on the screen. (Not available when the scrubber bar is grayed out.) 1 Touch panel keys Perform various operations by touching the panel. 2 Open/close keys Control the touch panel key area by touching these keys. 1 Turning the display to simplified display. Returning to the normal display by touching the screen when playing moving images. Returning to the normal display by touching same position when playing audio. 2 Viewing the hidden touch panel keys. 3 Shorten the touch panel area. En 13 Section Basic operations 04 Common operations for menu settings/lists Displaying the list menu. Starting the search function. Displaying the menu. Refer to Introduction of menu operations on page 45. Displaying still images as a slide show when listening to another source. Viewing slide shows. Refer to Introduction of still image playback operations on page 21. Returning to the previous display. Returning to the previous list/category (the folder/category one level higher.) ! Press and hold MENU to display Picture Adjustment. Refer to Changing the picture adjustment on page 57. Ejecting a disc % Press h (eject). Setting the clock 1 Switch to Clock Adjustment display. Refer to Basic operations on page 12. 2 Select the item to set. 3 Touch a or b to set the correct date and time. 14 En Section Tuner 05 Introduction of tuner operations 1 Radio Local Abcdeabcdeabcde Abcdeabcdeabcde Abcdeabcdeabcde 2 3 Wed 28 May 12:45 PM Tuner 87.9MHz P.ch 2 Band: FM1 87.9 MHz 4 5 ! Touch panel keys 1 Turning local seek tuning on and off. Refer to Tuning in to strong signals on page 29. 2 Switching the equalizer curves. Refer to Using the equalizer on page 46. 3 Displaying the preset channel list. Refer to Storing and recalling stations on page 29. Refer to Storing the strongest stations on page 29. 4 5 Band: Selecting a band (FM1, FM2, FM3 for FM or AM). Recalling radio station frequencies assigned to preset tuning keys. Manual tuning (step by step) using the buttons 1 Press c or d (TRACK/SEEK). Seek tuning using the buttons 1 Press and hold c or d (TRACK/SEEK). Note Listening AM radio while an iPod is charged from this unit may generate noise. In this case, disconnect the iPod from this unit. En 15 Section 06 Playing moving images Introduction of video playback operations You can view DVD/DVD-R/DVD-RW/CD/CD-R/ CD-RW/USB/iPod. DVD video such as the CD-IU50V (sold separately), you can enjoy the video contents of the iPod as an iPod source. ! Touch panel keys 1 Selecting the repeat range. Refer to Repeating playback on page 31. 2 During playback, touch the point at which you want to resume playback the next time the disc is loaded. Refer to Resume playback (Bookmark) on page 33. 3 Changing the screen mode. Refer to Changing the wide screen mode on page 36. 4 Switching the equalizer curves. Refer to Using the equalizer on page 46. 5 Switching between audio languages during playback. Refer to Changing audio language during playback (Multiaudio) on page 33. 6 Switching between subtitle languages during playback. Refer to Changing the subtitle language during playback (Multi-subtitle) on page 34. 7 Switching among viewing angles during playback. Refer to Changing the viewing angle during playback (Multi-angle) on page 34. 8 Switching the audio output, when playing video discs recorded with LPCM audio. Refer to Selecting audio output on page 34. Switching between stereo and monaural audio output, when playing Video CD discs. Wed 28 May 12:45 PM 1 01 L+R 1 Abcdeabcdeabcdeabcdeab 8 12 01:45 -02:45 Return Video CD Return DivX iPod video iPod S.Rtrv ALL Songs Wed 28 May 12:45 PM Abcdeabcdeabcdeabcdeab Abcdeabcdeabcdeabcdeab Abcdeabcdeabcdeabcdeab 2067/12345 01:45 -02:45 When playing a disc containing a mixture of various media file types 01:45 -02:45 ! If an iPod with video capabilities is connected to this unit using an interface cable 16 En Section Playing moving images a Pausing playback. Returning to normal playback during paused, slow motion, or frame-by-frame playback. b Displaying the DVD menu during DVD playback. Refer to Operating the DVD menu on page 30. c Returning to the top menu during DVD playback. d Stopping playback. Stopping playback at the point set in Resume playback. Touch one more time to stop playback completely when playing DivX. Refer to Resume playback (Bookmark) on page 33. e h Moving ahead one frame at a time during playback. Refer to Frame-by-frame playback on page 33. Touch and hold for more than two seconds to slow down playback speed. Speeding up the playback speed in four steps during slow motion playback on DVD video/Video CD. i Returning to the specified scene to which the DVD currently being played has been preprogrammed to return. Refer to Return to the specified scene on page 34. j Playing the video on your iPod in a random order. Refer to Random play (shuffle) on page 31. k Switching the S.Rtrv (sound retriever) function setting when playing a video on your iPod. Refer to Using sound retriever on page 35. l Conducting operation from your iPod and listening to it using your car’s speakers. Refer to Operating this unit’s iPod function from your iPod on page 30. m Switching between media file types to play on DVD/CD/ USB. Refer to Switching the media file type on page 30. Displaying arrow keys to operate the DVD menu. Refer to Using the arrow keys on page 30. f Skipping to another title. Selecting a folder during DivX file playback. g Speeding down the playback speed in four steps, during slow motion playback on Video CD. Return En Playing moving images 9 Starting the search function. Refer to Searching for the part you want to play on page 33. Refer to Selecting files from the file name list on page 35. Displaying iPod menus. Refer to Playing videos from your iPod on page 31 and Browsing for a video/music on the iPod on page 32. 06 17 Section 06 Playing moving images Playing back videos 1 Insert the disc into the disc loading slot with the label side up. Playback will automatically start. ! If you are playing a DVD or Video CD, a menu may appear. Refer to Operating the DVD menu on page 30 and PBC playback on page 34. ! When the automatic playback function is on, the unit will skip the DVD menu and automatically start playback from the first chapter of the first title. Refer to Automatic playback of DVDs on page 51. ! While an iPod is connected to this unit, PIONEER, OK to disconnect or (check mark) is displayed on the iPod. ! When the source icon is not displayed, it can be displayed by touching the screen. ! Disconnect headphones from the iPod before connecting it to this unit. ! Depending on the iPod model and the amount of data stored in the iPod, it may take some time for playback to begin. ! Use the touch panel keys to select the iPod after connecting it to this unit. ! No Device is displayed when disconnecting the iPod. ! If a message is displayed after loading a disc containing DivX VOD content, touch Play. Refer to Playing DivXâ VOD content on page 35. Ejecting a disc Refer to Ejecting a disc on page 14. Selecting a chapter using the buttons 1 Press c or d (TRACK/SEEK). Fast forwarding or reversing using the buttons 1 Press and hold c or d (TRACK/SEEK). ! Fast forward/fast rewind may not always be possible on some discs. In such cases, normal playback will automatically resume. Notes ! This DVD player can play back a DivX file recorded on CD-R/RW or DVD-R/RW. (Please see the following section for files that can be played back. Refer to page 78.) ! Do not insert anything other than a DVD (-R/RW) or CD (-R/-RW) into the disc loading slot. ! If the bookmark function is on, DVD playback resumes from the selected point. For more details, refer to Resume playback (Bookmark) on page 33. 18 En ! Some operations may not be available while watching a DVD due to the programming of the disc. In such cases, the icon appears on the screen. ! To ensure proper operation, connect the dock connector cable from the iPod directly to this unit. ! While the iPod is connected to this unit, the iPod cannot be turned on or off. Section Playing audio 07 Introduction of sound playback operations Switching the equalizer curves. Refer to Using the equalizer on page 46. 5 Displaying a list of track titles/file names to select songs on a CD. Refer to Selecting tracks from the track title list on page 35. Displaying the file name list to select the files. Refer to Selecting files from the file name list on page 35. Displaying iPod menus. Refer to Browsing for a video/music on the iPod on page 32. 6 Pausing and starting playback. 7 Switching the text information to display on this unit when playing MP3/ WMA/AAC files. 8 Selecting a folder. 9 Switching between media file types on a DVD/CD/USB. Refer to Switching the media file type on page 30. a Playing songs on the iPod in random order. Refer to Random play (shuffle) on page 31. b Changing the speed of audiobook playback on the iPod. Refer to Changing audiobook speed on page 35. You can listen to DVD-R/DVD-RW/CD/CD-R/ CD-RW/USB/iPod sound files. CD 1 2 3 4 S.Rtrv ROM Disc On 5 Wed 28 May 12:45 PM Abcdeabcdeabcdeabcdeab Abcdeabcdeabcdeabcdeab Abcdeabcdeabcdeabcdeab 87 125 01:45 -02:45 6 7 8 9 iPod audio f 1 a b 3 4i iPod S.Rtrv ALL Songs 5 Playing audio 4 Wed 28 May 12:45 PM Abcdeabcdeabcdeabcdea Abcdeabcdeabcdeabcdea Abcdeabcdeabcdeabcdea 2067/12345 01:45 6 -02:45 h g c d e You can control an iPod with this unit by using a cable such as the CD-IU50 (sold separately). ! Touch panel keys 1 2 3 Selecting the repeat range. Refer to Repeating playback on page 31. Playing songs in random order. Refer to Random play (shuffle) on page 31. Switching the S.Rtrv (sound retriever) function setting when playing audio. Refer to Using sound retriever on page 35. En 19 Section 07 Playing audio c Switching to Link Search mode to play songs related to the currently playing song on the iPod. Refer to Displaying lists related to the currently playing song (Link Search) on page 35. d Playing all songs on the iPod in random order. Refer to Playing all songs in random order (shuffle all) on page 31. e Conducting operation from your iPod and listening to it using your car’s speakers. Refer to Operating this unit’s iPod function from your iPod on page 30. ! Text information f g Displaying the Artists list on the iPod. Refer to Searching for a video/music by category on page 32. h Displaying the Albums list on the iPod. Refer to Searching for a video/music by category on page 32. ! Artwork display 20 En Ejecting a disc Refer to Ejecting a disc on page 14. Selecting a track using the buttons 1 Press c or d (TRACK/SEEK). Displaying the Songs list on the iPod. Refer to Searching for a video/music by category on page 32. i Playing back sound 1 Insert the disc into the disc loading slot with the label side up. Playback will automatically start. ! While an iPod is connected to this unit, PIONEER, OK to disconnect or (check mark) is displayed on the iPod. ! When the source icon is not displayed, it can be displayed by touching the screen. ! Disconnect headphones from the iPod before connecting it to this unit. ! Depending on the iPod model and the amount of data stored in the iPod, it may take some time for playback to begin. ! Use the touch panel keys to select the iPod after connecting it to this unit. ! No Device is displayed when disconnecting the iPod. Starting Album Link Search on your iPod when you touch the artwork display. Refer to Displaying lists related to the currently playing song (Link Search) on page 35. Fast forwarding or reversing using the buttons 1 Press and hold c or d (TRACK/SEEK). Notes ! When playing back files recorded as VBR (variable bit rate) files, the play time will not be correctly displayed if fast forward or reverse operations are used. ! To ensure proper operation, connect the dock connector cable from the iPod directly to this unit. ! While the iPod is connected to this unit, the iPod cannot be turned on or off. ! If the characters recorded on the disc are not compatible with this unit, those characters will not be displayed. ! Text information may not be correctly displayed depending on the recorded environment. ! Disconnect the USB portable audio player/ USB memory when you are done using it. ! When you select Clock on Selecting the background display on page 55, the artwork is not displayed. Section Playing still images Introduction of still image playback operations 08 5 Starting or pausing the slideshow. 6 Rotating the displayed picture 90° clockwise. 7 Capturing an image in JPEG files. Refer to Capture an image in JPEG files on page 36. 8 Selecting a folder. 9 Switching between media file types. Refer to Switching the media file type on page 30. You can view still images saved in CD-R/CDRW/USB. CD 1 2 3 4 Wed 28 May Photo Off 12:45 PM Full Abcdeabcdeabcde Abcdeabcdeabcde 2 2 Capture 5 6 7 8 When playing a disc containing a mixture of various media file types 01:45 -02:45 When loading a CD-R/CD-RW/USB containing JPEG picture files, this unit starts a slideshow from the first folder/picture on the disc/device. The player displays the pictures in each folder on the CD-R/CD-RW in alphabetical order by file name. The table below shows the controls for viewing a slideshow. ! Touch panel keys Touch any of the following touch panel keys to select the function to be adjusted. 1 Selecting the repeat range. Refer to Repeating playback on page 31. 2 Playing files in a random order. Refer to Random play (shuffle) on page 31. 3 Changing the screen mode. Refer to Changing the wide screen mode on page 36. Playing still images 4 Displaying the file name list to select the files. Refer to Selecting files from the file name list on page 35. Playing still images 1 Insert the disc into the disc loading slot with the label side up. Playback will automatically start. ! When the source icon is not displayed, it can be displayed by touching the screen. Ejecting a disc. Refer to Ejecting a disc on page 14. Selecting a file using the buttons 1 Press c or d (TRACK/SEEK). Fast file searching 1 Press and hold c or d (TRACK/SEEK). ! You can search 10 JPEG files at a time. Notes ! This unit can play back a JPEG file recorded on CD-R/CD-RW/USB storage device. (Please see the following section for files that can be played back. Refer to JPEG picture files on page 78.) En 21 Section 08 Playing still images ! Files are played back in file number order and folders are skipped if they contain no files. (If folder 01 (ROOT) contains no files, playback commences with folder 02.) Introduction of still image playback as a slideshow operations You can view still images saved in CD-R/CDRW/USB as a slideshow when listening to another source. 1 2 3 Off 4 5 1 Selecting the repeat range. Refer to Repeating playback on page 31. 2 Playing files in a random order. Refer to Random play (shuffle) on page 31. 3 Changing the screen mode. Refer to Changing the wide screen mode on page 36. 4 Selecting a folder. En 6 Starting or pausing the slideshow. 7 Rotating the displayed picture 90° clockwise. 8 Capturing an image in JPEG files. Refer to Capture an image in JPEG files on page 36. Displaying still images as a slide show. 7 8 The table below shows the controls for viewing a slideshow. ! Touch panel keys Touch any of the following touch panel keys to select the function to be adjusted. 22 Selecting a file. 1 Start slideshow when listening to another source. Refer to Common operations for menu settings/lists on page 14. Full Capture 6 5 2 Select the device containing the files that you want to display. ! Disc – Built-in DVD player ! USB – USB # To cancel searching, touch Cancel. Note When the disc or USB source is selected, this unit cannot view still images on disc/USB as a slideshow. Section XM/SIRIUS tuner 09 Introduction of XM/SIRIUS tuner operations SIRIUS tuner 1 2 3 SIRIUS Mode All CH Memo Off Abcdeabcdeabcde 4 Team Off 5 Wed 28 may 12:45 PM CH183 P.CH 2 Band: SIRIUS CH183 6 7 When the SIRIUS tuner is used together with this unit, some operations differ slightly from those described in the SIRIUS operation manual. This manual provides information on these points. For all other information on using the SIRIUS tuner, please refer to the SIRIUS operation manual. ! With this unit, you can operate one additional function: XM/SIRIUS channel direct selection. Refer to Selecting an XM/SIRIUS channel directly on page 37. ! Touch panel keys Instant Replay Memo Game Info Edit Team Setting 9 a b c d 1 XM tuner 1 XM XM 4 Mode All CH Abcdeabcdeabcde Abcdeabcdeabcde Abcdeabcdeabcde Abcdeabcdeabcde Mode All CH Mode Category Selecting a channel by number or category. Refer to Switching the XM/SIRIUS channel selection mode on page 37. Memo On Memo Off Tuning the MyMix function on or off for the SIRIUS tuner. Refer to Turning the MyMix function on or off on page 39. Team On Turning the Game Alert on or off for the SIRIUS tuner. Refer to Switching the Game Alert on or off on page 40. 5 Wed 28 may 12:45 PM 2 CH183 XM/SIRIUS tuner 8 Memo P.ch 2 Band: XM CH183 6 3 Memo 8 Team Off Memo Edit a b ! You can use this unit to control an XM satellite digital tuner (GEX-P920XM), which is sold separately. For details concerning operation, refer to the XM tuner’s operation manuals. This section provides information on XM operations with this unit which differs from that described in the XM tuner’s operation manual. ! You can use this unit to control a SIRIUS Satellite Radio tuner, which is sold separately. 4 Switching the equalizer curves. Refer to Using the equalizer on page 46. En 23 Section 09 XM/SIRIUS tuner Displaying the preset channel list. Refer to Storing and recalling stations on page 29. Selecting a channel directly. Refer to Selecting an XM/ SIRIUS channel directly on page 37. Selecting a channel from the XM channel list. Refer to Selecting a channel from the XM channel list display on page 37. 5 6 Band: Recalling radio station frequencies assigned to preset tuning keys. Refer to Storing and recalling stations on page 29. Selecting the channel category when selecting Mode Category. Refer to Switching the XM/SIRIUS channel selection mode on page 37 and Selecting a XM/SIRIUS channel from a channel category on page 37. 8 9 a 24 En Selecting a band (XM1, XM2 or XM3) for XM tuner. Selecting a band (SIRIUS1, SIRIUS2 or SIRIUS3) for the SIRIUS tuner. Instant Replay Selecting a track, fast forwarding/reversing or pausing/playing for the SIRIUS tuner. Refer to Using the Instant Replay function on page 41. Memo Storing the song title and artist name. Refer to Making the MyMix playlist on page 38. b c d Memo Edit Switching to memo edit mode. Refer to Setting up a song alert on page 39. Refer to Deleting a song from the MyMix playlist for XM tuner on page 39. Refer to Deleting a song from the MyMix playlist for SIRIUS tuner on page 40. Game Info Displaying information on games for the SIRIUS tuner. Refer to Displaying game information on page 41. Team Setting Selecting teams for game alert on the SIRIUS tuner. Refer to Selecting teams for Game Alert on page 40. ! SIRIUS tuner information 7 Switching the SIRIUS information. Refer to Switching the SIRIUS display on page 41. Touch and hold for more than two seconds to scroll the text. Manual tuning (step by step) using the buttons 1 Press c or d (TRACK/SEEK). Seek tuning using the buttons 1 Press and hold c or d (TRACK/SEEK). Note You can also perform tuning from a desired channel category. (Refer to Selecting a XM/SIRIUS channel from a channel category on page 37.) Section HD Radioä tuner 10 Introduction of HD Radioä tuner operations 1 2 3 Digital Radio Local Seek All Abcdeabcdeabcde Blending D/A Auto 4 5 Wed 28 may 12:45 PM 87.9MHz P.CH 2 Band: FM1 87.9 MHz 6 Band: 6 Recalling radio station frequencies assigned to preset tuning keys. Refer to Storing and recalling stations on page 29. 8 ! Digital Radio tuner information 7 7 8 This HD Radio Ready receiver is ready to receive HD Radio broadcasts when connected to the HD Radio tuner (e.g. GEX-P20HD), sold separately. Selecting a band (FM1, FM2, FM3 for FM or AM). Switching the digital radio tuner information. Manual tuning (step by step) using the buttons 1 Press c or d (TRACK/SEEK). Seek tuning using the buttons 1 Press and hold c or d (TRACK/SEEK). HD Radioä tuner For details concerning operation, refer to the HD Radio tuner’s operation manual. ! Touch panel keys Turning local seek tuning on or off. Refer to Tuning in to strong HD Radio signals on page 29. 1 2 Seek All Seek HD 3 Blending D/A Auto Blending Analog Switching between Digital broadcasting station seek and normal seek. Refer to Switching the seek mode on page 42. Switching to the analog broadcast of the same frequency. Refer to Switching the reception mode on page 42. 4 Switching the equalizer curves. Refer to Using the equalizer on page 46. 5 Displaying the preset channel list. Refer to Storing and recalling stations on page 29. En 25 Section 11 Using Bluetooth wireless technology Introduction of Bluetooth telephone operations 1 Switching the equalizer curves. Refer to Using the equalizer on page 46. 2 Accepting an incoming call. Making a phone call, when selecting a phone number from the dialed and received call history. 3 Ending a call. Rejecting an incoming call. Canceling call waiting. 4 Displaying the received/ missed call history. Selecting a phone number from the call history. Refer to Using the missed, received and dialed call lists on the optional Bluetooth adapter on page 42. 5 Displaying the dialed call history. Selecting a phone number from the call history. Refer to Using the missed, received and dialed call lists on the optional Bluetooth adapter on page 42. 6 Scrolling the phone number. Touch and hold for more than two seconds to activate connection mode on this unit and establish a Bluetooth wireless connection from your phone. Refer to Using a cellular phone to initiate a connection on page 43. During a call 2 3 1 Wed 28 May TEL 12:45 PM Abcdeabc Text Scroll REG 4 5 6 7 8 9 Except during a call Text Scroll REG a When you connect a Bluetooth adapter (e.g. CD-BTB200)(sold separately) to AVHP2300DVD, you can control Bluetooth telephone. But the available features are limited. Important ! In some countries, CD-BTB200 is not sold on the market. ! Since this unit is on standby to connect with your cellular phone via Bluetooth wireless technology, using it without the engine running can drain the battery power. ! Advanced operations that require attention such as dialing numbers on the monitor, etc., are prohibited while driving. Park your vehicle in a safe place when using these advanced operations. ! Operations available may be limited depending on the cellular phone connected to this unit. ! Touch panel keys 26 En 7 Text Scroll Registering connected cellular phone to take full advantage of the features available with Bluetooth wireless technology. Refer to Registering a connected cellular phone on page 43. Touch and hold for more than two seconds to terminate the Bluetooth wireless connection. Section Using Bluetooth wireless technology 9 Turning the ring tone for incoming calls on or off. Refer to Switching the ring tone on page 42. Touch and hold for more than two seconds to display the Bluetooth device address and the device name. Refer to Displaying Bluetooth Device address on page 44. a Switching between Bluetooth telephone and Bluetooth audio. Touch and hold for more than two seconds to start voice recognition. Refer to Voice recognition on page 43. Setting up for hands-free phoning Before you can use the hands-free phoning function you must set up the unit for use with your cellular phone. This entails establishing a Bluetooth wireless connection between this unit and your phone, registering your phone with this unit, and adjusting the volume level. 1 Connection First, you need to connect a Bluetooth telephone to this unit. For detailed instructions on connecting your phone to this unit via Bluetooth wireless technology, see following section. Using a cellular phone to initiate a connection on page 43 and Registering a connected cellular phone on page 43. 2 Volume adjustment Adjust the earpiece volume of your cellular phone to your preference. ! The volume of the caller’s voice and ring tone may vary depending on the type of cellular phone. ! If there is a large volume difference between the ring tone and caller’s voice, the overall volume level may become unstable. ! Make sure to adjust the volume to a proper level before disconnecting the cellular phone from the unit. If the volume is muted (zero level) on your cellular phone, the volume level of your cellular phone remains muted even after the cellular phone is disconnected. Bluetooth audio operations When you connect a Bluetooth adapter (e.g. CD-BTB200)(sold separately) to AVHP2300DVD, you can control Bluetooth audio. Important ! Depending on the Bluetooth audio player connected to this unit, the available operations will be limited to the following two levels: — A2DP profile (Advanced Audio Distribution Profile): You can only playback songs on your audio player. — AVRCP profile (Audio/Video Remote Control Profile): You can perform playback, pause playback, select songs, etc. ! Since there are a number of Bluetooth audio players available on the market, available operations will vary extensively. When operating your player with this unit, refer to the instruction manual that came with your Bluetooth audio player as well as this manual. En Using Bluetooth wireless technology 8 Turning automatic answering on or off. Refer to Setting automatic answering on page 42. Touch and hold for more than two seconds to connect to a Bluetooth telephone automatically. Refer to Connecting to a Bluetooth device automatically on page 43. 11 27 Section 11 Using Bluetooth wireless technology ! Information related to a song (such as the elapsed playing time, song title, song index, etc.) cannot be displayed on this unit. ! As the signal from your cellular phone may cause noise, avoid using it when you are listening to songs on your Bluetooth audio player. ! When a call is in progress on the cellular phone connected to this unit via Bluetooth wireless technology, the sound of the Bluetooth audio player connected to this unit is muted. ! When the Bluetooth audio player is in use, you cannot connect to a Bluetooth telephone automatically. ! Playback continues even if you switch from your Bluetooth audio player to another source while listening to a song. ! Touch panel keys Switching between Bluetooth telephone and Bluetooth audio. Skipping back or forward to another track when Auto is set for the auto/manual setting. Performing fast forward or rewind when Manual is set for the auto/ manual setting. 28 En F1 Pausing a song. Touch and hold for more than two seconds to activate connection mode on this unit and establish a Bluetooth wireless connection from your player. Refer to Connecting a Bluetooth audio player on page 43. F2 Playback starts. Touch and hold for more than two seconds to terminate the Bluetooth wireless connection. Setting the action for c and d icons. Auto Switching the equalizer curves. Refer to Using the equalizer on page 46. Setting up for Bluetooth audio Before you can use the Bluetooth audio function you must set up the unit for use with your Bluetooth audio player. This entails establishing a Bluetooth wireless connection between this unit and your Bluetooth audio player, and pairing your Bluetooth audio player with this unit. 1 Connection First, you need to connect a Bluetooth audio to this unit. For detailed instructions on connecting your Bluetooth audio to this unit via Bluetooth wireless technology, see Connecting a Bluetooth audio player on page 43. Section Detailed instructions Storing and recalling stations You can easily store up to six stations for each band as presets. ! Six stations for each band can be stored in memory. ! Channels are stored and recalled on a broadcast station basis. This means that if the broadcast station you stored has been assigned to a different channel by SIRIUS, you can still recall the same broadcast station (though a different channel number may appear in the display). 1 Display the preset screen. Refer to Introduction of tuner operations on page 15. Refer to Introduction of XM/SIRIUS tuner operations on page 23. Refer to Introduction of HD Radioä tuner operations on page 25. The preset screen appears in the display. 3 Touch one of the preset tuning keys to select the desired station. # You can also use a and b to recall stations assigned to preset tuning keys Preset1 to Preset6 when the Mode All CH mode is selected. (Function of SIRIUS tuner) Storing the strongest stations BSM (best stations memory) automatically stores the six strongest stations in the order of their signal strength. Storing broadcast frequencies with BSM may replace broadcast frequencies you have saved using the preset tuning keys. 1 Display the preset screen. Refer to Introduction of tuner operations on page 15. Refer to Introduction of HD Radioä tuner operations on page 25. The preset screen appears in the display. 2 Touch BSM to turn BSM on. The six strongest broadcast frequencies will be stored under preset tuning keys in order of their signal strength. # To cancel the storage process, touch Cancel. Tuning in to strong signals Local seek tuning lets you tune in to only those radio stations with sufficiently strong signals for good reception. — — FM: off — — AM: off — — The highest level setting allows reception of only the strongest stations, while lower levels allow the reception of weaker stations. Tuning in to strong HD Radio signals Local seek tuning lets you tune in to only those radio stations with sufficiently strong signals for good reception. Detailed instructions 2 Touch and hold one of the preset tuning keys to store the selected frequency in the memory. The selected radio station frequency has been stored in the memory. 12 1 Start local seek tuning Refer to Introduction of HD Radioä tuner operations on page 25. 2 Touch On on Local to turn on. # To turn off, touch Off. 3 Touch c or d on Level to select the desired level. # Level1—Level2—Level3—Level4 # The highest level setting allows reception of only the strongest stations, while lower levels allow the reception of weaker stations. En 29 Section Detailed instructions 12 Switching the media file type When playing a disc containing a mixture of various media file types, such as DivX and MP3, you can switch between media file types to play. Audio data (CD-DA) and JPEG picture files on DVD-R/RW/ROM cannot be played back on this unit. CD (audio data (CD-DA))—Music/ROM (compressed audio)—Video (DivX video files)— Photo (JPEG picture files) Operating the DVD menu (Function for DVD video) Some DVDs allow you to make a selection from the disc contents using a menu. Using the arrow keys 1 Display arrow keys to operate the DVD menu. Refer to Playing moving images on page 16. 2 Select the desired menu item. Selecting the desired menu item. Starting playback from the selected menu item. Operating the DVD menu by directly touching the menu item. # When operating the DVD menu by directly touching the menu item, touch the icon to operate. 30 En Returning to the normal DVD video display. Displaying arrow keys. # Ways to display the menu will differ depending on the disc. # Depending on the contents of the DVD disc, this function may not work properly. In such cases, use the touch panel keys to operate the DVD menu. Operating this unit’s iPod function from your iPod You can listen to the sound from your iPod applications using your car's speakers, when App Mode is selected. This function is not compatible with the following iPod models. ! iPod nano 1st generation ! iPod 5th generation APP mode is compatible with the following iPod models. ! iPhone 4 (software version 4.1 or later) ! iPhone 3GS (software version 4.1 or later) ! iPhone 3G (software version 4.1 or later) ! iPhone (software version 3.1.3 or later) ! iPod touch 4th generation (software version 4.1 or later) ! iPod touch 3rd generation (software version 4.0 or later) ! iPod touch 2nd generation (software version 4.0 or later) ! iPod touch 1st generation (software version 3.1.3 or later) 1 Switch the control mode to App Mode. Refer to Introduction of video playback operations on page 16. Refer to Introduction of sound playback operations on page 19. 2 Operate the connected iPod to select a video/song and play. Section Detailed instructions Note The following functions are still accessible from the unit even if the control mode is set to App Mode. However, the operation will depend on your applications. ! Pausing ! Fast forwarding/reversing ! Tracking up/down ! Moving to a chapter up/down Random play (shuffle) iPod-videos/songs can be played back in random order. Playing all songs in random order (shuffle all) (Function for iPod) This method plays all songs on the iPod randomly. Repeating playback ! ! ! ! ! ! Disc – Play through the current disc Chapter – Repeat the current chapter Title – Repeat the current title Track – Repeat the current track File – Repeat the current file Folder – Repeat the current folder ! One – Repeat just the current video/song/ track ! All – Repeat all videos/songs in the selected list on the iPod and all files on the USB ! This function cannot be operated during Video CD playback featuring PBC (playback control). ! If you perform chapter search, fast forward/ reverse, frame-by-frame playback or slow motion playback, the repeat play will stop. ! When playing discs with compressed audio and audio data (CD-DA), playback is repeated within the type of data currently playing even if Disc is selected. ! If you select another folder during repeat play, the repeat play range changes to Disc. If you select USB source, the repeat play range changes to All. ! If you perform track search or fast forward/ reverse during File, the repeat play range changes to Folder. ! If you perform title/chapter search or fast forward/reverse during Chapter, the repeat play range changes to Disc. ! If you perform track search or fast forward/ reverse during Track, the repeat play range changes to Disc. ! When Folder is selected, it is not possible to play back a subfolder of that folder. Detailed instructions ! Songs – Play back videos/songs in the selected list in random order. ! Albums – Play back videos/songs from a randomly selected album in order. ! Folder – Play back songs/tracks in the selected folder in random order. ! Disc – Play back songs/tracks in the selected disc in random order. ! On – Play back files in random order within the repeat range, Folder and Disc. ! Off – Cancel random play. 12 Playing videos from your iPod (Function for iPod) Videos can be played on this unit if an iPod with video capabilities is connected. ! This unit can play back “Movies”, “Music videos”, “Video Podcast” and “TV show” which are downloaded from the iTunes store. ! Before you display the video screen, be sure to change the video setting on the iPod so that the iPod can output the video to an external device. En 31 Section Detailed instructions 12 1 Display the iPod menus. Refer to Playing moving images on page 16. 2 Switch to iPod video mode. Video Switching to iPod video mode. ! Audiobooks (audiobooks) 3 Touch the title of the list that you want to play. Repeat this operation until you find the desired video/music. 4 3 Start playback of the selected list. Play the video from the iPod. # If you want to switch to iPod music mode, touch the icon. Music Switching to iPod music mode. Starting playback of the selected list. Searching the list by alphabet (Function for iPod) Browsing for a video/music on the iPod (Function for iPod) To make operating and searching easy, operations to control an iPod with this unit are designed to be as similar to the iPod as possible. Searching for a video/music by category 1 Display the iPod menus. Refer to Playing moving images on page 16. Refer to Playing audio on page 19. 2 Touch one of the categories in which you want to search for a video/music. ! ! ! ! ! ! ! ! ! ! ! ! 32 En Video Playlists (video playlists) Movies (movies) Music Videos (music videos) Video Podcasts (video podcasts) TV Shows (TV shows) Playlists (playlists) Artists (artists) Albums (albums) Songs (songs) Podcasts (podcasts) Genres (genres) Composers (composers) 1 Select a category. Refer to Searching for a video/music by category on this page. 2 Switch to alphabet search mode. Switching to alphabet search mode. Alphabet search mode is displayed. 3 Touch the first letter of the title of the video/song you are looking for. While searching, touch panel key operation is not available. # To refine the search with a different letter, touch Cancel. 4 Touch the title of the list that you want to play. Repeat this operation until you find the desired song/video. 5 Start playback of the selected list. Starting playback of the selected list. Section Detailed instructions Resume playback (Bookmark) (Function for DVD video) By using the Bookmark function, you can resume playback from a selected scene the next time the disc is loaded. The selected scene will be bookmarked so that playback resumes from that point next time. ! To clear the bookmark on a disc, touch and hold the button during playback. ! The oldest bookmark is replaced by the new one. 12 ! This function cannot be operated during some DVD videos or Video CD playback featuring PBC (playback control). 1 Start the search function. Refer to Playing moving images on page 16. 2 Touch the desired search option (e.g., Chapter). 3 Touch 0 to 9 to input the desired number. # To cancel the entered numbers, touch C. 4 Frame-by-frame playback (Function for DVD video/video CD/DivX file) Note Images during frame-by-frame playback may be unclear for some discs. Start playback from the selected part. Registering the numbers and starting playback. Note With discs featuring a menu, you can also use the DVD menu to make your selection. Refer to Playing moving images on page 16. Notes ! There is no sound during slow motion playback. ! Images during slow motion playback may be unclear for some discs. ! Reverse slow motion playback is not available. Changing audio language during playback (Multi-audio) Searching for the part you want to play Notes ! With some DVDs, switching between languages/audio systems may only be possible using a menu display. ! You can also switch between languages/audio systems using Video Setup menu. For details, refer to Setting the audio language on page 48. ! Depending on the setting, the video may not be played back with the audio system used to record the DVD. ! You will return to normal playback if you change the Audio during fast forward/fast rewind, pause or slow motion playback. You can use the search function to find the part you want to play. For DVD videos, you can select Title (title), Chapter (chapter) or 10key (numeric keypad). For video CDs, you can select Track (track) or 10key (numeric keypad). ! Chapter search is not available when disc playback is stopped. With DVDs/DivX files that provides audio playback in different languages and different audio systems such as Dolby Digital, you can switch between languages/audio systems during playback. En Detailed instructions Slow motion playback 33 Section 12 Detailed instructions Changing the subtitle language during playback (Multi-subtitle) With DVDs/DivX files featuring multi-subtitle recordings, you can switch between subtitle languages during playback. Notes ! With some DVDs, switching between subtitle languages may only be possible using a menu display. ! You can also switch between subtitle languages using Video Setup menu. For details, refer to Setting the subtitle language on page 48. ! You will return to normal playback if you change the Subtitle during fast forward/fast rewind, pause or slow motion playback. Changing the viewing angle during playback (Multi-angle) With DVDs featuring multi-angle (scenes shot from multiple angles) recordings, you can switch among viewing angles during playback. ! During playback of a scene shot from multiple angles, the angle icon is displayed. Use the Video Setup menu to turn the angle icon display on or off. For details, refer to Setting the multi-angle DVD display on page 49. Note You will return to normal playback if you change the viewing angle during fast forward/fast rewind, pause or slow motion playback. Return to the specified scene (Function for DVD video) This function cannot be used if a specified scene has not been preprogrammed on the DVD disc. 34 En Selecting audio output When playing DVD video discs recorded with LPCM audio, you can switch the audio output. When playing video CDs, you can switch between stereo and monaural audio output. ! This function is not available when disc playback is stopped. ! ! ! ! L+R – left and right Left – left Right – right Mix – mixing left and right You may not be able to select or use this function depending on the disc and the playback location. PBC playback (Function for Video CDs) During playback of Video CDs featuring PBC (Playback Control), PBC ON is displayed. 1 Start the search function. Refer to Playing moving images on page 16. 2 Touch 10key to display the numeric keypad. 3 Touch 0 to 9 corresponding to a menu number. 4 Start playback from the selected part. Registering the numbers and starting playback. Notes ! You can display the menu by touching Return during PBC playback. For details, refer to the instructions provided with the disc. ! PBC playback of a Video CD cannot be canceled. ! During playback of Video CDs featuring PBC (Playback Control), you cannot select the repeat play range or use the search function. Section Detailed instructions Selecting tracks from the track title list You can select tracks to playback using the track title list which is a list of the tracks recorded on a disc. 1 Display the track title list. Refer to Playing audio on page 19. 2 Touch your favorite track title. Playback begins. Selecting files from the file name list (Function for compressed audio/DivX/JPEG) File name list is a list of file names (or folder names) from which you can select a file (or folder) to play back. 2 Touch your favorite file (or folder) name. # When you have selected a folder, a list of the names of the files (or the folders) in it can be viewed. Repeat this operation to select the desired file name. # If folder 01 (ROOT) contains no files, playback commences with folder 02. 3 Start playback of the selected list. Changing audiobook speed (Function for iPod) ! – Playback at a speed faster than normal ! – Playback at normal speed – Playback at a speed slower than nor! mal Displaying lists related to the currently playing song (Link Search) (Function for iPod) 1 Start Link Search. Refer to Introduction of sound playback operations on page 19. 2 Touch one of the categories in which you want to play. ! Artist – Displays an album list of the artist currently being played. ! Album – Displays a song list from the album currently being played. ! Genre – Displays an album list from the genre currently being played. # To cancel searching, touch Cancel. 3 Touch the title of the list that you want to play. 4 Start playback of the selected list. Detailed instructions 1 Display the file (or folder) name list. Refer to Playing audio on page 19. Refer to Introduction of still image playback operations on page 21. 12 Starting playback of the selected list. Starting playback of the selected list. Playing DivXâ VOD content Using sound retriever Automatically enhances compressed audio and restores rich sound. Off — ! — is more effective than Some DivX VOD (video on demand) content may only be playable a fixed number of times. When you load a disc containing this type of content, the remaining number of times it can be played is shown on-screen. You can then decide whether or not to play the disc. . En 35 Section 12 Detailed instructions ! If there is no limit to the number of times the DivX VOD content can be viewed, then you may load the disc into your player and play the content as often as you like, and no message will be displayed. ! You can confirm the number of times that the content can be played by checking the message displayed after “This DivX rental has used”. Important ! In order to play DivX VOD contents on this unit, you first need to register the unit with your DivX VOD contents provider. For details on your registration code, refer to Displaying the DivXâ VOD registration code on page 51. ! DivX VOD content is protected by a DRM (Digital Rights Management) system. This restricts playback of content to specific, registered devices. % If a message is displayed after loading a disc containing DivX VOD content, touch Play. Playback of the DivX VOD content will start. # To skip to the next file, touch Next Play. # If you do not want to play the DivX VOD content, touch Stop. Capture an image in JPEG files You can capture image data and use it as wallpaper. Images can be stored and recalled easily in this unit. ! Only one image can be stored on this unit. Old image is overwritten with the new one. 1 Pause the slideshow when the desired image is displayed. Refer to Introduction of still image playback operations on page 21. Refer to Introduction of still image playback as a slideshow operations on page 22. 2 Capture the image. Refer to Introduction of still image playback operations on page 21. 36 En Refer to Introduction of still image playback as a slideshow operations on page 22. 3 When Do you save this image? is displayed, touch Yes. While storing the image to this unit, Saving the image Don't switch off the battery. is displayed. When the process is finished, Image saved is displayed. # To cancel the storage process, touch No. Changing the wide screen mode You can select a desired mode for enlarging a 4:3 picture to a 16:9 picture. 1 Display the screen mode. Refer to Introduction of video playback operations on page 16. Refer to Introduction of still image playback operations on page 21. Refer to Introduction of still image playback as a slideshow operations on page 22. 2 Touch the desired wide mode setting. Full (full screen) The 4:3 picture is enlarged in the horizontal direction only, giving you a 4:3 TV picture (normal picture) without any omissions. Just (just) The picture is enlarged slightly at the center and the amount of enlargement increases horizontally toward the edges of the screen, enabling you to enjoy a 4:3 picture without sensing any disparity even when viewing on a wide screen. Cinema (cinema) The picture is enlarged by the same proportion as Full or Zoom in the horizontal direction and by an intermediate proportion between Full and Zoom in the vertical direction; ideal for a cinemasized picture (wide screen picture) where captions lie outside the picture. Section Detailed instructions Zoom (zoom) The 4:3 picture is enlarged in the same proportion both vertically and horizontally; ideal for a cinema sized picture (wide screen picture). Normal (normal) The 4:3 picture is displayed as it is, giving you no sense of disparity since its proportions are the same as that of the normal picture. Notes ! You cannot operate this function while driving. ! Different settings can be stored for each video source. ! When a video is viewed in a wide screen mode that does not match its original aspect ratio, it may appear different. ! Remember that using the wide mode feature of this system for commercial or public viewing purposes may constitute an infringement on the author’s rights protected by the Copyright Law. ! The video image will appear coarser when viewed in Cinema or Zoom mode. You have two methods for selecting a channel: by number and by category. When selecting by number, channels in any category can be selected. Select by category to narrow your search down to only channels in a particular category. Mode All CH (channel number select setting) —Mode Category (channel category select setting) Selecting a XM/SIRIUS channel from a channel category Channels are organized into various program categories, e.g. Rock, Classic, Jazz while listening to a XM/SIRIUS station. You can specify channels by selecting the desired category. 1 Select channel category selection mode. Refer to Introduction of XM/SIRIUS tuner operations on page 23. Mode All CH (channel number select setting) —Mode Category (channel category select setting) 2 Touch a or b to select the desired channel category. 3 Touch c or d on the buttons to select the desired channel in the selected channel category. Selecting a channel from the XM channel list display The list content can be switched so you can search for the track you want to listen to not only by the channel name but also by the artist name or song title. ! This function is available for GEX-P920XM. ! The channel list shows all the channels during Mode All CH mode, and the channels included in the selected category during Mode Category mode. 1 Display the preset channel list. Refer to Introduction of XM/SIRIUS tuner operations on page 23. 2 Switch the channel list mode. Switching the channel list mode to the channel name or the artist name/song title. Detailed instructions Switching the XM/SIRIUS channel selection mode 12 3 Touch the desired channel that you want to listen to. Selecting an XM/SIRIUS channel directly You can select an XM/SIRIUS channel directly by entering the desired channel number. En 37 Section Detailed instructions 12 1 Display the preset channel list. Refer to Introduction of XM/SIRIUS tuner operations on page 23. 2 Switch to direct input display. Switching to direct input display. 3 Touch 0 to 9 to input the desired channel number. # To cancel the input numbers, touch C. 4 Select the XM/SIRIUS channel of the entered number. The XM/SIRIUS channel of the entered number is selected. Selecting the XM/SIRIUS channel of the entered number. Using the MyMix function The MyMix function allows you to make a MyMix song playlist. When a song in the MyMix playlist is being broadcast on a station other than the one you are listening to, you will be alerted, and you can tune in to the other station to listen to that song. ! This function is available for GEX-P920XM/ SIRIUS tuner. ! The track itself is NOT downloaded. Only the song title and artist name are stored. Making the MyMix playlist You can add a song that is being broadcast to the MyMix playlist. When it is added, the song title and its artist name are stored to this unit. The MyMix function will start when you listen to a song that matches a song title and its artist name in the MyMix playlist. % Store the song title and artist name. Refer to Introduction of XM/SIRIUS tuner operations on page 23. 38 En The song title and artist name of the song you are listening to are stored, and a confirmation message appears. # To delete a song from the MyMix playlist, refer to Deleting a song from the MyMix playlist for XM tuner on the next page and Deleting a song from the MyMix playlist for SIRIUS tuner on page 40. # (XM tuner) The song title and artist name of up to 12 tracks can be stored. Old tracks will be overwritten when saving more than 12 tracks. # (SIRIUS tuner) The song title and artist name of up to 10 tracks can be stored. # You cannot store the song title or the artist name when “– – – – – – – –” is displayed for the title information. # You cannot store song titles or artist names from channel 000. # Stored titles may not be displayed correctly. Section Detailed instructions When a song in the MyMix playlist is broadcast (XM tuner) As soon as a song in the MyMix playlist starts being broadcast on a different station, a message is displayed. Touch Yes to switch to that station, and you can listen to that song. (SIRIUS tuner) As soon as a stored song starts being broadcast on a different station, a song alert is displayed. Switching to the other station to listen to that track. 12 MyMix playlist and then change each alert setting. Set the alert to on to receive an alert when the song is broadcast, or set it to off to stop the alert for that song. 1 Switch to memo edit mode. Refer to Introduction of XM/SIRIUS tuner operations on page 23. The MyMix playlist is displayed. 2 Select the song title for which you want to turn the alert on or off. (XM tuner) The check mark is removed, and the alert for that song is off. (SIRIUS tuner) Not tuning in to the other station. Turning the MyMix function on or off You can turn the MyMix function off and stop the alerts for all the songs in the MyMix playlist. To restart, turn this function on. The MyMix function is on as the default setting. % Turn the MyMix function on or off. Refer to Introduction of XM/SIRIUS tuner operations on page 23. Selecting the song title for which you want to turn the alert off. 3 Turn the alert on or off. (SIRIUS tuner) Turning the alert on or off. Deleting a song from the MyMix playlist for XM tuner You can delete each song in the MyMix playlist. Detailed instructions ! (XM tuner) If you would rather not to tune in to the other station, touch No. ! If an alert for a song in the MyMix playlist is set to off, no alert will be provided even when the song is broadcast. Refer to Setting up a song alert on this page. ! If the stored title and the title of the song being broadcast differ, no alert will be provided even if they are the same song. 1 Switch to memo edit mode. Refer to Introduction of XM/SIRIUS tuner operations on page 23. The MyMix playlist is displayed. 2 Delete the song title. Deleting the song title. Setting up a song alert You can set up an alert (on or off) for each song in the MyMix playlist. First, display the Deleting all the songs in the MyMix playlist. En 39 Section Detailed instructions 12 That song will be deleted from the MyMix playlist. A message to confirm deletion will appear. 3 Touch Yes. # To cancel deletion, touch No. Selecting teams for Game Alert 1 Start Game Alert setup. Refer to Introduction of XM/SIRIUS tuner operations on page 23. 2 Deleting a song from the MyMix playlist for SIRIUS tuner Select a desired league in League. Switching the league name. You can delete each song in the MyMix playlist. 1 Switch to memo edit mode. Refer to Introduction of XM/SIRIUS tuner operations on page 23. 3 2 Select the song title that you want to delete. Selecting the song title that you want to delete. Select a desired team in Team. Switching the team name. 4 Turn the alert on or off. Turning the alert on or off. 3 Delete the song title. Deleting the song title. A message to confirm deletion will appear. 4 Touch Yes. That song will be deleted from the MyMix playlist. # To cancel deletion, touch No. Using the Game Alert function This system can alert you when games involving your favorite teams are about to start. To use this function you need to set up a game alert for the teams in advance. ! This function is available for SIR-PNR2/SIRPNR2C. 40 En The game alert function is activated for that team. # When you have already selected 12 teams, FULL is displayed and additional teams cannot be selected. In this case, first delete a selected team and then try again. 5 Repeat these steps to select other teams. Up to 12 teams can be selected. Switching the Game Alert on or off Once you select the teams, you need to turn the Game Alert function on. The Game Alert function is on at the default setting. Section Detailed instructions When a game of a selected team starts When a game of the selected team is about to start (or is currently playing) on a different station, a game alert is displayed. Switching to the other station to listen to the game. Not tuning in to the other station. Displaying game information If any games of the selected teams are currently playing, you can display information on the games and tune in to the broadcast channel. 2 Touch c or d to select a game. The game is displayed, followed by more detailed game information. ! The game score will be updated automatically. 3 Switch to the other station to listen to the game. Switching to the other station to listen to the game. # If you have not selected any teams, NOT SET is displayed. # When games involving your favorite teams are not currently playing, NO GAME is displayed. Displaying the Radio ID Channel number selection setting If you select CH000, the ID code is displayed. % Select CH000. Refer to Introduction of XM/SIRIUS tuner operations on page 23. Switching the SIRIUS display ! Actions will differ depending on the connected SIRIUS tuner. % Touch SIRIUS information to switch the SIRIUS display. Refer to Introduction of XM/SIRIUS tuner operations on page 23. Channel number—Channel name—Category name—Artist name—Song title/Title name— Composer name—Play time Note Play time is displayed during the Instant Replay mode. Using the Instant Replay function The following functions can be operated in Instant Replay mode. ! To use this function, a Pioneer SIRIUS bus interface (e.g. CD-SB10) is required. ! To use this function, a SIRIUS plug-andplay unit with an Instant Replay Function is required. ! For details, refer to the SIRIUS plug-andplay unit’s manuals. Detailed instructions 1 Display the game information for the selected team. Refer to Introduction of XM/SIRIUS tuner operations on page 23. 12 % To exit from Instant Replay mode, select another source or touch the following icon. Exiting from Instant Replay mode. % Select a track Press c or d (TRACK/SEEK). % Fast forward or reverse Press and hold c or d (TRACK/SEEK). En 41 Section 12 Detailed instructions % Pause and play Playing and pausing. Switching the seek mode Using the missed, received and dialed call lists on the optional Bluetooth adapter The 3 most recent calls dialed, received, and missed are stored in the memory. You can browse them and call numbers from these lists. There are two seek tuning settings, one is Seek HD (Digital broadcasting stations seek) and the other is Seek All (normal seek). 1 Switch to the call history list. Refer to Introduction of Bluetooth telephone operations on page 26. Seek All—Seek HD 2 Touch a phone number or name (if entered) you want to call. Switching the reception mode 3 Make the call. Refer to Introduction of Bluetooth telephone operations on page 26. If the reception for a digital broadcast becomes poor, this unit automatically switches to the analog broadcast of the same frequency. If this function is set to D/A Auto, the tuner switches between digital broadcast and analog broadcast automatically. If this function is set to Analog, the tuner will only receive analog broadcasts. D/A Auto—Analog Note If SEEK MODE is set to Seek HD and BLENDING is set to Analog, the tuner cannot receive broadcasts. In this case, the seek mode or reception mode is changed automatically as follows: ! When SEEK MODE is set to Seek HD, if you switch BLENDING from D/A Auto to Analog, SEEK MODE is changed to Seek All. ! When BLENDING is set to Analog, if you switch SEEK MODE from Seek All to Seek HD, BLENDING is changed to D/A Auto. 4 End the call. Refer to Introduction of Bluetooth telephone operations on page 26. Setting automatic answering If this function is on, this unit automatically answers all incoming calls. % Turn automatic answering on or off. Refer to Introduction of Bluetooth telephone operations on page 26. Switching the ring tone You can select whether or not to use this unit’s ring tone. If this function is set to on, the ring tone for this unit will sound. 1 Connect your cellular phone to this unit. 2 Turn ring tone on or off. Refer to Introduction of Bluetooth telephone operations on page 26. 42 En Section Detailed instructions Using a cellular phone to initiate a connection A Bluetooth wireless connection can be established from your phone by putting the unit into initiating a connection mode. You may need to refer to the operation manual that came with your phone if you are unsure how to initiate a connection from your phone. 1 Put the unit in initiating a connection mode. Refer to Introduction of Bluetooth telephone operations on page 26. 2 Use a cellular phone to connect to this unit. 12 Voice recognition If your cellular phone features voice recognition technology, you can make a call by voice commands. ! Operation varies depending on the type of cellular phone. Refer to the instruction manual that came with your cellular phone for detailed instructions. 1 Start voice recognition. Refer to Introduction of Bluetooth telephone operations on page 26. 2 Say the name of your contact aloud. # Operation varies depending on the type of cellular phone. # You may need to enter the link code on your cellular phone to complete the connection. Connecting a Bluetooth audio player Registering a connected cellular phone % Put the unit in initiating a connection mode. Refer to Bluetooth audio operations on page 27. This unit is now on standby for connection from Bluetooth audio player. If your Bluetooth audio player is set ready for Bluetooth wireless connection, connection to this unit is automatically established. 1 Start registering a connected cellular phone. Refer to Introduction of Bluetooth telephone operations on page 26. 2 Use cellular phone to register to this unit. If registration is successful, you can browse the dialed, received, and missed call lists. # To replace an assignment with a new phone, first delete the current assignment. # If registration failed, return to step 1 and try again. Detailed instructions You can register a phone that is temporarily connected to this unit in order to take full advantage of the features available with Bluetooth wireless technology. Only one cellular phone can be registered. A Bluetooth wireless connection can be established by putting the unit into initiating a connection mode. Connecting to a Bluetooth device automatically If this function is set to on, a connection between your Bluetooth device and this unit will take place automatically as soon as the two devices are less than a few meters apart. Initially, this function is set to on. 1 Touch Auto Connect to turn automatic connection on. Refer to Introduction of Bluetooth telephone operations on page 26. En 43 Section 12 Detailed instructions If your Bluetooth device is ready for a Bluetooth wireless connection, a connection to this unit will automatically be established. # To turn automatic connection off, touch Auto Connect again. 2 Turn your vehicle’s ACC switch off and on. Displaying Bluetooth Device address This unit displays its Bluetooth Device address. % Touch Bluetooth Version to display device information. Refer to Introduction of Bluetooth telephone operations on page 26. The Bluetooth Device address is displayed. 44 En Section Menu operations 13 ! You cannot display the Audio function menu when the mute function/attenuation is on or a JPEG file is playing. 21 Audio Fader/Balance F/R 0 L/R 0 Graphic EQ Super Bass Loudness High Subwoofer Off Bass Booster High Pass Filter Menu operations Introduction of menu operations 0 Off 34 5 1 Display menus. Refer to Common operations for menu settings/lists on page 14. 2 Touch any of the following touch panel keys to select the menu to be adjusted. ! Touch panel keys 1 Video Setup menu Refer to Setting up the DVD player on page 48. 2 Audio function menu Refer to Audio Adjustments on the next page. 3 System menu Refer to System settings on page 52. 4 Entertainment menu Refer to Entertainment settings on page 55. 5 Custom menu You can choose menus within each menu (Audio function menu, etc.) and register them to this custom menu. Refer to Customizing menus on page 56. Notes ! You can display the Video Setup menu when a Disc or USB source is selected. ! If you start the Video Setup menu, playback is stopped. En 45 Section 13 Menu operations Audio Adjustments Display Equalizer curve Vocal Vocal Custom1 Custom 1 Custom2 Custom 2 Using fader/balance adjustment Flat Flat You can change the fader/balance setting to provide an ideal listening environment for all of the occupied seats. Super Bass Super bass Note When selecting FM as the source, you cannot switch to Source Level Adjuster. 1 Display the audio function menu. Refer to Introduction of menu operations on the previous page. 2 Touch Fader/Balance on the audio function menu. 3 Touch a or b to adjust the front/rear speaker balance. Range: Front:15 to Rear:15 # Select F/R: 0 L/R: 0 when only using two speakers. # The front/rear speaker balance cannot be adjusted when the rear output setting is Subwoofer. Refer to Setting the rear output and subwoofer controller on page 52. ! The equalizer curves for Custom1 and Custom2 can be adjusted. ! When Flat, no changes are made to the sound. You can check the effects of the equalizer curves by switching alternatively between Flat and another equalizer curve. 1 Display the audio function menu. Refer to Introduction of menu operations on the previous page. 2 Touch Graphic EQ on the audio function menu. 3 Touch c or d to select the desired item. Powerful—Natural—Vocal—Custom1— Custom2—Flat—Super Bass Adjusting the 5-band graphic equalizer 4 Touch c or d to adjust the left/right speaker balance. Range: Left:15 to Right:15 Using the equalizer You can adjust the equalization to match the car’s interior acoustic characteristics as desired. Recalling equalizer curves There are seven stored equalizer curves which you can easily recall at any time. Here is a list of the equalizer curves. 46 Display Equalizer curve Powerful Powerful Natural Natural En You can adjust the level of each band for the equalizer curves. ! A separate Custom1 curve can be created for each source. If you make adjustments when a curve other than Custom2 is selected, the equalizer curve settings will be stored in Custom1. ! A Custom2 curve that is common for all sources can be created. If you make adjustments when the Custom2 curve is selected, the Custom2 curve will be updated. 1 Display the audio function menu. Refer to Introduction of menu operations on the previous page. 2 Touch Graphic EQ on the audio function menu. Section Menu operations 13 5 Touch c or d next to Level to adjust the output level of the subwoofer. Range: +6 to -24 4 6 Touch c or d next to Frequency to select the cut-off frequency. 50Hz—63Hz—80Hz—100Hz—125Hz Only frequencies lower than those in the selected range are outputted from the subwoofer. Touch the Equalizer band to adjust. 5 Touch a or b to adjust the level of the equalizer band. Range: +12dB to -12dB # You can then select another band and adjust the level. Adjusting loudness Loudness compensates for deficiencies in the low- and high-frequency ranges at low volume. 1 Display the audio function menu. Refer to Introduction of menu operations on page 45. 2 Touch Loudness on the audio function menu. 3 Touch c or d to select a desired level. Off (off)—Low (low)—Mid (mid)—High (high) Using subwoofer output This unit is equipped with a subwoofer output which can be turned on or off. ! The cut-off frequency and output level can be adjusted when the subwoofer output is on. 1 Display the audio function menu. Refer to Introduction of menu operations on page 45. 2 Touch Subwoofer on the audio function menu. Menu operations 3 Touch c or d to select the desired item. Powerful—Natural—Vocal—Custom1— Custom2—Flat—Super Bass Boosting the bass You can boost the bass level. 1 Display the audio function menu. Refer to Introduction of menu operations on page 45. 2 Touch c or d to select a desired level. Range: 0 to +6 Using the high pass filter When you do not want low sounds from the subwoofer output frequency range to play from the front or rear speakers, turn on the HPF (high pass filter). Only frequencies higher than those in the selected range are output from the front or rear speakers. 1 Display the audio function menu. Refer to Introduction of menu operations on page 45. 2 Touch c or d next to Frequency to select cut-off frequency. Off (off)—50Hz—63Hz—80Hz—100Hz— 125Hz Only frequencies higher than those in the selected range are output from the front or rear speakers. 3 Touch On or Off next to Subwoofer to turn the subwoofer output on or off. 4 Touch Normal or Reverse next to Phase to select the phase of subwoofer output. En 47 Section 13 Menu operations Adjusting source levels Setting up the DVD player With SLA (source level adjustment), the volume levels of each source can be adjusted to prevent significant differences between sources. ! Settings are based on the FM volume level, which remains unchanged. Setting the subtitle language 1 Display the audio function menu. Refer to Introduction of menu operations on page 45. You can set a desired subtitle language. When available, the subtitles will be displayed in the selected language. 1 Display the Video Setup menu. Refer to Introduction of menu operations on page 45. 2 Compare the FM volume level with the level of the source you wish to adjust. 2 Touch Subtitle Language on the Video Setup menu. A subtitle language menu is displayed. 3 Touch Source Level Adjuster on the audio function menu. 3 Touch the desired language. The subtitle language is set. 4 Touch a or b to adjust the source volume. Range: +4 to –4 Notes ! The AM volume level can also be adjusted with this function. ! Video CD, CD, compressed audio and DivX are automatically set to the same source level adjustment volume. ! iPod and USB storage device are automatically set to the same source level adjustment volume. ! External unit 1 and external unit 2 are automatically set to the same source level adjustment volume. # If you have selected Others, refer to When you select Others on this page. Notes ! If the selected language is not available, the language specified on the disc is displayed. ! You can also switch the subtitle language by touching the icon during playback. (Refer to Playing moving images on page 16.) ! The setting made here will not be affected even if the subtitle language is switched during playback using Subtitle. When you select Others A language code input display is shown when Others is selected. Refer to Language code chart for DVD on page 84. 1 Touch 0 to 9 to input the language code. # To cancel the entered numbers, touch C. 2 Registering the code. Registering the code. Setting the audio language You can set the preferred audio language. 48 En Section Menu operations 13 1 Display the Video Setup menu. Refer to Introduction of menu operations on page 45. 2 Touch Audio Language on the Video Setup menu. An audio language menu is displayed. 2 Touch Multi Angle on the Video Setup menu to turn angle icon display on or off. 3 Touch the desired language. The audio language is set. Setting the aspect ratio # If you have selected Others, refer to When you select Others on the previous page. Notes ! If the selected language is not available, the language specified on the disc is used. ! You can also switch the audio language by touching Audio during playback. (Refer to Playing moving images on page 16.) ! The setting made here will not be affected even if the audio language is switched during playback using Audio. Setting the menu language You can set the preferred language in which the menus recorded on a disc are displayed. 1 Display the Video Setup menu. Refer to Introduction of menu operations on page 45. 2 Touch Menu Language on the Video Setup menu. A menu language menu is displayed. 3 Touch the desired language. The menu language is set. # If you have selected Others, refer to When you select Others on the previous page. Note If the selected language is not available, the language specified on the disc is displayed. Setting the multi-angle DVD display There are two kinds of display: a wide screen display that has a width-to-height ratio (TV aspect ratio) of 16:9, and regular display that has a TV aspect of 4:3. Be sure to select the correct TV aspect for the display connected to V OUT. ! When using regular display, select either Letter Box or Pan Scan. Selecting 16 : 9 may result in an unnatural picture. ! If you select the TV aspect ratio, the unit’s display will change to the same setting. Menu operations 1 Display the Video Setup menu. Refer to Introduction of menu operations on page 45. 1 Display the Video Setup menu. Refer to Introduction of menu operations on page 45. 2 Touch TV Aspect on the Video Setup menu to select the TV aspect ratio. Touch TV Aspect repeatedly until the desired aspect ratio appears. ! 16 : 9 – Wide screen picture (16:9) is displayed as is (initial setting) ! Letter Box – The picture is the shape of a letterbox with black bands on the top and bottom of the screen ! Pan Scan – The picture is cut short on the right and left sides of the screen Notes ! When playing discs that do not specify Pan Scan, the disc is played back in Letter Box display even if you select the Pan Scan setting. Confirm whether the disc package bears the 16 : 9 LB mark. ! The TV aspect ratio cannot be changed for some discs. For details, refer to the disc’s instructions. The angle icon can be set so it appears on scenes where the angle can be switched. En 49 Section 13 Menu operations Setting the slide show interval 4 JPEG files can be viewed as a slide show on this unit. In this setting, the interval between each image can be set. 1 Display the Video Setup menu. Refer to Introduction of menu operations on page 45. 2 Touch Time Per Photo Slide on the Video Setup menu to select the slide show interval. Touch Time Per Photo Slide repeatedly until the desired setting appears. ! 5sec – JPEG images switch at intervals of 5 seconds ! 10sec – JPEG images switch at intervals of 10 seconds ! 15sec – JPEG images switch at intervals of 15 seconds ! Manual – JPEG images can be switched manually Setting parental lock Some DVD video discs let you use parental lock to restrict children from viewing violent and adult-oriented scenes. You can set parental lock to the desired level. ! When you have a parental lock level set and play a disc featuring parental lock, code number input indications may be displayed. In such cases, playback will begin when the correct code number is entered. Registering the code. Registering the code. The code number is set, and the level can now be set. 5 Touch 1 to 8 to select the desired level. 6 Touch Enter. The parental lock level is set. ! 8 – Playback of the entire disc is possible (initial setting) ! 7 to 2 – Playback of discs for children and non-adult-oriented discs is possible ! 1 – Playback of discs for children only is possible Notes ! We recommend to keep a record of your code number in case you forget it. ! The parental lock level is stored on the disc. Look for the level indication written on the disc package, included literature or on the disc itself. Parental lock of this unit is not possible if a parental lock level is not stored on the disc. ! With some discs, the parental lock may be active only for certain levels of scenes. The playback of those scenes will be skipped. For details, refer to the instruction manual that came with the disc. Changing the level Setting the code number and level You can change the set parental lock level. A code number must be registered in order to play back discs with parental lock. 1 Display the Video Setup menu. Refer to Introduction of menu operations on page 45. 1 Display the Video Setup menu. Refer to Introduction of menu operations on page 45. 2 Touch Parental on the Video Setup menu. 3 Touch 0 to 9 to input a four digit code number. # To cancel the entered numbers, touch C. 50 En 2 Touch Parental on the Video Setup menu. 3 Touch 0 to 9 to input the registered code number. Section Menu operations Registering the code. Registering the code. This sets the code number, and the level can now be changed. # If you enter an incorrect code number, the icon is displayed. Touch C and enter the correct code number. # If you forget your code number, refer to If you forget your code number on this page. 5 Touch 1 to 8 to select the desired level. 6 Touch Enter. The new parental lock level is set. If you forget your code number Press RESET. Displaying the DivXâ VOD registration code In order to play DivX VOD (video on demand) contents on this unit, the unit must first be registered with a DivX VOD contents provider. For registration, generate a DivX VOD registration code and submit it to your provider. ! Keep a record of the code as you will need it when you register your unit to the DivX VOD provider. Menu operations 4 13 1 Display the Video Setup menu. Refer to Introduction of menu operations on page 45. 2 Touch DivX VOD on the Video Setup menu. Registration Code and Deregistration Code appear. 3 Touch Registration Code. Your registration code is displayed. Setting the DivX subtitle file You can select whether or not to display DivX external subtitles. ! The DivX subtitles will be displayed even when Custom is selected if no DivX external subtitle files exist. 1 Display the Video Setup menu. Refer to Introduction of menu operations on page 45. 2 Touch DivX Subtitle on the Video Setup menu to select the desired subtitle setting. ! Original – Display the DivX subtitles ! Custom – Display the DivX external subtitles Notes ! Up to 42 characters can be displayed on one line. If more than 42 characters are set, the line breaks and the characters are displayed on the next line. ! Up to 126 characters can be displayed on one screen. If more than 126 characters are set, the excess characters will not be displayed. Displaying the deregistration code If your device is already activated, deregister it by entering the deregistration code. 1 Display the Video Setup menu. Refer to Introduction of menu operations on page 45. 2 Touch DivX VOD on the Video Setup menu. 3 Touch Deregistration Code. # To cancel deregistration, touch Cancel. 4 Touch OK. The deregistration is complete. Automatic playback of DVDs When a DVD disc with a DVD menu is inserted, this unit will cancel the menu automatically and start playback from the first chapter of the first title. ! Some DVDs may not operate properly. If this function is not fully operated, turn this function off and start playback. En 51 Section 13 Menu operations 1 Display the Video Setup menu. Refer to Introduction of menu operations on page 45. 2 Touch DVD Auto Play to turn automatic playback on. # To turn automatic playback off, touch DVD Auto Play again. System settings Switching the auxiliary setting Activate this setting when using an auxiliary device connected to this unit. 1 Display the system menu. Refer to Introduction of menu operations on page 45. 2 Touch AUX Input on the system menu to turn AUX Input on or off. Setting AV input Activate this setting when using an external video component connected to this unit. 1 Display the system menu. Refer to Introduction of menu operations on page 45. 2 Touch AV Input on the system menu to turn AV Input on or off. Setting the rear output and subwoofer controller This unit's rear speaker leads can be connected with full-range speaker (Full) or subwoofer (Subwoofer). If you switch the rear speaker setting to Subwoofer, you can connect the lead directly to a subwoofer without using an auxiliary amp. ! When no subwoofer is connected to the rear output, select Full (full-range speaker). ! If the rear speaker leads are connected with a subwoofer, select Subwoofer (subwoofer). This unit's rear output (RCA rear output) can be used for subwoofer (Subwoofer) or rear (Rear Speaker) connection. ! When no subwoofer is connected to the rear output, select Rear Speaker (Rear). ! When a subwoofer is connected to the rear output, select Subwoofer (subwoofer). 1 Turn the unit off. Refer to Basic operations on page 12. 52 En Section Menu operations 3 Touch Rear Speaker on the system menu. 4 Touch Rear Speaker to switch the subwoofer output or full-range speaker. 5 Touch Preout to switch the subwoofer or rear output. Notes ! Even if you change this setting, there will be no output unless you turn the subwoofer output on (refer to Using subwoofer output on page 47). ! If you change this setting, subwoofer output in the audio menu will return to the factory settings. Switching sound muting/ attenuation Sound from this system is automatically muted or attenuated when a signal from equipment with a mute function is received. ! Sound from this system returns to normal when the muting or attenuation is canceled. 1 Display the system menu. Refer to Introduction of menu operations on page 45. 2 Touch Mute/ATT until the desired setting appears. Touch Mute/ATT until the desired setting appears in the display. ! Mute – Muting ! ATT -20dB – Attenuation (ATT -20dB has a stronger effect than ATT -10dB) ! ATT -10dB – Attenuation ! Off – Turns the sound muting/attenuation off ! When ATT is displayed, the sound is attenuated and no other audio adjustments can be made. ! Operation returns to normal when the phone connection is ended. Selecting the menu language The menu language can be selected from four languages. If text information such as the title name, artist name or a comment is embedded in a European language, they can also be displayed on this unit. ! The language can be changed for the following: — System menu — Video Setup — On-screen display — Multi language setting for DivX — Language for cautions Some operations on this unit are prohibited from use while driving or require careful attention when operated. In such cases, a caution will appear on the display. You can change the language for caution messages with this setting. ! If the embedded language and the selected language setting are not the same, text information may not display properly. ! Some characters may not be displayed properly. ! To complete this operation, switch the ignition key off and on after you set this setting. Menu operations 2 Display the system menu. Refer to Introduction of menu operations on page 45. 13 1 Display the system menu. Refer to Introduction of menu operations on page 45. 2 Touch System Language on the system menu to select the desired language. 3 Touch the desired language. English (English)—Français (French)— Español (Spanish)—Português (Portuguese) Notes ! When Mute is displayed, the sound is turned off and no audio adjustments can be made. En 53 Section 13 Menu operations Setting the rear view camera (back up camera) CAUTION Pioneer recommends the use of a camera which outputs mirror-reversed images. Otherwise, the screen image will appear reversed. This unit features a function that automatically switches to the rear view camera video (R.C IN) when a rear view camera is installed on your car and the gear shift is moved to the REVERSE (R) position. (For more details, consult your dealer.) ! After you set up the rear view camera setting, move the gear shift to REVERSE (R) and confirm that the rear view camera video is shown on the display. ! Change this setting if the display switches to the rear view camera video by error while you are driving forward. ! To stop watching the rear view camera video and return to the source display, press and hold MUTE. ! Touch the RearView source icon to display the rear view camera image while driving. Touch the source icon again to turn the rear view camera off. For details, refer to Selecting a source using the touch panel keys on page 12. 1 Display the system menu. Refer to Introduction of menu operations on page 45. 2 Touch Camera Polarity on the system menu to select the appropriate setting. ! Battery – When the polarity of the connected lead is positive while the gear shift is in REVERSE (R) position ! Ground – When the polarity of the connected lead is negative while the gear shift is in REVERSE (R) position ! Off – When a rear view camera is not connected to this unit 54 En Setting the video signal When you connect this unit to an AV equipment to this unit, select the suitable video signal setting. ! As this function is initially set to Auto, the unit will automatically adjust the video signal setting. However, the screen may turn black or images may not be displayed properly when Auto has been selected and the reception is weak. Normally, select the appropriate video signal. 1 Display the system menu. Refer to Introduction of menu operations on page 45. 2 Touch Video Signal Setting on the function menu. Video Signal Setting items are displayed. ! AV – Adjusts the AV video signal ! AUX – Adjusts the AUX video signal ! Camera – Adjusts the rear view camera video signal 3 Touch c or d to select the desired video signal appears. Auto—PAL—NTSC—PAL-M—PAL-N— SECAM Section Menu operations 13 Selecting the OSD color Selecting the illumination color The OSD color can be changed. This unit is equipped with multiple-color illumination. 1 Display the entertainment menu. Refer to Introduction of menu operations on page 45. Direct selection from preset illumination colors 2 Touch Appearance. 3 Touch Screen. 4 Touch one of the colors on the list. You can select an illumination color from the color list. 1 Display the entertainment menu. Refer to Introduction of menu operations on page 45. 2 Touch Appearance. Selecting the background display You can switch the background that is displayed when listening to a source. 3 Touch Illumination and then touch a color on the list. 1 Display the entertainment menu. Refer to Introduction of menu operations on page 45. Customizing the illumination color 2 Touch Background. 1 Display the entertainment menu. Refer to Introduction of menu operations on page 45. 3 Touch the desired setting. 2 Touch Appearance. Menu operations Entertainment settings # If no JPEG images are stored in this unit, you cannot select photo. To store a JPEG image to this unit, refer to Capture an image in JPEG files on page 36. 3 Touch Illumination and then touch Custom icon. Custom icon 4 Touch the color bar to customize the color. 5 Touch c or d to fine-tune the color. 6 Touch the Memo icon and hold to store the customized color in the memory. Memo Memo icon The customized color has been stored in the memory. The set color will be recalled from the memory the next time you touch the same icon. En 55 Section 13 Menu operations Customizing menus 1 Display menu columns to register. Refer to Introduction of menu operations on page 45. You can customize menus except Video Setup menu. 2 Touch and hold the menu column to register it. # To cancel registration, touch and hold the menu column again. 3 Display the custom menu and choose a registered menu. Refer to Introduction of menu operations on page 45. Note You can register up to 12 columns. 56 En Section Other Functions Changing the picture adjustment 1 Press and hold MENU to display Picture Adjustment. The adjustment function names are displayed. 2 If you are adjusting the Picture Adjustment, select the unit. NAVI Adjusting the Picture Adjustment for the Navigation system. Rear View Adjusting the Picture Adjustment for the rear view camera. Source Adjusting the Picture Adjustment for the source. 3 Touch any of the following touch panel keys to select the function to be adjusted. Picture Adjustment items are displayed. ! ! ! ! ! ! ! ! Brightness – Adjusts the black intensity Contrast – Adjusts the contrast Color – Adjusts the color saturation Hue – Adjusts the tone of color (red or green is emphasized) Dimmer – Adjusts the brightness of the display Temperature – Adjusts the color temperature, resulting in a better white balance Black Level – Emphasizes the dark portions of images making the difference between bright and dark more distinct RGB Dot ADJ – Adjusts phase shifting by dot clock when a Navigation system is connected # You cannot adjust the picture adjustment for the rear view camera when Camera Polarity is set to Off. (Refer to Setting the rear view camera (back up camera) on page 54.) # If the color system is set to PAL/PAL-N/PAL-M/ SECAM, you cannot adjust Hue. # With some rear view cameras, picture adjustment may not be possible. 4 Touch c or d to adjust the selected item. Each time you touch c or d, the level of the selected item increases or decreases. Other Functions You can adjust the Brightness (brightness), Contrast (contrast), Color (color) , Hue (hue), Dimmer (dimmer), Temperature (temperature), Black Level (black level) and RGB Dot ADJ (RGB dot clock adjustment) for each source and rear view camera. ! You cannot adjust Color, Hue, Contrast and Black Level for the audio source. 14 # Dimmer can be adjusted from +1 to +48. # Temperature can be adjusted from +3 to –3. 5 Touch Black Level and RGB Dot ADJ to adjust. # Black Level can be set on or off. # RGB Dot ADJ can be set to 1 or 2. Notes ! You cannot operate this function while driving. ! Different Brightness/Contrast/Dimmer settings can be set for when the illumination switch is on and when it is off. Adjusting the response positions of the touch panels (Touch Panel Calibration) If you feel that the touch panel keys on the screen deviate from the actual positions that respond to your touch, adjust the response positions of the touch panel. There are two adjustment methods: 4-point adjustment, in which you touch four corners of the screen; and 16-point adjustment, in which you make fine-adjustments on the entire screen. ! Touch the screen gently for adjustment. Forcefully pressing the touch panel may damage the touch panel. Do not use a sharp pointed tool such as a ballpoint pen or mechanical pen. Doing so may damage the screen. En 57 Section 14 Other Functions ! If the touch panel cannot be adjusted properly, consult your local Pioneer dealer. is automatically recognized as an AUX source and is assigned to AUX. 1 Turn the unit off. Refer to Basic operations on page 12. About AUX connection methods 2 Press and hold MENU to display Picture Adjustment. 3 Press and hold MENU to start Touch Panel Calibration. The 4-point touch panel adjustment screen appears. 4 Touch each of the arrows on the four corners of the screen. # To cancel the adjustment, press and hold MENU. 5 Press MENU to complete 4-point adjustment. Data for the adjusted position is saved. # Do not turn off the engine while the data is being saved. 6 Press MENU to proceed to 16-point adjustment. The 16-point touch panel adjustment screen appears. Mini pin plug cable (AUX) When connecting an auxiliary device using a mini plug cable iPods and portable audio/video players can be connected to this unit via mini plug cable. ! If an iPod with video capabilities is connected to this unit via 3.5 mm plug (4 pole) cable (such as the CD-V150M), you can enjoy the video contents of the connected iPod. ! A portable audio/video player can be connected by using a 3.5 mm plug (4 pole) with an RCA cable (sold separately). However, depending on the cable, a reverse connection between the red (right side audio) cable and yellow (video) cable may be required in order for the sound and video image to be reproduced correctly. # To cancel the adjustment, press and hold MENU. % Insert the stereo mini plug into the AUX input jack on this unit. Refer to What’s what on page 10. 7 Gently touch the center of the + mark displayed on the screen. After you touch all the marks, the data for the adjusted position is saved. Using an external unit # Do not turn off the engine while the data is being saved. 8 Press and hold MENU to complete the adjustment. Using an AUX source A separately sold auxiliary device such as a VCR or portable device can be connected to this unit. When connected, the auxiliary device 58 You can connect auxiliary devices to this unit. En An external unit refers to a Pioneer product, such as those which will be available in the future. Although incompatible as a source, the basic functions of up to two external units can be controlled with this unit. When two external units are connected, the external units are automatically allocated to external unit 1 or external unit 2. Section Other Functions Basic operations The functions allocated to the following operations will differ depending on the connected external unit. For details concerning these functions, refer to the owner’s manual for the connected external unit. Auto Audio F1 F2 F3 Function 1 to 4 Actions will differ depending on the connected external unit. F4 Other Functions The basic operations of the external unit are explained below. The allocated functions will differ depending on the connected external unit. For details concerning these functions, refer to the owner’s manual for the external unit. 14 Using the functions allocated to 1 to 6 keys. Actions will differ depending on the connected external unit. Switching to auto or manual. Switching to video and audio. Video Changing the screen mode. Refer to Changing the wide screen mode on page 36. Switching the equalizer curves. Refer to Using the equalizer on page 46. Actions will differ depending on the connected external unit. En 59 Section 15 Installation Connecting the units WARNING ! To avoid the risk of accident and the potential violation of applicable laws, no viewing of front seat video should ever occur while the vehicle is being driven. Also, rear displays should not be in a location where they are visibly distracting to the driver. ! In some countries or states the viewing of images on a display inside a vehicle even by persons other than the driver may be illegal. Where such regulations apply, they must be obeyed and this unit’s DVD features should not be used. CAUTION ! PIONEER does not recommend that you install or service your display unit yourself. Installing or servicing the product may expose you to risk of electric shock or other hazards. Refer all installation and servicing of your display unit to authorized Pioneer service personnel. ! Secure all wiring with cable clamps or electrical tape. Do not allow any bare wiring to remain exposed. ! Do not drill a hole into the engine compartment to connect the yellow cable of the display unit to the vehicle battery. Engine vibration may eventually cause the insulation to fail at the point where the wire passes from the passenger compartment into the engine compartment. Take extra care in securing the wire at this point. ! It is extremely dangerous to allow the microphone lead to become wound around the steering column or gearstick. Be sure to install the unit in such a way that it will not obstruct driving. ! Make sure that cables will not interfere with moving parts of the vehicle, such as the gearshift, parking brake or seat sliding mechanism. ! Do not shorten any cables. If you do, the protection circuit may fail to work properly. 60 En WARNING ! LIGHT GREEN LEAD AT POWER CONNECTOR IS DESIGNED TO DETECT PARKED STATUS AND MUST BE CONNECTED TO THE POWER SUPPLY SIDE OF THE PARKING BRAKE SWITCH. IMPROPER CONNECTION OR USE OF THIS LEAD MAY VIOLATE APPLICABLE LAW AND MAY RESULT IN SERIOUS INJURY OR DAMAGE. WARNING ! Use speakers over 50 W (output value) and between 4 W to 8 W (impedance value). Do not use 1 W to 3 W speakers for this unit. ! The black cable is ground. When installing this unit or power amp (sold separately), make sure to connect the ground wire first. Ensure that the ground wire is properly connected to metal parts of the car’s body. The ground wire of the power amp and the one of this unit or any other device must be connected to the car separately with different screws. If the screw for the ground wire loosens or falls out, it could result in fire, generation of smoke or malfunction. Ground wire Other devices (Another electronic device in the car) POWER AMP Metal parts of car’s body Section Installation 15 Important O STAR T ACC position No ACC position na, connect it to the antenna booster power supply terminal. ! Never connect the blue/white cable to the power terminal of an external power amp. Also, never connect it to the power terminal of the auto antenna. Doing so may result in battery drain or a malfunction. ! IP-BUS connectors are color-coded. Be sure to connect connectors of the same color. ! Use this unit with a 12-volt battery and negative grounding only. Failure to do so may result in a fire or malfunction. ! To prevent a short-circuit, overheating or malfunction, be sure to follow the directions below. — Disconnect the negative terminal of the battery before installation. — Secure the wiring with cable clamps or adhesive tape. Wrap adhesive tape around wiring that comes into contact with metal parts to protect the wiring. — Place all cables away from moving parts, such as the gear shift and seat rails. — Place all cables away from hot places, such as near the heater outlet. — Do not connect the yellow cable to the battery by passing it through the hole to the engine compartment. — Cover any disconnected cable connectors with insulating tape. — Do not shorten any cables. — Never cut the insulation of the power cable of this unit in order to share the power with other devices. The current capacity of the cable is limited. — Use a fuse of the rating prescribed. — Never wire the negative speaker cable directly to ground. — Never band together negative cables of multiple speakers. ! When this unit is on, control signals are sent through the blue/white cable. Connect this cable to the system remote control of an external power amp or the vehicle’s auto-antenna relay control terminal (max. 300 mA 12 V DC). If the vehicle is equipped with a glass anten- En Installation F N OF ! This unit cannot be installed in a vehicle without ACC (accessory) position on the ignition switch. 61 Section 15 Installation When connecting to separately sold power amp Rear output or subwoofer output Power amp (sold separately) To rear output or subwoofer output Power amp (sold separately) To front output Front output This product Connect with RCA cables (sold separately) System remote control Blue/white Connect to system control terminal of the power amp or auto-antenna relay control terminal. (max. 300 mA 12 V DC). Left Front speaker Rear speaker or Subwoofer Right Perform these connections when using the optional amplifier. 62 En Front speaker Rear speaker or Subwoofer Section Installation 15 Connecting the system HD Radio tuner (sold separately) Installation Black Microphone for hands-free phoning (supplied with Bluetooth adapter) IP-BUS cable (Supplied with HD Radio tuner) Bluetooth adapter (e.g. CD-BTB200) (sold separately) Blue Black IP-BUS input IP-BUS cable (Supplied with Bluetooth adapter) This product En 63 Section 15 Installation Connecting the power cord 26 pin cable (Supplied with Navigation system) This product Insert the 26 pin cable in the direction indicated in the figure. Navigation system can be connected (AVIC-U220 (sold separately)). RGB input Antenna input Please contact your dealer to inquire about the connectable navigation system. Fuse (10 A) Yellow Connect to the constant 12 V supply terminal. Orange/white Connect to lighting switch terminal. Fuse resistor Red Connect to terminal controlled by ignition switch (12 V DC). Fuse resistor Black (chassis ground) Connect to a clean, paint-free metal location. White Front speaker White/black Left Green Rear speaker or Subwoofer (4 Ω) Gray Gray/black Right Violet Green/black Front speaker Violet/black Rear speaker or Subwoofer (4 Ω) When using a subwoofer of 70 W (2 Ω), be sure to connect with Violet and Violet/black leads of this unit. Do not connect anything to Green and Green/black leads. Green Violet Subwoofer (4 Ω) ×2 Not used. Green/black 64 En Violet/black Section Installation 15 Installation Wired remote input Hard-wired remote control adaptor can be connected (sold separately). Fuse resistor Violet/white Of the two lead wires connected to the back lamp, connect the one in which the voltage changes when the gear shift is in the REVERSE (R) position. This connection enables the unit to sense whether the car is moving forwards or backwards. Yellow/black If you use an equipment with Mute function, wire this lead to the Audio Mute lead on that equipment. If not, keep the Audio Mute lead free of any connections. Connection method 2. Clamp firmly with needle-nosed pliers. 1. Clamp the lead. Note: · The position of the parking brake switch depends on the vehicle model. For details, consult the vehicle Owner’s Manual or dealer. Light green Used to detect the ON/OFF status of the parking brake. This lead must be connected to the power supply side of the parking brake switch. Power supply side Parking brake switch Ground side Blue/white Connect to system control terminal of the power amp or auto-antenna relay control terminal (max. 300 mA 12 V DC). With a 2 speaker system, do not connect anything to the speaker leads that are not connected to speakers. Note: · Change the initial setting of this unit. The subwoofer output of this unit is monaural. En 65 Section 15 Installation When connecting the external video component and the display Display with RCA input jacks (sold separately) To video input Video input (V IN) Rear monitor output (V OUT) RCA cables (sold separately) To video output To audio outputs This product Audio inputs (L IN, R IN) External video component (sold separately) ! It is necessary to change AV Input in System Menu when connecting the external video component. When using a display connected to rear video output This product’s rear video output is for connection of a display to enable passengers in the rear seats to watch the DVD, etc. WARNING ! Never install the display in a location where it is visible to the driver while driving. 66 En Section Installation When connecting with a rear view camera 15 Rear view camera input (R.C IN) Installation When this product is used with a rear view camera, it is possible to automatically switch from the video to rear view image when the gear shift is moved to REVERSE (R). This product WARNING USE INPUT ONLY FOR REVERSE OR MIRROR IMAGE REAR VIEW CAMERA. OTHER USE MAY RESULT IN INJURY OR DAMAGE. RCA cable (sold separately) To video output CAUTION ! The screen image may appear reversed. ! The rear view camera function is to be used as an aid to keep an eye on trailers, or while backing up. Do not use for entertainment purposes. ! Objects in the rear view may appear closer or more distant than they actually are. Fuse resistor Rear view camera (sold separately) Violet/white Of the two lead wires connected to the back lamp, connect the one in which the voltage changes when the gear shift is in the REVERSE (R) position. This connection enables the unit to sense whether the car is moving forwards or backwards. CAUTION You must use a camera which outputs mirror reversed images. It is necessary to set Camera Polarity properly in System Menu when connecting the rear view camera. En 67 Section 15 Installation Installation Notes ! Check all connections and systems before final installation. ! Do not use unauthorized parts as this may cause malfunctions. ! Consult your dealer if installation requires drilling of holes or other modifications to the vehicle. ! Do not install this unit where: — it may interfere with operation of the vehicle. — it may cause injury to a passenger as a result of a sudden stop. ! Do not install the display where it may (i) obstruct the driver’s vision, (ii) impair the performance of any of the vehicle’s operating systems or safety features, including air bags, hazard lamp buttons or (iii) impair the driver’s ability to safely operate the vehicle. ! The semiconductor laser will be damaged if it overheats. Install this unit away from hot places such as near the heater outlet. ! Optimum performance is obtained when the unit is installed at an angle of less than 30°. and tighten the screws at 3 or 4 locations on each side. 1 2 3 4 5 ! To some types of vehicles, this unit cannot be properly installed. In such case, use the optional installation kit (ADT-VA133). Installation using the screw holes on the side of the unit % Fastening the unit to the factory radiomounting bracket. Position the unit so that its screw holes are aligned with the screw holes of the bracket, 68 En 1 If the pawl gets in the way, bend it down. 2 Factory radio mounting bracket 3 Use either truss (5 mm × 8 mm) or flush surface (5 mm × 9 mm) screws, depending on the bracket screw holes. 4 Frame In some types of vehicles, discrepancy may occur between the unit and the dashboard. If this happens, use the supplied frame to fill the gap. 5 Dashboard or console Appendix Additional Information Troubleshooting Common Cause The power will not turn on. The unit will not operate. Confirm once more Leads and connectors are incor- that all connecrectly connected. tions are correct. The fuse is blown. Action (Reference page) Rectify the cause and then replace the fuse. Be sure to install a fuse with the same rating. Press RESET. (Page Noise and/or other factors are 10) causing the builtin microprocessor to operate incorrectly. Operation with the remote control is not possible. The unit does not operate correctly even when the appropriate remote control buttons are pressed. Battery power is low. Load a new battery. Some operations Try operating with another disc. are prohibited with certain discs. Action (Reference page) There is no image displayed. The parking brake cable is not connected. Connect the parking brake cable, and apply the parking brake. The parking brake is not applied. Connect the parking brake cable, and apply the parking brake. The icon is The operation is displayed, and prohibited for the operation is not disc. possible. The operation is not compatible with the configuration of the disc. The disc loaded is not compatible with this video system. Change the disc to one that is compatible with your video system. Cables are not connected correctly. Connect the cables correctly. The unit is performing still, slow motion or frame-by-frame playback. There is no sound during still, slow motion or frameby-frame playback. This operation is not possible. This operation is not possible. The image displayed stops (pauses) and the unit cannot be operated. Stop playback The data could once, and start no longer be read during play- playback again. back. There is no sound. The volume level is low. The volume level is low. Adjust the volume level. The attenuator is Turn the attenuator on. off. The sound and The unit is not video skip. firmly secured. Playback is not The disc is dirty. Clean the disc. possible. The type of disc Check the disc loaded cannot be type. played on this unit. There is no sound. The volume level will not rise. Cause Additional Information Symptom Symptom Firmly secure the unit. File size and transmission rate are above recommended rates. Create a DivX file that is within the recommended size and transmission rate. The aspect ratio is incorrect and the image is stretched. The aspect ratio setting is incorrect for the display. Select the appropriate setting for your display. (Page 49) The motor sounds when the ignition switch is turned ON (or is turned to ACC). The unit is confirming whether or not a disc is loaded. This is a normal operation. En 69 Appendix Additional Information Symptom Cause Action (Reference page) Symptom Cause Action (Reference page) Nothing is displayed. The touch panel keys cannot be used. The rear view camera is not connected. Connect a rear view camera. Dialog language (and subtitle language) cannot be switched. The DVD being played does not feature multiple language recordings. The language cannot be switched if they are not recorded on the disc. Camera Polarity Press and hold MENU to return to is at incorrect the source display setting. and then select the correct setting for Camera Polarity. (Page 54) Switch the display There is no emNo xxxx apbedded text infor- or play another pears when a track/file. display is chan- mation. ged (No Title, for example). Sub-folders cannot be played back. Select the repeat Folder repeat play has been se- range again. lected. Select the repeat Another folder The repeat range changes was selected dur- range again. automatically. ing repeat play. Track search or fast forward/reverse was performed during file repeat play. Select the repeat range again. Cause Action (Reference page) DVD Symptom Playback is not The loaded disc possible. has a different region number from this unit. Replace the disc with one featuring the same region number as this unit. A parental lock Parental lock is message is dis- activated. played and playback is not possible. Turn parental lock off or change the level. (Page 50) The code number Enter the correct Parental lock code number. cannot be can- is incorrect. (Page 50) celed. You have forgotten your code number. 70 En Press RESET. (Page 51) Switch the lanYou can only switch between guage using the items indicated disc menu. in the disc menu. No subtitles are displayed. Subtitles are not The DVD being played does not displayed if they feature subtitles. are not recorded on the disc. Switch the lanYou can only switch between guage using the items indicated disc menu. in the disc menu. Playback is not performed with the audio language and subtitle language settings selected in Video Setup menu. The DVD being played does not feature dialog or subtitles in the selected language. The language cannot be switched if the selected language is not recorded on the disc. The viewing angle cannot be switched. The DVD being played does not feature scenes shot from multiple angles. The viewing angle cannot be switched if the DVD does not feature scenes recorded from multiple angles. You are trying to switch to multiangle viewing for a scene that was not recorded from multiple angles. Switch between multiple angles when watching scenes recorded from multiple angles. Appendix Additional Information Cause Action (Reference page) The image is extremely unclear/distorted and dark during playback. Some discs fea- Since this unit is compatible with ture a signal to prohibit copying. the analog copy generation management system, when playing a disc that has a signal prohibiting copying, horizontal stripes or other imperfections may appear when viewed on some displays. This is not a malfunction. Bluetooth audio/telephone Symptom Cause Action The sound from the Bluetooth audio source is not played back. There is a call in progress on a Bluetooth connected cellular phone. The sound will be played back when the call is terminated. A Bluetooth-con- Do not operate the cellular phone at nected cellular this time. phone is currently being operated. A call was made with a Bluetoothconnected cellular phone and then immediately terminated. As a result, communication between this unit and the cellular phone was not terminated properly. Video CD Symptom Cause Action The PBC (playback control) menu cannot be called up. The Video CD being played does not feature PBC. This operation is not available for Video CDs that do not feature PBC. Repeat play and track/time search are not possible. This operation is The Video CD being played fea- not available for Video CDs that features PBC. ture PBC. iPod Symptom Cause The iPod does not operate correctly. The cables are in- Disconnect the cable from the correctly coniPod. Once the nected. iPod’s main menu is displayed, reconnect the iPod and reset it. The iPod version is old. Action Update the iPod version. Reconnect the Bluetooth connection between this unit and the cellular phone. Additional Information Symptom Error messages When you contact your dealer or your nearest Pioneer Service Center, be sure to note the error message. Tuner Message Cause Action No Data Provided This unit cannot receive artist name/song title information. Move to the desirable location with good reception. No Data This unit cannot receive program service name information. Move to the desirable location with good reception. DVD Message Cause Action Different Region Disc The disc does not have the same region number as this unit. Replace the DVD with one bearing the correct region number. En 71 Appendix Additional Information Message Cause Action Message Cause Error-02-XX/ FF-FF The disc is dirty. Clean the disc. The disc is scratched. Replace the disc. Unplayable File Select a file that This type of file cannot be played can be played. on this unit. The disc is loaded upside down. Check that the disc is loaded correctly. Format Read/ Ready Sometimes there is a delay between the start of playback and when you start to hear any sound. Video frame rate not supported. DivX file’s frame Select a file that rate is more than can be played. 30 fps. There is an elec- Press RESET. trical or mechanical error. Unplayable Disc This type of disc Replace the disc cannot be played with one that can be played on this on this unit. unit. The inserted disc Replace the disc. does not contain any playable files. Protect Replace the disc. All the files on the inserted disc are embedded with DRM. Skipped The inserted disc Play an audio file not embedded with contains DRM Windows Media protected files. DRM 9/10. TEMP The temperature of the unit is outside the normal operating range. The inserted disc Select a file that contains expired can be played. DivX VOD content. Video resolution not supported The inserted disc Select a file that contains a high can be played. definition DivX file. It is not possi- This unit’s flash Select a file that ble to write it memory used as can be played. the temporary in the flash. storage area is full. Your device is not authorized to play this DivX protected video. 72 En This unit’s DivX Register this unit registration code to the DivX VOD contents provider. has not been authorized by the DivX VOD contents provider. Wait until the message disappears and you hear sound. Audio Format This type of file is Select a file that not supported on can be played. not supthis unit. ported. External storage device (USB) Message Cause Unplayable File Select a file that This type of file cannot be played can be played. on this unit. Action There are no songs. Transfer the audio files to the USB portable audio player/USB memory and connect. Security for the connected USB memory is enabled. Follow the USB memory instructions to disable security. Format Read/ Ready Sometimes there is a delay between the start of playback and when you start to hear any sound. Wait until the message disappears and you hear sound. Skipped The connected USB portable audio player/ USB memory contains WMA files that are protected by Windows Mediaä DRM 9/10. Play an audio file not embedded with Windows Media DRM 9/10. Wait until the unit returns to a temperature within the normal operating limits. Rental Expired. Action Appendix Additional Information Cause Action Message Cause All the files on the connected USB portable audio player/ USB memory are protected by Windows Media DRM 9/10. Transfer audio files not protected by Windows Media DRM 9/10 to the USB portable audio player/USB memory and connect. Rental Expired. The inserted ex- Select a file that ternal storage de- can be played. vice contains expired DivX VOD content. Video resolution not supported The USB device connected to is not supported by this unit. Connect a USB portable audio player or USB memory that is USB Mass Storage Class compliant. The inserted ex- Select a file that ternal storage de- can be played. vice contains a high definition DivX file. The USB device is not formatted with FAT16 or FAT32. The connected USB device should be formatted with FAT16 or FAT32. The USB connector or USB cable has shortcircuited. Check that the USB connector or USB cable is not caught in something or damaged. The connected USB portable audio player/ USB memory consumes more than maximum allowable current. Disconnect the USB portable audio player/USB memory and do not use it. Turn the ignition switch to OFF, then to ACC or ON and then connect a compliant USB portable audio player/USB memory. Incompatible USB Check USB Error-02-9X/DX Communication failed. Perform one of the following operations. –Turn the ignition switch OFF and back ON. –Disconnect the USB portable audio player/USB memory. –Change to a different source. Then, return to the USB portable audio player/USB memory. Action It is not possi- This unit’s flash Select a file that ble to write it memory used as can be played. the temporary in the flash. storage area is full. Your device is not authorized to play this DivX protected video. This unit’s DivX Register this unit registration code to the DivX VOD contents provider. has not been authorized by the DivX VOD contents provider. Format Read/ Ready Sometimes there is a delay between the start of playback and when you start to hear any sound. Video frame rate not supported. DivX file’s frame Select a file that rate is more than can be played. 30 fps. Additional Information Message Protect Wait until the message disappears and you hear sound. Audio Format This type of file is Select a file that not supported on can be played. not supthis unit. ported. iPod Message Cause Action Format Read/ Ready Sometimes there is a delay between the start of playback and when you start to hear any sound. Wait until the message disappears and you hear sound. En 73 Appendix Additional Information Message Cause Action Error-02-6X/9X/-DX Communication failed. Disconnect the cable from the iPod. Once the iPod’s main menu is displayed, reconnect the iPod and reset it. iPod failure. Disconnect the cable from the iPod. Once the iPod’s main menu is displayed, reconnect the iPod and reset it. Error-02-67 The iPod firmware version is old. Update the iPod version. Stop There are no songs. Transfer songs to the iPod. Select a list that There are no songs in the cur- contains songs. rent list. Not Found No related songs. Transfer songs to the iPod. Bluetooth 74 Message Cause Action Error-10 The power failed for the Bluetooth module of this unit. Turn the ignition switch OFF and then to ACC or ON. If the error message is still displayed after performing the above action, please contact your dealer or an authorized Pioneer Service Station. En Understanding messages Messages Translation CAUTION: Screen image may appear reversed. Pioneer recommends the use of a camera which outputs mirrorreversed images. Otherwise, the screen image will appear reversed. Appendix Additional Information Indicator list Area 1 Shows when analog audio of HD Radio signal is received. Area 2 Shows when digital audio of HD Radio signal is received. Shows while searching a song/ video in alphabet search mode. Shows which subtitle language has been selected. Area 3 Shows which viewing angle has been selected. Area 1 Indicates that the selected frequency is being broadcast in stereo. Indicates that the digital format is Dolby Digital. Shows which audio output has been selected. Additional Information Shows when HD Radio station information is received. Area 2 Indicates that the digital format is MPEG Audio. Shows the disc title of the CD text disc currently being played. Indicates that the digital format is Linear PCM. Indicates the sampling frequency. Shows the track title of the track currently being played for CD text discs. Shows the song title of the song currently being played for MP3/WMA/ AAC files. Indicates that the digital format is DTS. Shows the comment currently being played. Shows the station name currently tuned in to. 1+1ch 2 ch Indicates the audio channel. Mch Shows the artist name of the track/ song currently being played for CD text discs. Shows the artist name of the artist currently being played for MP3/ WMA/AAC files. Shows the category name. Indicates that a disc with PBC On is being played. Shows when HD Radio signal is received. Shows the folder name of the folder containing the MP3/WMA/AAC file currently being played. En 75 Appendix Additional Information Shows the file name of the MP3/ WMA/AAC file currently being played. Shows the preset number of the station currently being tuned in to. Handling guidelines Discs and player Use only discs featuring any of following logos. Shows SIRIUS information. Area 3 Shows the title number currently being played. Shows the chapter number currently being played. Shows the replay time currently being played. Shows when the game alert function is on while receiving SIRIUS stations. Use 12-cm discs. Do not use 8-cm discs or an adapter for 8-cm discs. Use only conventional, fully circular discs. Do not use shaped discs. Indicates that the feature demo is on. Do not insert anything other than a DVD (-R/-RW) or CD (-R/-RW) into the disc loading slot. Do not use cracked, chipped, warped, or otherwise damaged discs as they may damage the player. Unfinalized CD-R/CD-RW discs cannot be played back. Do not touch the recorded surface of the discs. Store discs in their cases when not in use. Do not attach labels, write on or apply chemicals to the surface of the discs. To clean a disc, wipe the disc with a soft cloth outward from the center. Condensation may temporarily impair the player’s performance. Let it rest for about one hour to adjust to a warmer temperature. Also, wipe any damp discs off with a soft cloth. Playback of discs may not be possible because of disc characteristics, disc format, recorded application, playback environment, storage conditions, and so on. Road shocks may interrupt disc playback. 76 En Appendix Additional Information Read the precautions for discs before using them. iPod Certain functions may not be available for some DVD video discs. To ensure proper operation, connect the dock connector cable from the iPod directly to this unit. It may not be possible to play back some DVD video discs. Firmly secure the iPod when driving. Do not let the iPod fall onto the floor, where it may become jammed under the brake or accelerator pedal. It is not possible to play back DVD-RAM discs. External storage device (USB) Depending on the external storage device (USB), the following problems may occur. ! Operations may vary. ! The storage device may not be recognized. ! Files may not be played back properly. USB storage device Connections via USB hub are not supported. Do not connect anything other than a USB storage device. Firmly secure the USB storage device when driving. Do not let the USB storage device fall onto the floor, where it may become jammed under the brake or accelerator pedal. Depending on the USB storage device, the device may cause noise to occur in the radio. Copyright protected files that are stored in the USB devices cannot be played back. You cannot connect a USB portable audio player/USB memory to this unit via USB hub. Partitioned USB memory is not compatible with this unit. Depending on the kind of USB portable audio player/ USB memory you use, the device may not be recognized or audio files may not be played back properly. Do not leave the USB portable audio player/USB memory in direct sunlight for extended amounts of time. Doing so may cause the device to malfunction from the extreme rise in temperature. About iPod settings ! When an iPod is connected, this unit changes the EQ (equalizer) setting of the iPod to off in order to optimize the acoustics. When you disconnect the iPod, the EQ returns to the original setting. ! You cannot set Repeat to off on the iPod when using this unit. Repeat is automatically changed to All when the iPod is connected to this unit. Incompatible text saved on the iPod will not be displayed by the unit. DVD-R/DVD-RW discs Additional Information This unit is not compatible with discs recorded in AVCHD (Advanced Video Codec High Definition) format. Do not insert AVCHD discs as you may not be able to eject the disc. Unfinalized DVD-R/-RW discs which have been recorded in the Video format (video mode) cannot be played back. Playback of DVD-R/DVD-RW discs may not be possible, due to disc characteristics, scratches or dirt on the disc, or dirt, condensation, etc. on the lens of this unit. Depending on the application settings and the environment, playback of discs recorded on a personal computer may not be possible. (For details, contact the manufacturer of the application.) CD-R/CD-RW discs When CD-R/CD-RW discs are used, playback is possible only for discs which have been finalized. Playback of CD-R/CD-RW discs recorded on a music CD recorder or a personal computer may not be possible due to disc characteristics, scratches or dirt on the disc, or dirt, condensation, etc., on the lens of this unit. Depending on the application settings and the environment, playback of discs recorded on a personal computer may not be possible. (For details, contact the manufacturer of the application.) Playback of CD-R/CD-RW discs may become impossible in case of direct exposure to sunlight, high temperatures, or the storage conditions in the vehicle. Titles and other text information recorded on a CD-R/ CD-RW disc may not be displayed by this unit (in the case of audio data (CD-DA)). En 77 Appendix Additional Information DualDiscs DualDiscs are two-sided discs that have a recordable CD for audio on one side and a recordable DVD for video on the other. Playback of the DVD side is possible with this unit. However, since the CD side of DualDiscs is not physically compatible with the general CD standard, it may not be possible to play the CD side with this unit. Frequent loading and ejecting of a DualDisc may result in scratches on the disc. Serious scratches can lead to playback problems on this unit. In some cases, a DualDisc may become stuck in the disc loading slot and will not eject. To prevent this, we recommend you refrain from using DualDisc with this unit. Please refer to the information from the disc manufacturer for more detailed information about DualDiscs. JPEG picture files JPEG is short for Joint Photographic Experts Group and refers to a still image compression technology standard. Files are compatible with Baseline JPEG and EXIF 2.1 still images up to a resolution of 8 192 × 7 680. (EXIF format is used most commonly with digital still cameras.) Playback of EXIF format files that were processed by a personal computer may not be possible. There is no progressive JPEG compatibility. DivX video files Depending on the composition of the file information, such as the number of audio streams or file size, there may be a slight delay when playing back discs. Some special operations may be prohibited due to the composition of the DivX files. Only DivX files downloaded from a DivX partner site are guarantee for proper operation. Unauthorized DivX files may not operate properly. DRM rental files cannot be operated until playback is started. Recommended file size: 2 Mbps or less with a transmission rate of 4 GB or less. The ID code of this unit must be registered to a DivX VOD provider in order to playback DivX VOD files. For information on ID codes, refer to Displaying the DivXâ VOD registration code on page 51. For more details about DivX, visit the following site: http://www.divx.com/ Important ! When naming a JPEG image file, add the corresponding filename extension (.jpg, .jpeg, . jpe or .jfif). ! This unit plays back files with these filename extensions (.jpg, .jpeg, .jpe or .jfif) as a JPEG image file. To prevent malfunctions, do not use these extensions for files other than JPEG image files. Compressed audio compatibility (disc, USB) WMA File extension: .wma Bit rate: 5 kbps to 320 kbps (CBR), VBR Sampling frequency: 8 kHz to 48 kHz Windows Media Audio Professional, Lossless, Voice/ DRM Stream/Stream with video: Not compatible MP3 File extension: .mp3 Bit rate: 8 kbps to 320 kbps (CBR), VBR Sampling frequency: 8 kHz to 48 kHz (32 kHz, 44.1 kHz, 48 kHz for emphasis) Compatible ID3 tag version: 1.0, 1.1, 2.2, 2.3 (ID3 tag Version 2.x is given priority over Version 1.x.) M3u playlist: Not compatible MP3i (MP3 interactive), mp3 PRO: Not compatible AAC Compatible format: AAC encoded by iTunes File extension: .m4a 78 En Appendix Additional Information Sampling frequency: 8 kHz to 44.1 kHz Packet write data transfer: Not compatible Bit rate: 8 kbps to 320 kbps Regardless of the length of blank sections between the songs from the original recording, compressed audio discs play with a short pause between songs. Apple Lossless: Not compatible AAC file bought from the iTunes Store (.m4p file extension): Not compatible Compatible format: DivX video format implemented in relation to DivX standards File extensions: .avi or .divx DivX Ultra format: Not compatible DivX HD format: Not compatible Playable folders: up to 6 000 (up to 700 for DivX) Playable files: up to 65 535, up to 255 for one folder Playback of copyright-protected files: Not compatible Partitioned external storage device (USB): Only the first playable partition can be played. There is no compatibility for Multi Media Cards (MMC). DivX files without video data: Not compatible DivX plus: Not compatible Compatible audio codec: MP2, MP3, Dolby Digital LPCM: Not compatible Bit rate: 8 kbps to 320 kbps (CBR), VBR Sampling frequency: 8 kHz to 48 kHz Compatible external subtitle file extension: .srt CAUTION Additional Information DivX compatibility External storage device (USB) ! Pioneer accepts no responsibility for data lost on the USB memory/USB portable audio player even if that data is lost while using this unit. ! Do not leave the discs/external storage device (USB) or iPod in places with high temperatures. Supplemental information Some characters in a file name (including the file extension) or a folder name may not be displayed. This unit may not operate correctly depending on the application used to encode WMA files. There may be a slight delay at the start of playback of audio files embedded with image data or audio files stored on a USB storage device that has numerous folder hierarchies. Disc Playable folders: up to 700 Playable files: up to 999 for CD-R/CD-RW Playable files: up to 3 500 for DVD-R/DVD-RW File system: ISO 9660 Level 1 and 2, Romeo, Joliet, UDF 1.02, 1.50, 2.00, 2.01, 2.50 (DVD-R/DVD-RW) Multi-session playback: Compatible En 79 Appendix Additional Information iPod compatibility Example of a hierarchy 01 This unit supports only the following iPod models. Supported iPod software versions are shown below. Older versions may not be supported. ! iPhone 4 (software version 4.1) ! iPhone 3GS (software version 4.1) ! iPhone 3G (software version 4.1) ! iPhone (software version 3.1.3) ! iPod nano 6th generation (software version 1.0) ! iPod nano 5th generation (software version 1.0.2) ! iPod nano 4th generation (software version 1.0.4) ! iPod nano 3rd generation (software version 1.1.3) ! iPod nano 2nd generation (software version 1.1.3) ! iPod nano 1st generation (software version 1.3.1) ! iPod touch 4th generation (software version 4.1) ! iPod touch 3rd generation (software version 4.0) ! iPod touch 2nd generation (software version 4.0) ! iPod touch 1st generation (software version 3.1.3) ! iPod classic 160GB (software version 2.0.4) ! iPod classic 120GB (software version 2.0.1) ! iPod classic (software version 1.1.2) ! iPod 5th generation (software version 1.3) Depending on the generation or version of the iPod, some functions may not be available. Operations may vary depending on the software version of iPod. When using an iPod, an iPod Dock Connector to USB Cable is required. When you use Pioneer CD-IU50V/CD-IU200V interface cable, consult your dealer for details. About the file/format compatibility, refer to the iPod manuals. Audio Book, Podcast: Compatible CAUTION Pioneer accepts no responsibility for data lost on the iPod, even if that data is lost while this unit is used. 02 03 04 05 Level 1 Level 2 Level 3 Level 4 : Folder : Compressed audio file 01 to 05: Folder number 1 to 6: Playback sequence Disc Folder selection sequence or other operation may differ depending on the encoding or writing software. External storage device (USB) The playback sequence is the same as the recorded sequence in the external storage device (USB). To specify the playback sequence, the following method is recommended. 1 Create a file name that includes numbers that specify the playback sequence (e.g., 001xxx. mp3 and 099yyy.mp3). 2 Put those files into a folder. 3 Save the folder that contains the files to the external storage device (USB). However, depending on the system environment, you may not be able to specify the playback sequence. For USB portable audio players, the sequence is different and depends on the player. Using the display correctly CAUTION Sequence of audio files The user cannot assign folder numbers and specify playback sequences with this unit. 80 En ! If liquid or foreign matter should get inside this unit, turn off the power immediately and consult your dealer or the nearest authorized PIONEER Service Station. Do not use the unit in this condition because doing so may result in fire, electric shock, or other failure. Appendix Additional Information Handling the display ! Never touch the screen with anything besides your finger when operating the touch panel function. The screen can scratch easily. ! When the display is subjected to direct sunlight for a long period of time, it will become very hot resulting in possible damage to the LCD screen. You should avoid exposing the display unit to direct sunlight as much as possible. ! The display should be used within the temperature range of –10°C to +60°C (14 °F to 140 °F). At temperatures higher or lower than this operating temperature range, the display may not operate normally. ! The LCD screen is exposed in order to increase its visibility within the vehicle. Do not press it strongly on it as this may damage it. ! Do not push the LCD screen forcefully as this may scratch it. due to the characteristics of the LCD screen and do not indicate a malfunction. ! When using a cellular phone, keep the antenna away from the display to prevent disruption of the video image by the appearance of spots, colored stripes, etc. LED (light-emitting diode) backlight ! At low temperatures, using the LED backlight may increase image lag and degrade the image quality due to the characteristics of the LCD screen. Image quality will improve with an increase in temperature. ! To protect the LED backlight, the display will darken in the following environments: — In the direct sunlight — Near the heater vent ! The product lifetime of the LED backlight is more than 10 000 hours. However, it may decrease if used in high temperatures. ! If the LED backlight reaches the end of its product lifetime, the screen will become dark and the image will no longer be projected. In such cases, please consult your dealer or the nearest authorized PIONEER Service Station. Additional Information ! If you notice smoke, a strange noise or smell, or any other abnormal signs from the display, turn off the power immediately and consult your dealer or the nearest authorized PIONEER Service Station. Using this unit in this condition may result in permanent damage to the system. ! Do not disassemble or modify this unit, as there are high-voltage components inside which may cause electric shock. Be sure to consult your dealer or the nearest authorized PIONEER Service Station for internal inspection, adjustments, or repairs. Keeping the display in good condition ! When removing dust from the screen or cleaning the display, first turn the system power off, then wipe with a soft dry cloth. ! When wiping the screen, take care not to scratch the surface. Do not use harsh or abrasive chemical cleaners. Liquid crystal display (LCD) screen ! Heat from the heater may damage the LCD screen, and cool air from the cooler may cause moisture to form inside the display resulting in possible damage. ! Small black dots or white dots (bright dots) may appear on the LCD screen. These are En 81 Appendix Additional Information Copyright and trademark This item incorporates copy protection technology that is protected by U.S. patents and other intellectual property rights of Rovi Corporation. Reverse engineering and disassembly are prohibited. DVD video is a trademark of DVD Format/Logo Licensing Corporation. iTunes Apple and iTunes are trademarks of Apple Inc., registered in the U.S. and other countries. MP3 Supply of this product only conveys a license for private, non-commercial use and does not convey a license nor imply any right to use this product in any commercial (i.e. revenuegenerating) real time broadcasting (terrestrial, satellite, cable and/or any other media), broadcasting/streaming via internet, intranets and/ or other networks or in other electronic content distribution systems, such as pay-audio or audio-on-demand applications. An independent license for such use is required. For details, please visit http://www.mp3licensing.com. WMA Windows Media is either a registered trademark or trademark of Microsoft Corporation in the United States and/or other countries. This product includes technology owned by Microsoft Corporation and cannot be used or distributed without a license from Microsoft Licensing, Inc. iPod & iPhone iPhone, iPod, iPod classic, iPod nano, and iPod touch are trademarks of Apple Inc., registered in the U.S. and other countries. “Made for iPod” and “Made for iPhone” mean that an electronic accessory has been designed to connect specifically to iPod or 82 En iPhone, respectively, and has been certified by the developer to meet Apple performance standards. Apple is not responsible for the operation of this device or its compliance with safety and regulatory standards. Please note that the use of this accessory with iPod or iPhone may affect wireless performance. Dolby Digital Manufactured under license from Dolby Laboratories. “Dolby” and the double-D symbol are trademarks of Dolby Laboratories. DivX DivXâ, DivX Certifiedâ and associated logos are trademarks of DivX, Inc. and are used under license. ABOUT DIVX VIDEO: DivXâ is a digital video format created by DivX, Inc. This is an official DivX Certifiedâ device that plays DivX video. Visit divx.com for more information and software tools to convert your files into DivX video. ABOUT DIVX VIDEO-ON-DEMAND: This DivX Certifiedâ device must be registered in order to play purchased DivX Video-on-Demand (VOD) movies. To obtain your registration code, locate the DivX VOD section in Displaying the DivXâ VOD registration code. Go to vod.divx.com for more information on how to complete your registration. About the SAT RADIO READY mark Appendix Additional Information Additional Information The SAT RADIO READY mark indicates that the Satellite Radio Tuner for Pioneer (i.e., XM tuner and Sirius satellite tuner which are sold separately) can be controlled by this unit. Please inquire to your dealer or nearest authorized Pioneer service station regarding the satellite radio tuner that can be connected to this unit. For satellite radio tuner operation, please refer to the satellite radio tuner owner’s manual. ! The system will use direct satellite-to-receiver broadcasting technology to provide listeners in their cars and at home with crystal-clear sound seamlessly from coast to coast. Satellite radio will create and package over 100 channels of digital-quality music, news, sports, talk and children’s programming. ! “SAT Radio”, the SAT Radio logo and all related marks are trademarks of Sirius Satellite Radio Inc., and XM Satellite Radio Inc. HD Radioä Technology HD Radioä, HD Radio Readyä, and the HD Radio Ready logo are proprietary trademarks of iBiquity Digital Corporation. This HD Radio Ready receiver is ready to receive HD Radio broadcasts when connected to the HD Radio tuner (e.g. GEX-P20HD), sold separately. En 83 Appendix Additional Information Language code chart for DVD Language (code), input code Japanese (ja), 1001 Dzongkha (dz), 0426 English (en), 0514 Ewe (ee), 0505 French (fr), 0618 Esperanto (eo), 0515 Spanish (es), 0519 Estonian (et), 0520 German (de), 0405 Basque (eu), 0521 Italian (it), 0920 Persian (fa), 0601 Chinese (zh), 2608 Fulah (ff), 0606 Dutch, Flemish (nl), 1412 Finnish (fi), 0609 Portuguese (pt), 1620 Fijian (fj), 0610 Swedish (sv), 1922 Faroese (fo), 0615 Russian (ru), 1821 Western Frisian (fy), 0625 Korean (ko), 1115 Irish (ga), 0701 Greek (el), 0512 Gaelic (gd), 0704 Afar (aa), 0101 Galician (gl), 0712 Abkhazian (ab), 0102 Guarani (gn), 0714 Avestan (ae), 0105 Gujarati (gu), 0721 Afrikaans (af), 0106 Manx (gv), 0722 Akan (ak), 0111 Hausa (ha), 0801 Amharic (am), 0113 Hebrew (he), 0805 Aragonese (an), 0114 Hindi (hi), 0809 Arabic (ar), 0118 Hiri Motu (ho), 0815 Assamese (as), 0119 Croatian (hr), 0818 Avaric (av), 0122 Haitian (ht), 0820 Aymara (ay), 0125 Hungarian (hu), 0821 Azerbaijani (az), 0126 Armenian (hy), 0825 Bashkir (ba), 0201 Herero (hz), 0826 Belarusian (be), 0205 Interlingua (ia), 0901 Bulgarian (bg), 0207 Indonesian (id), 0904 Bihari (bh), 0208 Interlingue (ie), 0905 Bislama (bi), 0209 Igbo (ig), 0907 Bambara (bm), 0213 Sichuan Yi (ii), 0909 Bengali (bn), 0214 Inupiaq (ik), 0911 Tibetan (bo), 0215 Ido (io), 0915 Breton (br), 0218 Icelandic (is), 0919 Bosnian (bs), 0219 Inuktitut (iu), 0921 Catalan (ca), 0301 Javanese (jv), 1022 Chechen (ce), 0305 Georgian (ka), 1101 Chamorro (ch), 0308 Kongo (kg), 1107 84 Kurdish (ku), 1121 Komi (kv), 1122 Cornish (kw), 1123 Kirghiz, Kyrgyz (ky), 1125 Latin (la), 1201 Luxembourgish (lb), 1202 Ganda (lg), 1207 Limburgan (li), 1209 Lingala (ln), 1214 Lao (lo), 1215 Lithuanian (lt), 1220 Luba-Katanga (lu), 1221 Latvian (lv), 1222 Malagasy (mg), 1307 Marshallese (mh), 1308 Maori (mi), 1309 Macedonian (mk), 1311 Malayalam (ml), 1312 Mongolian (mn), 1314 Marathi (mr), 1318 Malay (ms), 1319 Maltese (mt), 1320 Burmese (my), 1325 Nauru (na), 1401 Bokmal (nb), 1402 Ndebele, North (nd), 1404 Nepali (ne), 1405 Ndonga (ng), 1407 Nynorsk (nn), 1414 Norwegian (no), 1415 Ndebele, South (nr), 1418 Navajo, Navaho (nv), 1422 Chichewa (ny), 1425 Occitan (oc), 1503 Ojibwa (oj), 1510 Oromo (om), 1513 Oriya (or), 1518 Ossetian (os), 1519 Panjabi, Punjabi (pa), 1601 Pali (pi), 1609 Polish (pl), 1612 Pashto, Pushto (ps), 1619 Quechua (qu), 1721 Romansh (rm), 1813 Corsican (co), 0315 Kikuyu, Gikuyu (ki), 1109 Cree (cr), 0318 Czech (cs), 0319 Church Slavic (cu), 0321 Chuvash (cv), 0322 Welsh (cy), 0325 Kuanyama (kj), 1110 Kazakh (kk), 1111 Kalaallisut (kl), 1112 Central Khmer (km), 1113 Kannada (kn), 1114 Danish (da), 0401 Kanuri (kr), 1118 Rundi (rn), 1814 Divehi (dv), 0422 Kashmiri (ks), 1119 Romanian (ro), 1815 En Kinyarwanda (rw), 1823 Sanskrit (sa), 1901 Sardinian (sc), 1903 Sindhi (sd), 1904 Northern Sami (se), 1905 Sangho (sg), 1907 Sinhala (si), 1909 Slovak (sk), 1911 Slovenian (sl), 1912 Samoan (sm), 1913 Shona (sn), 1914 Somali (so), 1915 Albanian (sq), 1917 Serbian (sr), 1918 Swati (ss), 1919 Sotho, Southern (st), 1920 Sundanese (su), 1921 Swahili (sw), 1923 Tamil (ta), 2001 Telugu (te), 2005 Tajik (tg), 2007 Thai (th), 2008 Tigrinya (ti), 2009 Turkmen (tk), 2011 Tagalog (tl), 2012 Tswana (tn), 2014 Tonga (to), 2015 Turkish (tr), 2018 Tsonga (ts), 2019 Tatar (tt), 2020 Twi (tw), 2023 Tahitian (ty), 2025 Uighur, Uyghur (ug), 2107 Ukrainian (uk), 2111 Urdu (ur), 2118 Uzbek (uz), 2126 Venda (ve), 2205 Vietnamese (vi), 2209 Volapük (vo), 2215 Walloon (wa), 2301 Wolof (wo), 2315 Xhosa (xh), 2408 Yiddish (yi), 2509 Yoruba (yo), 2515 Zhuang, Chuang (za), 2601 Zulu (zu), 2621 Appendix Additional Information Specifications General DVD Player Screen size/aspect ratio ....... 5.8 inch wide/16:9 (effective display area: 128.4 mm × 70.9 mm) Pixels ............................................. 345 600 (1 440 × 240) Display method ........................ TFT active matrix, driving type Color system .............................. NTSC/PAL/PAL-M/PAL-N/ SECAM compatible Durable temperature range (power off) ..................................................... –20 °C to +80 °C System .......................................... DVD video, Video CD, CD, WMA, MP3, AAC, DivX, JPEG player Usable discs .............................. DVD video, Video CD, CD, CD-R/RW, DVD-R/RW/R DL Region number ........................ 1 Frequency response ............... 5 Hz to 44 000 Hz (with DVD, at sampling frequency 96 kHz) Signal-to-noise ratio ............... 96 dB (1 kHz) (IHF-A network) (RCA level) Output level: Video .................................... 1.0 Vp-p/75 W (±0.2 V) Number of channels .............. 2 (stereo) MP3 decoding format ........... MPEG-1 & 2 Audio Layer 3 WMA decoding format ......... Ver. 7, 7.1, 8, 9, 10, 11, 12 (2 ch audio) (Windows Media Player) AAC decoding format ............ MPEG-4 AAC (iTunes encoded only) (.m4a) (Ver. 9.0.3 and earlier) DivX decoding format ............ Home Theater Ver. 3, 4, 5.2, 6 (.avi, .divx) Audio USB Maximum power output ....... 50 W × 4 70 W × 1/2 W (for subwoofer) Continuous power output ... 22 W × 4 (50 Hz to 15 000 Hz, 5 % THD, 4 W load, both channels driven) Load impedance ...................... 4 W (4 W to 8 W (2 W for 1 ch) allowable) Preout maximum output level ..................................................... 2.0 V Equalizer (5-Band Graphic Equalizer): Frequency .......................... 100 Hz/315 Hz/1.25 kHz/ 3.15 kHz/8 kHz Gain ...................................... ±12 dB High pass filter: Frequency .......................... 50 Hz/63 Hz/80 Hz/100 Hz/ 125 Hz Slope .................................... –12 dB/oct Subwoofer (mono): Frequency .......................... 50 Hz/63 Hz/80 Hz/100 Hz/ 125 Hz Slope .................................... –18 dB/oct Gain ...................................... +6 dB to –24 dB USB standard specification ..................................................... USB 1.1, USB 2.0 full speed Maximum current supply .... 500 mA USB Class ................................... MSC (Mass Storage Class) File system .................................. FAT16, FAT32 MP3 decoding format ........... MPEG-1 & 2 Audio Layer 3 WMA decoding format ......... Ver. 7, 7.1, 8, 9, 10, 11, 12 (2 ch audio) (Windows Media Player) AAC decoding format ............ MPEG-4 AAC (iTunes encoded only) (Ver. 9.0.3 and earlier) DivX decoding format ............ Home Theater Ver. 3, 4, 5.2, 6 (.avi, .divx) Display Additional Information Power source ............................. 14.4 V DC (10.8 V to 15.1 V allowable) Grounding system ................... Negative type Maximum current consumption ..................................................... 10.0 A Dimensions (W × H × D): D Chassis ..................... 178 mm × 100 mm × 165 mm (7 in. × 3-7/8 in. × 6-1/2 in.) Nose ........................... 171 mm × 97 mm × 7 mm (6-3/4 in.× 3-7/8 in.× 1/4 in.) Weight .......................................... 1.7 kg (3.7 lbs) Phase .................................. Normal/Reverse Bass boost: Gain ...................................... +12 dB to 0 dB FM tuner Frequency range ...................... 87.9 MHz to 107.9 MHz Usable sensitivity ..................... 9 dBf (0.8 µV/75 W, mono, S/N: 30 dB) Signal-to-noise ratio ............... 72 dB (IHF-A network) AM tuner Frequency range ...................... 530 kHz to 1 710 kHz (10 kHz) En 85 Appendix Additional Information Usable sensitivity ..................... 25 µV (S/N: 20 dB) Signal-to-noise ratio ............... 62 dB (IHF-A network) CEA2006 Specifications Power output ............................. 14 W RMS × 4 Channels (4 W and ≦ 1 % THD+N) S/N ratio ....................................... 91 dBA (reference: 1 W into 4 W) Note Specifications and the design are subject to modifications without notice. 86 En En 87 PIONEER CORPORATION 1-1, Shin-ogura, Saiwai-ku, Kawasaki-shi, Kanagawa 212-0031, JAPAN PIONEER ELECTRONICS (USA) INC. P.O. Box 1540, Long Beach, California 90801-1540, U.S.A. TEL: (800) 421-1404 PIONEER EUROPE NV Haven 1087, Keetberglaan 1, B-9120 Melsele, Belgium/Belgique TEL: (0) 3/570.05.11 PIONEER ELECTRONICS ASIACENTRE PTE. LTD. 253 Alexandra Road, #04-01, Singapore 159936 TEL: 65-6472-7555 PIONEER ELECTRONICS AUSTRALIA PTY. LTD. 5 Arco Lane, Heatherton, Victoria, 3202 Australia TEL: (03) 9586-6300 PIONEER ELECTRONICS OF CANADA, INC. 300 Allstate Parkway, Markham, Ontario L3R 0P2, Canada TEL: 1-877-283-5901 TEL: 905-479-4411 PIONEER ELECTRONICS DE MEXICO, S.A. de C.V. Blvd.Manuel Avila Camacho 138 10 piso Col.Lomas de Chapultepec, Mexico, D.F. 11000 TEL: 55-9178-4270 先鋒股份有限公司 台北市內湖區瑞光路407號8樓 電話: (02) 2657-3588 先鋒電子(香港)有限公司 香港九龍尖沙咀海港城世界商業中心 9樓901-6室 電話: (0852) 2848-6488 Published by Pioneer Corporation. Copyright ã 2010 by Pioneer Corporation. All rights reserved. Printed in Thailand <KKMZX> <10L00000> <CRB3537-B/N> UC