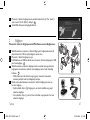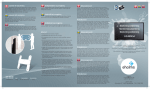
1
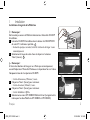
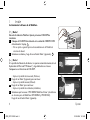
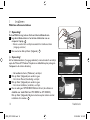
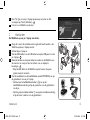
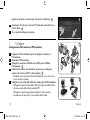
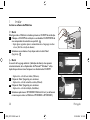
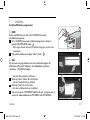
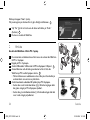
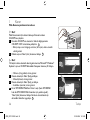
SPC1035NC
Register your product and get
support at
www.philips.com/support
EN WebCam
2
FR WebCam
5
ES WebCam
8
DE WebCam
11
NL WebCam
14
IT WebCam
17
PT WebCam
20
SV WebCam
23
TR Web Kamerasi
26
QSG_SPC1035NC.indd 1
07-05-2008 16:18:37
1
Install
Installing the WebCam software
1
Note
Do not plug in your WebCam yet. Run the Installation CD-ROM first.
1 Place the installation CD-ROM in your PC’s / laptop’s CD-ROM-/
DVD drive. 1
• After a couple of seconds the ‘Language Selection’ screen appears
automatically.
2 Select your language and click on the ‘Next’ button. 2
2
Note
If the ‘Language Selection’ screen does not appear automatically, open
Windows® Explorer® and double-click the ‘Setup.exe’ icon in the
CD-ROM directory.
3
4
5
• The ‘Welcome’ screen appears.
Click ‘Next’ to continue.
• The ‘Manual’ screen appears.
Click ‘Next’ to continue.
• The ‘Installation’ screen appears.
Select at least the ‘SPC1030NC WebCam Driver’ (software is the
same for both SPC1030NC and SPC1035NC WebCams).
Click the ‘Next’ button.
2
QSG_SPC1035NC.indd 2
3
English
07-05-2008 16:18:41
Follow the instructions on the screen to complete the installation.
6
7
Select ‘Yes’ to restart your PC / laptop and click ‘Finish’.
You can now connect your WebCam.
2
4
3
4
Connect
5
Connecting the WebCam to your PC / laptop
1
2
3
4
5
Be sure to run the installation CD first, before connecting the
WebCam to the PC / laptop.
Turn on the PC / laptop.
Connect the USB connector of the USB cable to the USB port of the
PC / laptop. 5
Use the clamp and the two rubber rims to attach the WebCam to
your PC monitor or laptop screen. 5
• Fold the clamp to place the WebCam on a desk or (large) desktop
monitor.
Connect the headset audio cable to the sound card of your PC /
laptop.
• Connect the black headphone plug (n) to the headphone or green
socket of the PC sound card.
• Connect the grey microphone plug (!) to the microphone or pink/
red socket of the sound card.
English
QSG_SPC1035NC.indd 3
AUDIO
OUT AUDIO
IN
6
3
07-05-2008 16:18:44
3
Enjoy
For more detailed information on how to use the applications see chapter ‘Operating the WebCam’ in the user
manual on the CD-ROM supplied.
Note
When using Skype, first select whether you wish to use the WebCam’s built-in microphone or the headset
microphone. To do this:
1 Launch Skype.
2 Select ‘Tools’ in the screen that appears.
3 Under ‘Tools’, select ‘Options’.
4 Under ‘Options’, select ‘Microphone’.
5 Select ‘Microphone (USB Video Camera)’ for the WebCam’s built-in microphone.
Select ‘Microphone (name of your audio driver)’ for the headset microphone.
6 Click ‘Save’.
7 To test the microphone sound, make a test call to Skype.
Under ‘Call’, select ‘Call to Skype Test Call’ and follow the spoken instructions.
4
QSG_SPC1035NC.indd 4
English
07-05-2008 16:18:49
1
Installation
Installation du logiciel de la WebCam
1
Remarque !
Ne branchez pas encore la WebCam. Exécutez tout d’abord le CD-ROM
d’installation.
1 Insérez le CD-ROM d’installation dans le lecteur de CD-ROM/DVD
de votre PC / ordinateur portable. 1
• Au bout de quelques secondes, l’écran de ‘sélection de la langue’ s’ouvre
automatiquement.
2 Sélectionnez la langue de votre choix et cliquez sur le bouton
‘Next’ (Suivant). 2
2
Remarque !
Si l’écran de ‘sélection de la langue’ ne s’affiche pas automatiquement,
ouvrez l’Explorateur Microsoft® Windows® et cliquez deux fois sur l’icône
‘Setup.exe’ située dans le répertoire CD-ROM.
3
4
5
• L’écran de bienvenue (‘Welcome’) s’ouvre.
Cliquez sur ‘Next’ (Suivant) pour continuer.
• L’écran du manuel (‘Manual’) s’ouvre.
Cliquez sur ‘Next’ (Suivant) pour continuer.
• L’écran ‘Installation’ s’affiche.
Sélectionnez au moins ‘SPC1030NC WebCam Driver’ (le logiciel est le
même pour les deux WebCams SPC1030NC et SPC1035NC).
Français
QSG_SPC1035NC.indd 5
3
5
07-05-2008 16:18:50
4
Cliquez sur le bouton ‘Next’ (suivant). Suivez les instructions qui
apparaissent à l’écran pour effectuer l’installation. 3
6
7
2
Sélectionnez ‘Yes’ (Oui) pour redémarrer votre PC / ordinateur
portable, et cliquez ensuite sur ‘Finish’ (Terminer). 4
Vous pouvez maintenant connecter votre WebCam.
5
Connexion
Connexion de la WebCam à votre PC / ordinateur portable
1
2
3
4
5
Veillez à commencer par exécuter le CD d’installation, avant de
connecter la WebCam au PC / à l’ordinateur portable.
Allumez le PC / l’ordinateur portable.
Connectez la prise USB du câble USB au port USB du PC / de
l’ordinateur portable. 5
Utilisez la fixation et les deux bords en caoutchouc pour fixer la
WebCam à votre moniteur de PC ou à l’écran de votre ordinateur
portable. 5
• Pliez la fixation pour placer la WebCam sur un bureau ou un
(grand) moniteur de bureau.
Connectez le câble audio du casque à la carte son de votre
PC / ordinateur portable.
• Connectez la prise de casque noire (n) à la sortie casque ou verte
de la carte son du PC.
6
QSG_SPC1035NC.indd 6
AUDIO
OUT AUDIO
IN
6
Français
07-05-2008 16:18:51
• Connectez la prise de micro grise (!) à l’entrée micro ou rose / rouge de la carte son.
3
Plaisir
Pour en savoir plus sur l’utilisation des applications, consultez le chapitre ‘Utilisation de la WebCam’ du manuel
d’utilisation, sur le CD-ROM fourni.
Remarque !
Lorsque vous utilisez Skype, sélectionnez d’abord si vous désirez utiliser le micro intégré de la WebCam ou le
micro du casque. Comment le faire :
1 Lancez Skype.
2 Sélectionnez ‘Outils’ dans l’écran qui apparaît.
3 Dans ‘Outils’, sélectionnez ‘Options’.
4 Dans ‘Options’, sélectionnez ‘Microphone’.
5 Sélectionnez ‘Microphone (Caméra Vidéo USB)’ pour le micro intégré de la WebCam.
Sélectionnez ‘Microphone (nom de votre pilote audio)’ pour le micro du casque.
6 Cliquez sur ‘Enregistrer’.
7 Pour tester le son du micro, passez un appel test à Skype
Dans ‘Appels’, sélectionnez ‘Appeler Test d’appel Skype’ et suivez les instructions orales.
Français
QSG_SPC1035NC.indd 7
7
07-05-2008 16:18:54
1
Instale
Instalación del software de la WebCam
1
¡ Notas !
No enchufe todavía la WebCam. Ejecute primero el CD-ROM de
instalación.
1 Coloque el CD-ROM de instalación en la unidad de CDROM-/ DVD
del ordenador / laptop. 1
• Tras un par de segundos aparecerá automáticamente la ‘Pantalla de
selección de idioma’.
2 Seleccione su idioma y haga clic en el botón ‘Next’ (siguiente). 2
2
¡ Notas !
Si la pantalla de ‘Selección de idioma’ no aparece automáticamente, abra el
Explorador de Microsoft® Windows® y haga doble clic en el icono
‘Setup.exe’ en el directorio del CD-ROM.
3
4
5
• Aparece la pantalla de bienvenida (Welcome).
Haga clic en ‘Next’ (Siguiente) para continuar.
• Aparece la pantalla manual (Manual).
Haga clic en ‘Next’ para continuar.
• Aparece la pantalla de instalación (Installation).
Seleccione por lo menos ‘SPC1030NC WebCam Driver’ (el software
es el mismo para las WebCams SPC1030NC y SPC1035NC).
Haga clic en el botón ‘Next’ (siguiente).
8
QSG_SPC1035NC.indd 8
3
Español
07-05-2008 16:18:55
Siga las instrucciones en pantalla para finalizar la instalación.
6
7
4
3
Seleccione ‘Yes’ (Sí) para reiniciar su PC /portátil y haga clic en ‘Finish’
(Terminar). 4
Ahora puede conectar su WebCam.
2
Conecte
5
Conexión de la WebCam a su PC / laptop
1
2
3
4
5
En primer lugar, asegúrese de ejecutar el CD de instalación, antes de
conectar la WebCam al PC / laptop.
Encienda su PC / laptop.
Conecte el conector USB del cable USB al puerto USB del PC /
laptop. 5
Utilice la pinza y las dos pestañas de goma para sujetar la WebCam al
monitor de su PC o a la pantalla de su laptop. 5
• Pliegue la pinza para colocar la WebCam sobre un escritorio o un
monitor de PC (grande).
Conecte el cable de audio de los auriculares a la tarjeta de sonido de
su PC / laptop.
• Conecte el enchufe de auriculares negro (n) al zócalo de
auriculares o verdede la tarjeta de sonido del PC.
• Conecte el enchufe de micrófono gris (!) al enchufe de micrófono o
rosa / rojo de la tarjeta de sonido.
Español
QSG_SPC1035NC.indd 9
AUDIO
OUT AUDIO
IN
6
9
07-05-2008 16:18:57
3
Disfrute
Para obtener información más detallada sobre cómo utilizar las aplicaciones, consulte el capítulo ‘Uso de la
WebCam’ en el manual del usuario del CD-ROM suministrado.
¡ Notas !
Cuando utilice Skype, en primer lugar seleccione si desea utilizar el micrófono integrado de la WebCam o el
micrófono de auriculares. Para ello:
1 Lance Skype.
2 Seleccione ‘Herramientas’ en la pantalla que aparece.
3 Bajo ‘Herramientas’, seleccione ‘Opciones’.
4 Bajo ‘Opciones’, seleccione ‘Entrada de audio’.
5 Seleccione ‘Micrófono (Cámara de vídeo USB)’ para el micrófono integrado de la WebCam.
Seleccione ‘Micrófono (nombre de su controlador de audio) para el micrófono de auriculares.
6 Haga clic en ‘Guardar’.
7 Para probar el sonido del micrófono, haga una llamada de prueba a Skype.
Bajo ‘Llamar’, seleccione ‘Llamar a Llamada di prueba Skype’ y siga las instrucciones verbales.
10
QSG_SPC1035NC.indd 10
Español
07-05-2008 16:19:00
1
Installation
Installieren der WebCam-software
1
Hinweis!
Schließen Sie die WebCam noch nicht an. Legen Sie zuerst die
Installations-CD-ROM ein und führen Sie das Installationsprogramm aus.
1 Legen Sie die Installations-CD-ROM in das CD-ROM-/DVD-Laufwerk
Ihres Computers/Laptops ein. 1
• Nach einigen Sekunden erscheint automatisch die Sprachenauswahl.
2 Wählen Sie die gewünschte Sprache und klicken Sie dann auf
‘Next’ (Weiter). 2
2
Hinweis!
Wenn der Bildschirm für die Sprachenauswahl nicht automatisch erscheint,
öffnen Sie den Windows® Explorer® und doppelklicken dann im
CD-ROM-Verzeichnis auf das Symbol ‘Setup.exe’.
3
4
5
• Der Begrüßungsbildschirm (Welcome) erscheint.
Klicken Sie auf ‘Next’ (Weiter), um fortzufahren.
• Der Anleitungsbildschirm (Manual) erscheint.
Klicken Sie auf ‘Next’ (Weiter), um fortzufahren.
• Der Installationsbildschirm (Installation) erscheint.
Wählen Sie mindestens den ‘SPC1030NC WebCam Driver’
(Software ist bei SPC1030NC und SPC1035NC WebCams identisch).
Klicken Sie den Button ‘Next’ (Weiter).
Deutsch
QSG_SPC1035NC.indd 11
3
11
07-05-2008 16:19:01
4
Folgen Sie den Anweisungen auf dem Bildschirm, um die Installation
abzuschließen. 3
6
7
2
Wählen Sie ‘Yes’ (Ja), um Ihren PC / Laptop erneut zu starten, und
klicken Sie auf ‘Finish’ (Beenden). 4
Jetzt können Sie Ihre WebCam anschließen.
5
Anschluss
Anschluss der WebCam an Ihren PC/Laptop
1
2
3
4
5
Lassen Sie die Installations-CD zuerst laufen, bevor Sie die WebCam
an den PC/Laptop anschließen.
Schalten Sie den PC/Laptop ein.
Schließen Sie den USB-Verbinder des USB-Kabels an den USB-Port
des PCs/Laptops an. 5
Benutzen Sie die Klemme und die beiden Gummiränder zum
Anbringen der WebCam an Ihrem PC-Monitor oder LaptopBildschirm. 5
• Klappen Sie die Klammer auf, um die WebCam auf einen
Schreibtisch oder (großen) Desktop-Monitor zu stellen.
Schließen Sie das Headset-Audiokabel an die Soundkarte Ihres PCs/
Laptops an.
• Schließen Sie den schwarzen Kopfhörerstecker (n) an die
Kopfhörerbuchse oder die grüne Buchse der PC-Soundkarte an.
12
QSG_SPC1035NC.indd 12
AUDIO
OUT AUDIO
IN
6
Deutsch
07-05-2008 16:19:02
• Schließen Sie den grauen Mikrofonstecker (!) an die Mikrofonbuchse oder die rosa / rote Buchse der
Soundkarte an.
3
Los geht’s
Für ausführlichere Informationen darüber, wie die Anwendungen benutzt werden, siehe Kapitel ‘Bedienung der
WebCam’ in der Bedienungsanleitung auf der mitgelieferten CD-ROM.
Hinweis!
Bei Benutzung von Skype wählen Sie zuerst, ob Sie das in die WebCam eingebaute Mikrofon oder das
Kopfhörermikrofon benutzen wollen. Hierzu:
1 Starten Sie Skype.
2 Wählen Sie ‘Aktionen’ im erscheinenden Bildschirm.
3 Unter ‘Aktionen’ wählen Sie ‘Optionen’.
4 Unter ‘Optionen’ wählen Sie ‘Mikrofon’.
5 Wählen Sie ‘Mikrofon (USB-Videokamera)’ für das in die WebCam eingebaute Mikrofon.
Wählen Sie ‘Mikrofon (Name Ihres Audiotreibers)’ für das Kopfhörermikrofon.
6 Klicken Sie auf ‘Speichern’.
7 Zum Testen des Mikrofonsounds führen Sie ein Testtelefonat mit Skype.
Unter ‘Anruf’ wählen Sie ‘Gespräch mit Skype Test’ und folgen Sie den mündlichen Anweisungen.
Deutsch
QSG_SPC1035NC.indd 13
13
07-05-2008 16:19:06
1
Installeren
WebCam software installeren
1
Opmerking!
Sluit uw WebCam nog niet aan. Start eerst de installatie-cd-rom.
1 Leg de installatie-cd-rom in het cd-rom-/dvd-station van uw
computer / laptop. 1
• Enkele seconden later verschijnt automatisch het taalkeuzescherm
(‘Language selection’).
2 Kies uw taal en klik op ‘Next’ (Volgende). 2
2
Opmerking!
Als het taalkeuzescherm (‘Language selection’) niet automatisch verschijnt,
open dan Microsoft® Windows® Explorer en dubbelklik op het pictogram
‘Setup.exe’ in de cd-rom-directory.
3
4
5
• Het welkomstscherm (‘Welcome’) verschijnt.
Klik op ‘Next’ (Volgende) om verder te gaan.
• Het scherm ‘Manual’ (handleiding) verschijnt.
Klik op ‘Next’ (Volgende) om verder te gaan.
• Het scherm ‘Installation’ (installatie) verschijnt.
Kies in ieder geval ‘SPC1030NC WebCam Driver’ (de software is
dezelfde voor beide WebCams SPC1030NC en SPC1035NC).
Klik op ‘Next’ (Volgende).Volg de instructies op het scherm om het
installeren af te ronden. 3
14
QSG_SPC1035NC.indd 14
3
Nederlands
07-05-2008 16:19:07
6
7
2
4
Kies ‘Yes’ (Ja) om uw pc / laptop opnieuw op te starten en klik
vervolgens op ‘Finish’ (Afsluiten). 4
U kunt nu uw WebCam aansluiten.
Aansluiten
De WebCam op uw pc / laptop aansluiten
1
2
3
4
5
Zorg dat u eerst de installatie-cd-rom gebruikt heeft voordat u de
WebCam op de pc / laptop aansluit.
Schakel de pc / laptop in.
Sluit de USB-stekker van de USB-kabel aan op de USB-poort van de
pc / laptop. 5
Gebruik de klem en de twee rubberen randen om de WebCam aan
de monitor van uw pc of aan het scherm van uw laptop te
bevestigen. 5
• Klap de klem dicht om de WebCam op het bureau of op een
(grote) monitor te zetten.
Sluit de audiokabel van de hoofdtelefoon (enkel SPC505NC) aan op
de geluidskaart van uw pc / laptop.
• Sluit de zwarte hoofdtelefoonstekker (n) aan op de
hoofdtelefoonaansluiting of op de groene bus van de geluidskaart
van de pc.
• Sluit de grijze microfoonstekker (!) aan op de microfoonaansluiting
of op de roze / rode bus van de geluidskaart.
5
AUDIO
OUT AUDIO
IN
6
Nederlands
15
QSG_SPC1035NC.indd 15
07-05-2008 16:19:08
3
Genieten
Voor meer details over het gebruik van de toepassingen, zie het hoofdstuk ‘Bedienen van de WebCam’ in de
gebruiksaanwijzing op de bijgeleverde cd-rom.
Opmerking!
Als u Skype gebruikt, kies dan eerst of u de ingebouwde microfoon van de WebCam of de microfoon van de
hoofdtelefoon wilt gebruiken. U doet dit zo:
1 Start Skype op.
2 Kies ‘Extra’ in het scherm dat verschijnt.
3 Onder ‘Extra’ kiest u ‘Instellingen’.
4 Onder ‘Instellingen’ kiest u ‘Microfoon’.
5 Kies ‘Microfoon (USB Videocamera)’ voor de ingebouwde microfoon van de WebCam.
Kies ‘Microfoon (naam van uw audiostuurprogramma)’ voor de microfoon van de hoofdtelefoon.
6 Klik op ‘OK’.
7 Om het geluid van de microfoon te testen, kunt u een testgesprek plaatsen naar Skype.
Onder ‘Gesprek’ kiest u ‘Bel naar Skype testgesprek’; volg vervolgens de gesproken instructies.
16
QSG_SPC1035NC.indd 16
Nederlands
07-05-2008 16:19:11
1
Installare
Installare il software della WebCam
1
Nota!
Nota! Non collegate ancora la WebCam. Prima, eseguite il CD
d’installazione.
1 Inserite il CD di installazione nell’unità CD/DVD-ROM del computer/
notebook. 1
• Dopo alcuni secondi, appare automaticamente lo schermo ‘Language
selection’ (Selezione lingua).
2 Selezionate la lingua e fate clic sul pulsante ‘Next’ (Avanti). 2
2
Nota!
Se lo schermo per la selezione della lingua ‘Language selection’ non
compare automaticamente, aprite Esplora risorse di Microsoft® Windows®
e fate doppio clic sull’icona ‘Setup.exe’ nella cartella del CD
3
4
5
• Viene visualizzata la schermata di benvenuto (Welcome).
Fare clic su ‘Next’ (Avanti) per continuare.
• Viene visualizzata la schermata (Manual).
Fare clic su ‘Next’ (Avanti) per continuare.
• Viene visualizzata la schermata (Installation).
Selezionare almeno ‘SPC1030NC WebCam Driver’ (il software è lo
stesso per le webcam SPC1030NC e SPC1035NC).
Fate clic sul tasto ‘Next’ (Avanti).
Italiano
QSG_SPC1035NC.indd 17
3
17
07-05-2008 16:19:12
Seguite le istruzioni su schermo per terminare l’installazione.
6
7
2
4
3
Selezionare ‘Yes’ (Sì), per riavviare il PC/notebook, quindi fare clic su
‘Finish’ (Fine). 4
Ora è possibile collegare la webcam.
Collegare
5
Collegamento della webcam al PC/notebook
1
2
3
4
5
Eseguite il CD di installazione prima di collegare la webcam al
PC/notebook.
Accendete il PC/notebook.
Collegate il connettore USB del cavo USB alla porta USB del
PC/notebook. 5
Utilizzate il morsetto ed i due dentini in gomma per collegare la
webcam allo schermo del PC o del notebook. 5
• Chiudere il morsetto per collocare la WebCam su una scrivania o
su uno schermo (ampio).
Collegate il cavo audio delle cuffie alla scheda audio del PC/notebook.
• Collegate lo spinotto nero delle cuffie (n) alla presa delle cuffie o
alla presa verde della scheda audio del PC.
• Collegate lo spinotto grigio del microfono (!) alla presa del
microfono o alla presa rosa / rosso della scheda audio.
18
QSG_SPC1035NC.indd 18
AUDIO
OUT AUDIO
IN
6
Italiano
07-05-2008 16:19:14
3
Gustare
Per ulteriori informazioni sull’utilizzo delle applicazioni, consultate il capitolo ‘Funzionamento della webcam’ nel
manuale di istruzioni del CD-ROM fornito in dotazione.
Nota!
Prima di utilizzare Skype, selezionare se si desidera utilizzare il microfono integrato della webcam o quello delle
cuffie. A tal fine:
1 Lanciare Skype.
2 Selezionare ‘Strumenti’ nella schermata visualizzata.
3 Su ‘Strumenti’, selezionare ‘Opzioni’.
4 Su ‘Opzioni’, selezionare ‘Ingresso audio’.
5 Selezionare ‘Microfono (videocamera USB)’ per il microfono integrato della webcam.
Selezionare ‘Microfono (nome del proprio driver audio)’ per il microfono delle cuffie.
6 Fare clic su ‘Salva’.
7 Per testare l’audio del microfono, effettuare una test di chiamata a Skype.
Su ‘Chiama’, selezionare ‘Chiama Skype test di chiamata’ e seguire le istruzioni comunicate.
Italiano
QSG_SPC1035NC.indd 19
19
07-05-2008 16:19:17
1
Instalar
Instalar o software da WebCam
1
Nota!
Não ligue ainda a WebCam. Introduza primeiro o CD-ROM de instalação.
1 Coloque o CD-ROM de instalação na unidade de CD-ROM/DVD do
seu computador de secretária ou portátil. 1
• Após alguns segundos aparece automaticamente o ‘Language selection
screen’ (Ecrã de selecção do idioma).
2 Seleccione o seu idioma e faça clique sobre o botão ‘Next’
(Seguinte). 2
2
Nota!
Se o ecrã de ‘Language selection’ (Selecção de idioma) não aparecer
automaticamente, abra o Explorador do Microsoft® Windows® e faça
duplo clique sobre o ícone ‘Setup.exe’ no directório do CD-ROM.
3
4
5
• Aparecerá o ecrã de boas vindas (Welcome).
Clique em ‘Next’ (Seguinte) para continuar.
• Aparecerá o ecrã do manual do usuário (Manual).
Clique em ‘Next’ (Seguinte) para continuar.
• Aparecerá o ecrã de instalação (Installation).
Seleccione pelo menos ‘SPC1030NC WebCam Driver’ (o software é
o mesmo para ambas as WebCams SPC1030NC e SPC1035NC).
20
QSG_SPC1035NC.indd 20
3
Português
07-05-2008 16:19:18
Clique no botão ‘Next’ (seguinte).
Siga as instruções dadas no ecrã para completar a instalação.
6
7
2
4
3
Seleccione ‘Yes’ (Sim) para reinicializar o computador, e depois clique
em ‘Finish’ (Concluir). 4
Pode agora ligar a WebCam ao computador.
Ligar
5
Ligar a WebCam ao PC de secretária ou portátil
1
2
3
4
5
Lembre-se de usar o CD de instalação antes de ligar a WebCam ao
PC de secretária ou portátil.
Ligue o PC de secretária ou portátil.
Ligue a ficha USB da câmara à porta USB do PC de secretária ou
portátil. 5
Use o grampo e as pinças de borracha para prender a WebCam ao
monitor do PC de secretária ou ao ecrã do portátil. 5
• Dobre o grampo quando a WebCam for colocada numa secretária
ou sobre um monitor grande de secretária.
Ligue o cabo de som do conjunto de auscultador e microfone à placa
de som do computador de secretária ou portátil.
• Ligue a ficha preta de auscultador (n) à tomada de auscultador ou
à tomada verde da placa de som do PC.
• Ligue a ficha cinzenta do microfone (!) à tomada de microfone ou à
tomada rosa / vermelho da placa de som.
AUDIO
OUT AUDIO
IN
6
Português
21
QSG_SPC1035NC.indd 21
07-05-2008 16:19:19
3
Desfrutar
Para obter informação mais detalhada sobre como usar a aplicação, consulte o capítulo sobre a ‘Utilização da
WebCam’, no manual do utilizador contido no CD-ROM fornecido.
Nota!
Quando usar o Skype, primeiro escolha se deseja usar o microfone integrado da WebCam, ou o microfone do
auricular. Para tal, faça o seguinte:
1 Abra o Skype.
2 Seleccione ‘Ferramentas’ no ecrã que aparece.
3 No menu ‘Ferramentas’, seleccione ‘Opções’.
4 Em ‘Opções’, seleccione ‘Microfone’.
5 Seleccione ‘Microfone (câmera de vídeo USB)’ para usar o microfone integrado da WebCam.
Seleccione ‘Microfone (nome do controlador de som)’ para usar o auricular.
6 Clique em ‘Guardar’.
7 Para testar o som do microfone, efectue uma chamada de teste para o Skype.
Em ‘Chamada’, seleccione ‘Ligar para Chamada de teste do Skype’ e siga as instruções vocais.
22
QSG_SPC1035NC.indd 22
Português
07-05-2008 16:19:22
1
Installera
Installera WebCam programmet
1
OBS!
Anslut inte WebCam ännu. Kör först CD-ROM-skivan med
installationsprogrammet.
1 Sätt i CD-ROM-skivan med installationsprogrammet i datorns /
laptop’s CD-ROM-/DVD-enhet. 1
• Efter några sekunder skärmen för språkval (Language selection) visas
automatiskt.
2 Välj språk och klicka på knappen “Next” (nästa). 2
2
Obs!
Om skärmen Language Selection inte visas automatiskt öppnar du
Utforskaren i Microsoft® Explorer® och dubbelklickar på ikonen
“Setup.exe” i CD-ROM-katalogen.
3
4
5
• Då visas välkomstskärmen (Welcome).
Klicka på “Next” (Nästa) för att fortsätta.
• Då visas handboksskärmen (Manual).
Klicka på “Next” för att fortsätta.
• Då visas installationsskärmen (Installation).
Välj som minimum “SPC1030NC WebCam Driver” (programvaran är
samma för både webbkameran SPC1030NC och SPC1035NC).
Svenska
QSG_SPC1035NC.indd 23
3
23
07-05-2008 16:19:23
Klicka på knappen “Next” (nästa).
Följ anvisningarna på skärmen för att göra färdigt installationen.
6
7
2
4
3
Välj “Yes” (Ja) för att starta om din dator och klicka på “Finish”
(Avsluta). 4
Du kan nu ansluta din WebCam.
5
Ansluta
Ansluta din WebCam till din PC / laptop
1
2
3
4
5
Du måste köra installationsskivan först innan du ansluter din WebCam
till PC:n / laptopen.
Koppla på PC:n / laptopen.
Anslut USB-kabelns USB-kontakt till PC:ns/laptopens USB-port. 5
Använd klämman och de båda gummikanterna för att fästa din
WebCam på PC:ns eller laptopens skärm. 5
• Fäll ner klämman om webbkameran ska ställas på ett bord eller på
en datorskärm som inte är en plattskärm.
Anslut headsetets audiokabel till ljudkortet på PC:n/laptopen.
• Anslut den svarta hörlurskontakten (n) till hörlursutgången eller
det gröna uttaget på PC:ns/laptopens ljudkort.
• Anslut den grå mikrofonkontakten (!) till mikrofonuttaget eller det
rosa / röda uttaget på ljudkortet.
24
QSG_SPC1035NC.indd 24
AUDIO
OUT AUDIO
IN
6
Svenska
07-05-2008 16:19:25
3
Spela
För mer ingående uppgifter om hur du använder tillämpningarna, se kapitlet “Använda webkameran” i användarhandboken på den medföljande cd-skivan.
Obs!
När du använder Skype väljer du först om du vill använda webbkamerans inbyggda mikrofon eller
headsetmikrofonen. Så här gör du:
1 Starta Skype.
2 Välj “Verktyg” i skärmen som visas.
3 Under “Verktyg” väljer du “Alternativ”.
4 Under “ Alternativ” väljer du “Mikrofon”.
5 Välj “Mikrofon (USB videokamera)” om du vill använda webbkamerans inbyggda mikrofon.
Välj “Mikrofon (namnet på din audiodrivrutin)” om du vill använda headsetmikrofonen.
6 Klicka på “Spara”.
7 För att testa mikrofonljudet kan du ringa ett testsamntal till Skype.
Under “Samtal” väljer du “Ring upp Skypes provtelefon” och följ de talade anvisningarna
Svenska
QSG_SPC1035NC.indd 25
25
07-05-2008 16:19:28
1
Kurun
Web Kamera yazılımının kurulması
1
Not!
Web Kameranızın fişini henüz takmayın. İlk önce kurulum
CD-ROM’unu çalıştırın.
1 Kurulum CD-ROM’unu masaüstü / dizüstü bilgisayarınızın
CD-ROM / DVD sürücüsüne yerleştirin. 1
• Birkaç saniye sonra ‘Language selection’ (dil seçimi) ekranı otomatik
olarak görünür.
2 Dilinizi seçin ve ‘Next’ (ileri) butonuna tıklayın. 2
2
Not!
‘Dil seçimi’ ekranı otomatik olarak görünmez ise, Microsoft® Windows®
Explorer’ı açın ve CD-ROM dizinindeki ‘Setup.exe’ ikonuna çift tıklayın.
3
4
5
• Welcome (Hoş geldiniz) ekranı görünür.
Devam etmek için ‘Next’ (İleri)ye tıklayın.
• Manual (kılavuz) ekranı görünür.
Devam etmek için ‘Next’ (İleri) ye tıklayın.
• Installation (kurulum) ekranı görünür.
En az ‘SPC1030NC WebCam Driver’ seçin (hem SPC1030NC
hem de SPC1035NC Web Kameraları için yazılım aynıdır).
‘Next’ (ileri) butonuna tıklayın. Kurulumu tamamlamak için
ekrandaki talimatları uygulayın. 3
26
QSG_SPC1035NC.indd 26
3
Türkçe
07-05-2008 16:19:29
6
7
4
Masaüstü / dizüstü bilgisayarınızı yeniden başlatmak için ‘Yes’ (evet)’i
seçin, sonra ‘Finish’ (Bitir)’i tıklayın. 4
Şimdi Web Kameranızı bağlayabilirsiniz.
2
Bağlayın
Masaüstü / dizüstü bilgisayarınıza Web Kamerasının Bağlanması
1
2
3
4
5
Web Kamerasını masaüstü / dizüstü bilgisayara bağlamadan önce ilk
olarak kurulum CD’sini çalıştırdığınıza emin olun.
Masaüstü / dizüstü bilgisayarı açın.
USB kablosunun USB konektörünü masaüstü / dizüstü bilgisayarın USB
portuna bağlayın. 5
Web Kamerasını masaüstü bilgisayarınızın monitörüne veya dizüstü
bilgisayarınızın ekranına takmak için kelepçeyi ve iki lastik kenarlığı
kullanın. 5
• Web Kamerasını bir dizüstü veya (geniş) masaüstü monitörü
üzerine yerleştirmek için kelepçeyi katlayın.
Başlık seti audio kablosunu masaüstü / dizüstü bilgisayarınızın ses
kartına bağlayın.
• Siyah kulaklık fişini (n) bilgisayarın ses kartı kulaklık veya yeşil
soketine bağlayın.
• Gri mikrofon fişini (!), ses kartının mikrofon veya pembe / kırmızı
soketine bağlayın.
Türkçe
QSG_SPC1035NC.indd 27
5
AUDIO
OUT AUDIO
IN
6
27
07-05-2008 16:19:30
3
Eğlenin
Uygulamaların nasıl kullanılacağı hakkında daha ayrıntılı bilgi için, birlikte verilen kullanım kılavuzundaki
‘Web Kamerasının Çalıfltırılması’ bölümüne bakın.
Not!
Skype’ı kullanırken, ilk önce Web Kamerasının tümleşik mikrofonunu mu yoksa başlık seti mikrofonunu mu
kullanmak isteyip istemediğinizi seçin. Bunu yapmak için:
1 Skype’ı başlatın.
2 Görünen ekranda ‘Araçlar’ ı seçin.
3 Araçlar’ altında, ‘Seçenekler’ i seçin.
4 ‘Seçenekler’ altında, ‘Mikrofon’ u seçin.
5 Web Kamerasının tümleşik mikrofonu için ‘Mikrofon (USB Video Kamera)’ seçin.
Başlık seti mikrofonu için ‘Mikrofon (audio sürücünüzün adı)’ seçin.
6 ‘Kaydet’ e tıklayın.
7 Mikrofonun sesini test etmek için, Skype için bir test araması yapın.
‘Ara’ altında, ‘Skype Test Araması’ seçin ve sesli talimatları uygulayın.
28
QSG_SPC1035NC.indd 28
Türkçe
07-05-2008 16:19:33
29
QSG_SPC1035NC.indd 29
07-05-2008 16:19:34
30
QSG_SPC1035NC.indd 30
07-05-2008 16:19:35
31
QSG_SPC1035NC.indd 31
07-05-2008 16:19:35
© 2008 Koninklijke Philips Electronics N.V.
All rights reserved. Reproduction in whole or in part is prohibited without the prior written consent of the copyright owner.
The information presented in this document does not form part of any quotation or contract, is believed to be accurate and
reliable and may be changed without notice. No liability will be accepted by the publisher for any consequence of its use.
Publication there of does not convey nor imply any license under patent- or other industrial or intellectual property rights.
May 2008
www.philips.com
QSG_SPC1035NC.indd 32
NMW/RR/RD/RM/1608
07-05-2008 16:19:36