1
ENGLISH 4
DEUTSCH 18
FRANÇAIS 33
NEDERLANDS 48
ESPAÑOL 63
ITALIANO 78
PORTUGUÊS 93
HQ9161, HQ9160
TÜRKÇE 108
Downloaded from www.Manualslib.com manuals search engine
4
ENGLISH
Important
Read these instructions for use carefully before
using the appliance and save them for future
reference.
C
C
C
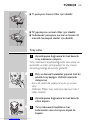
◗ Only use the powerplug supplied.
◗ The powerplug transforms 100-240 volts to a
safe low voltage of less than 24 volts.
◗ The powerplug contains a transformer. Do
not cut off the powerplug to replace it with
another plug, as this will cause a hazardous
situation.
◗ Do not use a damaged powerplug.
◗ If the powerplug is damaged, always have it
replaced by one of the original type in order
to avoid a hazard.
◗ Make sure the powerplug does not get wet.
◗ Charge and store the appliance at a
temperature between 5cC and 35cC.
◗ Never immerse the charging stand in water
nor rinse it under the tap.
◗ Do not recharge the shaver in a closed pouch.
◗ Always unplug the shaver before cleaning it
under the tap.
◗ The appliance complies with the
internationally approved IEC safety regulations
and can be safely cleaned under the tap.
Be careful with hot water. Always check if the
water is not too hot, to prevent your hands from
getting burnt.
Downloaded from www.Manualslib.com manuals search engine
ENGLISH
5
Charging
Make sure the appliance is switched off before
you start charging it.
Charging normally takes approx. 1 hour.
You can also shave without charging by
connecting the shaver to the mains.
Charge indications
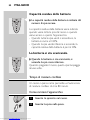
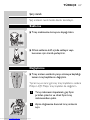
Charging
you start charging the empty shaver,
C ◗ When
the bottom light burns red.When the battery
contains enough power for one shave, all
lights start blinking green sequentially.
Battery fully charged
the battery has been fully charged, all
C ◗ When
green lights are on.
A few hours after charging, all lights go out.
Remaining battery capacity
amount of power left in the battery is
C ◗ The
indicated by the number of lights that are on.
Downloaded from www.Manualslib.com manuals search engine
6
ENGLISH
The remaining battery capacity is shown when
you unplug the shaver or when you switch it on
or off:
- When all lights burn green, the battery is 100%
charged.
- When the bottom light burns green, 20% of the
battery capacity is left.
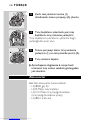
Battery running low
the battery is running low, the bottom
C ◗ When
light starts burning red.
When you switch the shaver off, this light blinks a
few times.
Cordless shaving time
A fully charged shaver has a cordless shaving time
of up to 80 minutes.
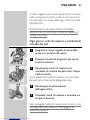
Charging the appliance
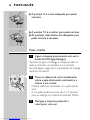
C
1
Put the appliance plug in the shaver.
2
Put the powerplug in the wall socket.
3
Remove the powerplug from the wall
socket and pull the appliance plug out of
the shaver when the battery has been fully
charged.
Downloaded from www.Manualslib.com manuals search engine
ENGLISH
Charging stand
You can also charge the appliance by placing it in
the charging stand, if provided.
Never immerse the charging stand in water nor
rinse it under the tap.
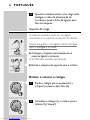
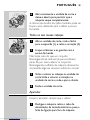
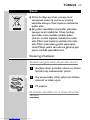
the shaver properly in the plugged-in
C ◗ Place
charging stand.
The bottom light starts burning red.
the shaver from the stand without tilting
C ◗ Lift
it.
Removing and inserting the clock
C
1
Turn the clock anticlockwise (1) ('click')
and pull it out (2).
C
2
Insert the clock (1) and turn it clockwise
(2) ('click').
Downloaded from www.Manualslib.com manuals search engine
7
8
ENGLISH
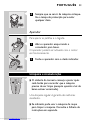
Setting the time
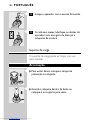
the time by pressing the small button at
C ◗ Set
the back of the clock.
The time can only be set forward.
Replacing the battery
C
1
Remove the cap.Then remove the battery
by means of a miniature screwdriver.
C
2
Insert a new battery and put the cap back
into place.
Using the appliance
Personal Comfort Control
Personal Comfort Control system allows
C ◗ The
you to adapt the shaver to your skin type.
- You can set the shaver to 'Normal' for a fast
and comfortable close shave.
- You can set the shaver to 'Sensitive' for a
comfortable close shave with optimal skin
comfort.
Downloaded from www.Manualslib.com manuals search engine
ENGLISH
9
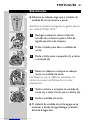
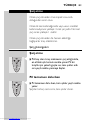
'S' position is best suited for sensitive
C ◗ The
skin.
'N' position is best suited for normal
C ◗ The
skin.
◗ The in-between positions are suitable for skin
types between normal and sensitive.
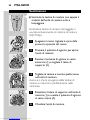
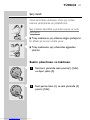
Shaving
1
Switch the shaver on by pressing the on/off
button once.
When you switch the shaver on or off, all lights
and symbols go on and then the remaining
battery capacity is shown for a few seconds.
C
C
2
Move the shaving heads quickly over your
skin, making both straight and circular
movements.
- Shaving on a dry face gives the best results.
- Your skin may need 2 or 3 weeks to get
accustomed to the Philips system.
3
Switch the shaver off by pressing the on/off
button once.
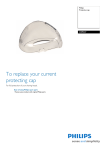
4
Put the protection cap on the shaver every
time you have used it, to prevent damage.
Downloaded from www.Manualslib.com manuals search engine
10
ENGLISH
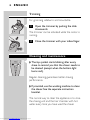
Trimming
For grooming sideburns and moustache.
C
C
1
Open the trimmer by pushing the slide
downwards.
The trimmer can be activated while the motor is
running.
2
Close the trimmer with your index finger.
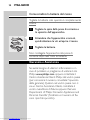
Cleaning and maintenance
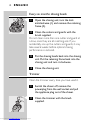
tap symbol starts blinking after every
C ◗ The
shave to remind you that the shaver needs to
be cleaned (except when the bottom light
burns red).
Regular cleaning guarantees better shaving
performance.
◗ If provided, use the washing machine to clean
the shaver. See the seperate instruction
booklet.
The normal way to clean the appliance is to rinse
the shaving unit and the hair chamber with hot
water every time you have used the shaver.
Downloaded from www.Manualslib.com manuals search engine
ENGLISH
11
Be careful with hot water. Always check if the
water is not too hot, to prevent your hands from
getting burnt.
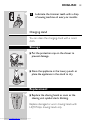
Every day: shaving unit and hair chamber
1
Switch the shaver off, remove the
powerplug from the wall socket and pull
the appliance plug out of the shaver.
C
2
Press the release button to open the
shaving unit.
C
3
C
Clean the shaving unit and the hair
chamber by rinsing them under a hot tap
for some time.
Make sure the inside of the shaving unit and the
hair chamber have been cleaned properly.
4
Rinse the outside of the appliance.
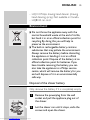
5
Close the shaving unit and shake off excess
water.
Never dry the shaving unit with a towel or tissue
as this may damage the shaving heads.
C
6
Open the shaving unit again and leave it
open to let the appliance dry completely.
You can also clean the hair chamber without
water by using the brush supplied.
Downloaded from www.Manualslib.com manuals search engine
12
ENGLISH
Every six months: shaving heads
C
1
Open the shaving unit, turn the lock
anticlockwise (1) and remove the retaining
frame (2).
2
Clean the cutters and guards with the
brush supplied.
Do not clean more than one cutter and guard at
a time, since they are all matching sets. If you
accidentally mix up the cutters and guards, it may
take several weeks before optimal shaving
performance is restored.
3
Put the shaving heads back into the shaving
unit. Put the retaining frame back into the
shaving unit and turn it clockwise.
4
Close the shaving unit.
Trimmer
Clean the trimmer every time you have used it.
C
1
Switch the shaver off, remove the
powerplug from the wall socket and pull
the appliance plug out of the shaver.
2
Clean the trimmer with the brush
supplied.
Downloaded from www.Manualslib.com manuals search engine
ENGLISH
C
3
Lubricate the trimmer teeth with a drop
of sewing machine oil every six months.
Charging stand
You can clean the charging stand with a moist
cloth.
Storage
the protection cap on the shaver to
C ◗ Put
prevent damage.
the appliance in the luxury pouch or
C ◗ Store
place the appliance in the stand to dry.
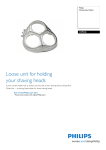
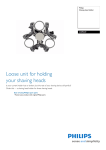
Replacement
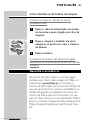
the shaving heads as soon as the
C ◗ Replace
shaving unit symbol starts blinking.
Replace damaged or worn shaving heads with
HQ9 Philips shaving heads only.
Downloaded from www.Manualslib.com manuals search engine
13
14
ENGLISH
1
Switch the shaver off, remove the
powerplug from the wall socket and pull
the appliance plug out of the shaver.
C
2
Press the release button to open the
shaving unit.
C
3
Turn the lock anticlockwise (1) and
remove the retaining frame (2).
C
4
C
Remove the shaving heads and place new
ones in the shaving unit.
Make sure that the projections of the shaving
heads fit exactly into the recesses.
5
Put the retaining frame back into the
shaving unit (1) and turn the lock
clockwise (2).
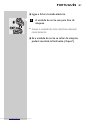
6
Close the shaving unit.
◗ The shaving unit symbol will go out if you
keep the on/off button pressed for 6 seconds.
Accessories
The following accessories are available:
- HQ8000 powerplug.
- HQ9 Philips shaving heads.
Downloaded from www.Manualslib.com manuals search engine
ENGLISH
15
- HQ110 Philips shaving head cleaner (shaving
head cleaning spray). Not available in Canada.
- HQ8010 car cord.
Environment
not throw the appliance away with the
C ◗ Do
normal household waste at the end of its life,
but hand it in at an official collection point for
recycling. By doing this you will help to
preserve the environment.
◗ The built-in rechargeable battery contains
substances that may pollute the environment.
Always remove the battery before discarding
the appliance or handing it in at an official
collection point. Dispose of the battery at an
official collection point for batteries. If you
have trouble removing the battery, you can
also take the appliance to a Philips service
centre, which will remove the battery for you
and will dispose of it in an environmentally
safe way.
Disposal of the shaver battery
Only remove the battery if it is completely empty.
C
1
Remove the powerplug from the wall
socket and pull the appliance plug out of
the shaver.
2
Let the shaver run until it stops, undo the
screws and open the shaver.
Downloaded from www.Manualslib.com manuals search engine
16
ENGLISH
3
Remove the battery.
Do not connect the shaver to the mains again
after the battery has been removed.
Guarantee & service
If you need information or if you have a problem,
please visit the Philips website at www.philips.com
or contact the Philips Customer Care Centre in
your country (you will find its phone number in
the worldwide guarantee leaflet). If there is no
Customer Care Centre in your country, turn to
your local Philips dealer or contact the Service
Department of Philips Domestic Appliances and
Personal Care BV.
Troubleshooting
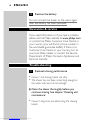
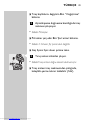
1
B
B
Reduced shaving performance
Cause 1: the shaving heads are dirty.
The shaver has not been rinsed long enough or
the water used was not hot enough.
◗ Clean the shaver thoroughly before you
continue shaving. See chapter 'Cleaning and
maintenance'.
B
Downloaded from www.Manualslib.com manuals search engine
Cause 2: long hairs are obstructing the shaving
heads.
ENGLISH
17
◗ Clean the cutters and guards with the brush
supplied. See chapter 'Cleaning and
maintenance', section 'Every six months:
shaving heads'.
B
Cause 3: the shaving heads are damaged or worn.
◗ Replace the shaving heads. See chapter
'Replacement'.
2
B
The shaver does not work when the on/off
button is pressed.
Cause 1: the battery is empty.
◗ Recharge the battery. See chapter 'Charging'.
B
Cause 2: the appliance is not connected to the
mains.
◗ Put the powerplug in the wall socket.
C
3
B
The shaving unit has come off the shaver.
Cause: the shaving unit has not been placed
correctly.
◗ If the shaving unit becomes detached from the
shaver, you can easily reattach it ('click').
Downloaded from www.Manualslib.com manuals search engine
18
DEUTSCH
Wichtig
Lesen Sie diese Bedienungsanleitung vor dem
ersten Gebrauch des Geräts gründlich durch und
bewahren Sie sie zur späteren Einsichtnahme auf.
C
C
C
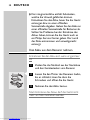
◗ Verwenden Sie mit diesem Gerät
ausschließlich das mitgelieferte Netzteil.
◗ Das Netzteil wandelt Netzspannungen von
100 bis 240 Volt in eine sichere
Betriebsspannung von unter 24 Volt um.
◗ Das Netzteil enthält einen Transformator.
Ersetzen Sie das Netzteil keinesfalls durch
einen anderen Stecker, da dies den Benutzer
gefährdet.
◗ Benutzen Sie keinesfalls ein beschädigtes
Netzteil.
◗ Ist das Netzteil defekt, darf es nur durch ein
Original-Ersatznetzteil ausgetauscht werden,
um Gefährdungen zu vermeiden.
◗ Achten Sie darauf, dass das Netzteil nicht nass
wird.
◗ Laden Sie das Gerät bei Temperaturen
zwischen 5c C und 35c C. Bewahren Sie es
auch in diesem Temperaturbereich auf.
◗ Tauchen Sie die Ladestation niemals in Wasser.
Spülen Sie sie auch nicht unter fließendem
Wasser ab.
◗ Nehmen Sie den Rasierer zum Laden aus der
Tasche.
◗ Ziehen Sie stets das Netzteil aus der
Steckdose, bevor Sie den Rasierer unter
fließendem Wasser reinigen.
◗ Das Gerät entspricht den internationalen IEC
Downloaded from www.Manualslib.com manuals search engine
DEUTSCH
19
Sicherheitsvorschriften und kann ohne
Bedenken unter fließendem Wasser gereinigt
werden.
Gehen Sie vorsichtig mit heißem Wasser um.
Achten Sie darauf, dass das Wasser nicht zu heiß
ist und Sie sich nicht die Hände verbrühen.
Aufladen
Das Gerät muss ausgeschaltet sein, wenn Sie mit
dem Laden beginnen.
Normalerweise ist der Akku nach ungefähr
1 Stunde voll aufgeladen.
Sie können sich auch bei leeren Akkus rasieren,
indem Sie den Rasierer an das Stromnetz
anschließen.
Ladeanzeigen
Aufladen
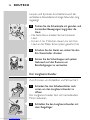
Sie mit dem Aufladen beginnen, leuchtet
C ◗ Wenn
die unterste Lampe rot. Sobald der Akku
genügend Energie für eine Rasur hat, blinken
alle Lampen nacheinander grün.
Downloaded from www.Manualslib.com manuals search engine
20
DEUTSCH
Akku voll aufgeladen
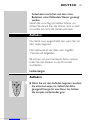
der Akku voll geladen ist, leuchten alle
C ◗ Wenn
Lampen grün.
Einige Stunden nach dem Laden erlöschen alle
Kontrolllampen.
Restkapazität
Anzahl der leuchtenden Lampen zeigt die
C ◗ Die
noch im Akku verbliebene Energie an.
Die restliche Energie wird angezeigt, wenn Sie den
Stecker ziehen oder den Rasierer ein- bzw.
ausschalten.
- Wenn alle Lampen grün leuchten, ist der Akku
voll geladen.
- Wenn nur die unterste Lampe grün leuchtet, ist
eine Restkapazität von 20% vorhanden.
Die Energie geht zur Neige
der Akkuladestand niedrig ist, leuchtet
C ◗ Wenn
die unterste Lampe rot.
Beim Ausschalten des Rasierers blinkt diese
Lampe mehrmals.
Kabellose Rasierzeit
Ein voll geladener Akku reicht für ca. 80 Minuten
kabellose Rasur.
Downloaded from www.Manualslib.com manuals search engine
DEUTSCH
21
Laden des Geräts
C
1
Stecken Sie den Gerätestecker in den
Rasierer.
2
Stecken Sie das Netzteil in die Steckdose.
3
Ziehen Sie das Netzteil aus der Steckdose
und den Gerätestecker vom Rasierer,
sobald der Akku voll geladen ist.
Ladestation
Sie können das Gerät auch in der Ladestation
(sofern mitgeliefert) aufladen.
Tauchen Sie die Ladestation niemals in Wasser
Spülen Sie sie auch nicht unter fließendem Wasser
ab.
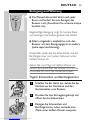
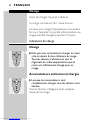
Sie den Rasierer senkrecht in die am
C ◗ Stellen
Stromnetz angeschlossene Ladestation.
Die unterste Lampe leuchtet rot.
Sie den Rasierer aus der Ladestation,
C ◗ Heben
ohne ihn zu kippen.
Downloaded from www.Manualslib.com manuals search engine
22
DEUTSCH
Die Uhr entnehmen und einsetzen
C
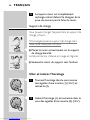
1
Drehen Sie die Uhr gegen den
Uhrzeigersinn (1) - Sie hören ein Klicken und ziehen Sie sie heraus (2).
C
2
Zum Einsetzen der Uhr (1) drehen Sie sie
im Uhrzeigersinn (2) - Sie hören ein
Klicken.
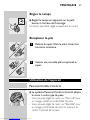
Die Zeit einstellen
Sie auf den kleinen Knopf hinten an
C ◗ Drücken
der Uhr, um die Zeit einzustellen.
Die Zeit lässt sich nur vorwärts einstellen.
Die Batterie austauschen
C
1
Downloaded from www.Manualslib.com manuals search engine
Nehmen Sie die Kappe ab und entfernen
Sie dann die Batterie mit einem MiniSchraubendreher.
DEUTSCH
C
2
23
Legen Sie eine neue Batterie ein und
setzen Sie die Kappe wieder darauf.
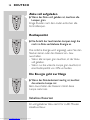
Benutzung des Geräts
Persönliches Komfort System
dem "Personal Comfort Control"-System
C ◗ Mit
können Sie den Rasierer an Ihren Hauttyp
anpassen.
- Mit der Einstellung "N" (Normal) erzielen Sie
eine schnelle und gründliche Rasur.
- Mit der Einstellung "S" (Sensitiv) erzielen Sie
eine gründliche Rasur bei höchster
Hautverträglichkeit.
Position "S" ist für empfindliche Haut
C ◗ Die
geeignet.
Position "N" ist für normale Haut
C ◗ Die
geeignet.
◗ Die Einstellungen dazwischen eignen sich für
Hauttypen von normal bis empfindlich.
Rasieren
1
Schalten Sie das Gerät ein, indem Sie den
Ein-/Ausschalter drücken.
Wenn Sie den Rasierer einschalten, leuchten alle
Downloaded from www.Manualslib.com manuals search engine
24
DEUTSCH
Lampen und Symbole. Anschließend wird der
verbliebene Akkuladestand einige Sekunden lang
angezeigt.
C
C
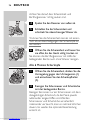
2
Führen Sie die Scherköpfe mit geraden und
kreisenden Bewegungen zügig über die
Haut.
- Die beste Rasur erzielen Sie bei trockener
Haut.
- Es kann 2 bis 3 Wochen dauern, bis sich Ihre
Haut an das Philips Schersystem gewöhnt hat.
3
Schalten Sie das Gerät aus, indem Sie den
Ein-/Ausschalter drücken.
4
Setzen Sie die Schutzkappe nach jedem
Gebrauch auf den Rasierer, um
Beschädigungen zu vermeiden.
Der Langhaarschneider
Zum Trimmen von Koteletten und Schnurrbart.
C
C
1
Schieben Sie den Schiebeschalter nach
unten, um den Langhaarschneider zu
öffnen.
Der Langhaarschneider lässt sich bei laufendem
Motor aktivieren.
2
Downloaded from www.Manualslib.com manuals search engine
Schließen Sie den Langhaarschneider mit
dem Zeigefinger.
DEUTSCH
25
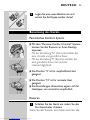
Reinigung und Wartung
Wasserhahnsymbol blinkt nach jeder
C ◗ Das
Rasur und fordert Sie zum Reinigen des
Rasierers auf. (Ausnahme: Die unterste Lampe
leuchtet rot).
Regelmäßige Reinigung sorgt für bessere Rasur
und verlängert die Nutzungsdauer des Geräts.
◗ Sofern mitgeliefert, empfiehlt es sich, den
Rasierer mit dem Reinigungsgerät zu säubern
(siehe separate Anleitung).
Andernfalls spülen Sie die Schereinheit und die
Bartfangkammer nach jedem Gebrauch unter
heißem Wasser ab.
Gehen Sie vorsichtig mit heißem Wasser um
Achten Sie darauf, dass das Wasser nicht zu hei
ist und Sie sich nicht die Hände verbrühen.
Täglich: Schereinheit und Bartfangkammer
1
Schalten Sie das Gerät aus, ziehen Sie das
Netzteil aus der Steckdose und den
Gerätestecker vom Rasierer.
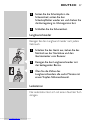
C
2
Drücken Sie den Entriegelungsknopf und
öffnen Sie die Schereinheit.
C
3
Reinigen Sie Schereinheit und
Bartfangkammer, indem sie beide eine
Weile unter heißem Wasser ausspülen.
Downloaded from www.Manualslib.com manuals search engine
26
DEUTSCH
Achten Sie darauf, dass Schereinheit und
Bartfangkammer richtig sauber sind.
C
4
Spülen Sie den Rasierer von außen ab.
5
Schließen Sie die Schereinheit und
schütteln Sie überschüssiges Wasser ab.
Trocknen Sie die Schereinheit niemals mit einem
Tuch ab, um Beschädigungen der Scherköpfe zu
vermeiden.
C
6
Öffnen Sie die Schereinheit und lassen Sie
sie offen, bis das Gerät völlig trocken ist.
Sie können die Bartfangkammer mit Hilfe der
beiliegenden Bürste auch ohne Wasser reinigen.
Alle 6 Monate: Scherköpfe
C
1
2
Öffnen Sie die Schereinheit, drehen Sie die
Verriegelung gegen den Uhrzeigersinn (1)
und entnehmen Sie den Scherkopfhalter
(2).
Reinigen Sie Schermesser und Scherkörbe
mit der beiliegenden Bürste.
Reinigen Sie immer nur ein Schermesser mit dem
dazugehörigen Scherkorb, da die Paare jeweils
aufeinander eingeschliffen sind.Werden
Schermesser und Scherkörbe versehentlich
miteinander vertauscht, kann es mehrere Wochen
dauern, bis wieder die optimale Rasierleistung
erreicht ist.
Downloaded from www.Manualslib.com manuals search engine
DEUTSCH
27
3
Setzen Sie die Scherköpfe in die
Schereinheit; setzen Sie den
Scherkopfhalter wieder ein und drehen Sie
die Verriegelung im Uhrzeigersinn fest.
4
Schließen Sie die Schereinheit.
Langhaarschneider
Reinigen Sie den Langhaarschneider nach jedem
Gebrauch.
1
Schalten Sie das Gerät aus, ziehen Sie das
Netzteil aus der Steckdose und den
Gerätestecker vom Rasierer.
C
2
Reinigen Sie den Langhaarschneider mit
der beiliegenden Bürste.
C
3
Ölen Sie die Zähne des
Langhaarschneiders alle sechs Monate mit
einem Tropfen Nähmaschinenöl.
Ladestation
Die Ladestation lässt sich mit einem feuchten Tuch
reinigen.
Downloaded from www.Manualslib.com manuals search engine
28
DEUTSCH
Aufbewahrung
Sie die Schutzkappe auf die
C ◗ Setzen
Schereinheit, um Beschädigungen zu
vermeiden.
Sie das trockene Gerät im Etui auf
C ◗ Bewahren
oder stellen Sie es zum Trocknen in die
Ladestation.
Austauschen der Scherköpfe
Sie die Scherköpfe aus, sobald das
C ◗ Tauschen
Scherkopfsymbol blinkt.
Ersetzen Sie beschädigte und abgenutzte
Scherköpfe ausschließlich durch Philips HQ9
Scherköpfe.
1
Schalten Sie das Gerät aus, ziehen Sie das
Netzteil aus der Steckdose und den
Gerätestecker vom Rasierer.
C
2
Drücken Sie den Entriegelungsknopf und
öffnen Sie die Schereinheit.
C
3
Drehen Sie die Verriegelung gegen den
Uhrzeigersinn (1) und entnehmen Sie den
Scherkopfhalter (2).
Downloaded from www.Manualslib.com manuals search engine
DEUTSCH
C
C
29
4
Entnehmen Sie die Scherköpfe und setzen
Sie neue Scherköpfe in die Schereinheit.
Die Vorsprünge an den Scherköpfen müssen
genau in die Aussparungen der Schereinheit
passen.
5
Setzen Sie den Scherkopfhalter wieder in
die Schereinheit (1) und drehen Sie die
Verriegelung im Uhrzeigersinn fest (2).
6
Schließen Sie die Schereinheit.
◗ Das Scherkopfsymbol erlischt, wenn Sie den
Ein-/Ausschalter 6 Sekunden lang gedrückt
halten.
Zubehör
Die folgenden Ersatz- und Zubehörteile sind
erhältlich:
- HQ8000 Netzteil.
- HQ9 Philips Scherköpfe
- HQ110 Philips Shaving Head Cleaner
(Reinigungsspray für Scherköpfe)
- HQ8010 Kfz-Kabel
Umweltschutz
Sie das Gerät am Ende der
C ◗ Geben
Lebensdauer nicht in den normalen Hausmüll.
Bringen Sie es zum Recycling zu einer
offiziellen Sammelstelle.Auf diese Weise helfen
Sie die Umwelt zu schonen.
Downloaded from www.Manualslib.com manuals search engine
30
DEUTSCH
◗ Der integrierte Akku enthält Substanzen,
welche die Umwelt gefährden können.
Entnehmen Sie den Akku, bevor Sie das Gerät
entsorgen bzw. an einer offiziellen
Sammelstelle abgeben. Geben Sie den Akku an
einer offiziellen Sammelstelle für Batterien ab.
Sollten Sie Probleme bei der Entnahme des
Akkus haben, können Sie das Gerät auch an
ein Philips Service Center geben. Dort wird
der Akku entnommen und umweltgerecht
entsorgt.
Den Akku aus dem Rasierer nehmen
Entnehmen Sie den Akku erst, wenn er ganz leer
ist.
C
1
Ziehen Sie das Netzteil aus der Steckdose
und den Gerätestecker vom Rasierer.
2
Lassen Sie den Motor des Rasierers laufen,
bis er stillsteht, lösen Sie dann die
Schrauben und öffnen Sie das Gerät.
3
Nehmen Sie den Akku heraus.
Nach Entnahme des Akkus darf das Gerät nicht
mehr am Netz betrieben werden.
Downloaded from www.Manualslib.com manuals search engine
DEUTSCH
31
Garantie und Kundendienst
Benötigen Sie weitere Informationen oder treten
Probleme auf, wenden Sie sich bitte an Ihren
Philips-Händler oder setzen Sie sich mit einem
Philips Service-Center in Ihrem Land in
Verbindung (Tel. Nr. 0180/5356767). Besuchen Sie
auch die Philips Website (www.philips.com).
Problembehebung
1
B
B
Schlechte Rasur
Ursache 1: Die Scherköpfe sind verschmutzt.
Die Schereinheit wurde nicht heiß genug oder
nicht lange genug abgespült.
◗ Reinigen Sie den Rasierer gründlich, bevor Sie
die Rasur fortsetzen (siehe "Reinigung und
Wartung").
B
Ursache 2: Lange Haare behindern die Rotation
der Scherköpfe.
◗ Reinigen Sie Schermesser und Scherkörbe mit
der beliegenden Bürste (siehe "Reinigung und
Wartung",Abschnitt "Alle 6 Monate:
Scherköpfe").
B
Ursache 3: Die Scherköpfe sind beschädigt oder
abgenutzt.
◗ Wechseln Sie die Scherköpfe aus (siehe
"Austauschen der Scherköpfe").
Downloaded from www.Manualslib.com manuals search engine
32
DEUTSCH
2
B
Der Rasierer läuft nicht, wenn der Ein/Ausschalter gedrückt wird.
Ursache 1: Der Akku ist leer.
◗ Laden Sie den Akku auf (siehe "Aufladen").
B
Ursache 2: Das Gerät ist nicht an das Stromnetz
angeschlossen.
◗ Stecken Sie das Netzteil in die Steckdose.
C
3
B
Die Schereinheit hat sich vom Rasierer
gelöst.
Ursache: Die Schereinheit wurde nicht richtig
angebracht.
◗ Sollte sich die Schereinheit vom Rasierer
lösen, lässt sie sich problemlos wieder
befestigen ("Klick").
Downloaded from www.Manualslib.com manuals search engine
FRANÇAIS
33
Important
Avant d'utiliser l'appareil, lisez les instructions cidessous et conservez ce mode d'emploi pour un
usage ultérieur.
C
C
C
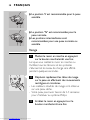
◗ Utilisez exclusivement le chargeur fourni.
◗ Le chargeur transforme le 100-240 V en une
tension de sécurité de 24 V.
◗ Le chargeur est doté d'un transformateur.
N'essayez pas de remplacer la fiche du
chargeur pour éviter tout accident.
◗ N'utilisez pas un chargeur endommagé.
◗ Lorsque le chargeur est endommagé,
remplacez-le par un chargeur d'origine pour
éviter tout accident.
◗ Evitez le contact du chargeur avec de l'eau.
◗ Chargez et utilisez l'appareil à une
température comprise entre 5cC et 35cC.
◗ N'immergez jamais le support de charge dans
l'eau, ne le rincez pas non plus.
◗ Ne chargez jamais l'appareil dans un étui
fermé.
◗ Débranchez toujours le rasoir avant de le
nettoyer sous jet d'eau.
◗ Ce rasoir est conforme aux normes
internationales IEC et il peut être nettoyé en
toute sécurité à l'eau.
Faites attention que l'eau ne soit pas trop chaude
pour ne pas vous brûler.
Downloaded from www.Manualslib.com manuals search engine
34
FRANÇAIS
Charge
Avant de charger l'appareil, arrêtez-le.
La charge normale est de 1 heure environ.
Lorsque vous chargez l'appareil pour la première
fois ou si l'appareil n'a pas été utilisé pendant une
longue période: chargez-le pendant 4 heures.
Indications de charge
Charge
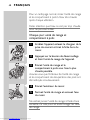
que vous commencez à charger le rasoir
C ◗ Dès
vide, le témoin du bas s'allumera en rouge.
Tous les témoins s'allument en vert et
clignotent en ordre séquentiel lorsque le
rasoir est suffisamment chargé pour un
rasage.
Accumulateurs entièrement chargés
les accumulateurs sont
C ◗ Lorsque
complètement chargés, tous les témoins sont
allumés.
Tous les témoins s'éteignent après quelques
heures de la charge.
Downloaded from www.Manualslib.com manuals search engine
FRANÇAIS
35
Capacité restante des accumulateurs
capacité restante des accumulateurs est
C ◗ Laindiquée
par le nombre des témoins allumés.
La capacité restante des accumulateurs est
affichée quand vous débranchez le rasoir, le
mettez en marche ou l'arrêtez:
- Lorsque tous les témoins sont allumés, les
accumulateurs sont chargés à 100%.
- Lorsque le témoin du bas est allumé en vert, le
niveau de charge est de 20%.
Accumulateurs déchargés
les accumulateurs sont déchargés, le
C ◗ Lorsque
témoin du bas s'allume en rouge.
Quand vous arrêtez le rasoir, le témoin clignote
plusieurs fois.
Autonomie de rasage
Un rasoir complètement chargé offre une
autonomie de rasage jusqu'à 80 minutes.
Charger l'appareil
C
1
Enfoncez la fiche dans le rasoir.
2
Mettez le chargeur dans la prise de
courant.
Downloaded from www.Manualslib.com manuals search engine
36
FRANÇAIS
3
Lorsque le rasoir est complètement
rechargé, retirez d'abord le chargeur de la
prise de courant puis la fiche du rasoir.
Support de charge
Vous pouvez charger l'appareil dans le support de
charge, si fourni.
N'immergez jamais le support de charge dans
l'eau, ne le rincez pas non plus.
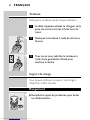
le rasoir correctement sur le support
C ◗ Placez
de charge branché.
Le témoin du bas s'allume en rouge et clignote.
C ◗ Soulevez le rasoir du support sans l'incliner.
Oter et insérer l'horologe
C
1
Tournez l'horologe dans le sens inverse
des aiguilles d'une montre (1) ("clic") et
retirez-le (2).
C
2
Insérez l'horologe (1) et tournez-le dans le
sens des aiguilles d'une montre (2) ("clic").
Downloaded from www.Manualslib.com manuals search engine
FRANÇAIS
37
Régler le temps
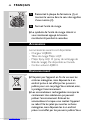
le temps en appuyant sur le petit
C ◗ Réglez
bouton à l'arrière de l'horologe.
Le temps peut être réglé uniquement en avant.
Remplacer la pile
C
1
Retirez le capot. Otez la pile à l'aide d'un
tournevis miniature.
C
2
Insérez une nouvelle pile et replacez le
capot.
Utilisation de l'appareil
Personal Comfort Control
système Personal Comfort Control adapte
C ◗ Le
le rasoir à votre type de peau.
- Vous pouvez régler le rasoir sur "Normal" pour
un rasage rapide et confortable de près.
- Vous pouvez régler le rasoir sur "Sensible" pour
un rasage confortable de près en assurant le
confort optimal de la peau.
Downloaded from www.Manualslib.com manuals search engine
38
FRANÇAIS
position 'S' est recommandée pour la peau
C ◗ Lasensible.
"N" est recommandée pour la
C ◗ Lapeauposition
normale.
◗ Les positions intermédiaires sont
recommandées pour une peau normale ou
sensible.
Rasage
1
Mettez le rasoir en marche en appuyant
sur le bouton marche/arrêt une fois.
Lorsque vous mettez le rasoir en marche ou
l'arrêtez, tous les témoins et les symboles
s'allument et le niveau de charge sera affiché
pendant quelques secondes.
C
2
Déplacez rapidement les têtes de rasage
sur la peau en effectuant des mouvements
rectilignes et circulaires.
- Les meilleurs résultats de rasage sont obtenus
sur une peau sèche.
- Votre peau peut avoir besoin de 2-3 semaines
pour s'habituer au système Philips.
3
Downloaded from www.Manualslib.com manuals search engine
Arrêtez le rasoir en appuyant sur le
bouton marche/arrêt une fois.
FRANÇAIS
C
4
39
Remettez le capot protecteur sur le rasoir
après chaque utilisation pour éviter tout
dommage.
Tondeuse
Pour tailler les favoris et la moustache.
C
C
1
Dégagez la tondeuse en faisant glisser
l'interrupteur vers le bas.
La tondeuse peut être mise en service pendant
que le moteur fonctionne.
2
Fermez la tondeuse.
Nettoyage et entretien
symbole robinet commence à clignoter
C ◗ Le
après chaque rasage pour vous rappeler que
le rasoir doit être nettoyé (sauf quand le
témoin du bas s'allume en rouge).
Nettoyez régulièrement l'appareil pour obtenir de
meilleurs résultats de rasage.
◗ Si fourni, utilisez le nettoyeur spécial (option)
pour nettoyer le rasoir.Voir le livret conseils
inclus.
Downloaded from www.Manualslib.com manuals search engine
40
FRANÇAIS
Pour un nettoyage normal, rincez l'unité de rasage
et le compartiment à poils à l'eau très chaude
après chaque utilisation.
Faites attention que l'eau ne soit pas trop chaude
pour ne pas vous brûler.
Chaque jour: unité de rasage et
compartiment à poils
1
Arrêtez l'appareil, enlevez le chargeur de la
prise de courant et tirez la fiche hors du
rasoir.
C
2
Appuyez sur le bouton de déverrouillage
et ôtez l'unité de rasage de l'appareil.
C
3
C
Rincez l'unité de rasage et le
compartiment à poils sous l'eau la plus
chaude possible.
Assurez-vous que l'intérieur de l'unité de rasage
et le compartiment de récupération des poils ont
été nettoyés minutieusement.
4
Rincez l'extérieur du rasoir.
5
Fermez l'unité de rasage et secouez l'eau
du rasoir.
Ne séchez jamais l'unité de rasage à l'aide d'une
serviette, car cela pourrait endommager les têtes
de rasage.
Downloaded from www.Manualslib.com manuals search engine
FRANÇAIS
C
41
6
Ouvrez l'unité de rasage à nouveau et
laissez-la ouverte pour sécher l'appareil
complètement.
Vous pouvez également nettoyer le
compartiment à poils à l'aide de la brosse fournie
avec l'appareil.
Tous les six mois: têtes de rasage
C
1
Ouvrez l'unité de rasage, tournez le verrou
dans le sens inverse des aiguilles d'une
montre (1) et retirez la plaque de
fermeture (2).
2
Nettoyez les couteaux et les grilles avec la
brosse fournie.
Ne nettoyez pas plus d'un couteau et une grille à
la fois, parce que ceux-ci sont affûtés par paires. Si
vous intervertissez par mégarde les couteaux et
les grilles, plusieurs semaines peuvent être
nécessaires avant que l'appareil rase à nouveau de
manière optimale.
3
Remontez les têtes de rasage. Replacez la
plaque de fermeture sur l'unité de rasage
et tournez-la dans le sens des aiguilles
d'une montre.
4
Fermez l'unité de rasage.
Downloaded from www.Manualslib.com manuals search engine
42
FRANÇAIS
Tondeuse
Nettoyez la tondeuse après chaque utilisation.
1
Arrêtez l'appareil, enlevez le chargeur de la
prise de courant et tirez la fiche hors du
rasoir.
C
2
Nettoyez la tondeuse à l'aide de la brosse
fournie.
C
3
Tous les six mois, lubrifiez la tondeuse à
l'aide d'une gouttelette d'huile pour
machine à coudre.
Support de charge
Vous pouvez nettoyer le support de charge à
l'aide d'un chiffon humide.
Rangement
le capot de protection pour éviter
C ◗ Remettez
les détériorations.
Downloaded from www.Manualslib.com manuals search engine
FRANÇAIS
43
l'appareil dans l'étui de luxe ou placezC ◗ Rangez
le sur le support pour le sécher.
Remplacement
les têtes de rasage lorsque le
C ◗ Remplacez
symbole de l'unité de rasage commence à
clignoter.
Remplacez les têtes de rasage endommagées ou
usagées exclusivement par des têtes de rasage
Philips HQ9.
1
Arrêtez l'appareil, enlevez le chargeur de la
prise de courant et tirez la fiche hors du
rasoir.
C
2
Appuyez sur le bouton de déverrouillage
et ôtez l'unité de rasage de l'appareil.
C
3
Tournez le verrou dans le sens inverse des
aiguilles d'une montre (1) et retirez la
plaque de fermeture (2).
C
4
Enlevez les têtes usagées et placez les
nouvelles têtes dans l'unité de rasage.
Veillez à ce que les petites ailettes qui dépassent
des têtes de rasage tombent exactement dans les
renfoncements.
Downloaded from www.Manualslib.com manuals search engine
44
FRANÇAIS
C
5
Remontez la plaque de fermeture (1) et
tournez le verrou dans le sens des aiguilles
d'une montre (2).
6
Fermez l'unité de rasage.
◗ Le symbole de l'unité de rasage s'éteint si
vous maintenez appuyé le bouton
marche/arrêt pendant 6 secondes.
Accessoires
Les accessoires suivants sont disponibles:
- Chargeur HQ8000.
- Têtes de rasage Philips HQ9.
- Philips Spray HQ110 (spray de nettoyage de
tête de rasage). Pas disponible au Canada.
- Cordon voiture HQ8010.
Environnement
jetez pas l'appareil en fin de vie avec les
C ◗ Ne
ordures ménagères, mais déposez-le à un
endroit prévu à cet effet par les pouvoirs
publics pour son recyclage.Vous aiderez, ainsi,
à protéger l'environnement.
◗ Les accumulateurs rechargeables incorporés
contiennent des substances qui peuvent
polluer l'environnement. Enlevez les
accumulateurs lorsque vous mettez l'appareil
au rebut. Ne les jetez pas avec les ordures
ménagères, mais déposez-les à un endroit
prévu à cet effet par les pouvoirs publics.Vous
Downloaded from www.Manualslib.com manuals search engine
FRANÇAIS
45
pouvez également porter l'appareil dans un
Centre Service Agréé Philips. Les
accumulateurs y seront traités dans le respect
de l'environnement.
Elimination des accumulateurs du rasoir
Eliminez les accumulateurs uniquement lorsque
ceux-ci sont entièrement déchargés.
C
1
Enlevez le chargeur de la prise de courant
et tirez la petite fiche hors de l'appareil.
2
Laissez l'appareil fonctionner jusqu'à l'arrêt
complet du moteur, ôtez les vis et ouvrez
l'appareil.
3
Enlevez les accumulateurs.
Ne raccordez plus l'appareil à la tension du
réseau une fois que les accumulateurs ont été
enlevés.
Garantie et service
Pour plus d'informations, visitez notre site Internet :
www.philips.com ou veuillez contacter le Service
Consommateurs Philips de votre pays (vous
trouverez le numéro de téléphone dans le
dépliant sur la garantie internationale). S'il n'y a
aucun Service Consommateurs Philips dans votre
pays, contactez votre distributeur ou le Service
Department of Philips Domestic Appliances and
Personal Care BV.
Downloaded from www.Manualslib.com manuals search engine
46
FRANÇAIS
Dépannage
1
B
B
Les résultats de rasage se dégradent
Cause 1: Les têtes de rasage sont sales.
L'appareil n'a pas été rincé suffisamment
longtemps ou l'eau n'était pas assez chaude.
◗ Nettoyez l'appareil à fond avant de continuer.
Reportez-vous au chapitre "Nettoyage et
entretien".
B
Cause 2: Des poils longs sont emmêlés dans les
têtes de rasage.
◗ Nettoyez les couteaux et les grilles avec la
brosse fournie.Voir chapitre "Nettoyage et
entretien", section "Tous les six mois: têtes de
rasage".
B
Cause 3: les têtes de rasage sont abîmées ou
usagées.
◗ Remplacez les têtes de rasage.Voir chapitre
"Remplacement".
2
B
Le rasoir ne fonctionne pas lorsque le
bouton marche/arrêt est pressé.
Cause 1: Les accumulateurs sont vides.
◗ Rechargez le rasoir.Voir chapitre "Charge".
B
Downloaded from www.Manualslib.com manuals search engine
Cause 2: L'appareil n'est pas connecté au secteur.
FRANÇAIS
47
◗ Mettez le chargeur dans la prise de courant.
C
3
B
L'unité de rasage s'est détachée.
Cause: L'unité de rasage n'a pas été positionnée
correctement.
◗ Si l'unité de rasage se détache du rasoir, vous
pouvez la remonter facilement ("clic").
Downloaded from www.Manualslib.com manuals search engine
48
NEDERLANDS
Belangrijk
Lees deze gebruiksaanwijzing zorgvuldig door
voordat u het apparaat gaat gebruiken. Bewaar de
gebruiksaanwijzing om hem indien nodig te
kunnen raadplegen.
C
C
C
◗ Gebruik uitsluitend de bijgeleverde
powerplug.
◗ De powerplug zet 100-240 volt om in een
veilige laagspanning van minder dan 24 volt.
◗ De powerplug bevat een transformator. Knip
de powerplug niet af om hem te vervangen
door een andere stekker, omdat dit een
gevaarlijke situatie kan opleveren.
◗ Gebruik nooit een beschadigde powerplug.
◗ Indien de powerplug beschadigd is, laat hem
dan altijd vervangen door een van het
oorspronkelijke type om gevaar te
voorkomen.
◗ Voorkom dat de powerplug nat wordt.
◗ Laad het apparaat op en bewaar het bij een
temperatuur tussen 5cC en 35cC.
◗ Dompel de oplader nooit in water en spoel
deze ook niet af onder de kraan.
◗ Laad het apparaat niet op in een gesloten etui.
◗ Haal altijd de powerplug uit het stopcontact
en trek het stekkertje uit het apparaat
voordat u het scheerapparaat onder de kraan
schoonspoelt.
◗ Het apparaat voldoet aan de internationaal
erkende IEC veiligheidsvoorschriften en kan
veilig onder de kraan worden gereinigd.
Downloaded from www.Manualslib.com manuals search engine
NEDERLANDS
49
Wees voorzichtig met heet water. Controleer
altijd of het water niet te heet is om te
voorkomen dat u uw handen verbrandt.
Opladen
Zorg ervoor dat het apparaat uitgeschakeld is
voordat u het gaat opladen.
Opladen duurt normaal ongeveer 1 uur.
U kunt zich ook direct scheren, zonder eerst op
te laden, door het apparaat rechtstreeks op
netspanning aan te sluiten.
Oplaadlampjes
Opladen
u het lege scheerapparaat gaat
C ◗ Wanneer
opladen, brandt het onderste lampje rood.
Zodra de accu genoeg energie voor één
scheerbeurt bevat, gaan alle lampjes
opeenvolgend groen knipperen.
Accu vol
de accu volledig is opgeladen,
C ◗ Wanneer
branden alle lampjes groen.
Enkele uren na het opladen gaan alle lampjes uit.
Downloaded from www.Manualslib.com manuals search engine
50
NEDERLANDS
Resterende accucapaciteit
hoeveelheid energie die nog in de accu zit,
C ◗ De
wordt aangegeven door het aantal brandende
lampjes.
De resterende accucapaciteit wordt getoond
wanneer u de stekker uit het stopcontact haalt en
wanneer u het apparaat in- of uitschakelt:
- Wanneer alle lampjes groen branden, is de accu
voor 100% opgeladen.
- Wanneer het onderste lampje groen brandt, is
er nog 20% van de accucapaciteit over.
Accu bijna leeg
de accu bijna leeg is, gaat het
C ◗ Wanneer
onderste lampje rood branden.
Wanneer u het scheerapparaat uitschakelt,
knippert dit lampje enkele keren.
Snoerloze scheertijd
Wanneer het scheerapparaat volledig is
opgeladen, heeft het een snoerloze scheertijd van
maximaal 80 minuten.
Downloaded from www.Manualslib.com manuals search engine
NEDERLANDS
51
Het apparaat opladen
C
1
Steek het apparaatstekkertje in het
scheerapparaat.
2
Steek de powerplug in het stopcontact.
3
Haal de powerplug uit het stopcontact en
trek het stekkertje uit het apparaat
wanneer de accu volledig opgeladen is.
Oplader
U kunt het apparaat ook opladen door het in de
oplader (indien meegeleverd) te plaatsen.
Dompel de oplader nooit in water en spoel deze
ook niet af onder de kraan.
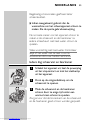
ervoor dat de oplader op netspanning is
C ◗ Zorg
aangesloten en plaats het scheerapparaat goed
in de oplader.
Het onderste lampje gaat rood branden.
het scheerapparaat uit de oplader zonder
C ◗ Til
het te kantelen.
Het klokje plaatsen en verwijderen
C
1
Downloaded from www.Manualslib.com manuals search engine
Draai het klokje linksom (1) ('klik') en trek
het uit de oplader (2).
52
NEDERLANDS
C
2
Plaats het klokje in de oplader (1) en draai
het rechtsom (2) ('klik').
De tijd instellen
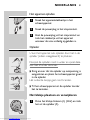
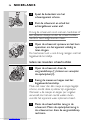
de tijd in door op het kleine knopje aan
C ◗ Stel
de achterzijde van het klokje te drukken.
De tijd kan alleen vooruitgezet worden.
De batterij vervangen
C
1
Verwijder het dopje.Verwijder daarna de
batterij met behulp van een
precisieschroevendraaier.
C
2
Plaats een nieuwe batterij en duw het
dopje terug op zijn plaats.
Downloaded from www.Manualslib.com manuals search engine
NEDERLANDS
53
Gebruik
Personal Comfort Control
Personal Comfort Control systeem stelt
C ◗ Het
u in staat het scheerapparaat aan te passen
aan uw huidtype.
- Stel het scheerapparaat in op 'Normal' voor
snel en gerieflijk glad scheren.
- Stel het scheerapparaat in op 'Sensitive' voor
gerieflijk glad scheren op een extra
huidvriendelijke manier.
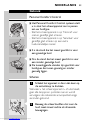
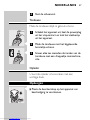
stand die het meest geschikt is voor
C ◗ Seenis degevoelige
huid.
de stand die het meest geschikt is voor
C ◗ Neenis minder
gevoelige huid.
◗ De tussenliggende standen zijn geschikt voor
huidtypes die tussen gevoelig en minder
gevoelig liggen.
Scheren
1
Schakel het apparaat in door één keer op
de aan/uitknop te drukken.
Wanneer u het scheerapparaat in- of uitschakelt,
gaan alle lampjes en symbolen aan en wordt
vervolgens de resterende accucapaciteit enige
seconden getoond.
C
2
Downloaded from www.Manualslib.com manuals search engine
Beweeg de scheerhoofden vlot over de
huid; maak zowel rechte als draaiende
bewegingen.
54
NEDERLANDS
- Scheren op een droog gezicht geeft het beste
resultaat.
- Uw huid kan 2 tot 3 weken nodig hebben om
aan dit Philips-scheersysteem te wennen.
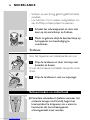
C
3
Schakel het scheerapparaat uit door één
keer op de aan/uitknop te drukken.
4
Plaats na gebruik altijd de beschermkap op
het apparaat om beschadiging te
voorkomen.
Tondeuse
Voor het bijwerken van bakkebaarden en snor.
C
C
1
Klap de tondeuse uit door de knop naar
beneden te duwen.
U kunt de tondeuse inschakelen terwijl de motor
draait.
2
Klap de tondeuse in met uw wijsvinger.
Schoonmaken en onderhoud
iedere scheerbeurt (behalve wanneer het
C ◗ Na
onderste lampje rood brandt) begint het
kraansymbool te knipperen om u eraan te
herinneren dat het scheerapparaat
schoongemaakt moet worden.
Downloaded from www.Manualslib.com manuals search engine
NEDERLANDS
55
Regelmatig schoonmaken geeft een beter
scheerresultaat.
◗ Indien meegeleverd, gebruik dan de
wasmachine om het scheerapparaat schoon te
maken. Zie de aparte gebruiksaanwijzing.
De normale manier om het apparaat schoon te
maken is de scheerunit en de haarkamer na
iedere scheerbeurt met heet water schoon te
spoelen.
Wees voorzichtig met heet water. Controleer
altijd of het water niet te heet is om te
voorkomen dat u uw handen verbrandt.
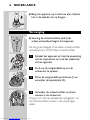
Iedere dag: scheerunit en haarkamer
1
Schakel het apparaat uit, haal de powerplug
uit het stopcontact en trek het stekkertje
uit het apparaat.
C
2
Druk op de ontgrendelknop om de
scheerunit te openen.
C
3
Maak de scheerunit en de haarkamer
schoon door ze enige tijd onder een
warme kraan schoon te spoelen.
Zorg ervoor dat de binnenkant van de scheerunit
en de haarkamer goed schoon worden gespoeld.
Downloaded from www.Manualslib.com manuals search engine
56
NEDERLANDS
C
4
Spoel de buitenkant van het
scheerapparaat schoon.
5
Sluit de scheerunit en schud het
achtergebleven water eraf.
Droog de scheerunit nooit met een handdoek of
een papieren doekje omdat de scheerhoofden
hierdoor beschadigd kunnen raken.
C
6
Open de scheerunit opnieuw en laat hem
openstaan om het apparaat volledig te
laten drogen.
De haarkamer kunt u ook droog reinigen met het
bijgeleverde borsteltje.
Iedere zes maanden: scheerhoofden
C
1
Open de scheerunit, draai de
vergrendelknop (1) linksom en verwijder
de opsluitplaat (2).
2
Reinig de messen en kapjes met het
bijgeleverde borsteltje.
Maak niet meer dan één mesje en kapje tegelijk
schoon, omdat deze op elkaar zijn ingeslepen.
Wanneer u de mesjes en kapjes per ongeluk
verwisselt, kan het een aantal weken duren
voordat het apparaat weer optimaal scheert.
3
Downloaded from www.Manualslib.com manuals search engine
Plaats de scheerhoofden terug in de
scheerunit. Plaats de opsluitplaat terug in
de scheerunit en draai de vergrendelknop
rechtsom.
NEDERLANDS
4
57
Sluit de scheerunit.
Tondeuse
Maak de tondeuse altijd na gebruik schoon.
1
Schakel het apparaat uit, haal de powerplug
uit het stopcontact en trek het stekkertje
uit het apparaat.
C
2
Maak de tondeuse met het bijgeleverde
borsteltje schoon.
C
3
Smeer elke zes maanden de tanden van de
tondeuse met een druppeltje naaimachineolie.
Oplader
U kunt de oplader schoonmaken met een
vochtige doek.
Opbergen
de beschermkap op het apparaat om
C ◗ Plaats
beschadiging te voorkomen.
Downloaded from www.Manualslib.com manuals search engine
58
NEDERLANDS
het apparaat op in het luxe etui of plaats
C ◗ Berg
het in de oplader om te drogen.
Vervanging
de scheerhoofden zodra het
C ◗ Vervang
scheerunitsymbool begint te knipperen.
Vervang beschadigde of versleten scheerhoofden
uitsluitend door HQ9 Philips scheerhoofden.
1
Schakel het apparaat uit, haal de powerplug
uit het stopcontact en trek het stekkertje
uit het apparaat.
C
2
Druk op de ontgrendelknop om de
scheerunit te openen.
C
3
Draai de vergrendelknop linksom (1) en
verwijder de opsluitplaat (2).
C
4
Verwijder de scheerhoofden en plaats
nieuwe in de scheerunit.
Zorg ervoor dat de uitstekende 'vleugeltjes' van
de scheerhoofden precies in de uitsparingen
vallen.
Downloaded from www.Manualslib.com manuals search engine
NEDERLANDS
C
59
5
Plaats de opsluitplaat terug in de
scheerunit (1) en draai de vergrendelknop
rechtsom (2).
6
Sluit de scheerunit.
◗ Het scheerunitsymbool gaat uit als u de
aan/uitknop 6 seconden ingedrukt houdt.
Accessoires
De volgende accessoires zijn verkrijgbaar:
- HQ8000 powerplug
- HQ9 Philips scheerhoofden
- HQ110 Philips reinigingsspray voor
scheerhoofden (spuitbus)
- HQ8010 autosnoer
Milieu
het apparaat aan het einde van zijn
C ◗ Gooi
levensduur niet weg met het normale huisvuil,
maar lever het in op een officieel
verzamelpunt om het te laten recyclen. Op
deze wijze helpt u om het milieu te
beschermen.
◗ De ingebouwde accu bevat stoffen die
schadelijk kunnen zijn voor het milieu.
Verwijder altijd de accu voordat u het
apparaat afdankt of inlevert op een officieel
verzamelpunt. Lever de accu in op een
officieel inzamelpunt voor batterijen.Als u
moeite heeft de accu te verwijderen, dan kunt
Downloaded from www.Manualslib.com manuals search engine
60
NEDERLANDS
u het apparaat ook naar een Philips
servicecentrum brengen, waar men de accu
voor u zal verwijderen en ervoor zal zorgen
dat deze op milieuvriendelijke wijze wordt
verwerkt.
Accu verwijderen
Verwijder de accu alleen als deze volledig leeg is.
C
1
Haal de powerplug uit het stopcontact en
trek het stekkertje uit het apparaat.
2
Laat het apparaat lopen tot het stopt, draai
de schroeven los en maak het apparaat
open.
3
Verwijder de accu.
Sluit het scheerapparaat niet meer op
netspanning aan wanneer de accu verwijderd is.
Garantie & service
Als u informatie nodig heeft of als u een
probleem heeft, bezoek dan onze website
(www.philips.com), of neem contact op met het
Philips Customer Care Centre in uw land (u vindt
het telefoonnummer in het 'worldwide
guarantee' vouwblad). Als er geen Customer Care
Centre in uw land is, ga dan naar uw Philips
dealerof neem contact op met de afdeling Service
van Philips Domestic Appliances and Personal
Care BV.
Downloaded from www.Manualslib.com manuals search engine
NEDERLANDS
61
Problemen oplossen
1
B
B
Het scheerresultaat gaat achteruit.
Oorzaak 1: de scheerhoofden zijn vuil.
Het apparaat is niet lang genoeg schoongespoeld
of het gebruikte water was niet warm genoeg.
◗ Maak het apparaat grondig schoon voordat u
zich er weer mee gaat scheren. Zie hoofdstuk
'Schoonmaken en onderhoud'.
B
Oorzaak 2: er zitten lange haren in de
scheerhoofden.
◗ Reinig de messen en kapjes met het
bijgeleverde borsteltje. Zie 'Iedere zes
maanden: scheerhoofden' in hoofdstuk
'Schoonmaken en onderhoud'.
B
Oorzaak 3: de scheerhoofden zijn beschadigd of
versleten.
◗ Vervang de scheerhoofden. Zie hoofdstuk
'Vervanging'.
2
B
Het scheerapparaat werkt niet wanneer de
aan/uitknop wordt ingedrukt.
Oorzaak 1: de accu is leeg.
◗ Laad de accu op. Zie hoofdstuk 'Opladen'.
B
Downloaded from www.Manualslib.com manuals search engine
Oorzaak 2: het scheerapparaat is niet op
netspanning aangesloten.
62
NEDERLANDS
◗ Steek de powerplug in het stopcontact.
C
3
B
De scheerunit is losgeraakt van het
scheerapparaat.
Oorzaak: de scheerunit zit niet goed op het
apparaat.
◗ Als de scheerunit is losgeraakt van het
scheerapparaat, kunt u deze makkelijk weer
opnieuw bevestigen ('klik').
Downloaded from www.Manualslib.com manuals search engine
ESPAÑOL
63
Importante
Antes de usar el aparato, lea atentamente estas
instrucciones y consérvelas por si necesitara
consultarlas en el futuro.
C
C
C
◗ Use sólo la clavija adaptadora que se
suministra.
◗ La clavija adaptadora transforma la corriente
de 100-240 voltios en un voltaje seguro
inferior a 24 voltios.
◗ La clavija adaptadora incorpora un
transformador. No quite la clavija adaptadora
para sustituirla por otra, ya que podría
producirse una situación de peligro.
◗ No utilice una clavija adaptadora dañada.
◗ Si la clavija está dañada, debe sustituirla
siempre por un modelo original de Philips
para evitar que se produzcan situaciones de
peligro.
◗ Asegúrese de que la clavija adaptadora no se
moje.
◗ Cargue y guarde el aparato a una temperatura
entre 5cC y 35cC.
◗ No sumerja nunca el soporte de carga en
agua ni lo lave bajo el grifo.
◗ No recargue la afeitadora dentro de la funda
cerrada.
◗ Desenchufe siempre la afeitadora antes de
limpiarla bajo el grifo
◗ El aparato cumple las normas de seguridad
IEC aprobadas internacionalmente y se puede
limpiar bajo el grifo de forma segura.
Downloaded from www.Manualslib.com manuals search engine
64
ESPAÑOL
Tenga cuidado con el agua caliente. Compruebe
siempre que no esté demasiado caliente para
evitar quemarse las manos.
Carga
Asegúrese de que el aparato está desconectado
antes de empezar a cargarlo.
La afeitadora suele tardar aproximadamente 1
hora en cargarse.
También puede afeitarse sin recargar la afeitadora
enchufándola a la red eléctrica.
Indicaciones de carga
Carga
empiece a cargar la afeitadora, el
C ◗ Cuando
piloto inferior parpadeará en color rojo.
Cuando la batería esté lo suficientemente
cargada para un afeitado, todos los pilotos
empezarán a parpadear en color verde.
Batería completamente cargada
la batería se haya cargado
C ◗ Cuando
completamente, se iluminarán todos los
pilotos en verde.
Después de unas horas de haberse cargado, se
apagarán todos los pilotos.
Downloaded from www.Manualslib.com manuals search engine
ESPAÑOL
65
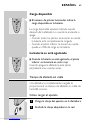
Carga disponible
número de pilotos iluminados indica la
C ◗ Elcarga
disponible en la batería.
La carga disponible aparece indicada cuando
desenchufa la afeitadora o cuando la enciende o
apaga.
- Cuando todos los pilotos se iluminan en verde,
la batería está completamente cargada.
- Cuando el piloto inferior se ilumina en verde,
queda un 20% de carga en la batería.
La batería se está agotando
la batería se esté agotando, el piloto
C ◗ Cuando
inferior se iluminará en color rojo.
Cuando apague la afeitadora, este piloto
parpadeará unas cuantas veces.
Tiempo de afeitado sin cable
Una afeitadora completamente cargada le
proporcionará un tiempo de afeitado sin cable de
hasta 80 minutos.
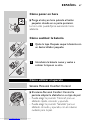
Cómo cargar el aparato
C
1
Ponga la clavija del aparato en la afeitadora.
2
Enchufe la clavija adaptadora a la red.
Downloaded from www.Manualslib.com manuals search engine
66
ESPAÑOL
3
Cuando la batería se haya cargado
completamente, desenchufe la clavija
adaptadora de la red y saque la clavija de la
afeitadora.
Soporte de carga
También puede cargar el aparato colocándolo en
el soporte de carga, si se suministra.
No sumerja nunca el soporte de carga en agua ni
lo lave bajo el grifo.
correctamente la afeitadora en el
C ◗ Coloque
soporte de carga enchufado.
El piloto inferior se ilumina en rojo.
C ◗ Quite la afeitadora del soporte sin inclinarla.
Cómo quitar y poner el reloj
C
1
Gire el reloj en sentido contrario al de las
agujas del reloj (1) (oirá un clic) y sáquelo
(2).
C
2
Inserte el reloj (1) y gírelo en el sentido de
las agujas del reloj (2) (oirá un clic).
Downloaded from www.Manualslib.com manuals search engine
ESPAÑOL
67
Cómo poner en hora
el reloj en hora pulsado el botón
C ◗ Ponga
pequeño situado en su parte posterior.
La hora sólo puede fijarse avanzando hacia
adelante.
Cómo sustituir la batería
C
1
Quite la tapa. Después saque la batería con
un destornillador pequeño.
C
2
Introduzca la batería nueva y vuelva a
colocar la tapa en su sitio.
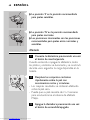
Cómo utilizar el aparato
Sistema Personal Comfort Control
sistema Personal Comfort Control le
C ◗ Elpermite
adaptar la afeitadora a su tipo de piel.
- Puede elegir la posición 'Normal' para un
afeitado rápido, cómodo y apurado.
- Puede elegir la posición 'Sensible' para un
afeitado cómodo y apurado, con el máximo
cuidado para la piel.
Downloaded from www.Manualslib.com manuals search engine
68
ESPAÑOL
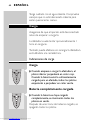
'S' es la posición recomendada
C ◗ Laparaposición
pieles sensibles.
'N' es la posición recomendada
C ◗ Laparaposición
pieles normales.
◗ Las posiciones intermedias son las posiciones
recomendadas para pieles entre normales y
sensibles.
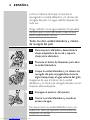
Afeitado
1
Conecte la afeitadora presionando una vez
el botón de marcha/parada.
Cuando encienda o apague la afeitadora, todos
los pilotos y símbolos se iluminarán y se mostrará
durante unos segundos la carga disponible en la
batería.
C
2
Desplace los conjuntos cortantes
rápidamente sobre la piel con
movimientos rectos y circulares.
- Los mejores resultados se obtienen afeitando
sobre la piel seca.
- Puede que su piel necesite de 2 a 3 semanas
para acostumbrarse al sistema de afeitado
Philips.
3
Downloaded from www.Manualslib.com manuals search engine
Apague la afeitadora presionando una vez
el botón de encendido/apagado.
ESPAÑOL
C
4
69
Después de usar la afeitadora, póngale
siempre la funda de protección para evitar
daños.
Cortapatillas
Para arreglar las patillas y el bigote.
C
C
1
Abra el cortapatillas moviendo el botón
deslizante hacia abajo.
El cortapatillas se puede activar con la afeitadora
en marcha.
2
Cierre el cortapatillas con su dedo índice.
Limpieza y mantenimiento
símbolo del grifo parpadea después de cada
C ◗ Elafeitado
para recordarle que tiene que limpiar
la afeitadora (excepto cuando el piloto
inferior parpadea en rojo).
Una limpieza frecuente garantiza el mejor
resultado en el afeitado.
◗ En caso de que se suministre, puede limpiar la
afeitadora en el dispositivo de limpieza.
Consulte el folleto de instrucciones al
respecto.
Downloaded from www.Manualslib.com manuals search engine
70
ESPAÑOL
La forma habitual de limpiar el aparato es
enjuagando la unidad afeitadora y la cámara de
recogida del pelo con agua caliente después de
cada uso.
Tenga cuidado con el agua caliente. Compruebe
siempre que no esté demasiado caliente para
evitar quemarse las manos.
Todos los días: unidad afeitadora y cámara
de recogida del pelo
1
Desconecte la afeitadora, desenchufe la
clavija adaptadora de la red y saque la
clavija de la afeitadora.
C
2
Presione el botón de liberación para abrir
la unidad afeitadora.
C
3
C
Limpie la unidad afeitadora y la cámara de
recogida del pelo enjuagándolas durante
algún tiempo bajo el agua caliente del grifo.
Asegúrese de que el interior de la unidad
afeitadora y la cámara de recogida del pelo se han
limpiado adecuadamente.
4
Enjuague el exterior del aparato.
5
Cierre la unidad afeitadora y sacuda el
exceso de agua.
No seque nunca la unidad afeitadora con una
toalla o un paño, ya que esto podría dañar los
conjuntos cortantes.
Downloaded from www.Manualslib.com manuals search engine
ESPAÑOL
C
71
6
Vuelva a abrir la unidad afeitadora y déjela
abierta para permitir que el aparato se
seque completamente.
También puede limpiar la cámara de recogida del
pelo sin agua usando el cepillo que se suministra.
Cada seis meses: conjuntos cortantes
C
1
Abra la unidad afeitadora, gire el cierre de
seguridad en sentido contrario al de las
agujas del reloj (1) y quite el marco de
retención (2).
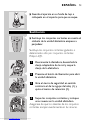
2
Limpie las cuchillas y los protectores con
el cepillo que se suministra.
No limpie más de una cuchilla y un protector al
mismo tiempo, ya que forman conjuntos entre sí.
Si, accidentalmente, se mezclan las cuchillas y los
protectores, pueden ser necesarias varias semanas
para que se restablezcan los resultados óptimos
en el afeitado.
3
Coloque de nuevo los conjuntos cortantes
en la unidad afeitadora.Vuelva a colocar el
marco de retención en la unidad afeitadora
y gírelo en el sentido de las agujas del
reloj.
4
Cierre la unidad afeitadora.
Downloaded from www.Manualslib.com manuals search engine
72
ESPAÑOL
Cortapatillas
Limpie el cortapatillas cada vez que lo use.
1
Desconecte la afeitadora, desenchufe la
clavija adaptadora de la red y saque la
clavija de la afeitadora.
C
2
Limpie el cortapatillas con el cepillo que se
suministra.
C
3
Cada seis meses lubrique los dientes del
cortapatillas con una gota de aceite de
máquina de coser.
Soporte de carga
Puede limpiar el soporte de carga con un paño
húmedo.
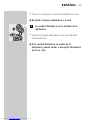
Cómo guardar el aparato
evitar deterioros, ponga la tapa
C ◗ Para
protectora en la afeitadora.
Downloaded from www.Manualslib.com manuals search engine
ESPAÑOL
73
el aparato en su funda de lujo o
C ◗ Guarde
colóquelo en el soporte para que se seque.
Sustitución
los conjuntos cortantes en cuanto el
C ◗ Sustituya
símbolo de la unidad afeitadora empiece a
parpadear.
Sustituya los conjuntos cortantes gastados o
deteriorados sólo por conjuntos cortantes
Philips HQ9.
1
Desconecte la afeitadora, desenchufe la
clavija adaptadora de la red y saque la
clavija de la afeitadora.
C
2
Presione el botón de liberación para abrir
la unidad afeitadora.
C
3
Gire el cierre de seguridad en sentido
contrario al de las agujas del reloj (1) y
quite el marco de retención (2).
C
4
Saque los conjuntos cortantes y coloque
unos nuevos en la unidad afeitadora.
Asegúrese de que los salientes de los conjuntos
cortantes encajen exactamente en las ranuras.
Downloaded from www.Manualslib.com manuals search engine
74
ESPAÑOL
C
5
Coloque de nuevo el marco de retención
en la unidad afeitadora (1) y gire el cierre
de seguridad en el sentido de las agujas del
reloj (2).
6
Cierre la unidad afeitadora.
◗ El símbolo de la unidad afeitadora
desaparecerá si mantiene pulsado el botón de
encendido/apagado (on/off) durante 6
segundos.
Accesorios
Están disponibles los siguientes accesorios:
- Clavija adaptadora HQ8000.
- Conjuntos cortantes Philips HQ9.
- Limpiador Philips HQ110
(spray limpiador de los conjuntos cortantes).
- Clavija para el coche HQ8010.
Medio ambiente
vaya a deshacerse de este aparato, no
C ◗ Cuando
lo tire con la basura normal del hogar;
deposítelo en un punto de recogida oficial
para su reciclado.Al hacerlo, contribuirá a
preservar el medio ambiente.
◗ La batería recargable incorporada contiene
sustancias que pueden contaminar el medio
ambiente. Quite la batería antes de
deshacerse del aparato o de depositarlo en un
punto de recogida oficial. Lleve la batería a un
punto de recogida oficial de baterías. Si tiene
Downloaded from www.Manualslib.com manuals search engine
ESPAÑOL
75
problemas a la hora de extraerla, puede llevar
el aparato a un Servicio de Asistencia Técnica
de Philips, donde quitarán la batería y se
desharán de ella de forma no perjudicial para
el medio ambiente.
Cómo deshacerse de la batería
Quite la batería sólo cuando esté completamente
descargada.
C
1
Desenchufe la clavija adaptadora de la red
y saque la clavija de la afeitadora.
2
Deje que la afeitadora funcione hasta que
se pare. Luego afloje los tornillos y abra la
afeitadora.
3
Quite la batería.
La afeitadora no puede volver a enchufarse a la
red después de haber quitado la batería.
Garantía y servicio
Si necesita información o tiene algún problema,
visite la página web de Philips en www.philips.com,
o póngase en contacto con el Servicio Philips de
Atención al Cliente de su país (hallará el número
de teléfono en el folleto de la Garantía Mundial).
Si en su país no hay Servicio Philips de Atención
al Cliente, diríjase a su distribuidor local Philips o
póngase en contacto con el Service Department
of Philips Domestic Appliances and Personal
Care BV.
Downloaded from www.Manualslib.com manuals search engine
76
ESPAÑOL
Solución de problemas
1
B
B
Menor rendimiento en el afeitado
Causa 1: los conjuntos cortantes están sucios.
La afeitadora no se ha limpiado con agua lo
suficientemente caliente o durante el tiempo
suficiente.
◗ Limpie bien el aparato antes de seguir
afeitando. Consulte el capítulo 'Limpieza y
mantenimiento'.
B
Causa 2: hay pelos largos obstruyendo los
conjuntos cortantes.
◗ Limpie los protectores y las cuchillas con el
cepillo que se suministra. Consulte el capítulo
'Limpieza y mantenimiento', sección 'Cada seis
meses: conjuntos cortantes'.
B
Causa 3: los conjuntos cortantes están gastados o
dañados.
◗ Sustituya los conjuntos cortantes. Consulte el
capítulo 'Sustitución'.
2
B
La afeitadora no funciona cuando se
aprieta el botón de encendido/apagado.
Causa 1: la batería está descargada.
◗ Vuelva a cargar la batería. Consulte el capítulo
"Carga".
Downloaded from www.Manualslib.com manuals search engine
ESPAÑOL
B
77
Causa 2: el aparato no está enchufado a la red.
◗ Enchufe la clavija adaptadora a la red.
C
3
B
La unidad afeitadora se ha soltado de la
afeitadora.
Causa: la unidad afeitadora no se ha colocado
correctamente.
◗ Si la unidad afeitadora se suelta de la
afeitadora, puede volver a encajarla fácilmente
(oirá un clic).
Downloaded from www.Manualslib.com manuals search engine
78
ITALIANO
Importante
Prima di usare l'apparecchio leggete con
attenzione queste istruzioni e conservatele per
eventuali riferimenti futuri.
C
C
C
◗ Usate esclusivamente la spina fornita.
◗ La spina trasforma la tensione 100-240 volt in
una tensione più bassa e più sicura, inferiore a
24 volt.
◗ La spina contiene un trasformatore. Non
tagliate la spina per sostituirla con un'altra, per
evitare situazioni a rischio.
◗ Non usate la spina nel caso fosse danneggiata.
◗ Nel caso la spina fosse danneggiata, dovrà
essere sostituita esclusivamenet con una spina
originale, per evitare situazioni a rischio.
◗ Fate in modo che la spina non si bagni.
◗ Caricate e riponete l'apparecchio a una
temperatura compresa fra 5cC e 35cC.
◗ Non immergete mai l'unità di carica
nell'acqua, nè risciacquatela sotto l'acqua
corrente.
◗ Non ricaricare l'apparecchio in un sacchetto
chiuso.
◗ Togliete sempre la spina dal rasoio prima di
pulirlo sotto l'acqua del rubinetto.
◗ L'apparecchio è conforme alle norme di
sicurezza IEC approvate a livello
internazionale e può essere lavato
tranquillamente sotto l'acqua del rubinetto.
Fate attenzione all'acqua calda. Controllate
sempre che non sia troppo calda, per evitare di
scottarvi le mani.
Downloaded from www.Manualslib.com manuals search engine
ITALIANO
79
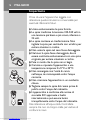
Come caricare l'apparecchio
Prima di caricare l'apparecchio, controllate che sia
spento.
In occasione della prima ricarica o dopo un lungo
periodo di inattività, lasciate il rasoio sotto carica
per almeno 4 ore di fila. Una normale ricarica
richiede circa 1 ora.
È possibile inoltre utilizzare l'apparecchio senza
averne ricaricato le batterie, collegandolo
direttamente alla rete.
Istruzioni per la ricarica
Come caricare l'apparecchio
inizierete a caricare l'apparecchio, la
C ◗ Quando
spia rossa inferiore lampeggerà. Quando la
batteria sarà sufficientemente carica per
garantire una rasatura, tutte le spie verdi
lampeggeranno in sequenza.
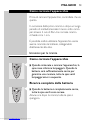
Ricarica completa della batteria
la batteria è completamente carica,
C ◗ Quando
tutte le spie verdi sono accese.
Alcune ore dopo la ricarica, tutte le spie si
spengono.
Downloaded from www.Manualslib.com manuals search engine
80
ITALIANO
Capacità residua delle batterie
capacità residua delle batterie è indicata dal
C ◗ Lanumero
di spie accese.
La capacità residua delle batterie viene indicata
quando viene tolta la spia dal rasoio o quando
viene acceso o spento l'apparecchio.
- Quando tutte le spie verdi si accendono, la
batteria è carica al 100%.
- Quando la spia verde inferiore si accende, la
capacità residua della batteria è pari al 20%.
La batteria si sta scaricando.
la batteria si sta scaricando, si
C ◗ Quando
accende la spia rossa inferiore.
Quando spegnete il rasoio, questa spia lampeggia
alcune volte.
Tempo di rasatura cordless
Un rasoio a piena carica permette un'autonomia
di rasatura cordless di circa 80 minuti.
Come caricare l'apparecchio
C
1
Inserito lo spinotto nel rasoio.
2
Inserite la spina nella presa.
Downloaded from www.Manualslib.com manuals search engine
ITALIANO
3
81
Togliete la spina dalla presa e lo spinotto
dall'apparecchio quando la batteria è
completamente carica.
Unità di carica
Potete anche caricare l'apparecchio mettendolo
nell'apposita unità di carica, se fornita.
Non immergete mai l'unità di carica nell'acqua, nè
risciacquatela sotto l'acqua corrente.
correttamente il rasoio nell'unità di
C ◗ Inserite
carica collegata alla presa di corrente.
Si accenderà la spia rossa inferiore.
il rasoio nell'unità di carica, senza
C ◗ Lasciate
inclinarlo.
Come togliere e inserire l'orologio
C
1
Ruotate l'orologio in senso antiorario (1)
("Click") ed estraetelo (2).
C
2
Inserite l'orologio (1) e ruotatelo in senso
orario (2) ("Click").
Downloaded from www.Manualslib.com manuals search engine
82
ITALIANO
Come impostare l'ora
impostare l'ora, premete il pulsante posto
C ◗ Per
sul retro dell'orologio.
Il tempo può essere spostato solo in avanti.
Come sostituire la batteria
C
1
Togliete il cappuccio, poi estraete la
batteria usando un piccolo cacciavite.
C
2
Inserite una batteria nuova e rimettete a
posto il cappuccio.
Rasatura
Personal Comfort Control
Comfort Control adatta la rasatura
C ◗ Ilal Personal
tuo tipo di pelle.
- Potete impostare il rasoio su 'Normal' per una
rasatura rapida e comoda.
- Potete impostare il rasoio su 'Sensitive' per
un'ottima rasatura, nel pieno rispetto della
pelle.
Downloaded from www.Manualslib.com manuals search engine
ITALIANO
83
'S': particolarmente adatta per le
C ◗ Posizione
pelli sensibili
'N': particolarmente adatta per le
C ◗ Posizione
pelli meno sensibili
◗ Le posizioni intermedie sono adatti per pelli
da normalil a sensibili.
Rasatura
1
Accendete l'apparecchio premendo una
volta l'interruttore on/off.
Quando accendete o spegnete l'apparecchio,
tutte le spie e i simboli si accendono e per alcuni
secondi viene visualizzata la capacità residua della
batteria.
C
2
Muovete le testine di rasatura sulla pelle,
compiendo movimenti lineari e circolari.
- Per ottenere i migliori risultati, è meglio radersi
con la pelle asciutta.
- Può essere necessario un periodo di
adattamento di 2 o 3 settimane per consentire
alla pelle di abituarsi al sistema di rasatura
Philips.
3
Downloaded from www.Manualslib.com manuals search engine
Per spegnere l'apparecchio, premete una
volta il pulsante on/off.
84
ITALIANO
C
4
Quando non usate il rasoio, mettete
l'apposito cappuccio di protezione, per
evitare di danneggiarlo.
Tagliabasette
Per la rifinitura di basette e baffi.
C
C
1
Aprite il tagliabasette premendo il cursore
verso il basso.
Il tagliabasette può essere attivato mentre il
rasoio è in funzione.
2
Chiudete il tagliabasette con il dito indice.
Pulizia e manutenzione
simbolo del rubinetto inizia a lampeggiare
C ◗ Ildopo
ogni rasatura per indicare che è
necessario pulire il rasoio (tranne quando la
spia rossa inferiore è accesa).
Una pulizia regolare garantisce i migliori risultati di
rasatura.
◗ Se fornito, usate l'apposito accessorio pulizia
per il rasoio.Vedere il libretto istruzioni a
parte.
Downloaded from www.Manualslib.com manuals search engine
ITALIANO
85
Il modo migliore per pulire l'apparecchio consiste
nello sciacquare l'unità di rasatura e la camera di
raccolta peli con acqua calda ogni volta che usate
l'apparecchio.
Fate attenzione all'acqua calda. Controllate
sempre che non sia troppo calda, per evitare di
scottarvi le mani.
Ogni giorno: unità di rasatura e vaschetta di
raccolta dei peli
1
Spegnete il rasoio, togliete la spina dalla
presa e lo spinotto dal rasoio.
C
2
Premere il pulsante di sgancio per aprire
l'unità di rasatura.
C
3
C
Risciacquate l'unità di rasatura e la
vaschetta di raccolta dei peli sotto l'acqua
calda corrente.
Controllate che l'unità di rasatura e la vaschetta
dei peli siano state pulite adeguatamente.
4
Risciacquate la parte esterna
dell'apparecchio.
5
Chiudete l'unità di rasatura e scuotete via
l'acqua in eccesso.
Non asciugate l'unità di rasatura con stracci o con
l'asciugamano, per evitare di danneggiare le
testine di rasatura.
Downloaded from www.Manualslib.com manuals search engine
86
ITALIANO
C
6
Riaprite l'unità di rasatura e lasciatela
aperta per farla asciugare completamente.
Potete pulire la vaschetta di raccolta dei peli
anche senz'acqua, utilizzando lo spazzolino fornito.
Ogni sei mesi: testine di rasatura
C
1
Aprite l'unità di rasatura, ruotate il
pulsante di sgancio in senso antiorario (1)
e togliete il telaio di supporto (2).
2
Pulite lame e paralame con l'apposito
spazzolino fornito.
Non pulite più di una lama e di un paralama alla
volta, cioè un set completo, per evitare di
scambiarli. In caso venissero accidentalmente
scambiati, potrebbero trascorrere parecchie
settimane prima di ottenere nuovamente i
migliori risultati di rasatura.
3
Rimettete le testine di rasatura nell'unità di
rasatura. Rimettete il telaio di supporto
nell'unità di rasatura e ruotate in senso
orario.
4
Chiudete l'unità di rasatura.
Tagliabasette
Pulite il tagliabasette subito dopo l'uso.
1
Downloaded from www.Manualslib.com manuals search engine
Spegnete il rasoio, togliete la spina dalla
presa e lo spinotto dal rasoio.
ITALIANO
87
C
2
Pulite il tagliabasette con lo spazzolino
fornito.
C
3
Lubrificate i dentini del tagliabasette ogni
sei mesi, utilizzando una goccia di olio per
macchina per cucire.
Unità di carica
Per pulire l'unità di carica, utilizzate un panno
umido.
Come riporre l'apparecchio
evitare di danneggiare l'apparecchio,
C ◗ Per
inserire il cappuccio di protezione sul rasoio.
l'apparecchio nell'apposita custodia
C ◗ Riponete
oppure nel supporto per farlo asciugare.
Downloaded from www.Manualslib.com manuals search engine
88
ITALIANO
Sostituzione
le testine di rasatura non appena il
C ◗ Sostituite
simbolo dell'unità di rasatura inizia a
lampeggiare.
Sostituite le testine di rasatura danneggiate o
usurate esclusivamente con testine di rasatura
HQ9 Philips.
1
Spegnete il rasoio, togliete la spina dalla
presa e lo spinotto dal rasoio.
C
2
Premere il pulsante di sgancio per aprire
l'unità di rasatura.
C
3
Ruotate il pulsante di sgancio in senso
antiorario (1) e togliete il telaio di
supporto (2).
C
4
C
Togliete le testine e inserite quelle nuove
nell'unità di rasatura.
Assicurarsi che le sporgenze delle testine di
rasatura si inseriscano perfettamente nelle
rientranze.
5
Rimettete il telaio di supporto nell'unità di
rasatura (1) e ruotate il pulsante di sgancio
in senso orario (2).
6
Chiudete l'unità di rasatura.
Downloaded from www.Manualslib.com manuals search engine
ITALIANO
89
◗ Il simbolo dell'unità di rasatura si spegne
tenendo premuto il pulsante on/off per
6 secondi.
Accessori
Sono disponibili i seguenti accessori:
- Spinotto HQ8000
- Testine di rasatura HQ9 Philips.
- HQ110 Philips Head Cleaner
(spray per la pulizia delle testine).
- Cavo auto HQ8010
Ambiente
vita non gettare questo apparecchio
C ◗ Anellafinenormale
raccolta dei rifiuti, ma portalo
presso uno dei punti di raccolta autorizzati. In
questo modo contribuirai a preservare
l'ambiente.
◗ La batteria ricaricabile incorporata contiene
sostanze che potrebbero inquinare l'ambiente.
Togliete sempre la batteria prima di gettare
l'apparecchio o prima di portarlo presso un
centro di raccolta differenziata. Portate le
batterie presso un centro di raccolta
differenziato specifico per batterie. Se avete
problemi per togliere la batteria, potete
portare l'apparecchio presso un centro
assistenza Philips: il personale provvederà a
togliere la batteria senza danneggiare
l'ambiente.
Downloaded from www.Manualslib.com manuals search engine
90
ITALIANO
Come smaltire la batteria del rasoio
Togliete la batteria solo quando è completamente
scarica
C
1
Togliete la spina dalla presa di corrente e
lo spinotto dall'apparecchio.
2
Attendere che l'apparecchio si arresti,
quindi allentare le viti ed aprire il rasoio.
3
Togliete le batterie.
Non ricollegate l'apparecchio alla presa di
corrente dopo aver tolto le batterie.
Garanzia e Assistenza
Se avete bisogno di ulteriori informazioni o in
caso di problemi, vi preghiamo di visitare il sito
Philips www.philips.com oppure contattate il
Centro Assistenza Clienti Philips del vostro paese
(per conoscere il numero, consultate l'opuscolo
della garanzia). Qualora nel vostro paese non ci
sia un Centro Assistenza Clienti, contattate il
vostro rivenditore di fiducia oppure il Service
Department of Philips Domestic Appliances and
Personal Care BV (l'indirizzo e il numero di fax
sono riportati qui sotto).
Downloaded from www.Manualslib.com manuals search engine
ITALIANO
91
Ricerca e risoluzione guasti
1
B
B
Prestazioni di rasatura ridotte
Causa 1: le testine di rasatura sono sporche.
Il rasoio è stato risciacquato con acqua non
abbastanza calda o per un tempo non
sufficientemente lungo.
◗ Pulite accuratamente il rasoio prima di
continuare la rasatura.Vedere il capitolo
"Pulizia e manutenzione".
B
Causa 2. i peli lunghi stanno ostruendo le testine
di rasatura.
◗ Pulite lame e paralame con l'apposito
spazzolino fornito.Vedere il capitolo "Pulizia e
manutenzione", sezione "Ogni sei mesi: testine
di rasatura".
B
Causa 3: le testine di rasatura sono danneggiate o
usurate.
◗ Sostituite le testine di rasatura.Vedere il
capitolo "Sostituzione".
2
B
Il rasoio non funziona premendo il
pulsante on/off.
Causa 1: la batteria è scarica.
◗ Ricaricate la batteria.Vedere il capitolo
"Ricarica".
Downloaded from www.Manualslib.com manuals search engine
92
ITALIANO
B
Causa 2: l'apparecchio non è stato collegato alla
presa di corrente.
◗ Inserite la spina nella presa.
C
3
B
L'unità di rasatura si è staccata dal rasoio.
Causa: l'unità di rasatura non è stata inserita
correttamente.
◗ Se l'unità di rasatura si stacca dal rasoio,
potete rimetterla facilmente a posto ("click").
Downloaded from www.Manualslib.com manuals search engine
PORTUGUÊS
93
Importante
Antes da primeira utilização, leia estas instruções
com atenção e guarde-as para uma eventual
consulta futura.
C
C
C
◗ Use apenas a ficha fornecida.
◗ A ficha transforma 100-240 volts numa
voltagem segura e baixa inferior a 24 volts.
◗ A ficha de ligação integra um transformador.
Não corte a ficha para a substituir por uma
outra, porque isso poderá provocar uma
situação perigosa.
◗ Nunca utilize uma ficha que esteja estragada.
◗ Se a ficha estiver estragada, só deverá ser
substituída por uma peça de origem para se
evitarem situações gravosas para o utilizador.
◗ A ficha de ligação não deve ser molhada.
◗ Carregue e guarde a máquina numa
temperatura entre 5cC e 35cC.
◗ Nunca mergulhe o carregador dentro de água
nem o enxague à torneira.
◗ Não recarregue a máquina de barbear dentro
da bolsa fechada.
◗ Antes de limpar à torneira, desligue a máquina
da corrente.
◗ A máquina está conforme as regulamentações
de segurança IEC aprovadas
internacionalmente e pode ser lavada à
torneira com total segurança.
Tenha cuidado com a água quente.Verifique
sempre se não está demasiado quente para evitar
queimar as mãos.
Downloaded from www.Manualslib.com manuals search engine
94
PORTUGUÊS
Carga
Antes de começar a carga, certifique-se que a
máquina está desligada.
A carga da máquina normalmente demora cerca
de 1 hora.
Poderá igualmente barbear-se sem carregar a
máquina, bastando que a ligue à corrente.
Indicações de carga
Carga
se começa a carregar uma máquina
C ◗ Quando
vazia, a luz de baixo fica encarnada. Quando a
bateria já contém energia suficiente para fazer
uma barba, todas as luzes começam a piscar
sequencialmente na cor verde.
Carga
a pilha atinge a carga total, todas as
C ◗ Quando
luzes verdes estão acesas.
Algumas horas após a carga, todas as luzes se
apagam.
Downloaded from www.Manualslib.com manuals search engine
PORTUGUÊS
95
Capacidade de carga remanescente
quantidade de energia que resta na bateria
C ◗ Aé indicada
pelo número de luzes que
estiverem acesas.
A capacidade de energia restante é indicada
quando se desliga a máquina da corrente ou
quando se liga e desliga no interruptor.
- Se todas as luzes estiverem verdes, a pilha está
com 100% de carga.
- Quando a luz de baixo acende na cor verde, a
pilha está com 20% de capacidade.
Pilha fraca
a bateria começa a ficar fraca, a luz
C ◗ Quando
de baixo acende-se a encarnado.
Quando se desliga a máquina, esta luz pisca
algumas vezes.
Barbear sem fio
Uma máquina totalmente carregada terá
autonomia de até 80 minutos para funcionar sem
fio.
Carga da máquina
C
1
Introduza a ficha de ligação do aparelho na
máquina de barbear.
2
Ligue a ficha à tomada de corrente.
Downloaded from www.Manualslib.com manuals search engine
96
PORTUGUÊS
3
Quando a bateria estiver com carga total,
desligue o cabo de alimentação da
corrente e puxe a ficha de ligação para
fora da máquina.
Suporte de carga
A máquina também pode ser carregada
colocando-a no suporte, se este for fornecido.
Nunca mergulhe o carregador dentro de água
nem o enxague à torneira.
a máquina correctamente no
C ◗ Coloque
suporte ligado à corrente.
A luz de baixo acende a encarnado.
C ◗ Retire a máquina do suporte sem a inclinar.
Retirar e colocar o relógio
C
1
Rode o relógio para a esquerda (1)
('clique!') e puxe-o para fora (2).
C
2
Introduza o relógio (1) e rode-o para a
direita (2) ('clique!').
Downloaded from www.Manualslib.com manuals search engine
PORTUGUÊS
97
Acerto do relógio
as horas premindo o pequeno botão
C ◗ Acerte
na parte de trás do relógio.
As horas só podem ser acertadas para a frente.
Substituição da pilha
C
1
Retire a tampa. Retire a pilha com o auxílio
de uma chave de parafusos miniatura.
C
2
Introduza uma pilha nova e volte a colocar
a tampa.
Utilização
Personal Comfort Control
função Personal Comfort Control adapta a
C ◗ Amáquina
de barbear ao seu tipo de pele.
- Pode programar a máquina para 'Normal' para
obter um barbear rápido, confortável e
apurado.
- Pode programar a máquina para 'Sensitive' para
obter um barbear apurado e com o máximo
de conforto.
Downloaded from www.Manualslib.com manuals search engine
98
PORTUGUÊS
posição 'S' é a mais adequada para peles
C ◗ Asensíveis.
'N' é a melhor para peles normais.
C ◗◗ AAsposição
posições intermédias são adequadas para
peles normais e sensíveis.
Fazer a barba
1
Ligue a máquina pressionando uma vez o
botão On/Off (ligar/desligar).
Quando se liga e se desliga a máquina, todas as
luzes e símbolos se acendem e é mostrada
durante alguns segundos a capacidade de energia
restante na bateria.
C
2
Passe as cabeças de corte rapidamente
sobre a pele, efectuando movimentos a
direito e em círculo.
- Obterá melhores resultados se a pele estiver
seca.
- A sua pele poderá precisar de 2 a 3 semanas
para se adaptar ao sistema de barbear Philips.
3
Downloaded from www.Manualslib.com manuals search engine
Desligue a máquina premindo o
interruptor uma vez.
PORTUGUÊS
C
4
99
Sempre que se servir da máquina coloquelhe a tampa de protecção para evitar
qualquer dano.
Aparador
Para aparar as patilhas e o bigode.
C
C
1
Abra o aparador empurrando o
comutador para baixo.
O aparador poderá ser activado com o motor
em funcionamento.
2
Feche o aparador com o dedo indicador.
Limpeza e manutenção
da torneira começa a piscar após
C ◗ Ocadasímbolo
barba para recordar que a máquina
precisa de ser limpa (excepto quando a luz de
baixo estiver encarnada).
Uma limpeza regular é garantia de melhores
resultados.
◗ Se indicado, pode usar a máquina da roupa
para limpar a máquina. Consulte o folheto de
instruções em separado.
Downloaded from www.Manualslib.com manuals search engine
100
PORTUGUÊS
A maneira normal de limpar a máquina será
enxaguando a unidade de corte e a câmara de
recolha dos pêlos com água quente sempre que
se servir da máquina.
Tenha cuidado com a água quente.Verifique
sempre se não está demasiado quente para evitar
queimar as mãos.
Diariamente: unidade de corte e câmara de
recolha dos pêlos
1
Desligue a máquina, retire o cabo de
alimentação da tomada eléctrica e puxe a
ficha de ligação para fora da máquina.
C
2
Prima o botão para abrir a unidade de
corte.
C
3
C
Lave a unidade de corte e a câmara de
recolha dos pêlos, mantendo-a sob um
jacto de água quente durante algum
tempo.
Verifique se o interior da unidade de corte e da
câmara de recolha dos pêlos ficaram bem limpos.
4
Enxague a parte exterior da máquina.
5
Feche a unidade de corte e sacuda o
excesso de água.
Nunca seque a unidade de corte com uma toalha
ou qualquer tecido porque poderá danificar as
cabeças.
Downloaded from www.Manualslib.com manuals search engine
PORTUGUÊS
C
101
6
Abra novamente a unidade de corte e
deixe-a aberta para permitir que a
máquina seque completamente.
A câmara de recolha dos pêlos também pode ser
limpa a seco, utilizando para o efeito a escova
fornecida.
Todos os seis meses: cabeças
C
1
Abra a unidade de corte, rode o fecho
para a esquerda (1) e retire a armação (2).
2
Limpe as lâminas e as guardas com a
escova fornecida.
Não limpe mais do que um conjunto
lâmina/guarda de cada vez já que constituem
pares. Se, por acaso, alterar os conjuntos
lâmina/guarda, a eficácia da máquina diminuirá e
só passadas algumas semanas voltará ao normal.
3
Volte a colocar as cabeças na unidade de
corte.Volte a colocar a armação na
unidade de corte e rode-a para a direita.
4
Feche a unidade de corte.
Aparador
Limpe o aparador sempre que o utilizar.
1
Downloaded from www.Manualslib.com manuals search engine
Desligue a máquina, retire o cabo de
alimentação da tomada eléctrica e puxe a
ficha de ligação para fora da máquina.
102
PORTUGUÊS
C
2
Limpe o aparador com a escova fornecida.
C
3
A cada seis meses, lubrifique os dentes do
aparador com uma gota de óleo para
máquinas de costura.
Suporte de carga
O suporte de carga pode ser limpo com um
pano húmido.
Arrumação
evitar danos, coloque a tampa de
C ◗ Para
protecção na máquina.
a máquina dentro da bolsa ou
C ◗ Guarde
coloque-a no suporte para secar.
Downloaded from www.Manualslib.com manuals search engine
PORTUGUÊS
103
Substituição
as cabeças logo que o símbolo da
C ◗ Substitua
unidade de corte comece a piscar.
Substitua as cabeças estragadas ou gastas apenas
por cabeças Philips HQ9.
1
Desligue a máquina, retire a ficha da
tomada de corrente e puxe a ficha de
ligação para fora da máquina.
C
2
Prima o botão para abrir a unidade de
corte.
C
3
Rode o fecho para a esquerda (1) e retire
a armação (2).
C
4
C
Retire as cabeças e coloque as cabeças
novas na unidade de corte.
Certifique-se que as saliências existentes nas
cabeças encaixam perfeitamente nos seus
alojamentos.
5
Volte a colocar a armação na unidade de
corte (1) e rode o fecho para a direita (2).
6
Feche a unidade de corte.
◗ O símbolo da unidade de corte apaga-se se
mantiver o botão de ligar/desligar premido
durante 6 segundos.
Downloaded from www.Manualslib.com manuals search engine
104
PORTUGUÊS
Acessórios
Estão disponíveis os seguintes acessórios:
- HQ8000 Ficha de ligação
- HQ9 Cabeças Philips.
- HQ110 Philips Head Cleaner
(spray para limpeza das cabeças).
- HQ8010 Fio para o carro.
Meio ambiente
chegar a altura de se desfazer do
C ◗ Quando
aparelho, não o deite fora juntamente com o
seu lixo doméstico normal. Deverá colocá-lo
num ponto de recolha oficial para efeitos de
reciclagem.Ao fazê-lo, estará a contribuir para
a preservação do meio ambiente.
◗ A bateria recarregável integrada contém
substâncias susceptíveis de poluirem o
ambiente. Retire sempre a bateria antes de se
desfazer da máquina ou, então, entregue-a
num ponto oficial de recolha desse tipo de
resíduos.As baterias devem ser colocadas nos
ecopontos (pilhão). Se tiver problemas para
retirar a bateria, poderá sempre dirigir-se a
um concessionário autorizado pela Philips que
se encarregará de remover a bateria e de se
desfazer dela de forma a respeitar as normas
de protecção ambiental.
Downloaded from www.Manualslib.com manuals search engine
PORTUGUÊS
105
Como desfazer-se da bateria da máquina
A bateria só deve ser retirada se estiver
totalmente vazia.
C
1
Retire o cabo de alimentação da tomada
de corrente e puxe a ligação para fora da
máquina.
2
Deixe a máquina a trabalhar até parar,
desaperte os parafusos e abra a máquina
de barbear.
3
Retire a bateria.
A máquina de barbear não deverá ser ligada
novamente à corrente depois de lhe ser retirada
a bateria.
Garantia e assistência
Se precisar de informações ou se tiver algum
problema, por favor visite a página da Philips na
Internet em www.philips.pt ou contacte o
Centro de Informação ao Consumidor Philips do
seu país (encontrará os números de telefone no
folheto da garantia mundial). Se não existir um
Centro de Informação ao Consumidor no seu
país, por favor dirija-se ao seu distribuidor Philips
local ou contacte o Departamento de Service da
Philips Domestic Appliances and Personal Care
BV.
Downloaded from www.Manualslib.com manuals search engine
106
PORTUGUÊS
Resolução de problemas
1
B
B
Reduzida performance no barbear
Causa 1: As cabeças estão sujas.
A máquina de barbear não tem sido lavada com
a frequência necessária ou não tem sido lavada
com água suficientemente quente.
◗ Limpe a máquina cuidadosamente antes de
continuar a fazer a barba.Vidé capítulo
'Limpeza e manutenção'.
B
Causa 2: há pêlos compridos a obstruir as
cabeças.
◗ Limpe as lâminas e as guardas com a escova
fornecida. Consulte o capítulo 'Limpeza e
manutenção', secção 'De seis em seis meses:
cabeças'.
B
Causa 3: as cabeças estão estragadas ou gastas.
◗ Substitua as cabeças.Vidé capítulo
'Substituição'.
2
B
A máquina não funciona quando se prime
o interruptor.
Causa 1: a bateria está vazia.
◗ Recarregue a bateria.Vidé capítulo 'Carga'.
B
Downloaded from www.Manualslib.com manuals search engine
Causa 2: a máquina não está ligada à corrente.
PORTUGUÊS
107
◗ Ligue a ficha à tomada eléctrica.
C
3
B
A unidade de corte saiu para fora da
máquina.
Causa: a unidade de corte não ficou colocada
correctamente.
◗ Se a unidade de corte se soltar da máquina,
poderá recolocá-la facilmente ('clique!').
Downloaded from www.Manualslib.com manuals search engine
108
TÜRKÇE
Önemli
Lütfen cihazı kullanmadan önce verilen talimatları
okuyun. İleride başvurmak için bu talimatları
saklayın.
C
C
C
◗ Cihazı şarj etmek için sadece cihaz ile birlikte
satılan şarj aletini kullanınız.
◗ Güç fişi 100-240 volt'u 24 volt'a
çevirmektedir.
◗ Güç fişinin içerisinde bir dönüştürücü
bulunmaktadır.Tehlikeli bir duruma sebep
olabileceğinden, güç fişini başka bir fişle
değiştirmek için kesmeyin.
◗ Hasarlı güç fişini kullanmayın.
◗ Cihazın güçfişi hasarlıysa, daha fazla hasara yol
açmamak için mutlaka orjinal modeli ile
değiştirilmelidir.
◗ Güç fişinin ıslanmamasına özen gösterin.
◗ Cihazı 5cC ila 35cC arasında şarj edin,
saklayın ve kullanın.
◗ Şarj ünitesini kesinlikle suya batırmayınız ve
suda yıkmayınız.
◗ Cihazı kapalı kılıf içinde şarj etmeyiniz.
◗ Cihazı musluk altında yıkamadan önce fişini
prizden çekin.
◗ Cihaz uluslararası IEC güvenlik uygulamaları
tarafından onaylanmıştır. Musluk suyu altında
yıkanabilir.
Sıcak suya dikkat edin. Ellerinizin yanmaması için
daima suyun çok sıcak olmadığını kontrol edin.
Downloaded from www.Manualslib.com manuals search engine
TÜRKÇE
109
Şarj etme
Cihazı şarj etmeden önce kapalı konumda
olduğundan emin olun.
Cihazı ilk kez kullandığınızda veya uzun müddet
kullanmadıysanız yaklaşık 4 saat şarj edin. Normal
şarj süresi yaklaşık 1 saattir.
Cihazı şarj etmeden de hemen elektriğe
bağlayarak tıraş olabilirsiniz.
Şarj göstergeleri
Şarj etme
boş olan tıraş makinesini şarj ettiğinizde,
C ◗ Pili
en alttaki ışık kırmızı renkte yanar. Pil bir
tıraşlık için yeterli güçte ise, tüm ışıklar ardı
sıra yeşil renkte yanmaya başlar.
Pil tamamen dolu iken
tamamen dolu iken, tüm ışıklar yeşil renkte
C ◗ Pil
yanar.
Şarjdan birkaç saat sonra, tüm ışıklar söner.
Downloaded from www.Manualslib.com manuals search engine
110
TÜRKÇE
Kalan pil kapasitesi
C ◗ Yanan ışıkların sayısı, pilin kalan gücünü belirtir.
Cihazın fişini prizden çektiğinizde veya cihazı
kapattığınızda, kalan pil kullanım kapasitesi
göstergede belirtilecektir.
- Tüm ışıklar yeşil renkte yandığında, pil %100
şark olmuştur.
- En alttaki ışık yeşil yandığında, pilde %20
kullanım kapasitesi kaldığı belirtilir.
Pil zayıf iken
zayıfladığında, en alttaki ışık kırmızı renkte
C ◗ Pil
yanar.
Tıraş makinesini kapattığınızda, ışık bir kaç defa
yanıp söner.
Kordonsuz tıraş olma süresi
Tamamen şarj olmuş bir tıraş makinesinin
ortalama 80 dakika kordonsuz tıraş süresi vardır.
Cihazın şarj edilmesi
C
1
Cihazın fişini tıraş makinesine takın.
2
Güç fişinin fişini duvar prizine takın.
3
Cihazın pili tamamen şarj olduğunda, şarj
cihazının fişini prizden, cihazın fişini şarj
cihazından çekin.
Downloaded from www.Manualslib.com manuals search engine
TÜRKÇE
111
Şarj standı
Cihaz ile birlikte verilmişse, cihazı şarj ünitesi
üzerine yerleştirerek şarj edebilirsiniz.
Şarj ünitesini kesinlikle suya batırmayınız ve suda
yıkmayınız.
makinasını şarj cihazına doğru yerleştirin.
C ◗EnTıraş
alttaki ışık kırmızı renkte yanar.
makinesini şarj cihazından eğmeden
C ◗ Tıraş
çıkartın.
Saatin çıkarılması ve takılması
C
1
Saat tersi yönünde saati çevirin(1) ('klik')
ve dışarı çekin (2).
C
2
Saati yerine takın (1) ve saat yönünde (2)
çevirin ('klik').
Downloaded from www.Manualslib.com manuals search engine
112
TÜRKÇE
Saatin ayarlanması
arka kısmında yer alan küçük düğmeye
C ◗ Saatin
basarak saati ayarlayın.
Saat yalnızca ileriye yönelik ayar edilir.
Pilin değiştirilmesi
C
1
Kapağı çıkartın. Küçük tornavida yardımı ile
pili yerinden çıkartın.
C
2
Yeni pili yerine yerleştirerek kapağı yerine
takın.
Cihazın kullanımı
Personal Comfort Control
Rahatlık Kontrol sistemi sayesinde tıraş
C ◗ Kişisel
makinesi cilt tipinize uyum sağlar.
- Cihazı 'Normal' ayara getirerek hızlı ve rahat
yakın tıraş olabilirsiniz.
- Cihazı 'Hassas' ayara getirerek rahat ve yakın
tıraş olabilirsiniz.
Downloaded from www.Manualslib.com manuals search engine
TÜRKÇE
113
C ◗ 'S' pozisyonu hassas ciltler için idealdir.
ppozisyonu normal ciltler için idealdir.
C ◗◗ 'N'
'In-between' pozisyonu normal ve hassas cilt
arasında hassasiyeti olanlar için idealdir.
Tıraş olma
1
Açma/kapama düğmesine bir kez basarak
tıraş makinesini çalıştırın.
Tıraş makinesini açıp/kapattığınızda, tüm ışıklar ve
semboller ve kalan pil kapasitesi bir kaç saniye
zamanla gösterge ekranında gösterilir.
C
C
2
Düz ve dairesel hareketler yaparak hızlı bir
şekilde tıraş başlığını cildinizin üzerinde
dolaştırınız.
- Kuru cilt üzerinde yapılan tıraş en iyi sonucu
verir.
- Cildinizin Philips tıraş sistemine alışması 2 ile 3
hafta sürebilir.
3
Açma/kapama düğmesine bir kez basarak
cihazı kapatın.
4
Tıraş makinesinin başlıklarını her
kullanımdan sonra koruyucu kapak ile
kapatın.
Downloaded from www.Manualslib.com manuals search engine
114
TÜRKÇE
Düzeltici
Favori ve bıyık düzeltmek içindir.
C
C
1
Sürgüyü yukarıya doğru iterek düzelticiyi
açın.
Cihaz çalıştığında düzelticiyi aktif hale
getirebilirsiniz.
2
İşaret parmağınız ile düzelticiyi kapatın.
Temizlik & bakım
makinesinin temizlenmesi gerektiğini
C ◗ Tıraş
belirten musluk sembolü göstergede yanıp
sönmeye başlar ( yalnız en alltaki ışık kırmızı
renkte yanmadığında)
Cihazı düzenli olarak temizlemek daha iyi tıraş
performansını sağlar.
◗ Tedarik edilmişse, tıraş makinesini temizlemek
için yıkama makinesini kullanın.Talimatları
incelemek için diğer kullanma kitapçığına
bakın.
Cihazı temizlemenin en kolay ve en hijyenik yolu,
her kullanımdan sonra, tıraş ünitesini ve kıl
haznesini sıcak suyla durulayarak temizlemektir.
Downloaded from www.Manualslib.com manuals search engine
TÜRKÇE
115
Sıcak suya dikkat edin. Ellerinizin yanmaması için
daima suyun çok sıcak olmadığını kontrol edin.
Hergün:Tıraş Ünitesi ve Kıl toplama haznesi
1
Tıraş makinasını kapatarak, şarj cihazının
fişini prizden ve tıraş makinasından çekiniz.
C
2
Tıraş ünitesini açmak için kapak açma
düğmesine basınız.
C
3
C
Tıraş ünitesini ve kıl haznesini belirli bir
müddet sıcak su musluğunun altına tutmak
suretiyle temizleyiniz.
Tıraş ünitesinin içinin ve kıl haznesinin tam olarak
temizlenmesine özen gösterin.
4
Cihazın dış kısmını durulayın.
5
Tıraş ünitesini kapatın, kalan suyu silkeleyin.
Tıraş ünitesini kuruturken kesinlikle havlu veya
peçete kullanmayınız.Tıraş başlıklarına zarar
verebilirsiniz.
C
6
Tıraş ünitesini tekrar açarak kuruması için
açık bırakınız.
Kıl toplama haznesini su kullanmadan da cihaz ile
birlikte satılan fırça yardımı ilede temizleyebilirsiniz.
Downloaded from www.Manualslib.com manuals search engine
116
TÜRKÇE
Her altı ay: tıraş başlıkları
C
1
Tıraş ünitesini açarak, kilidi saat yönünün
tersine (1) döndürerek, tutucu çerçeveyi
(2) çıkartın.
2
Fırça ile kesici ve koruyucu parçaları
temizleyin.
Her seferinde ancak bir bıçak ve koruyucu parça
takımını temizleyiniz. Bunlar birbirlerini
bilemişlerdir. Bıçakları ve koruyucu parçaları
birbirine karıştırırsanız, tekrar en iyi tıraş
performansına ulaşılması haftalarca sürebilir.
3
Tıraş başlıklarını tıraş ünitesine takın.
Tutucu çerçeveyi yeniden tıraş ünitesine
yerleştirerek saat yönünde çevirin.
4
Tıraş ünitesini kapatınız.
Düzeltici
Her kullanımdan sonra düzelticiyi temizleyiniz.
C
C
1
Tıraş makinasını kapatarak, şarj cihazının
fişini prizden ve tıraş makinasından çekiniz.
2
Düzelticiyi fırçayla temizleyiniz.
3
Düzelticinin dişlerini her altı ayda bir, bir
damla dikiş makinası yağıyla yağlayınız.
Downloaded from www.Manualslib.com manuals search engine
TÜRKÇE
117
Şarj standı
Şarj ünitesini nemli bezle silerek temizleyin.
Saklama
C ◗ Tıraş makinesine koruyucu kapağı takın.
saklama kılıfı içinde saklayın veya
C ◗ Cihazı
kuruması için standa yerleştirin.
Değiştirme
ünitesi sembolü yanıp sönmeye başladığı
C ◗ Tıraş
zaman tıraş başlıklarını değiştirin.
Yıpranmış ve zarar görmüş tıraş başlıklarını sadece
Philips HQ9 Philips tıraş başlıkları ile değiştirin.
C
1
Tıraş makinesini kapatarak, güç fişini
prizden çıkartın ve cihaz fişini tıraş
makinesinden çekin.
2
Açma düğmesine basarak tıraş ünitesini
açın.
Downloaded from www.Manualslib.com manuals search engine
118
TÜRKÇE
C
3
C
4
C
Çarkı saat yönünün tersine (1)
döndürerek, tutucu çerçeveyi (2) çıkartın.
Tıraş başlıklarını çıkartarak yeni tıraş
başlıklarını tıraş ünitesine yerleştirin.
Tıraş başlıklarının çıkıntılarının yerlerine doğru
yerleştiğinden emin olun.
5
Tutucu çerçeveyi tekrar tıraş ünitesine
yerleştirin (1) ve saat yönünde çevirin (2).
6
Tıraş ünitesini kapatın.
◗ Açma/kapama düğmesine 6 saniye basılı
tutarsanız tıraş ünitesi sembolü göstergeden
yok olacaktır.
Aksesuarlar
Belirtilen aksesuarlar bulunmaktadır:
- HQ8000 güç fişi.
- HQ9 Philips tıraş başlıkları
- HQ110 Philips tıraş başlığı temizleyici
(tıraş başlığı temizleme spreyi)
- HQ8010 araba kiti
Downloaded from www.Manualslib.com manuals search engine
TÜRKÇE
119
Çevre
hurdaya ayırırken, çevreye zarar
C ◗ Cihazı
vermemek amacı ile normal ev çöpüne
kesinlikle atmayın. Özel toplama noktalarına
teslim edin.
◗ Şarj pilleri içerdikleri kimyasallar yüzünden
çevreye zararli olabilirler. Cihazı hurdaya
ayırmadan önce mutlaka içindeki pilleri
çıkartın ve özel toplama noktalarına teslim
edin. Pilleri özel toplama noktalarında imha
edin. Pilleri çıkarmakta güçlük çekerseniz,
cihazı Philips yetkili servislerine götürüp aynı
işlemi oradada yaptırabilirsiniz.
Kassering af batteriet
Tamamen şarj gücü bitmiş pili yerinden çıkartın.
C
1
Güçfişini duvar prizinden çıkarın ve cihazın
fişinide tıraş makinasından çıkarın.
2
Duruncaya kadar cihazı çalıştırınız.Vidaları
sökünüz ve cihazı açınız.
3
Pili çıkartın.
Pili cihazdan çıkardıktan sonra, cihazın fişini prize
takmayın.
Downloaded from www.Manualslib.com manuals search engine
120
TÜRKÇE
Garanti & Servis
Eğer daha fazla bilgiye ihtiyaç duyarsanız veya bir
problem yaşarsanız, lütfen Philips Web sitesini
www.philips.com.tr adresinden ziyaret ediniz veya
ülkenizde bulunan Philips Müşteri Danışma
Merkezi ile iletişime geçiniz (dünya genelindeki
telefon numaraları verilen garanti belgeleri
içerisinde bulabilirsiniz). Eğer ülkenizde Müşteri
Danışma Merkezi yoksa, yerel Philips yetkilinize
başvurun veya Philips Ev Aletleri ve Kişisel Bakım
BV Servis Departmanı ile iletişime geçin.
0 800 261 33 02
Sorun giderme
1
B
B
Azalan tıraş performansı
Sebep 1: tıraş başlıkları kirli.
Cihaz yeterince uzun durulanarak temizlenmedi
veya kullanılan su yeterince sıcak değildi.
◗ Tıraş devam etmeden önce cihazı temizleyin.
Bkz. "Temizlik ve bakım" bölümü
B
Sebep 2: Uzun kıllar tıraş başlıklarının çalışmasını
önlüyor.
◗ Fırça ile bıçak ve koruyucu parçaları
temizleyin. Bkz. "Temizlik ve bakım" "Her altı
ayda bir": tıraş başlıkları bölümü
B
Downloaded from www.Manualslib.com manuals search engine
Sebep 3: tıraş başlıkları zarar görmüş veya
aşınmıştır.
TÜRKÇE
121
◗ Tıraş başlıklarını değiştirin.Bkz. " Değiştirme"
bölümü
2
B
Açma/kapama düğmesine basıldığında tıraş
makinesi çalışmıyor.
Sebeb: Pil boştur.
◗ Pili tekrar şarj edin Bkz. 'Şart etme' bölümü.
B
Sebeb 2: Cihazın fişi prize takılı değildir.
◗ Güç fişinin fişini duvar prizine takın.
C
3
B
Tıraş ünitesi cihazdan çıkıyor.
Sebeb:Tıraş ünitesi doğru olarak takılmamıştır.
◗ Tıraş ünitesi tıraş makinesinden çıktığında,
kolaylıkla yerine tekrar takılabilir ('klik').
Downloaded from www.Manualslib.com manuals search engine
122
4222 002 44744
Downloaded from www.Manualslib.com manuals search engine