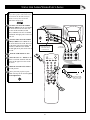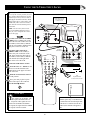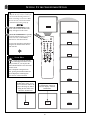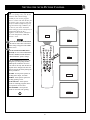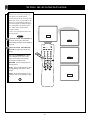
1
Color
Television
Your Television’s
Directions for Use
Read this manual first!
Congratulations on purchasing this Philips product.
We’ve included everything you need to get started.
If you have any problems, Philips Representatives can
help you get the most from your new product by explaining:
• Hookups,
• First Time Setup, and
• Feature Operation.
Do not attempt to return this product to the store.
For fast help, call us first!
1-800-531-0039
Thank you for making Philips a part of your home!
3121 235 20121
Return your Warranty Registration card today to ensure you
receive all the benefits you’re entitled to.
Once your MAGNAVOX purchase is registered, you’re eligible to receive all the privileges of owning
a MAGNAVOX product. So complete and return the Warranty Registration Card enclosed with your
purchase at once. And take advantage of these important benefits.
Owner
Confirmation
Model
Registration
Registering your product within
10 days confirms your right to
maximum protection under the
terms and conditions of your MAGNAVOX warranty.
Your completed Warranty
Registration Card serves as
verification of ownership in the
event of product theft or loss.
Returning your Warranty
Registration Card right away guarantees you’ll receive all the information and special offers which
you qualify for as the owner of your
model.
S REG
D
ry!
r
u
H
IT
AY
RATION
EEDED W
Congratulations on your purchase,
and welcome to the “family!”
ST
N
I
Warranty
Verification
HIN 10
Dear MAGNAVOX product owner:
Thank you for your confidence in MAGNAVOX. You’ve selected one of the best-built, best-backed
products
available today. And we’ll do everything in our power to keep you happy with your purchase for many
years to come.
As a member of the MAGNAVOX “family,” you’re entitled to protection by one of the most comprehensive warranties and outstanding service networks in the industry.
What’s more, your purchase guarantees you’ll receive all the information and special offers for which
you qualify, plus easy access to accessories from our convenient home shopping network.
And most importantly you can count on our uncompromising commitment to your total satisfaction.
All of this is our way of saying welcome–and thanks for investing in a MAGNAVOX product.
Sincerely,
P.S. Remember, to get the most from your MAGNAVOX
product, you must return your Warranty Registration
Card within 10 days. So please mail it to us right now!
Philips Consumer Electronics Company
Know these
t This “bolt of lightning” indicates uninsulated material within your unit which may cause an
safetysymbols
electrical shock. For the safety of everyone in your household, please do not remove product covering.
s The “exclamation point” calls attention to features for which you should read the enclosed literature closely to prevent operating and maintenance problems.
CAUTION
RISK OF ELECTRIC SHOCK
DO NOT OPEN
CAUTION: TO REDUCE THE RISK OF ELECTRIC SHOCK, DO NOT
REMOVE COVER (OR BACK). NO USER-SERVICEABLE PARTS
INSIDE. REFER SERVICING TO QUALIFIED SERVICE PERSONNEL.
WARNING: TO PREVENT FIRE OR SHOCK HAZARD, DO NOT EXPOSE THIS EQUIPMENT
TO RAIN OR MOISTURE.
CAUTION: To prevent electric shock, match wide blade of plug to wide slot, and fully insert.
ATTENTION: Pour éviter les chocs électriques, introduire la lame la plus large de la fiche dans la
borne correspondante de la prise et pousser jusqu’au fond.
Visit our World Wide Web Site at http://www.philipsusa.com
2
IMPORTANT SAFETY INSTRUCTIONS
Read before operating equipment
1.
2.
3.
4.
5.
6.
7.
8.
9.
10.
11.
12.
13.
14.
15.
Read these instructions.
Keep these instructions.
Heed all warnings.
Follow all instructions.
Do not use this apparatus near water.
Clean only with a dry cloth.
Do not block any of the ventilation openings. Install in
accordance with the manufacturers instructions.
Do not install near any heat sources such as radiators, heat
registers, stoves, or other apparatus (including amplifiers)
that produce heat.
Do not defeat the safety purpose of the polarized or grounding-type plug. A polarized plug has two blades with one
wider than the other. A grounding type plug has two blades
and third grounding prong. The wide blade or third prong
are provided for your safety. When the provided plug does
not fit into your outlet, consult an electrician for replacement
of the obsolete outlet.
Protect the power cord from being walked on or pinched
particularly at plugs, convenience receptacles, and the point
where they exit from the apparatus.
Only use attachments/accessories specified by the manufacturer.
Use only with a cart, stand, tripod, bracket, or table
specified by the manufacturer, or sold with the apparatus. When a cart is used, use caution when
moving the cart/apparatus combination to avoid
injury from tip-over.
Unplug this apparatus during lightning storms or when
unused for long periods of time.
Refer all servicing to qualified service personnel. Servicing
is required when the apparatus has been damaged in any
way, such as power-supply cord or plug is damaged, liquid
has been spilled or objects have fallen into apparatus, the
apparatus has been exposed to rain or moisture, does not
operate normally, or has been dropped.
This product may contain lead and mercury. Disposal of
these materials may be regulated due to environmental considerations. For disposal or recycling information, please
contact your local authorities or the Electronic Industries
Alliance: www.eiae.org
16. Damage Requiring Service - The appliance should be
serviced by qualified service personnel when:
A. The power supply cord or the plug has been damaged;
or
B. Objects have fallen, or liquid has been spilled into the
appliance; or
C. The appliance has been exposed to rain; or
D. The appliance does not appear to operate normally or
exhibits a marked change in performance; or
E. The appliance has been dropped, or the enclosure
damaged.
17. Tilt/Stability - All televisions must comply with recommended international global safety standards for tilt and stability
properties of its cabinet design.
• Do not compromise these design standards by applying
excessive pull force to the front, or top, of the cabinet which
could ultimately overturn the product.
• Also, do not endanger yourself, or children, by placing
electronic equipment/toys on the top of the cabinet. Such
items could unsuspectingly fall from the top of the set and
cause product damage and/or personal injury.
18. Wall or Ceiling Mounting - The appliance should be
mounted to a wall or ceiling only as recommended by the
manufacturer.
19. Power Lines - An outdoor antenna should be located away
from power lines.
20. Outdoor Antenna Grounding - If an outside antenna is
connected to the receiver, be sure the antenna system is
grounded so as to provide some protection against voltage
surges and built up static charges.
Section 810 of the National Electric Code, ANSI/NFPA No.
70-1984, provides information with respect to proper
grounding of the mats and supporting structure grounding of
the lead-in wire to an antenna discharge unit, size of
grounding connectors, location of antenna-discharge unit,
connection to grounding electrodes and requirements for
the grounding electrode. See Figure below.
21. Object and Liquid Entry - Care should be taken so that
objects do not fall and liquids are not spilled into the enclosure through openings.
Note to the CATV system installer: This reminder is provided to call the CATV system installer's attention to Article 820-40 of the NEC that provides
guidelines for proper grounding and, in particular, specifies that the cable ground shall be connected to the grounding system of the building, as close
to the point of cable entry as practical.
Example of Antenna Grounding
as per NEC - National Electric Code
GROUND CLAMP
ANTENNA LEAD IN WIRE
ANTENNA DISCHARGE UNIT (NEC SECTION 810-20)
GROUNDING CONDUCTORS (NEC SECTION 810-21)
GROUND CLAMPS
POWER SERVICE GROUNDING ELECTRODE SYSTEM (NEC ART 250, PART H)
ELECTRIC SERVICE EQUIPMENT
3
TABLE OF CONTENTS
Here are a few of the special features built into this new
Color Television:
Introduction
Welcome/Registration of Your TV . . . . . . . . . . . . . . . . . . .2
Safety Instructions . . . . . . . . . . . . . . . . . . . . . . . . . . . . . . .3
Table of Contents . . . . . . . . . . . . . . . . . . . . . . . . . . . . . . . .4
SmartLock™ feature allows you to block the viewing of
certain channels or external audio/video connections where
you might not want your children viewing inappropriate
material.
Picture Menu
How to Use the Picture Adjustment Controls . . . . .5
How to use the DNR (Digital Noise Reduction) Control . . . .6
How to use the Contrast + (Black Stretch) Control . . . . . . .7
Infrared Remote Control works your TV set, and allows
you to program certain features with the press of one button.
Can also be used with accessory devices such as VCRs,
DVDs, Cable Boxes, and more.
Sound Menu
Using the Treble, Bass, and Balance Controls . . . .8
How to Use the AVL Control . . . . . . . . . . . . . . . . . . . . . . .9
Setting the Incredible Surround Control . . . . . . . . . . . . . .10
Setting the TV for SAP (Secondary Audio Programs) . . . .11
Setting the TV to Receive Stereo Programming . . . . . . . .12
Let's
Look
Inside!
Audio/Video Jackpanel for direct connections of accessory
devices. Audio/Video Inputs and Outputs.
Standard broadcast (VHF/UHF) or Cable TV (CATV)
channel capability.
Features Menu
Using the Timer Controls . . . . . . . . . . . . . . . . . .13
Understanding the SmartLock Controls . . . . . . . . . . . . . .14
Setting Up the SmartLock Access Code . . . . . . . . . . . . . .15
How to Block Channels . . . . . . . . . . . . . . . . . . . . . . . . . .16
How to Clear All Channels at the Same Time . . . . . . . . . .17
How to Block All Channels at the Same Time . . . . . . . . .18
Blocking Programming Based on Movie Ratings . . . . . . .19
Blocking Programming Based on TV Ratings . . . . . . . . .20
Using the SmartLock Blocking Options . . . . . . . . . . . . . .21
How to Use the Closed Captioning Control . . . . . . . . . . .22
Closed Captioning allows the viewer to read TV program
dialogue or voice conversations as on-screen text.
Automatic Programming of Channels for quick and easy
selection of favorite stations available in your area.
On-screen Features (in either English or Spanish) show
helpful messages for setting of TV controls.
On Timer automatically turns the TV ON at a preset time,
and channel.
Sleeptimer automatically turns the TV OFF at preset times.
Audio/Video Connections
SmartPicture™ allows you to set the picture color, tint, contrast, etc. for various types of programming such as Sports,
Movies, Personal, Weak Signals or Multi Media with the
push of one button.
Using the A/V Inputs Jacks . . . . . . . . . . . . . . . . .23
Using the A/V Output Jacks . . . . . . . . . . . . . . . . . . . . . . .24
Using the S-Video Input Jack . . . . . . . . . . . . . . . . . . . . . .25
Remote Control Use
Setting up the Sleeptimer Option . . . . . . . . . . . . . .26
Setting the SmartPicture Control . . . . . . . . . . . . . .27
Setting the SmartSound Control . . . . . . . . . . . . . . . . . . . .28
Using the Surf Button (Alternate Channel) . . . . . . . . . . . .29
Remote Use with Accessory Devices (Direct Method) . . .30
Remote Use with Accessory Devices (Code Entry) . . . . .31
Remote Use with Accessory Devices (Search Method) . . .32
Remote Code Entry List . . . . . . . . . . . . . . . . . . . . . . .33-34
Remote VCR Related Buttons . . . . . . . . . . . . . . . . . . . . .35
SmartSound™ controls allow you to set the sound controls
for various types of listening programs such as Personal
(sound controls the way you set them), Theatre, Music, or
Voice with the push of one button.
Treble, Bass and Balance controls to enhance the television’s sound.
General Information
NOTE: It is possible that this owner's manual may be
used with several different television models. Not all
features (and drawings) discussed in this manual will
necessarily match those found with your television system. This is normal and does not require you contacting your dealer or requesting service.
Troubleshooting Tips . . . . . . . . . . . . . . . . . . . . . .36
Glossary of Terms . . . . . . . . . . . . . . . . . . . . . . . . . . . . . .37
Index . . . . . . . . . . . . . . . . . . . . . . . . . . . . . . . . . . . . . . . .37
Warranty . . . . . . . . . . . . . . . . . . . . . . . . . . . . . . . . . . . . 38
Magnavox™, SmartLock™, SmartPicture™, SmartSound™
are all registered trademarks of Philips Consumer Electronics Company.
Copyright © 2001 All rights reserved.
4
HOW TO USE THE PICTURE ADJUSTMENT CONTROLS
T
o adjust your TV picture controls,
select a channel and follow the
steps shown below:
Main
Picture
Sound
Features
Install
Press the MENU button on the
remote to display the on-screen menu.
Press the CURSOR UP 䊳 or
DOWN ■ buttons until the word PICTURE is highlighted.
Brightness
Color
Picture
Sharpness
Tint
More...
Picture
Brightness
Color
Picture
Sharpness
Tint
Color Temp.
Press the CURSOR RIGHT 䊳䊳
button to display the PICTURE menu
features.
Press CURSOR UP 䊳 or DOWN
■ buttons to scroll the Picture features
and highlight the control you wish to
adjust (Brightness, Color, Picture,
Sharpness, Tint, or Color Temp.).
Press the CURSOR RIGHT 䊳䊳
or the CURSOR LEFT 䊴䊴 buttons
to adjust the selected control or to make
selections for the Color Temp. control
(Normal, Warm, or Cool).
Press the CURSOR UP 䊳 or
DOWN ■ buttons to select and adjust
other Picture Menu controls.
POWER
7
SLEEP
A/CH
TV
STATUS/EXIT
RECORD
VCR
CC
CLOCK
1
2
3
4
5
6
7
8
ACC
1
SMART
29
4
6
SMART
0
SOUND
PICTURE
MENU
SURF
3
5
6
Picture
Brightness
Color
Picture
Sharpness
Picture
Tint
Brightness
Color Temp.
Color
Picture
Sharpness
Tint
Picture
Color
Temp.
Brightness
TV/VCR
CH
VOL
When finished, press the STATUS
/EXIT button to remove the menu
from the TV’s screen.
50
4
MUTE
2
SMART HELP
5
Color
Picture
Sharpness
Tint
Color Temp.
Picture
Brightness
Color
Picture
Sharpness
Tint
Color Temp.
Picture
Brightness
Color
Picture
Sharpness
Tint
Color Temp.
BRIGHTNESS Press the 䊳䊳
or 䊴䊴 buttons until darkest parts of
the picture are as bright as you prefer.
COLOR Press the 䊳䊳 or 䊴䊴 buttons to
add or eliminate color.
PICTURE Press the 䊳䊳 or 䊴䊴 buttons
until lightest parts of the picture show good
detail.
Picture
Brightness
Color
Picture
Sharpness
Tint
Color Temp.
SHARPNESS Press the 䊳䊳 or 䊴䊴 buttons to improve detail in the picture.
TINT Press the 䊳䊳 or 䊴䊴 buttons to
obtain natural skin tones.
COLOR TEMP Press the 䊳䊳 or 䊴䊴 buttons to select NORMAL, COOL, or WARM
picture preferences. (NORMAL will keep
the whites, white; COOL will make the
whites, bluish; and WARM will make the
whites, reddish.)
65
50
50
50
0
Normal
Warm
or
Cool
5
HOW TO USE THE DNR (NOISE REDUCTION) CONTROL
F
or reasons such as poor cable reception, the picture can sometimes
appear slightly “speckled” (or has signal
noise shown in the picture). The DNR
(Dynamic Noise Reduction) control can
help eliminate this type of interference
and improve the quality of the picture.
Main
Picture
Sound
Features
Install
Press the MENU button on the
remote to display the on-screen menu.
Brightness
Color
Picture
Sharpness
Tint
More...
Picture
Brightness
Color
Picture
Sharpness
Tint
Color Temp.
Press the CURSOR UP 䊳 or
CURSOR DOWN ■ button until the
word PICTURE is highlighted.
Press the CURSOR RIGHT 䊳䊳
button to display the PICTURE menu
features.
POWER
6
SLEEP
A/CH
Press the CURSOR UP 䊳 or
CURSOR DOWN ■ button to scroll
the Picture menu features until the word
DNR is highlighted.
Press the CURSOR RIGHT 䊳䊳
button turn the DNR feature ON or
OFF.
50
TV
STATUS/EXIT
RECORD
VCR
CC
CLOCK
TV/VCR
1
2
4
5
6
8
29
3
ACC
7
1
SMART
4
SMART
Picture
Color
Picture
Sharpness
Tint
Color Temp.
DNR
On
Picture
Color
Picture
Sharpness
Tint
Color Temp.
DNR
On
0
SOUND
PICTURE
MENU
SURF
When finished, press the STATUS
/EXIT button to remove the menu
from the TV’s screen.
3
CH
VOL
4
MUTE
2
5
SMART HELP
“Noise” Reduction is a video
adjustment feature that affects the
picture quality of the TV not the sound.
OR
Picture
Color
Picture
Sharpness
Tint
Color Temp.
DNR
6
Off
HOW TO USE THE CONTRAST + (BLACK STRETCH) CONTROL
T
he Contrast + (Black Stretch) control helps to “sharpen” the picture
quality. The black portions of the picture become richer in darkness and the
whites become brighter.
Main
Picture
Sound
Features
Install
Press the MENU button on the
remote to display the on-screen menu.
Press the CURSOR UP 䊳 or CURSOR DOWN ■ button until the word
PICTURE is highlighted.
Brightness
Color
Picture
Sharpness
Tint
More...
Press the CURSOR RIGHT 䊳䊳
button to display the PICTURE menu
features.
50
POWER
6
SLEEP
Press the CURSOR UP 䊳 or
CURSOR DOWN ■ button to scroll
the Picture menu features until the word
CONTRAST + is highlighted.
Press the CURSOR RIGHT 䊳䊳
button turn the CONTRAST + feature
ON or OFF.
Picture
Brightness
Color
Picture
Sharpness
Tint
Color Temp.
A/CH
TV
STATUS/EXIT
RECORD
VCR
CC
CLOCK
TV/VCR
1
2
4
5
6
8
29
3
ACC
7
1
SMART
4
SMART
0
SOUND
On
Picture
Color
Picture
Sharpness
Tint
Color Temp.
Contrast +
On
PICTURE
MENU
SURF
When finished, press the STATUS
/EXIT button to remove the menu
from the TV’s screen.
3
CH
VOL
4
Picture
Picture
Sharpness
Tint
Color Temp.
DNR
Contrast +
MUTE
2
5
OR
Picture
Color
Picture
Sharpness
Tint
Color Temp.
Contrast +
7
Off
HOW TO ADJUST THE BASS, TREBLE, BALANCE CONTROLS
B
esides the normal volume level control, your TV also has Bass, Treble
and Balance sound controls. The TREBLE control effects only the high frequency sound coming from the TV
enhancing the highs; while the BASS
control effects only the low frequency
sound coming from the TV enhancing
the lows. The Balance control adjusts
the sound level being heard from each
speaker.
Main
Picture
Sound
Features
Install
Brightness
Color
Picture
Sharpness
Tint
More...
Main
Picture
Sound
Features
Install
Treble
Bass
Balance
AVL
Incr. Surround
More...
Press the MENU button on the
remote to display the on-screen menu.
Press the CURSOR UP 䊳 or CURSOR DOWN ■ button until the word
SOUND is highlighted.
POWER
A/CH
Press the CURSOR RIGHT 䊳䊳
button to display the SOUND menu
features.
Press the CURSOR UP 䊳 or
CURSOR DOWN ■ button to scroll
the Sound menu features until the
words TREBLE, BASS or BALANCE
are highlighted.
TV
STATUS/EXIT
RECORD
VCR
CC
Sound
Treble
Bass
Balance
AVL
Incr. Surround
SAP
CLOCK
TV/VCR
1
2
4
5
7
8
3
ACC
1
SMART
6
29
4
50
SMART
0
SOUND
PICTURE
MENU
OR
SURF
5
3
Press the CURSOR RIGHT 䊳䊳
or LEFT 䊴䊴 button to adjust the
Treble, Bass or Balance controls.
When finished, press the STATUS
/EXIT button to remove the menu
from the TV’s screen.
6
SLEEP
CH
VOL
4
MUTE
2
5
Sound
Treble
Bass
Balance
AVL
Incr. Surround
SAP
50
OR
Sound
Treble
Bass
Balance
AVL
Incr. Surround
SAP
8
L
R
HOW TO USE THE AVL (AUTOMATIC VOLUME LEVELER) CONTROL
I
n most cases, the volume levels coming from broadcast programming or
commercials are never the same. With
the AVL (Audio Volume Leveler) control
turned ON, you can have the TV level
out sound that is being heard. This
makes for a more consistent sound by
reducing the peaks and valleys that
occur during program changes or commercial breaks. To turn the AVL ON,
follow these steps.
Main
Picture
Sound
Features
Install
Brightness
Color
Picture
Sharpness
Tint
More...
Main
Picture
Sound
Features
Install
Treble
Bass
Balance
AVL
Incr. Surround
More...
Press the MENU button on the
remote to display the on-screen menu.
Press the CURSOR UP 䊳 or CURSOR DOWN ■ button until the word
SOUND is highlighted.
POWER
A/CH
Press the CURSOR RIGHT 䊳䊳
button to display the SOUND menu
features.
Press the CURSOR UP 䊳 or
CURSOR DOWN ■ button to scroll
the Sound menu features until the word
AVL is highlighted.
6
SLEEP
TV
STATUS/EXIT
RECORD
VCR
CC
TV/VCR
1
2
4
5
6
8
29
3
ACC
7
1
SMART
4
50
SMART
0
SOUND
PICTURE
MENU
SURF
Press the CURSOR RIGHT 䊳䊳
button to turn the AVL control ON or
OFF.
3
CH
VOL
When finished, press the STATUS
/EXIT button to remove the menu
from the TV’s screen.
Sound
Treble
Bass
Balance
AVL
Incr. Surround
SAP
CLOCK
4
2
MUTE
5
Sound
Treble
Bass
Balance
AVL
Incr. Surround
SAP
Off
OR
Sound
Treble
Bass
Balance
AVL
Incr. Surround
SAP
9
On
SETTING THE INCREDIBLE SURROUND CONTROL
T
he Incredible Surround feature
adds greater depth and dimension to
both monaural (MONO) and stereo TV
sound. With the control turned ON the
TV's speakers can add even wider
sound separation to normal broadcasts.
Main
Picture
Sound
Features
Install
Press the MENU button on the
remote to display the on-screen menu.
Press the CURSOR UP 䊳 or CURSOR DOWN ■ button until the word
SOUND is highlighted.
Brightness
Color
Picture
Sharpness
Tint
More...
Main
Picture
Sound
Features
Install
Treble
Bass
Balance
AVL
Incr. Surround
More...
Press the CURSOR RIGHT 䊳䊳
button to display the SOUND menu
features.
Press the CURSOR UP 䊳 or
CURSOR DOWN ■ button to scroll
the Sound menu features until the
words INCR. SURROUND are highlighted.
Press the CURSOR RIGHT 䊳䊳
button to set the Incredible Surround
control as follows:
MONO: When in the Mono Sound
Mode, Incredible Surround can be set
to Mono or Spatial.
STEREO: When in the Stereo Sound
Mode, Incredible Surround can be set
to Stereo or Incredible Surround.
When finished, press the STATUS
/EXIT button to remove the menu
from the TV’s screen.
POWER
6
SLEEP
A/CH
TV
STATUS/EXIT
RECORD
VCR
CC
Sound
Treble
Bass
Balance
AVL
Incr. Surround
SAP
CLOCK
TV/VCR
1
2
4
5
7
8
3
ACC
1
SMART
6
29
4
50
SMART
0
SOUND
PICTURE
MENU
SURF
3
CH
VOL
4
MUTE
2
5
Sound
Treble
Bass
Balance
AVL
Incr. Surround
SAP
Spatial
OR (if in Stereo)
SMART HELP
NOTE: If the TV signal is
being received from a mono
source, pressing the INCR. SURR. button will cause either MONO or SPATIAL to appear on the the screen. If the
TV signal is being received from a
stereo source and the “Sound” control
is set to Stereo, pressing the INCR.
SURR. button will toggle two choices:
STEREO and INCR. SURROUND.
SPATIAL – widens the “Mono” sound,
simulating a broader, fuller sound.
INCR. SURROUND – widens the
“Stereo” sound, simulating a broader,
fuller sound.
Sound
Treble
Bass
Balance
AVL
Incr. Surround
SAP
10
Incr. Surround
SETTING THE TV FOR SAP (SECONDARY AUDIO PROGRAMS)
A
SAP signal is an additional part of
the stereo broadcast system. Sent as
a third audio channel, a SAP signal can
be heard apart from the current TV program sound. TV stations are free to use
SAP for any number of purposes.
If a SAP signal is not present with a
selected program, the SAP option cannot
be selected. Also, if SAP is selected on a
channel (with SAP) and you select another channel, when you return to the original channel, SAP will be OFF. You will
have to reselect the SAP feature.
Main
Picture
Sound
Features
Install
Brightness
Color
Picture
Sharpness
Tint
More...
Main
Picture
Sound
Features
Install
Treble
Bass
Balance
AVL
Incr. Surround
More...
Press the MENU button on the
remote to display the on-screen menu.
Press the CURSOR UP 䊳 or CURSOR DOWN ■ button until the word
SOUND is highlighted.
POWER
A/CH
Press the CURSOR RIGHT 䊳䊳
button to display the SOUND menu
features.
Press the CURSOR UP 䊳 or
CURSOR DOWN ■ button to scroll
the Sound menu features until the word
SAP is highlighted.
TV
STATUS/EXIT
RECORD
VCR
CC
Sound
Treble
Bass
Balance
AVL
Incr. Surround
SAP
CLOCK
TV/VCR
1
2
4
5
3
ACC
8
7
1
SMART
6
29
4
50
SMART
0
SOUND
PICTURE
MENU
Press the CURSOR RIGHT 䊳䊳
button to turn the SAP control ON or
OFF.
When finished, press the STATUS
/EXIT button to remove the menu
from the TV’s screen.
6
SLEEP
SURF
3
CH
VOL
4
2
MUTE
5
Sound
Treble
Bass
Balance
AVL
Incr. Surround
SAP
Off
OR
Sound
Treble
Bass
Balance
AVL
Incr. Surround
SAP
On
Note: If SAP is not present on the
channel you are tuned to, when the
SAP control is set to ON the screen
will read:
“SAP NOT AVAILABLE.”
11
SETTING THE TV TO RECEIVE STEREO PROGRAMMING
Y
ou can receive broadcast stereo TV
programs. The TV has both an
amplifier and twin speakers through
which the stereo sound can be heard.
Press the MENU button on the
remote to display the on-screen menu.
Main
Picture
Sound
Features
Install
Press the CURSOR UP 䊳 or CURSOR DOWN ■ button until the word
SOUND is highlighted.
Brightness
Color
Picture
Sharpness
Tint
More...
Press the CURSOR RIGHT 䊳䊳
button to display the SOUND menu
features.
Press the CURSOR UP 䊳 or
CURSOR DOWN ■ button to scroll
the Sound menu features until the word
SOUND is highlighted.
A/CH
Press the CURSOR RIGHT 䊳䊳
button to set the Sound control to
Mono or Stereo.
6
STATUS/EXIT
RECORD
VCR
CC
Sound
Treble
Bass
Balance
AVL
Incr. Surround
SAP
CLOCK
TV/VCR
1
2
4
5
3
ACC
8
7
1
SMART
6
29
4
50
SMART
0
SOUND
PICTURE
MENU
SURF
3
CH
VOL
SMART HELP
Treble
Bass
Balance
AVL
Incr. Surround
More...
POWER
SLEEP
TV
When finished, press the STATUS
/EXIT button to remove the menu
from the TV’s screen.
Main
Picture
Sound
Features
Install
4
2
MUTE
Remember, if stereo is not
present on a selected show, the
Sound control cannot be changed to
Stereo. On the other hand, if stereo is
present on a selected show the Sound
control can be set to Mono.
5
Sound
Bass
Balance
AVL
Incr. Surround
SAP
Sound
Mono
OR
Sound
Bass
Balance
AVL
Incr. Surround
SAP
Sound
When channel changes are made, the
screen may indicate Mono for a second
or two, then change to Stereo if the signal being received is in stereo.
12
Stereo
Let's
Look
Inside!
HOW TO USE THE TIMER CONTROLS
T
he Timer controls allow you to use
your TV as an alarm clock if set to
turn itself on and off at a specific time.
It also can be set to tune to a specific
channel at a specific time.
Press the CLOCK button on the
remote. The Timer menu will appear on
the screen.
Press the CURSOR UP 䊳 or
DOWN ■ button to highlight one of
the Timer controls you wish to set
(Time, Start Time, Stop Time, Channel,
Activate, or Display).
Timer
Time
Start Time
Stop Time
Channel
Activate
Display
10 :30 AM
Press the CURSOR RIGHT 䊳䊳
button to adjust the selected option.
TIME: Enter the current time with the
numbered buttons. Use the Cursor Right
button to move to the AM/PM area and use
the Cursor Left or Right buttons to toggle
AM or PM.
START TIME: Use the numbered buttons
to enter a start-up time for the TV to turn
on or to tune a specific channel.
POWER
4
SLEEP
A/CH
TV
VCR
STATUS/EXIT
RECORD
CC
TV/VCR
1
2
4
5
6
8
29
3
ACC
7
SMART
STOP TIME: Use the numbered buttons
to enter a time for the TV to shut itself off.
SMART
0
SOUND
PICTURE
MENU
SURF
CHANNEL: Use the Numbered buttons or
the CH + or – buttons to select a specific
channel for the TV to tune to at the specific
Start Time.
ACTIVATE: Set the Timer to preform it’s
function ONCE or DAILY.
1
CLOCK
3
2
CH
VOL
MUTE
DISPLAY: Set to ON or OFF. When ON,
the time will be displayed ALL the time the
TV in ON. When OFF, the time will only
appear when the STATUS/EXIT button is
pressed.
Timer
Time
Start Time
Stop Time
Channel
Activate
Display
Timer
Time
Start Time
Stop Time
Channel
Activate
Display
Timer
Time
Start Time
Stop Time
Channel
Activate
Display
Timer
Time
Start Time
Stop Time
Channel
Activate
Display
Timer
Time
Start Time
Stop Time
Channel
Activate
Display
When finished, press the STATUS
/EXIT button to remove the menu
from the TV’s screen.
13
12 :30 PM
01 :30 PM
0
10
Once
On
UNDERSTANDING THE AUTOLOCK CONTROLS
T
he AutoLock feature is an integrated circuit that receives and
processes data sent by broadcasters, or other program providers,
that contain program content advisories. When programmed by the
viewer, a TV with AutoLock can
respond to the content advisories
and block program content that
may be found objectionable (such
as offensive language, violence,
sexual situations, etc.). This is a
great feature to censor the type of
viewing children may watch.
Over the next few pages you’ll
learn how to block channels and
certain rated programming. Below
is a brief explanation of some terms
and ratings you will find in the
AutoLock feature.
AutoLock offers various
BLOCKING controls from which
to choose:
Access Code: An Access Code
must be set to prevent children from
unblocking questionable or censored programming set by their parents.
Channel Block: After an access
code has been programmed, you
can block individual channels
including the A/V inputs.
Clear All: Allows you clear all
channels being blocked from your
viewing set with the Channel Block
Control.
Block All: Allows you to block
ALL channels and A/V inputs at
one time.
Movie Ratings: Certain blocking
options exist which will block programming based on ratings patterned by the Motion Pictures
Association of America.
TV Ratings: Just like the Movie
Ratings, programs can be blocked
from viewing using standard TV
ratings set by TV broadcasters.
To learn more about the Motion
Picture Association of America
Ratings and the TV Broadcasters
Television Ratings, refer to the definitions listed on the columns to the
right.
Movie Rating
G
TV Rating
TV-Y
On
PG
PG-13
R
NC-17
X
On
TV-Y7
TV-G
TV-PG
TV-14
TV-MA
MOVIE RATINGS
TV PARENTAL GUIDELINES
(MOTION PICTURE ASSOCIATION OF AMERICA)
(TV BROADCASTERS)
G: General Audience - All ages admitted.
Most parents would find this program suitable for all ages. This type of programming
contains little or no violence, no strong language, and little or no sexual dialogue or
situations.
TV TV-Y - (All children -- This program is
PG: Parental Guidance Suggested - This
programming contains material that parents
may find unsuitable for younger children.) It
may contain one or more of the following:
Moderate violence, some sexual situations,
infrequent coarse language, or some suggestive dialogue.
PG-13: Parents Strongly Cautioned - This
programming contains material that parents
may find unsuitable for children under the
age of 13. It contains one or more of the following: violence, sexual situations, coarse
language, or suggestive dialogue.
R: Restricted -This is programming is specifically designed for adults. Anyone under the
age of 17 should only view this programming with an accompanying parent or adult
guardian. It contains one or more of the following: intense violence, intense sexual situations, strong coarse language, or intensely
suggestive dialogue.
NC-17: No one under the age of 17 will be
admitted. - This type of programming should
be viewed by adults only. It contains graphic
violence, explicit sex, or crude indecent language.
X: Adults Only - This type of programming
contains one or more of the following: very
graphic violence, very graphic and explicit or
indecent sexual acts, very coarse and intensely suggestive language.
to be appropriate for all chilY designed
dren.) Designed for a very young audi-
ence, including children ages 2-6. This type of
programming is not expected to frighten
younger children.
TV TV-Y7 - (Directed to Older Children -
program is designed for children
Y7 -ageThis7 and
above.) It may be more
appropriate for children who have acquired the
development skills needed to distinguish
between make-believe and reality. This programming may include mild fantasy and comic
violence (FV).
TV TV-G - (General Audience -- Most par-
would find this program suitable
G ents
for all ages.) This type of programming
contains little or no violence, no strong language, and little or no sexual dialogue or situations.
TV TV-PG - (Parental Guidance
-- This program contains
PG Suggested
material that parents may find unsuitable for younger children.) This type of programming contains one or more of the following: Moderate violence (V), some sexual situations (S), infrequent coarse language (L), or
some suggestive dialogue (D).
TV-14 - (Parents Strongly Cautioned - This program contains some material
that many parents would find unsuitable
for children under 14 years of age.) This type
of programming contains one or more of the
following: intense violence (V), intense sexual
situations (S), strong coarse language (L), or
intensely suggestive dialogue (D).
TV
14
TV TV-MA - (Mature Audience Only --
program is specifically designed to
MA This
be viewed by adults and therefore may
be unsuitable for children under 17.) This type
of programming contains one or more of the
following: graphic violence (V), explicit sexual
situations (S), or crude indecent language (L).
14
SETTING UP THE AUTOLOCK ACCESS CODE
O
ver the next few pages you’ll learn
how to block channels and get a
better understanding of the rating terms
for certain programming.
First, let’s start by learning how to set a
personal access code:
Main
Picture
Sound
Features
Install
Brightness
Color
Picture
Sharpness
Tint
More...
Main
Picture
Sound
Features
Install
Press the MENU button on the
remote to display the on-screen menu.
Press the CURSOR UP 䊳 or
DOWN ■ button until the word FEATURES is highlighted.
POWER
SLEEP
A/CH
TV
Press the CURSOR RIGHT 䊳䊳
button to display the FEATURES
menu options.
CC
CLOCK
6
7
Features
Timer
AutoLock
TV/VCR
1
2
4
5
6
7
8
29
3
ACC
1
SMART
4
SMART
0
SOUND
SURF
3
CH
VOL
4
2
Time
Start Time
Stop Time
Channel
Activate
Display
PICTURE
MENU
Press the CURSOR RIGHT 䊳䊳
button. The screen will read,
“ACCESS CODE - - - - .”
The screen will ask you to enter a
“New Code.” Enter a “new” 4 digit
code using the NUMBERED buttons.
The screen will then ask you to CONFIRM the code you just entered. Enter
your new code again. “XXXX” will
appear when you enter your new code
and then display the AutoLock menu
options.
STATUS/EXIT
RECORD
VCR
Press the CURSOR UP 䊳 or
DOWN ■ button until the words
AUTOLOCK are highlighted.
Using the NUMBERED buttons,
enter 0, 7, 1, 1. “XXXX” appears on
the Access Code screen as you press the
numbered buttons.
“INCORRECT CODE” will appear on
the screen, and you will need to enter 0,
7, 1, 1 again.
Timer
AutoLock
5
Features
Timer
AutoLock
MUTE
NOTE: The 0,7,1,1 access code shown
on this page is the default code or a
way to reset the code when the current
access code is not known.
Features
Timer
AutoLock
Access Code
XXXX
Features
Timer
AutoLock
Features
Timer
AutoLock
New Code
----
Features
Timer
AutoLock
Access Code
XXXX
Incorrect
Timer
Start Time
Stop Time
Channel
Activate
Display
Features
Timer
AutoLock
Access Code
----
Features
Timer
AutoLock
Access Code
XX - -
Features
Timer
AutoLock
Confirm Code
XXXX
Proceed to the next page to learn more...
SMART HELP
Parents - it isn’t possible for
your child to unblock a channel
without knowing your access code or
changing it to a new one. If your code
changes, and you didn’t change it, then
you know it’s been altered by someone
else and blocked channels have been
viewed.
AutoLock
Block Channel
Setup Code
Clear All
Block All
Movie Rating
TV Rating
OffStop Time
Channel
Activate
Display
15
New Code
XXX -
The AutoLock
Access Code also
can be changed
anytime using the
Setup Code feature
AutoLock
Block Channel
Setup Code
Clear All
Block All
Movie Rating
TV Rating
OffStop Time
Channel
Activate
Display
HOW TO BLOCK CHANNELS
A
fter your personal access code has
been set (see previous page), you
are now ready to select the channels or
A/V Inputs you want to block out or
censor.
Main
Picture
Sound
Features
Install
Press the NUMBERED (or CH +,
–) buttons to tune the channel you
wish to block or censor.
Brightness
Color
Picture
Sharpness
Tint
More...
Press the MENU button on the
remote to show the on-screen menu.
Main
Picture
Sound
Features
Install
POWER
SLEEP
Press the CURSOR UP 䊳 or
DOWN ■ button until the word FEATURES is highlighted.
A/CH
TV
2
1
2
4
5
6
7
8
39
3
SMART
10
Features
Timer
AutoLock
5
8
SMART
0
SURF
4
CH
VOL
8
5
3
MUTE
Access Code
XXXX
select other channels you wish to
block. Repeat step 9 to block the new
channel.
Channel 12
Blocked By AutoLock
Channel Blocking
Access Code
----
If you tune to a blocked channel and enter your Access Code
to view the channel, ALL blocked channels will be viewable until the TV has
been turned off. When the TV is powered back ON, the previously blocked
channels will be blocked again.
16
6
9
Features
Timer
AutoLock
1
NOTE: Remember, if you ever forget
your Access Code, the 0,7,1,1 access
code is the default code or a way to
reset the code when the current access
code is not known.
Features
Timer
AutoLock
Timer
Start Time
Stop Time
Channel
Activate
Display
PICTURE
MENU
10 Press the CH + or – button to
SMART HELP
1
7
TV/VCR
SOUND
Press the CURSOR RIGHT 䊳䊳
button.
Press the CURSOR RIGHT 䊳䊳
button to turn blocking ON or OFF for
that channel. When ON is selected the
channel will be blocked.
CLOCK
ACC
Press the CURSOR UP 䊳 or
DOWN ■ button until the words
AutoLock are highlighted.
Press the CURSOR UP 䊳 or
DOWN ■ buttons until the words
BLOCK CHANNELS are highlighted.
CC
RECORD
VCR
Press the CURSOR RIGHT 䊳䊳
button to display the FEATURES
menu options.
Enter the correct access code
number. “XXXX” shows on the
Access Code display as you press the
NUMBERED buttons. AutoLock
menu options will be displayed.
STATUS/EXIT
Timer
AutoLock
AutoLock
Block Channel
Setup Code
Clear All
Block All
Movie Rating
TV Rating
OffStop Time
Channel
Activate
Display
Features
Timer
AutoLock
AutoLock
Block Channel
Setup Code
Clear All
Block All
Movie Rating
TV Rating
Timer
Start Time
Stop Time
Channel
Activate
Display
Access Code
----
OnStop Time
Channel
Activate
Display
Enter your Access Code to
view a tuned channel that is
blocked with Block Channel.
HOW TO CLEAR ALL BLOCKED CHANNELS AT THE SAME TIME
A
fter blocking specific channels there
may come a time when you want to
clear all the channels so they can be
viewed. The following steps explain
how to CLEAR ALL blocked channels.
Main
Picture
Sound
Features
Install
Press the MENU button on the
remote to show the on-screen menu.
Brightness
Color
Picture
Sharpness
Tint
More...
Main
Picture
Sound
Features
Install
Press the CURSOR UP 䊳 or
DOWN ■ button until the word FEATURES is highlighted.
POWER
Press the CURSOR RIGHT 䊳䊳
button to display the FEATURES
menu options.
SLEEP
A/CH
TV
STATUS/EXIT
6
CC
CLOCK
RECORD
VCR
Press the CURSOR UP 䊳 or
DOWN ■ button until the words
AutoLock are highlighted.
1
2
4
5
6
8
29
7
1
3
SMART
7
SMART
SURF
3
CH
VOL
7
4
2
MUTE
NOTE: Remember, if you ever forget
your Access Code, the 0,7,1,1 access
code is the default code or a way to
reset the code when the current access
code is not known.
Features
Timer
AutoLock
Access Code
XXXX
Time
Start Time
Stop Time
Channel
Activate
Display
PICTURE
MENU
Enter the correct access code
number. “XXXX” shows on the
Access Code display as you press the
NUMBERED buttons. AutoLock
menu options will be displayed.
When finished, press the STATUS
/EXIT button to remove the menu
from the TV’s screen.
4
0
SOUND
Press the CURSOR RIGHT 䊳䊳
button.
Press the CURSOR RIGHT 䊳䊳
button to clear all blocked channels.
The Clear All option will read,
“Cleared.”
Features
Timer
AutoLock
TV/VCR
ACC
Press the CURSOR UP 䊳 or
DOWN ■ buttons until the words
CLEAR ALL are highlighted.
Timer
AutoLock
AutoLock
Block Channel
Setup Code
Clear All
Block All
Movie Rating
TV Rating
OffStop Time
Channel
Activate
Display
5
8
Features
Timer
AutoLock
Features
Timer
AutoLock
AutoLock
Block Channel
Setup Code
Clear All
Block All
Movie Rating
TV Rating
Timer
Start Time
Stop Time
Channel
Activate
Display
Access Code
----
Clear ?Stop Time
Channel
Activate
Display
SMART HELP
If you tune to a blocked channel and enter your Access Code
to view the channel, ALL blocked channels will be viewable until the TV is
powered OFf and then turned back ON.
When the TV is powered back ON, the
previously blocked channels will be
blocked again.
CLEAR ALL will not work with the
Movie and TV Ratings. These options
must be reset individually.
AutoLock
Block Channel
Setup Code
Clear All
Block All
Movie Rating
TV Rating
ClearedStop Time
Channel
Activate
Display
The Clear All option when activated
will unblock ALL blocked channels. It
will not affect programming blocked
by the Movie or TV Rating options.
17
Channel 12
Blocked By AutoLock
Channel Blocking
Access Code
----
Or, enter your Access
Code to view a tuned
channel that is blocked
with Block Channel.
HOW TO BLOCK ALL CHANNELS AT THE SAME TIME
T
here may come a time when you
want to Block All the television’s
channels. Maybe you don’t want your
children to watch TV for a given time.
With the Block All control, ALL available channels (including the A/V
Inputs) can be set to block at the same
time.
Main
Picture
Sound
Features
Install
Brightness
Color
Picture
Sharpness
Tint
More...
Main
Picture
Sound
Features
Install
Timer
AutoLock
Press the MENU button on the
remote to show the on-screen menu.
POWER
Press the CURSOR UP 䊳 or
DOWN ■ button until the word FEATURES is highlighted.
SLEEP
9
A/CH
TV
STATUS/EXIT
CC
CLOCK
RECORD
1
VCR
6
2
3
ACC
Press the CURSOR RIGHT 䊳䊳
button to display the FEATURES
menu options.
1
4
5
6
7
8
29
SMART
4
0
SOUND
SURF
3
CH
VOL
Press the CURSOR RIGHT 䊳䊳
button.
Press the CURSOR RIGHT 䊳䊳
button to turn Block All ON or OFF.
When ON is selected, ALL available
channels will be blocked.
7
If you tune to a blocked channel and enter your Access Code
to view the channel, ALL blocked channels will be viewable until the TV has
been turned off. When the TV is powered back ON, the previously blocked
channels will be blocked again.
2
MUTE
NOTE: Remember, if you ever forget
your Access Code, the 0,7,1,1 access
code is the default code or a way to
reset the code when the current access
code is not known.
Features
Timer
AutoLock
Access Code
XXXX
When finished, press the STATUS/EXIT button to remove the
menu from the screen.
SMART HELP
4
Channel 12
Blocked By AutoLock
Channel Blocking
Access Code
----
18
Timer
Start Time
Stop Time
Channel
Activate
Display
PICTURE
Press the CURSOR UP 䊳 or
DOWN ■ button until the words
AutoLock are highlighted.
Press the CURSOR UP 䊳 or
DOWN ■ buttons until the words
BLOCK ALL are highlighted.
7
SMART
MENU
Enter the correct access code
number. “XXXX” shows on the
Access Code display as you press the
NUMBERED buttons. AutoLock
menu options will be displayed.
Features
Timer
AutoLock
TV/VCR
AutoLock
Block Channel
Setup Code
Clear All
Block All
Movie Rating
TV Rating
Off
5
8
Features
Timer
AutoLock
Features
Timer
AutoLock
AutoLock
Block Channel
Setup Code
Clear All
Block All
Movie Rating
TV Rating
Timer
Start Time
Stop Time
Channel
Activate
Display
Access Code
----
On
Enter your Access Code to
view a tuned channel that is
blocked with Block Channel.
BLOCKING PROGRAMMING BASED ON MOVIE RATINGS
T
here are two types of program ratings within the AutoLock feature.
One is based on the Movie Industry ratings while the other is based on the TV
Industry ratings. Both can be used to
block or censor programming that has
been rated in either manner.
Let’s first look at the Movie Rating
options of AutoLock:
Main
Picture
Sound
Features
Install
Brightness
Color
Picture
Sharpness
Tint
More...
Main
Picture
Sound
Features
Install
Press the MENU button on the
remote to display the on-screen menu.
Press the CURSOR UP 䊳 or
DOWN ■ button until the word FEATURES is highlighted.
Each Movie Rating can
be turned “ON” or “OFF.”
POWER
SLEEP
A/CH
TV
Press the CURSOR RIGHT 䊳䊳
button to display the FEATURES
menu options.
Press the CURSOR UP 䊳 or
DOWN ■ button to highlight the
words MOVIE RATINGS.
Press the CURSOR RIGHT 䊳䊳
button to display the MOVIE RATINGS options (G, PG, PG-13, R,
NC17, or X).
Press the CURSOR UP 䊳 or
DOWN ■ button to highlight any of
the Movie Ratings options. When highlighted, all these options can be turned
ON (which will allow blocking) or
OFF (which will allow viewing).
6
CC
CLOCK
1
1
2
4
5
6
7
8
29
SMART
3
4
7
9
SMART
0
SOUND
SURF
3
CH
VOL
9
4
2
MUTE
5
8
10
NOTE: Remember, if you ever forget
your Access Code, the 0,7,1,1 access
code is the default code or a way to
reset the code when the current access
code is not known.
Features
Timer
AutoLock
Access Code
XXXX
Time
Start Time
Stop Time
Channel
Activate
Display
PICTURE
MENU
7
Features
Timer
AutoLock
TV/VCR
ACC
Press the CURSOR UP 䊳 or
DOWN ■ button until AutoLock is
highlighted.
Using the NUMBERED buttons
on the remote, enter your 4 digit
Access Code. The AutoLock menu
options will be displayed.
STATUS/EXIT
RECORD
VCR
Press the CURSOR RIGHT 䊳䊳
button. The screen will prompt you
for your Access Code.
Timer
AutoLock
AutoLock
Setup Code
Clear All
Block All
Movie Rating
TV Rating
Blocking Options
G
PG
PG-13
R
NC-17
More...
Features
Time
AutoLock
Features
Timer
AutoLock
Movie Rating
G
PG
PG-13
R
NC-17
X
Timer
Start Time
Stop Time
Channel
Activate
Display
Access Code
----
Off
10 Use the CURSOR RIGHT 䊳䊳
button on the remote to turn the rating
option ON or OFF.
SMART HELP
Movie Rating
G
PG
PG-13
R
NC-17
X
On
When a rating is set to block,
all higher ratings will be automatically blocked as well. (Example: If
the the PG-13 rating is set to block, the
R, NC-17, and X ratings will also be
blocked.
19
To view a program blocked
by the Movie Rating
options, enter your 4 digit
access code. This will disable all blocked Movie
Ratings until the TV is
powered off and on again.
Then the blocking options
will be restored.
Channel 12
OffStop Time
Blocked By AutoLock
Channel
Movie Rating
Activate
Display
Access Code
----
BLOCKING PROGRAMMING BASED ON TV RATINGS
T
his portion of the AutoLock features
cover program ratings based on the
TV Industry rating system. This is
known as TV Ratings within AutoLock.
After selecting the Autolock feature and
entering your personal access code, the
AutoLock options screen appears;
Scroll the menu using the CURSOR UP 䊳 or DOWN ■ buttons
until the words TV RATINGS are
highlighted.
Press the CURSOR RIGHT 䊳䊳
button to display the TV Ratings (TVY, TV-Y7, TV-G, TV-PG, TV-14, or
TV-MA). When highlighted, the TV-Y
and TV-G can be turned ON (which will
allow blocking) or OFF (which will
allow viewing), of these rated programs.
The ratings of TV-Y7, TV-PG, TV-14,
TV-MA can be customized to block V
(violence), FV (fantasy violence), S
(sexual situations), L (coarse language),
or D (suggestive dialogue).
Press the CURSOR UP 䊳 or
DOWN ■ button to highlight the
desired rating.
Press the CURSOR RIGHT 䊳䊳
button on the remote to turn the TV-Y
or TV-G rating ON or OFF. Or, press
the CURSOR RIGHT 䊳䊳 button to
enter the sub-menus for the TV-Y7, TVPG, TV-14 or TV-MA ratings.
If the TV-Y7, TV-PG, TV-14 or TVMA sub-menu is accessed, press the
CURSOR UP 䊳 or CURSOR DOWN
■ button to select one of the options
(Block All, V, S, L, D, or FV).
Press the CURSOR RIGHT 䊳䊳
button on the remote to turn the option
ON or OFF.
AutoLock
Block Channel
Setup Code
Clear All
Block All
Movie Rating
TV Rating
TV-Y
TV-Y7
TV-G
TV-PG
TV-14
TV-MA
TV Rating
TV-Y
TV-Y7
TV-G
TV-PG
TV-14
TV-MA
Off
POWER
SLEEP
To view a program
blocked by the TV Rating
options, enter your 4 digit
access code. This will
disable all blocked TV
Ratings until the TV is
powered off and on
again. Then the blocking
options will be restored.
A/CH
TV
STATUS/EXIT
RECORD
VCR
CC
CLOCK
TV/VCR
1
2
3
4
5
6
8
19
TV Rating
TV-Y
TV-Y7
TV-G
TV-PG
TV-14
TV-MA
ACC
7
SMART
3
SMART
0
SOUND
PICTURE
MENU
SURF
2
CH
VOL
3
1
Channel 12
OffStop Time
Blocked By AutoLock
Channel
TV Rating
Activate
Display
Access Code
----
TV Rating
TV-Y
TV-Y7
TV-G
TV-PG
TV-14
TV-MA
Block All
V
S
L
D
4
TV Rating
TV-Y
TV-Y7
TV-G
TV-PG
TV-14
TV-MA
MUTE
On
Block All
FV
TV Rating
TV-Y
TV-Y7
TV-G
TV-PG
TV-14
TV-MA
TV Rating
TV-Y
TV-Y7
TV-G
TV-PG
TV-14
TV-MA
Block All
V
S
L
D
TV Rating
TV-Y
TV-Y7
TV-G
TV-PG
TV-14
TV-MA
Off
Block All
V
S
L
TV Ratings and
Rating Sub-Menus
When a TV Rating is selected to block,
ALL higher ratings will be blocked also.
TV-Y - (All children -- This program is designed to be appropriate for all children.) Designed for a very young audience, including children ages 2-6. This type of programming is not expected to frighten younger children.
TV-Y7 - (Directed to Older Children -- This program is designed for children age 7 and above.) It may be more appropriate for children who have acquired the development
skills needed to distinguish between make-believe and reality. This programming may include mild fantasy and comic violence (FV).
TV-G - (General Audience -- Most parents would find this program suitable for all ages.) This type of programming contains little or no violence, no strong language and little
or no sexual dialogue or situations.
TV-PG - (Parental Guidance Suggested -- This program contains material that parents may find unsuitable for younger children.)This type of programming contains one or
more of the following: some suggestive dialogue (D), infrequent coarse language (L), some sexual situations (S), or moderate violence (V).
TV-14 - (Parents Strongly Cautioned -- This program contains some material that many parents would find unsuitable for children under 14 years of age.) This type of programming contains one or more of the following: intensely suggestive dialogue (D), strong coarse language (L), intense sexual situations (S), or intense violence (V).
TV-MA - (Mature Audience Only -- This program is specifically designed to be viewed by adults and therefore may be unsuitable for children under 17.) This type of programming contains one or more of the following: crude indecent language (L), explicit sexual situations (S), or graphic violence (V).
20
USING THE AUTOLOCK BLOCKING OPTIONS
A
utoLock offers the viewer other
blocking features as well. With
these Blocking Options, the censoring
can be turned ON or OFF.
Main
Picture
Sound
Features
Install
Brightness
Color
Picture
Sharpness
Tint
More...
Press the MENU button on the
remote to show the on-screen menu.
Press the CURSOR UP 䊳 or
DOWN ■ button until the word FEATURES is highlighted.
POWER
A/CH
TV
CC
CLOCK
1
2
4
5
7
1
8
9
7
64
3
29
SMART
SMART
0
SOUND
SURF
10
3
CH
VOL
2
MUTE
NOTE: Remember, if you ever forget
your Access Code, the 0,7,1,1 access
code is the default code or a way to
reset the code when the current access
code is not known.
Features
Timer
AutoLock
Access Code
XXXX
Press the CURSOR UP 䊳 or
DOWN ■ buttons to highlight the
desired feature.
Time
Start Time
Stop Time
Channel
Activate
Display
PICTURE
MENU
4
7
9
Features
Timer
AutoLock
TV/VCR
ACC
Press the CURSOR RIGHT 䊳䊳
button.
Press the CURSOR RIGHT 䊳䊳
button to display the Blocking
Options (BLOCKING, UNRATED,
or NO RATING) menu.
STATUS/EXIT
RECORD
VCR
Press the CURSOR UP 䊳 or
DOWN ■ button until the words
AutoLock are highlighted.
Press the CURSOR UP 䊳 or
DOWN ■ buttons until the words
BLOCKING OPTIONS are highlighted.
Timer
AutoLock
SLEEP
6
Press the CURSOR RIGHT 䊳䊳
button to display the FEATURES
menu options.
Enter the correct access code
number. “XXXX” shows on the
Access Code display as you press the
NUMBERED buttons. AutoLock
menu options will be displayed.
Main
Picture
Sound
Features
Install
AutoLock
Block Channel
Setup Code
Clear All
Block All
Movie Rating
TV Rating
OffStop Time
Channel
Activate
Display
5
8
10
Features
Timer
AutoLock
Features
Timer
AutoLock
Timer
Start Time
Stop Time
Channel
Activate
Display
Access Code
----
AutoLock
Setup Code
Clear All
Block All
Movie Rating
TV Rating
Blocking Options
10 When highlighted, each feature can
be turned ON or OFF using the CURSOR RIGHT 䊳䊳 or LEFT 䊴䊴 buttons on the remote.
Blocking Options
Blocking
Unrated
No Rating
On
Blocking Options
Blocking
Unrated
No Rating
On
Blocking Options
Blocking
Unrated
No Rating
On
BLOCKING OPTIONS:
BLOCKING: This is what might be called the “master switch” for AutoLock. When in the ON position, ALL blocking/censoring
will take place. When in the OFF position, ALL blocking is disabled.
UNRATED: ALL unrated programs based on the Movie Ratings or Parental (TV) Guidelines can be blocked if this feature is set
to ON and the BLOCKING feature is set to OFF.
NO RATING: ALL programming with NO content advisory data can be blocked if this feature is set to ON and the BLOCKING
feature is set to OFF.
21
Let's
Look
Inside!
HOW TO USE THE CLOSED CAPTION CONTROL
C
losed Captioning (CC) allows you
to read the voice content of television programs on the TV screen.
Designed to help the hearing impaired,
this feature uses on-screen “text boxes”
to show dialogue and conversations
while the TV program is in progress.
Press the CC button on the remote
to display the current Closed Caption setting.
Press the CC button repeatedly to
choose from the four Closed Caption
options (CC Off, CC 1, CC 2, CC
Mute). Dialogue (and descriptions) for
the action on the captioned TV program
will appear on-screen if the tuned program is broadcasting CC information.
When finished, press the STATUS
/EXIT button to remove the menu from
the TV’s screen or let the option time out
and disappear from the TV screen.
CC Off
CC 1
POWER
3
SLEEP
A/CH
TV
VCR
STATUS/EXIT
RECORD
CC
1
2
CLOCK
TV/VCR
1
2
3
4
5
6
7
8
ACC
SMART
9
SMART
CC 2
0
SOUND
SMART HELP
Not all TV programs and
product commercials are made
with Closed Caption (CC) information
included. Neither are all Closed Caption
modes (CC 1, or CC 2) necessarily being
used during the transmission of a closed
caption program. Refer to your area's TV
program listings for the stations and
times of Closed Caption shows.
PICTURE
MENU
SURF
CH
VOL
MUTE
CC Mute
NOTE: The CC MUTE option can be
used to set the TV to turn the Closed
Caption mode “ON” whenever the MUTE
button on the remote is pressed. This activates the CC1 option.
22
Let's
Look
Inside!
USING THE AUDIO/VIDEO INPUT JACKS
T
he TV’s Audio/Video Input jacks are
for direct picture and sound connections between the TV and a VCR (or
similar accessory device) that has
Audio/Video Output jacks.
Connect one end of the VIDEO
(yellow) CABLE to the AV1 in VIDEO
jack on the back of the TV. Then connect one end the AUDIO (red and
white) CABLES to the AV1 in AUDIO
L and R(left and right) jacks on the rear
of the TV.
1
BACK OF TV
Monitor out
AV1 in
VIDEO
L/
Mono
S-VIDEO
AUDIO
Monitor out
AV1 in
VIDEO
L/
Mono
AUDIO
Connect other end of the VIDEO
(yellow) CABLE to the VIDEO OUT
jack on the back of the VCR. Then connect the other ends of the AUDIO (red
and white) CABLES to the AUDIO
(left and right) OUT jacks on the rear of
the VCR.
75 ⍀
75 ⍀
R
VIDEO IN
(YELLOW)
IF YOU ARE USING A
MONO DEVICE, USE
ONLY THE AUDIO
L/MONO JACK.
AUDIO IN
(RED/WHITE)
OUT
Turn the VCR and the TV ON.
Press the CH + or – buttons on the
remote to scroll the channels until AV1
appears in the upper left corner of the
TV screen.
S-VIDEO
R
5
OUT
ANTENNA
IN
VIDEO
ANTENNA
OUT
2
POWER
R AUDIO
L
SLEEP
A/CH
TV
VCR
STATUS/EXIT
RECORD
CC
CLOCK
IN
IN
BACK OF VCR
TV/VCR
1
2
3
4
5
6
7
8
ACC
Slide the TV/VCR/ACC switch to
the VCR position.
SMART
9
SMART
6
0
SOUND
Now your ready to place a prerecorded video tape in the VCR and press
the PLAY 䊳 button.
PICTURE
MENU
SURF
3
CH
VOL
MUTE
4
23
VCR
(EQUIPPED WITH
VIDEO AND AUDIO
OUTPUT JACKS)
Let's
Look
Inside!
USING THE AUDIO/VIDEO (MONITOR) OUTPUT JACKS
T
he Audio/Video (Monitor) Output
jacks are great for recording with a
VCR or used to connect an external
audio system for better sound reproduction.
For Stereo System:
BACK OF TV
1
Monitor out
AV1 in
VIDEO
L/
Mono
For an external audio system,
connect one end of the R(ight) and
L(eft) AUDIO (Monitor Out) jacks on
the TV to the R and L audio input jacks
on your amplifier or sound system. Set
the audio system’s volume to a normal
listening level.
S-VIDEO
AUDIO
Monitor out
AV1 in
VIDEO
L/
Mono
AUDIO
75 ⍀
75 ⍀
S-VIDEO
R
R
1
AUDIO IN
(RED/WHITE)
Turn the TV and audio system
ON. You can hear TV sound coming
from the audio system. Adjust the volume at the audio system to a comfortable listening level.
R
L
AUX/TV INPUT
PHONO INPUT
To connect a second VCR for recording:
Connect one end of the yellow
Video Cable to the Monitor Out
VIDEO plug. Connect the other end to
the VIDEO IN plug on the second
VCR.
Connect one end of the red and
white Audio cable from the Monitor
Out AUDIO L and R plugs on the TV
to the AUDIO IN plugs on the VCR.
External audio System
2
For Second VCR:
BACK OF TV
3
Turn the VCR ON, insert a blank
VHS tape and it’s ready to record
what’s being viewed on the TV screen.
Monitor out
AV1 in
VIDEO
L/
Mono
S-VIDEO
AUDIO
Monitor out
AV1 in
VIDEO
L/
Mono
75 ⍀
AUDIO
75 ⍀
AUDIO IN
(RED/WHITE)
IF YOU ARE USING A
MONO DEVICE, USE
ONLY THE AUDIO
L/MONO JACK.
S-VIDEO
R
R
4
VIDEO IN
(YELLOW)
ANTENNA
IN
OUT
OUT
ANTENNA
OUT
VIDEO
L AUDIO R
IN
IN
OUT
OUT
ANTENNA
IN
VIDEO
ANTENNA
OUT
BACK OF VCR
5
R AUDIO
IN
L
IN
BACK OF VCR
VCR Number Two
24
VCR Number One
Let's
Look
Inside!
USING THE S-VIDEO INPUT JACKS
T
he S(uper)-Video connection on the
rear of the TV can provide you with
better picture detail and clarity for the
playback of accessory sources such as
DBS (digital broadcast satellite), DVD
(digital video discs), video games, and
S-VHS VCR (video cassette recorder)
tapes than the normal antenna picture
connections.
NOTE: The accessory device must
have an S-VIDEO OUT(put) jack in
order for you to complete the connection on this page.
IF YOU ARE USING A
MONO DEVICE, USE
ONLY THE AUDIO
L/MONO JACK.
1
BACK OF TV
Monitor out
AV1 in
VIDEO
L/
Mono
S-VIDEO
AUDIO
Connect one end of the S-VIDEO
CABLE to the S-VIDEO jack on the
back of the TV. Then connect one end
the AUDIO (red and white) CABLES
to the AV1 in AUDIO L and R(left and
right) jacks on the rear of the TV.
Connect other end of the SVIDEO CABLE to the S-VHS (SVideo) OUT jack on the back of the
VCR. Then connect the other ends of
the AUDIO (red and white) CABLES
to the AUDIO (left and right) OUT
jacks on the rear of the VCR.
AV1 in
L/
Mono
75 ⍀
S-VIDEO
R
R
S-VIDEO
CABLE
2
AUDIO IN
(RED/WHITE)
OUT
5
R AUDIO
OUT
L
S-VHS
VIDEO
ANTENNA
IN
IN
ANTENNA
OUT
POWER
SLEEP
IN
A/CH
TV
Turn the VCR and the TV ON.
Monitor out
VIDEO
AUDIO
75 ⍀
VCR
STATUS/EXIT
RECORD
CC
CLOCK
BACK OF VCR
TV/VCR
1
2
3
4
5
6
7
8
ACC
Press the CH + or – buttons on the
remote to scroll the channels until
SVHS appears in the upper left corner
of the TV screen.
SMART
9
SMART
6
0
SOUND
PICTURE
MENU
SURF
3
Slide the TV/VCR/ACC switch to
the VCR position.
Now your ready to place a prerecorded video tape in the VCR and
press the PLAY 䊳 button.
VCR
EQUIPPED WITH
S-VHS (S-Video) JACKS
CH
VOL
MUTE
SVHS
4
SMART HELP
The S-VIDEO and VIDEO
AV1 in(puts) are in parallel. The
S-VIDEO input is dominant when in
use. If separate video signals are connected to the S-VIDEO and VIDEO
AV1 in(put), the signal from the VIDEO
AV1 in(put) will not be usable.
Note: SVHS will appear as a valid
channel option only if a SVHS device
is connected to the S-Video Input Jack.
If the device is connected to the AV1
Video In, the channel will appear as
AV1.
25
SETTING UP THE SLEEPTIMER OPTION
H
ave you ever fallen asleep in front
of the TV only to have it wake you
up at two in the morning with a test
pattern screeching in your ears? Well,
your TV can save you all that trouble
by automatically turning itself off.
15 Min
Press the SLEEP button on the
remote control and the SLEEP timer
display will appear on the screen.
Press the SLEEP button repeatedly
to pick the amount of time (15, 30, 45,
60, 90, 120, 180, or 240 minutes)
before the TV will turn itself off.
30 Min
2
1
POWER
SLEEP
A/CH
TV
An on-screen count down will appear
during the last minute before the TV
shuts itself off.
VCR
STATUS/EXIT
CC
CLOCK
RECORD
TV/VCR
1
2
3
4
5
6
45 Min
ACC
7
8
9
SMART
SMART
0
SOUND
PICTURE
MENU
SURF
60 Min
SMART HELP
The on-screen menu will time
out and disappear from the screen
when you finish, or you can press the
STATUS/EXIT button to clear the menu
from the screen.
CH
VOL
MUTE
90 Min
After a Sleeptimer setting has been
made, pressing the STATUS/EXIT button will display the remaining time
before the TV will shut itself off.
120 Min
During the last minute of a
SLEEP timer setting, an onscreen count down will be displayed. Pressing any button
during the last minute will
cancel the SLEEP timer.
During the last 10 seconds of
a SLEEP timer setting, an
onscreen display will read
GOOD BYE.
180 Min
Good Bye
9 Sec
45 Sec
26
240 Min
SETTING THE AUTO PICTURE CONTROL
W
hether you’re watching a movie
or a sporting event, your TV has
automatic video control settings
matched for your current program
source or content. The Auto Picture feature quickly resets your TV’s video controls for a number of different types of
programs and viewing conditions you
may have in your home. Each Auto
Picture setting is preset at the factory to
automatically adjust the TV’s
Brightness, Color, Picture, Sharpness,
Tint, Color Temperature, DNR and
Contrast+ levels.
Personal
Movies
Press the AUTO PICTURE button
on the remote control. The current Auto
Picture setting will appear in the middle
of the screen.
POWER
SLEEP
A/CH
Press the AUTO PICTURE button
repeatedly to select either PERSONAL,
MOVIES, SPORTS, WEAK SIGNAL,
or MULTI MEDIA picture settings.
TV
VCR
STATUS/EXIT
RECORD
CLOCK
TV/VCR
1
2
3
4
5
6
7
8
ACC
SMART
Note: The PERSONAL setting is the
setting that you setup using the PICTURE options within the on-screen
menu. This is the only Auto Picture setting that can be changed. All other settings are setup at the factory during the
time of production.
CC
9
1
2
Sports
SMART
0
SOUND
PICTURE
MENU
SURF
CH
VOL
MUTE
MOVIES - Preset picture options for
watching Video Tapes, or DVDs.
Weak Signal
SPORTS - Preset picture options for
watching sporting events.
WEAK SIGNAL - Preset picture
options for watching programs where
the reception is not at its best.
MULTI MEDIA - Preset picture
options for use with video gaming.
Multi Media
27
SETTING THE AUTO SOUND CONTROL
T
he Auto Sound feature allows the
listener to select between four different factory set sound options.
Personal (which can be set by the user),
Theatre (for movie viewing), Music (for
musical type programming) and Voice
(when the program is mainly dialogue).
These setting affect the Sound menu’s
Bass, Treble, AVL, and Incredible
Surround controls
To select any of the options follow the
directions below.
Personal
Press the AUTO SOUND button on
the remote control. The current Auto
Sound setting will appear in the middle of
the screen.
Theatre
POWER
SLEEP
Press the AUTO SOUND button
repeatedly to toggle between the four
settings.
A/CH
TV
VCR
2
Note: Only the PERSONAL control
can be changed by the viewer. This
changes the settings in the main onscreen menu's sound controls.
STATUS/EXIT
RECORD
CC
CLOCK
TV/VCR
1
2
3
4
5
6
7
8
ACC
1
SMART
9
SMART
0
SOUND
Music
PICTURE
MENU
SURF
THEATRE - Preset sound options for
watching movies.
MUSIC - Preset sound options for musical programming where there is little
dialogue.
CH
VOL
MUTE
VOICE - Preset sound options for programming where heavy dialogue is present.
Voice
28
USING THE SURF BUTTON (AND THE ALTERNATE CHANNEL BUTTON)
A
“list” or series of previously
viewed channels can be selected using the SURF button on your
remote control. With this feature
you can easily switch between different TV programs that currently
interest you. The SmartSurf control
allows you set up to 8 channels in
its quick viewing “list”.
5
5
Stereo
Surf
5
ADD
5
Press the SURF button on the
remote. The channel number will be
displayed with the word ADD to the
right.
POWER
A/CH
1
STATUS/EXIT
CC
CLOCK
RECORD
VCR
Press the CURSOR RIGHT
button to ADD the channel to the
Surf list. The display will change
from ADD to DELETE.
TV/VCR
1
2
3
4
5
6
7
8
7
5
9
SMART
2
SMART
0
SOUND
4
7
SURF
3
Stereo
Surf
5
7
PICTURE
MENU
ADD
ADD
6
5
CH
VOL
Stereo
Surf
5
7
MUTE
5
How to select Surf channels:
DELETE
DELETE
1
Press the Surf button on the
remote control.
Press the CURSOR UP or
CURSOR DOWN button to scroll
the list of up to 8 channels. As you
scroll to a channel the TV will tune
to that channel.
While the Surf Channel List is
still displayed on the screen, press
the CURSOR RIGHT button to
DELETE the channel from the list.
The display will change from
DELETE to ADD.
Stereo
ACC
Repeat steps 1 through 3 to add
additional channels (up to 8) to the
SURF list. As soon as a ninth channel is added, the first channel in the
list will be removed.
Follow steps 4 and 5 to select a
channel in the Surf list.
DELETE
SLEEP
TV
To remove a channel from the
SURF list:
Stereo
Surf
5
Press the CHANNEL (+) or (–)
buttons (or the NUMBER buttons)
to select a channel to add to the
SURF list.
9
A/CH BUTTON
Stereo
9
Your remote also has an A/CH
(Alternate Channel) button.
Pressing this button will toggle
between the current and one
previously selected channel.
Stereo
Surf
5
7
9
ADD
ADD
ADD
5
POWER
1
SLEEP
A/CH
TV
VCR
STATUS/EXIT
RECORD
CC
5
CLOCK
22
TV/VCR
1
2
4
5
7
8
3
ACC
SMART
6
9
SMART
0
SOUND
PICTU
29
Stereo
Surf
5
7
9
DELETE
DELETE
DELETE
REMOTE USE WITH ACESSORY DEVICES - DIRECT METHOD
Y
our remote control is set to
work your TV and many
infrared remote (IR) control
VCRs, Cable Boxes, Satellite
Systems, DBS, DVD, etc.
However, an easy onetime step
may be necessary before the
remote will work your VCR.
Try this initial check to see if
going on to the following section
is necessary.
SLEEP
1
A/CH
VCR
CC
RECORD
TV
VCR
Place the TV/VCR/ACC
Mode Switch in the proper position.
STATUS/EXIT
1
2
3
4
5
6
7
8
ACC
Point the remote control at
the device and press the POWER
button.
SMART
Does the remote turn the
device ON?
If YES, stop and try other function buttons on the remote. If
they also work the device, then
the remote is ready and no further steps are needed.
0
SOUND
Satellite Receiver
POWER
SLEEP
A/CH
TV
/EXIT
STATUS
CC
TV/VCR
VCR
ACC
SMART
E
PICTUR
SMART
If NO, continue...
2
CLOCK
RECORD
Cable Converter
SURF
SOUND
MENU
CH
VOL
First look up a THREE-DIGIT
remote control number for your
brand of Device before going
through the simple steps on the
following page.
Find your Three-Digit Code on
pages 33-34.
SMART HELP
Remember, if more than
one number is listed, you may
have to try more than the first ThreeDigit code given in order to locate
your Device’s remote code.
NOTE: Setting up the remote is for
use with external accessory devices
only and not for use with other television brands.
30
MUTE
REMOTE USE WITH ACCESSORY DEVICES - CODE ENTRY METHOD
Direct Access Method
N
ow that you have looked up
the three-digit Remote Code
Number for your brand of device,
you are ready to follow the four
simple steps below.
POWER
1
Please read through steps 1-4
before beginning.
A/CH
3
1
2
3
4
5
6
7
8
9
SMART
0
VCR
SOUND
PICTURE
MENU
SURF
Satellite Receiver
or DBS, DVD
CH
VOL
MUTE
Cable Converter
5
SMART HELP
POWER
Remember, if this doesn’t
work the first time, repeat steps
using the same remote code number.
CLOCK
TV/VCR
SMART
Press the SmartSound button
on the remote within 30 seconds,
then release.
Point the remote at the
Device. Press the POWER button
on the remote to turn the unit
ON.
CC
ACC
Place the TV/VCR/ACC
Mode Switch in the proper position.
Enter the THREE-DIGIT
REMOTE CODE NUMBER
for your desired device. The
remote is now ready to send
commands to the unit.
STATUS/EXIT
TV RECORD
VCR
Press the VCR RECORD
button on the remote control and
release.
2
SLEEP
SLEEP
A/CH
TV
XIT
STATUS/E
CC
CLOCK
TV/VCR
RECORD
VCR
ACC
SMART
SMART
PICTURE
SURF
SOUND
MENU
After a second try and the remote does
not operate your device, see if there is
another three-digit code number
(pages 33-34) listed for your device
and repeat the steps above using the
new number.
CH
VOL
If after repeated attempts the code
number method does not work you
device, try the SEARCH METHOD
on the next page.
NOTE: Setting up the remote is for
use with external accessory devices
only and not for use with other television brands.
31
MUTE
4
REMOTE USE WITH ACCESSORY DEVICES - SEARCH METHOD
Search Method
Y
our TV remote can be set to
work various external devices
such as VCRs, Cable Boxes,
Satellite Receivers, DBS, DVD,
etc. by what is called the search
method of remote control programming.
If the “Remote Code” number
method shown on the previous
page did not set your remote to
work your external device, then
follow the easy steps listed below.
Satellite Receiver
07
08
09
Cable Converter
1
06
09
07
08
09
VCR
Press the POWER button on
the device your are attempting to
program to turn it ON.
POWER
SLEEP
2
A/CH
STATUS/EXIT
TV RECORD
VCR
Press the (A/CH) • RECORD
and the SMART SOUND buttons simultaneously and hold
them down.
CC
CLOCK
TV/VCR
1
2
3
4
5
6
7
8
9
ACC
The device will begin to change
channels after the remote identifies the correct code. When the
channels start to change release
the VCR RECORD and SMART
SOUND buttons. The remote
should be ready to operate the
device.
07
08
Please read steps 1-4 before
beginning.
Place the TV/VCR/ACC
Mode Switch in the proper position.
06
3
SMART
SMART
0
SOUND
PICTURE
MENU
SURF
3
CH
VOL
MUTE
SMART HELP
This method can take up to
two minutes to perform.
Don’t let the device scan up more
than five channels. If you do the
remote may pass up the right code
and another two minute search cycle
will have to be repeated.
If no channel change happens within
two minutes, repeat steps 1-4.
Should a channel change still not
occur, the remote will not work the
desired device.
NOTE: Setting up the remote is for use
with external accessory devices only and
not for use with other television brands.
32
4
REMOTE CONTROL DIRECT ENTRY CODES
REMOTE
CODE NO.
VCR
Admiral . . . . . . . . . . . . . . . . . . . . . . . .048
Advantz . . . . . . . . . . . . . . . . . . . . . . . .358
Adventure . . . . . . . . . . . . . . . . . . . . . .000
Aiko . . . . . . . . . . . . . . . . . . . . . . . . . .278
Aiwa . . . . . . . . . . .000, 037, 307, 348, 352
Akai . . . . . . .041, 049, 053, 061, 106, 315
Alba . . . . . . . . . . . . . . . . . . . . . . . . . . .352
Amercian High . . . . . . . . . . . . . . . . . .035
Amstrad . . . . . . . . . . . . . . . . . . . .325, 332
Asha . . . . . . . . . . . . . . . . . . . . . . . . . .240
Audiovox . . . . . . . . . . . . . . . . . . . . . . .037
Baird . . . . . . . . . . . . . . . . . . . . . . . . . .107
Beaumark . . . . . . . . . . . . . . . . . . . . . .240
Bell & Howell . . . . . . . . . . . . . . . . . . .104
Blaupunkt . . . . . . . . . . . . . . .003, 006, 154
Brandt . . . . . . . . . . . . . . . . .187, 320, 321
Broksonic . . . . . . .121, 184, 211, 295, 361
Bush . . . . . . . . . . . . . . . . . . . . . . . . . .352
CCE . . . . . . . . . . . . . . . . . . . . . . .072, 278
Calix . . . . . . . . . . . . . . . . . . . . . . . . . .037
Canon . . . . . . . . . . . . . . . . . . . . . . . . .035
Capehart . . . . . . . . . . . . . . . . . . . . . . .020
Carver . . . . . . . . . . . . . . . . . . . . .081, 146
Citizen . . . . . . . . . . . . . . . . . . . . .037, 278
Colt . . . . . . . . . . . . . . . . . . . . . . . . . . .072
Combitach . . . . . . . . . . . . . . . . . . . . . .352
Craig . . . . . . . . . . .037, 047, 072, 240, 271
Curtis Mathes . . . . . . . . . . . .035, 041, 060
Cybermax . . . . . . . . . . . . . . . . . .051, 240
Daewoo . . . . . . . . . . . . . . . .020, 045, 276
Daytron . . . . . . . . . . . . . . . . . . . . . . . .020
Denon . . . . . . . . . . . . . . . . . . . . . . . . .042
Dynatech . . . . . . . . . . . . . . . . . . . . . . .000
Electrophonic . . . . . . . . . . . . . . . . . . . .037
Emerex . . . . . . . . . . . . . . . . . . . . . . . .032
Emerson . . . .000, 002, 036, 037, 043, 061
. . . . . . . . . .068, 088, 121, 164, 208, 209,
. . . . . . . . . . .211, 212, 278, 295, 361, 479
Ferguson . . . . . . . . . . . . . . .107, 320, 321
Fisher . . . . . . . . . . . . . .047, 054, 066, 104
Fuji . . . . . . . . . . . . . . . . . . . . . . .033, 035
Funai . . . . . . . . . . . . . . . . . . . . . . . . . .000
GE . . . . . . . . . . . . . . . .035, 060, 065, 202
Garrard . . . . . . . . . . . . . . . . . . . . . . . .000
Go Video . . . . . . . . . . . . . . .232, 279, 432
Gold Star . . . . . . . . . . . . . . . . . . .037, 038
Gradiente . . . . . . . . . . . . . . . . . . .000, 406
Grundig . . . . . . . . . . . .003, 007, 195, 347
HI-Q . . . . . . . . . . . . . . . . . . . . . . . . . .047
Harley Davidson . . . . . . . . . . . . . . . . .000
Harman/Kardon . . . . . . . . . . . . . .038, 075
Harwood . . . . . . . . . . . . . . . . . . .068, 072
Headquarter . . . . . . . . . . . . . . . . . . . . .046
Hinari . . . . . . . . . . . . . . . . . . . . .004, 352
Hitachi . . . . . . . . . . . . .000, 004, 041, 042,
. . . . . . . . . . . . . . . . . . .065, 105, 168, 235
Ingersol . . . . . . . . . . . . . . . . . . . . . . . .004
JVC . . . . . . . .008, 041, 067, 208, 384, 486
Jensen . . . . . . . . . . . . . . . . . . . . . . . . .041
KEC . . . . . . . . . . . . . . . . . . . . . . .037, 278
KLH . . . . . . . . . . . . . . . . . . . . . . . . . .072
Kenwood . . . . . . . . . . .038, 041, 067, 384
Kodak . . . . . . . . . . . . . . . . . . . . .035, 037
LXI . . . . . . . . . . . . . . . . . . . . . . . . . . .037
Lloyd’s . . . . . . . . . . . . . . . . . . . . .000, 206
REMOTE
CODE NO.
VCR
Loewe . . . . . . . . . . . . . . . . . . . . . . . . .004
Logik . . . . . . . . . . . . . . . . . . . . . .004, 072
MEI . . . . . . . . . . . . . . . . . . . . . . . . . . .035
MGA . . . . . . . . . . . . . . . . . . . . . .043, 061
MGN Technology . . . . . . . . . . . . . . . .240
MTC . . . . . . . . . . . . . . . . . . . . . .000, 240
Magnavox . . . . . . .000, 035, 081, 146, 181
Marta . . . . . . . . . . . . . . . . . . . . . . . . . .037
Matsui . . . . . . . . . . . . . . . . .004, 348, 352
Matsushita . . . . . . . . . . . . . .035, 162, 454
Memmorex . . . . . . . . . . . . . . . . . . . . .307
Memorex . . . . . . .000, 035, 037, 039, 046,
. . . . . . . . . . .047, 048, 104, 240, 266, 307
Metz . . . . . . . . . . . . . . . . . . . . . .003, 347
Minolta . . . . . . . . . . . . . . . . . . . .042, 105
Mitsubishi . . .043, 061, 067, 075, 173, 443
Motorola . . . . . . . . . . . . . . . . . . .035, 048
Multitech . . . . . . . . . . . . . . . . . . .000, 072
NAD . . . . . . . . . . . . . . . . . . . . . . . . . .058
NEC . . . . . . . . . . .036, 040, 041, 067, 104
Nikko . . . . . . . . . . . . . . . . . . . . . . . . .037
Nikon . . . . . . . . . . . . . . . . . . . . . .034, 253
Noblex . . . . . . . . . . . . . . . . . . . . . . . . .240
Nordmende . . . . . . . . . . . . . .297, 320, 321
Okano . . . . . . . . . . . . . . . . . . . . . . . . .346
Olympus . . . . . . . . . . . . . . . . . . .035, 226
Optimus . . . . . . . . . . . .037, 048, 058, 104,
. . . . . . . . . . . . . . . . . . . . . .162, 432, 454
Optonica . . . . . . . . . . . . . . . . . . . . . . .062
Orion . . . . . . . . . .004, 295, 348, 352, 479
Panasonic . . . . . . . . . .035, 077, 162, 225,
. . . . . . . . . . . . . . . . . . . . . .226, 378, 454
Penney . . . . . . . . . . . . .035, 037, 038, 040,
. . . . . . . . . . . . . . . . . . . . . .042, 065, 105
Pentax . . . . . . . . . . . . . . . . .042, 065, 105
Philco . . . . . . . . . . . . . . . . . . . . . . . . .035
Philips . . . . . . . . . .035, 062, 081, 110, 403
Pilot . . . . . . . . . . . . . . . . . . . . . . . . . . .037
Pioneer . . . . . . . . . . . . . . . . . . . . .058, 067
Portland . . . . . . . . . . . . . . . . . . . . . . . .020
Profax . . . . . . . . . . . . . . . . . . . . . . . . .322
Profitronic . . . . . . . . . . . . . . . . . . . . . .240
Protec . . . . . . . . . . . . . . . . . . . . . . . . .072
Pulsar . . . . . . . . . . . . . . . . . . . . . .039, 051
Quarter . . . . . . . . . . . . . . . . . . . . . . . .046
Quartz . . . . . . . . . . . . . . . . . . . . . . . . .046
Quasar . . . . . . . . . . . . .035, 077, 162, 454
RCA . . . . . . . . . . . . . .042, 060, 065, 077,
. . . . . . . . . . . . . . . . . . .105, 106, 149, 202
Radio Shack . . . . . . . . . . . . . . . . .000, 037
Radix . . . . . . . . . . . . . . . . . . . . . . . . . .037
Randex . . . . . . . . . . . . . . . . . . . . . . . .037
Realistic . . . . . . . .000, 035, 037, 045, 047
. . . . . . . . . . . . . . . . . . 048, 062, 066, 104
Ricoh . . . . . . . . . . . . . . . . . . . . . .034, 253
Runco . . . . . . . . . . . . . . . . . . . . . . . . .039
SEG . . . . . . . . . . . . . . . . . . . . . . . . . . .322
SEI . . . . . . . . . . . . . . . . . . . . . . . . . . .004
STS . . . . . . . . . . . . . . . . . . . . . . . . . . .042
Saba . . . . . . . . . . . . . . . . . . .297, 320, 321
Saisho . . . . . . . . . . . . . . . . . . . . . . . . .004
Salora . . . . . . . . . . . . . . . . . . . . . . . . .075
Samsung . . . . . . . . . . . .045, 051, 053, 240
Sanky . . . . . . . . . . . . . . . . . . . . . .039, 048
Sansui . . . . . . . . . . . . . .000, 041, 067, 271
33
REMOTE
CODE NO.
VCR
Sanyo . . . . . . . . . .046, 047, 104, 240, 268
Saville . . . . . . . . . . . . . . . . . . . . . . . . .352
Scott . . . . . . .043, 045, 121, 164, 211, 212
Sears . . . . . . . . . .000, 035, 037, 042, 046,
. . . . . . . . . . . . . . .047, 054, 066, 104, 105
Sharp . . . . . . . . . . . . . . . . . . . . . .046, 062
Shintom . . . . . . . . . . . . . . . . . . . . . . . .072
Shogun . . . . . . . . . . . . . . . . . . . . .051, 240
Shoral . . . . . . . . . . . . . . . . . . . . . . . . .004
Siemens . . . . . . . . . . . . . . . . . . . . . . . .003
Singer . . . . . . . . . . . . . . . . . . . . . . . . .072
Sinudyne . . . . . . . . . . . . . . . . . . . . . . .004
Sony . . . . . . . . . .000, 011, 022, 032, 033,
. . . . . . . . . . . . . . . . . . .034, 035, 253, 275
Sunkel . . . . . . . . . . . . . . . . . . . . . . . . .348
Sunpak . . . . . . . . . . . . . . . . . . . . . . . .253
Sylvania . . . .000, 035, 043, 081, 103, 110
Symphonic . . . . . . . . . . . . . . . . . . . . . .000
TMK . . . . . . . . . . . . . . . . . .036, 208, 240
Tatung . . . . . . . . . . . . . . . . . . . . . . . . .041
Teac . . . . . . . . . . . . . . . . . . . . . . .000, 041
Technics . . . . . . . . . . . . . . . . . . . .035, 162
Teknika . . . . . . . . . . . . . . . .000, 035, 037
Telefunken . . . . . . . . . . . . . .187, 320, 321
Tansal . . . . . . . . . . . . . . . . . . . . . . . . .322
Thomas . . . . . . . . . . . . . . . . . . . . . . . .000
Thomson . . . . . . . . . . . . . . . . . . . . . . .320
Toshiba . . . . . . . . .043, 045, 066, 212, 366
Totavision . . . . . . . . . . . . . . . . . .037, 240
Towada . . . . . . . . . . . . . . . . . . . . . . . .322
Unitech . . . . . . . . . . . . . . . . . . . . . . . .240
Universum . . . . . . . . . . . . . . . . . . . . . .325
Vactor . . . . . . . . . . . . . . . . . . . . . . . . .045
Vactor Research . . . . . . . . . . . . . .038, 040
Video Concepts . . . . . . . . . .040, 045, 061
Videosonic . . . . . . . . . . . . . . . . . . . . . .240
Wards . .000, 035, 042, 047, 048, 060, 062,
. . . . . . . . . . .072, 081, 149, 161, 212, 240
XR-1000 . . . . . . . . . . . . . . .000, 035, 072
Yamaha . . . . . . . . . . . . . . . . . . . . . . . .038
Zenith . . . . . . . . . . . . . .000, 033, 034, 039
CABLE
REMOTE
CODE NO.
CONVERTOR
ABC . . . . . . . . . . . . . .001, 003, 007, 008,
. . . . . . . . . . . . . . . . . . .011, 013, 014, 017
Aliegio . . . . . . . . . . . . . . . . . . . . . . . .153
Andover . . . . . . . . . . . . . . . . . . . . . . . .544
Antronix . . . . . . . . . . . . . . . . . . . . . . .022
Archer . . . . . . . . . . . . . . . . . . . . .022, 153
Balcor . . . . . . . . . . . . . . . . . . . . . . . . .056
British Telecom . . . . . . . . . . . . . . . . . .105
Cable Star . . . . . . . . . . . . . . . . . . . . . .056
Cablatenna . . . . . . . . . . . . . . . . . . . . . .022
Cabletime . . . . . . . . . . .161, 271, 377, 448
Cableview . . . . . . . . . . . . . . . . . . . . . .022
Century . . . . . . . . . . . . . . . . . . . . . . . .153
Citizen . . . . . . . . . . . . . . . . . . . . . . . . .153
Clyde . . . . . . . . . . . . . . . . . . . . . . . . . .086
Colour Voice . . . . . . . . . . . . . . . .025, 031
Comtec . . . . . . . . . . . . . . . . . . . . . . . .274
Comtronics . . . . . . . . . . . . . . . . . . . . .040
Contec . . . . . . . . . . . . . . . . . . . . . . . . .019
Cryptovision . . . . . . . . . . . . . . . . . . . .600
Deceat . . . . . . . . . . . . . . . . . . . . . . . . .423
REMOTE CONTROL DIRECT ENTRY CODES
CABLE
REMOTE
CODE NO.
CONVERTOR
Eastern . . . . . . . . . . . . . . . . . . . . .002, 274
Everquest . . . . . . . . . . . . . . . . . . .015, 040
Filmnet . . . . . . . . . . . . . . . . . . . . . . . .443
Focus . . . . . . . . . . . . . . . . . . . . . . . . . .400
France Telecom . . . . . . . . . . . . . . . . . .451
GC Electronics . . . . . . . . . . . . . . . . . .056
GEC . . . . . . . . . . . . . . . . . . . . . . . . . .086
Ganard . . . . . . . . . . . . . . . . . . . . . . . . .153
Gemini . . . . . . . . . . . . . . . . .015, 070, 242
General Instrument . . . . . . . .011, 276, 476
Gold Star . . . . . . . . . . . . . . . . . . . . . . .040
Grundig . . . . . . . . . . . . . . . . . . . . . . . .529
Hamlin . . . . . . . . . . . . .009, 020, 034, 259
Hitachi . . . . . . . . . . . . . . . . . . . . . . . . .011
Hytex . . . . . . . . . . . . . . . . . . . . . . . . . .007
Jasco . . . . . . . . . . . . . . . . . . . . . . . . . .153
Jerrold . . . . . . . . . . . . .003, 011, 012, 014,
. . . . . . . . . . . . . . . . . . .015, 024, 276, 476
M.N.E. T. . . . . . . . . . . . . . . . . . . . . . . .443
MNet . . . . . . . . . . . . . . . . . . . . . . . . . .443
Macon . . . . . . . . . . . . . . . . . . . . . . . . .033
Magnavox . . . . . . . . . . . . . .027, 032, 334
Memorex . . . . . . . . . . . . . . . . . . . . . . .000
Movie Time . . . . . . . . . . . . . . . . . . . . .063
NSC . . . . . . . . . . . . . . . . . . . . . . .063, 070
Oak . . . . . . . . . . . . . . . . . . . . . . .007, 019
Optimus . . . . . . . . . . . . . . . . . . . . . . . .021
Panasonic . . . . . . . . . . . . . . .000, 021, 107
Paragon . . . . . . . . . . . . . . . . . . . . . . . .000
Philips . .025, 027, 031, 153, 242, 290, 334
Pioneer . . . . . . . . . . . . . . . . . . . . .533, 753
Popular Mechanics . . . . . . . . . . . . . . . .400
Pulsar . . . . . . . . . . . . . . . . . . . . . . . . .000
RCA . . . . . . . . . . . . . . . . . . . . . . . . . .021
Radio Shack . . . . . . . . . . . . . . . . . . . .015
Recoton . . . . . . . . . . . . . . . . . . . . . . . .400
Regal . . . . . . . . . . . . . . . . . . . . . .020, 259
Regency . . . . . . . . . . . . . . . . . . . . . . . .002
Rembrandt . . . . . . . . . . . . . . . . . .011, 070
Runco . . . . . . . . . . . . . . . . . . . . . . . . .000
SL Marx . . . . . . . . . . . . . . . . . . . . . . .040
Salora . . . . . . . . . . . . . . . . . . . . . . . . .382
Samsung . . . . . . . . . . . . . . . . . . . . . . .040
Satbox . . . . . . . . . . . . . . . . . . . . . . . . .375
Scientific Atlanta . . . . . . . . .008, 017, 477
Signal . . . . . . . . . . . . . . . . . . . . .015, 040
Signature . . . . . . . . . . . . . . . . . . . . . . .011
Sprucer . . . . . . . . . . . . . . . . . . . . . . . .021
Star Sight . . . . . . . . . . . . . . . . . . . . . . .542
Starcom . . . . . . . . . . . . . . . . . . . .003, 015
Stargate . . . . . . . . . . . . . . . . . . . .015, 040
Starquest . . . . . . . . . . . . . . . . . . . . . . .015
Sylvania . . . . . . . . . . . . . . . . . . . . . . . .001
TV85 . . . . . . . . . . . . . . . . . . . . . . . . . .063
Tandy . . . . . . . . . . . . . . . . . . . . . . . . .258
Tele+1 . . . . . . . . . . . . . . . . . . . . . . . . .443
Teleservice . . . . . . . . . . . . . . . . . . . . . .281
Teleview . . . . . . . . . . . . . . . . . . . . . . .040
Texscan . . . . . . . . . . . . . . . . . . . . . . . .001
Timeless . . . . . . . . . . . . . . . . . . . . . . .274
Tocom . . . . . . . . . . . . . . . . .012, 013, 059
Toshiba . . . . . . . . . . . . . . . . . . . . . . . .000
Tudl . . . . . . . . . . . . . . . . . . . . . . . . . . .286
Tusa . . . . . . . . . . . . . . . . . . . . . . . . . . .015
Unike . . . . . . . . . . . . . . . . . . . . . .022, 153
CABLE
REMOTE
CODE NO.
CONVERTOR
United Artists . . . . . . . . . . . . . . . . . . . .007
United Cable . . . . . . . . . . . . . . . . . . . .003
Universal . . . . . . . . . . .022, 056, 153, 191
Videoway . . . . . . . . . . . . . . . . . . . . . .250
Viewstar . . . . . . . . . . . . . . . .027, 063, 258
Visi Cable+ . . . . . . . . . . . . . . . . . . . . .461
Westminster . . . . . . . . . . . . . . . . . . . . .105
Wolsey Gaine . . . . . . . . . . . . . . . . . . .544
Zenith . . . . . . . . . . . . . . . . . .000, 054, 525
Zentek . . . . . . . . . . . . . . . . . . . . . . . . .400
REMOTE
CODE NO.
DBS
Alpha Star . . . . . . . . . . . . . . . . . . . . . .772
Echostar . . . . . . . . . . . . . . . . . . . . . . . .775
HTS . . . . . . . . . . . . . . . . . . . . . . . . . . .775
Hitachi . . . . . . . . . . . . . . . . . . . . . . . . .819
Hughes Network System . . . . . . . . . . .749
Jerrold . . . . . . . . . . . . . . . . . . . . . . . . .627
Magnavox . . . . . . . . . . . . . . . . . .722, 724
Memorex . . . . . . . . . . . . . . . . . . . . . . .724
Panasonic . . . . . . . . . . . . . . . . . . . . . .701
Philips . . . . . . . . . . . . . . . . . . . . .722, 724
Primestar . . . . . . . . . . . . . . . . . . . . . . .627
RCA . . . . . . . . . . . . . . . . . . . . . . . . . .566
Sony . . . . . . . . . . . . . . . . . . . . . . . . . .639
Toshiba . . . . . . . . . . . . . . . . . . . . . . . .790
Uniden . . . . . . . . . . . . . . . . . . . . . . . . .724
REMOTE
CODE NO.
Satellite
AST . . . . . . . . . . . . . . . . . . . . . . . . . . .351
Akai . . . . . . . . . . . . . . . . . . . . . . . . . . .515
Alba . . . . . . . . . . . . . . . . . . .352, 515, 613
Aldea . . . . . . . . . . . . . . . . . . . . . . . . . .288
Amstrad . . . .080, 252, 345, 461, 509, 689
Ankaro . . . . . . . . . . . . . . . . .220, 288, 369
Anitron . . . . . . . . . . . . . . . . . . . . . . . .183
Armstrong . . . . . . . . . . . . . . . . . . . . . .243
Astra . . . . . . . . . . . . . . . . . . . . . . . . . .108
Avalon . . . . . . . . . . . . . . . . . . . . . . . . .396
Axis . . . . . . . . . . . . . . . . . . . . . . . . . . .369
BT . . . . . . . . . . . . . . . . . . . . . . . .515, 668
Beko . . . . . . . . . . . . . . . . . . . . . . . . . .189
Best . . . . . . . . . . . . . . . . . . . . . . . . . . .369
Boca . . . . . . . . . . . . . . . . . . . . . .243, 513
Bush . . . . . . . . . . . . . . . . . . . . . . . . . .067
Cambridge . . . . . . . . . . . . . . . . . .344, 515
Channel Master . . . . . . . . . . . . . . . . . .362
Commlink . . . . . . . . . . . . . . . . . . . . . .288
Connexions . . . . . . . . . . . . . . . . . . . . .396
Conrad . . . . . . . . . . . . . . . . . . . . . . . . .607
Crown . . . . . . . . . . . . . . . . . . . . . . . . .243
DDC . . . . . . . . . . . . . . . . . . . . . . . . . .362
DNT . . . . . . . . . . . . . . . . . . . . . . . . . .396
Echostar . . . . . . . . . . . . . . . . . . . . . . . .396
Farguson . . . . . . . . . . . .067, 183, 189, 336
Fidelity . . . . . . . . . . . . . . . . . . . . . . . .252
Finiux . . . . . . . . . . . . . . . . . . . . .108, 397
Fuba . . . . . . . . . . . . . . . . . . . . . . .369, 396
G-Bat . . . . . . . . . . . . . . . . . . . . . . . . . .183
Galaxis . . . . . . . . . . . . . . . . . . . . . . . .286
Gooding . . . . . . . . . . . . . . . . . . . . . . . .571
Grundig . . . . . . . . . . . .173, 189, 571, 750
Hinari . . . . . . . . . . . . . . . . . . . . . . . . .183
34
REMOTE
CODE NO.
Satellite
Hirschmann . . . . . . . . . . . . . . . . .397, 573
Houston . . . . . . . . . . . . . . . . . . . . . . . .668
Huth . . . . . . . . . . . . . . . . . . .220, 243, 268
ITT . . . . . . . . . . . . . . . . . . . . . . . . . . .108
Intervision . . . . . . . . . . . . . . . . . . . . . .592
JVC . . . . . . . . . . . . . . . . . . . . . . .515, 571
Kathrein . . . . . . . . . . . .092, 504, 622, 658
La Sat . . . . . . . . . . . . . . . . . . . . .513, 607
Lennox . . . . . . . . . . . . . . . . . . . . . . . .592
Lupus . . . . . . . . . . . . . . . . . . . . . . . . .369
Luxor . . . . . . . . . . . . . . . . . . . . . .108, 573
Manhatten . . . . . . . . . . . . . . . . . . . . . .592
Maspro . . . . . . . . . . . . . . . . .092, 336, 750
Matsui . . . . . . . . . . . . . . . . . . . . . . . . .571
Mediamarkt . . . . . . . . . . . . . . . . . . . . .248
Minerva . . . . . . . . . . . . . . . . . . . . . . . .571
Mintec . . . . . . . . . . . . . . . . . . . . . . . . .576
Morgan’s . . . . . . . . . . . . . . . . . . .243, 513
Newhaus . . . . . . . . . . . . . . . . . . . . . . .220
Nikko . . . . . . . . . . . . . . . . . . . . . .360, 713
Nokia . . . . . . . . . . . . . . . . . .108, 397, 573
Nordmende . . . . . . . . . . . . . . . . . . . . .362
Orbitech . . . . . . . . . . . . . . . . . . . . . . . .501
Pace . . . . . . . . . . .067, 183, 336, 455, 791
Paliadium . . . . . . . . . . . . . . . . . . . . . .571
Palsat . . . . . . . . . . . . . . . . . . . . . . . . . .501
Philips . . . . . . . . . . . . .200, 292, 571, 750
Phonotrend . . . . . . . . . . . . . . . . . .288, 592
Plasmatic . . . . . . . . . . . . . . . . . . . . . . .442
Proset . . . . . . . . . . . . . . . . . . . . . . . . .288
Quadral . . . . . . . . . . . . . . . . . . . .362, 628
RFT . . . . . . . . . . . . . . . . . . . . . . .220, 288
Radix . . . . . . . . . . . . . . . . . . . . . . . . . .396
SAT . . . . . . . . . . . . . . . . . . . . . . .351, 461
SEG . . . . . . . . . . . . . . . . . . . . . . . . . . .369
Saba . . . . . . . . . . . . . . . . . . . . . . . . . . .336
Salora . . . . . . . . . . . . . . . . . . . . . . . . .108
Satec . . . . . . . . . . . . . . . . . . . . . . . . . .183
Schwaiger . . . . . . . . . . . . . . . . . .183, 504
Seemann . . . . . . . . . . . . . . . .396, 578, 626
Skymaster . . . . . . . . . . . . . . . . . .288, 626
Sony . . . . . . . . . . . . . . . . . . . . . . . . . .704
Star Trak . . . . . . . . . . . . . . . . . . . . . . .421
Strong . . . . . . . . . . . . . . . . . . . . . . . . .421
Sunstar . . . . . . . . . . . . . . . . . . . . . . . .513
Tantec . . . . . . . . . . . . . . . . . . . . . . . . .336
Techni Sat . . . . . . . . . . . . . . . . . .262, 501
Teleka . . . . . . . . . . . . . . . . . . . . .243, 613
Tonna . . . . . . . . . . . . . . . . . . . . . . . . .668
Triad . . . . . . . . . . . . . . . . . . . . . . . . . .351
Universum . . . . . . . . . . . . . . . . . . . . . .571
Vtech . . . . . . . . . . . . . . . . . . . . . . . . . .351
Wisi . . . . . . . . . . . . . . . . . . . . . . .351, 396
REMOTE
CODE NO.
DVD
Kenwood . . . . . . . . . . . . . . . . . . . . . . .534
Mitsubishi . . . . . . . . . . . . . . . . . . . . . .521
Panasonic . . . . . . . . . . . . . . . . . . . . . .490
Philips . . . . . . . . . . . . . . . . . . . . . . . . .539
Pioneer . . . . . . . . . . . . . . . . . . . . . . . .550
RCA . . . . . . . . . . . . . . . . . . . . . . . . . .522
Sony . . . . . . . . . . . . . . . . . . . . . . . . . .552
Toshiba . . . . . . . . . . . . . . . . . . . . . . . .503
USING THE REMOTE’S VCR BUTTONS
W
hen using the TV remote
with a VCR, first make certain it is set to control your VCR
(by the REMOTE CODE or
SEARCH method).
Set the TV/VCR/ACC mode
switch to VCR on the remote.
POWER BUTTON
Press to turn the VCR ON and
OFF.
Point the top of the remote
toward the front of the VCR
(remote sensor window) when
pressing the buttons.
POWER
SLEEP
A/CH
TV
RECORD BUTTON
Hold the (A/CH) • RECORD button
down to begin a VCR recording.
VCR SYSTEM SWITCH
Set in the VCR position to send
remote commands to the VCR.
VCR
STATUS/EXIT
RECORD
1
REWIND BUTTON 䊴䊴
Press to rewind tapes. For some
VCR’s the STOP button may
have to be pressed first, then
REWIND. In playback mode
hold down the button to view
picture moving rapidly in
reverse.
CLOCK
TV/VCR
1
2
3
4
5
6
7
8
ACC
SMART
9
SMART
0
SOUND
PLAY BUTTON 䊳
Press to begin playback of a
video tape.
CC
PICTURE
MENU
SURF
TV/VCR BUTTON
Press while in the VCR mode (VCR
indicator on the front of the unit
will light) to view the playback of a
tape. Press again to place in the TV
position (VCR indicator light will
go off) to view one program while
recording another program.
When used in the TV mode, the
TV/VCR/CLOCK button will
access the TV's Clock menu
options.
NUMBER BUTTON
Press buttons for direct VCR
channel selections.
PAUSE BUTTON II
Press to temporarily stop the tape
during a playback or recording.
Press again to release Pause.
CH
VOL
MUTE
STOP BUTTON ■
Press to stop the motion of a tape
in playback, rewind, fast forward, etc.
FAST FORWARD BUTTON 䊳䊳
Press to rapidly advance the tape.
For some VCR’s you may need
to press the STOP button first,
then the FAST FORWARD button. In playback mode hold the
button down to view the picture
moving rapidly in the forward
direction.
CHANNEL + & – BUTTONS
Press to scan up or down through
the VCR channel numbers.
SMART HELP
Remember, the VCR buttons on the remote will not
operate your VCR if those features
are not found on your VCR remote
control.
Note: All VCR functions (particularly
Search, Rewind, Fast Forward, etc.)
will operate the same as with the original VCR remote control provided
with the VCR.
35
TROUBLESHOOTING TIPS
lease make these simple
checks before calling for
service. These tips can save you
time and money since charges for
TV installation and adjustment of
customer controls are not covered under your warranty.
CAUTION: A video source (such as a video game, Compact Disc Interactive - CDI, or
TV information channel) which shows a constant non-moving pattern on the TV screen,
can cause picture tube damage. When your TV is continuously used with such a source
the pattern of the non-moving portion of the game could leave an image permanently on
the picture tube. When not in use, turn the video source OFF. Regularly alternate the
use of such video sources with normal TV viewing.
No Power
• Check the TV power cord. Unplug the TV, wait 10 seconds, then reinsert plug into
outlet and push POWER button again.
• Check that outlet is not on a wall switch. Be sure fuse is not blown on AC Power strip.
P
No Picture
• Check antenna connections. Are they properly secured to the TV's 75Ω plug?
• Check the TUNER MODE control for CABLE or ANTENNA setting.
• Check Audio/Video Input jack connections if using a VCR or other external device.
No Sound
• Check the VOLUME buttons.
• Check the MUTE button on the remote control.
• Check Audio/Video Input jack connections if using a VCR or other external device.
Unusual Screen
Coloring
Remote Does Not
Work
TV Displays Wrong
Channel or No
Channels Above 13
• Turn the TV OFF for several seconds, then power the set back ON.
• Unplug the TV for FIVE minutes. Plug the TV back into the AC outlet and power the
TV ON. This should correct the problem.
• Check the Picture menu options for proper control settings.
• Pressthe Auto Picture button on the remote to change the color options. If the color
resets itself, readjust the Picture menu option control.
• Check batteries. Replace with AA Heavy Duty (Zinc Chloride) or Alkaline batteries
if necessary.
• Clean the remote and the remote sensor window on the TV.
• Check the TV power cord. Unplug the TV, wait 10 seconds, then reinsert plug into
outlet and push POWER button again. Be sure fuse is not blown on AC Power strip.
• Check to be sure TV outlet is not on a wall switch.
• Repeat channel selection.
• Add desired channel numbers (CHANNEL control) into TV memory.
• Check to be sure the TUNER MODE control is set to the CABLE option.
Cleaning and Care
• To avoid possible shock hazard be sure the TV is unplugged from the electrical outlet before cleaning.
• When cleaning the TV screen take care not to scratch or damage the screen surface (avoid wearing jewelry or using
anything abrasive). Wipe the front screen with a clean cloth dampened with water. Use even, easy, vertical strokes when
cleaning.
• Gently wipe the cabinet surfaces with a clean cloth or sponge dampened in a solution of cool clear water. Use a clean
dry cloth to dry the wiped surfaces.
• Never use thinners, insecticide sprays, or other chemicals on or near the cabinet, as they might cause permanent marring
of the cabinet finish.
36
GLOSSARY TO TELEVISION TERMS
Auto Picture Booster • A control that will automatically amplify “weak video signals” to a point where they are acceptable for
viewing.
On-screen Displays (OSD) • Refers to the wording or messages
generated by the television (or VCR) to help the user with specific feature controls (color adjustment, programming, etc.).
Auto Programming • The procedure of adding or deleting
channel numbers into the Television’s memory circuits. In this
way the Television “remembers’’ only the locally available or
desired channel numbers and skips over any unwanted channel
numbers.
Quadra Surf • The feature that allows the programming of four
separate Surf lists holding up to 10 channels each.
Remote Sensor Window • A window or opening found on the
Television control panel through which infrared remote control
command signals are received.
Coaxial Cable • A single solid antenna wire normally matched
with a metal plug (F-type) end connector that screws (or pushes)
directly onto a 75 Ohm input found on the Television or VCR.
Surf • The action of scanning specific channel in a limited
channel list.
Closed Caption • Broadcast standard which allows you to read
the voice content of television programs on the TV screen.
Designed to help the hearing impaired this feature uses onscreen "text boxes" to show dialogue and conversations while
the TV program is in progress.
Status/Exit • Allows the user to quickly confirm what channel
number is currently being viewed. Status can also be used to
clear the Television of on screen displays or information (rather
than waiting for the displays to “time out” or automatically disappear from the screen).
Front Audio/Video Inputs • Located on the front of the TV
these connectors (phono type plug) are used for the input of
audio and video signals. Designed for easy use with VCRs or
cameras.
Twin Lead Wire • The more commonly used name for the two
strand 300 Ohm antenna wire used with many indoor and outdoor antenna systems. In many cases this type of antenna wire
requires an additional adapter (or balun) in order to connect to
the 75 Ohm Input terminals designed into the more recent
Televisions and VCRs.
Menu • An on-screen listing of feature controls shown on the
Television screen that are made available for user adjustments.
Tuner Mode • Designed for first time set up and use where the
TV is set for antenna or cable TV signal connections.
INDEX
Alternate Channel Control . . . . . . . . . . . . . . . . . . . . . . . . . . .29
Audio/Video Input Jacks . . . . . . . . . . . . . . . . . . . . . . . . . . . .23
Audio/Video Output Jacks . . . . . . . . . . . . . . . . . . . . . . . . . . .24
SmartLock
Access Code . . . . . . . . . . . . . . . . . . . . . . . . . . . . . . . . . . . .15
Block All Channels . . . . . . . . . . . . . . . . . . . . . . . . . . . . . .18
Blocking Channels . . . . . . . . . . . . . . . . . . . . . . . . . . . . . . .16
Blocking Options . . . . . . . . . . . . . . . . . . . . . . . . . . . . . . . .21
Clear All Blocked Channels . . . . . . . . . . . . . . . . . . . . . . . .17
Definitions/Understanding Auto Lock . . . . . . . . . . . . . . . .14
Movie Ratings . . . . . . . . . . . . . . . . . . . . . . . . . . . . . . . . . .19
TV Ratings . . . . . . . . . . . . . . . . . . . . . . . . . . . . . . . . . . . . .20
AVL (Automatic Volume Leveler) Control . . . . . . . . . . . . . . .9
Balance Control . . . . . . . . . . . . . . . . . . . . . . . . . . . . . . . . . . .8
Bass Control . . . . . . . . . . . . . . . . . . . . . . . . . . . . . . . . . . . . . .8
Brightness Control . . . . . . . . . . . . . . . . . . . . . . . . . . . . . . . . .5
Closed Caption Control . . . . . . . . . . . . . . . . . . . . . . . . . . . . .22
Color Control . . . . . . . . . . . . . . . . . . . . . . . . . . . . . . . . . . . . .5
Color Temperature Control . . . . . . . . . . . . . . . . . . . . . . . . . . .5
Contrast + (Black Stretch) Control . . . . . . . . . . . . . . . . . . . . .7
DNR (Digital Noise Reduction) Control . . . . . . . . . . . . . . . . .6
Picture Control . . . . . . . . . . . . . . . . . . . . . . . . . . . . . . . . . . . .5
Surf Control . . . . . . . . . . . . . . . . . . . . . . . . . . . . . . . . . . . . .29
Registration Information . . . . . . . . . . . . . . . . . . . . . . . . . . . . .2
Remote Control Use with Accessory Devices:
Code Entry List . . . . . . . . . . . . . . . . . . . . . . . . . . . . . .33-34
Code Entry Method of Identification . . . . . . . . . . . . . . . .31
Direct Access Method of Identification . . . . . . . . . . . . . .30
Search Method of Identification . . . . . . . . . . . . . . . . . . . .32
VCR Related Buttons . . . . . . . . . . . . . . . . . . . . . . . . . . . .35
S-Video Input Jacks . . . . . . . . . . . . . . . . . . . . . . . . . . . . . . . .25
Safety Information . . . . . . . . . . . . . . . . . . . . . . . . . . . . . . . . .3
SAP (Secondary Audio Program) Control . . . . . . . . . . . . . . .11
Sharpness Control . . . . . . . . . . . . . . . . . . . . . . . . . . . . . . . . . .5
Sleeptimer Control . . . . . . . . . . . . . . . . . . . . . . . . . . . . . . . .26
SmartPicture Control . . . . . . . . . . . . . . . . . . . . . . . . . . . . . . .27
SmartSound Control . . . . . . . . . . . . . . . . . . . . . . . . . . . . . . .28
Sound Control . . . . . . . . . . . . . . . . . . . . . . . . . . . . . . . . . . . .12
Stereo/Mono Settings . . . . . . . . . . . . . . . . . . . . . . . . . . . . . .12
Table of Contents . . . . . . . . . . . . . . . . . . . . . . . . . . . . . . . . . .4
Timer Controls . . . . . . . . . . . . . . . . . . . . . . . . . . . . . . . . . . .13
Tint Control . . . . . . . . . . . . . . . . . . . . . . . . . . . . . . . . . . . . . .5
Treble Control . . . . . . . . . . . . . . . . . . . . . . . . . . . . . . . . . . . . .8
Troubleshooting Tips . . . . . . . . . . . . . . . . . . . . . . . . . . . . . . .36
Warranty . . . . . . . . . . . . . . . . . . . . . . . . . . . . . . . . . . . . . . . .38
Glossary of Terms . . . . . . . . . . . . . . . . . . . . . . . . . . . . . . . . .37
Incredible Surround Control . . . . . . . . . . . . . . . . . . . . . . . . .10
Index . . . . . . . . . . . . . . . . . . . . . . . . . . . . . . . . . . . . . . . . . . .37
37
RENEWED
90 DAY
LIMITED WARRANTY