1
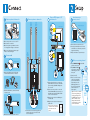
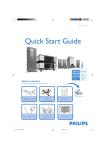
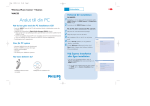
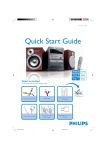
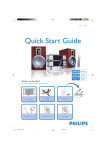
DVD Home Theatre System
DVD system (front)
• Press OPEN/CLOSE
panel to open the disc tray
on the front
• Place DVD in any of the 5 trays with the
label facing up
• Press OPEN/CLOSE
again
• Press UP
, DOWN
, RIGHT
or
LEFT
to scroll through the options in
the DVD menu
• Press PLAY
Quick Star t Guide
Listen to Radio
Play DVD
on the option you want.
• To stop press STOP
Tip Press PLAY
to resume from where
you stopped or press STOP
and PLAY
to start from the beginning of the title
• Press DISC MENU
DVD menu
to go back to the
DVD system (front)
• Press SOURCE
select TUNER mode.
HTS5510C
on the front panel to
• Press PLAY/PAUSE
on the front panel
or PLAY
to enter into auto install mode.
Tip This feature is only availble for first
time setup, refer to user manual if you
wish to program radio stations again
or for manual programming
• Once completed, the last tuned radio station
will play.
Experience Surround Sound
1 Press SURR
Multi-channel
to switch between Stereo and
2 Press SOUND
for either Concert, Drama,
Action or Sci-fi preset digital sound effects
Troubleshooting
For more troubleshooting tips, see the user manual
What’s in the Box
Problem
Tip
No power
• Check if the AC power cord is properly connected.
• Press the STANDBY-ON on the front of the DVD system to turn on the power.
No picture
• Press DISC 1-2-3-4-5 on remote control.
• Check connection to TV and ensure the plugs are firmly in place.
No sound or
distorted sound
• Adjust the volume and check the speaker connections and settings.
• Check audio cable connections and press SOURCE to select correct input source.
Remote control
does not work
• Check that the batteries are loaded correctly or replace the batteries with new ones.
• Select the source (DISC or TUNER, for example) before pressing the function button.
• Point the remote control directly toward the IR sensor.
DVD system
Centre speaker
Quick start guide
Audio cables
(red & white plugs)
FM wire antenna
Subwoofer
Remote control
and 2 batteries
Video cables
(yellow plug)
Inter-connect
cable
AM/MW
loop antenna
Need help?
User Manual
See the user manual that came with your home
theatre system.
Online
Go to www.philips.com/support
Front speakers
(left & right)
2005 © Koninklijie Philips N.V.
All rights reserved.
12 NC 31 39 246 17472
www.philips.com
Rear speakers
(left & right)
User manual
Position speakers & subwoofer
Connect speakers to subwoofer
Front
right
speakers
(back)
Front
left
speakers
(back)
Connect DVD system to TV
and subwoofer
VIDEO IN
(CVBS)
Insert batteries in
remote control
Remote control (back)
Television (back)
VIDEO IN
(CVBS)
To antenna
or set-top
box
1 Place centre speaker on or close to the TV
2 Place subwoofer on the floor
DVD system (back)
VIDEO OUT
3 Place front speakers equal distance from the
TV and angle them 45 degree to the listener
4 Place rear speakers facing the listener, equal
distance on the left and right
Fix antennas
FM
ANT
S-VIDEO
MW
ANT
S-VIDEO
Y
PB
COMPONENT
PR
TV-IN
AUX-IN
LINE-OUT
L
COAXIAL
COAXIAL
DIGITAL IN
VIDEO
R
TO AV SUBWOOFER
Subwoofer (back)
Rear
left
speakers
(back)
Rear
right
speakers
(back)
VIDEO
DIGITAL IN
VIDEO OUT
FM
ANT
MW
ANT
S-VIDEO
Y
PB
COMPONENT
PR
TV-IN
AUX-IN
LINE-OUT
L
COAXIAL
Find correct viewing channel
Centre speakers
(back)
• Press STANDBY-ON
system’s remote control
DIGITAL IN
VIDEO
R
TO AV SUBWOOFER
~ AC
MAINS
TO DVD
SYSTEM
FRONT CENTERFRONT
LEFT
RIGHT
REAR REAR
LEFT RIGHT
Subwoofer
(back)
• Connect the FM antenna to the FM socket,
extend the antenna and fix it on the wall
TO DVD
SYSTEM
~ AC
MAINS
TO DVD
SYSTEM
FRONT CENTERFRONT
LEFT
RIGHT
REAR REAR
LEFT RIGHT
3 Plug in the power cable of the DVD system
to an AC outlet
DVD system (back)
VIDEO OUT
S-VIDEO
COAXIAL
DVD System (back)
FM
ANT
MW
ANT
Y
PB
COMPONENT
PR
TV-IN
AUX-IN
LINE-OUT
L
DIGITAL IN
VIDEO
R
TO AV SUBWOOFER
MW loop
antenna
• Push back tab and insert each wire into slot
1 Use the yellow Video cable to connect the
yellow CVBS socket on the rear of the DVD
system and the yellow VIDEO IN jack at the
rear of the TV
2 Use the inter-connect cable to connect the
TO AV SUBWOOFER socket on the rear of
the DVD system and the TO DVD SYSTEM
on the rear of the subwoofer
• Unfold the AM/ MW loop antenna and fix the
claw into the slot
FRONT CENTERFRONT
LEFT
RIGHT
REAR REAR
LEFT RIGHT
Connect the various coloured plugs from the
speakers to the same colour socket on the
rear of the subwoofer
• Insert the provided batteries in the remote
control. Take note of where the positive and
negative ends should go
• Replace the batteries compartment cover
TO A VSUBWOOFER
DVD system (back)
• Remove batteries compartment cover
4 Plug in the power cable of the subwoofer to
an AC outlet
Tip To connect other devices
or audio from TV to the DVD
system, refer to the user
manual
on the DVD
• Press DISC 1-2-3-4-5
on the remote control until
‘LOAD X’ appears on the
front panel
• Switch on the TV
• Press ‘0’ on the TV’s remote
control, then repeatedly
press the Channel Down
button until you see the
DVD background screen.
This is the correct viewing
channel for the home
theatre system
Tip For some TVs, to find the
correct viewing channel, you
can keep pressing the AV or
the SELECT buttons. If still
unable to find the correct
viewing channel, check the
connections again or check
your TV’s user manual