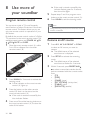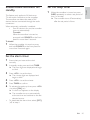
1
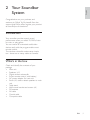
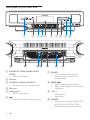
HSB3280
Register your product and get support at
Philips vous remercie de
votre confiance.
Gracias por escoger Philips
Besoin d'une aide
rapide?
Necesita ayuda
inmediata?
Les Guide d'utilisation rapide et Manuel de
l'utilisateur regorgent d'astuces destinées à
simplifier l'utilisation de votre produit Philips.
Toutefois, si vous ne parvenez pas à résoudre
votre probléme, vous pouvez accéder à
notre aide en ligne à l'adresse
Lea primero la Guía de uso rápido o el
Manual del usuario, en donde encontrará
consejos que le ayudarán a disfrutar
plenamente de su producto Philips.
Si después de leerlo aún necesita ayuda,
consulte nuestro servicio de
asistencia en línea en
Thank you for choosing Philips.
Need help fast?
Read your Quick Use Guide and/or
Owner's Manual first for quick tips
that make using your Philips product
more enjoyable.
If you have read your instructions
and still need assistance,
you may access our online help at
www.philips.com/welcome
or call
1 866 771 4018
while with your product.
(and Model / Serial number)
EN User manual
www.philips.com/welcome
ou formez le
1 800 661 6162 (Francophone)
1 866 771 4018 (English speaking)
Veillez à avoir votre produit à
portée de main.
(et model / serial nombre)
3
ES Manual del usuario
31
FR Mode d’emploi
63
www.philips.com/welcome
o llame al teléfono
1 866 771 4018
y tenga a mano el producto.
(y número de model / serial)
EN
3
Engl i sh
1 866 771 4018
1 800 661 6162 (French Speaking)
1 866 771 4018 (English or Spanish Speaking)
P&F USA, Inc. P.O. Box 672768, Marietta, GA. 30006
4
EN
Contents
1 Important
Important safety instructions
Important Safety Instructions
Notice
Recycling
2 Your Soundbar System
Introduction
What’s in the box
Overview of the main unit
Overview of the remote control
3 Get started
6
6
6
7
8
9
9
9
10
11
13
13
13
14
Attach speakers to the main unit
Attach the stand
Connect AV devices
Option 1: Connect this soundbar to
devices through the TV
14
Option 2: Connect devices through this
soundbar to the TV (basic)
15
Option 3: Connect devices through this
soundbar to the TV (advanced)
16
Connect FM antenna
17
Connect power
17
Install remote control batteries
18
Set clock
18
Turn on
19
Switch to standby mode
19
Set up wireless connection manually 19
22
Adjust volume level
22
Adjust subwoofer volume
22
Select a sound effect
22
Select a game sound effect
22
Select a movie sound effect
22
Select a music mode (for USB only) 22
Mute sound
22
7 Tune to FM radio stations
Program radio stations automatically
Program radio stations manually
Tune to a preset radio station
8 Use more of your soundbar
Program remote control
Rename an AV source
Enable/disable automatic on/standby
Set the alarm timer
Set the sleep timer
9 Product information
23
23
23
23
24
24
24
25
25
25
26
26
26
26
26
26
26
26
27
Product information
Specifications
Amplifier
Tuner (FM)
L/R speakers
Subwoofer
General information
USB playability information
10 Troubleshooting
28
4 Play
20
Play an AV source through this soundbar 20
Play from USB
20
5 Control USB play
Skip to a track
Pause/resume play
Search within a track
Repeat play
Random play
Program tracks
21
21
21
21
21
21
21
11 Appendix
29
Mount to a wall
29
What’s in the supplied mounting kit 29
What else you’ll need
29
Mount the main unit and speakers 29
EN
5
Engl i s h
6 Adjust volume level and sound effect
1 Important
Important safety instructions
Important Safety Instructions
a Read these instructions.
k Only use attachments/accessories
specified by the manufacturer.
l Use only with the cart, stand, tripod,
bracket, or table specified by the
manufacturer or sold with the apparatus.
When a cart is used, use caution when
moving the cart/apparatus combination to
avoid injury from tip-over.
b Keep these instructions.
c Heed all warnings.
d Follow all instructions.
e Do not use this apparatus near water.
f Clean only with dry cloth.
g Do not block any ventilation openings.
Install in accordance with the
manufacturer’s instructions.
h Do not install near any heat sources such
as radiators, heat registers, stoves, or
other apparatus (including amplifiers) that
produce heat.
i Do not defeat the safety purpose of
the polarized or grounding-type plug.
A polarized plug has two blades with
one wider than the other. A grounding
type plug has two blades and a third
grounding prong. The wide blade or the
third prong are provided for your safety.
If the provided plug does not fit into
your outlet, consult an electrician for
replacement of the obsolete outlet.
m Unplug this apparatus during lightning
storms or when unused for long periods
of time.
n Refer all servicing to qualified service
personnel. Servicing is required when
the apparatus has been damaged in any
way, such as power-supply cord or plug
is damaged, liquid has been spilled or
objects have fallen into the apparatus, the
apparatus has been exposed to rain or
moisture, does not operate normally, or
has been dropped.
o Battery usage CAUTION – To prevent
battery leakage which may result in bodily
injury, property damage, or damage to the
unit:
• Install all batteries correctly, + and - as
marked on the unit.
• Do not mix batteries (old and new or
carbon and alkaline, etc.).
• Remove batteries when the unit is not
used for a long time.
p Apparatus shall not be exposed to
dripping or splashing.
j Protect the power cord from being
walked on or pinched, particularly at
plugs, convenience receptacles, and the
point where they exit from the apparatus.
6
EN
q Do not place any sources of danger on
the apparatus (e.g. liquid filled objects,
lighted candles).
Know these safety symbols
This ‘bolt of lightning’ indicates uninsulated
material within your unit may cause an electrical
shock. For the safety of everyone in your
household, please do not remove product
covering.
The ‘exclamation point’ calls attention to
features for which you should read the enclosed
literature closely to prevent operating and
maintenance problems.
WARNING: To reduce the risk of fire or electric
shock, this apparatus should not be exposed to
rain or moisture and objects filled with liquids,
such as vases, should not be placed on this
apparatus.
CAUTION: To prevent electric shock, match
wide blade of plug to wide slot, fully insert.
Warning
Eng l i s h
r This product may contain lead and
mercury. Disposal of these materials
may be regulated due to environmental
considerations. For disposal or recycling
information, please contact your local
authorities or the Electronic Industries
Alliance: www.eiae.org.
• Never remove the casing of this soundbar.
• Never lubricate any part of this soundbar.
• Never place this soundbar on other electrical
•
•
equipment.
Keep this soundbar away from direct sunlight, naked
flames or heat.
Ensure that you always have easy access to the power
cord, plug or adaptor to disconnect the soundbar from
the power.
a Wall or Ceiling Mounting - The
appliance should be mounted to a wall
or ceiling only as recommended by the
manufacturer.
Wall mounting of the soundbar should only be
performed by qualified personnel. The soundbar
must only be mounted on an appropriate wall
bracket and on a wall that can safely hold the
weight of the soundbar. Improper wall mounting
can result in severe injury or damage. Do not
attempt to wall mount the soundbar yourself.
Notice
Notice of compliance
For USA:
This equipment has been tested and found
to comply with the limits for a Class B digital
device, pursuant to Part 15 of the FCC Rules.
These limits are designed to provide reasonable
protection against harmful interference in a
residential installation. This equipment generates,
uses and can radiate radio frequency energy
and, if not installed and used in accordance with
the instructions, may cause harmful interference
to radio communications. However, there is
no guarantee that interference will not occur
in a particular installation. If this equipment
does cause harmful interference to radio or
television reception, which can be determined
by turning the equipment off and on, the user is
encouraged to try to correct the interference
by one or more of the following measures:
EN
7
•
•
Reorient or relocate the receiving antenna.
Increase the separation between the
equipment and receiver.
• Connect the equipment into an outlet on
a circuit different from that to which the
receiver is connected.
• Consult the dealer or an experienced
radio/TV technician for help.
For Canada:
This digital apparatus does not exceed the Class
B limits for radio noise emissions from digital
apparatus as set out in the Radio Interference
Regulations of the Canadian Department of
Communications. This Class B digital apparatus
complies with Canadian ICES-003.
The set complies with the FCC-Rules, Part
15. Operation is subject to the following two
conditions:
1.This device may not cause harmful
interference, and
2.This device must accept any interference
received, including interference that may cause
undesired operation.
FCC Declaration of conformity
Model number: HSB3280/F7
Trade name: Philips
Responsible Party:
Philips
P. O. Box 672768
Marietta, GA 30006
1 866 771 4018 (English)
1 800 661 6162 (Français)
Any changes or modifications made to this
device that are not expressly approved by
Philips Consumer Lifestyle may void the user’s
authority to operate the equipment.
Recycling
Your product is designed and manufactured
with high quality materials and components,
which can be recycled and reused.
When you see the crossed-out wheel bin
symbol attached to a product, it means the
product is covered by the European Directive
2002/96/EC:
8
EN
Never dispose of your product with other
household waste. Please inform yourself about
the local rules on the separate collection of
electrical and electronic products. The correct
disposal of your old product helps prevent
potentially negative consequences on the
environment and human health.
Your product contains batteries covered by the
European Directive 2006/66/EC, which cannot
be disposed of with normal household waste.
When you see the crossed-out wheel bin
symbol with the chemical symbol ‘Pb’, it means
that the batteries comply with the requirement
set by the directive for lead:
Pb
Please inform yourself about the local rules on
separate collection of batteries. The correct
disposal of batteries helps prevent potentially
negative consequences on the environment and
human health.
Manufactured under license from Dolby
Laboratories. ‘Dolby’, ‘Pro Logic’ and the
double D symbol are trademarks of Dolby
Laboratories.
Engl i s h
2 Your Soundbar
System
Congratulations on your purchase, and
welcome to Philips! To fully benefit from the
support that Philips offers, register your product
at www.Philips.com/welcome.
Introduction
Your soundbar provides superb sound
performance when you watch TV, DVDs, listen
to music, or play games.
You can control all connected audio/video
devices easily with the programmable smart
remote control.
The wireless subwoofer makes setup simple,
too - there are no messy cables to connect.
What’s in the box
Check and identify the contents of your
package:
• Main unit
• Speakers (x 2)
• Digital wireless subwoofer
• Smart remote control (with battery)
• AC power adaptor for main unit
• Studs (x2) used to attach speakers to main
unit
• Table stand
• Wall mount bracket and screws (x4)
• FM antenna
• AV cable
• Coaxial cable
• Composite cable
EN
9
Overview of the main unit
a
k
l
b
cd e
mn
a SOUND SETTINGS (GAMES, MOVIE,
MUSIC)
• Select a sound effect.
b IR sensor
c AV FRONT (VIDEO L-AUDIO-R)
• AV input sockets on the front panel.
d Flip cover
e Display panel
• Show current status.
f
•
10
EN
Socket for a USB mass storage device.
f
o
g h
p
i j
q
g POWER
• Turn on the soundbar, switch to
standby mode, or switch to Eco
Power Standby.
h PRESET/
• Select a preset FM radio station.
• Select an album/folder in a connected
USB device.
i - VOL +
• Adjust volume.
• Adjust time.
j SOURCE
• Select a source for play: TUNER, USB,
AV1, AV2, AV FRONT or COAX.
• Enable/disable automatic on/standby.
l DC IN
• Connect the AC adaptor.
Overview of the remote
control
Eng l i sh
k PRESS
• Detach speakers from the main unit.
m AUDIO IN - COAXIAL
• Coaxial audio output socket.
n VIDEO OUT
• Socket for composite video output.
o AV1 IN (VIDEO L - AUDIO - R)
• AV input sockets.
p AV2 IN (VIDEO L - AUDIO - R)
• AV input sockets.
q FM ANTENNA
•
Connect the FM antenna.
a
y
b
x
c
w
v
u
d
e
f
t
s
r
g
q
p
o
h
i
n
m
l
j
k
EN
11
a
•
Turn on the soundbar, switch to
standby mode, or switch to Eco
Power Standby.
b SET TIME/PROG
• Set the clock.
• Program tracks in a USB device.
• Program radio stations.
c SETUP
• Rename AV resource.
d REPEAT
• Select a repeat play mode for the
connected USB device.
e SHUF
• Play tracks in the USB device
randomly.
f GAME SOUND
• Select a game sound setting.
g MOVIE SOUND
• Select a movie sound setting.
h VOL +/• Adjust volume.
• Adjust time.
i LEARN
• Program remote control.
j COAX
• Select the AV input source from the
AUDIO IN - COAXIAL socket.
k AV FRONT
• Select the AV source input from the
AV FRONT (VIDEO L-AUDIO-R)
sockets.
l AV2
• Select the AV source input from the
AV2 IN (VIDEO L - AUDIO - R)
sockets.
m AV1
• Select the AV source input from the
AV1 IN (VIDEO L - AUDIO - R)
sockets.
12
EN
n Programing buttons
• Are reserved for remote control
programing.
o
/
•
Fast reverse or fast forward within a
track in the USB device.
Tune to a radio station.
•
p Indicator for remote control programing
q MUSIC MODE/SUBW VOL
• In USB mode, select a music sound
setting.
• In AV1, AV2, AV FRONT or
COAXIAL mode, adjust subwoofer
volume.
r
/
•
Skip to the previous/next track in the
USB device.
s OK /
• Start or pause USB play.
• Confirm renaming of an AV source.
t PRESET/ALB/
• Skip to the previous/next album
(folder) in the USB device.
• Select a preset radio station.
u MUTE
• Mutes volume.
v TIMER
• Set the alarm timer.
w SLEEP
• Set the sleep timer.
x USB
• Select the USB source.
y TUNER
• Select the tuner (FM) source.
Englis h
3 Get started
Caution
• Use the controls only as stated in this user manual.
Always follow the instructions in this chapter in
sequence.
If you contact Philips, you will be asked for the
model and serial number of your soundbar. The
model number and serial number are on the
bottom of your soundbar. Write the numbers
here:
Model No. __________________________
Serial No. ___________________________
Attach speakers to the main
unit
1
2
Place the main unit on a soft and flat
surface.
• Ensure that the bottom side faces
upwards.
3
Insert a supplied stud into the hole.
4
Repeat steps 2 and 3 to attach the right
speaker.
Attach the stand
1
Slide the supplied table stand onto the
bottom of the main unit until you hear a
click.
Attach the left speaker to the left side of
the main unit.
EN
13
Tip
• You can also mount the soundbar on a wall (see
‘Appendix’ on page 29).
Connect AV devices
Note
• There are various ways to connect the soundbar to
•
•
•
•
other AV devices. You only need to select the best
option that fits your existing AV device setup.
For AV connection to the soundbar, there are multiple
sets of AV sockets available on the main unit. You can
choose either set for an AV connection.
When you connect cables, ensure that the color of the
plug matches the color of the socket.
To use sockets on the front panel, flip open the cover.
The types of AV devices and connections in the
following instructions are for reference only.
AUDIO OUT
(DIGITAL)
•
TV
You can also connect the red/white
audio connectors of the supplied AV
cable from the TV to a set of audio
input sockets.
Note
• It is unnecessary to connect the yellow video
Option 1: Connect this soundbar to
devices through the TV
connectors.
If all the devices for use are connected to the
TV and the TV has an available audio output
socket, follow these instructions.
1
If the TV has a digital output socket,
connect the supplied coaxial cable
(orange) from the TV to the AUDIO IN
- COAXIAL socket.
Not used
L
R
AUDIO OUT
14
EN
TV
If the TV does not have an available audio
output socket, follow these instructions.
1
B Set top box
Connect the AV output sockets the
set top box to the AV1 IN (VIDEO L
- AUDIO - R) sockets.
Connect the video input socket on the TV
to the VIDEO OUT socket.
L
VIDEO IN
2
AUDIO OUT
AUDIO
R
VIDEO
TV
Connect the AV devices directly to the
soundbar:
A Game console:
Connect the AV output sockets on
the game console to the AV FRONT
(VIDEO L-AUDIO-R) sockets.
C DVD player
Connect the AV output sockets on the DVD
player to the AV2 IN (VIDEO L - AUDIO - R)
sockets.
L
AUDIO OUT
AUDIO
R
VIDEO
EN
15
E n glish
Option 2: Connect devices through
this soundbar to the TV (basic)
Option 3: Connect devices through
this soundbar to the TV (advanced)
If you want to connect all the devices for use to
this soundbar and the TV has an available digital
output socket, follow these instructions.
1
Connect the AV devices directly to the
soundbar:
A DVD player:
Connect the AV output sockets on
the DVD player to the AV FRONT
(VIDEO L-AUDIO-R) sockets.
L
AUDIO OUT
AUDIO R
VIDEO
C Game console 2:
Connect the AV output sockets on
the other game console to the AV2
IN (VIDEO L - AUDIO - R) sockets.
L
AUDIO OUT
AUDIO R
VIDEO
B Game console 1:
Connect the AV output sockets on a
game console to the AV1 IN (VIDEO
L - AUDIO - R) sockets.
L
2
16
EN
AUDIO OUT
AUDIO
R
VIDEO
Connect the video input socket on the
TV to the VIDEO OUT socket with the
supplied yellow composite cable.
Eng l i s h
Connect FM antenna
VIDEO IN
TV
Tip
• For optimal reception, fully extend and adjust the
3
Connect the digital output socket on the
TV to the AUDIO IN - COAXIAL socket
with the supplied orange coaxial cable.
•
•
1
position of the antenna.
For better FM stereo reception, connect an outdoor
FM antenna to the FM ANTENNA socket.
The soundbar does not support AM radio reception.
Connect the supplied FM antenna to the
FM ANTENNA socket.
Connect power
Caution
• Risk of product damage! Ensure that the power supply
AUDIO OUT
(DIGITAL)
TV
•
•
voltage corresponds to the voltage printed on the back
or the underside of the soundbar.
Risk of electric shock! When you unplug the AC
adaptor, always pull the plug from the socket. Never
pull the cord.
Before connecting the AC adaptor, ensure you have
completed all other connections.
1
Prepare the AC adaptor.
2
Connect one end to the DC IN socket on
the main unit.
EN
17
Install remote control
batteries
Caution
• Risk of explosion! Keep batteries away from heat,
•
sunshine or fire. Never discard batteries in fire.
Perchlorate Material - special handling may apply. See
www.dtsc.ca.gov/hazardouswaste/perchlorate.
For first-time use:
1
3
Connect the other end to the wall outlet.
Remove the protective tab to activate the
remote control battery.
To replace the remote control battery:
1
2
Open the battery compartment.
3
Close the battery compartment.
Insert one lithium CR2025 battery with
correct polarity (+/-) as indicated.
Note
• Before pressing any function button on the remote
4
Connect the power plug of the digital
wireless subwoofer to the wall outlet.
•
control, first select the correct source with the remote
control instead of the main unit.
If you are not going to use the remote control for a
long time, remove the battery.
Set clock
1
In the standby mode, press and hold SET
TIME/PROG to enter the clock setting
mode.
» The hour digits are displayed and begin
to blink.
» If the hour digits are not displayed,
press and hold for more than 2
seconds to switch to standby mode,
then repeat step 1.
18
EN
2
Press + VOL - to set the hour.
» The minute digits are displayed and
begin to blink.
3
Press + VOL - to set the minute.
Press SET TIME/PROG to confirm the
clock setting.
Set up wireless connection manually
1
Turn on
In standby mode, press and hold SOURCE
on the main unit for 3 seconds.
» The blue and green indicators on the
subwoofer flash alternately.
» [PAIRING] (pairing) flashes.
1
Press .
» The soundbar switches to the last
selected source.
2
Wait for automatic setup of wireless
connection between the main unit and
subwoofer.
» [PAIRING] (pairing) flashes.
» If the connection succeeds, [PAIR OK]
(pair OK) and are displayed and
the blue indicator on the subwoofer
lights up.
» If the connection fails, [PAIR FAIL]
(pair fail) is displayed and the green
indicator on the subwoofer lights up.
2
Press and hold PAIR on the subwoofer for
3 seconds.
» [PAIR OK] (pair OK) and are
displayed and the blue indicators on
the subwoofer lights up.
3
Turn on the main unit again.
Note
• If the wireless connection fails again, check whether
there is any conflict or strong interference (for example,
interference from other electronic devices) around
your location. After removal of the conflict or strong
interference, repeat the above procedures.
» If the wireless connection fails, set up
the connection manually.
Switch to standby mode
To switch the soundbar to standby mode:
1
Press .
» The clock (if set) is displayed.
To switch the soundbar to Eco Power Standby
mode:
1
Press and hold to switch the soundbar
to Eco Power Standby mode.
» The backlight on the display panel
turns off.
» The blue Eco Power indicator lights up.
EN
19
Engl i s h
4
6
4 Play
Play an AV source through
this soundbar
Note
• Ensure that you have made the necessary AV
connections (see ‘Connect AV devices’ on page 14).
1
Press AV 1, AV 2, AV FRONT or COAX
to select an AV source.
Play from USB
Note
• Ensure that the USB device contains playable music
(see ‘USB playability information’ on page 27).
1
2
Flip open the cover on the front panel.
3
Press USB to select the USB source.
» The total number of tracks is displayed.
4
5
Press PRESET/ALB/
20
EN
Insert the USB plug of a USB device into
the
socket.
Press /
to select a folder.
to select a file.
Press OK /
to start play.
Random play
Engl i sh
5 Control USB
play
1
Press SHUF.
» All tracks are played randomly.
2
To return to normal play, press SHUF again.
Skip to a track
1
2
Tip
Press PRESET/ALB/
(folder).
Press /
to select an album
the same time.
to select a track (file).
Pause/resume play
1
During play, press OK /
resume play.
Program tracks
to pause/
Search within a track
1
2
• The repeat and shuffle functions cannot be activated at
During play, press and hold
/
.
Release to resume normal play.
You can program a maximum of 20 tracks.
1
Press SET TIME/PROG to activate the
programming mode.
» A track number flashes.
2
Press PRESET/ALB/
to select the album
where the track is located.
3
Press / to select a track number to
program, then press SET TIME/PROG to
confirm.
» [P-X] is displayed, where “X” is the
next position in the program.
4
Repeat steps 2 to 3 to select and store all
tracks to program.
5
Press SET TIME/PROG to complete.
» [PROG] (program) is displayed.
6
Press OK /
to play the programmed
tracks.
• To erase the program, press SET
TIME/PROG.
Repeat play
1
During play, press REPEAT repeatedly to
select:
» [REPEAT] (repeat): play the current
track repeatedly.
» [REPEAT ALL] (repeat all): play all
tracks repeatedly.
» [REPEAT] (repeat) and [ALB] (album):
play the current album repeatedly.
2
To return to normal play, press REPEAT
until the selected function is no longer
displayed.
EN
21
6 Adjust volume
level and sound
effect
Select a movie sound effect
1
Adjust volume level
1
During play, press VOL +/- to increase/
decrease the volume level.
Adjust subwoofer volume
1
During play, press MOVIE SOUND
repeatedly to select:
• [DRAMA] (drama)
• [SCIENCE FICTION] (science
fiction)
• [ACTION] (action)
• [CONCERT] (concert)
• [NORMAL] (normal)
Select a music mode (for USB only)
1
In AV1, AV2, AV FRONT or COAXIAL
mode, press MUSIC MODE/SUBW VOL
to adjust the subwoofer volume.
During USB play, press MUSIC MODE/
SUBW VOL repeatedly to select:
• [POP] (pop)
• [JAZZ] (jazz)
• [ROCK] (rock)
• [CLASSIC] (classic)
• [NORMAL] (normal)
Select a sound effect
Mute sound
Note
• You cannot use different sound effects at the same
time.
Select a game sound effect
1
During play, press GAME SOUND
repeatedly to select:
• [SHOOTING] (sporting)
• [SPORT] (sport)
• [RACING] (racing)
• [ARCADE] (arcade)
• [NORMAL] (normal)
22
EN
1
During play, press MUTE to mute/unmute
sound.
Program radio stations
manually
Engl i sh
7 Tune to FM
radio stations
Note
1
Ensure that you have connected and fully
extended the supplied FM antenna.
2
3
4
Press TUNER.
5
Press and hold
/
.
When [SEARCH] (search) is displayed,
release the button.
» The FM tuner tunes to a station with
strong reception automatically.
stations.
1
2
Tune to a radio station.
3
Press PRESET/ALB/
to allocate a
number from 1 to 20 to this radio station,
then press SET TIME/PROG to confirm.
» The preset number and the frequency
of the preset station are displayed.
4
Repeat the above steps to program other
stations.
Repeat steps 3 and 4 to find more stations.
To tune to a weak station:
1
• You can program a maximum of 20 preset radio
Press / repeatedly until you find
optimal reception.
Press SET TIME/PROG to activate
programming.
Note
Program radio stations
automatically
• To overwrite a programmed station, store another
station in its place.
Note
• You can program a maximum of 20 preset radio
stations.
Tune to a preset radio station
1
1
Press PRESET/ALB/
to select a preset
number to start programing.
2
Press and hold SET TIME/PROG
for 2 seconds to activate automatic
programming.
» [AUTO] (auto) is displayed.
Press PRESET/ALB/
to select a preset
number that you want.
» All available stations are programmed
in the order of waveband reception
strength.
» The last programed radio station is
played automatically.
EN
23
» If the code is stored successfully, the
indicator flashes green for 2 seconds,
then turns blue again.
8 Use more of
your soundbar
5
Repeat steps 3 and 4 to program more
buttons on the smart remote control (A).
Program remote control
6
Press LEARN to exit the learning mode.
You can store a total of 12 most frequently
used functions of other AV devices in the smart
remote control. This feature allows you to use
only one remote control to operate all of your
AV devices.
By default, the remote control codes of a Philips
TV are stored in the smart remote control. The
available preset buttons are POWER, AV, CH
, VOL , MUTE and SLEEP.
1
Place the smart remote control (A) within
1mm-10mm distance from the other
remote control (B).
Note
• During the learning process, the normal remote control
functions are disabled.
Rename an AV source
1
Press AV 1, AV 2, AV FRONT or COAX
to select an AV source you want to
rename.
» The default name of the selected
sound source is displayed.
2
Press SETUP to activate the renaming
mode.
» The default name of the selected
sound source flashes for 4 seconds.
3
Within 2 seconds, press PRESET/ALB/
to select a name that matches the AV
device connected with the current socket
from:
• [TV]
• [DVD]
• [GAME] (game)
• [SET TOP BOX] (set top box)
• [CABLE] (cable)
• [SATELLITE] (satellite)
B
1-1
0m
m
A (HSB3280)
2
Press LEARN for 2 seconds to activate the
learning mode.
» A blue indicator on the smart remote
control (A) lights up.
3
Press the button on the other remote
control (B) that is to be stored on the
smart remote control (A).
» If the code is received successfully, the
blue indicator flashes.
4
Press one of the white learning buttons on
the smart remote control (A) to store the
code of this button.
24
EN
This feature only applies to AV devices or
TV with audio connection to the soundbar.
The soundbar can detect the state of AV
devices that are connected through the audio
connectors.
When automatic on/standby is enabled:
• If an AV device turns on, the soundbar
turns on automatically.
To enable
When the soundbar is turned on,
press and hold SOURCE on the front
panel for more than 2 seconds.
To disable
1
Set the sleep timer
1
When the soundbar is turned on, press
SLEEP repeatedly to select a set period of
time (in minutes).
» The soundbar turns off automaticaly
after the set period of time.
When the soundbar is turned on, press
and hold SOURCE on the front panel for
more than 2 seconds again.
Set the alarm timer
1
Ensure that you have set the clock
correctly.
2
In standby mode, press and hold TIMER.
» The hour digits are displayed and begin
to blink.
3
Press + VOL - to set the hour.
» The minute digits are displayed and
begin to blink.
4
5
6
Press + VOL - to set the minute.
Press TIMER to confirm.
To activate the wake-up timer, press + VOL
- to select [ON] (on).
» A clock icon appears on the display.
» The soundbar turns on automatically
at the set time and switches to the last
selected source.
•
To deactivate the alarm timer, select [OFF]
(off) at step 6.
EN
25
Engl i s h
Enable/disable automatic on/
standby
9 Product
information
L/R speakers
Speaker
Impedance
Speaker Driver
Sensitivity
3ohm (woofer) + 3ohm(
tweeter)
1.5” woofer+1.5” tweeter
>82dB/m/W
Note
• Product information is subject to change without prior
notice.
Subwoofer
Speaker Impedance
Speaker Driver
Sensitivity
3ohm*subwoofer
6.5” subwoofer
>78dB/m/W
Product information
General information
Specifications
Amplifier
Rated Output Power 180W + 120W
(wireless subwoofer)
RMS
Frequency Response 40 - 16000 Hz, -3dB
Signal to Noise Ratio >65dB
AV1, 2 Input
1.0V RMS 20kohm
Front AV Input
1.0V RMS 20kohm
Coaxial Input
0.5V RMS 75ohm
Total Harmonic
<1%
Distortion
Tuner (FM)
Tuning Range
Tuning grid
Sensitivity
- Mono, 26dB S/N Ratio
Search Selectivity
Total Harmonic Distortion
Signal to Noise Ratio
26
EN
87.5 - 108MHz
50KHz
<22 dBf
>28dBf
<1%
>55dB
AC power
Operation Power
Consumption
Standby Power
Consumption
Eco Standby Power
Consumption
USB Direct
Dimensions (W x H x D)
Main unit and speakers
Subwoofer
Weight
With Packing
Main unit and speakers
Subwoofer
120V, 60Hz
35W
<10W
<1W
Full Speed Ver1.1
800 x 90 x
89.7mm
328 x 302 x
180mm
9 kg
1.75 Kg
5 kg
USB playability information
•
•
•
•
•
•
•
•
•
•
•
•
Engl i sh
Compatible USB devices:
• USB flash memory (USB 2.0 or
USB1.1)
• USB flash players (USB 2.0 or USB1.1)
• memory cards (requires an additional
card reader to work with this
soundbar)
Supported formats:
USB or memory file format FAT12,
FAT16, FAT32 (sector size: 512 bytes)
MP3 bit rate (data rate): 32-320 Kbps
and variable bit rate
WMA v9 or earlier
Directory nesting up to a maximum
of 8 levels
Number of albums/ folders: maximum
99
Number of tracks/titles: maximum 999
File name in Unicode UTF8
(maximum length: 128 bytes)
Unsupported formats:
Empty albums: an empty album is an
album that does not contain MP3/
WMA files, and is not be shown in the
display.
Unsupported file formats are skipped.
For example, Word documents (.doc)
or MP3 files with extension .dlf are
ignored and not played.
AAC, WAV, PCM audio files
DRM protected WMA files (.wav,
.m4a, .m4p, .mp4, .aac)
WMA files in Lossless format
EN
27
10 Troubleshooting
Caution
• Never remove the casing of this soundbar.
To keep the warranty valid, never try to repair
the system yourself.
If you encounter problems when using this
soundbar, check the following points before
requesting service. If the problem remains
unsolved, go to the Philips web site (www.
Philips.com/support). When you contact Philips,
ensure that your soundbar is nearby and the
model number and serial number are available
(see ‘Get started’ on page 13).
No power
•
Ensure that the AC adaptor of the main
unit is connected properly.
•
Ensure that there is power at the AC
outlet.
No sound
•
Adjust the volume.
•
Check that the speakers are connected
correctly.
•
If there is no sound in the USB mode,
ensure that you have connected a USB
device that contains playable music.
•
If there is no sound in the AV mode,
ensure that you have connected AV
devices to the soundbar correctly.
Remote control does not work
•
Before you press any function button, first
select the source with the remote control.
•
Reduce the distance between the remote
control and the soundbar.
•
Insert the batteries with its polarities
(+/– signs) aligned as indicated.
•
Replace the battery.
•
Aim the remote control directly at the
sensor on the front of the soundbar.
Wireless connection fails.
28
EN
•
Set up wireless connection manually (see
‘Set up wireless connection manually’ on
page 19).
Poor radio reception
•
Increase the distance between the
soundbar and your TV or VCR.
•
Fully extend the FM antenna.
•
Connect an outdoor FM antenna instead.
Cannot display some files in USB device
•
The number of folders or files in the USB
device has exceeded a certain limit. This
phenomenon is not a malfunction.
•
The formats of these files are not
supported.
USB device not supported
•
The USB device is incompatible with the
soundbar. Try another one.
Timer does not work
•
Set the clock correctly.
•
Switch on the timer.
Clock/timer setting erased
•
Power has been interrupted or the power
cord has been disconnected.
•
Reset the clock/timer.
Engl i sh
11 Appendix
Mount the main unit and speakers
Caution
Mount to a wall
• To find a suitable mounting location, make the
•
necessary physical and wireless connections.
Mount the main unit and speakers to a solid concrete
wall or plaster board wall only!
Caution
• Risk of product damage! Always consult professional
•
personnel to safely mount the product to a wall.
Risk of injury! Ensure that no supply ducts such as gas,
water or electricity are harmed when you drill the
holes.
You can use the supplied bracket to mount the
main unit and speakers to the wall.
1
Align the bracket in the chosen location
on a wall. Use a pencil to mark the drilling
positions.
2
Drill holes as marked.
What’s in the supplied mounting kit
1 x wall mount bracket for the main unit and
speakers
4 x screws
What else you’ll need
•
•
•
Electric drill
Screwdriver
Pencil
EN
29
3
Secure 2 supplied screws in the holes, but
leave 5mm between the screw head and
the wall.
4
Secure the wall mount bracket onto the
main unit with 2 supplied screws.
5
Hook the main unit and speakers in place.
30
ES
Philips and Philips Shield are used under license of Koninklijke
Philips Electronics NV
P&F USA, Inc. PO Box 672768 Marietta, GA 30006
All rights reserved.