1
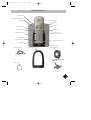
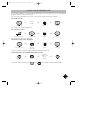
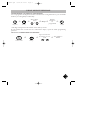
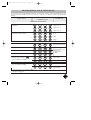
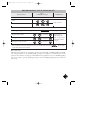
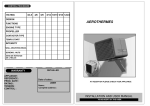
ang6120.qxd 31/05/99 15:36 Page 1 ILLUSTRATION Base station Mains power supply / line LED Earpiece Display SOS key Memory key On/Off line key Redial key Internal call / music on hold key Dialling keypad Recall and Programming key Earpiece volume key Microphone Colour clip Telephone cable User guide 2 extra colour clips Mains Adapter AA batteries 1 ang6120.qxd 31/05/99 15:36 Page 2 Your telephone has all the advantages of the latest technological advances which make it even simpler and easier to use. SAFETY INFORMATION This equipment is not designed for making emergency telephone calls when the power fails. Alternative arrangements should be made for access to emergency services. This product may be used legally only in a country where the appropriate authority has given its specific authorisation. This authorisation appears on a label under the base station. The marking on the product certifies its conformity to the technical regulations for user safety and electromagnetic disturbance which were applicable on the date of approval in accordance with European Union directive No. N°73/23/EEC, 89/336/EEC, 91/263/EEC and 93/68/EEC. POWER REQUIREMENTS This product requires an electrical supply of 220-240 volts, alternating monophased current, excluding IT installations defined in standard EN 60-950. WARNING! The electrical network is classified as dangerous according to criteria in the standard EN60-950. The only way to power down this product is by unplugging the power cable from the electrical outlet. Ensure the electrical outlet is located close to the apparatus and is always easily accessible. To be able to make calls in the event of a power cut, it is recommended that this telephone be used as a complement to another telephone which does not require mains power. TELEPHONE CONNECTION: The voltage on the network is classified as TNV-3 (Telecommunication Network Voltages, as defined in the standard EN 60-950). SAFETY PRECAUTIONS: Do not allow the handset to come into contact with water. Do not open the handset or the base station. This could expose you to high voltages. Contact our after-sales service for all repairs. Do not allow the charging contacts or the battery to come into contact with conductive materials such as keys, paper clips, rings, bracelets, etc. Make sure you insert the batteries with their polarities in the correct position. ENVIRONMENTAL CARE Your telephone has been manufactured at a site certified ISO 14001 - the international standard for environmental management systems. Your telephone has also benefited from the Philips EcoDesign program - Environmental Conscious Product Design - which considers the environmental impact of a product during its entire life cycle. 2 ang6120.qxd 31/05/99 15:36 Page 3 INSTALLING YOUR TELEPHONE CHOOSING THE POSITION FOR THE BASE STATION To reduce any risks of interference, avoid placing the base station less than 1 metre from another electrical device (telephone, television, computer, etc.). The base station must be placed on a flat surface. Avoid placing the base station: - in a damp room, - near a heat source, - near obstacles like thick walls or metal structures. INSERTING / REPLACING THE BATTERIES Your handset is powered by 2 rechargeable AA/R6 batteries. If you need to replace them you should use PHILIPS RC NC-P or Saft RC6 batteries. 1 ð Press the top of the battery cover and slide it downwards. 2 ð Insert the batteries, taking care to respect the marked polarities. 3 ð Close the cover. Cd The batteries contain cadmium and should be disposed of in accordance with the regulations in force concerning the disposal of waste. Never use non-rechargeable batteries. The manufacturer disclaims all responsibility if these recommendations are not respected. CONNECTING THE TELEPHONE 1 2 At the back of the base station: 1 ðConnect the mains adapter cable to the base station, then plug the mains adapter into the wall socket. 2 ðConnect the telephone cable to the base station and then to the wall socket. ðPlace the telephone handset on the base station and allow the batteries to charge for at least 12 hours. Only use the cables supplied with the product. FITTING THE COLOUR CLIP 1 ðInsert the clip from the top first. 2 ðFirmly press on the clips (in the arrow direction) until they lock. 3 ðTo remove the colour clip, pull it out from the Philips marking. 3 ang6120.qxd 31/05/99 15:36 Page 4 DESCRIPTION HANDSET DISPLAY Numerical characters ICON Telephone icons STATE Displayed DESCRIPTION Batteries charged. Batteries low. Blinking Handset being charged. Displayed Programming activated. Blinking Waiting for an answer from the base station (in the context of registration). Displayed Memories in use (consultation, programming). Displayed External call in progress. Blinking External call arriving. Displayed Internal call in progress. Blinking Internal call arriving. Displayed Handset in receiving mode (connected to the base station). Not displayed Handset out of range of the base station. Base station not connected to power supply. Blinking Handset not registered with the base station. 4 ang6120.qxd 31/05/99 15:36 Page 5 DESCRIPTION TELEPHONE LEDS The base station has a green LED: - Lit, when the base station is powered. - Blinking, when: . receiving a call, . the line is connected or the answering machine is replying. - Unlit, when the base station is not connected to the power supply. AUDIBLE SIGNALS Your telephone emits: - 1 short beep - 1 long beep - 2 beeps - 3 beeps = when you press a key. = when these is no contact between the handset and the base station any other problem occurs (if you make a mistake). = to indicate that the handset needs to be recharged = when you place the handset on the base station. = confirming the programming you have entered. = in the programming phase, inviting you to continue with the procedure. RINGER EQUIVALENCE NUMBER OR REN (UK ONLY) Your has a Ringer Equivalence Number (REN) of 1.0. To determine the maximum number of telephones that can be connected to your line, add together the individual RENs of all the apparatus you wish to connect. If this total exceeds four, one or all of your telephones may not ring correctly. 5 ang6120.qxd 31/05/99 15:36 Page 6 USING YOUR TELEPHONE Your Philips telephone is GAP certified, nevertheless we cannot guarantee its use with DECT products made by other manufacturers. You can register 4 handsets with 1 base station and 1 handset with 2 base stations. TO MAKE A CALL ð ð Dial the number Connect the line The duration of the call is displayed. ð Speak Hang up TO ANSWER A CALL ð ð Your telephone rings Conned the line The duration of the call is displayed. ð Speak Hang up TO REDIAL THE LAST NUMBER ð ð ð Connect the line Press the Speak Redial key* * The last telephone number dialled is displayed and the call made. Hang up TO PROGRAMME A NUMBER FOR THE SOS KEY ð ð Programme To dial the 'SOS' number, press Press then Dial the number you want to register ð Confirm , the number is dialled automatically. 6 ang6120.qxd 31/05/99 15:36 Page 7 USING YOUR TELEPHONE TO ADJUST THE EARPIECE VOLUME Your telephones handset is equipped with adjustable earpiece volume (3 levels). During a call: ð Low Mid Ç Ã High TO PUT ON HOLD OR TRANSFER AN EXTERNAL CALL During an external call: If you have no additional handset, when you press the call is put on hold with music: ð ð Press Caller on hold Call resumed listening to music If you have several handsets registered to the same base station, when you press transfer the external call to another handset: you can ð ð On handset n° 1* All the other handsets ring ** On another handset, take the call or hang up * Your correspondent can hear the music. ** If there is no reply, you can press To make an internal call, press again to return to the external call. , pick up from another receiver or hang up with . 7 ang6120.qxd 31/05/99 15:36 Page 8 USING YOUR TELEPHONE TO PROGRAMME A NUMBER IN THE MEMORY You can programme 10 telephone numbers in the memories. Using this function, you can dial the numbers you call regularly automatically. ð Programme ð select a digit* from to ð Beeps ð Memory Dial the number to be programmed ð Confirm * This digit corresponds to the number of the memory chosen. If your handset does not emit the two confirmation "beeps", repeat the whole programming operation. TO CALL A NUMBER FROM THE MEMORY ð ð Connect the line Memory Digit associated with the number you want to dial ð The number is dialled to 8 ang6120.qxd 31/05/99 15:36 Page 9 PROGRAMMING YOUR TELEPHONE Your telephone has programmable functions. To change the settings, refer to the table below. The options you choose will be saved even if there is a power cut. A beep confirms programming changes. KEY COMBINATIONS FUNCTIONS COMMENTS ACOUSTIC FUNCTIONS u u Melodies Handset melody volume + + + Option no. 1 + + + Option no. 2 + + + Option no. 3 + + + Low + + + Mid + + + High ADVANCED FUNCTIONS u Select type of network u + + + Residential network PABX 1* + + + u PABX 2* + + + u PABX 3* + + + For selecting the network when your telephone is connected to a PABX u Change type of flash ** + + + Short flash + + + Long flash + + + No pause + + + Pause after the first digit dialled (for use behind a PABX) u Insert an automatic pause (for use behind a PABX) * You may have to try several settings. ** Only for Singapore. 9 ang6120.qxd 31/05/99 15:36 Page 10 PROGRAMMING YOUR TELEPHONE FUNCTIONS KEY COMBINATIONS COMMENTS DIALLING MODE u Tone + + u Pulse + + Only for U.K. REGISTERING/UN-REGISTERING A HANDSET TO A BASE STATION Before registering a handset, unplug the base station mains adapter and then plug it in again. u Register this handset + + Code ∆ + u Un-register this handset + + Code ∆ + u Un-register other handset + + Code ∆ + For handsets from other manufacturers or for models other than the to the base station user manual. The ∆ code is indicated on the label on the bottom of the base station (4 digits). , please refer Note: (UK only) Although this equipment can use either loop disconnect (PULSE) or DTMF signalling (TONE), only the performance of the DTMF signalling is subject to regulatory requirements for correct operation. It is therefore strongly recommended that the equipment is set to use DTMF signalling of access to public or private signalling emergency services. DTMF signalling also provides faster call set up. 10 ang6120.qxd 31/05/99 15:36 Page 11 PROBLEMS YOU MAY ENCOUNTER WITH YOUR TELEPHONE The table below lists the problems you may encounter when using your Philips telephone. CAUSE PROBLEM The LED on the base station is The base station has not been not lit. plugged in correctly or there is a power cut. No audible signal is transmitted when you place the handset on the base station. There is no dialling tone. The charging contacts are not making contact. u The charging contacts are dirty. u u u u These is no dialling tone even though you have left the handset on the base station for at least 12 hours. If all these solutions fail. The base station has not been connected to the telephone line correctly. The handset battery is flat. You are too far from the base station. The batteries are worn out. SOLUTION Check the connections. Pick up the handset and the replace it. u Clean them with a clean dry cloth. u u u u Check the connections (see page 3). Place the handset on the base station and wait for at least 12 hours. Go nearer to the base station. Contact your local Philips dealer for new batteries. Unplug your base station then plug it in again. 11