1
Quick
¿ ì ËStart
Ù ²Guide
Ù × ÷ Ö ¸ÄÏ
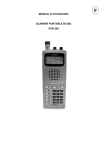
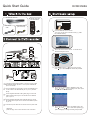
1 Hard Disk/DVD Recorder
2 RF coaxial
cable
DVDR3588H
4 Remote control and
two AAA batteries
3 Video/Audio cable
(yellow/red/white)
3
CABLE
Press STANDBY-ON on the recorder.
Turn on the TV and other connected devices (e.g. Cable
Box, Satellite Receiver).
3b
Set it to the correct video-in channel. You should see the
blue DVD background screen.
3c
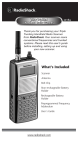
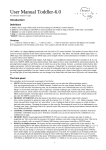
Press SETUP and press
keys for moving preview.
Press
key to select the options needed and press OK.
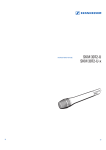
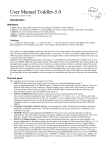
SATELLITE
c/2d
ANTENNA
b
e
Connect the existing Antenna/Cable TV signal (or from the Cable
Box/Satellite Receiver {RF OUT or TO TV} to the ANTENNA IN
jack on the recorder.
Use the supplied RF coaxial cable to connect the ANTENNA OUT
b on
the recorder to the ANTENNA IN jack on your TV (VHF/UHF
3d
Move cursor to "SETUP MENU - GENERAL" option, then
press key. Press
keys to highlight "Auto Scan" option
and press OK to search for stations.
RF IN).
the supplied audio/video cable (yellow plug) to connect the
c Use
VIDEO (CVBS) OUTPUT jack on the recorder to the VIDEO IN
jack on your TV.
the supplied audio/video cable (red/white plugs) to connect
d Use
the AUDIO OUTPUT jacks on the recorder to the AUDIO IN jacks
on your TV.
e Connect the power cable from the recorder to an AC power outlet.
3e
Helpful hint:
please see page 16-23 of user manual for more connections.
Move cursor to "SETUP MENU - DATE/TIME" option, then
press key. Press
keys to select "Date (dd/mm/yyyy)"
option. Press
key to change the setting and press OK.
Playback from disc
Supported disc formats:
4
6
Press OPEN/CLOSE to open the disc tray, load a recordable
DVD+R/+RW with the label facing up.
5
ALL
Press OPEN/CLOSE
to open the disc tray, load a recordable
DVD+R/+RW with the label facing up.
4b To select external program source. Press SOURCE repeatedly
to select the source to record from.
Input Source: CAM 1, R CVBS, R Y/C, R YUV, CHXXX or press
DV/USB twice to select input source of DV.
4c
5b
Playback will begin automatically, otherwise press OK or
PLAY/PAUSE to start playback. If a User Interface appears,
keep pressing
keys to preview disc menu and
highlight the preferred option, press OK or PLAY/PAUSE
to play the selected file.
To select recording media. Press DVD REC repeatedly
to select "Rec to: Optical disc" or "Rec to: Hard disc".
Press ADD/CLEAR to toggle between the different modes
of record quality.
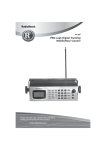
Quality
5c
Maximum recording time Maximum recording time
for a disc (160GB, HDD)
for a disc (4.7GB, DVD)
To stop playback press STOP key.
Switch to TV program
HQ(High quality)
SP(DVD quality)
SP+( DVD quality )
LP( VHS quality )
EP(VHS quality)
SLP( VHS quality )
5d
4d Press DVD, then press SOURCE or DVD/USB to select matching
input source, and press REC to record to DVD.
Press TUNER, then press CH+ and CH- keys to select a TV channel.
Press HDD to access to title recordings in hard disc.
Press DVD to access to title recordings in disc.
Acquiring picture
Check video input jacks on TV, it can be FRONT A/V IN
or VIDEO jacks on the back.
Toggle among different modes with remote control.
Or, select channels by TV's remote control, then press CH+ and
CH- keys repeatedly until picture display.
Please refer to user manual for more information
Acquiring sound
4e To pause the recording, press PLAY/PAUSE. Press REC to resume
recording and press STOP key to stop recording.
Need help
Connect Audio L/R (red/while) jacks on back of DVD recorder to
AUDIO INPUT jacks of TV, stereo system or receiver. Switched on
connected systems and choose matching channel.
please read supplied manual or browse our website at www.philips.com/support