1
3375
User Manual
4
60
LASER
Type Semiconductor laser
InGaAlP (DVD)
AIGaAs (CD)
Wave length 658 nm (DVD)
790 nm (CD)
Output Power 30 mW(DVD±RW write)
1.0 mW (DVD read)
1.0 mW (CD read)
Beam divergence 84 degrees (DVD)
61 degrees (CD)
‘CONSUMERS SHOULD NOTE THAT NOT ALL HIGH
DEFINITION TELEVISION SETS ARE FULLY
COMPATIBLE WITH THIS PRODUCT AND MAY CAUSE
ARTIFACTS TO BE DISPLAYED IN THE PICTURE. IN
CASE OF 525 OR 625 PROGRESSIVE SCAN PICTURE
PROBLEMS, IT IS RECOMMENDED THAT THE USER
SWITCH THE CONNECTION TO THE ‘STANDARD
DEFINITION’ OUTPUT. IF THERE ARE QUESTIONS
REGARDING OUR TV SET COMPATIBILITY WITH THIS
MODEL 525p AND 625p DVD PLAYER, PLEASE
CONTACT OUR CUSTOMER SERVICE CENTER.’
Microsoft, Windows Media, and the
Windows logo are trademarks, or registered
trademarks of Microsoft Corporation in the
United States and/or other countries.
For Customer Use:
Read carefully the information located at
the bottom or rear of your DVD Recorder
and enter below the Serial No. Retain this
information for future reference.
Model No. DVD RECORDER DVDR 3375
Serial No. _______________
Due to the inconsistency of disc formats provided
by various disc manufacturers, your DVD system/
player/recorder may require a playability
enhancement or upgrade. As DVD technology
advances, these enhancement will become
common and will be easy to complete.
Go to www.philips.com/support for software upgarde.
En raison de la diversité des formats utilisés par les
fabricants, votre système DVD peut nécessiter
l'ajout de périphériques ou une mise à niveau
logicielle. Au fur et à mesure des progrès de la
Use
of controls
technologie
DVD,or
cesadjustments
périphériquesorse font de plus
performance
of etprocedures
otherPour
than
en plus courants
aisés à intégrer.
télécharger
mise àinniveau
logicielle,
visitez le site
herein
maylaresult
hazardous
radiation
www.philips.com/support.
CAUTION
exposure or other unsafe operation.
Debido a los diferentes formatos de discos
disponibles en el mercado, es posible que deba
realizar mejoras o actualizaciones en el sistema de
DVD relativas a las funciones de reproducción.
Conforme la tecnología DVD avanza, estas mejoras
estarán al alcance de todo tipo de usuarios y se
podrán llevar a cabo fácilmente.Visite la página
“www.philips.com/support” para buscar
información sobre actualizaciones de software.
Da das Disk-Format je nach Hersteller verschieden
ist, ist für Ihr DVD-System möglicherweise die
Erweiterung der Spielbarkeit oder eine
Aktualisierung erforderlich. Da die DVD-Technologie
sich ständig weiterentwickelt, werden sich diese
Erweiterungen durchsetzen und einfach auszuführen
sein. Gehen Sie zu für Ihre Software-Aktualisierung
zu „www.philips.com/support“.
Doordat fabrikanten verschillende schijfindelingen
aanbieden, moet uw dvd-systeem mogelijk worden
geüpgradet of uitgebreid. Naarmate de
dvd-technologie zich verder ontwikkelt, zullen
deze uitbreidingen normaal worden en zult u ze
gemakkelijk kunnen uitvoeren. Ga naar
"www.philips.com/support" om uw software te
upgraden.
A causa della differenza di formato tra i dischi
forniti dai vari produttori, il sistema DVD potrebbe
richiedere un potenziamento o aggiornamento
della riproducibilità. Col progredire della tecnologia
DVD, questi potenziamenti diverranno comuni e
facili da implementare. Visitare
“www.philips.com/support” per scaricare gli
aggiornamenti del software.
English-------------------------------------------4
This product incorporates copyright
protection technology that is protected
by US patents. Use of this copyright
protection technology must be authorized by
Macrovision, and is intended for home and
other limited viewing uses only unless otherwise authorized by Macrovision. Reverse
engineering or disassembly is prohibited.
U.S. Patent Number 4,631,603; 4,819,098;
4,907,093; 5,315,448; and 6,516,132.
-------------------------------- 61
English
Index
Special Features
English
Manufactured under license from Dolby
Laboratories. “Dolby” and the double-D
symbol are trademarks of Dolby
Laboratories.
DivX®, DivX Certified, and associated
logos are trademarks of DivX Networks, Inc
and are used under license.
This connection is also known as ‘FireWire’
and ‘IEEE 1394.’ This connection is used for
the transfer of high bandwidth digital signals
as used by digital video (DV) camcorders.
Audio and video signals are transmitted using
a cable.
What kind of disc should I use for
recording?
You can only record on a DVD±R and
DVD±RW discs. DVD±R/±RW is the most
compatible recordable DVD format on the
market today. They are fully compatible with
most of the existing DVD-Video players and
DVD-ROM drives in computers.
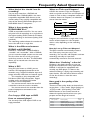
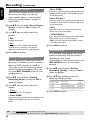
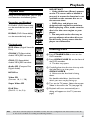
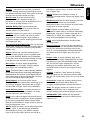
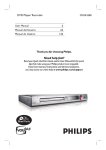
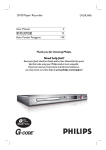
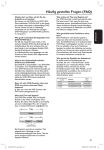
What are Titles and Chapters?
A DVD disc contains Titles and Chapters,
which are similar to the Titles and Chapters of
a book. A Title is often a complete movie and
is broken down into Chapters, or individual
scenes from the movies.
Title
Chapter
What is the capacity of a
DVD±R/±RW disc?
4.7GB, or equivalent to 6CDs. You can store
only one hour of recordings on a single disc at
the highest quality (DVD standard) and about
6 hours recordings at the lowest quality (VHS
standard).
The recording mode indicates the number of
hours that will fit on a single disc.
What is the difference between
DVD±R and DVD±RW?
DVD±R is “recordable” and DVD±RW is
“erasable” and “rewritable”. With a DVD±R,
you can record multiple sessions on the same
disc, but when the disc is full, you cannot
record any more on the disc. The DVD±RW
allows you to record over the same disc
repeatedly.
What is DV?
Using DV, also known as i.LINK, you can
connect a DV-equipped camcorder to this
recorder using a single DV cable for input and
output of audio, video, data and control signals.
– This recorder is only compatible with
DV-format (DVC-SD) camcorders. Digital
satellite tuners and Digital VHS video
recorders are not compatible.
– You cannot connect more than one DV
camcorder at one time to this recorder.
– You cannot control this recorder from the
external equipment connected via the
DV IN jack.
Can I copy a VHS tape or DVD
from an external player?
Yes, but only if the VHS tape or DVD is not
copy protected.
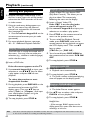
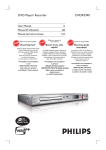
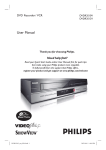
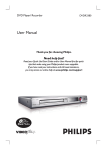
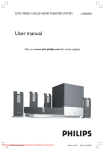
Title
Chapter Chapter Chapter Chapter
chapter markers
Programs are recorded as a single title; it may
consist of one chapter or a few chapters
within a title, depending on the recording
settings.
How do I set up Titles and Chapters?
The DVD recorder automatically creates a
new Title every time you start a new
recording. You can then add Chapters to these
recordings manually or have them
automatically inserted at 5-minute intervals.
What does “finalizing” a disc do?
Finalizing a disc locks the disc so it can no
longer be recorded and is only required for
DVD±R. It will then be compatible with
virtually any DVD player. To close a disc
without finalizing it, simply stop recording and
eject the disc. You will still be able to record
on the disc if there is room for more
recordings.
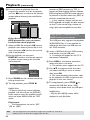
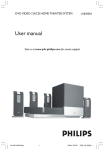
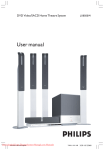
How good is the quality of the
recording?
There are a few quality levels to choose from,
ranging from “1 hour mode” (High Quality) to
“6 hours mode” (VHS quality). Press REC
MODE button on the remote control to
choose the quality level that best suits your
purpose and the length of material.
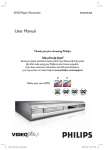
Maximum Recording
Time per Disc
1 hour
2 hours
4 hours
6 hours
Picture Quality
HQ(High quality)
SP(DVD quality-Standard Play)
EP(VHS quality-Extended Play)
SLP(VHS quality-Super Long Play)
Record
Mode
1 Hour Mode
2 Hour Mode
4 Hour Mode
6 Hour Mode
English
Frequently Asked Questions
Contents
English
Index................................................. 3
Special Features.............................. 4
Frequently Asked Questions......... 5
Care and Safety Information
Setup...............................................................8
Cleaning discs...............................................8
About recycling............................................8
General Information
Introduction..................................................9
Accessories supplied...................................9
Region codes.................................................9
Copyright notice..........................................9
Basic Connections - DVD recorder
Step 1: Connecting the antenna cables10
Step 2: Connecting the video cable......11
Option 1: Using Video(CVBS) jack ......... 11
Option 2: Using S-Video jack ................... 11
Option 3 : Using Component Video
jack . ................................................................. 11
Step 3: Connecting the audio cables....12
Option 1: Using Audio jacks......................12
Option 2: Using Coaxial jack.....................12
Optional Connections
Connecting to a Cable Box or
Satellite Receiver.......................................13
Connecting to a DVD player or similar
device............................................................14
Connecting to a VCR and Cable Box/
Satellite Receiver.......................................15
Connecting a camcorder to the
front jacks....................................................16
Option 1: Using DV IN jack.......................16
Option 2: Using S-VIDEO In or
VIDEO In jack................................................16
Connecting a USB flash drive or USB
memory card reader.................................17
Main Unit........................................ 18
Jacks behind the flap.....................................18
Remote control........................19-21
Display window..............................22
Getting Started
Step 1 : Inserting Batteries..................... 23
Using the remote control to operate
the system.......................................................23
Step 2 : Finding the correct viewing
channel......................................................... 23
Step 3 : TV channel programming........ 24
Automatic TV channel search...................24
Modifying Channel Information................25
Sorting the TV channels..............................26
Step 4 : Setting the time & date....... 26
Recording
Discs for recording................................... 27
Recording settings .................................. 27
Auto Chapter Markers................................28
Default Source...............................................28
Default Recording Quality..........................28
Manual recording................................. 29
One Touch Recording - automatic
turn-off........................................................ 29
About timer recording............................ 30
Timer recording (manually)................... 30
Setting a timer recording from an
external Cable Box/ Satellite Receiver... 31
Changing/ Deleting a timer recording32
Watching another TV channel
during recording........................................ 32
Editing/Finalizing Recording
About Disc editing.................................... 33
Accessing disc editing menu................... 33
Rename disc.........................................................34
Erase disc (DVD±RW only).......................34
Record new title............................................34
Overwrite disc (DVD±RW only).............34
Make compatible (DVD±RW only)..........35
Lock/Unlock disc (DVD±RW only).........35
Playing your recordings (DVD±R) on
other DVD players................................... 35
About title editing.................................... 36
Accessing title editing menu.................. 36
Editing video...................................................36
Rename title...................................................37
Erase title........................................................37
Overwrite title (DVD±RW only).............37
Overwrite from the selected title...........37
Append recording .......................................37
About video editing............................. 38
Accessing video editing menu............... 38
Selecting a title...............................................39
Selecting a chapter........................................39
Selecting a playback mode..........................39
Creating chapter marker............................39
Hiding an unwanted chapter......................40
Changing Index Picture...............................40
Splitting a title (DVD±RW only)...............40
Playback
Playable discs...............................................41
Inserting a disc........................................... 42
Starting disc playback.............................. 42
Playing a DVD video disc............................42
Playing a (Super) Video CD........................42
Playing an audio CD.....................................42
Playing a DVD±R/±RW disc.......................42
Playing a DivX disc........................................43
Playing an MP3 disc.......................................43
Playing a picture disc (or musical
slide show)......................................................43
Playing from a USB flash drive / USB
memory card reader....................................44
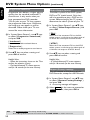
DVD System Menu Options
Accessing System Setup - General ..... 49
Screen Saver...................................................49
Karaoke mode...............................................49
Progressive/ Interlace..................................50
Video Output Format..................................50
Restore Factory settings.............................50
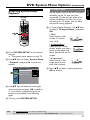
Accessing System Setup -Playback...51
TV Aspect Ratio............................................51
Parental rating level......................................52
Setting or changing the password............53
Digital Audio Output...................................53
Accessing System Setup - Record........ 54
Accessing System Setup - Channel
Setup............................................................ 54
Accessing System Setup - Clock........... 54
Date and Time...............................................54
Show DivX® registration code.................54
Karaoke Operation.......................55
Playing Karaoke discs...................................55
General Operation.......................................55
Karaoke Recording.......................................55
Troubleshooting..................... 56~57
Specifications.................................58
Glossary.......................................... 59
Additional Playback Features
Changing to another title/chapter/
track............................................................. 45
Pausing playback and step play ............ 45
Searching forward/backward................. 45
Zooming in................................................. 45
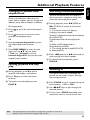
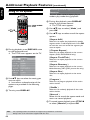
Using TITLE options................................ 46
Selecting various repeat/shuffle
functions..........................................................46
Programming disc tracks.............................47
Changing the audio soundtrack language47
Changing subtitle language.........................48
Switching camera angles..............................48
Time search....................................................48
English
Contents
Care and Safety Information
English
CAUTION!
High voltage! Do not open
the device. You run the risk of
getting an electric shock.
The machine does not contain
any user-serviceable parts. Please
leave all maintenance work to
qualified personnel.
Cleaning discs
Some problems occur because the disc
inside the recorder is dirty (picture
freeze, sound disruptions, picture
distortions). To avoid these problems,
discs should be cleaned on a regular
basis.
To clean a disc, use a micro fibre
cleaning cloth and wipe the disc from the
center to the edge in a straight line.
Setup
Finding a suitable location
– Place the set on a flat, hard and stable
surface. Do not place the set on a carpet.
– Do not position the set on top of
other equipment that might heat it up
(e.g., receiver or amplifier).
– Do not put anything under the set
(e.g., CDs, magazines).
– Install this unit near the AC outlet and
where the AC power plug can be reached
easily.
Space for ventilation
– Place the apparatus in a location with
adequate ventilation to prevent internal
heat build up. Allow at least 10 cm (4.5”)
clearance from the rear and the top of
the set and 5cm (2.3”) from the left and
right to prevent overheating.
CAUTION!
Do not use solvents such as benzene,
thinner, commercially available cleaners,
or anti-static sprays intended for analog
discs. Since the optical unit (laser) of the
DVD recorder operates at a higher
power than regular DVD or CD players,
cleaning CDs intended for DVD or CD
players may damage the optical unit
(laser). Therefore, refrain from using a
cleaning CD.
5cm (2.3")
10cm (4.5")
10cm (4.5")
5cm (2.3")
Avoid high temperatures, moisture,
water and dust
– Apparatus shall not be exposed to
dripping or splashing.
– Do not place any sources of danger
on the apparatus (e.g., liquid filled objects,
lighted candles).
About recycling
These operating instructions have been
printed on non-polluting paper. This
electronic equipment contains a
large number of materials that can be
recycled. If you are disposing of an old
machine, please take it to a recycling
center. Please observe the local
regulations regarding disposal of
packaging materials, exhausted batteries,
and old equipment.
General Information
Accessories supplied
Your Philips DVD recorder allows you to
record the TV programs or duplicate
camcorder recordings to a DVD±RW or
DVD±R and play pre-recorded DVDs.
The recordings you make on the
recorder will play on most of the DVD
players and DVD-ROM drives. The
DVD±R discs have to be finalized before
they can be played on other DVD players.
–
–
–
–
–
Please take time to read this user manual
before using your DVD recorder. It
contains important information and notes
regarding operation.
DVD films are usually not released at the
same time in all regions of the world,
thus all DVD players are keyed to a
specific region code.
Helpful Hints:
– If you have questions or if problems come
up during operation, please see the chapter
‘Troubleshooting’.
– If you need further assistance, please call
the customer support service for your
country. The corresponding telephone
numbers and e-mail addresses are given in
the guarantee booklet.
– Refer to the type plate on the rear or
bottom of the product for identification and
supply ratings.
The regional code is shown at the back
panel of this device. If the DVD is
marked with a different region code, it
cannot be played on this device.
English
Introduction
Remote control and batteries
Audio/Video (AV) cables
RF coaxial cable
Quick Start Guide
User Manual
Region codes
DVD that can
be played
Region
China, Calcos Islands,
Walls and Futuna
Islands
ALL
6
Copyright notice
The making of unauthorised copies of
copy-protected material, including
computer programmes, files, broadcasts
and sound recordings, may be
infringement of copyrights and constitute
a criminal offence. This equipment
should not be used for such purposes.
Basic Connections - DVD recorder
English
VCR/Cable Box/
Satellite Receiver
ANT OUT
RF OUT
ANT IN
RF IN
Antenna/
cable TV signal
A
AC IN ~
B
TV
AU D IO
O U T
S-V ID E O
IN
V ID E O IN
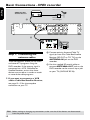
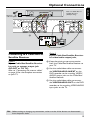
Step 1: Connecting the
antenna cables
These connections enable you to watch
and record TV programs using the
DVD recorder. If the antenna signal is
connected via a VCR, Cable Box or
Satellite Receiver, ensure that these
devices are turned on in order to watch
or record the cable programs.
A Connect existing Antenna/Cable TV
signal (or from the Cable Box/Satellite
Receiver {RF OUT or TO TV}) to the
ANTENNA IN jack on the DVD
recorder.
B Use the supplied RF coaxial cable to
connect ANTENNA OUT jack on the
DVD recorder to the antenna input jack
on your TV (VHF/UHF RF IN).
l If you want to connect to a VCR
and/or Cable Box/Satellite Receiver,
see page 13~15 for the complete
connection to your TV.
TIPS: Before making or changing any connections, make sure that all the devices are disconnected
from the power outlet.
10
English
Basic Connections - DVD recorder (continued)
Option 1
Option 2
Option 3
TV
AU D IO
O U T
S-V ID E O
IN
V ID E O IN
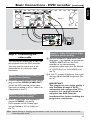
Step 2: Connecting the
video cable
This connection enables you to view the
disc playback from the DVD recorder.
You only need to choose one of the
options below to make your video
connection.
Option 1: Using Video(CVBS) jack
(good picture quality)
l Use the supplied audio/video cables (yellow
plug) to connect VIDEO (CVBS)-OUT
jack on the DVD recorder to the video
input jack (or labeled as A/V In, Video In or
Composite) on the TV.
Option 2: Using S-Video jack
(excellent picture quality)
l Use an S-video cable (not supplied) to
connect S-VIDEO jack on the
DVD recorder to the S-Video input
jack (or labeled as Y/C or S-VHS) on
the TV.
Option 3 : Using Component Video
jack (best picture quality)
A
Use the component video cables (red/
blue/green - not supplied) to connect the
Y Pb Pr -OUT jacks on the DVD
recorder to the corresponding
component video input jacks (or labeled
as Y Pb/Cb Pr/Cr or YUV(Y/Pb/Pr)) on
the TV.
B If your TV accepts Progressive Scan signal,
see page 50 for detailed Progressive Scan
set up.
IMPORTANT!
The progressive scan video quality is
only available through Y Pb Pr
connection and a progressive TV is
required. It is strongly advised to
complete the DVD recorder
installation first, before enabling the
progressive scan feature.
TIPS: Before making or changing any connections, make sure that all the devices are disconnected
from the power outlet.
11
Basic Connections - DVD recorder (continued)
English
Option 2
Option 1
TV
AU D IO
O U T
DIGITAL IN
AV amplifier/
receiver
S-V ID E O
IN
V ID E O IN
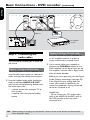
Step 3: Connecting the
audio cables
This connection enables you to listen to
the sound.
Option 1: Using an Audio cable
You can connect the DVD recorder to a
two channel stereo system or receiver in
order to enjoy the stereo sound system.
l Use the supplied audio cable (red/white
ends) to connect AUDIO L/R OUT
jacks to one of the following devices with
the same input jacks.
– a stereo system (for example, TV or
mini system).
– a receiver with two channel analog
stereo.
Option 2: Using a Coaxial cable
You can connect the DVD recorder to
an AV amplifier/receiver in order to
enjoy multichannel surround sound.
l Use a coaxial cable (not supplied) to
connect the COAXIAL socket on the
DVD recorder to the digital input on the
AV amplifier/ receiver with a digital multichannel sound decoder.
Before you start operating, set the Digital
Audio Output accordingly (see page 55).
If the Digital Output setting does not
match your stereo’s capabilities, the
stereo may produce a strong, distorted
sound or no sound at all.
Helpful Hint:
– Do not connect your TV’s audio output
jacks to the AUDIO L/R (IN-EXT) jacks on
this DVD recorder as this may cause
unwanted noise.
TIPS: Before making or changing any connections, make sure that all the devices are disconnected
from the power outlet.
12
IN
RF
VIDEO
Antenna/
cable TV signals
Back of a Cable Box or
Satellite Receiver
(Example only)
OUT
R
AUDIO
L
English
Optional Connections
S-VIDEO
B
C
A
TV
AU D IO
O U T
S-V ID E O
IN
V ID E O IN
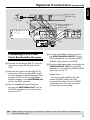
Connecting to a Cable Box or
Satellite Receiver
Option 1
If your Cable Box/Satellite Receiver
has only an antenna output jack
(RF OUT or TO TV),
refer to “Connecting the antenna cables”
on page 10 for the complete connection
to your TV.
Option 2
If your Cable Box/Satellite Receiver
has video/audio output jacks,
A Keep the existing antenna connection
from the Cable Box/Satellite Receiver to
your TV.
B Use the audio/video cables to connect
the VIDEO/AUDIO IN-EXT on the
DVD recorder to the matching VIDEO/
AUDIO output jacks on the Cable Box/
Satellite Receiver.
C Use the audio/video cables to connect
the VIDEO/AUDIO OUT on the DVD
recorder to the matching VIDEO/AUDIO
input jacks on the TV.
TIPS: Before making or changing any connections, make sure that all the devices are disconnected
from the power outlet.
13
Optional Connections (continued)
English
DVD PLAYER
DVD RECORDER
TV
AU D IO
O U T
S-V ID E O
IN
V ID E O IN
Connecting to a DVD player
or similar device
This connection enables you to record
from video CDs to a DVD±R/±RW and
allows the DVD player to be used for
playback if the DVD recorder is turned
off.
A Connect the Antenna/Cable TV signal to
the antenna input (RF IN) jack on the
DVD player, then connect the antenna
output(RF out) jack on the DVD player
to the ANTENNA IN jack on the DVD
recorder.
B Use the supplied RF coaxial cable to
connect the ANTENNA OUT jack on
the DVD recorder to the antenna input
jack on the TV.
C Use the audio/video cables to connect
the VIDEO/AUDIO IN-EXT on the
DVD recorder to the matching VIDEO/
AUDIO output jacks on the DVD player.
D Use the audio/video cables to connect
the VIDEO/AUDIO OUT on the DVD
recorder to the matching VIDEO/AUDIO
input jacks on the TV.
Helpful Hints:
– You may use the S-VIDEO (Y/C) jack
instead of VIDEO (CVBS) jack if the
connected device has the same S-VIDEO
input/output jack. This video connection
provides better picture quality.
– Most commercial video cassettes and
DVDs are copy-protected and therefore
cannot be recorded.
– Connect the DVD recorder directly to the
TV. If there is a DVD player or an additional
device in between, the picture quality may be
poor because of the copy protection system
built into the DVD recorder.
TIPS: Before making or changing any connections, make sure that all the devices are disconnected
from the power outlet.
14
VHF/UHF
RF IN
Antenna/cable
TV signals
A
VHF/UHF
RF OUT
Back of a VCR
(Example only)
• •
•• •
English
Optional Connections (continued)
VIDEO
OUT
VIDEO
IN
AUDIO
L
AUDIO
L
AUDIO
R
AUDIO
R
B
IN
RF
VIDEO
Back of a Cable Box or
Satellite Receiver
(Example only)
OUT
R
AUDIO
L
S-VIDEO
D
AC IN ~
C
TV
AU D IO
O U T
E
S-V ID E O
IN
V ID E O IN
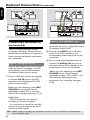
Connecting to a VCR and
Cable Box/Satellite Receiver
A Connect the Antenna/Cable TV signal to
the antenna input (RF IN) jack on the
VCR.
B Connect the antenna output (RF OUT)
jack on the VCR to the input(RF in) jack
on the Cable Box/Satellite Receiver.Then
connect the RF out on the Cable Box/
Satellite receiver to the ANTENNA IN
jack on the DVD recorder.
C Use the supplied RF coaxial cable to
connect the ANTENNA OUT jack on
the DVD recorder to the antenna input
jack on the TV .
D Use the audio/video cables to connect
the VIDEO/AUDIO IN-EXT on the
DVD recorder to the matching VIDEO/
AUDIO output jacks on the VCR.
E Use the audio/video cables to connect the
VIDEO/AUDIO OUT on the DVD
recorder to the matching VIDEO/AUDIO
input jacks on the TV.
Helpful Hints:
– You may use the S-VIDEO (Y/C) jack
instead of VIDEO (CVBS) jack if the
connected device has the same S-VIDEO
input/output jack. This video connection
provides better picture quality.
TIPS: Before making or changing any connections, make sure that all the devices are disconnected
from the power outlet.
15
Optional Connections (continued)
English
DV OUT
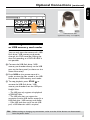
Connecting a camcorder to
the front jacks
You can use the front jacks to copy
camcorder recordings. These jacks are
located behind the flap on the right hand
side; it provides convenient connections
for a camcorder.
Option 1: Using DV IN jack
Use this connection if you have a Digital
Video or Digital 8 camcorder. The DV
jack conforms to the i.LINK standard.
It provides the best picture quality.
l Use an i.LINK 4-pin cable (not supplied)
to connect DV IN jack on the DVD
recorder to the appropriate DV OUT
jack on the camcorder.
Option 2: Using VIDEO In jack
You can use VIDEO connection if your
camcorder has only a single video output
(Composite Video,CVBS).
A Connect the VIDEO jack at the front
panel of the DVD recorder to the
corresponding Video output jack on the
camcorder.
B Use an audio cable (red/white ends) to
connect the AUDIO L/R jacks at the
front panel of the DVD recorder to the
audio output jacks on the camcorder.
Before you start operating, press REC
SOURCE on the remote control
repeatedly to select ‘Front CVBS’ as the
input channel, depending on your
connections. For recording, see pages
27-29.
Before you start operating, press REC
SOURCE on the remote control
repeatedly to select ‘DV’ as the input
channel. For recording, see pages 27-29.
Helpful Hints:
– The DV IN jack does not support a
connection to a Personal Computer.
– It is not possible to record from the DVD
recorder to your camcorder via the DV IN
jack on your DVD recorder.
TIPS: Before making or changing any connections, make sure that all the devices are disconnected
from the power outlet.
16
English
Optional Connections (continued)
USB extension cable
(optional accessory - not supplied)
Connecting a USB flash drive
or USB memory card reader
You can only view the contents of a USB
flash drive / USB memory card reader
through this DVD recorder. Editing the
data and recording to a DVD+R/+RW is
not possible.
A Connect the USB flash drive / USB
memory card reader directly to the USB
port on the front panel (as shown on the
above illustration).
B Press USB on the remote control in
order to view the files stored in the USB
flash drive or USB memory card reader.
C To stop playback, press STOP n or
remove the USB flash drive / USB
memory card reader from the USB port.
Helpful Hints:
– The USB port only supports the playback
of JPEG/MP3 files.
– The USB port does not support the
connection to other USB devices except for a
USB flash drive / USB memory card reader.
– If the USB jack does not fit into the USB
port, a USB extension cable is required.
TIPS: Before making or changing any connections, make sure that all the devices are disconnected
from the power outlet.
17
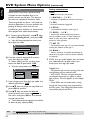
Main Unit
English
a STANDBY-ON 2
– Turns on or off the DVD recorder.
b Disc tray
c OPEN CLOSE ç
– Opens/closes the disc tray.
d n STOP
– Stop playback/recording.
e ÉPLAY/ ÅPAUSE
– Play a disc.
– Pauses the playback or recording.
f SOURCE
– Selects the recorder’s input source.
gRECORD l
– Start recording the current TV channel
or the current video input source.
– Press repeatedly to set up a One Touch
Recording at 30 minutes interval.
h System display panel
– Show information about the current
status of the DVD recorder.
Jacks behind the flap
Flip down the door as indicated by the
OPEN label at the right hand corner.
i USB
– Input for USB flash drive / USB memory
card reader.
Press USB in order to view the input
source.
j VIDEO
– Video input for camcorders or video
recorders.
Press REC SOURCE on the remote
control to select ‘Front CVBS’ in order
to view the input source.
k L/R AUDIO
– Audio input for camcorders or video
recorders.
l DV IN
– Input for digital camcorders or other
suitable devices using this connector.
Press REC SOURCE on the remote
control to select ‘DV’ in order to view
the input source.
m Karaoke
– Input for the microphones.
18
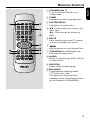
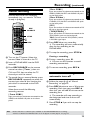
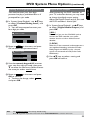
Remote Control
English
a STANDBY-ON 2
– Turns on the DVD recorder or to
standby mode.
b TIMER
– Enters/exits the timer recording menu.
c SYSTEM-SETUP
– Enters/exits the system menu.
d :Cursor buttons for moving to the
left or right.
: Cursor buttons for moving up/
down.
e REC l
– Starts recording the current TV channel
or the current video input source.
f
– Skips to previous or next Chapter/Track.
g TOP MENU (For DVD±R/±RW only)
– Enters the disc editing menu.
h AUDIO
– Selects an audio language (DVD, VCD) or
an audio channel.
i SUBTITLE
– Selects a DVD subtitle language.
j REC MODE
– Toggles between recording modes :
1, 2, 4 and 6 hour mode.
This determines the quality of the
recording and the amount/length of time
you can record on a DVD±R/±RW.
19
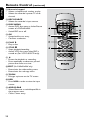
Remote Control (continued)
English
k Numeric keypad
– Selects a chapter/track number to play.
– Selects the recorder’s preset TV tuner
channel.
l REC SOURCE
– Selects the recorder’s input source.
m DISC-MENU
– Access DVD disc menu or Index Picture
screen of a DVD±R/±RW.
– Switch PBC on or off.
n OK
– Stores/confirms an entry.
– Confirms a selection.
o PLAYÉ
– Plays a disc.
p STOP n
– Stops playback/recording.
– Access VCD disc menu when PBC is
turned on (For VCD 2.0/SVCD only).
q Å
– Pauses the playback or recording.
– Press repeatedly to advance a paused
picture one frame at a time.
rEDIT (For DVD±R/±RW only)
– Enters/exits the video editing menu.
– Enters/exits the usb copy menu.
s ZOOM
– Enlarges a picture on the TV screen.
t USB
– Press USB in order to view the input
source.
u ADD/CLEAR
– Selects/Removes a track/chapter/file in
the program menu.
– Clears a timer entry.
20
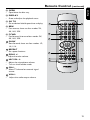
Remote Control (continued)
English
v OPEN
– Open/close the disc tray.
w DISPLAY
– Show and adjust the playback status.
x GO TO
– Go to desired title/chapter/time and play.
22
23
y REW
– Fast reverse, there are four modes: 2X,
4X, 16X, 32X.
z F.FWD
– Fast forward, there are four modes: 2X,
4X, 16X, 32X.
24
25
27
SLOW
– Slow forward, there are four modes: 1/2,
1/4, 1/16.
27
28 REPEAT
– Set repeat functions.
ECHO +/– Adjust the echo volume.
26
28
29
30 MIC
VOL +/– Adjust the microphone volume.
– Turn on the Karaoke mode.
29
31
30
32
31 CH+/– Select TV channel or external signal
source.
32 VOL+/– Adjust the audio output volume.
21
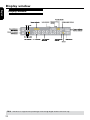
Display window
English
Display window
TIPS: DTS discs are supported via passthrough mode through Digital Coaxial connection only.
22
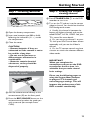
Step 1 : Inserting Batteries
3
1
+2
A Open the battery compartment.
B Insert two batteries type R03 or AAA,
following the indications (+-) inside
the compartment.
C Close the cover.
CAUTION!
– Remove batteries if they are
exhausted or if the remote is not to
be used for a long time.
– Do not use old and new or
different types of batteries in
combination.
– Batteries contain chemical
substances, so they should be
disposed of properly.
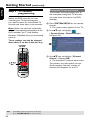
Using the remote control to
operate the system
Step 2 : Finding the correct
viewing channel
A Press STANDBY-ON 2 on the DVD
recorder to turn it on.
B Turn on the TV and set it to the correct
video-in channel. You should see the blue
DVD background screen.
Usually this channel is between the
lowest and highest channels and may be
called FRONT, A/V IN, VIDEO. See your
TV’s manual for more details.
Or, you may go to channel 1 on your
TV, then press the Channel down button
repeatedly until you see the Video In
channel.
Or, the TV remote control may have
a button or switch that chooses different
video modes.
IMPORTANT!
When you complete the
connections and turn on the DVD
recorder for the first time, it is
advisable that you make several
basic settings.
Please see the following pages on
using the System Menu features
to program TV channels and
menu language settings. This will
improve the performance of this
DVD recorder considerably.
A Aim the remote control directly at the
remote sensor (IR) on the front panel.
B Press the REC SOURCE button on the
remote control to select the mode you
wish to control (for example FrontCVBS).
23
English
Getting Started
Getting Started (continued)
English
Step 3 : TV channel programming
Before the DVD recorder can start
recording the TV channel programs,
you need to search for the available TV
channels and store them in the recorder.
Note: Make sure you have successfully
made all the required connections to the
DVD recorder, the TV and Satellite
Receiver/ Cable Box (if any) and switched
them on.
Automatic TV channel search
This function will automatically scan all
the receivable analog local TV channels
and store these channels on the DVD
recorder.
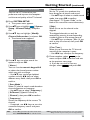
A Press SYSTEM-SETUP on the remote
control.
The system menu appears on the TV.
B Use keys to highlight
{ System Setup - Channel Setup }
and press OK.
Tuner settings can only be changed
when there is no disc in the disc tray.
SYSTEM
SETUP
OK
TIPS:
24
Press to go back to previous menu item.
Press SYSTEM-SETUP to exit the menu.
C Use keys to highlight { Channel
Search } and press OK.
The automatic TV channel search starts.
This process may take several minutes.
Once complete, the total number of
channels found appears on the TV.
Modifying Channel Information
You can set a TV channel to your
preference and improve the reception
and the sound quality of the TV channel.
A Press SYSTEM-SETUP
The system menu appears.
B Use keys to highlight
{ System
Setup - Channel Setup } and press
OK.
C Use keys to highlight { Modify
Channel Information } and press OK.
The channel menu appears.
{ Sound mode }
Set the TV system that produces the
least distortion of picture and sound.
– Use keys to select a suitable sound
mode, then press OK to confirm.
(See chapter “TV System Guide” at the
back of this manual for more information).
{ Skip }
Select this to set the channel to be
skipped.
The skipped channels can only be
accessed by pressing the corresponding
number button on the remote control.
– Use keys to choose { Yes } if you
wish to skip this channel, then press OK
to confirm.
{ Fine Tune }
Select this to fine-tune the TV channel
manually if the reception is poor.
– Use keys to adjust the frequency.
D Use keys to select one of the
options and press OK.
{ Name }
You can use the numeric keypad 0-9
to select the channel preset number
which you wish to change.
– Use keys to change alphabet/
number and use keys to select
different entry fields, then press OK to
confirm.
E Once complete, select OK in the
menu and press OK to confirm and exit
to the previous menu page.
If you do not wish to save any
changes, select CANCEL and press OK.
{ Scan Mode }
Select TV channel search mode based on
channel allocation or frequency.
– Use keys to select { Frequency },
{ S-Channel } (Special Channel) or
{ Channel }, then press OK to confirm.
{ Frequency }
Shows the frequency of the current TV
channel.
– If required, use keys to start the
automatic frequency search and press
OK to confirm.
TIPS:
Press to go back to previous menu item.
Press SYSTEM-SETUP to exit the menu.
TIPS: By default, PAL D/K is TV System for most parts of China.
Change to PAL I if you are sure your area support PAL I.
25
English
Getting Started (continued)
Getting Started (continued)
English
Sorting the TV channels
You may not agree with the sequence in
which the individual TV channels have
been allocated to the program
numbers. You can use this function to
rearrange all the stored TV channels.
A Press SYSTEM-SETUP.
The system menu appears.
B Use keys to highlight
{ System Setup - Channel SEARCH
} and press OK.
C Use keys to highlight
{ Sort Channels } and press OK.
The list of TV channel programs
appears.
Step 4 : Setting the time & date
If the DVD recorder has not set the time
and date correctly, set the clock manually
by following the steps below.
A Press SYSTEM-SETUP.
The system menu appears.
B Use keys to select
{ System Setup - Clock } and press
OK to confirm.
C Press OK to set { Date (dd/mm/yy) }.
D Use keys to change number and use
tu keys to select different entry fields,
then press OK to confirm.
D Use keys to highlight the channel
you want to change and press OK or u.
The selected channel will move to the
right side of the screen.
l Alternatively, you can key in the numbers
E Use keys to shift the TV channel to
the desired position and press OK or u.
The selected channel will be inserted
before the current position.
F Move to { Time (hh:mm:ss) } and
repeat step D~E.
F Repeat steps D~E until you have sorted
all the TV channels you want.
TIPS:
26
Press to go back to previous menu item.
Press SYSTEM-SETUP to exit the menu.
using the numeric keypad 0-9 on the
remote control.
E Press OK to confirm.
Note: For information on { Show
DivX® registration code }, see page 54.
Discs for recording
Several formats of DVD recordable discs
can be used with this DVD recorder:
DVD±RW (DVD ReWritable)
– Discs that are re-writable can be used
for multiple recordings once existing data
is erased.
DVD±R (DVD Recordable)
– Discs can only be used for a single
recording. Each new recording is always
added at the end of all previous
recordings as existing recordings cannot
be overwritten.
– Editing can be made on any DVD±R
discs as long as they have not been
finalized. It is also possible to create
additional chapter markers.
– To play a DVD±R on other DVD
player, it must be finalized (see page 35
“Playing your recordings (DVD±R) on
other DVD players”). After this is done,
no more data can be added to the disc.
IMPORTANT!
Unrecordable pictures
Television programs, films, video tapes,
discs, and other materials may be
copy-protected and therefore cannot be
recorded on this recorder.
Recording settings
The default recording settings allow you
to set the auto chapter markers,
preferred recording input source and
recording mode. Any changes made using
the remote control will only apply to the
current recording settings, the default
recording settings will remain for the
next recording.
A Press SYSTEM-SETUP on the remote
control.
The system menu appears on the TV.
B Use keys to select
{ System Setup - Record } and press
OK to confirm.
C Use keys to select the setting you
wish to change and press OK to confirm.
Instructions and explanation of the
options are provided in the following
pages.
D To exit, press SYSTEM-MENU.
TIPS:
Press to go back to previous menu item.
Press SYSTEM-SETUP to exit the menu.
27
English
Recording
Recording (continued)
English
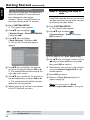
Auto Chapter Markers
You can insert chapter markers within a
title during recording. This lets you
access specific points on the recorded
disc as you would choose a chapter on
other DVDs.
A Use keys to select { Auto Chapter
Marker } and press OK to access its
options.
B Use keys to select one of the
options.
{ Off }
Disable this feature.
{ On }
A chapter marker will be automatically
inserted during recording. The interval
depends on the recording mode selected.
C Press OK to confirm.
Default Recording Source
You can define your preferred source of
recording. The default source is selected
when the DVD recorder is turned on.
To change the current recording source
without changing the default setting, you
can press REC SOURCE button on the
remote control.
A Use keys to select { Default
Recording Source } and press OK to
access its options.
B Use keys to select one of the
options.
{ Tuner }
Input source from TV programs.
{ Rear CVBS }
Input source from the device connected to the
VIDEO (CVBS)-IN-EXT and AUDIO L/R jacks
on the back panel.
{ Rear S-Video }
Input source from the device connected to the
S-VIDEO (Y/C)-IN-EXT and AUDIO L/R jacks
on the back panel.
{ DV }
Input source from the device connected to
DV IN jack at the front panel.
{ YUV(Y/Pb/Pr) }
Input source from the device connected to the
YUV(Y/Pb/Pr) jacks on the back panel.
TIPS: Cannot record if YUV(Y/Pb/Pr) source
is P.SCAN signal input.
C Press OK to confirm.
Default Quality
The recording mode defines the picture
quality of recordings and the maximum
recording time for a disc.
This function can also be accessed via the
REC MODE button on the remote
control.
A Use keys to select { Default
Recording Quality } and press OK to
access its options.
B Use keys to select one of the
following recording mode.
Maximum Recording
Time per Disc
1 hour
2 hours
4 hours
6 hours
Picture Quality
HQ(High quality)
1 Hour Mode
SP(DVD quality-Standard Play)
2 Hour Mode
EP(VHS quality-Extended Play)
4 Hour Mode
SLP(VHS quality-Super Long Play) 6 Hour Mode
C Press OK to confirm.
{ Front CVBS }
Input source from the device connected to the
VIDEO and AUDIO L/R jacks on the front
panel.
TIPS:
28
Record
Mode
The underlined option is the factory default setting.
Press to go back to previous menu item. Press SYSTEM-SETUP to exit the menu.
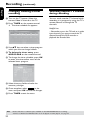
Manual recording
Use this feature to start recording
immediately (e.g., to record a TV show
already in progress).
{ Rear CVBS }
Input source from the device connected to the
VIDEO (CVBS)-IN-EXT and AUDIO L/R jacks
on the back panel.
{ Rear S-Video }
Input source from the device connected to the
S-VIDEO (Y/C)-IN-EXT and AUDIO L/R jacks
on the back panel.
{ DV }
REC
SOURCE
STOP
REC
Input source from the device connected to DV
IN jack at the front panel.
{ YUV(Y/Pb/Pr) }
Input source from the device connected to the
YUV(Y/Pb/Pr) jacks on the back panel.
TIPS: Cannot record if YUV(Y/Pb/Pr) source
is P.SCAN signal input.
D Press REC l to start recording.
The recording will start automatically
after the last recording on the
DVD±R/±RW.
E To stop the recording, press STOP n.
A Turn on the TV power. Select the
correct Video In channel at the TV.
B Insert a DVD±R/±RW into the DVD
recorder.
C Press REC SOURCE on the remote
control to select { Tuner }, then use
CH+ and CH- keys to select the TV
channel you wish to record.
l To record from an external device, press
REC SOURCE repeatedly to select the
correct input channel that matches the
jack which is connected to the DVD
recorder.
Select from one of the following
recording sources:
{ Front CVBS }
Input source from the device connected to the
VIDEO and AUDIO L/R jacks on the front
panel.
Pausing a recording
A During a recording, press Å.
You can use this function to avoid
recording commercials.
B To resume recording, press REC l.
One Touch Recording automatic turn-off
A Follow the steps A~C of “Manual
Recording” on page 29.
B Press REC l twice to start a 30 minutes
recording. Each time you press REC l
after that, you will add 30 minutes to the
recording time.
The recorder will stop recording at
the designated end time and turn off
automatically.
l Press STOP n if you wish to stop the
recording.
TIPS:
Ensure that there is sufficient space available on the DVD±R/±RW before recording.
You have to finalize the DVD±R, before it can be played on other players, see page 36.
29
English
Recording (continued)
Recording (continued)
English
About timer recording
Use ‘Timer Recording’ to automatically
start and stop a recording at a later date/
time. The DVD recorder will tune to the
right program channel and begin
recording at the specified time.
To make a timer recording, your
DVD recorder needs to know:
– The date you want to make the
recording.
– The recording input source.
– The start and stop time of the recording.
– The recording quality, see page 28.
OK
TIMER
TIPS:
30
Timer recording (manually)
A Turn on the TV power. Select the
correct Video In channel at the TV.
B Press TIMER on the remote control.
The timer schedule list appears.
C Press OK on the remote control.
The timer editor menu appears.
D Use keys to select an entry in the
menu and press OK to enter its options.
Ensure that there is sufficient space available on the DVD±R/±RW before recording.
You have to finalize the DVD±R, before it can be played on other players, see page 36.
{ Source }
– Use keys to select the recording input
source.
{ Rec Mode }
– Use keys to select your option.
See pages 28 on “Recording settings Default Recording Mode”).
{ Mode }
– Use keys to select { Once },
{ Daily }, { Weekly }, { Mon-Fri } (Monday
to Friday, ) { Mon-Sat } (Monday to Saturday)
or { Weekend } (Saturday and Sunday)
recordings.
{ Date }
– Use keys or the numeric keypad
0-9 to enter the date for recording.
{ Start }
– Use keys or the numeric keypad
0-9 to enter the start time of recording.
{ End }
– Use keys or the numeric keypad
0-9 to enter the end time of recording.
E Select OK in the menu and press OK.
The system will store the timer entry
and return to the timer schedule list.
l To cancel the above timer setting, select
CANCEL
in the menu and press OK.
F Press TIMER to exit the menu.
G Insert a DVD±R/±RW into the DVD
recorder.
H Press STANDBY-ON to turn off the
DVD recorder.
If the DVD recorder is not in standby
mode, a warning message will appear
three minutes before the recording
starts.
The ‘ TIMER ’ icon will light up on
the display panel if a timer recording is
set.
Helpful Hint:
– Set the timer recording one minute ahead
of the program’s start time. This helps to
ensure the entire program is recorded as
the disc requires about 30 seconds to
prepare for recording.
– The alternation of two timing recorder task
need at least 1 min.
Setting a timer recording from
an external Cable Box/ Satellite
Receiver
If you have a Satellite Receiver/Cable Box
connected to this DVD recorder via the
S-VIDEO (Y/C) or VIDEO (CVBS) (see
page 13), follow the steps described
below to program the recordings.
A Select the channel you want to record at
the Satellite Receiver/Cable Box.
B Program the recording with the required
information. Follow the steps A~H of
“Timer Recording (manually)” on pages
30~31.
{ Source }
– Use keys to select { Rear
S-Video } or { Rear CVBS } as the input
channel and press OK to confirm.
C Leave the Satellite Receiver/Cable Box on
for the recording.
TIPS:
Ensure that there is sufficient space available on the DVD±R/±RW before recording.
You have to finalize the DVD±R, before it can be played on other players, see page 36.
31
English
Recording (continued)
Recording (continued)
English
Changing/ Deleting a timer
recording
A Turn on the TV power. Select the
correct Video In channel at the TV.
B Press TIMER on the remote control.
The timer schedule list appears.
Watching another TV channel
during recording
You can watch another TV channel while
recording is in progress by using the TV’s
remote control to change the TV
channels.
Helpful hint:
– Remember to turn the TV back to its video
input channel if you want to watch the TV
channel through the DVD recorder or
playback the recorded disc.
C Use keys to select a timer program
which you want to change/ delete.
D To delete the timer entry, press
ADD/CLEAR on the remote control.
E To change the timer schedule, press OK
to enter the timer editor menu of the
selected timer program.
F Select the entry field and make the
necessary changes.
G Once complete, select OK in the
menu and press OK to save the changes.
H Press TIMER to exit the menu.
TIPS:
32
Ensure that there is sufficient space available on the DVD±R/±RW before recording.
You have to finalize the DVD±R, before it can be played on other players, see page 35.
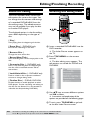
About Disc editing
Accessing disc editing menu
This DVD recorder offers various disc
edit options for various disc types. You
can change the disc content and settings
of a recorded DVD±R/±RW from the
disc editing menu. The edited contents
may not be available if you play the disc
on another DVD player.
TOP MENU
OK
The displayed options in the disc editing
menu differ depending on the type of
disc.
REC
{ Play }
Start playing from the beginning of the disc.
{ Erase Disc } - DVD±RW only
Erase all the recordings in the disc.
{ Rename Disc }
Change the name of the disc.
{ Record New Title }
Start recording from the last empty title in the
disc.
{ Overwrite Disc } - DVD±RW only
Start a new recording from the beginning of
the disc; all the recorded content will be
overwritten.
A Insert a recorded DVD±R/±RW into the
DVD recorder.
The Index Picture screen appears on
the TV.
B Press TOP MENU on the remote
control.
The disc editing menu appears. The
edit options are varied for DVD±R and
DVD±RW.
{ Lock/Unlock Disc } - DVD±RW only
Lock or unlock a disc to prevent accidental
erasure or changes being made.
{ Finalize Disc } - DVD±R, DVD-RW
Finalize the disc to enable playback on other
DVD players. Further recording and editing to
the disc are not allowed. It is not possible to
unfinalize the disc(excluding DVD-RW).
C Use keys to access different options
and OK to select.
Instructions and explanation of the
options are provided on the following pages.
D To exit, press TOP MENU to go back
to the disc Index Picture screen.
TIPS:
No further recording and editing can be carried out on a finalized DVD±R.
Press to go back to the previous menu. Press DISC MENU to exit.
33
English
Editing/Finalizing Recording
Editing/Finalizing Recording (continued)
English
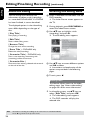
Rename disc
The original disc name is generated
automatically by the DVD recorder. You
can change the disc name by following
the steps below.
A Press TOP MENU, then use keys
to select { Rename Disc } and press OK.
The keyboard screen appears.
B Use keys to highlight a
character on the keyboard and press OK
to select.
The maximum input is up to 12
characters.
l You can use the following keys on the
keyboard screen to edit your input:
BkSp
:to remove the character to
the left of the cursor.
DELETE :to remove the character to
the right the cursor.
SPACE :to create a space between
characters. CAPS :to toggle between upper and
lower case characters.
CLEAR :to clear the entry field
completely.
C To confirm your entry, select OK
the keyboard and press OK.
The info panel is now updated.
l To cancel the changes, select
the keyboard and press OK.
EXIT
on
on
Erase disc (DVD±RW only)
This erases the content of the
DVD±RW including those that was not
recorded on this DVD recorder. Once
the existing content is erased, it can be
used for recording.
A Press TOP MENU, then use keys
to select { Erase Disc } and press OK.
A warning message will appear.
B Select
YES
in the menu to proceed or
, to abort, then press OK to
confirm.
NO
Record new title
This function allows you to start a new
recording at the remaining empty space
in the DVD±RW.
A Press TOP MENU, then use keys
to select { Record New Title } and
press OK.
B Select the source you want to record
from and press REC l to start
recording.
Overwrite disc (DVD±RW only)
This function allows you to start a new
recording from the beginning of a
DVD±RW regardless of the contents of
the disc.
A Press TOP MENU, then use keys
to select { Overwrite disc } and press
OK.
B Select the source you want to record
from and press REC l to start
recording.
TIPS:
34
No further recording and editing can be carried out on a finalized DVD±R.
Press to go back to the previous menu. Press DISC MENU to exit.
Editing/Finalizing Recording (continued)
l Press TOP MENU, then use keys to
select { Make Compatible } and press
OK to confirm.
Helpful Hint:
– If the option {Compatible} is not available
for selection, it means that the disc is already
compatible.
Lock/Unlock disc (DVD±RW only)
You can choose to protect the recorded
DVD±RW in order to prevent accidental
loss of recordings.
A Press TOP MENU, then use keys to
select { Lock Disc } and press OK.
Except playback function, other
functions are prohibit while the disc is
locked.
When the disc is locked, the option in
the disc editing menu will change to
{ Unlock Disc }.
Playing your recordings
(DVD±R) on other DVD
players
English
Make compatible (DVD±RW only)
The edited DVD±RW may still display
the original titles or hidden scenes when
played back on other DVD players. This
function allows you to make an edited
DVD±RW compatible with other players.
It is necessary to finalize a DVD±R or
DVD-RW disc before you can play it on
any other DVD player. Otherwise, the
DVD±R or DVD-RW will only playback
on this DVD recorder.
After a DVD±R or DVD-RW disc
has been finalized, no further
recordings or editing can be made
to it. Make sure that you have
completed all the recordings and
editing before finalizing the disc.
A Press TOP MENU, then use keys to
select { Finalize Disc } and press OK.
A warning message will appear.
B Select YES in the menu and press OK
to start the process.
Finalization will take a few minutes.
Do not try to open the disc tray or turn
the power off as this may render the disc
unusable.
C Select
NO
to abort.
B If you want to overwrite or edit on the
protected disc, select { Unlock Disc }.
Finalize disc (DVD±R,DVD-RW only)
l Press TOP MENU, then use keys to
select { Finalize Disc } and press OK.
TIPS:
No further recording and editing can be carried out on a finalized DVD±R.
Press to go back to the previous menu. Press DISC MENU to exit.
35
Editing/Finalizing Recording (continued)
English
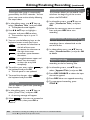
About title editing
Accessing title editing menu
You can change the individual title
information or delete a title (recording)
in a recorded DVD±R/±RW. If a DVD±R
has been finalized, it cannot be edited.
A Insert a recorded DVD±R/±RW into the
DVD recorder.
The Index Picture screen appears on
the TV.
The displayed options in the title editing
menu differ depending on the type of
disc.
l During playback, press DISC MENU to
{ Play Title }
Start playing a recording.
access the Index Picture screen.
B Use keys to highlight a title
(recording), and press .
The title editing menu appears.
{ Edit Title }
Access video editing menu.
{ Rename Title }
Change the name of the recording.
{ Erase Title } - DVD±RW only
Delete the title (recording).
{ Overwrite Title } - DVD±RW only
Start a new recording, the existing title
(recording) will be overwritten.
{ Overwrite Disc }
Overwrite from existing selected title onwards
to the end of the disc.
C Use keys to access different options
and OK to select.
Instructions and explanation of the
options are provided in the following
pages.
D To exit, press .
Editing video
This feature allows access to the video
editing menu. See “About video editing”
on pages 38~40 for more information.
l In title editing menu, use keys to
select { Edit Title } and press OK.
The video editing menu appears.
The DVD recorder will play the
selected title.
TIPS:
36
No further recording and editing can be carried out on a finalized DVD±R.
Press to go back to the previous menu.
Rename title
The original title name is automatically
generated by the DVD recorder. You can
give a new name to the title by following
the steps below.
A In title editing menu, use keys to
select { Rename Title } and press OK.
The keyboard screen appears.
B Use keys to highlight a
character and press OK to select.
The maximum input is up to 12
characters.
l You can use the following keys on the
keyboard screen to edit your input:
BkSp
:to remove the character to
the left of the cursor.
DELETE :to remove the character to
the right the cursor.
SPACE :to create a space between
characters. CAPS :to toggle between upper and
lower case characters.
CLEAR :to clear the entry field
completely.
C To confirm your entry, select OK
the keyboard and press OK.
The info panel is now updated.
on
l To cancel the changes, select
on
EXIT
the keyboard and press OK.
Erase title
You can delete a specific title (recording)
from the disc.
Overwrite title (DVD±RW only)
This function allows you to record a new
title from the beginning of the current
title in the DVD±RW.
A In title editing menu, use keys to
select { Overwrite Title } and press
OK.
B Select the source you want to record
from and press REC l to start
recording.
Overwrite from the selected title
You can choose to overwrite only the
recordings from a selected title to the
end of the disc.
A In video editing menu, use keys to
select { Overwrite Disc } and press OK
to delete.
Append recording
This function allows you to append
recording to the last existing title.
A In title editing menu, use keys to
select { Append Title } and press OK.
B Press REC SOURCE to select the input
channel to append.
C Press REC l to start append recording.
D To stop append recording, press
STOP n.
A In title editing menu, use keys to
select { Erase Title } and press OK.
A warning message will appear.
B Select
NO
YES
in the menu to proceed or
to abort, then press OK to
confirm.
TIPS:
No further recording and editing can be carried out on a finalized DVD±R.
Press to go back to the previous menu.
37
English
Editing/Finalizing Recording (continued)
Editing/Finalizing Recording (continued)
English
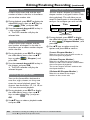
About video editing
Accessing video editing menu
After a recording has been made, this
DVD recorder allows you to edit the
video content. You can add/delete
chapter markers, hide unwanted scenes,
change the picture in the index picture
screen and split one title (recording) into
two.
When you playback a recording in video
edit mode, the entire recording will be
played back including hidden scenes.
PLAY
OK
EDIT
The edit functions available in the disc
editing menu are:
{ Title }
Select a title (recording) to play.
{ Chapter }
Select a chapter within the selected title.
{ Play }
Select to playback a chapter.
{ Chapter Marker }
Insert a chapter marker in the recording or
erase a chapter marker to combine two
chapters.
{ Hide Chapter }
A Insert a recorded DVD±R/±RW into the
DVD recorder.
The Index Picture screen appears on
the TV.
B Use keys to select a title (recording).
C Press PLAY to start playback.
D Press EDIT on the remote control.
The video editing menu appears.
Hide the unwanted scene in the recording.
{ Index Picture }
Select a scene in the recording as the index
picture screen.
{ Split Title }
Divide the recording into two under
separate titles.
{ T-Elapsed:x:xx:xx }
Display the elapsed time.
E Use keys to access different options
and press OK to select.
Instructions and explanation of the
options are provided in the following
pages.
F To exit, press EDIT.
TIPS:
38
No further recording and editing can be carried out on a finalized DVD±R.
Press to go back to the previous menu.
Selecting a title
It shows the current title and the total
number of titles in the disc. It also allows
you to select another title.
A During playback, press EDIT to display the
video editing menu, then use keys to
select
{ Title } and press OK.
B Use the numeric keypad 0-9 to key in
a title and press OK.
The DVD recorder will play the
selected title.
Selecting a chapter
It shows the current chapter and the
total number of chapters in the title. It
also allows you to select another chapter
within the title.
A During playback, press EDIT to display
the video editing menu, then use
keys to select
{ Chapter } and
press OK.
B Use the numeric keypad 0-9 to key in
the chapter and press OK.
The DVD recorder will play the
selected chapter.
Selecting a playback mode
Creating chapter marker
You can create a chapter by inserting
chapter marker at
any point within a title
Title
during playback. This will allow you to
access a specific point in the recording
Chapter
easily or set a chapter you wish to hide.
Title
Chapter Chapter Chapter Chapter
chapter markers
A During playback, press EDIT to display
the video editing menu, then use keys
to select
{ Chapter Marker } and
press OK.
B Use keys to select one of the
options and press OK to confirm.
{ Insert Chapter Marker }
Select this to insert a new chapter marker at
the current point of playback.
{ Delete Chapter Marker }
Select this to delete the current chapter
marker (it refers to the closest marker before
the current point of playback).
The current chapter will then combine with
the chapter before it.
{ Delete All Chapter Marker }
Select this to delete all the chapter
markers in the current title.
You can fast forward/fast backward at
two, four, eight, sixteen, or thirty two
times the normal playback speed. You
also can slow forward at 1/2, 1/4, 1/8, or
1/16 time the normal playback.
A During playback, press EDIT to display
the video editing menu, then use
keys to select
{ Play } and press
OK.
B Use keys to select a playback mode
and press OK.
TIPS:
No further recording and editing can be carried out on a finalized DVD±R.
Press to go back to the previous menu.
39
English
Editing/Finalizing Recording (continued)
Editing/Finalizing Recording (continued)
English
Hiding an unwanted chapter
You can choose to hide certain scene
from playback (e.g. skipping a commercial
scene) or make it visible again.
A Create a chapter marker at the scene
you are going to hide. ( See previous page
on “Insert Chapter Marker”).
B Select the chapter you want to hide and
start playback. ( See previous page on
“Selecting a chapter”).
C During playback, press EDIT to display
the video editing menu, then use
keys to select
{ Hide Chapter }
and press OK.
The current chapter will be hidden.
l If the video editing menu does not show,
press EDIT on the remote control.
To unhide a chapter
A Press EDIT on the remote control
during playback.
The video editing menu appears.
While in editing mode, the hide
chapter will play.
BUse keys to select { Unhide
Chapter } and press OK.
The current chapter will be visible
during playback.
Changing Index Picture
The index picture is the picture of the
title you will see when the DVD recorder
loads up the Index menu. Normally, the
first frame of a recording is shown as the
title’s index picture.
l Press EDIT to display the video editing
menu, then use keys to select
{ Index Picture } and press OK
to select the current scene as the index
picture for the title.
Splitting a title (DVD±RW only)
You can divide the current title into two
new titles. Each of these titles is
characterized by its own index picture.
Warning! Once a title is divided, it
cannot be reversed.
l During playback, press EDIT to display
the video editing menu, then use
keys to select
{ Split Title } and
press OK to divide the title at the
current playback position.
A new title will be shown at the Index
Picture screen.
Helpful Hint:
– All the hidden chapters will be played
back while in video editing mode.
TIPS:
40
No further recording and editing can be carried out on a finalized DVD±R.
Press to go back to the previous menu.
Playable discs
Using this DVD Recorder, you can play
and record on the following discs:
Recording and Playback
DVD±RW (DVD Rewritable);
can be recorded on over and
over.
DVD±R (DVD Recordable);
can be recorded only once.
IMPORTANT!
– If the inhibit icon (Error) appears
on the TV screen when a button is
pressed, it means the function is not
available on the current disc or at
the current time.
– DVD discs and players are
designed with regional restrictions.
Before playing a disc, make sure the
disc is for the same region as your
player.
– Do not push on the disc tray or
put any objects other than discs on
the disc tray. It may cause the disc
player to malfunction.
Playback only:
DVD Video (Digital Versatile
Disc)
CD-RW (CD-Rewritable)
Audio/ MP3/ JPEG contents
CD-R (CD-Recordable)
Audio/ MP3/ JPEG contents
Audio CD (Compact Disc
Digital Audio)
MP3-Disc
Video CD
(Formats 1.0, 1.1, 2.0)
Inserting a disc
ReWritable
Recordable
A Press STANDBY-ON to turn on the
DVD recorder.
B Press OPEN CLOSE ç on the front of
the DVD recorder.
The disc tray opens.
C Carefully place the disc into the tray with
the label facing up, then press
OPEN CLOSEç.
Make sure the disc label is facing
down.
For double-sided discs, load the side
which you want to play facing up.
Super Video CD
D Turn on the TV power. Select the correct
Video In channel at the TV (see page 24).
DivX Disc
(DivX 3.11, 4.x, 5.x)
E Playback will start automatically or a
dialog will appear on the TV (see next
page).
TIPS:
Some discs cannot be played on this DVD recorder due to the configuration and characteristics of the disc,
or due to the condition of recording and authoring software.
41
English
Playback
Playback (continued)
English
Starting disc playback
l Playback will begin automatically. If the
disc has its own menu this will be loaded,
otherwise the DVD recorder will launch
an index screen.
l If the pin code entry dialog appears on
the TV, this means that the parental
control was activated for the inserted
disc (see page 55).
Use the numeric keypad 0-9 on the
remote control to enter your pin code
(password).
l For more playback features, see pages
48 ~ 51 “Additional Playback Features”.
Playing a DVD video disc
The DVD disc is usually formatted with a
disc menu. You may have to make your
selection (e.g., subtitle or audio language)
within the disc menu.
A Insert a DVD disc.
If the disc menu appears on the TV
l Use numeric keypad 0-9 to input your
selection or use keys to select
a play option and press OK to start
playback.
To select the previous or next
chapter/title marker
l During playback, press DISPLAY on the
remote control to access the DVD
display menu. Then use keys to
select { Title } or { Chapter } and input
your title/chapter number using the
numeric keypad 0-9.
B To stop playback, press STOP n.
Playing a (Super) Video CD
(Super) Video CDs may feature ‘PBC’
(Play Back Control). This allows you to
play the video CDs interactively,
following the menu on the display.
A Insert a (Super) Video CD.
If the ‘PBC’ is on, the disc index
menu will appear on the TV
B Use numeric keypad 0-9 to input your
selection or to select a play option.
l Press STOP on the remote control to
return to the previous menu.
l To turn on/off the Playback Control
mode, press DISPLAY twice on the
remote control during playback to access
the VCD display menu. Then use
keys to select
{ PBC On } or { PBC Off }.
l You also could press DISC MENU on
the remote control to switch PCB ON/
OFF.
C To stop playback, press STOP n.
Playing an audio CD
A Insert an audio CD.
Playback starts automatically.
B To stop playback, press STOP n.
The track number and elapsed playing
time will appear on the display panel.
Playing a DVD±R/±RW disc
A Insert a DVD±R/±RW disc.
The Index Picture screen appears.
B Use keys to select a title and press
PLAY to start playback.
C To stop playback, press STOP n.
Helpful Hint:
– If the message ‘BLAN’ appears on the
display panel, this means that there are no
recordings on this disc.
TIPS:
42
Some discs cannot be played on this DVD recorder due to the configuration and characteristics of the disc,
or due to the condition of recording and authoring software.
Playing a DivX disc
This DVD system supports the playback
of DivX movies which you can copy from
your computer onto a CD-R/RW,
DVD+R/RW.
A Insert a DivX disc.
The disc content menu appears.
B Select the right subtitle file, then select
the film.
C Press PLAY to start playback.
l During playback, you can press DISC
MENU to display the disc content menu.
l To select another subtitle file, press
SUBTITLE on the remote control.
Helpful Hints:
– Subtitle files with the following filename
extensions (.srt, .smi, .sub, .ssa, .txt) are
supported.
– It is normal to experience an occasional
pixelation during MPEG-4/DivX playback
due to poor clarity of digital contents during
internet downloading.
–Support Divx 3.11/4/5.x and support
playback of DivX 6.
Playing an MP3 disc
A Insert an MP3 CD.
The disc content menu appears.
File Play - Stop 0:00:00/ 0:00:00
Directory
1
2
3
4
5
6
7
8
Selection
Bee Gees
Phil Collins
Bryan Adams
Collin Raye
Nat King Cole
UB40
Jordan Hill
Faith Hill
Note: It may require longer time for the
DVD recorder to display the disc content
menu on the TV due to the large number
of songs/pictures compiled into one disc.
B Use keys to navigate within the
TIPS:
menu and press OK to access the folder/
album.
C Use keys to select the track/file to
play.
l To go to the previous menu, press DISC
MENU.
D To create a playlist, highlight the track/file
and press ADD/CLEAR.
The selected tracks/files will appear
on the right screen.
Use tu keys to toggle between the
left and right screen.
E Press PLAY to start playback.
F During playback, you can press
select the next/previous track.
/
to
G To stop playback, press STOP n.
Helpful Hints:
– Only the first session of a multi-session
CD will play back.
– It is normal to experience an occasional
“skip” while listening to your MP3 disc.
– Further information on the album, track
and artist will also be displayed on the TV if
included in the ID tag.
Playing a picture disc (or musical
slide show)
You can display JPEG pictures in the
selected roll automatically one after the
other.
A Insert a JPEG picture disc (CD,CD-R/RW,
DVD±R/±RW).
The disc content menu appears.
B Use keys to navigate within the
menu and press OK to access the folder/
album.
C To create a playlist, highlight the track/file
and press ADD/CLEAR.
The selected tracks/files will appear
on the right screen.
To remove the track/file from the
playlist, press ADD/CLEAR.
Some discs cannot be played on this DVD recorder due to the configuration and characteristics of the disc,
or due to the condition of recording and authoring software.
43
English
Playback (continued)
Playback (continued)
English
pictures or JPEG pictures e.g. TIFF. It
cannot play back moving pictures, Motion
JPEG, progressive JPEG and other formats,
or pictures in formats other than JPEG, or
pictures associated with sound.
– It may require a longer time for the
DVD recorder to display the disc content
on the TV due to the large number of
songs/ pictures compiled into one disc.
D You can select to playback from the
original disc content or from the playlist,
just use tu keys to move to the correct
screen before selecting the track/file for
playback.
File Play - Stop 0:00:00/ 0:00:00
Directory
1
2
3
4
Japan trip
Bryan Bday
My songs
Hot Hits
Selection
File Play - Stop 0:00:00/ 0:00:00
Directory
..\
1
2
3
4
5
6
7
8
Selection
P1010001.JPG
P1010008.JPG
BUTTER-1.JPG
NATURE-1.JPG
BUTTER-1.JPG
P1022500.JPG
P1023000.JPG
MERLIO-1.JPG
Playing from a USB flash drive
/USB memory card reader
If the disc contains MP3 music and
JPEG picture files, you can start a
musical slide show playback,
This USB port only supports the playback
of JPEG/MP3 files. It is not possible to
record the data from the USB port to
this DVD recorder.
l Select an MP3 file and press OK to start
playback, then select a picture file in the
menu and press OK to start the musical
slide show playback.
E During playback, you can press
DISPLAY twice on the remote control
to access various settings for the slide
show playback.
File Play
Type
Mode
Trick
Wipe
Zoom
Rotate
PIC
Normal
Play
Top to bottom
Fitscreen
Clockwise 0
Top to bottom
Down to top
Left to right
Right to left
Extend center V.
l Press ZOOM on the remote control to
enlarge the picture.
F To stop playback, press STOP n.
Helpful Hints:
–To pause mp3 during musical slideshow
playback, user has to press the [DISPLAY]
button twice to access the playback control
menu and select AUDIO under the TYPE
option.
A Insert a USB flash drive or USB memory
card reader into the USB port
A message will appear on the TV if
the device is detected.
B Press USB on the remote control to
access the data in the drive.
The content menu appears on the TV.
C Use to navigate within the menu
and select the file you want to access,
then press OK.
For more playback information, refer
to the chapters on MP3 and picture disc
playback in this user manual.
D To stop playback, press STOP n or
remove the USB flash drive / USB
memory card reader from the USB port.
Helpful Hints:
– Only the first 600 file names will be
displayed in each file folder.
File format:
– The file extension has to be ‘.JPG,’ ‘.JPE’ or ‘.JPEG.’
TIPS:
–
44
The operating features described here might not be possible for cerain discs. referdisplay
to the instructions
supplied
with the discs.
It Always
can only
DCF-standard
still
Changing to another title/
chapter/track
When a disc contains more than one
track, title or chapter, you can change to a
different track, title or chapter as follows.
During playback,
l Press
to go to the next title/chapter/
track.
l Press
to return to the start of the
previous title/chapter/track.
OR
l Use the numeric keypad 0-9 to input
the title/chapter/track number.
OR
l Press DISC MENU to enter the title
menu and use keys to select
{ Title } or { Chapter } and use
numeric keypad 0-9 to input the title/
chapter/track number.
Pausing playback and step
play
A During playback, pressÅto pause
playback and display a still picture.
Searching forward/backward
You can fast forward or fast reverse a
disc at two, four, sixteen or thirty two
times the normal playback speed.
A During playback, press tt (REW) or
uu (F.FWD) to switch to the search
function.
The search status bar appears.
It displays the search speed:
2x,4x,16x,32x(backward or forward)(only
for DVD/VCD);
2x,4x(backward or forward)(only for
CD);
2x,4x,8x,16x,32x(backward or
forward)(only for MP3);
The sound will be muted(DVD/VCD)
or distorted(CD).
B Press tt(reverse) or uu (forward) to
cycle through the search speeds.
C To resume normal playback, press
PLAY .
Zooming in
B Press Åagain to move one frame
forward.
This option allows you to enlarge the
picture on the screen and pan through
the enlarged picture.
C To resume normal playback, press
PLAY .
A Press ZOOM on your remote control to
activate zoom : 150% or 200%.
B Use tu keys to pan through the
zoomed picture.
C To exit, press ZOOM repeatedly until
the picture returns to the normal size.
TIPS:
The operating features described here might not be possible for cerain discs. Always refer to the instructions supplied with the discs.
45
English
Additional Playback Features
Additional Playback Features (continued)
English
Using TITLE options
ADD/CLEAR
USB
Selecting various repeat/shuffle
functions
You can select various repeat play or
random play mode during playback.
A During disc playback, press DISPLAY
twice on the remote control.
The TITLE menu appears.
B Use keys to select { Mode } and
press OK.
OK
C Use keys to select one of the repeat
options.
{ Repeat A-B }
A During playback, press DISPLAY twice
on the remote control.
The TITLE menu appears on the TV.
Select this to repeat the playback of a specific
segment within a title/chapter/track. Press OK
to mark the start and end of the segment you
want to repeat.
{ Chapter Repeat }
Select this to repeat playback on the current
chapter (DVD, DVD±R/±RW only).
{ Repeat Track/Title }
Select this to repeat playback on the current
track/title.
{ Repeat Directory }
Select this to repeat playback on the current
folder/directory (MP3, JPEG, picture disc only).
{ Repeat Disc }
Select this to repeat playback on the entire
disc.
B Use keys to select the setting you
want to adjust.
Instructions and explanation of the
options are provided in the following
pages.
C To exit, press DISPLAY.
{ Program }
Select this to program playback all the tracks
within the disc.
{ Shuffle }
Select this to randomly playback all the tracks
within the disc.
{ Normal }
Select this to cancel the repeat mode and
return to normal playback.
D To cancel repeat playback, press STOP n
or select { Normal } and press OK.
TIPS:
46
The operating features described here might not be possible for cerain discs. Always refer to the instructions supplied with the discs.
Programming disc tracks
You can play the contents of the disc in
the order you want by programming the
tracks to be played.
A Press DISPLAY twice on the remote
control.
The TITLE menu appears.
B Use keys to select { Mode } >
{ Program } and press OK.
The program menu appears.
DVD
Title
Program
Title 1
Title 2
Title 3
Title 4
Title 5
Title 6
Title 7
Title 8
C If the disc is recorded with Titles/Folders/
Albums, press OK to access the tracks/
files/chapters.
l Pressing OK at the highlighted track/file/
chapter will start playback.
l Use keys to toggle between the left
and right screen.
To program your favourite track/
file/chapter
D Use keys to select the track/file/
chapter to program and press ADD/
CLEAR on the remote control.
The selected track/file/title will appear
at the right screen.
The order on the right screen will be
the order of program playback.
To start program play
F Press key to move to the right screen
and press OK.
Playback will start from the selected
track/file/chapter according to the
programmed sequence.
To exit program play
G Press STOP n to exit program play.
Changing the audio soundtrack
language
This operation works only on DVDs with
multiple soundtrack language or VCDs
with multiple audio channels.
This function can also be accessed via the
AUDIO button on the remote control.
A During playback, press DISPLAYon the
remote control.
The T/C menu appears.
B Use keys to select { Audio } and
press to access its options.
C Use keys to select the audio
language and press OK to confirm.
The languages may be numbered or
abbreviated, such as “En” for English.
If the language selected is not available
on the disc, the disc’s default setting for
language will be used instead.
Helpful Hint:
– Some DVDs allow soundtrack language
changes only via the DVD disc menu. To
access the Disc Menu, press DISC-MENU.
To remove the programmed item
from your selection
E Press key to move to the right screen.
Select the track/file/chapter and press
ADD/CLEAR on the remote control.
TIPS:
The operating features described here might not be possible for cerain discs. Always refer to the instructions supplied with the discs.
47
English
Additional Playback Features (continued)
Additional Playback Features (continued)
English
Changing subtitle language
This operation works only on DVDs with
multiple subtitle languages, you can
change the language you want while
playing the DVD.
This function can be also accessed via
SUBTITLE key on the remote control.
A Press DISPLAY twice on the remote
control.
The TITLE menu appears.
B Use keys to select { Subtitle } and
press to enter the menu and find the
different available options.
Time search(except WMA disc)
This option allows you to skip to a
specific point in the current disc.
A Press GOTO repeatedly on the remote
control.
The time search screen appears.
B Use the numeric keypad (0-9) to
enter the time required and press OK to
confirm.
Playback skips to the selected time.
C Use keys to select the language and
press OK to confirm.
The languages may be numbered or
abbreviated, such as “En” for English.
If the language selected is not available
on the disc, the disc’s default setting
language will be used instead.
Helpful Hint:
– Some DVDs discs allow subtitle language
changes only via the DVD disc menu. To
access the disc menu, press DISC-MENU.
Switching camera angles
This option is only available with DVDs
that contain sequences recorded from
different camera angles. This allows you
to view the picture from different angles.
A Press DISPLAY twice on the remote
control.
The TITLE menu appears.
B Use keys to select { Angle } and
press to enter the menu.
The camera angles available for
selection appears.
C Use keys to select the camera angle
you want to switch to, then press OK to
confirm.
TIPS:
48
The operating features described here might not be possible for cerain discs. Always refer to the instructions supplied with the discs.
Accessing System Setup
- General
SYSTEM
SETUP
Screen Saver
A screen saver prevents damage to the
TV screen by avoiding exposure to a
static image for too long.
A In ‘System Setup-General’, use keys
to highlight { Screen Saver } and press
OK.
{ On }
OK
Select this if you wish to turn off the TV
screen, after playback has been stopped or
paused for more than 5 minutes.
{ Off }
Select this to disable the screen saver.
B Use keys to select a setting and
press OK to confirm.
Karaoke Mode
A Press SYSTEM-SETUP on the remote
control.
The system menu appears on the TV.
B Use keys to select
{ System Setup - General } and press
to access its options.
A In ‘System Setup-General’, use keys
to highlight { Karaoke Mode } and press
OK.
{ On }
Select this to turn on the karaoke function.
{ Off }
Select this to turn off the karaoke function.
B Use keys to select a setting and
press OK to confirm.
C Use keys to select the setting you
wish to change and press OK to confirm.
Instructions and explanation of the
options are provided in the following
pages.
Helpful Hints:
–When the Karaoke function is not in use,
turn off the Karaoke mode.
D To exit, press SYSTEM-SETUP.
TIPS:
The underlined option is the factory default setting.
Press t to go back to previous menu item. Press SYSTEM SETUP to exit the menu item.
49
English
DVD System Menu Options
DVD System Menu Options (continued)
English
Progressive/ Interlace
Progressive scan delivers a higher picture
quality than the standard interlaced TV
channel scan. It only works when you
have connected the DVD recorder
Y Pb Pr jacks to your TV that supports
the progressive video input. Otherwise,
the image may not appear or will be
distorted. Please check your TV user
manual for more information.
A In ‘System Menu-General’, use keys
to select { Progressive / Interlaced }
and press OK.
{ Interlaced }
Select this to enable interlaced feature.
{ Progressive }
Select this to enable progressive scan feature.
B Use keys to select a setting and
press OK to confirm.
Helpful Hints:
– Follow the instructions shown on the TV to
confirm the selection (if any).
– If a blank/distorted TV screen appears,
wait for 10 seconds for the auto recovery.
Video Output Format
The colour system of the DVD system,
DVD and TV should match. Only then
will it be possible to play a DVD on this
system. Before changing the TV system,
determine the colour system of your TV.
A In ‘System Menu-General’, use keys
to select { Video Output Format } and
press OK.
{ PAL }
Select this if the connected TV has the PAL
colour system. It will change the video signal of
an NTSC disc and output it to PAL format.
{ NTSC }
Select this if the connected TV has the NTSC
colour system. It will change the video signal of
a PAL disc and output it to NTSC format.
B Use keys to select a setting and
press OK to confirm.
Helpful Hint:
– If a blank/distorted TV screen appears,
wait for 10 seconds for the auto recovery.
Restore Factory settings
This will restore all the settings of this
DVD Recorder, except for the PIN code.
A In ‘System Menu-General’, use keys
to select { Restore Factory Settings }
and press OK.
A warning message will appear
B Select
CANCEL
OK
in the menu to proceed or
to abort, then press OK to
confirm.
TIPS:
50
The underlined option is the factory default setting.
Press t to go back to previous menu item. Press SYSTEM SETUP to exit the menu item.
Accessing System Setup Playback
SYSTEM
SETUP
TV Aspect Ratio
Set the aspect ratio of the DVD recorder
according to the TV type you have
connected. The format you select must
also be available on the disc. If it is not,
the setting for TV display will not affect
the picture during playback.
A In ‘System Menu-Playback’, use keys
to select { TV Aspect Ratio } and press
OK.
{ 16:9 }
Select this for wide
screen TV (frame
ratio 16:9).
OK
A Press SYSTEM-SETUP on the remote
control.
The system menu appears on the TV.
B Use keys to select { System Setup
- Playback } and press to access its
options.
System Menu - Playback
TV Aspect Ratio
4:3Panscan
Parental Rating Level
Off
Digital Audio Output
All
{ 4:3 Letterbox }
Select this for a ‘wide
screen’display with black
bands on the upper and
lower portions of the TV
screen.
{ 4:3 panscan }
Select this for a fullheight picture with
both side trimmed.
B Press to select a setting and press
OK to confirm.
C Use keys to select the setting you
wish to change and press OK to confirm.
Instructions and explanation of the
options are provided in the following
pages.
D To exit, press SYSTEM-SETUP.
TIPS:
The underlined option is the factory default setting.
Press t to go back to previous menu item. Press SYSTEM SETUP to exit the menu item.
51
English
DVD System Menu Options (continued)
DVD System Menu Options (continued)
English
Rating level
Some DVDs may have a parental level
assigned to the complete disc or to
certain scenes on the disc. This feature
lets you set a playback limitation level.
The rating levels are from 1 to 8 and are
country dependent. You can prohibit the
playing of certain discs that are not
suitable for your children, or have certain
discs played with alternative scenes.
A In ‘System Setup-Playback’, use keys
to select { Rating Level } and press OK.
You will be prompted to enter your
four-digit pin code.
Enter Password
Rating explanations
{ Off }
– Parental Control is not active.
{ 1. Kid Safe } ~ { 2. G }
– Childsafe; acceptable for viewers of all ages.
{ 3. PG }
– Parental Guidance suggested.
{ 4. PG13 }
– Unsuitable for children under age 13.
{ 5. PG R } ~ { 6. R }
– Restricted; recommended that parents
restrict children under 17 from viewing or
allow to view only when supervised by a
parent or adult guardian.
{ 7. NC 17 }
– No children under age 17; not recommended
viewing for children under age 17.
****
{ 8. Adult }
OK
CancelOK
B Use the numeric keypad 0-9 to enter
your four-digit pin code.
When doing this for the first time,
enter the default password ‘3308’ .
The set rating level menu appears.
Set Rating Level
4. PG 13
5. PG R
OK
4.
PG 13
New
password
New
OK
l If you forget your four-digit pin code, the
default password is 3308.
C Use keys to select the top field and
press OK to confirm. – Mature material; should be viewed only by
adults due to graphic sexual material, violence
or language.
l DVDs that are rated higher than the level
you selected will not play unless you
enter your four-digit pin code.
Helpful hints:
– This feature will not limit viewing if the disc
manufacturer did not code the disc.
– VCD, SVCD, CD have no level indication,
so parental control has no effect on these
type of discs. This also applies to most illegal
DVDs.
– Some DVDs are not coded with a rating
though the movie rating may be printed on
the Disc cover. The rating level feature does
not prohibit play of such Discs.
D Use keys to select the desired
parental level, then move to OK
in
the menu and press OK on the remote
control to confirm.
To disable parental controls and allow
all discs to play, select { Off }.
TIPS:
52
The underlined option is the factory default setting.
Press t to go back to previous menu item. Press SYSTEM SETUP to exit the menu item.
Setting or changing the password
You need to enter your four-digit
password to play a prohibited disc or if
prompted for a pin code.
A In ‘System Setup-Playback’, use keys
to select { Parental Rating Level } and
press OK.
You will be prompted to enter your
four-digit pin code.
A In ‘System Setup Playback’, use keys
to select { Digital Audio Output } and
press OK.
{ ALL }
Enter Password
Select this if you use the COAXIAL jack to
connect the DVD recorder to a stereo
receiver that has a built in Multi-Channel
decoder.
****
OK
Digital Audio Output
After connecting the DVD recorder to
your TV and other devices, you may need
to change the digital output setting.
Adjust the Digital Output only if you used
the DVD recorder’s coaxial jack.
CancelOK
{ LPCM }
B Move to New in the menu and press
OK to access new password menu.
New Password
New password
****
OK
Confirm password
Cancel OK
Select this if the connected audio equipment is
not capable of decoding multichannel audio
Dolby Digital and MPEG-2 multi - channel
signals are converted to PCM (Pulse Code
Modulation).
B Use keys to select a setting and
press OK to confirm.
C Use the numeric keypad 0-9 to enter
your new four-digit pin code, then press
to select the next entry field and enter
the same pin code a second time.
D Move to OK in the menu and press
OK to confirm.
To abort the change, select CANCEL
and press OK.
TIPS:
The underlined option is the factory default setting.
Press t to go back to previous menu item. Press SYSTEM SETUP to exit the menu item.
53
English
DVD System Menu Options (continued)
DVD System Menu Options (continued)
English
Accessing System Setup
- Record
See pages 27~29 on “Recording settings”.
Accessing System Setup Channel Setup
See pages 24~26 on “TV channel
programming”
Accessing System Setup
- Clock
Date and Time
See page 26 on “Setting the time & date”.
Show DivX® registration code
Philips provides you with the DivX®
VOD (Video On Demand) registration
code that allows you to rent and
purchase videos using the DivX® VOD
service. For more information, visit us at
www.divx.com/vod.
A In ‘System Menu-Clock’, use keys to
select { DivX(R) VOD } and press
OK.
The registration code will appear.
B Press SYSTEM SETUP to exit.
C Use the registration code to purchase or
rent the videos from DivX® VOD
service at www.divx.com/vod. Follow the
instructions and download the video
from your computer onto a CD-R/RW
for playback on this DVD recorder.
Helpful Hint:
– All the downloaded videos from DivX®
VOD can only be played back on this DVD
recorder.
TIPS:
54
The underlined option is the factory default setting.
Press t to go back to previous menu item. Press SYSTEM MENU to exit the menu item.
compared to the disc playback volume, Press
VOL+/- to lower the playback volume to
balance the mic volume
Playing a Karaoke disc
A Turn on the TV power. Select the
correct Video In channel at the TV (See
page 23 “Finding the correct viewing
channel”).
B Connect a microphone(not supplied) to
the MIC jack on the front panel of the
DVD recorder or your additional
amplifier.
C Insert a karaoke disc and press PLAY
button on the remote control.
l If the disc menu appears, use
UP/DOWN buttons to make your
selection and press OK to start playback.
D Press MIC VOL + button on the remote
control to turn on the Karaoke mode.
Whilst enjoying your karaoke session,
l To adjust the echo volume, press
ECHO +/- button.
l To adjust the microphone volume, press
MIC VOL +/- button.
Helpful Hint:
– Press any source input key to turn off the
karaoke mode.
– For digital microphone output, connect the
mircophone to the MIC IN jack on the
amplifier.
– Press AUDIO button on the remote control
to switch between left/right stereo output.
(For VCD discs only).
– Set the microphone volume its minimum
level to prevent howling when you connect
the microphone.
– If mic volume is still too soft when
Recording a Karaoke session
Before you start:
Make sure you have connected a DVD
player to the DVD recorder. See Page 14 “
Optional connections - connecting to a DVD
player or similar device”.
A Turn on the TV power. Select the
correct Video In channel at the TV.
B Turn on the DVD player.
C Insert a Karaoke disc into the DVD
player and press PLAY to start
playback.
l If the disc menu appears, use UP/DOWN
keys to make your selection and press
OK to start playback.
D Connect a microphone(not supplied) to
the MIC jack on the front panel of the
DVD recorder or your additional
amplifier.
E Press MIC VOL + button on the remote
control to turn on the Karaoke mode.
F Insert a DVD+R/RW disc into the DVD
recorder.
G To start recording, press RECORD on
the front panel of the DVD recorder.
Start your karaoke session and adjust the
ECHO or MIC VOL to enhance your
singing.
H To stop recording, press STOP on the
front panel of the DVD recorder.
3
Helpful Hint:
– You can connect to other external devices
connected to the S-video and AUDIO L/R
input jacks on the DVD recorder.
– When connecting the audio input jacks on
the amplifier to the DIGITAL AUDIO
COAXIAL jack on the DVD recorder may
result in a MIC delay.
– The DVD recorder works best with a
microphone of 60 ohm resistance.
55
English
Karaoke Options
Troubleshooting
English
WARNING
Under no circumstances should you try to repair the system yourself, as this
will invalidate the warranty. Do not open the system as there is a risk of
electric shock.
If a fault occurs, first check the points listed below before taking the system for
repair. If you are unable to remedy a problem by following these hints, consult
your dealer or Philips for help.
Problem
Solution
No power.
– Press STANDBY-ON button on the front of the DVD
recorder to switch on the system.
– Make sure the AC outlet has power.
Remote control does not
work.
– Aim the remote control directly at the sensor on the front
of the DVD recorder (not towards TV).
– Remove any obstacles between DVD recorder and the
remote control.
– Batteries are weak, replace the batteries.
– Press REC SOURCE on the remote control to select an
input source.
Disc does not play.
– Insert the disc with the label facing up.
– Wrong region code. The DVD must be coded for ALL
regions or Region 6 in order to play on this DVD recorder.
– There is no recording on the disc or wrong disc type. Read
chapter “Playback - Playable discs” for details.
– Make sure the disc is not scratched or warped. Clean the
disc or replace a new one.
– Check if the disc is defective by trying another disc.
No sound.
– Check the audio connections, the red and white jacks. Read
chapters “Getting Started - Connecting the audio cables” for
details.
– Set the Digital output correctly, based on the equipment you
connected to the DVD recorder. Read chapter “Accessing
System Menu - Digital Audio Output” for details.
Distorted sound coming
from a connected hi-fi
amplifier.
– Do not connect any cables from the DVD recorder to the
‘Phono’ input of your amplifier.
– Do not connect the DVD recorder’s Coaxial DIGITAL
AUDIO OUT jack to an analog jack (red/white) on the
connecting devices.
No picture.
– Switch on your TV and set to the correct Video In channel.
Change the TV channel until you see the DVD screen. Read
chapter “Getting Started - Finding your viewing channel”
for details.
– Check the video connection between the DVD recorder
and the TV.
Unable to play DivX movies.
– Check that the DivX file is encoded in ‘Home Theatre’
mode with DivX 5.x encoder.
– Check that the DivX movie downloaded is a complete file.
56
Problem
Solution
The picture is distorted or
black and white during
playback.
– The disc does not match with the TV colour system
standard (PAL/NTSC).
– The disc is dirty, clean the disc.
– Sometimes a small amount of picture distortion may appear.
This is not a malfunction.
– If you set the Record Mode to a low-quality speed, change
to a higher-quality speed after you finish recording. Leaving
the DVD recorder set to a low-quality speed may affect the
picture quality when playing DVDs later. Read chapter
“Recording - Recording settings” for details.
– The recording can be made in colour only when the TV
channels or the connected additional device sends a colour
signal. In some situations, programs that are broadcast in
black and white cannot be recorded.
Recordings are not
occurring as scheduled.
New recordings cannot be
made.
– The TV channel you want to record is not stored or you
selected the wrong program number. Check TV channels
stored.
– If you adjust the clock after you set a timer recording, you
have toreset the timer recording.
– If the DVD recorder cannot read the disc, you cannot
record.
– You cannot use the DVD recorder to duplicate copyrighted
materials (DVDs or videotapes) onto a DVD±R/±RW.
– A finalized DVD±R has been inserted. Change disc.
No TV signal received from
the DVD recorder.
– Install the TV channel. Read chapter “Step 3 : TV channel
programming” for details.
A DVD±R/±RW recorded on
this DVD recorder does not
play on a DVD player.
– If a recording is too short, it is possible that a DVD player
cannot detect it. Please observe the following ‘minimum
recording times’. Recording mode : {1 hour} – 5 minutes,
{2 hours} – 10 minutes, {4 hours} – 20 minutes, {6 hours} –
30 minutes.
– You have to finalize the DVD±R. Refer to chapter “Playing
your recordings (DVD±R) on other DVD players” for
details.
Picture is fuzzy and brightness
varies when copying DVD Video
discs or prerecorded video
cassettes.
– This happens if you try to copy DVDs or video cassettes
that have been copy-protected. Even though the picture on
the TV is fine, but the recording on a DVD±R/±RW is
faulty. This interference is unavoidable with copy-protected
DVDs or video cassettes.
– The DVD±R/±RW has recording lifetime, please change a
new disc for recording.
57
English
Troubleshooting (continued)
Specifications
English
Picture/Display
• Aspect ratio: 4:3, 16:9
• D/A converter: 10 bit, 54 MHz
• A/D converter: 10 bit, 27 MHz
• Picture enhancement: Progressive Scan
Sound
• D/A converter: 24 bit, 96 kHz
• A/D converter: 24 bit, 96 kHz
• Signal to noise ratio: 90 dB
• Crosstalk (1kHz): 80 dB
• Dynamic Range (1kHz): 80 dB
Video Recording
• Recording system: PAL, NTSC
• Compression formats: MPEG2
• Recording modes: 1 hour (high quality),
2 hours (DVD quality), 4 hours ( VHS
quality), 6 hours (VHS quality)
Video Playback
• Disc playback media: CD, CD-R/-RW,
DVD, DVD-Video, DVD±R/±RW, SVCD,
Video CD
• Compression formats: MPEG2, MPEG1,
Dvix
• Video disc playback system: PAL. NTSC
Audio Playback
• Disc playback media: CD, CD-R/-RW,
MP3-CD, MP3-DVD
• Compression formats: Dolby Digital, MP3,
MPEG2 Multichannel, PCM
• MP3 bit rates: 32~256 kbps and VBR
Still Picture Playback
• Disc formats: DVD±R/±RW, Picture CD
• Picture compression formats: JPEG
• Picture enhancement: Rotate
Storage Media
• Recording media: DVD±R, DVD±RW
• Recording speed: 2.4x
58
Tuner/Reception/Transmission
• TV system: PAL
• Aerial Input: 75 Ohm coaxial (IEC75)
Connectivity
Rear Connections:
• S-Video Out
• Video (CVBS) Out
• Audio left/right Out
• Digital audio out (coaxial)
• RF antenna in
• RF TV out
• Y, Pb, Pr out
• S-Video in
• Video(CVBS) in
• Y, Pb, Pr in
• Audio left/right/ in
•
•
•
•
Front Connections:
i.LINK DV in (IEEE 1394 4-pin)
S-Video In
Video In
Audio left/right In
Convenience
• Programming/Timer Enhancements:
Daily/Weekly, Repeat Program, Manual
Timer, One Touch Recording,
• Timer recording events: 20
Power
• Power supply: 110 – 240 V~; 50-60 Hz
• Consumption: 28 W (typical)
• Standby power consumption: < 4W
Cabinet
• Dimensions (wxhxd) : 435 x 53 x 300 mm
• Net Weight : < 4 kg
Analog: Sound that has not been turned into
numbers. Analog sound varies, while digital sound
has specific numerical values. These jacks send audio
through two channels, the left and right.
Aspect ratio: The ratio of vertical and
horizontal sizes of a displayed image. The
horizontal vs. vertical ratio of conventional TVs is
4:3, and that of wide-screens is 16:9.
AUDIO OUT Jacks: Red and white jacks
on the back of the system that send audio to
another system (TV, Stereo, etc).
Chapter: Sections of a picture or a music piece
on a DVD that are smaller than titles. A title is
composed of several chapters. Each chapter is
assigned a chapter number enabling you to locate
the chapter you want.
Component Video Out Jacks: Jacks on the back
of the DVD System that send high-quality video to
a TV that has Component Video In jacks (R/G/B,
Y/Pb/Pr, etc).
Digital: Sound that has been converted into
numerical values. Digital sound is available when
you use the DIGITAL AUDIO OUT COAXIAL.
These jacks send audio through multiple channels,
instead of just two channels as analog does.
Disc menu: A screen display prepared for
allowing selection of images, sounds, subtitles,
multi-angles, etc recorded on a DVD.
DivX: The DivX code is a patent pending, MPEG-4
based video compression technology, developed by
DivXNetworks Inc., that can shrink digital video to
sizes small enough to be transported over the internet, while maintaining high visual quality.
Dolby Digital: A surround sound system
developed by Dolby Laboratories containing up to
six channels of digital audio (front left and right,
surround left and right, center and subwoofer).
Index Picture Screen: A screen that gives an
overview of a DVD±RW or DVD±R. An Index
Picture represents each recording.
JPEG: A very common digital still picture format.
A still-picture data compression system proposed
by the Joint Photographic Expert Group, which
features small decrease in image quality in spite of
its high compression ratio.
CD-RW can contain about 10 times more data
than a regular CD.
MPEG: Motion Picture Experts Group. A
collection of compression systems for digital audio
and video.
Multichannel: DVDs are formatted to have each
sound track constitute one sound field.
Multichannel refers to a structure of sound tracks
having three or more channels.
PBC: Playback Control. Refers to the signal
recorded on video CDs or SVCDs for controlling
playback. By using menu screens recorded on a
Video CD or SVCD that supports PBC, you can
enjoy interactive playback and searching.
PCM: Pulse Code Modulation. A digital audio
encoding system.
Parental control: Limits disc play according to
the age of the users or the limitation level in each
country. The limitation varies from disc to disc;
when it is activated, playback will be prohibited if
the software’s level is higher than the user-set
level.
Region code: A system allowing discs to be
played only in the region designated. This unit will
only play discs that have compatible region codes.
You can find the region code of your unit by
looking on the product label. Some discs are
compatible with more than one region (or ALL
regions).
S-Video: Produces a clear picture by sending
separate signals for the luminance and the color.
You can use S-Video only if your TV has an S-Video
In jack.
Surround: A system for creating realistic threedimensional sound fields full of realism by
arranging multiple speakers around the listener.
Title: The longest section of a movie or music
feature on DVD. Each title is assigned a title
number, enabling you to locate the title you want.
VIDEO OUT jack: Yellow jack on the back
of the DVD system that sends the DVD picture
video to a TV.
MP3: A file format with a sound data compression
system. “MP3” is the abbreviation of Motion
Picture Experts Group 1 (or MPEG-1) Audio
Layer 3. By using the MP3 format, one CD-R or
59
English
Glossary