1
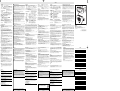
AJ3320/a(6lang)30-4
30/4/02
12:39 pm
Page 1
English
Clock Radio
AJ
Français
3320
CONTROLS
1 ALARM
1
AC MAINS SUPPLY
l
switches off the ALARM 1
activates radio for ALARM 1 setting
BUZZER
activates buzzer for ALARM 1 setting
2 SLEEP
adjusts / activates timer function for the radio
3 SLEEP OFF/ REPEAT ALARM switches off timer
switches off the alarm for a 6-7 minute
period
4 DAILY ALARM RESET
stops the active alarm for 24 hours
5 ALARM 2
OFF
switches off the ALARM 2
RADIO
activates radio for ALARM 2 setting
l
BUZZER
activates buzzer for ALARM 2 setting
6 Display
shows the time and activated alarms
7 BAND
selects FM-MW waveband
8 TUNING
tunes to radio stations
9 VOLUME
adjusts the sound level
0 Time controls:
ALARM 1 adjusts /reviews ALARM 1
ALARM 2 adjusts/ reviews ALARM 2
SET TIME adjusts clock time
7 /∞
fast up/ slow down: adjusts both the hours and
minutes
! RADIO
switches radio off/on(OFF/ON)
@ BRIGHTNESS changes the brightness of the display
# Battery door insert a 9 volt battery, type 6F22 (not supplied) for
clock memory backup
$ Mains lead
for AC power supply and also the aerial for FM
reception
OFF
RADIO
1. Check if the mains voltage as shown on the type plate on the base
of the set corresponds to your local mains supply.
2. Connect the mains plug to the wall socket. The mains supply is now
switched on and the numbers on the display will start to flash.You will
need to set the correct time.
3. To disconnect the set from the mains supply completely, unplug from
the wall socket.
The type plate is located on the base of the set.
For users in the U.K.: please follow the instructions on the bottom of
this sheet.
CLOCK MEMORY BACKUP
When a power failure occurs, the complete clock radio will be switched
off.When the power supply returns, the time display will start to flash and
you will need to reset the correct time on the clock.
To retain the clock time and the set alarm time(s) in the event of an
AC power failure or disconnection, insert a 9 volt battery, type 6F22
(not supplied) into the battery compartment: this will act as a clock
memory backup. However, the time will not be illuminated on the clock
display.
Operation of the alarms, FM/ MW radio are also excluded.As soon as the
power supply returns, the display will indicate the correct time.
1. Connect the plug to the wall socket.
2. Insert the battery into the battery compartment.
• Replace the battery once a year, or as often as necessary.
Standby power consumption ..................……………………….. 3W
BASIC FEATURES
AJ3320 - Clock Radio
SETTING THE ALARM OPTIONS
Display brightness
• To change the brightness of the clock display illumination, adjust the
BRIGHTNESS switch to HI or LOW.
English
Clock display
The time is displayed using the 24-hour clock system.
Français
SETTING THE CLOCK AND ALARM TIMES
Español
1. Press and hold down SET TIME / ALARM 1/ ALARM 2.
2. Simultaneously, also press and hold down 7 / ∞ to adjust the hours and
minutes.
• With your finger held down on 7 the time will increase rapidly and continuously from minutes to hours. Release 7 when you reach the approximate time setting.
• Pressing ∞ will allow you to adjust the time slowly back minute by
minute.
3. Release 7 / ∞ and SET TIME / ALARM 1/ ALARM 2 when you have
reached the correct setting.
• To review your alarm time, press ALARM 1 / ALARM 2.
Deutsch
Nederlands
Italiano
GENERAL
If you wish to use the alarm, then you should first set the alarm time.There
is a choice of two alarm modes: buzzer or radio.The display also indicates
whether you have switched on the alarm(s), and these indicators will light
up respectively next to ALARM 1and ALARM 2 on the display.
1. Set the alarm time for ALARM 1 / ALARM 2. (See SETTING THE
CLOCK AND ALARM TIMES.)
2. To select the alarm mode you wish to be awoken by, set the respective
ALARM 1 / ALARM 2 switch to RADIO l or BUZZER
• If you have selected the radio alarm, make sure you have adjusted the volume
loud enough to wake you up!
• The 2 buzzers are at a set volume and cannot be adjusted. BUZZER on
ALARM 1 is a low tone buzzer while BUZZER on ALARM 2 is high
tone.
Switching Off the Alarm
There are three ways of switching off the alarm. Unless you choose to
cancel the alarm completely, the DAILY ALARM RESET option will be
automatically selected after 59 minutes from the time your alarm time first
goes off.
RADIO
1. Adjust the RADIO switch to ON.
2. Select your FM/MW waveband using BAND.
3. Use TUNING (on the side panel) to find your radio station.
4. Adjust the sound with the VOLUME control.
5. To turn off the radio, adjust the RADIO switch to OFF.
DAILY ALARM RESET
If you want the alarm mode to be stopped immediately but also wish to
repeat the alarm call at the same time for the following day:
• Press DAILY ALARM RESET during the alarm call.
To improve radio reception:
• For FM, use the aerial built in the mains lead. Adjust the mains lead
slightly to obtain optimum reception.
• For MW (AM), the set is provided with a built-in aerial. Direct the AM
aerial by adjusting the position of your clock radio.
Meet Philips at the Internet
http://www.philips.com
REPEAT ALARM
This will repeat your alarm call at 6-7 minute intervals.
• Press SLEEP OFF/REPEAT ALARM.
• Press SLEEP OFF/REPEAT ALARM again during the next call if you
wish to repeat the alarm call.
Printed in China
1
2
3
• If, however, you do not press SLEEP OFF/REPEAT ALARM again, the
alarm will sound for 59 minutes before turning itself off.Your alarm time
setting will then automatically enter the DAILY ALARM RESET
mode to sound at the same time next day.
4
5
6
AJ332
0DUAL
CLOC
KADIO
R ALARM
REPEAT
FM MH
AM MH
Z
PM
Z
AJ3330
WEATHE
RBAND
88
ALARM
CLOCK
• 92 •
RADIO
96 • 102
• 106
• 108
MHZ FM
530 630
750
1000
1300
1700 MHZ
7
AM
8
ALA
1
2
R
M
9
AL A R M
10
Canceling the Alarm Completely
• Before or during the set alarm time goes off, adjust the ALARM
ALARM 2 switch to the OFF position.
The alarm indicator ✦ will disappear from the display.
1/
M
AR
AL IO
AL RD
DU KA
2 0 LO C
JA 33 C
RADIO
ON
OFF
•
•
•
•
HI
LOW
11
12
MAINTENANCE
• If you do not intend to use the clock radio for a long time, disconnect
the mains plug from the wall socket. The battery should also be
removed to prevent chemical leakage which will damage your set.
• To clean your unit from fingerprints, dust and dirt, use a clean and soft
damp cloth or chamois leather. Do not use cleaning products which
contain, benzene, thinner, etc. as these may harm the housing.
• Do not expose the set, to humidity, rain, sand or excessive heat caused
by heating equipment or direct sunlight.
SLEEP
About SLEEP
The clock radio has a built-in timer device called the SLEEP, which
enables the radio to be automatically switched off after a specified period
of time; this allows you to lie back, listen and fall asleep.
Setting and switching off SLEEP
1. Make sure the radio is switched off.
2. Set your timer by pressing on the SLEEP button. Keep your finger on
the button and the display will begin to count down from 59 to 00
minutes.
3. Release the button as soon as the desired time is reached.
4. To cancel the timer, press SLEEP OFF/REPEAT ALARM.
SS
B R IG HTNE
Español
TROUBLESHOOTING
• If a fault occurs, first check the points listed below before taking the unit
for repair.
• If you are unable to remedy a problem by following these hints, consult
your dealer or service centre.
WARNING:
Under no circumstances should you try to repair the unit
yourself, as this will invalidate the guarantee.
Note
• The timer does not change the operation of your alarm settings.
• If during SLEEP you have turned down the volume and you have an
alarm set in the radio mode, make sure you have adjusted the volume loud
enough to wake you up the following day!
1. Remove fuse cover and fuse.
2. Fix new fuse which should be a BS1362 5 Amps. A.S.A.A. or BSI
approved type.
3. Refit the fuse cover.
If the fitted plug is not suitable for your socket outlets, it should be cut
off and an appropriate plug fitted in its place. If the mains plug contains a
fuse, this should have a value of 5 Amp. If a plug without a fuse is used,
the fuse at the distribution board sholud not be greater than 5 Amp.
Note: The severed plug must be disposed of to avoid a possible shock hazard
should it be inserted into a 13 Amp socket elsewhere.
How to connect a plug
The wires in the mains lead are coloured with the following code:
blue=neutral(N), brown = live (L). As these colours may not correspond
with the colour markings identifying the terminals in your plug, proceed
as follows:
• Connect the blue wire to the terminal marked N or coloured black.
• Connect the brown wire to the terminal marked L or coloured red.
• Do not connect either wire to the earth terminal in the plug, marked
E (or
) or coloured green (or green and yellow).
Before replacing the plug cover, make certain that the cord grip is
clamped over the sheath of the lead - not simply over the two wires.
Copyright in the U.K.
Recording and playback of material may require consent. See Copyright
Act 1956 and The Performer’s Protection Acts 1958 to 1972.
PROBLEM
-- Possible cause
• Remedy
MW broadcast cannot be received properly
-- Weak radio signal
• Rotate the unit for better reception and make sure that the set is
placed on a suitable (non-metallic) surface.
Continuous crackling and hiss noise during MW reception
-- Interference from other electrical equipment e.g.TVs, computers, fluorescent
lamps
• Move the clock radio away from electrical equipment
Intermittent crackling sound during FM reception
-- Weak signal
• Adjust the aerial built-in the mains lead
The alarm does not function
-- The alarm is not set
• Set the alarm time and the alarm switch to BUZZER or RADIO
-- Volume too low for radio
• Increase the volume
SLEEP does not function
-- Radio still in ON position
• Make sure the radio is switched off
1
désactive l'ALARM 1
l règle l'ALARM 1 sur le mode radio
BUZZER
règle l'ALARM 1 sur le mode sonnerie
2 SLEEP
ajuste / active la fonction minuterie de la radio
3 SLEEP OFF/ REPEAT ALARM désactive la minuterie
désarme momentanément l’alarme
pour une période de 6-7 minutes
4 DAILY ALARM RESET
désactive l’alarme pendant 24
heures
5 ALARM 2
OFF
désactive l'ALARM 2
RADIO
règle l'ALARM 2 sur le mode radio
l
BUZZER
règle l'ALARM 2 sur le mode sonnerie
6 Affichage
affiche l’heure et les alarmes activées
7 BAND
sélectionne les bandes d’ondes FM-MW
8 TUNING
recherche les stations radio
9 VOLUME
règle le volume sonore
0 Boutons de commande de l'heure:
ALARM 1
ajuste / affiche l'ALARM 1
ALARM 2
ajuste / affiche l'ALARM 2
SET TIME
ajuste l’heure de l’horloge
7 /∞
croissant / décroissant: règle l’heures et les
minutes
! RADIO
allume/éteint la radio (OFF/ON)
@ BRIGHTNESS
varie la luminosité à l’affichage
# Couvercle du Compartiment à Piles insérez une pile de 9 volts,
type 6F22 (non fournie)
pour la sauvegarde des
réglages
OFF
RADIO
Consommation d'Energie en Mode de Veille.....................................3W
FONCTIONS DE BASE
Luminosité à l'Affichage
• Pour faire varier la luminosité à l’écran d’affichage de votre radio-réveil,
mettez l’interrupteur BRIGHTNESS sur HI ou LOW.
Affichage de l'Heure
L’heure est affichée suivant le système de 24-heures.
REGLAGE DE L'HEURE COURANTE ET DES ALARMES
1. Appuyez sur SET TIME / ALARM 1 / ALARM 2 et maintenez
enfoncés.
2. Simultanément, appuyez sur 7/ ∞ et maintenez enfoncé pour procéder
au réglage des heures et des minutes.
• Gardez la touche 7 nfoncée pour faire avancer les minutes et l’heure
rapidement. Relâchez 7 lorsque vous vous approchez de l’heure
courante.
• Appuyez sur ∞ pour ajuster tranquilement l’heure minute par minute.
3. Relâchez 7 / ∞ et SET TIME / ALARM 1 / ALARM 2 lorsque vous
avez atteint le réglage correct.
• Pour afficher l’heure d’activation des alarmes, appuyez sur ALARM 1 /
ALARM 2.
RADIO
1. Mettez l'interrupteur RADIO en position ON.
2. Sélectionnez aux choix la bande de fréquences FM/MW à l’aide de
BAND.
3. Utilisez TUNING (sur le côté de l’appareil) pour rechercher la station
radio de votre choix.
4. Faites tourner le bouton de réglage du VOLUME pour régler le
volume sonore.
FONCTION D'ACTIVATION JOURNALIERE DE L'ALARME
Si vous souhaitez désactiver l’alarme immédiatement mais conserver le
réglage pour une réactivation de l’alarme à la même heure le lendemain:
• Appuyez sur DAILY ALARM RESET lorsque l'alarme retentit.
REPETITION DE L'ALARME
Cette fonction permet une réactivation de l’alarme à 6-7 minutes
d’intervalles.
• Appuyez sur SLEEP OFF / REPEAT ALARM.
• Appuyez une nouvelle fois sur SLEEP OFF / REPEAT ALARM lorsque
l’alarme retentit à nouveau si vous souhaitez que le signal d’alarme se
répète.
• Si vous n’appuyez pas de nouveau sur SLEEP OFF / REPEAT ALARM,
ll’alarme retentit pendant 59 minutes avant de s’éteindre. L’alarme entre
automatiquement en mode de DAILY ALARM RESET pour une
réactivation de l’alarme à la même heure le lendemain.
Désactivation Complète de l'Alarme
• Avant ou lorsque l'alarme retentit à l'heure préréglée, mettez
l'interrupteur ALARM 1 / ALARM 2 en position OFF.
L'indicateur d'activation de l'alarme ✦ disparaît de l'affichage.
Réglage et Désactivation de la Fonction SLEEP
1. Assurez-vous que l'interrupteur RADIO est en position d’arrêt.
2. Réglez la minuterie en appuyant sur le bouton SLEEP. Maintenez le
bouton enfoncé. Le décompte commence à l’affichage de 59 à 00
minutes.
3. Relâchez le bouton lorsque vous atteignez la durée souhaitée.
Environmental information
We have reduced the packaging to its minimum and made it easy to
separate into two materials: cardboard and paper pulp.
Your set consists of materials which can be recycled if disassembled by
a specialized company. Please observe the local regulations to
dispose of packing materials, exhausted batteries and old
equipment.
$ Cordon d'alimentation
pour alimentation sur C/A et également
antenne pour la réception FM
ALIMENTATION SUR C/A
PROBLEME
-- Cause Possible
- Remède
Mauvaise réception des programmes MW
-- Le signal radio est faible
• Faites pivoter l’appareil pour une meilleure réception et assurez-vous
que l’appareil soit posé sur une surface appropriée (non-métallique).
Crépitement ou sifflement continuel en mode de réception MW
-- Interférences en provenance d’autres appareils électriques tels que Téléviseur,
ordinateur, lampe fluorescente, etc.
• Eloignez votre radio-réveil de ces équipements électriques.
Crépitement intermittent en mode de réception FM
-- Le signal radio est faible
• Ajustez la position de l’antenne intégrée dans le cordon d’alimentation
L'alarme ne fonctionne pas
-- L'alarme n'est pas réglée
• Réglez l’heure d’activation de l’alarme et mettez l’interrupteur de
l’alarme sur BUZZER ou RADIO
-- Le volume sonore est trop bas pour entendre la radio
• Augmentez le volume sonore
La plaque signalétique est située sur la base de l’appareil.
SAUVEGARDE DES REGLAGES
Lorsqu’une panne de courant se produit, le radio-réveil s’éteint
complètement. Lorsque le courant est rétabli, l’heure se met à clignoter à
l’affichage et il vous faut de nouveau procéder au réglage de l’heure.
Pour conserver les réglages de l’heure du réveil et les heures
d’activation des alarmes en cas de panne de courant ou de coupure
accidentelle, insérez une pile de 9 volts, type 6F22 (non fournie) dans le
compartiment à piles en tant que pile de secours pour la sauvegarde des
réglages.
Toutefois, lorsqu’il y a une coupure de courant, l’heure ne s’illumine pas à
l’affichage.
L’opération des alarmes et de la radio FM/ MW est également excluse. Dès
que le courant est rétabli, l’affichage indique l’heure courante.
1. Branchez le cordon d’alimentation sur le secteur.
2. Insérez la pile dans le compartiment à piles.
• Remplacez la pile une fois par an, ou aussi souvent que nécessaire.
OFF.
Pour améliorer la réception radio:
• Pour les signaux FM, utilisez l’antenne intégrée dans le cordon
d’alimentation. Faites varier la position du cordon d’alimentation jusqu’à
ce que la réception soit optimale.
• Pour les fréquences MW(AM), l’appareil est équipé d’une antenne
intégrée. Changez l’orientation de l’antenne AM en faisant pivoter votre
radio-réveil.
GENERALITES
Si vous souhaitez utiliser l’alarme, il vous faut d’abord régler l’heure
d’activation.Vous pouvez choisir entre deux modes d’alarme: sonnerie ou
radio. L’affichage indique également si la ou les alarmes sont activée(s). Les
indicateurs respectifs s’illuminent à côté de ALARM 1et ALARM 2 à
l’affichage.
1. Réglez l’heure d’activation pour l’ALARM 1 / ALARM 2. (Voir
REGLAGE DE L’HEURE COURANTE ET DES ALARMES)
2. Pour sélectionner le mode d’alarme au son duquel vous souhaitez vous
réveiller, réglez l’alarme respective ALARM 1 / ALARM 2 sur RADIO
l ou BUZZER .
• Si vous choisissez l’alarme-radio, assurez-vous que le volume sonore soit réglé
à un niveau suffisant de sorte qu’il puisse vous réveiller!
• Le volume des 2 sonneries est fixe et ne peut être ajusté. La sonnerie
BUZZER de l'ALARM 1 st une sonnerie à faible tonalité tandis que la
sonnerie BUZZER de l'ALARM 2 est une sonnerie à haute tonalité.
Désactiver l'Alarme
Vous pouvez désactiver l’alarme de trois façons différentes. A moins que
vous ne choisissiez de désactiver l’alarme complètement, l’option DAILY
ALARM RESET est sélectionnée automatiquement 59 minutes après
l’activation de l’alarme.
4. Pour annuler la minuterie, appuyez sur SLEEP OFF/ REPEAT ALARM.
Note
• La minuterie n’affecte en aucun cas les réglages des alarmes.
• Si, lorsque la fonction SLEEP est activée, vous avez baissé le volume
sonore et vous avez réglé l’alarme sur le mode radio, assurez-vous que
le volume soit suffisant pour vous réveiller le lendemain!
ENTRETIEN
• Si vous pensez ne pas utiliser votre radio-réveil sur de longues
périodes, débranchez le cordon d’alimentation du secteur. Enlevez
également la pile pour éviter les risques d’écoulement pouvant
endommager votre appareil.
• Pour essuyer les empreintes de doigts, les poussières ou les saletés
éventuelles, utilisez un chiffon doux ou une peau de chamois
légèrement humide. N’utilisez pas de produits nettoyants contenant du
benzène, diluant, etc. au risque d’endommager la surface.
• Ne pas exposer l’équipement ni les piles à l’humidité, à la pluie, au sable
ou à la chaleur excessive due à un équipement de chauffage ou aux
rayons directs du soleil.
GUIDE EN CAS DE PROBLEMES
• Si un problème se présente, vérifiez les points suivants avant d’amener
votre appareil pour réparation.
• Si vous n’êtes pas à même de remédier au problème en suivant ce
guide, demandez conseil à votre distributeur ou centre de réparation
agréé.
AVERTISSEMENT:
N’essayez en aucun cas de procéder vous même à la réparation
car ceci invalidera votre garantie.
desconecta ALARM 1
l activa la radio para la configuración de ALARM 1
BUZZER
activa el zumbido para la configuración de ALARM 1
2 SLEEP
ajusta / activa la función de temporizador para la radio
3 SLEEP OFF/ REPEAT ALARM desconecta el temporizador
desconecta la alarma durante un
periodo de 6-7 minutos
4 DAILY ALARM RESET
detiene durante 24 horas la alarma
activada
5 ALARM 2
OFF
desconecta ALARM 2
RADIO
l activa la radio para la configuración de ALARM 2
BUZZER
activa el zumbido para la configuración de ALARM 2
6 Visualizador muestra la hora del reloj y las alarmas activadas
7 BAND
selecciona entre la banda de ondas FM-MW
8 TUNING
sintoniza las emisoras de radio
9 VOLUME
ajusta el nivel del sonido
0 Mandos horarios:
ALARM 1 ajusta /revisa ALARM 1
ALARM 2 ajusta/ revisa ALARM 2
SET TIME ajusta la hora del reloj
7 /∞
rápido/ despacio: ajusta las horas y los minutos
! RADIO
enciende/apaga (OFF/ON) la radio
@ BRIGHTNESS
cambia el brillo del visualizador
# Tapa de las pilas introduzca una pila de 9 voltios, tipo 6F22
(no suministrada) para mantener la memoria del
reloj
$ Cable eléctrico
para recibir el suministro eléctrico AC y también
la antena para la sintonización de FM
RADIO
PRESTACIONES BÁSICAS
1. Compruebe que el voltaje mostrado en la placa de características
de la base del aparato coincide con el voltaje del suministro
eléctrico local.
2. Enchufe el cable eléctrico a la toma de la pared. En ese momento, el
suministro eléctrico está conectado y los números del visualizador
empiezan a destellar.Vd. deberá ajustar la hora correcta.
3. Para desconectar por completo el aparato del suministro eléctrico,
desenchúfelo de la toma de la pared.
La placa de características está situada en la base del aparato.
MANTENIMIENTO DE LA MEMORIA DEL RELOJ
Cuando se produce una interrupción en el suministro eléctrico, el radio
reloj quedará desconectado por completo. Cuando se restablezca el
suministro eléctrico, el visualizador del reloj empezará a destellar y Vd.
tendrá que reajustar la hora correcta en el reloj.
Para retener la hora del reloj y la(s) hora(s) de alarma ajustada(s) en
caso de que se produzca una interrupción o desconexión del
suministro eléctrico AC, introduzca una pila de 9 voltios, tipo 6F22 (no
suministrada) en el compartimento para la pila: esto mantendrá la
memoria del reloj. Sin embargo, la hora no aparecerá iluminada en el
visualizador del reloj. El funcionamiento de las alarmas, la radio FM/ MW
también quedan excluidas. Tan pronto se restablezca el suministro
eléctrico, el visualizador indicará la hora correcta.
1. Enchufe el cable eléctrico a la toma de pared.
2. Introduzca la pila en el compartimento para la pila.
• Sustituya la pila una vez al año, o con la frecuencia necesaria.
Consumo eléctrico durante el periodo de reserva .....................3W
AJUSTAR LAS OPCIONES DE LA ALARMA
El brillo del visualizador
• Para cambiar el brillo de la iluminación en el visualizador del reloj, ajuste
el interruptor BRIGHTNESS a la posición HI o LOW.
Visualizador del reloj
La hora aparece visualizada utilizando el formato de 24-horas.
AJUSTAR LA HORA DEL RELOJ Y DE LA ALARMA
1. Pulse y mantenga pulsado SET TIME / ALARM 1 / ALARM 2.
2. Simultáneamente, pulse también y mantenga pulsado 7 / ∞ para ajustar
las horas y los minutos.
• Cuando Vd. mantiene pulsado 7 la hora aumentará rápida e
ininterrumpidamente de minutos a horas. Deje de pulsar 7 cuando
alcance el ajuste aproximado para la hora.
• Pulsando ∞ Vd. podrá ajustar la hora despacio y hacia atrás, minuto a
minuto.
3. Deje de pulsar 7 / ∞ y SET TIME / ALARM 1 / ALARM 2 cuando
haya alcanzado el ajuste correcto.
• Para revisar la hora de la alarma, pulse ALARM 1 / ALARM 2.
RADIO
1. Ajuste el interruptor de RADIO a ON.
2. Seleccione su banda de ondas FM/MW utilizando BAND.
3. Utilice TUNING (en el panel lateral) para encontrar su emisora de
radio.
4. Ajuste el sonido con el control del VOLUME.
5. Para apagar la radio, ajuste el interruptor de RADIO a OFF.
Para mejorar la recepción de la radio:
• Para señales FM, utilice la antena incorporada en el cable eléctrico.
Ajuste ligeramente el cable para conseguir una recepción óptima.
• Para señales de ondas MW(AM), el aparato dispone de una antena
interior incorporada. Oriente la antena MW ajustando la posición de su
radio reloj.
• Sin embargo, si Vd. no pulsa SLEEP OFF /REPEAT ALARM de nuevo,
la alarma sonará durante 59 minutos antes de apagarse. Entonces, el
ajuste de la alarma quedará automáticamente fijado en el modo DAILY
ALARM RESET y sonará el día siguiente a la misma hora.
Cancelar la Alarma por Completo
• Antes de que suene la alarma o cuando está sonando, ajuste el
interruptor ALARM 1 / ALARM 2 a la posición OFF.
El indicador de la alarma ✦ desaparecerá del visualizador.
SLEEP
Referente a SLEEP
Este radio reloj tiene un dispositivo temporizador incorporado que se
llama SLEEP, y que consigue que la radio se apague automáticamente
después de un periodo de tiempo indicado; esto permite que Vd. pueda
tumbarse, escuchar y quedarse dormido.
Ajustar y desconectar SLEEP
1. Asegúrese de que la radio está apagada.
2. Ajuste el temporizador pulsando el botón SLEEP. Mantenga el botón
pulsado y el temporizador empezará la cuenta atrás desde 59 a 00
minutos.
3. Deje de pulsar el botón cuando alcance el tiempo deseado.
4. Para cancelar el temporizador, pulse SLEEP OFF / REPEAT ALARM.
GENERAL
Si Vd. desea utilizar la alarma, debe ajustar primero la hora de la alarma.Vd.
puede seleccionar entre dos modos de alarma: zumbido o radio. El
visualizador también indica si Vd. ha conectado la(s) alarma(s), y estos
indicadores se encenderán respectivamente junto a ALARM 1 y
ALARM 2 en el visualizador.
1. Ajuste la hora de la alarma para ALARM 1 / ALARM 2. (Consulte
AJUSTAR LA HORA DEL RELOJ Y DE LA ALARMA.)
2. Para seleccionar el modo de alarma con el que Vd. desea despertar,
ajuste el interruptor respectivo de ALARM 1 / ALARM 2 a RADIO l
o BUZZER .
• ¡Si Vd. ha seleccionado la alarma de radio, asegúrese de ajustar el volumen a
un nivel suficientemente alto para despertarle!
• Los 2 zumbidos tienen un nivel fijo de volumen y no se pueden ajustar.El BUZZER
de ALARM 1 es un zumbido de tono bajo mientras que el BUZZER de
ALARM 2 es un tono alto.
Desconectar la Alarma
Existen tres modos de desconexión de la alarma. A menos que Vd. escoja
cancelar la alarma por completo, la opción DAILY ALARM RESET será
seleccionada de modo automático después de 59 minutos desde la hora
en que la alarma sonó por primera vez.
REAJUSTE DE LA ALARMA DIARIA
Si Vd. desea que la alarma se detenga inmediatamente pero también quiere
que la alarma vuelva a sonar a la misma hora el día siguiente:
• Pulse DAILY ALARM RESET cuando está sonando la alarma.
ALARMA DE REPETICIÓN
La alarma sonará reiteradamente cada 6-7 minutos.
• Pulse SLEEP OFF /REPEAT ALARM.
• Pulse SLEEP OFF /REPEAT ALARM de nuevo cuando la alarma vuelva
a sonar si Vd. desea la alarma de repetición.
MANTENIMIENTO
• Si Vd. no va a utilizar el radio reloj durante un largo periodo de tiempo,
desenchufe el cable eléctrico de la toma de la pared. La pila también se
debe extraer para evitar fugas de productos químicos que dañarían el
aparato.
• Para limpiar huellas dactilares, polvo y suciedad sobre el aparato, utilice un
paño limpio y suave o una gamuza chamois. No utilice productos para la
limpieza que contengan benceno, disolvente, etc. porque podrían dañar la
carcasa.
• No exponga el aparato, las pilas a la humedad, lluvia, arena o al calor
excesivo causado por sistemas de calefacción o la luz directa del sol.
RESOLUCIÓN DE PROBLEMAS
• Si se produce un fallo, compruebe primero los puntos detallados a
continuación antes de llevar el aparato a reparar.
• Si Vd. no puede solucionar el problema siguiendo estas indicaciones,
consulte a su distribuidor o servicio técnico.
ADVERTENCIA:
No intente reparar usted mismo el aparato en ningún caso,
porque esto anularía la garantía.
Nota
• El temporizador no altera el funcionamiento de sus ajustes de la alarma.
• ¡Si durante el SLEEP Vd. ha disminuido el volumen y una alarma está
ajustada en el modo radio, asegúrese de que el volumen está ajustado a un
nivel suficientemente alto para despertarle el día siguiente!
PROBLEMA
Informations sur l’Environnement
Nous avons réduit les matériaux d’emballage au minimum et fait en
sorte que vous puissiez facilement séparer le carton et le papier pour
un recyclage approprié.
Votre appareil est composé de matériaux qui peuvent être recyclés
facilement s’il est démonté par une société spécialisée. Merci
d’observer les règlements locaux pour le recyclage des
matériaux d’emballage, piles mortes et vieux équipements.
--–Causa posible
• Solución
La recepción de MW no es correcta
-- La señal de radio es débil
• Gire el aparato para conseguir mejor recepción y asegúrese de que la
unidad está colocada sobre una superficie adecuada (no metálica).
Información medio ambiental
Hemos reducido el embalaje al mínimo y hemos facilitado su
separación en dos materiales: cartón y pulpa de madera.
Su aparato se compone de materiales reciclables si los desmonta una
empresa especializada. Le recomendamos que cumpla con la
regulación local para deshacerse del material de embalaje, las
pilas usadas y el equipo viejo.
Se escuchan crujidos y silbidos continuos durante la recepción de MW
--–Interferencias con otros aparatos eléctricos por ejemplo, TVs, ordenadores,
lámparas fluorescentes
• Mueva el radio reloj alejándolo de otros aparatos eléctricos
Se escuchan crujidos intermitentes durante la recepción de FM
-- La señal es débil
• Ajuste la antena de cable incorporada
La alarma no funciona
-- La alarma no está ajustada
• Ajuste la hora de la alarma y el interruptor de alarma a
BUZZER
o
RADIO
La fonction SLEEP ne fonctionne pas
--–El volumen es demasiado bajo para la radio
• Aumente el volumen
-- Radio est en position ON
• Désactivez le fonction RADIO
This product complies with the radio interference requirements
of the European Union.
Both the model number and production number are located on
the bottom of the set.
SUMINISTRO ELÉCTRICO AC
1
OFF
1. Assurez-vous que la tension recommandée sur la plaque signalétique
à la base de l’appareil corresponde à la tension de votre localité.
2. Branchez le cordon d’alimentation sur le secteur. L’appareil est
maintenant alimenté et les chiffres à l’affichage se mettent à clignoter. Il
vous faut procéder au réglage l’heure.
3. Pour couper complètement l’alimentation, débranchez le cordon
d’alimentation du secteur.
5. Pour éteindre la radio, mettez l’interrupteur RADIO en position
CONTROLES
1 ALARM
REGLAGE DES OPTIONS D'ALARME
Concernant la fonction SLEEP
Votre radio-réveil est équipé d’une minuterie intégrée appelée SLEEP qui
permet un arrêt automatique de la radio après une période de temps
donnée; ceci vous permet de vous détendre, d’écouter la radio, et de vous
endormir. La durée maximale de la minuterie est de 59 minutes.
13
Important notes for users in the U.K.
1 ALARM
SLEEP
14
Mains plug
This apparatus is fitted with an approved 13 Amp plug.To change a fuse
in this type of plug proceed as follows:
BOUTONS DE COMMANDE
La función SLEEP falla
--–La radio todavía está en la posición ON
• Desconecte la RADIO
Ce produit satisfait aux conditions imposées par l’Union
Européenne en matière d’interférences radio.
Le numéro de modèle et numéro de production sont sités sur
l’envers de l’appareil.
Este producto cumple los requisitos sobre interferencias de radio
de la Unión Europea.
Tanto el número del modelo como el número de producción
están situados en la base del aparato.
12:40 pm
Page 2
Nederlands
Deutsch
CONTROLS
1 ALARM
1
Display-Helligkeit
• Um die Helligkeit der Uhrdisplay-Beleuchtung zu ändern, stellen Sie den
BRIGHTNESS-Schalter auf HI oder LOW.
Uhrdisplay
Die Uhrzeit wird im 24-Stunden-System angezeigt.
EINSTELLUNG DER UHR- UND WECKALARMZEITEN
1. Halten Sie SET TIME / ALARM 1/ ALARM 2 gedrückt.
2. Halten Sie zur Einstellung der Stunden und Minuten gleichzeitig 7 / ∞
gedrückt.
• 7 mit dem Finger niedergedrückt, erhöht schnell und kontinuierlich die
Zeitanzeige der Minuten und der Stunden.Wenn Sie die Zeiteinstellung
in etwa erreicht haben, lassen Sie 7 frei.
• Drücken von∞ erlaubt Ihnen eine langsame Zeiteinstellung, Minute um
Minute zurück.
3. Geben Sie 7 / ∞ und SET TIME / ALARM 1 / ALARM 2 frei, wenn
die korrekte Einstellung erreicht wurde.
• Um Ihre Weckalarmzeit zu überprüfen, ALARM 1 / ALARM 2
drücken.
RADIO
1. Stellen Sie den RADIO-Schalter auf ON.
2. Wählen Sie mit BAND Ihr FM/MW-Wellenband aus.
3. Verwenden Sie TUNING (auf dem seitlichen Bedienfeld), um Ihre
Radiostation zu finden.
4. Stellen Sie die Lautstärke mit dem VOLUME-Regler ein.
5. Um das Radio abzuschalten, stellen Sie den RADIO-Schalter auf OFF.
Zur Verbesserung des Radioempfangs:
• Verwenden Sie für FM die in das Netzkabel integrierte Antenne.
Richten Sie für einen optimalen Empfang das Netzkabel geringfügig aus.
• Für MW (AM) ist das Gerät mit einer eingebauten Antenne
ausgestattet. Richten Sie die AM–Antenne durch Einstellung der
Position Ihres Uhrenradios aus.
• Wenn Sie jedoch SLEEP OFF /REPEAT ALARM. nicht nochmals
drücken, ertönt der Weckalarm 59 Minuten lang, bevor er sich selbst
abschaltet. Ihre Alarmzeiteinstellung startet dann automatische die
Funktion DAILY ALARM RESET, damit zur gleichen Zeit am
nächsten Tag der Alarm ertönt.
Den Alarm komplett abstellen
• Bevor oder während die eingestellte Alarmzeit auslöst, stellen Sie den
Schalter ALARM 1 / ALARM 2 in die OFF-Stellung.
Die Alarmanzeige ✦ verschwindet vom Display.
SLEEP
Über SLEEP
Das Uhrenradio hat eine SLEEP genannte Timerfunktion eingebaut, die
ermöglicht, das Radio nach einer angegebenen Zeitdauer automatisch
abzuschalten; dies ermöglicht Ihnen, sich zurückzulegen und zuhörend
einzuschlafen.
Einstellen und Ausschalten von SLEEP
1. Stellen Sie sicher, dass das Radio ausgeschaltet ist.
2. Stellen Sie durch Drücken der SLEEP-Taste Ihren Timer ein. Halten
Sie Ihren Finger auf der Taste und das Display beginnt von 59 auf 00
Minuten herunterzuzählen.
3. Geben Sie die Taste frei, sobald die gewünschte Zeit erreicht wurde.
4. Um den Timer abzustellen, drücken Sie SLEEP OFF/ REPEAT
ALARM.
Dieses Typenschild befindet sich auf dem Boden des Gerätes.
SPEICHERSICHERUNG DER UHR
Wenn ein Netzausfall eintritt, schaltet das Uhrenradio komplett ab.Wenn
die Stromversorgung dann wieder zurückkehrt, beginnt das Display zu
blinken und Sie müssen an der Uhr die richtige Uhrzeit wieder einstellen.
Um die Uhrzeit und die Weckalarmzeiten bei einem Netzausfall
oder der Trennung der Stromversorgung zu beizubehalten, legen Sie
eine 9-Volt-Batterie,Typ 6F22 (nicht mitgeliefert) in das Batteriefach ein.
Diese wirkt als Speichersicherung der Uhr. Die Uhrzeit wird jedoch
auf dem Uhrendisplay nicht beleuchtet. Bedienung der Weckalarme und
des FM/ MW-Radio sind auch ausgeschlossen. Sobald die
Stromversorgung zurückkehrt, zeigt das Display die korrekte Zeit an.
1. Stecken Sie den Stecker in die Netzsteckdose.
2. Legen Sie eine Batterie in das Batteriefach ein.
• Tauschen Sie die Batterie einmal jährlich oder so oft wie erforderlich
aus.
Standby-Energieverbrauch ..................……………………….......... 3W
EINSTELLUNG DER ALARMOPTIONEN
ALLGEMEIN
Wenn Sie den Weckalarm verwenden wollen, sollten Sie zuerst die
Weckalarmzeit einstellen. Es gibt zwei Weckalarmbetriebsarten zur
Auswahl: Summer oder Radio. Das Display zeigt auch an, ob Sie die Alarme
eingeschaltet haben und diese Anzeigen leuchten entsprechend neben
ALARM 1 und ALARM 2 auf dem Display auf.
1. Stellen Sie die Weckalarmzeit für ALARM 1 / ALARM 2 ein. (Siehe
EINSTELLUNG DER UHR-UND WECKALARMZEITEN.)
2. Um die Alarmbetriebsart einzustellen, mit der Sie geweckt werden
wollen, stellen Sie den betreffenden Schalter ALARM 1 / ALARM 2
auf RADIO l oder BUZZER
• Wenn Sie den Radioalarm auswählten, Stellen Sie sicher, dass die eingestellte
Lautstärke laut genug zum Wecken ist.
• Die 2 Summer haben eine fixierte Lautstärke, die nicht eingestellt
werden kann. Der BUZZER bei ALARM 1 ist ein Niedrigton- während
der BUZZER bei ALARM 2 ein Hochton-Summer ist.
Ausschalten des Weckalarms
Es gibt drei Arten, den Alarm abzuschalten.Außer wenn Sie die vollständige
Abschaltung des Weckalarms wählten, wird automatisch 59 Minuten nach
dem Zeitpunkt, zu dem die Weckalarmzeit zuerst auslöste, die Option
DAILY ALARM RESET ausgewählt.
RÜCKSTELLUNG DES TÄGLICHEN ALARMS
Wenn Sie den Alarmbetrieb sofort stoppen, aber den Weckalarm am
nächsten Tag um die gleiche Zeit wiederholen wollen:
• Drücken Sie DAILY ALARM RESET während des Weckalarms.
ALARM WIEDERHOLEN
Dies wiederholt Ihren Weckalarm in 6-7-Minutenintervallen.
• Drücken Sie SLEEP OFF /REPEAT ALARM.
• Drücken Sie nochmals SLEEP OFF /REPEAT ALARM. während dem
nächsten Weckalarm, wenn dieser wiederholt werden soll.
WARTUNG
• Wenn Sie vorhaben, das Radio über einen längeren Zeitraum nicht zu
benutzen, ziehen Sie den Stecker aus der Netzsteckdose. Die Batterie
sollte auch entfernt werden, um gegen Chemikalien-Lecks
vorzubeugen, die Ihr Gerät beschädigen könnten.
• Zur Reinigung Ihres Gerätes von Fingerabdrücken, Staub und Schmutz
verwenden Sie ein weiches feuchtes Tuch oder Fensterleder. Benutzen
Sie keine Reinigungsprodukte, die Benzol,Verdünnung etc. enthalten, da
diese das Gehäuse beschädigen könnten.
• Gerät, Batterien, nicht Feuchtigkeit, Regen, Sand oder übertriebener
Wärme, die auf Heizanlagen oder direkte Sonneneinstrahlung
zurückzuführen ist, aussetzen.
FEHLERSUCHE
• Wenn eine Störung auftritt, prüfen Sie zuerst die unten aufgeführten
Punkte, bevor Sie das Gerät zur Reparatur bringen..
• Wenn Sie ein Problem durch Befolgung dieser Hinweise nicht lösen
können, wenden Sie sich an Ihren Händler oder ein Service-Center.
WARNUNG:
Unter keinen Umständen sollten Sie versuchen, das Gerät
selbst zu reparieren, da hierdurch die Garantie ungültig wird.
MW-Sender können nicht richtig empfangen werden
-- Schwaches Radioempfangsignal
• Drehen Sie das Gerät für einen besseren Empfang und stellen Sie
sicher, dass das Gerät auf einer passenden Oberfläche (nicht
metallisch) steht.
Ständiges Knack- und Zischgeräusche während dem MW-Empfang
-- Störungen von anderen elektrischen Geräten wie z. B. Fernseher,
Computer, Leuchtstoffröhren.
• Entfernen Sie das Radio weg von elektrischen Geräten.
1
hiermee wordt ALARM 1 uitgeschakeld
RADIO l hiermee wordt de radio voor ALARM 1-instelling
geactiveerd
BUZZER
hiermee wordt de zoemer voor ALARM 1-instelling
geactiveerd
2 SLEEP
hiermee wordt de timerfunctie voor de radio
aangepast/geactiveerd
3 SLEEP OFF/ REPEAT ALARM hiermee wordt de timer uitgeschakeld
hiermee wordt de wekker voor een
periode van 6-7 minuten uitgeschakeld
4 DAILY ALARM RESET
hiermee wordt de actieve wekker
gedurende 24 uur uitgeschakeld
5 ALARM 2
OFF
shiermee wordt ALARM 2 uitgeschakeld
RADIO l
hiermee wordt de radio voor ALARM 2-instelling
geactiveerd
BUZZER
hiermee wordt de zoemer voor ALARM 2
instelling geactiveerd
6 Display
hiermee worden de tijd en actieve wekkers
weergegeven
7 BAND
hiermee wordt de FM-MW golflengte geselecteerd
8 TUNING
hiermee wordt op een radiostation afgestemd
9 VOLUME
hiermee wordt het geluidsniveau ingesteld
0 Tijdinstelknoppen:
ALARM 1
hiermee wordt ALARM 1 ingesteld/bekeken
ALARM 2
hiermee wordt ALARM 2 ingesteld /bekeken
SET TIME
hiermee wordt de kloktijd ingesteld
7 /∞
versneld omhoog/ vertraagd omlaag: hiermee
worden de uren en minuten ingesteld
OFF
Voor behoud van klok- en wektijd(en) van het toestel bij een
stroomstoring of als de stekker uit het stopcontact werd verwijderd,
moet u een 9 volt batterij van het type 6F22 (niet inbegrepen) in het
batterijvak plaatsen: deze fungeert als reservevoeding voor het
klokgeheugen. De verlichting van het display werkt echter niet tijdens
stroomonderbrekingen. Ook de werking van de wekkers en de FM/MWradio wordt niet ondersteund. Zodra de netspanning hersteld is, wordt op
het display de juiste tijd aangegeven.
1. Steek de stekker in het stopcontact.
2. Plaats de batterij in het batterijvak.
• Vervang de batterij éénmaal per jaar, of zo nodig vaker.
Stroomverbruik tijdens stand-by ..................…………………….... 3W
Helderheid van het display
• Voor het wijzigen van de helderheid van het klokdisplay: de
BRIGHTNESS-schakelaar op HI of LOW zetten. .
Klokdisplay
De tijd wordt weergegeven in 24-uur formaat.
KLOK- EN WEKTIJDEN INSTELLEN
1. Houd SET TIME / ALARM 1 / ALARM 2 ingedrukt.
2. Houd tegelijkertijd ook 7 / ∞ ingedrukt om de uren en minuten in te
stellen.
• Met een vinger 7 ingedrukt houden zodat de tijd snel en continu van
minuten tot uren oploopt. Laat 7 los als het tijdstip bijna bereikt is..
• Druk op ∞ om de tijd langzaam minuut voor minuut in te stellen.
3. Laat 7 / ∞ en SET TIME / ALARM 1 / ALARM 2 los als de juiste
instelling bereikt is.
• Druk op ALARM 1 / ALARM 2 om de wektijd te controleren.
Wekker uitzetten
Er zijn drie manieren om de wekker uit te zetten. Tenzij u de wekker
helemaal wilt annuleren wordt 59 minuten na de tijd dat de wekker voor
het eerst klinkt vanzelf DAILY ALARM RESET gekozen.
DAGELIJKSE WEKKER-RESET
Als u de wekker meteen wilt uitschakelen maar het de volgende dag op
hetzelfde tijdstip weer wilt laten afgaan:
• op DAILY ALARM RESET drukken als de wekker klinkt.
REPETEERWEKKER
Hierdoor de repeteert de wekker met tussenpozen van 6-7 minuten.
• Druk op SLEEP OFF/REPEAT ALARM.
• Druk de volgende keer als de wekker afgaat opnieuw op SLEEP
OFF/REPEAT ALARM om de repeteerwekker te activeren.
• Als u echter niet weer op SLEEP OFF/REPEAT ALARM drukt, klinkt
de wekker 59 minuten lang voordat het automatisch uitschakelt. De
wekker komt dan automatisch in de stand DAILY ALARM RESET en
klinkt de volgende dag weer op hetzelfde tijdstip.
Wekker geheel annuleren
• Voor of tijdens het ingestelde wekker de ALARM
schakelaar op OFF zetten.
De wekkerindicator ✦ verdwijnt van het display.
1 / ALARM 2 -
PROBLEEM
-- Mogelijke oorzaak
• Remedie
Der Weckalarm funktioniert nicht
-- Der Weckalarm ist nicht eingestellt
• Stellen Sie die Weckalarmzeit ein und den Weckalarmschalter auf
BUZZER oder RADIO
-- Lautstärke für das Radio zu leise
• Lautstärke erhöhen.
SLEEP funktioniert nicht
-- Radio immer noch auf ON-Stellung
• Stellen Sie sicher, dass das radio ausgeschaltet ist.
RESERVEVOEDING KLOKGEHEUGEN
Bij een stroomstoring gaat de klokradio geheel uit. Als de spanning
hersteld is, gaat de tijd op het display knipperen en dient de juiste tijd
opnieuw te worden ingevoerd.
1 ALARM
1
spegne ALARM 1
RADIO
l attiva la radio per la regolazione di ALARM 1
BUZZER
attiva il cicalino per la regolazione di ALARM 1
2 SLEEP
regola / attiva la funzione di timer per la radio
3 SLEEP OFF/ REPEAT ALARM spegne il timer
spegne la sveglia per un periodo di
6-7 minuti
4 DAILY ALARM RESET
interrompe la sveglia attiva per 24 ore
5 ALARM 2
OFF
spegne ALARM 2
RADIO
attiva la radio per la regolazione di ALARM 2
l
BUZZER
attiva il cicalino per la regolazione di ALARM 2
6 Visualizzatore mostra l’ora e attiva le sveglie
7 BAND
seleziona le onde radio FM-MW
8 TUNING
sintonizza le stazioni radio
9 VOLUME
regola il livello del suono
0 Comandi per l’impostazione delle ore:
ALARM 1
regola/rivede ALARM 1
ALARM 2
regola/rivede ALARM 2
SET TIME
regola l’ora dell’orologio
7 /∞
veloce in su/ lento in giù: regola sia le ore che i
minuti
! RADIO
accende/spegne la radio (OFF/ON)
@ BRIGHTNESS
cambia l’intensità del visualizzatore
# Porta della batteria inserire una batteria da 9 volt, tipo 6F22
(non in dotazione) per la memoria di backup
dell’orologio
$ Cavo elettrico
per l’alimentazione elettrica e anche antenna
per la ricezione FM
OFF
CARATTERISTICHE DI BASE
RADIO
1. Zet de RADIO-schakelaar op ON
2. Kies de FM/MW-golflengte met BAND.
3. Gebruik TUNING (op het zijpaneel) om op het gewenste
radiostation af te stemmen.
4. Stel het geluid in met de VOLUME-regelknop.
5. Schakel de radio uit door de RADIO-schakelaar in stand OFF te
zetten.
Om de radio-ontvangst te verbeteren:
• Voor FM de in het netsnoer ingebouwde antenne gebruiken.Verleg het
netsnoer enigszins voor de beste ontvangst.
• Voor MW (AM) is het toestel voorzien van een ingebouwde antenne.
Richt de AM-antenne door de stand van de klokradio te wijzigen.
ALGEMEEN
Om de wekker te gebruiken eerst de wektijd instellen. Er is keuze uit twee
wekkerstanden: zoemer of radio. Het display geeft ook aan of de
wekkerstand(en) aan staan en de respectievelijke indicatoren gaan naast
ALARM 1 en ALARM 2 branden.
1. Stel de wektijd in voor ALARM 1 / ALARM 2. (Zie KLOK- EN
WEKTIJDEN INSTELLEN)
2. Om de gewenste wekkerstand te kiezen: de schakelaar van ALARM 1
/ ALARM 2 op RADIO l of BUZZER
zetten.
• Als de wekkerstand radio geselecteerd is, dient u ervoor te zorgen dat
u het volume hard genoeg heeft gezet om er wakker van te worden!
• De 2 zoemers staan op een vast volume ingesteld en kunnen niet
worden gewijzigd. De BUZZER op ALARM 1 is een lage zoemtoon en
de BUZZER op ALARM 2 is een hoge toon.
3. Laat de knop los zodra de gewenste tijd bereikt is.
4. Druk op SLEEP OFF/ REPEAT ALARM om de timer te annuleren.
Opmerkingen:
• De timer heeft verder geen invloed op de werking van de
wekkerinstellingen.
• Als u tijdens SLEEP het geluidsvolume zachter hebt gezet en een
wekkerstand staat ingesteld op de radiostand, zorg er dan voor dat het
volume luid genoeg is om u de volgende dag wakker te maken!
Luminosità del visualizzatore
• Per cambiare l’intensità dell’illuminazione sul visualizzatore
dell’orologio, regolare l’interruttore BRIGHTNESS su HI o LOW.
Visualizzatore dell’orologio
• L’ora è visualizzata con il sistema in 24 ore.
REGOLAZIONE DELL’ORA DELL’OROLOGIO E DELLE SVEGLIE
1. Premere e tenere premuto SET TIME / ALARM 1/ ALARM 2.
2. Contemporaneamente premere e tenere premuto 7 / ∞ per regolare
ore e minuti.
• Tenendo premuto 7 l’orario aumenterà rapidamente e senza
interruzione dai minuti alle ore. Quando raggiungete la regolazione
approssimativa lasciate andare 7.
• Premere ∞ vi permetterà di regolare l’orario minuto per minuto.
3. Quando raggiungete l’impostazione desiderata lasciate andare 7 / ∞ e
SET TIME / ALARM 1/ ALARM 2.
• Per vedere l’ora della sveglia, premere ALARM 1/ ALARM 2.
RADIO
1.
2.
3.
4.
5.
Spostate l’interruttore RADIO su ON.
Selezionare la banda radio FM/MW usando BAND.
Usare TUNING (sul pannello laterale) per trovare la stazione radio.
Regolare il suono con il comando VOLUME.
Per spegnere la radio, spostare l’interruttore RADIO su OFF.
Per migliorare la ricezione radio:
• Per FM, usate l’antenna inserita nel cavo elettrico. Spostare
leggermente il cavo elettrico per ottenere una ricezione ottimale.
• Per MW (AM), l’apparecchio è munito di un’antenna interna. Dirigete
l’antenna AM regolando la posizione della radio sveglia.
• Se, comunque, non premete più SLEEP OFF /REPEAT ALARM, la
sveglia rimarrà in funzione per 59 minuti prima di spegnersi
automaticamente. La sveglia si reimposterà quindi automaticamente su
DAILY ALARM RESET per ripartire alla stessa ora il giorno
seguente.
Cancellare completamente la sveglia
• Prima che la sveglia entri in funzione o durante il funzionamento,
regolate l’interruttore ALARM 1 / ALARM 2 sulla posizione OFF.
L’indicatore di sveglia ✦ scomparirà dal visualizzatore.
ONDERHOUD
• Als u van plan bent de klokradio langere tijd niet te gebruiken, haal dan
de stekker uit het stopcontact.Verwijder ook de batterij om chemische
lekkage te voorkomen, die het toestel zou kunnen beschadigen.
• Gebruik een schoon vochtig doekje of zeemleer om vingerafdrukken,
stof en vuil van het toestel te vegen. Gebruik geen
schoonmaakproducten die benzeen, thinner enz. bevatten, omdat deze
de behuizing kunnen beschadigen.
• Bescherm het apparaat, de batterijen tegen vocht, regen, zand of
extreem hoge temperaturen zoals bij verwarmingsapparatuur of in felle
zon.
• Bij defecten eerst de volgende lijst doornemen alvorens toestel naar
een reparatieservice te brengen.
• Als u het probleem niet aan de hand van deze tips kunt oplossen,
raadpleeg dan uw winkelier of reparatieservice.
WAARSCHUWING:
Onder geen enkele voorwaarde proberen toestel zelf te
repareren, want hierdoor komt de garantie te vervallen.
SLEEP
Su SLEEP
La radio sveglia ha un timer interno che si chiama SLEEP, che fa spegnere
la radio automaticamente dopo un periodo di tempo prefissato; questo vi
permette di coricarvi, ascoltare e addormentarvi.
Come impostare e spegnere SLEEP
1. Assicuratevi che la radio sia spenta.
2. Impostate il timer premendo il pulsante SLEEP. Tenere il dito sul
pulsante e il visualizzatore inizierà il conto alla rovescia da 59 a 00
minuti.
3. Lasciate andare il pulsante quando raggiungete l’ora desiderata.
4. Per eliminare il funzionamento del timer, premere SLEEP OFF/ REPEAT
ALARM.
ALIMENTAZIONE ELETTRICA DI RETE
Continu krakend en ruisend geluid tijdens MW-ontvangst
-- Interferentie van andere elektrische apparatuur, bijv. tv’s, computers, tlbuizen.
• Plaats de klokradio uit de buurt van elektrische apparatuur.
We hebben de hoeveelheid verpakkings-materiaal zoveel mogelijk
beperkt en ervoor gezorgd dat de verpakking gemakkelijk in twee
materialen te scheiden is: karton en pulp.
Uw toestel bestaat uit materiaal dat gerecycled kan worden door een
gespecialiseerd bedrijf. Houd u aan de plaatselijke voorschriften
voor het wegwerpen van verpakkingsmateriaal, lege batterijen
en oud wit- en bruingoed.
RADIO
Dit apparaat voldoet aan de radio-ontstoringseisen van de
Europese Unie.
U vindt het model- en productienummer aan de onderkant van
het toestel.
1
1. 1.Controllare che il voltaggio elettrico mostrato sulla piastra sulla
base dell’apparecchio corrisponda al voltaggio locale.
2. Collegare la spina alla presa di corrente. L’apparecchio è alimentato
dalla rete e i numeri sul visualizzatore inizieranno a lampeggiare. Dovete
impostare l’ora.
3. Per scollegare l’apparecchio completamente dall’alimentazione, staccare
la spina dalla presa.
2
3
4
5
6
AJ332
0DUAL
CLOC
KADIO
R ALARM
REPEAT
FM MH
AM MH
PM
M
La piastra è situata sulla base dell’apparecchio.
Z
AJ3330
Z
WEATHE
ALARM
RBAND
88 • 92
CLOCK
• 96 •
RADIO
102 •
106 •
108 MH
530 630
Z FM
750
1000
1300
1700 MHZ
7
AM
8
1
Quando manca la corrente, la radio si spegnerà completamente. Quando
torna la corrente, la visualizzazione dell’ora lampeggerà e dovrete regolare
di nuovo l’ora .
10
Per conservare l’impostazione dell’ora e della(e) sveglia(e) in caso di
mancanza di corrente o in caso l’apparecchio venga staccato dalla
presa, inserire una batteria da 9 volt, tipo 6F22 (non in dotazione) nel
comparto della batteria: funziona come memoria di backup
dell’orologio. Tuttavia l’ora non sarà illuminata sul visualizzatore. Anche il
funzionamento delle sveglie e della radio FM/ MW è escluso. Non appena
torna la corrente, il visualizzatore indicherà l’ora corretta.
1. Collegare la spina alla presa.
2. Inserire la batteria nell’apposito comparto.
• Cambiare batteria una volta all’anno, o secondo necessità.
RADIO
ON
OFF
•
•
SS
B R IG HTNE
•
LOW •
HI
11
12
14
Consumo elettrico in standby .................……………………….. 3W
13
REGOLAZIONE DELLE OPZIONI DI SVEGLIA
I
GENERALE
Se desiderate usare la sveglia, prima dovete impostare l’ora della stessa.
Avete la possibilità di scegliere tra due modalità: cicalino o radio. Il
visualizzatore indica anche se gli(l’) allarmi(e) sono(è) accesi(o), e questi
indicatori si accenderanno rispettivamente vicino a ALARM 1 e ALARM
2 sul visualizzatore.
1. Regolazione della sveglia per ALARM 1/ ALARM 2. (Vedere
REGOLAZIONE DELL’ORA DELL’OROLOGIO E DELLE
SVEGLIE.)
2. Per scegliere la modalità di sveglia con cui volete svegliarvi, regolate
rispettivamente l’interruttore ALARM 1 / ALARM 2 su RADIO l o
Italia
DICHIARAZIONE DI CONFORMITA’
Si dichiara che l’apparecchio AJ3320 Philips risponde alle prescizioni
dell’art. 2 comma 1 del D.M. 28 Agosto 1995 n. 548.
Fatto a Eindhoven
Philips Consumer Electronics
Philips, Glaslaan 2, SFF 10
5616 JB Eindhoven,The Netherlands
BUZZER
• Se avete scelto la sveglia con la radio, assicuratevi di avere regolato il volume
abbastanza alto da svegliarvi!
• Il volume dei 2 cicalini è preimpostato e non può essere cambiato.
BUZZER su ALARM 1 è un tono basso mentre BUZZER su ALARM 2
è un tono alto.
Spegnere la sveglia
Ci sono tre modi di spegnere la sveglia. A meno che decidiate di staccarla
completamente, la opzione di DAILY ALARM RESET, verrà selezionata
automaticamente dopo che sono trascorsi 59 minuti da quando la sveglia
è partita per la prima volta.
REIMPOSTAZIONE QUOTIDIANA DELLA SVEGLIA
Se volete interrompere immediatamente la modalità di sveglia ma volete
che questa riparta alla stessa ora il giorno seguente:
• Premere DAILY ALARM RESET mentre la sveglia è in funzione.
SVEGLIA RIPETUTA
Questo farà ripartire la sveglia a intervalli di 6-7 minuti.
• Premere SLEEP OFF /REPEAT ALARM.
• Se volete farla ripartire un’altra volta, premere di nuovo
/REPEAT ALARM quando la sveglia riparte.
SLEEP OFF
MANUTENZIONE
NOTES
• Se non intendete usare la radio per un lungo periodo di tempo, staccate
la spina dalla presa di corrente. Dovreste anche togliere la batteria per
evitare perdite di sostanze chimiche che potrebbero danneggiare
l’apparecchio.
• Per togliere impronte, sporco e polvere dall’apparecchio, usare un
panno morbido e umido o di camoscio. Non usare prodotti per la
pulizia che contengano benzene, solventi, ecc. perché possono
danneggiare l’involucro.
• Non esporre l’apparecchio, le batterie ad umidità, pioggia, sabbia o
calore eccessivo, generato da apparecchi di riscaldamento o dai raggi
solari diretti.
SUGGERIMENTI PER LA RISOLUZIONE DEI PROBLEMI
• Se c’è un malfunzionamento controllare I punti elencati di seguito prima
di portare l’apparecchio a riparare.
• Se non riuscite a risolvere un problema seguendo questi consigli,
consultate il vostro rivenditore o il centro servizi.
AVVERTENZA:
Non dovete cercare di riparare l’apparecchio da soli per
Nota
• Il timer non cambia le impostazioni della sveglia.
• Se durante SLEEP avete abbassato il volume e la sveglia è impostata sulla
radio, assicuratevi che il volume sia sufficientemente alto da permettervi di
svegliarvi la mattina seguente!
PROBLEMA
--- Possibile causa
• Rimedio
La trasmissione in MW non viene ricevuta in modo corretto
-- Segnale radio debole
• Ruotate l’apparecchio per una ricezione migliore e assicuratevi che sia
sistemato su una superficie adatta (non-metallica).
Scariche e sibili continui durante la ricezione in MW
-- Interferenza da altre attrezzature elettriche, es. TV, computer, lampade
fluorescenti
• Allontanare la radio sveglia da apparecchi elettrici
Scariche intermittenti durante la ricezione in FM
-- Segnale debole
• Regolare l’antenna dentro il cavo elettrico
La sveglia non funziona
--- La sveglia non è impostata
• Regolare l’ora e l’interruttore della sveglia su BUZZER o RADIO
- Volume troppo basso per la radio
• Aumentare il volume
SLEEP non funziona
--- Radio ancora su posizione ON
• Assicuratevi che la radio sia spenta
9
AL A R M
MEMORIA DI BACKUP DELL’OROLOGIO
NOTES
nessuna ragione, perché questo invalida la garanzia.
Batterijen niet weggooien,
maar inleveren als KCA.
Dieses Produkt entspricht den Funkentstörvorschriften der
Europäischen Union.
Die Modellnr. sowie die Herstellungsnr. befinden sich am Boden
des Geräts.
COMANDI
Met het oog op het milieu
MW-uitzending kan niet goed worden ontvangen
-- Zwak radiosignaal
• Draai het toestel om betere ontvangst te verkrijgen en zorg er voor
dat het op een geschikte (niet-metalen) ondergrond staat.
Onderbroken krakend geluid tijdens FM-ontvangst
-- Zwak signaal
• Verleg de in netsnoer ingebouwde antenne.
De wekker werkt niet
-- De wekker is niet ingesteld
• Stel de wektijd in en zet timerschakelaar op BUZZER of
-- Volume te laag voor de radio
• Verhoog het volume
SLEEP werkt niet
-- Radio nog in ON-stand
• Zorg er voor dat de radio uit is
Zwischenzeitliche Knacktöne während dem FM-Empfang
-- Schwaches Radioempfangsignal
• Richten Sie die im Netzkabel eingebaute Antenne aus.
Het typeplaatje bevindt zich op de onderkant van het toestel.
PROBLEMEN OPLOSSEN
SLEEP instellen en uitschakelen
1. Zorg ervoor dat de radio uit staat.
2. Stel de timer in door op de knop SLEEP te drukken. Houd een
vinger op de knop waardoor op het display wordt afgeteld van 59 tot
00 minuten.
Wir haben die Verpackung auf ihr Minimum reduziert und
erleichterten damit, diese in zwei Materialien zu trennen: Pappkarton
und Papierzellstoff.
Ihr Gerät besteht aus Materialien, die wiederverwertet werden
können, wenn es von einer darauf spezialisierten Firma zerlegt wird.
Beachten Sie bitte die lokalen Bestimmungen zur Entsorgung
von Packmaterial, verbrauchten Batterien und alten Geräten.
1. Controleer of de netspanning aangegeven op het typeplaatje aan
de onderkant van het toestel overeenkomt met de plaatselijke
netspanning.
2. Steek de stekker in het stopcontact. De netvoeding is nu gereed en
de cijfers op het display gaan knipperen. Stel nu de juiste tijd in.
3. Om toestel geheel van de netvoeding af te sluiten moet u de stekker
uit het stopcontact halen.
WEKKEROPTIES INSTELLEN
Over SLEEP
De klokradio heeft een ingebouwde timer genaamd SLEEP, waardoor
de radio na een bepaalde tijd automatisch uitschakelt; hierdoor kunt u op
uw gemak gaan liggen, luisteren en in slaap dommelen.
Umwelt-Informationen
NETVOEDING
HOOFDFUNCTIES
SLEEP
Hinweis
• Der Timer ändert nicht die Einstellung Ihrer Weckalarmeinstellung.
• Wenn Sie während SLEEP die Lautstärke zurückdrehten und einen
Alarm im Radiobetrieb eingestellt haben, stellen Sie sicher, dass Sie die
Lautstärke laut genug eingestellt haben, um Sie am nächsten Tag zu
wecken!
PROBLEM
-- Mögliche Ursache
• Behebung
1 ALARM
hiermee wordt de radio in/uit(OFF/ON)
geschakeld
@ BRIGHTNESS
hiermee wordt de helderheid van het display
gewijzigd
# Klepje batterijvak plaats een 9 volt batterij, type 6F22 (niet
inbegrepen) als reservevoeding voor het
klokgeheugen
$ Netsnoer
voor de netvoeding en tevens de antenne voor
FM ontvangst.
R
GRUNDFUNKTIONEN
1. Prüfen Sie, ob die auf dem Typenschild unten am Boden des
Gerätes angegebene Netzspannung mit Ihrer lokalen Netzspannung
übereinstimmt.
2. Stecken Sie den Netzstecker in die Netzsteckdose. Die
Netzstromversorgung ist nun eingeschaltet und die Zahlen auf dem
Display beginnen zu blinken. Sie werden die richtige Uhrzeit einstellen
müssen.
3. Um das Gerät komplett von der Netzstromversorgung zu trennen,
ziehen Sie den Stecker aus der Netzsteckdose.
! RADIO
BEDIENING
ALA
schaltet den ALARM 1 aus
RADIO
l aktiviert das Radio für die ALARM 1 Einstellung
BUZZER
aktiviert den Summer für die ALARM 1Einstellung
2 SLEEP
Einstellung/Aktivierung der Timer-Funktion für das
Radio
3 SLEEP OFF/ REPEAT ALARM schaltet den Timer aus
schaltet den Weckalarm für eine Dauer
von 6-7 Minuten ab.
4 DAILY ALARM RESET
stoppt den aktiven Weckalarm für 24
Stunden
5 ALARM 2
OFF
schaltet den ALARM 2 aus
RADIO
l aktiviert das Radio für die ALARM 2 Einstellung
BUZZER
aktiviert den Summer für die ALARM 2 Einstellung
6 Display
zeigt die Uhrzeit und aktivierte Weckalarme an
7 BAND
wählt das FM- MW-Wellenband aus
8 TUNING
stellt die Radiostationen ein
9 VOLUME
stellt die Tonstärke ein
0 Zeiteinstellungen:
ALARM 1 Einstellung/Überprüfung von ALARM 1
ALARM 2 Einstellung/Überprüfung von ALARM 2
SET TIME Einstellung der Uhrzeit
7 /∞
schnell/langsam: Stellt beides, Stunden und Minuten ein
! RADIO
schaltet das Radio aus/ein (OFF/ON)
@ BRIGHTNESS ändert die Helligkeit des Displays
# Batterieklappe eine 9-Volt-Batterie,Typ 6F22 (nicht mitgeliefert)
für die Speichersicherung der Uhr einlegen
$ Netzkabel
für den Netzanschluss und auch als Antenne für
den FM-Empfang
OFF
NETZSTROMVERSORGUNG
Italiano
2
30/4/02
M
AR
AL IO
AL RD
DU KA
2 0 LO C
JA 33 C
AJ3320/a(6lang)30-4
Informazioni per l’ambiente
Abbiamo ridotto l’imballo al minimo e abbiamo facilitato la sua
suddivisione in due materiali: cartone e pasta da carta.
L’apparecchio consiste di materiali che possono essere riciclati se
smontati da personale qualificato. Vogliate osservare la
normativa vigente in materia di materiali da imballo,
batterie scariche e apparecchiature vecchie.
Questo prodotto è conforme ai requisiti delle interferenze radio
della Unione Europea.
Sia il numero del modello e il numero di produzione si trovano
sotto l’apparecchio.