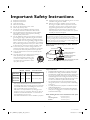
1
Quick Start Setup Guide 46HFL5784L 42HFL5784D 42HFL5784L 39HFL5784D 39HFL5784L 46 42 39HFL5784D L LC11_PHILIPS_hospitality_EN_QG.indd 1 2013/07/25 11:01:59 Know these safety symbols The lightning flash with arrowhead symbol, within an equilateral triangle, is intended to alert the user to the presence of uninsulated “dangerous voltage” within the apparatus’s enclosure that may be of sufficient magnitude to constitute a risk of electric shock to persons. CAUTION RISK OF ELECTRIC SHOCK DO NOT OPEN The exclamation point within an equilateral triangle is intended to alert the user to the presence of important operating and maintenance (servicing) instructions in the literature accompanying the apparatus. CAUTION: TO REDUCE THE RISK OF ELECTRIC SHOCK, DO NOT REMOVE COVER (OR BACK). NO USER-SERVICEABLE PARTS INSIDE. REFER SERVICING TO QUALIFIED SERVICE PERSONNEL. The caution marking is located on the rear or bottom of the cabinet. WARNING: To reduce the risk of fire or electric shock, do not expose this apparatus to rain or moisture. Apparatus shall not be exposed to dripping or splashing and no objects filled with liquids, such as vases, shall be placed on the apparatus. CAUTION: ATTENTION: To prevent electric shock, match wide blade of plug to wide slot, fully insert. Pour éviter les choc électriques,introduire la lame la plus large de la fiche dans la borne correspondante de la prise et pousser jusqu’au fond. Visit our World Wide Web Site at www.philips.com/support www.philips.com/hospitality CHILD SAFETY: PROPER TELEVISION PLACEMENT MATTERS WALL OR CEILING MOUNT YOUR TELEVISION ALWAYSXdciVXindjggZiV^aZgVWdjiegd[Zhh^dcVa ^chiVaaVi^dc^[ndj]VkZVcnYdjWihVWdjindjgVW^a^inid hV[ZanbdjcindjgiZaZk^h^dc# ALWAYSjhZVbdjcii]Vi]VhWZZcgZXdbbZcYZYWn i]ZiZaZk^h^dcbVcj[VXijgZgVcY]VhVhV[ZinXZgi^[^XVi^dc WnVc^cYZeZcYZciaVWdgVidgnhjX]VhJA!8H6!:IA# ALWAYS[daadlVaa^chigjXi^dchhjeea^ZYWni]Z iZaZk^h^dcVcYbdjcibVcj[VXijgZgh# ALWAYSbV`ZhjgZi]Vii]ZlVaadgXZ^a^c\l]ZgZndj VgZbdjci^c\i]ZiZaZk^h^dc^hVeegdeg^ViZ#HdbZbdjcih VgZcdiYZh^\cZYidWZbdjciZYidlVaahVcYXZ^a^c\h l^i]hiZZahijYhdgX^cYZgWadX`XdchigjXi^dc#>[ndjVgZ jchjgZ!XdciVXiVegd[Zhh^dcVa^chiVaaZg# IZaZk^h^dchXVcWZ]ZVkn#6b^c^bjbd[ildeZdeaZ^h gZfj^gZY[dgVlVaadgXZ^a^c\bdjci^chiVaaVi^dc# MOVING AN OLDER TELEVISION TO A NEW PLACE IN YOUR HOME BVcncZliZaZk^h^dcWjnZghbdkZi]Z^gdaYZg8GI iZaZk^h^dch^cidVhZXdcYVgngddbV[iZgi]ZejgX]VhZd[V [aVi"eVcZaiZaZk^h^dc#HeZX^VaXVgZh]djaYWZbVYZ^ci]Z eaVXZbZcid[daYZg8GIiZaZk^h^dch# ALWAYSeaVXZndjgdaYZg8GIiZaZk^h^dcdc[jgc^ijgZ i]Vi^hhijgYnVcYVeegdeg^ViZ[dg^ihh^oZVcYlZ^\]i# NEVEReaVXZndjgdaYZg8GIiZaZk^h^dcdcVYgZhhZg l]ZgZX]^aYgZcbVnWZiZbeiZYidjhZi]ZYgVlZghid Xa^bW# ALWAYSbV`ZhjgZndjgdaYZg8GIiZaZk^h^dcYdZh cdi]Vc\dkZgi]ZZY\Zd[ndjg[jgc^ijgZ# THE CONSUMER ELECTRONICS INDUSTRY CARES BVcj[VXijgZgh!gZiV^aZghVcYi]ZgZhid[i]ZXdchjbZg ZaZXigdc^Xh^cYjhignVgZXdbb^iiZYidbV`^c\]dbZ ZciZgiV^cbZcihV[ZVcYZc_dnVWaZ# 6hndjZc_dnndjgiZaZk^h^dc!eaZVhZcdiZi]ViVaa iZaZk^h^dch¶cZlVcYdaY"bjhiWZhjeedgiZYdcegdeZg hiVcYhdg^chiVaaZYVXXdgY^c\idi]ZbVcj[VXijgZg»h gZXdbbZcYVi^dch#IZaZk^h^dchi]ViVgZ^cVeegdeg^ViZan h^ijViZYdcYgZhhZgh!Wdd`XVhZh!h]ZakZh!YZh`h!heZV`Zgh! X]Zhih!XVgih!ZiX#!bVn[VaadkZg!gZhjai^c\^c^c_jgn# TUNE IN TO SAFETY ALWAYS[daadli]ZbVcj[VXijgZg»hgZXdbbZcYVi^dch [dgi]ZhV[Z^chiVaaVi^dcd[ndjgiZaZk^h^dc# ALWAYSgZVYVcY[daadlVaa^chigjXi^dch[dgegdeZgjhZ d[ndjgiZaZk^h^dc# NEVERVaadlX]^aYgZcidXa^bWdcdgeaVndci]Z iZaZk^h^dcdgi]Z[jgc^ijgZdcl]^X]i]ZiZaZk^h^dc^h eaVXZY# NEVEReaVXZi]ZiZaZk^h^dcdc[jgc^ijgZi]ViXVcZVh^an WZjhZYVhhiZeh!hjX]VhVX]Zhid[YgVlZgh# ALWAYS^chiVaai]ZiZaZk^h^dcl]ZgZ^iXVccdiWZ ejh]ZY!ejaaZYdkZgdg`cdX`ZYYdlc# ALWAYSgdjiZXdgYhVcYXVWaZhXdccZXiZYidi]Z iZaZk^h^dchdi]Vii]ZnXVccdiWZig^eeZYdkZg!ejaaZYdg \gVWWZY# CE.org/safety 2 46 42 39HFL5784D L LC11_PHILIPS_hospitality_EN_QG.indd 2 2013/07/25 11:01:59 Important Safety Instructions 1. 2. 3. 4. 5. 6. 7. 13. Unplug this apparatus during lightning storms or when unused for long periods of time. 14. Refer all servicing to qualified service personnel. Servicing is required when the apparatus has been damaged in any way, such as power-supply cord or plug is damaged, liquid has been spilled or objects have fallen into the apparatus, the apparatus has been exposed to rain or moisture, does not operate normally, or has been dropped. Read these instructions. Keep these instructions. Heed all warnings. Follow all instructions. Do not use this apparatus near water. Clean only with dry cloth. Do not block any ventilation openings. Install in accordance with the manufacturer’s instructions. 8. Do not install near any heat sources such as radiators, heat registers, stoves, or other apparatus (including amplifiers) that produce heat. 9. Do not defeat the safety purpose of the polarized or grounding-type plug. A polarized plug has two blades with one wider than the other. A grounding type plug has two blades and a third grounding prong. The wide blade or the third prong are provided for your safety. If the provided plug does not fit into your outlet, consult an electrician for replacement of the obsolete outlet. 10. Protect the power cord from being walked on or pinched particularly at plugs, convenience receptacles, and the point where they exit from the apparatus. 11. Only use attachments / accessories specified by the manufacturer. 12. Use only with the cart, stand, tripod, bracket, or table specified by the manufacturer, or sold with the apparatus. When a cart is used, use caution when moving the cart / apparatus combination to avoid injury from tip-over. Note to the CATV system installer: This reminder is provided to call the CATV system installer’s attention to Article 820-40 of the NEC that provides guidelines for proper grounding and, in particular, specifies that the cable ground shall be connected to the grounding system of the building, as close to the point of cable entry as practical. Example of Antenna Grounding as per NEC - National Electric Code GROUND CLAMP ANTENNA DISCHARGE UNIT (NEC SECTION 810-20) GROUNDING CONDUCTORS (NEC SECTION 810-21) GROUND CLAMPS ELECTRIC SERVICE EQUIPMENT Wall Mount Bracket Kit Brand Model # Screw dimension PHILIPS SQM6485 M6 x 1.614” (41mm) with spacer 42HFL5784D 42HFL5784L SANUS 39HFL5784D 39HFL5784L SAN25BB M4 x 0.472” (12mm) 46HFL5784L • • • • ANTENNA LEAD IN WIRE POWER SERVICE GROUNDING ELECTRODE SYSTEM (NEC ART 250, PART H) P&F USA is not liable for these types of accidents or injury noted below. • Install the Wall Mount Bracket on a sturdy vertical wall. • If installed onto a ceiling or slanted wall, the TV and Wall Mount Bracket may fall which could result in a severe injury. • Do not use screws that are longer or shorter than their specified length. If screws too long are used this may cause mechanical or electrical damage inside the TV set. If screws too short are used this may cause the TV set to fall. • Do not fasten the screws by excessive force.This may damage the product or cause the product to fall, leading to an injury. • For safety reasons use 2 people to mount the TV onto a Wall Mounting Bracket. • Do not mount the TV onto the Wall Mounting Bracket while your TV is plugged in or turned on. It may result in an electrical shock injury. The recommended Wall Mount Bracket Kit (sold separately) allows the mounting of the TV on the wall. For detailed information on installing the wall mount, refer to the Wall Mount Instruction Book. P&F USA is not responsible for any damage to the product or injury to yourself or others if you elect to install the TV Wall Mount Bracket or mount the TV onto the Bracket on your own. The Wall Mount Bracket must be installed by experts. When installing the unit on the wall, allow this much space. Top: Left and right side: Bottom: 11.8 inches (30cm) 5.9 inches (15cm) 3.9 inches (10cm) 3 46 42 39HFL5784D L LC11_PHILIPS_hospitality_EN_QG.indd 3 2013/07/25 11:02:00 1 Notice Modifications This apparatus may generate or use radio frequency energy. Changes or modifications to this apparatus may cause harmful interference unless the modifications are expressly approved in the manual. The user could lose the authority to operate this apparatus if an unauthorized change or modification is made. Trademarks are the property of Koninklijke Philips N.V. or their respective owners. P&F USA reserves the right to change products at any time without being obliged to adjust earlier supplies accordingly. The material in this manual is believed adequate for the intended use of the system. If the product or its individual modules or procedures are used for purposes other than those specified herein, confirmation of their validity and suitability must be obtained. P&F USA warrants that the material itself does not infringe any United States patents. No further warranty is expressed or implied. P&F USA cannot be held responsible neither for any errors in the content of this document nor for any problems as a result of the content in this document. Errors reported to P&F USA will be adapted and published on the P&F USA support website as soon as possible. Cables Connections to this device must be made with shielded cables with metallic RFI / EMI connector hoods to maintain compliance with FCC Rules and Regulations. Canadian notice CAN ICES-3 (B)/NMB-3 (B) Standard Television Receiving Apparatus, Canada BETS-7 / NTMR-7. Copyright All other registered and unregistered trademarks are the property of their respective owners. The terms HDMI and HDMI HighDefinition Multimedia Interface, and the HDMI Logo are trademarks or registered trademarks of HDMI Licensing LLC in the United States and other countries. Pixel characteristics This LCD product has a high number of color pixels. Although it has effective pixels of 99.999% or more, black dots or bright points of light (red, green or blue) may appear constantly on the screen. This is a structural property of the display (within common industry standards) and is not a malfunction. Manufactured under license from Dolby Laboratories. Dolby and the double-D symbol are trademarks of Dolby Laboratories. Warranty No components are user serviceable. Do not open or remove covers to the inside of the product. Repairs may only be done by Service Centers and official repair shops. Failure to do so shall void any warranty, stated or implied. Any operation expressly prohibited in this manual, any adjustments or assembly procedures not recommended or authorized in this manual shall void the warranty. is a trademark of SRS Labs, Inc. TruSurround HD technology is incorporated under license from SRS Labs, Inc. SRS TruSurround HD™ creates an immersive, feature-rich surround sound experience from two speakers, complete with rich bass, high frequency detail and clear dialog. Federal Communications Commission Notice This equipment has been tested and found to comply with the limits for a Class B digital device, pursuant to part 15 of the FCC Rules. These limits are designed to provide reasonable protection against harmful interference in a residential installation. This equipment generates, uses and can radiate radio frequency energy and, if not installed and used in accordance with the instructions, may cause harmful interference to radio communications. However, there is no guarantee that interference will not occur in a particular installation. If this equipment does cause harmful interference to radio or television reception, which can be determined by turning the equipment off and on, the user is encouraged to try to correct the interference by one or more of the following measures: • Reorient or relocate the receiving antenna. • Increase the separation between the equipment and the receiver. • Connect the equipment into an outlet on a circuit different from that to which the receiver is connected. • Consult the dealer or an experienced radio or television technician for help. Consumer Notice: ENERGY STAR® is a joint program of the U.S. Environmental Protection Agency and the U.S. Department of Energy helping us all save money and protect the environment through energy efficient products and practices. This TV has been set to maximize energy efficiency while delivering the best possible picture using the factory installed home mode settings. Changing or enabling other features in this TV (e.g. brightened backlighting) will possibly increase energy consumption beyond the original ENERGY STAR® qualified limits. LED backlighting technology uses less energy when compared with a standard CCFL backlighting LCD television of the same screen size. Actual energy savings will vary depending on the screen size. Declaration of Conformity Portions of this software are copyright © The FreeType Project (www.freetype.org). Trade Name : PHILIPS Responsible Party : P&F USA, Inc. Model : 46HFL5784L, 42HFL5784D, 42HFL5784L, 39HFL5784D, 39HFL5784L Address : PO Box 2248, Alpharetta, GA 30023 U.S.A. Telephone Number : 1 866 497 4225 The American Academy of Pediatrics discourages television viewing for children younger than two years of age. 4 46 42 39HFL5784D L LC11_PHILIPS_hospitality_EN_QG.indd 4 2013/07/25 11:02:01 2 Important CAUTION: Danger of explosion if battery is incorrectly replaced. Replace only with the same or equivalent type. WARNING: Batteries (battery pack or battery installed) shall not be exposed to excessive heat such as sunshine, fire or the like. Positioning the TV • • • • • • • • • • • • WARNING: To prevent injury, this apparatus must be securely attached to the furniture / wall in accordance with the instructions. Tipping, shaking or rocking the unit may cause injury / death. Large screen TVs are heavy. 2 people are required to carry and handle a large screen TV. Make sure to hold the upper and bottom frames of the unit firmly as illustrated. Install the unit in a horizontal and stable position. Do not install the unit in direct sunlight or in a place subject to dust or strong vibration. Depending on the environment, the temperature of this unit may increase slightly. This is not a malfunction. Avoid a place with drastic temperature changes. Do not place anything directly on top or bottom of the unit. Depending on your external devices, noise or disturbance of the picture and / or sound may be generated if the unit is placed too close to them. In this case, please ensure enough space between the external devices and the unit. Do not insert the AC power cord into the power socket outlet before all the connections are made. Ensure that you always have easy access to the AC power cord or plug to disconnect the TV from the power. Before you move the TV, disconnect attached cables to prevent damage to connectors. Be sure to unplug the AC power cord from the AC outlet before moving or carrying the unit. Environmental care The packaging of this product is intended to be recycled. Contact your local authorities for information about how to recycle the packaging. For product recycling information, please visit www.recycle.philips.com End of life directives Philips pays a lot of attention to produce environment-friendly products in green focal areas.Your new TV contains materials which can be recycled and reused. At the end of its life, specialized companies can dismantle the discarded TV to concentrate the reusable materials and to minimize the amount of materials to be disposed of. Please ensure you dispose of your old TV according to local regulations. Regulatory notices Do not place the unit on the furniture that is capable of being tilted by a child and an adult leaning, pulling, standing or climbing on it. A falling unit can cause serious injury or even death. This apparatus should not be placed in a built-in installation such as a bookcase or rack unless proper ventilation is provided. Make sure to leave a space of 4 inches (10cm) or more around this apparatus. Disposal of used batteries The batteries supplied do not contain the heavy metals mercury and cadmium. Nevertheless, in many areas batteries may not be disposed of with your household waste. Please ensure you dispose of batteries according to local regulations. Press to turn the unit on and go into standby mode. To completely turn off the unit, you must unplug the AC power cord. Disconnect the AC plug to shut the unit off when trouble is found or not in use. The AC plug shall remain readily available. AC plug Never use a gas duster on this TV. The gas trapped inside of this unit may cause ignition and explosion. 5 46 42 39HFL5784D L LC11_PHILIPS_hospitality_EN_QG.indd 5 2013/07/25 11:02:01 How to use this guide TV Setup The Quick Start Setup Guide helps you install the Philips commercial television, as quickly as possible. It contains the necessary information to install the TV and configure the settings. Read and understand the instructions in the Quick Start Setup Guide before you use your TV. For detailed information on additional features, download the user manual by selecting your TV model at www.philips.com/hospitality. The Quick Start Setup Guide contains the following information: • Contents of the box • Configuration of channel and advanced settings • Cloning of data As part of striving to improve the TV performance throughout the product life, some TV menus may differ from the illustration on this document. Philips Hospitality TVs have a USB cloning capability so you only need to manually setup one TV - the “master TV”. Then the complete setup configuration can be copied from the master TV to a USB storage device which can then be used to load the same setup configuration into all other TVs. Step 1 is to setup the master TV as follows: Accessing the setup menu To access and adjust the setup functions, YOU MUST USE A SPECIAL SETUP REMOTE CONTROL (not provided with the TV) IN THE RC5 SETUP MODE. All the following instructions assume the use of a setup remote control in the RC5 Setup mode. Note • The optional setup remote control is not included in the box. Contact your Philips authorized agent or dealer to purchase the setup remote control. Setup remote control might differ from the illustration. The contents of the box The box contains the following items: • TV • TV stand • Quick Start Setup Guide (this document) • Warranty sheet • Remote control • 2 x AAA, 1.5V batteries • TV stand hardware A B C D E F G RESET/UPGRADE GUIDE RECALL/INFO HOME MENU BACK/PP Stand-to-TV screws (x 3 for 42HFL5784D, 42HFL5784L, 39HFL5784D, 39HFL5784L) (x 4 for 46HFL5784L) • Stand -to-Stand neck screw (x 4 for 46HFL5784L) • Stand pin (x 2 for 42HFL5784D, 42HFL5784L, 39HFL5784D, 39HFL5784L) • Screw for Stand pin (x 4 for 42HFL5784D, 42HFL5784L, 39HFL5784D, 39HFL5784L) • TV security package • Stand-to-TV security hex screws (x 3 for 42HFL5784D, 42HFL5784L, 39HFL5784D, 39HFL5784L) (x 4 for 46HFL5784L) • Stand -to-Stand neck security hex screw (x 4 for 46HFL5784L) • Security bolt and cap (x 2) • Washer (x 2) • Security nut (x 2) • Security double-sided tape (x 4) OPTIONS ALARM/CLOCK SMART TELETEXT CC • MUTE TV VOL P ABC DEF GHI JKL MNO PQRS TUV WXYZ AV RC5 GUEST SLEEP RC5 SETUP RC6 GUEST RC6 SETUP HOSPITALITY Note • The items are available on selected models only. • An optional security tool is required to tighten the security screws and nuts. Please contact your Philips authorized agent or distributor to purchase the tool. 6 46 42 39HFL5784D L LC11_PHILIPS_hospitality_EN_QG.indd 6 2013/07/25 11:02:02 Channel installation 39HFL5784D, 39HFL5784L • Press . POWER at the front of the TV or use the This section describes how to install the TV channels automatically. 1 Connect the RF signal to the TV. 2 Plug the power cord into the power outlet. . (POWER) on the remote control. 4 5 Cable 3 Press RC5 SETUP to put the remote control into setup mode, then press the HOME/MENU button to display the setup menu. (Hereafter, HOME/MENU will be simply referred to as MENU) Select Setup Menu - Channels - Autoprogram; then select Cable. (unless the installation is using only Antenna signals - in which case you would select Antenna) Turn the TV on. 46HFL5784L, 42HFL5784D, 42HFL5784L • Press . (POWER) at the rear of the TV or use the . (POWER) on the remote control. 7 46 42 39HFL5784D L LC11_PHILIPS_hospitality_EN_QG.indd 7 2013/07/25 11:02:03 f g h i a j b c d e a DATA (RJ-12 SPI port) b Digital audio output jack c IP Control port d Antenna Input jack GAME port PC Input jack USB terminal HDMI Input jack(s) i Audio input jack for PC connection j Audio Video Input jack *e f g h * 46HFL5784L, 42HFL5784L, 39HFL5784L only. 8 46 42 39HFL5784D L LC11_PHILIPS_hospitality_EN_QG.indd 8 2013/07/25 11:02:05 Installation Install TV Channels (Skip if the TV is in PPV mode) 1 Note Press MENU on the setup remote control to display the setup menu. 2 Select Channels. 3 Select Installation mode and the required installation mode(Antenna, Cable). 4 If auto installation is required, select Auto program and Start. 5 If manual installation is preferred, select Manual setup and the correct parameters. After the initial setup, the TV can be further configured, to achieve the desired behavior. A summary of available options is described in the following sections. • As part of the initial TV setup, there is PC application to support the installation. The application that can be downloaded at www.philips.com/hospitality or contact Philips agent representative, this tool is subject to availability. In the 1st time (Virgin) installation, the following steps should be followed: Language If Language other than English is required, select the desired language. 1 2 3 Press MENU on the setup remote control to display the setup menu. Select Settings. Select the preferred language. Channel setting setup This section describes how to change the channel settings. The TV must be in FTG mode for the channel settings to be available. 1 Press MENU on the setup remote control to display the setup menu. 2 Select Channels. 3 Manual setup options: Channel, Input, Channel Logo, Digital, RF Channel Number, MPEG Program Number, Rings, Label and Mute. 4 Select the Current Ring. Note • The setup menu is available in English only - this setting changes the language of the guest menus. TV system If TV is part of a PPV (Pay Per View) system 1 2 3 4 Press MENU on the setup remote control to display the setup menu. Select System. Select SPI. Select the correct SPI mode ( 3v3 , 5V). Configuration menu This section describes how to change the TV general performance settings. Switch On settings and Control settings. 1 Press MENU on the setup remote control to display the setup menu. If the TV will be used in FTG (Free To Guest) mode (Skip if the TV is in PPV mode) 1 2 3 4 5 6 Press MENU on the setup remote control to display the setup menu. Select System. Select Pro:Idiom Control. Select Mode. Select FTG. Enter the correct pass-code. 2 Press Î ï to select the desired mode, then press OK. property information. Hotel Info Defines (Hotel name and Room ID) Defines the parameters loaded when the TV is Switch On switched On and the OSD behavior. and OSD (Welcome Message, Switch On Program and Channel Display) Note Volume Defines the Volume and Volume OSD behavior. Settings (Volume Indicator, Max Volume and Switch On Volume) • D-model TVs ship in FTG mode • L-model TVs ship in PPV mode Enable disable various interfaces and controls. Lock Keyboard, Remote Control, AV Inputs and Auto Settings (USB, Sensing) You need a pass code to change the TV mode between FTG ↔ PPV. The pass code is unique for each TV and may be manually input using the setup remote control, or it may be input using a USB storage device. The pass codes may be obtained from the call center helpline. the TV standby and Eco power, as well as the Power DefinesOn mode. Settings Power (StandBy Mode, Power On and Eco Power) 9 46 42 39HFL5784D L LC11_PHILIPS_hospitality_EN_QG.indd 9 2013/07/25 11:02:06 How to capture a clonefile from the TV to a USB storage device Configure standard TV settings This menu will allow the configuration of the standard TV parameters. Options: Language, Picture, Sound, Caption settings, Child Lock, EasyLink Use of Slideshow application The slideshow application will enable a basic signage mode. 1 Insert the USB stick with the graphic files. 2 Press MENU on the setup remote control to display the setup menu. 3 4 Select Applications or Slideshow. For testing and fine tuning, select Run from USB. The TV will start displaying the files, with the parameters configured in the Slideshow menu. 5 When all is confirmed, select Copy to TV. The graphic files will be copied to the TV memory. 6 Select Configuration, Switch On and OSD, Switch On Program or Slideshow in the main setup menu. Next time the TV will switch On, will automatically start the slideshow application. 1. Insert a USB storage device into the TV USB terminal. (It must have sufficient free space to hold a TV clonefile – about 5 MB.) 2. Press MENU on the setup remote control to display the setup menu. 3. 4. 5. 6. 7. 8. Scroll down to and select Upgrades. Select Source and select USB then press OK. Select Type and select Clone then press OK. Select Direction and select from TV then press OK. Select Execute and select Start then press the OK. After the successful completion, Upgrade Completed! Press OK to continue message appears on screen. How to install a clonefile from a USB storage device to the TV Configure the upgrading and cloning settings Preface: The Upgrades section of the Hospitality TV setup menu has three possible sources: 1. IP 2. USB 3. RF Only the USB source is bidirectional, meaning that the TV can either read from the USB, or write to the USB. The IP and RF sources are unidirectional – read only. It cannot write to them. If the source USB is selected, there are 5 upgrade types available: 1. All 2. Software (TV firmware(s)) 3. Assets (Slideshow pictures) 4. Clone (TV settings and channel map) 5. P:I Key (Change TV between PPV ↔ FTG modes) Of these, only the Assets and Clone types are bidirectional. The All, Software, and P:I Key types are read only. So, if either Assets or Clone is selected, an additional menu item: Direction appears. There are two possible directions: 1. To TV (reads data from the USB, copies it to the TV) 2. From TV (reads data from the TV, copies it to the USB) 1. Insert the USB storage device containing the clonefile into the TV USB terminal. 2. Press MENU on the setup remote control to display the setup menu. 3. 4. 5. 6. 7. 8. Scroll down to and select Upgrades. 9. After pressing OK, the TV will restart and initialize with the new values Select Source and select USB then press OK. Select Type and select Clone then press OK. Select Direction and select To TV then press the OK. Select Execute and select Start then press the OK. After the successful completion, Upgrade Completed! Press OK to continue message appears on screen. Note • When selecting RF and its respective parameter, ensure that this is the channel that will be used to stream the data and it is not used by any video channel. • RF cloning/upgrading must be used with a Gateway Network Appliance (GNA) device. For more information on the GNA, contact your Philips authorized agent or dealer. 10 46 42 39HFL5784D L LC11_PHILIPS_hospitality_EN_QG.indd 10 2013/07/25 11:02:06 Installation of pay-per-view box Multi RC This section describes how to install a external pay-perview box. Step 1 : Set the communication mode You must setup the correct communication protocol before you connect the Pay-per-View box to the TV. This section describes how to select the communication mode. 1 Press MENU on the setup remote control to display the setup menu. Multi RC enables control of multiple TVs in a room without any interference from each other’s remote control. To enable Multi RC, each remote control is set to one of the four colors - Blue, Green, Yellow or Red. Each TV in the room is separately programmed to a remote control of one of those colors. In this way, each TV responds to only one RC that is set to the same color as the TV itself. This prevents interference from each other’s remote control when you watch multiple TVs in a room. 1 Press MENU on the setup remote control to display the setup menu. 2 Select System. 3 Select MultiRC and the correct color code. 2 Select SPI and the appropriate option (3v3 , 5v). Step 2 : Set the communication mode Note • Turn off your TV before you connect the pay-per-view box. 1 Insert the RJ12 cable of the Pay-per-View box into the RJ12 connector of the TV. 2 Connect the other cables as directed by the Pay-perView provider. After completing the connections of the cable, turn on the TV. 3 4 4 Press ÎïÍÆ to select [Select a color code]. • The TV is configured to respond to the RC that is set to the 5 On the guest RC, press HOME (the menu button) and the color button (same color as above) simultaneously, for at least 5 seconds. • The guest RC is set to the selected color. same color. Note • The Guest RC defaults to Blue, and a remote which has been set to any color can operate any TV which has not been configured to a different color yet. Therefore, if 2 TVs are being configured in the same space, then each TV/RC pair MUST be set a their own color (one pair cannot be left as default, otherwise both RCs will operate the TV which has not been configured). Press RECALL on the setup remote control and check that the status of SPI ONLINE in page 4. Watch your video on a USB storage device 1 Connect your USB storage device to the TV. 2 Press MENU on the remote control to display the guest 3 menu. Select Browse USB. 11 46 42 39HFL5784D L LC11_PHILIPS_hospitality_EN_QG.indd 11 2013/07/25 11:02:06 P&F USA, Inc. PO Box 2248, Alpharetta, GA 30023 P&F Mexicana, S.A. de C.V. Av. La Palma No. 6, Col. San Fernando La Herradura. Huixquilucan, Edo. de México. C.P. 52787 Philips and Philips Shield are used under license of Koninklijke Philips N.V. Printed in China A37QZUH / A37HYUH / A37HZUH / A37TYUH / A37TZUH 2EMN00058 ★★★★ * 2 E M N 0 0 0 5 8 * 46 42 39HFL5784D L LC11_PHILIPS_hospitality_EN_QG.indd 12 2013/07/25 11:02:06