1
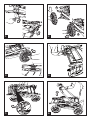
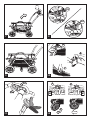
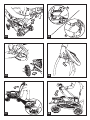
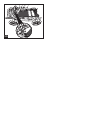
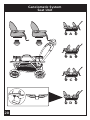
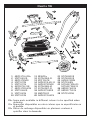
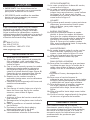
U.S.A./CANADA/AUSTRALIA
Instructions for use EN
Instrucciones de uso ES
Notice dʼemploi FR
FIUS0501I63
Duette SW
A
1
2
A
B
3
4
5
6
B
OK
NO
7
8
A
B
A
B
C
C
9
10
A
1
2
3
11
4
12
B
A
B
A
13
14
15
16
17
18
B
19
Ganciomatic System
Seat Unit
A
B
C
D
20
Ganciomatic System
Primo Viaggio Car Seat
A
21
Ganciomatic System
Seat Unit - Primo Viaggio Car Seat
A
B
22
Duette SW
2
1
4
3
5
6
8
13
7
9
15
14
10
12
16
17
11
20
18
24
19
28
26
21
25
23
27
1
2
3
4
5
6
7
8
9
10
ARPI0371L65N•
SPST5981GR
ARPI0372NGR
SPST5970N
SPST5971N
ASPI0073L31N
ARPI0373DL65N
SPST5966GR
SPST5965N
SPST5959N
11
12
13
14
15
16
17
18
19
20
ERSHDS•
SOTA0284L31
SPST5967N
ARPI0374L65L31
ARPI0375DNGR
SOTA0286L65
SOTA0287L31
ARPI0375SNGR
MMST0025
ARPI0373SL65N
22
21
22
23
24
25
SPST6080GR
SPST6082GR
ASPI0074GRN
SPST5968N
SOTA0279DL65S
SOTA0279SL65S
26 ARPI0376L31N
27 ARPI0377L31N
28 SPST5945NS
EN• Spare parts available in different colours to be specified when
ordering.
ES• Repuestos disponibles en otros colores que se especificarán en
el pedido.
FR• Pièces de rechange disponibles en plusieurs couleurs à
spécifier dans la demande.
EN•ENGLISH
• IMPORTANT: read the instructions carefully
before use. Save the instructions for future
reference.
• PEG PEREGO reserves the right to make any
necessary changes or improvements to the
products shown at any time without notice.
CUSTOMER SERVICE
If parts of the model are accidentally lost or
damaged, use only original Peg Perego spare
parts. Contact the Peg Perego Customer
Service for all repair work, replacements,
information about products, and sale of
original spare parts and accessories, at the
following:
USA:
tel.: 800.671.1701
fax: 260.471.6332
Call us toll free: 1.800.671.1701
CANADA:
tel.: 905.839.3371
fax: 905.839.9542
Call us toll free: 1.800.661.5050
www.pegperego.com
INSTRUCTIONS FOR USE
1•
2•
3•
•
ASSEMBLING THE WHEELS
Remove the four protection caps (two
round ones and two square ones) from
the chassis while it is still folded up, as
shown in the Þgure.
Mount the front wheels with the chassis
folded, pressing on the attachment lever
(Þgure A) and inserting the hub onto the
rod (Þgure B). Check to make sure the
wheels are correctly attached by pulling
them in opposite directions.
Repeat the same operation on the rear
wheels as for the front wheels (steps A
and B).
Check to make sure the brake gear is
correctly installed.
BRAKE
4• To set the brake on the chassis, lower the
brake bar on the rear wheels, as shown in
the Þgure.
•
5•
6•
7•
OPENING THE CHASSIS
Set the brake while the chassis is still
folded up.
Unfasten the tab, as shown in the Þgure.
Lift the handlebar in the direction shown
by the arrow.
Press the handlebar downwards until it
clicks into the Þnal position.
8• To make sure the chassis is correctly
open, check the illustration.
BASKET
9• The basket goes at the base of the
chassis, as shown in the Þgure.
10• The basket fastens to six different points.
First, fasten it to the four buttons in the
front and back, as shown in Þgure A
and B. Then fasten the two straps to the
chassis pipe, as shown in Þgure C.
STEERING WHEEL
11• To allow a good grip, the steering wheel
can be adjusted to four different positions
by pressing on the button shown in the
Þgure.
SWIVEL WHEELS
12• The practical steering wheel has a lever
for swiveling the front wheels. Move the
lever on the steering wheel to the right
to swivel the front wheels, as shown in
Þgure A. To set the wheels on stationary,
use the lever on the left, as shown in
Þgure B.
OUTER HANDLES
13• The chassis can be completely lifted
off the ground using the center, outer
handles and the large back handle, as
shown in the Þgure. It takes two people
to lift the chassis.
14• The Þgure shows the correct way to lift
the chassis.
REMOVING THE WHEELS
15• To remove the wheels, press the lever
on the center of the wheel, as shown in
the Þgure, and pull the wheel towards
yourself.
FOLDING UP THE CHASSIS
• Set the brake and unfasten the seats.
16• To fold up the chassis, lift the lever on
the large handle as shown in the Þgure,
unfastening the handlebar and moving it
slightly forward.
17• Use your left foot to press the safety lever
downward to loosen the handlebar, as
shown in the Þgure.
18• Turn the handlebar downward, as shown
in the Þgure.
19• Fold up the chassis, fastening the tab to
the hook on the handlebar.
GANCIOMATIC SYSTEM
The Duette SW chassis features the G-matic
system and this means that you can select
the product to mount as required, from
the carriage to the car seat and carrying
chair. Follow the indications for the product
combinations listed below.
DUETTE + 2 CARRIER SEATS
ATTENTION:
• To ensure greater stability, we
recommend installing both carrier
seats at all times.
• If for any reason DUETTE SW is used
with only one occupant, we recommend
attaching both carrier seats in any
case. Make sure the seats are securely
attached.
20• For instructions on how to attach and
detach the product from the chassis, see
the manual supplied with the carrier seat.
Figures A, B, C, and D show different
ways to attach the seats. Figure D shows
the “crib” position, with the backrest
completely lowered and the footboard
raised as shown in the Þgure.
DUETTE + 2 PRIMO VIAGGIO CAR
SEATS
21• Figure A shows how to attach the product
(with the seat turned towards the mother).
DUETTE + 1 PRIMO VIAGGIO CAR SEAT
AND 1 CARRIER SEAT
ATTENTION:
• To ensure greater stability, we
recommend installing the carrier seat
at all times.
• If for any reason DUETTE SW is used
with only one occupant, we recommend
attaching the carrier seat in any
case. Make sure the seat is securely
attached.
22• Figures A and B show how to attach the
products.
CLEANING & MAINTENANCE
Your product requires only minimal
maintenance. Cleaning and maintenance
operations must be performed only by adults.
• Be sure to keep all moving parts clean,
lubricating them with light oil if necessary.
• Dry off metal parts to prevent rusting.
• Regularly clean the plastic parts with a
damp cloth. Do not use solvents or similar
products.
• Remove any dust and sand from the wheels.
• Protect the product against smog, water,
rain and snow. Continued and extended
exposure to sunlight can change the
colours of many materials.
• Store the product in a dry area.
SAFETY
WARNING
• NEVER LEAVE YOUR CHILD
UNATTENDED.
• THE USE OF PARTS OR
ACCESSORIES NOT APPROVED BY
THE MANUFACTURER COULD BE
DANGEROUS.
• DO NOT INTRODUCE FINGERS IN
THE MECHANISMS.
• ALL OPERATING AND ASSEMBLY
PROCEDURES SHOULD BE
PERFORMED BY AN ADULT.
• DO NOT USE THE PRODUCT IF IT
HAS BROKEN OR MISSING PARTS.
• ALWAYS USE BRAKES WHEN
STOPPED.
• DO NOT USE THIS PRODUCT
AROUND STAIRS OR STEPS.
• UNIT MAY BECOME UNSTABLE IF
MANUFACTURERS INSTRUCTIONS
ARE NOT FOLLOWED.
• CHECK THAT THE SEATS ARE
CORRECTLY FITTED.
SAFETY RULES
Use special care when performing
operating procedures to avoid
injurying the child or yourself.
Parcels and accessory items, or both,
placed on the unit may cause the
unit to become unstable. Maximum
weight for objects placed in basket is
11 lbs. Excessive weight may cause a
hazardous condition to exist.
Stay attentive to the risks provided
by Þre and other signiÞcant sources
of heat such as electric radiators,
gas heaters, ect. That are in the
immediate vicinity of the product.
Always take care that the seats are
correctly Þxed to the sides, pushing
down with both hands on the
product.
ES•ESPAÑOL
• IMPORTANTE: leer detenidamente las
instrucciones antes del uso y conservarlas
para poder utilizarlas en el futuro.
• PEG PEREGO podrá modificar los modelos
decritos en este prospecto, por razones
técnicas o commerciales.
SERVICIO DE ASISTENCIA
Si por casualidad alguna parte del modelo
se pierde o se rompe, usar sólo piezas de
repuesto originales Peg Perego. Para todo
lo que concierne las reparaciones, cambios,
informaciones sobre los productos y la venta de
repuestos originales y accesorios, contacte con
el Servicio de Asistencia Peg-Perego:
USA:
tel.: 800.671.1701
fax: 260.471.6332
Call us toll free: 1.800.671.1701
www.pegperego.com
INSTRUCCIONES DE USO
MONTAJE DE LAS RUEDAS
1• Quitar los cuatro tapones de protección
(dos redondos y dos cuadrados) del
carrito cuando aún está cerrado, como
indica la Þgura.
2• Con el carrito cerrado, montar las ruedas
delanteras presionando la palanquita
de enganche (Þgura A) y metiendo el
cubo en el pivote hasta el tope (Þgura B).
Controlar que se enganche bien tirando
de las ruedas en dirección opuesta.
3• Repetir con las ruedas traseras la
operación hecha antes con las delanteras
(secuencia A y B).
• Controlar que el engranaje del freno está
metido correctamente.
FRENO
4• Para frenar el carrito, bajar con el pie la
barra del freno que hay en las ruedas
traseras, como indica la Þgura.
APERTURA
• Accionar el freno del carrito cuando aún
está cerrado.
5• Desenganchar la lengüeta como indica la
Þgura.
6• Subir el manillar en el sentido indicado
por la ßecha.
7• Presionar el manillar hacia abajo y
bloquearlo hasta oír el clic Þnal.
8• Para comprobar que se abre
correctamente controlar la ilustración.
CESTA PORTAOBJETOS
9• La cesta se coloca en la base del carrito,
como indica la Þgura.
10• La cesta se engancha en seis puntos
especíÞcos; en la zona delantera y
trasera hay cuatro botones, como indican
las Þguras A y B. Luego unir las dos
abrazaderas de velcro al tubo del carrito,
como indica la Þgura C.
VOLANTE
11• El volante puede asumir cuatro posiciones
diferentes, presionando el botón como
indica la Þgura, para poder cogerlo
siempre bien.
RUEDAS GIRATORIAS
12• Gracias al práctico volante se puede
decidir si torcer las ruedas de delante.
Para girar las ruedas delanteras hay que
desplazar hacia la derecha la palanquita
que hay en el volante, como indica la
Þgura A. Para que las ruedas queden
Þjas, usar la palanquita hacia la izquierda,
como indica la Þgura B.
ASAS EXTERIORES
13• Se puede levantar todo el carrito con las
asas exteriores centrales y con el asa
trasera, como indica la Þgura. El carro
debe ser levantado por dos personas.
14• La Þgura muestra cómo hay que
levantarlo.
PARA QUITAR LAS RUEDAS
15• Para quitar las ruedas hay que presionar
la palanquita que hay en el centro de la
rueda como indica la Þgura y al mismo
tiempo tirar de la rueda hacia usted.
CIERRE
• Accionar el freno y desenganchar las
sillas.
16• Para cerrar el carrito levantar la
palanquita que hay en el asa, como indica
la Þgura, desenganchando así el manillar
y poniéndolo un poco hacia adelante.
17• Para desbloquear el manillar, presionar
con el pie izquierdo la palanca de
seguridad hacia abajo, como indica la
Þgura.
18• Girar el manillar hacia abajo como indica
la Þgura.
19• Cerrar el carrito, enganchando la lengüeta
de cierre en el gancho del manillar.
GANCIOMATIC SYSTEM
En el modelo Duette SW, el Sistema
Ganciomatic permite elegir en función de
las propias exigencias el producto a acoplar,
del carrito a la silla de auto, a la sillita. Es
necesario seguir las indicaciones para las
combinaciones de productos que
presentamos.
DUETTE + 2 ASIENTOS DE PASEO
ADVERTENCIA PARA EL USO:
• Para mantener el producto estable
se aconseja instalar siempre ambos
asientos de paseo.
• Si por algún motivo se utiliza Duette
SW con un solo ocupante, se aconseja
enganchar de todas formas ambos
asientos de paseo y asegurarse de que
estén bien enganchados.
20• Para obtener más información sobre las
operaciones de enganche y desenganche
del producto al carrito consultar el
manual de la silla.
Las Þguras A, B, C, D, muestran las
posibilidades de enganche de las sillas.
La Þgura D, muestra la posición camita,
bajando los respaldos y subiendo el
reposapiés de los peldaños como indica
la Þgura.
DUETTE + 2 SILLAS DE AUTO PRIMO
VIAGGIO
21• La Þgura A muestra cómo enganchar el
producto (mirando hacia la madre).
DUETTE + 1 SILLA DE AUTO PRIMO
VIAGGIO Y 1 ASIENTO DE PASEO
ADVERTENCIA PARA EL USO:
• Para mantener el producto estable se
aconseja instalar siempre el asiento de
paseo.
• Si por algún motivo se utiliza Duette
SW con un solo ocupante, se aconseja
enganchar de todas formas el asiento
de paseo y asegurarse de que esté bien
enganchado.
22• Las Þguras A y B muestran cómo
enganchar los productos.
LIMPIEZA & MANTENIMIENTO
Su producto necesita un mínimo
mantenimiento. Las operaciones delimpieza y
mantenimiento tiene que ser efectuadas sólo
por adultos.
• Se aconseja mantener limpias las partes en
movimiento y si hiciera falta, lubricarlas con
aceite ligero.
• Secar las partes de metal del producto para
evitar que se oxiden.
• Limpiar periódicamente las partes de
plástico con un paño húmedo, no usar
disolventes ni otros productos parecidos.
• Mantener limpias las ruedas quitando polvo
y arena.
• Proteger el producto contra los agentes
atmosféricos, agua, lluvia o nieve; la
exposición continua y prolongada al sol
puede causar cambios de color en muchos
materiales.
• Conservar el producto en un sitio seco.
SEGURIDAD
CUIDADO
• NO DEJAR NUNCA VUESTRO NIÑO
SIN CUSTODIA.
• PUEDE SER PERIGROSO UTILIZAR
ACCESSORIOS QUE NON HAYAN
SIDO APROBADOS POR EL
FABRICANTE.
• EVITAR INTRODUCIR LOS DEDOS EN
LOS MECANISMOS.
• LAS OPERACIONES DE MONTAJE
DEBEN SER REALIZADAS
ÚNICAMENTE POR PÉRSONAL
ADULTAS.
• NO UTILIZAR EL PRODUCTO SI
PRESENTA DESPERFECTOS Y/O
PIEZAR FALTANTES.
• CUANDO SE ESTÁ PARADOS PONER
SIEMPRE LOS FRENOS.
• NO UTILIZAR EL PRODUCTO CERCA
DE ESCALERAS O ESCALONES.
• COMPROBAR QUE LOS ASIENTOS
ESTÉN BIEN ENGANCHADOS AL
COCHECITO.
NORMAS DES SEGURIDAD
Abrir y cerrar con cuidado, evitando
el introducir los dedos dentro el
mecanismo.
Los bultos y/o accessorios pueden
desestabilizar el producto.
Recomendamos no cargarla con màs
de 5 kg - 11.0 lbs de peso.
Presten atención al riesgo que
representa el fuego y otras
importantes fuentes de calor como
son los radiadores eléctricos, estufas
a gas ect., en las proximidades del
producto.
Asegurarse siempre que los asientos
estén bien enganchados en los dos
lados, apretando con las dos manos
en el producto.
FR•FRANÇAIS
• AVERTISSEMENT: lire attentivement les
instructions avant dʼutiliser le produit et les
conserver pour toute référence ultérieure.
• Pour des raisons techniques et commerciales,
PEG PEREGO pourra apporter à tout moment
des modifications aux modèles décrits dans ce
manuel.
SERVICE DʼASSISTANCE
En cas de perte ou dommage fortuit de pièces
du modèle, utilisez exclusivement les pièces
de rechange originales Peg Perego. Pour
les éventuelles réparations, substitutions,
informations sur les produits, la vente de
pièces de rechange originales et dʼaccessoires,
contactez le Service dʼassistance Peg-Perego:
CANADA:
tel.: 905.839.3371
fax: 905.839.9542
Call us toll free: 1.800.661.5050
www.pegperego.com
NOTICE DʼEMPLOI
MONTAGE ROUES
1• Enlever les quatre caches de protection
(deux ronds et deux carrés) de la
poussette encore fermée, comme sur la
Þgure.
2• Lorsque la poussette est fermée, monter
les roues avant en appuyant sur le petit
levier de Þxation (Þgure A) et en insérant
le moyeu sur lʼessieu (Þgure B). Contrôler
que la roue est correctement accrochée
en la tirant dans la direction opposée.
3• Reproduire sur les roues arrière
lʼopération effectuée sur les roues avant
(séquence A et B).
• VériÞer que lʼengrenage frein est
correctement inséré.
FREIN
4• Pour bloquer la poussette, abaisser du
pied la barre de frein située sur les roues
arrière, comme indiqué sur la Þgure.
OUVERTURE
• Actionner le frein de la poussette tandis
quʼelle est encore fermée.
5• Détacher la languette, comme indiqué sur
la Þgure.
6• Relever le guidon dans le sens indiqué
par la ßèche.
7• Appuyer sur le guidon pour le bloquer
jusquʼà entendre un déclic.
8• Sʼassurer que lʼouverture a été effectuée
correctement en se reportant à
lʼillustration.
PANIER
9• Le panier doit être installé à la base de la
poussette, comme indiqué sur la Þgure.
10• Le panier doit être accroché à six points
spéciÞques. A lʼavant et à lʼarrière se
trouvent quatre boutons, comme sur
les Þgures A et B. Attacher ensuite les
deux rubans au montant de la poussette,
comme indiqué sur la Þgure C.
VOLANT
11• Le volant peut adopter quatre positions
différentes aÞn de garantir une bonne
prise en main en toutes circonstances.
Pour changer de position, appuyer sur le
bouton indiqué sur la Þgure.
ROUES PIVOTANTES
12• Grâce au volant pratique, il est possible
de faire pivoter les roues avant. Pour
faire pivoter les roues avant, déplacer la
languette située sur le volant vers la droite,
comme indiqué sur la Þgure A. Pour rendre
les roues Þxes, déplacer la languette vers
la gauche, comme indiqué sur la Þgure B.
POIGNEES LATERALES
13• Il est possible de soulever la poussette
entièrement montée par les poignées
latérales et le guidon arrière, comme
indiqué sur la Þgure. La poussette doit
être soulevée par deux personnes.
14• La Þgure montre comment soulever
correctement la poussette.
POUR ENLEVER LES ROUES
15• Pour enlever les roues, appuyer sur les
boutons situés au centre de la roue,
comme indiqué sur la Þgure, et, dans le
même temps, tirer la roue vers soi.
FERMETURE
• Actionner le frein et décrocher les sièges.
16• Pour replier la poussette, soulever le
levier situé sur le guidon, comme indiqué
sur la Þgure. En déplaçant le guidon
légèrement vers lʼavant, il sera alors
possible de le démonter.
17• Appuyer du pied gauche sur le levier de
sécurité, comme indiqué sur la Þgure,
pour débloquer le guidon.
18• Replier le guidon comme indiqué sur la
Þgure.
19• Replier la poussette en accrochant la
languette de fermeture au crochet du
guidon.
GANCIOMATIC SYSTEM
Grâce au système Ganciomatic du châssis
Duette SW, il est possible de choisir quel
produit accrocher en fonction de ses besoins:
landau, siège auto ou siège amovible. Suivre
les indications relatives aux combinaisons de
produits ci-après.
DUETTE + 2 SIEGES AMOVIBLES
CONSEILS DʼUTILISATION :
• Pour que le produit reste stable, il est
recommandé de toujours installer les
deux sièges amovibles.
• Si, pour quelque raison que ce
soit, Duette SW est utilisé avec un
seul occupant, il est recommandé
dʼaccrocher tout de même les deux
sièges amovibles et de sʼassurer quʼils
sont bien accrochés.
20• Pour toute information relative au
montage et au démontage du produit
du chariot, consulter le manuel du siège
auto.
Les Þgures A, B, C, D, montrent les
différentes possibiltés de montage
des sièges auto. La Þgure D montre
la position « lit », que lʼon atteint en
abaissant le dossier et en relevant les
pédales repose-pieds, comme sur la
Þgure.
DUETTE + 2 SIEGES AUTO PRIMO
VIAGGIO
21• La Þgure A montre comment accrocher le
produit (tourné vers maman).
DUETTE + 1 SIEGE AUTO PRIMO
VIAGGIO ET 1 SIEGE AMOVIBLE
CONSEILS DʼUTILISATION :
• Pour que le produit reste stable, il est
recommandé de toujours installer le
siège amovible.
• Si, pour quelque raison que ce
soit, Duette SW est utilisé avec un
seul occupant, il est recommandé
dʼaccrocher tout de même le siège
amovible et de sʼassurer quʼil soit bien
accroché.
22• Les Þgures A et B montrent comment
accrocher les produits.
NETTOYAGE ET ENTRETIEN
Votre produit nécessite un minimum
dʼentretien. Les opérations de nettoyage
et dʼentretien doivent être effectuées
uniquement par des adultes.
• Il est recommandé de maintenir toutes les
parties mobiles propres et, au besoin, de
les lubriÞer avec une huile légère.
• Essuyer les parties métalliques du produit
pour prévenir la formation de rouille.
• Nettoyer régulièrement les parties en
plastique avec un chiffon humide, ne pas
utiliser de solvants ou dʼautres produits du
même type.
• Éliminer les dépôts de poussière et de sable
des roues.
• Protéger le produit contre les agents
atmosphériques, lʼeau, la pluie ou la neige ;
lʼexposition continue et prolongée au soleil
pourrait altérer les couleurs de nombreux
matériaux.
• Conserver le produit dans un endroit sec.
SECURITE
AVERTISSEMENT:
• NE JAMAIS LAISSER LʼENFANT SANS
SURVEILLANCE.
• LʼUTILISATION DʼACCESSOIRES
NON APPROUVES PAR LE
CONSTRUCTEUR POURRAIT ETRE
DANGEREUSE.
• NE PAS METTRE LES DOIGTS DANS
LES MECANISMES.
• LES OPERATIONS DE MONTAGE ET
DE DEMONTAGE DOIVENT ETRE
EFFECTUEES PAR DES ADULTES.
• NE PAS UTILISER LE PRODUIT SʼIL
EST ENDOMMAGE OU SI DES PIECES
SONT MANQUANTES.
• A LʼARRET, TOUJOURS ENCLENCHER
LE FREIN.
• NE PAS UTILISER LE PRODUIT À
PROXIMITÉ DʼESCALIERS OU DE
MARCHES.
• VERIFIER QUE LES SIEGES SONT BIEN
ATTACHES.
NORMES DE SECURITE
Des paquets et/ou des accessoires
peuvent rendre instables le produit.
Nous recommandons de ne pas
mettre dans le panier une charge de
plus de 5 kg.
ATTENTION: veillez à ne pas mettre
cette poussette à proximité dʼune
source de chaleur telle quʼun
convecteur électrique, chauffage, etc.
VériÞez systématiquement que les
sièges soient bien attachés des deux
côtés, en appuyant avec les deux
mains sur le produit.
Duette SW
PEG PEREGO S.p.A.
VIA DE GASPERI 50 20043 ARCORE MI ITALIA
tel. 0039•039•60881 fax 0039•039•615869-616454
Servizio Post Vendita - After Sale:
tel. 0039•039•6088213 fax: 0039•039•3309992
PEG PEREGO U.S.A. Inc.
3625 INDEPENDENCE DRIVE FORT WAYNE INDIANA 46808
phone 260•482•8191 fax 260•484•2940
Call us toll free 1•800•671•1701
PEG PEREGO CANADA Inc.
585 GRANITE COURT PICKERING ONTARIO CANADA L1W3K1
phone 905•839•3371 fax 905•839•9542
Call us toll free 1•800•661•5050
www.pegperego.com
02-02-06