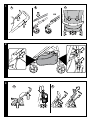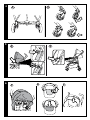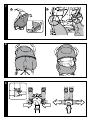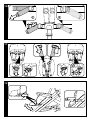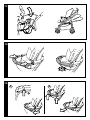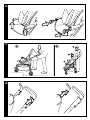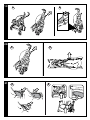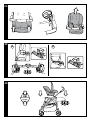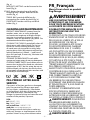
1
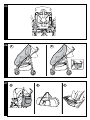
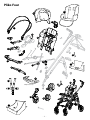
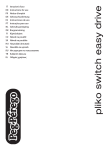
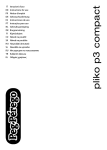
ENInstructions for use
FR Notice d’emploi
pliko four
CANADA
1
B
A
C
OK
2
B
A
B
A
3
A
C
C
B
2
1
4
B
A
1
2
5
6
A
C
B
D
E
7
A
B
8
9
A
D
B
D
B
C
10
B
A
11
C
D
F
A
B
E
12
2
1
13
B
A
14
15
A
B
16
2
1
1
2
17
B
A
2
3
1
18
2
1
19
A
B
4
3
20
21
A
B
A
B
1
2
4
5
3
6
22
23
A
B
2
1
2
1
24
GM
Ganciomatic
System
25
26
27
A
A
B
B
C
Pliko Four
22
21
3
1
6
2
23
4
5
7
19
8
20
11
10
9
24
12
16
Only Accessory
17
14
15
13
- 11 -
18
EN_English
Pliko Four
Thank you for choosing a
Peg-Pérego product.
1) SAPI6832NGL
2) ARPI0441NPEG
3) SAPI7087N
4dx) SPST7036DGR
4sx) SPST7036SGR
5dx) SPST7007DNPEG
5sx) SPST7007SNPEG
6dx) SPST7002XDGRS
6sx) SPST7002XSGRS
7) SPST6991GR
8) SAPI7038NPEG
9) SAPI6994JL31NGR
10dx) ASPI0116DNGR
10sx) ASPI0116SNGR
11dx) ASPI0127DGL
11sx) ASPI0127SGL
WARNING
12) MUCI5P22N
13) IRSHPF00NY01RE53M
14dx) SAPI6812DNGR
14sx) SAPI6812SNGR
15) SAPI6810JGRN
16) SPST6813N
17) SAPI6811JGRN
18) ITP3FOCANL65
19) SOFF0302L31
20) RSEP3N---NL01
21) BCAPLK*
22) BSAPLK*
23dx) SPST7048DN
23sx) SPST7048SN
24) IKTR0013N
EN• Spare parts available in different colours to
be specified when ordering.
FR• Pièces de rechange disponibles en plusieurs
couleurs à spécifier dans la demande.
- 12 -
_CAREFULLY READ INSTRUCTIONS
AND KEEP FOR FUTURE USE.
_THE CHILD’S SAFETY COULD BE PUT
AT RISK IF THE INSTRUCTIONS ARE
NOT FOLLOWED.
_THIS PRODUCT IS DESIGNED FOR
CHILDREN WHOSE MAXIMUM
WEIGHT IS 45 POUNDS (20 KG) AND
WHOSE MAXIMUM HEIGHT IS 43
INCHES (110 CM). THIS SHOPPER
BASKET IS DESIGNED TO CARRY A
MAXIMUM WEIGHT OF 11 POUNDS
(5 KG). ANY POACH OR POCKET
PROVIDED WITH THIS UNIT IS
DESIGNED TO CARRY A MAXIMUM
WEIGHT OF 0.44 POUNDS (0.2 KG).
_THIS ITEM WAS DESIGNED FOR
USE IN COMBINATION WITH 1 PEGPÉREGO GANCIOMATIC “PRIMO
VIAGGIO” CAR SEAT (GROUP 0+).
_BEFORE USE CHECK THAT THE “PRIMO
VIAGGIO” CAR SEAT (GROUP 0+) IS
CORRECTLY FIXED TO THE ITEM.
_DO NOT PUT HOT DRINKS IN
THE DRINK-HOLDER, NOR ITEMS
WEIGHING MORE THAN 0,5 KG (1 LBS).
_FAILURE TO FOLLOW
MANUFACTURER’S SPECIFICATIONS
OR USE OF ACCESSORIES OTHER
THAN THOSE APPROVED BY THE
MANUFACTURER MAY CAUSE THE
UNIT TO BECOME UNSTABLE.
_ WARNING: AVOID SERIOUS
INJURY FROM FALLING OR SLIDING
OUT. ALWAYS USE COMPLETE 5
POINT SEAT BELT.
_ WARNING: NEVER LEAVE YOUR
CHILD UNATTENDED.
_ALWAYS USE ALL THE BRAKES
WHENEVER PARKED.
_TO AVOID SERIOUS INJURY, WHEN
MAKING ADJUSTMENTS ENSURE
THE CHILD’S BODY IS CLEAR OF ALL
MOVING PARTS.
_ALL OPERATING AND ASSEMBLY
PROCEDURES SHOULD BE
PERFORMED BY AN ADULT.
_DO NOT LIFT THE STROLLER BY
GRIPPING THE FRONT BAR. THE
FRONT BAR IS NOT DESIGNED TO
WITH STAND LOADS.
_ENSURE THAT THE STROLLER IS
OPENED CORRECTLY AND LOCKED IN
POSITION OF USE.
_CHECK TO MAKE SURE THAT THE
CAR SEAT OR THE BABY CARRIAGE
IS CORRECTLY FASTENED TO THE
STROLLER (WHERE APPLICABLE).
_DO NOT DRIVE THIS PRODUCT
AROUND STAIRS OR STEPS; CARE
MUST BE TAKEN IF UNIT IS USED ON
STAIRS OR ESCALATORS.
_DO NOT USE THE PRODUCT IF IT HAS
BROKEN OR MISSING PARTS.
_DO NOT USE NEAR FIRE OR EXPOSED
FLAME.
_ WARNING: CHILD MAY SLIP INTO
LEG OPENINGS AND STRANGLE,
NEVER USE IN RECLINE CARRIAGE
POSITION UNLESS FOOTREST
ENCLOSURE IS FULLY INSTALLED/
IMPLEMENTED (SEE MANUAL
INSTRUCTIONS FOR CORRECT USE).
_ WARNING: DO NOT ADD A
MATTRESS PAD.
NOTICE
THIS ARTICLE MEETS OR EXCEEDS ALL
REQUIREMENTS COVERED IN ASTM F833
STANDARD AND LATEST REVISIONS.
COMPONENTS OF THE ITEM
Check the contents of the packaging and if
you have any complaints please contact the
Assistance Service.
_ Pliko Four: a basket, 2 swiveling or locking front
wheels, 2 rear wheels, cup holder, front bar,
hood.
INSTRUCTIONS FOR USE
1• OPENING: pull the two levers on the handlebars
upwards (Fig. a), lift the chassis and it will
open automatically. To make sure that the
stroller is correctly open, check the two side
hooks (Fig. b).
- 13 -
If the straps are not fasten correctly, press
onto the seat (fig_c) until it clicks into place.
2• BASKET: to mount the basket, slip the loops
over the front hooks A and rear hooks B and
C. The figure shows the attached basket.
3• CUP HOLDER :It can be applied on the 4
knobs on the chassis. Two are on the left or
right side of the handle and two on the sides
of the pushchair’s chassis, at the height of the
bumper, on the right or left . To apply the cup
holder, attach it and press until it clicks into
place (Fig. a)
ADJUSTING THE HANDLEBARS: The height
of the 3 handlebars can be adjusted to two
positions. For the higher position, press the
button while pulling the handlebars upwards.
To lower it, do the opposite (Fig.b).
4• BRAKE: to set the brakes on the stroller, lower
the levers on the rear wheels with your foot
(Fig.a). To release the brakes, lift the lever.
Always set the brakes when the stroller is
not moving.
SWIVEL WHEELS: to swivel the front wheels
lower the levers as shown in arrow 1 (Fig.b).
WHEELS IN STATIONARY POSITION: To
make them stationary, push the lever in the
opposite direction, as indicated by arrow 2.
5• HOOD: to mount the hood, fasten the
attachments which are situated on the
sides of the hood onto those on the chassis,
pushing outwards until the hood clicks into
place (Fig.a); fasten it onto the inside of the
armrest (Fig.b),
6 •and onto the backrest of the stroller (Fig.c).
The hood has a window enabling you to
observe your child, a large and practical
pocket (Fig.d) and a cord which games can
be hung on (Fig.e).
To remove the hood: unhook the hood’s
side attachments from the chassis by pulling
inwards, unbutton it from the inside of the
armrest and from the backrest of the stroller.
7 •You can detach the back part of the fabric by
unzipping it and use the hood also as a sun
canopy (Fig.a). To reattach the back part of the
fabric, close the zipper (Fig.b).
8 •By lowering the stroller backrest, the rear
hood extends and through the double zipper
a window can be created to allow more air to
circulate and watch the child when sleeping.
9 •5-POINT SAFETY HARNESS: to fasten, insert
the two buckles of the waist strap (with
attached shoulder straps, arrow a) into the leg
divider strap until they click into place (arrow
b). To unfasten them, press the button which
is situated in the centre of the fastener (arrow
c) and pull the waist strap outwards (arrow d).
10•To tighten the waist strap, pull on both sides in
the direction of the arrow (Fig.a). To loosen it do
the opposite. The waist strap can be tightened as
far as the safety lock (Fig_b).
11•To adjust the height of the safety harnesses, release
the two buckles on the rear of the backrest.
Pull the shoulder straps towards you (arrow a)
until the buckles are released and insert them
in the backrest loops (arrow b). Remove the
shoulder straps from the sack (arrow c) and
insert them in the most appropriate buckle
(arrow d), then reattach the two buckles
behind the backrest (arrow e). The buckles are
securely attached when a click is heard (fig f).
12•ADJUSTING THE FOOTREST: the footrest can be
adjusted to 2 positions. To lower the footrest,
pull the two side levers downwards while
lowering the footrest. To lift the footrest, pull it
upwards until it clicks into place.
13•ADJUSTING THE BACKREST: the backrest
reclines to 4 different positions. To lower the
backrest, lift the handle while lowering the
backrest, locking it in the desired position. To
raise it, pull the backrest upwards.
14•FRONT BAR: to fasten the front bar, slip both
ends of the front bar into the armrests until it
clicks into place.
15•The front bar can be opened to one side only to
allow the child to get in and out of the stroller
easier when he or she is older. To open the front
bar, press the button under the armrest while
pulling out the front bar (Fig.a). To remove
the front bar, press the two buttons under the
armrests while pulling out the front bar (Fig.b).
16•When removing the front bumper, insert the
plugs provided to close the armrests of the
chassis.
17•REAR LEDGE: the rear ledge helps the mother
overcome small bumps and can also be used
to carry a second child (fig_a).
LOADING SEQUENCE: to use the Pliko Four
with two children (fig_b), first set the brakes
on the stroller, then place the smaller child
in the seat and fasten the safety harness (1).
Hold the handlebars (2) and have the second
child stand on the ledge (3).
• Never leave your children unattended.
• Do not allow a child to stand on the rear
ledge when the stroller is empty.
18•FOLDING UP: before folding up Pliko Four,
remove the Navetta XL or the PrimoViaggio
car seat. The stroller can be folded up using one
hand only: pull first one lever upwards and then
the other, until they click.
19•Hold the central handlebar and pull it
upwards until the stroller folds up (fig_a).
Check the correct closure of the chassis from
- 14 -
the safety hook. When folded, the chassis will
stand upright (fig_b).
20•CARRYING: Pliko Four can be conveniently
carried by the central handle (with the front
wheels set on stationary) (fig.a). It can also be
carried by the side handle (fig_b).
21•REMOVABLE LINING: To remove the lining from
the stroller: unhook the sack attachments from
the armrests in the order indicated (fig_a);
unfasten the sack button at the sides; remove
the sack from the footrest; slide the leg divider
part of the strap from under the seat (fig_b);
22•unfasten the sack buttons from the seat;
unscrew the strap (only on one side), by
keeping your finger under the nut; slide it
downwards
GANCIOMATIC SYSTEM
The swift, practical system that allows you to
fasten car seat to stroller (Primo Viaggio SIP
30.30 car seat sold separately).
23• GANCIOMATIC HOOKS FOR THE STROLLER:
to raise the Ganciomatic connectors on
the chassis, pull the lever outwards and at
the same time swivel the two connectors
upwards until they click (fig_a).
To lower the stroller Ganciomatic hooks, pull
the lever outwards while turning the hooks
downwards (fig_b).
24• Pliko Four + Primo Viaggio SIP 30•30:
(capacity: 5-30 pounds and up to 30 inches))
to fasten the car seat to the stroller proceed
as follows:
- set the brakes on the stroller;
- lower the stroller backrest completely;
- raise the stroller Ganciomatic hooks;
- place the car seat so that it faces the mother
and press it down until it clicks into place;
- It is important not to remove the front bar from
the stroller when fastening the car seat (for
fastening the front bar, please see point 20);
- To remove the car seat from the stroller,
please refer to its instructions manual.
SERIAL NUMBERS
25•Behind the Pliko Four backrest information
relating to product name, date of
manufacture and serial number of the
product are provided. This information is
required for any complaints.
ACCESSORIES
26•RAIN CANOPY: can be fastened to the hood
FR_Français
(fig_a).
MOSQUITO NETTING: can be fastened to the
hood (fig_b).
27•BAG: diaper-changing bag with pad for
changing baby’s diaper. Attaches to the
stroller (fig_a).
TRAVEL BAG: practical duffle bag for
transporting the stroller by plane (fig_b).
FRONT BAR: Front bar with tray and drink
holder (fig_c).
Merci d’avoir choisi un produit
Peg-Pérego.
AVERTISSEMENT
CLEANING AND MAINTENANCE
PRODUCT MAINTENANCE: protect from the
weather: water, rain, or snow; prolonged
and continuous exposure to bright sunlight
may give rise to colour changes of various
materials; store this product in a dry place. The
maintenance have to be regularly.
CLEANING THE CHASSIS: periodically clean all
plastic parts with a damp cloth. Do not use
solvent or similar cleaning products; keep
all metal parts dry to prevent rusting; keep
moving parts clean (adjustment mechanisms,
locking mechanisms, wheels, ...) and free of
dust and sand and, if necessary, lubricate with
light machine oil.
CLEANING THE RAIN CANOPY: wash with a
sponge and soapy water; do not use detergents.
CLEANING FABRIC PARTS: brush fabric parts to
remove dust and wash by hand at a maximum
temperature of 30°C; do not wring; do not use
chlorine bleach, do not iron; do not dry clean;
do not apply solvent-based stain removers and
do not dry in a tumble dryer.
PEG-PÉREGO AFTER-SALES
SERVICE
If any parts of the item get lost or damaged,
only use genuine Peg Pérego spare parts.
For any repairs, replacements, information
on the products and sales of genuine spare
parts and accessories, contact the Peg
Pérego Assistance Service and state the serial
number of the product, if present.
USA:
tel. 800.671.1701
fax: 260.471.6332
call us toll free: 1.800.671.1701
web site: www.pegperego.com
Peg-Perego reserves the right to make any
necessary changes or improvements to the
products shown at any time without notice.
- 15 -
_LIRE CES INSTRUCTIONS AVEC
ATTENTION ET LES CONSERVER
POUR TOUTE RÉFÉRENCE FUTURE.
_LA SÉCURITÉ DE VOTRE ENFANT
POURRAIT ÊTRE MENACÉE SI CES
INSTRUCTIONS NE SONT PAS
RESPECTÉES.
_CE PRODUIT A ETE CONÇU POUR DES
ENFANTS DONT LE POIDS N’EXCEDE
PAS 20 KG (45 LIVRES) ET LA TAILLE
NE DEPASSE PAS 110 CM (43
POUCES). LE PANIER A ETE CONÇU
POUR SUPPORTER DES CHARGES
MAXIMALES DE 5 KG (11 LIVRES).
LES POCHETTES OU SACS FOURNIS
AVEC CE PRODUIT ONT ETE CONÇUS
POUR SUPPORTER DES CHARGES
MAXIMALES DE 0,2 KG (0,44 LIVRES).
_CET ARTICLE A ÉTÉ CONÇU POUR
ÊTRE UTILISÉ AVEC UN SIÈGE-AUTO
“PRIMO VIAGGIO” GANCIOMATIC DE
PEG-PÉREGO (GROUPE 0+).
_AVANT TOUTE UTILISATION, VEUILLEZ
CONTRÔLER QUE LE SIÈGE-AUTO
“PRIMO VIAGGIO” (GROUPE 0+) EST
FIXÉ CORRECTEMENT À L’ARTICLE.
_IL EST DÉCONSEILLÉ DE METTRE
UN BIBERON OU UNE BOUTEILLE
CONTENANT UNE BOISSON CHAUDE
ET PESANT PLUS D' 0,5 KG DANS LE
PORTE-BIBERON.
_LE DEFAUT D’OBSERVATION DES
SPECIFICATIONS DU FABRICANT
OU L’EMPLOI D’ACCESSOIRES NON
APPROUVES PAR LE FABRICANT PEUT
AFFECTER LA STABILITE DU PRODUIT.
_ AVERTISSEMENT: POUR ÉVITER
DE GRAVES BLESSURES SUITE À
LA CHUTE OU AU GLISSEMENT DE
L’ENFANT DU PRODUIT, TOUJOURS
UTILISER UNE CEINTURE DE SÉCURITÉ
À 5 POINTS COMPLÈTE.
_ AVERTISSEMENT: NE
REQUISES PAR LA NORME ASTM F833
ET RÉVISIONS RÉCENTES OU SATISFAIT
À DES CONDITIONS PLUS SÉVÈRES.
JAMAIS LAISSER L’ENFANT SANS
SURVEILLANCE.
_TOUJOURS ACTIONNER LES FREINS
LORSQUE LE PRODUIT EST A L’ARRET.
_POUR ÉVITER DE GRAVES BLESSURES
LORS DU RÉGLAGE DU PRODUIT,
S’ASSURER QUE LES MEMBRES DE
L’ENFANT NE SONT PAS EN CONTACT
AVEC DES PIÈCES EN MOUVEMENT.
_L’ENSEMBLE DES PROCÉDURES DE
MONTAGE ET D’UTILISATION DOIT
ÊTRE EFFECTUÉ PAR UN ADULTE
_NE PAS SOULEVER LA POUSSETTE
PAR LA BARRE FRONTALE. ELLE N’A
PAS ÉTÉ CONÇUE POUR SUPPORTER
DES CHARGES.
_S’ASSURER QUE LA POUSSETTE
EST CORRECTEMENT OUVERTE
EST BLOQUÉE DANS LA POSITION
CONVENANT À SON UTILISATION.
_CONTRÔLER QUE LE SIÈGE ENFANT
OU LE LANDAU EST CORRECTEMENT
ACCROCHÉ À LA POUSSETTE.
_NE PAS UTILISER CE PRODUIT
À PROXIMITÉ DE MARCHES OU
D’ESCALIERS; PRÊTER ATTENTION
À LA MANIPULATION DU PRODUIT
DANS DES ESCALIERS OU DES
ESCALATORS.
_NE PAS UTILISER LE PRODUIT SI DES
PIÈCES SONT MANQUANTES OU
CASSÉES.
_NE PAS UTILISER PRÈS DU FEU OU
D’UNE FLAMME DIRECTE.
_ AVERTISSEMENT: L’ENFANT
POURRAIT GLISSER ENTRE
LES PASSAGES DE JAMBES ET
S’ÉTRANGLER. NE JAMAIS UTILISER
EN POSITION LANDAU INCLINÉ SI
LA HOUSSE DU REPOSE-PIEDS N’EST
PAS COMPLÈTEMENT INSTALLÉE/
EN PLACE (VOIR LE MANUEL
D’INSTRUCTIONS POUR UNE
UTILISATION CORRECTE).
_ AVERTISSEMENT: NE PAS
RAJOUTER DE MATELAS.
COMPOSANTS DE L’ARTICLE
Vérifier le contenu de l’emballage. Pour toute
réclamation, veuillez contacter le Service
d’assistance.
_ Pliko Four: un panier, 2 roues avant pivotantes
ou bloquantes, 2 roues arrière, porte-gobelet,
barre frontale, capot.
INSTRUCTIONS D’UTILISATION
REMARQUE
CET ARTICLE REMPLIT LES CONDITIONS
- 16 -
1• OUVERTURE : pour ouvrir le châssis, il faut
tirer vers le haut les deux leviers sur les
poignées (Fig.a); soulever, en même temps, le
châssis qui s’ouvrira automatiquement. Pour
vérifier que la poussette est correctement
ouverte, contrôler les deux crochets latéraux
(Fig.b). Si les crochets ne sont pas fixés
correctement, faire pression sur l’assise (fig_c)
jusqu’au déclic d’accrochage.
2• PANIER : Pour monter le panier, enfiler les
boutonnières aux crochets avant A et aux
crochets arrière B et C. La figure montre le
panier fixé.
3• PORTE-BOISSONS : il peut être accroché
sur les 4 champignons déjà présents sur le
châssis. Deux sur le côté droit ou gauche de
la poignée, deux, sur les côtés du châssis de
la poussette, au niveau de la main courante,
deux sur le côté droit ou gauche. Pour
accrocher le porte-boissons, l’insérer jusqu’au
déclic (fig. a)
RÉGLAGE DES POIGNÉES : Le poignées sont
réglables en hauteur en 3 positions. Pour la
position haute, appuyer sur le bouton et en
même temps lever la poignée vers le haut.
Pour l’abaisser, agir dans le sens inverse
(Fig.b).
4• FREIN : Pour freiner la poussette, baisser avec
le pied les leviers situées sur les roues arrière
(Fig.a). Pour débloquer les freins, agir dans le
sens inverse. A l’arrêt, utiliser toujours les
freins.
ROUES PIVOTANTES : Pour rendre les roues
avant pivotantes (Fig.b), il faut baisser le
levier comme la flèche 1.
ROUES FIXES : Pour les rendre fixes, agir sur le
levier dans le sens contraire, comme l’indique
la flèche 2 .
5• CAPOTE : pour la monter, accrocher les
fixations latérales de la capote dans les sites
du châssis vers l'extérieur, jusqu’au déclic
(Fig.a) ; et la boutonner à l’intérieur de
l’accoudoir (Fig.b),
6• et au dossier de la poussette (Fig.c). La
capote est dotée d’une fenêtre pour observer
l’enfant, d’une grande poche pratique (Fig.d)
et d’un lacet qui permet d’accrocher des
jouets (Fig.e).
Pour enlever la capote : décrocher les
fixations latérales de la capote du châssis,
en tirant vers l’intérieur, la déboutonner de
l’intérieur de l’accoudoir et du dossier de la
poussette.
7•En ouvrant la fermeture éclair, il est possible
de détacher la partie arrière de tissu, en
utilisant la capote comme pare-soleil (Fig.a).
Pour raccrocher la partie arrière du tissu,
fermer la fermeture éclair (Fig.b).
8•En baissant le dossier de la poussette, la capote
arrière s’allonge et, grâce à la fermeture éclair
avec double curseur, il est possible de créer
une fenêtre pour faire passer davantage d’air
et observer l’enfant quand il dort.
9•CEINTURE DE SÉCURITÉ À 5 POINTS : pour
l’accrocher, insérer les deux clips de la sangle
ventrale (avec les bretelles accrochées,
flèche_a) dans la sangle d’entrejambes
jusqu’au déclic (flèche_b). Pour le détacher,
appuyer sur le bouton situé au centre de la
bouche (flèche c) et tirer vers l’extérieur la
ceinture ventrale (flèche d).
10•Pour serrer la sangle ventrale, tirer, des deux
côtés, dans le sens de la flèche (Fig.a), pour
la desserrer procéder dans le sens inverse.
La sangle ventrale peut être serrée jusqu’à la
butée de sécurité (Fig.b).
11•Pour régler la hauteur des ceintures de
sécurité, il faut décrocher les deux clips à
l’arrière du dossier.
Tirer vers soi les bretelles (flèche_a) jusqu’à
décrocher les clips et les enfiler dans les
boutonnières du dossier (flèche b). Enlever les
bretelles de la housse (flèche c) et les enfiler
dans la boutonnière la plus adaptée (flèche
d), enfin accrocher de nouveau les deux clips
derrière le dossier (flèche e). L’accrochage
correct des clips est déterminé par le déclic
(fig.f).
12•RÉGLAGE DU REPOSE-PIEDS : Le repose-pieds
est réglable en 2 positions. Pour baisser le
repose-pieds, tirer les deux leviers latéraux
vers le bas et, en ême temps, le baisser. Pour
soulever le repose-pieds, le pousser vers le
haut jusqu’au déclic.
13•RÉGLAGE DU DOSSIER : Le dossier est
réglable en quatre positions. Pour baisser
le dossier, soulever la poignée et, en même
temps, baisser le dossier, en le bloquant
dans la position souhaitée. Pour le soulever,
pousser le dossier vers le haut.
14•MAIN COURANTE : pour fixer la main
- 17 -
courante, insérer ses deux extrémités dans les
accoudoirs jusqu’au déclic.
15•Il est possible d’ouvrir la main courante
seulement d’un côté pour faciliter l’entrée et
la sortie de l’enfant quand il est plus grand.
Pour ouvrir, appuyer sur le bouton situé
sous l’accoudoir et, en même temps, tirer la
main courante vers l’extérieur (Fig.a). Pour
enlever la main courante, appuyer sur les
deux boutons situés sous les accoudoirs et,
en même temps, tirer la main courante vers
l’extérieur (Fig.b).
16•Après avoir enlevé la barre frontale,
introduire les cachess fournis pour refermer
les accoudoirs du châssis.
17•MARCHEPIED ARRIÈRE : Le marchepied
arrière facilite maman pour franchir de petits
obstacles et il peut aussi transporter un
deuxième enfant (fig_a).
SÉQUENCE D’INSTALLATION D'ENFANTS: Pour
utiliser le Pliko Four avec deux enfants (fig_b),
il faut d’abord freiner la poussette, puis
positionner l’enfant plus petit dans le siège
et fixer la ceinture de sécurité (1). Prendre
les poignées (2) et faire monter le deuxième
enfant sur le marchepied (3).
• Ne laissez jamais vos enfants seuls.
• Ne permettez pas à un efant de monter sur
le marchepied arrière quand la poussette est
vide.
18•FERMETURE : Avant de fermer Pliko Four, il
faut décrocher la Navetta XL ou le siègeauto Primo Viaggio. On peut fermer la
poussette d’une seule main: Tirer vers le haut
d’abord un levier, puis l’autre jusqu’au déclic.
19•Prendre la poignée centrale et la tirer vers
le haut jusqu’à la fermeture (fig_a). Vérifier
la fermeture correcte du châssis grâce au
crochet de sécurité. Le châssis reste debout
tout seul (fig_b).
20•TRANSPORT : On peut facilement transporter
Pliko Four (avec les roues avant fixes) en le
tenant par la poignée centrale (fig_a). On
peut aussi le tenir par la poignée latérale,
(fig_b).
21•DÉHOUSSAGE : pour déhousser la poussette:
décrocher les fixations des accoudoirs dans
l’ordre indiqué (fig_a); Défaire le bouton de
la housse sur le côté ; extraire la housse du
repose-pied ; enlever la ceinture entre-jambe
de la ceinture depuis le dessous de l’assise
(fig_b);
22•décrocher les boutons de la housse, de
l’assise ; dévisser la ceinture (uniquement
d’un côté) en mettant le doigt sous l’écrou ;
l’extraire par le haut.
SYSTÈME GANCIOMATIC
au soleil pourrait entraîner un changement
de couleur de nombreux matériaux; ranger
cet article dans un lieu sec. Effectuer des
contrôles et des interventions d’entretien
sur les pièces principales à des intervalles
réguliers.
NETTOYAGE DU CHÂSSIS: nettoyer
régulièrement les pièces en plastique à l’aide
d’un linge humide; ne pas utiliser de solvants
ou autres produits similaires. Veiller à ce
que toutes les pièces métalliques restent
sèches pour prévenir la formation de rouille.
Maintenir le bon état de propreté de toutes
les pièces mobiles (mécanismes de réglage,
mécanismes de fixation, roues, etc.) en
enlevant poussière ou sable; graisser avec
une huile légère si nécessaire.
NETTOYAGE DE L’HABILLAGE PLUIE: utiliser
une éponge et de l’eau savonneuse; ne pas
utiliser de détergents.
NETTOYAGE DES ÉLÉMENTS EN TISSU:
brosser les éléments en tissu pour enlever
la poussière et laver à la main à une
température maximale de 30° ; ne pas tordre ;
ne pas utiliser d’eau de javel ; ne pas repasser
; ne pas laver à sec ; ne pas détacher à l’aide
de solvants; ne pas sécher dans un sèchelinge à tambour rotatif.
Grâce à Ganciomatic, le système Ganciomatic
exclusif Peg Perego, pratique et rapide, il
permet d’installer sur la poussette les produits
suivants:
23•FIXATIONS GANCIOMATIC DE LA POUSSETTE:
pour relever les fixations Ganciomatic du
châssis, pousser le bouton vers l’extérieur et
tourner les deux fixations vers le haut jusqu’au
déclic (fig_a).
Pour baisser les fixations Ganciomatic de la
poussette, tirer vers l’extérieur le levier et, en
même temps, tourner vers le bas les fixations
(fig_b).
24•Pliko Four + Primo Viaggio SIP 30.30:
(groupe 0+ poids enfant de 5 livres à 22 livres)
pour fixer le siège-auto à la poussette, il faut :
- freiner la poussette ;
- baisser complètement le dossier de la
poussette ;
- soulever les fixations Ganciomatic de la
poussette ;
- positionner le siège-auto vers maman et le
pousser vers le bas jusqu’au déclic ;
- Il est important de ne pas enlever la main
courante de la poussette quand on fixe
le siège-auto (pour la fixation de la main
courante, consulter le point 20);
- Pour décrocher le siège-auto de la poussette,
consulter son mode d’emploi.
SERVICE D’ASSISTANCE
PEG-PÉREGO
NUMÉROS DE SÉRIE
En cas de perte de pièces ou de rupture de
l'une d'elles, utiliser exclusivement des pièces
de rechange originales Peg-Pérego. Pour
toute réparation, remplacement, informations
sur les produits, vente de pièces détachées
d’origine et accessoires, contactez le service
après-vente Peg Pérego en indiquant, si
présent, le numéro de série du produit.
25•Pliko Four reporte, derrière le dossier,
des informations: Nom du produit, date
de production et numéro de série. Ces
informations sont indispensables en cas de
réclamation.
ACCESSOIRES
26HABILLAGE PLUIE : applicable à la capote (fig_a).
MOUSTIQUAIRE : applicable à la capote (fig_b).
27SAC : Sac avec un petit matelas pour langer
bébé, applicable à la poussette (fig_a).
SAC DE VOYAGE : Sac pratique pour le
transport en avion de la poussette (fig_b).
BARRE FRONTALE: barre frontale avec plateau
et porte-boissons (fig_c).
NETTOYAGE ET ENTRETIEN
ENTRETIEN DE L’ARTICLE: protéger l’article
des agents atmosphériques (eau, pluie ou
neige); une exposition continue et prolongée
- 18 -
CANADA:
tel.: 905.839.3371
fax: 905.839.9542
numéro sans frais: 1.800.661.5050
site internet: www.pegperego.com
Peg-Pérego se réserve le droit d’apporter à
tout moment des modifications aux modèles
décrits dans le présent ouvrage, pour des
raisons de nature technique ou commerciale.
- 19 -
PEG PEREGO U.S.A. Inc.
3625 INDEPENDENCE DRIVE FORT WAYNE INDIANA 46808
phone 260 482 8191 fax 260 484 2940
Call us toll free: 1 800 671 1701
Conforms to
ASTM F833
Safety Standards
PEG PEREGO CANADA Inc.
585 GRANITE COURT PICKERING ONTARIO CANADA L1W3K1
phone 905 839 3371 fax 905 839 9542
Call us toll free: 1 800 661 5050
www.pegperego.com
pliko four
PEG PEREGO S.p.A.
VIA DE GASPERI 50 20862 ARCORE MB ITALIA
tel. 0039 039 60881 fax 0039 039 615869/616454
Servizio Post Vendita - After Sale:
tel. 0039 039 6088213 fax: 0039 039 3309992
WARNING
AVOID SERIOUS INJURY FROM FALLING OR SLIDING OUT.
ALWAYS USE COMPLETE 5 POINT SEAT BELT.
AVERTISSEMENT
EVITER UNE BLESSURE SÉRIEUSE DUE À UNE CHUTE OU À UN GLISSEMENT.
TOUJOURS UTILISER LA CEINTURE DE SÉCURITÉ À 5 POINTS COMPLÈTE. All of the intellectual property rights for the contents of this instruction manual belong to PEG PEREGO S.p.A. and are
protected by the laws in force.
Tous les droits de propriété intellectuelle relatifs au contenu de ce manuel appartiennent à PEG PEREGO SpA et sont
protégés par la loi.
pliko four
FICA1101I147
06/10/2011