1
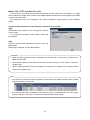
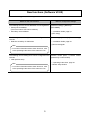
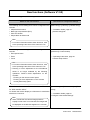
New functions (Software V2.10) Due to software upgrade, the following new functions have become available. Details on the new functions Reference pages The "Dual mode" that can record the same images and audio on two HDDs is added to the HDD operational mode. Installation Guide page 81 Refer to "■ About the HDD operational mode" (page 3) for further information. Important: This function supports only the models in which 2 HDDs can be installed. When using this function, disk size of two hard disk drives to be used shall be the same. After replacing one of the HDDs, it is impossible to copy data on the existing HDD to the replaced HDD using this software. (No recovery function is featured.) When the existing HDD (not replaced one) doesn’t exist, the recorded data of a certain period* after replacing the HDD cannot be played. * In case of overwriting in one month, up to two days. The alarm history relating to the i-VMD of the camera is added. Intruder detection: Camera alarm (Intruder detection) Loitering detection: Camera alarm (Loitering detection) Direction detection: Camera alarm (Direction detection) Scene change detection: Camera alarm (Scene change detection) Note: This function is available when “On” is selected for “Additional alarm area data” on the camera. For further information about this setting, refer to the operating instructions of the camera in use. 1 Operating Instructions page 38, page 62 Details on the new functions Reference pages The following camera setting items can be configured on the recorder. Transmission priority (Frame rate/Advanced VBR) Installation Guide page 48 Note: For further information about these functions, refer to the operating instructions of the camera in use. The release key number of the camera's extension software can be registered in the camera from this product now. Installation Guide By using the viewer software, the function that compensates and Operating Instructions converts fish-eye images captured by Panasonic's 360-degree network page 88 camera (hereinafter referred to as 360-degree camera) to "1-screen PTZ" or "4-screen PTZ" is now available.(Compensation function) Important: The compensation function is available only when the library file for compensation is downloaded from the URL below and installed on the PC in which the viewer software is installed. http://security.panasonic.com/pss/security/support/info.html When images that can be compensated are detected, the / / buttons will be displayed. Click one of them to change the compensation method. : Get back to fish-eye image. : Compensate and convert to "1-screen PTZ". : Compensate and convert to "4-screen PTZ". When displaying images that are compensated and converted to "1-screen PTZ" or "4-screen PTZ", it is possible to make a desired point to position as the center point of the image by clicking on the image. 2 page 58, page 82 Details on the new functions Reference pages A new parameter is added to the setting of "Duration" of "Live sequence" Installation Guide under "Live monitor". (The underlined parameter is newly added.) page 62 3s / 5s / 10s / 15s / 30s / Ext 3 ■About the HDD operational mode In this document, the conventional operational mode that records images from the cameras on a single HDD is referred as "Single mode" and the newly added operational mode that records images on two HDDs is referred as "Dual mode". The operational mode can be changed on the "HDD management" page (Page 80 in the Installation Guide) Change the HDD operational mode [Change the operation mode of HDD] Step1 Click the [Execute >] button next to "Change the operation mode of HDD". → The "Change the operation mode of HDD" window will be displayed. Step2 Select the desired HDD operational mode and click the [Start] button. When [OK] is displayed, click the [Back] button. Important: When the HDD operational mode is changed from "Single mode" to "Dual mode", all data on the HDDs will be erased. The available capacity of the HDDs will become half when running on "Dual mode" compared to "Single mode". When the HDD operational mode is changed from "Dual mode" to "Single mode", the state of HDDs will become "Playback only". Note: The "Dual mode" indication will be displayed in the title field of the HDD information when the HDD operational mode is "Dual mode". By executing "Add HDD" (Installation Guide page 81) with the replaced HDD, the "Dual mode" operation will start. At this point, all data on the replaced HDD will be erased. 4 New functions (Software V2.00) Due to software upgrade, the following new functions have become available. Details on the new functions Menu to configure the settings The following two NTP server addresses can be registered. Primary server address (The former name: NTP server address) Secondary server address [Advanced setup] > [Network] > [NTP/SNMP] The following camera setting items can be configured on the recorder. Detection sensitivity of VMD alarm [Basic setup] > [Camera] > [Camera setup] Note: → Installation Guide, page 70: [NTP setup] → Installation Guide, page 48: [Camera setup] tab For further information about these functions, refer to the operating instructions of the camera in use. The following camera setting items can be configured on the recorder. Initial position setup Camera control panel > Camera control [Advanced] > Camera setup → Operating Instructions, page 49: Camera setup window Note: For further information about these functions, refer to the operating instructions of the camera in use. 5 New functions (Software V1.50) Due to software upgrade, the following new functions have become available. Details on the new functions Menu/Panel to configure the settings The following camera setting items can be configured on the recorder. Adaptive black stretch Back light compensation (BLC) Auto slow shutter Simple black & white mode [Basic setup] > [Camera] > [Camera setup] → Installation Guide, page 48: [Camera setup] tab Note: For further information about these functions, refer to the operating instructions of the camera in use. The following camera setting items can be configured on the recorder. Extra optical zoom Zoom Focus Camera control panel > Camera control [Advanced] > Camera setup → Operating Instructions, page 49: Camera setup window Note: For further information about these functions, refer to the operating instructions of the camera in use. Zooming or focus adjustment for the WV-SW316 series is no longer available by the following operations. Perform these adjustments on the recorder. - Zooming on the camera control panel - Zooming or focus adjustment on the "Camera control [Advanced]" panel The main monitor action will be activated on a full screen for “Main monitor action”. On: Switch the monitor display to a full screen in association with alarm occurrence. [Basic setup] > [REC & event] > [Event setup] → Installation Guide, page 55: “Configure event-related settings” Note: When “Divide the live camera image positions equally in wide view” is not checked, the images will be displayed on the left-side segment of a 3-screen. av0912-2073 PGQQ1063XA