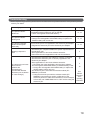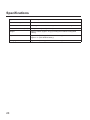
1
Model No. TH-65PB1U Operating Instructions Electronic Pen Operations Interactive Plasma Display English Before connecting, operating or adjusting this product, please read these instructions completely. Please keep this manual for future reference. Introduction Abbreviations Windows® refers to the Microsoft® Windows® operating system. Windows® XP refers to the Microsoft® Windows® XP operating system. Windows Vista® refers to the Microsoft® Windows Vista® operating system. Windows® 7 refers to the Microsoft® Windows® 7 operating system. DirectX® refers to the Microsoft® DirectX® application programming interface. Trademarks • Microsoft, Windows, Windows Vista, DirectX, Windows Media, and Internet Explorer are either registered trademarks or trademarks of Microsoft Corporation in the United States and/or other countries. • IBM is a trademark of International Business Machines Corporation in the United States, other countries, or both. • Intel and Pentium are trademarks of Intel Corporation in the U.S. and other countries. • Adobe, Reader and Flash are either registered trademarks or trademarks of Adobe Systems Incorporated in the United States and/or other countries. • All other trademarks identified herein are the property of their respective owners. Help of the Software Instructions for elite Panaboard software and elite Panaboard book (included) are provided in the help information accompanying the software. For details on accessing this information, see “Viewing the Help of the Software” (see page 17). 2 FCC and IC STATEMENT This equipment has been tested and found to comply with the limits for a Class B digital device, pursuant to Part 15 of the FCC Rules. These limits are designed to provide reasonable protection against harmful interference in a residential installation. This equipment generates, uses and can radiate radio frequency energy and, if not installed and used in accordance with the instructions, may cause harmful interference to radio communications. However, there is no guarantee that interference will not occur in a particular installation. If this equipment does cause harmful interference to radio or television reception, which can be determined by turning the equipment off and on, the user is encouraged to try to correct the interference by one or more of the following measures: • Reorient or relocate the receiving antenna. • Increase the separation between the equipment and receiver. • Connect the equipment into an outlet on a circuit different from that to which the receiver is connected. • Consult the Panasonic Service Center or an experienced radio/TV technician for help. FCC Caution: To assure continued compliance, follow the attached installation instructions and use only shielded interface cable when connecting to computer or peripheral devices. Any changes or modifications not expressly approved by Panasonic Corp. of North America could void the user’s authority to operate this device. Under Industry Canada regulations, this radio transmitter may only operate using an antenna of a type and maximum (or lesser) gain approved for the transmitter by Industry Canada. To reduce potential radio interference to other users, the antenna type and its gain should be so chosen that the equivalent isotropically radiated power (e.i.r.p.) is not more than that necessary for successful communication. FCC Declaration of Conformity Models: DKB-DP12, SSR-RFNANO Responsible Party: Panasonic Corporation of North America One Panasonic Way, Secaucus, NJ 07094 Contact Source: Panasonic System Communications Company of North America Panasonic North America 3 Panasonic Way 7D-6, Secaucus NJ 07094 Telephone:+1-855-772-8324 http://panasonic.com/business/flat-panel-displays/ This device complies with Part 15 of the FCC Rules and all applicable IC RSS standards. Operation is subject to the following two conditions: (1) This device may not cause harmful interference, and (2) this device must accept any interference received, including interference that may cause undesired operation. 3 System Requirements Computer CPU Operating System Interface IBM® PC/AT compatible with a DVD-ROM drive Intel® Pentium® 4 processor or later Windows(R) XP SP3 or later / Windows Vista(R) SP2 or later / Windows 7 (except for Starter and Home Basic versions) (Windows XP 64-bit edition is not supported.) USB 2.0 Note • For details about the system requirements, refer to “Read Me First” (see page 14) in the install menu of the included DVD-ROM. • Even when the system requirements are met, the Interactive Plasma Display response may be delayed or the electronic pen may malfunction if other applications, anti-virus software, etc. are active. 4 Table of Contents Table of Contents Safety Precautions....................................................................................6 Requests regarding handling...................................................................8 Accessories Supplied...............................................................................9 Names and Uses of the Parts.................................................................10 Preparation ..............................................................................................12 Operation .................................................................................................15 About software ........................................................................................17 Additional Information............................................................................18 Specifications ..........................................................................................20 5 Safety Precautions For Your Safety WARNING Operating Safeguards Electronic Pen Do not alter the unit or modify any parts. Alteration or modification can cause fire or electric shock. Do not use near medical equipment. (Do not bring into a surgery room, intensive care unit, critical care unit, etc.) Electromagnetic waves generated by this device can affect equipment, and can cause equipment to malfunction. Choking Hazard Keep the penpoint, electronic pen adapter and battery out of reach of children to prevent swallowing. Battery Use only the specified type of battery. Using the incorrect type of battery can result in overheating/ burning or leakage of battery acid. Make sure that the battery is installed with the correct polarity as indicated on the battery holder. Incorrectly installed batteries may burst or leak, resulting in injuries. Do not use the damaged batteries. Using damaged batteries may result in leaking. Do not short, heat, break or throw in a fire, as it may result in the battery leaking, generating heat, or bursting. When disposing of the battery, cover the battery contacts with insulation (ex. tape). Direct contact with other batteries may result in leaking, fire, or explosion. Do not solder the battery, as it may result in the battery leaking, generating heat, or bursting. Remove empty batteries immediately to avoid battery fluid leakage. Avoid contact of battery fluid with eyes, skin or clothing, as this may result in irritation or injury. In these cases, do not rub the affected area, and rinse thoroughly with clean water. 6 Do not use near automatic doors, smoke detectors and other automatically controlled equipment. Electromagnetic waves generated by this device can affect equipment, and can cause equipment to malfunction. Use at least 22 cm (9 in.) away from pacemakers. Electromagnetic waves generated by this device can affect the operation of pacemakers. CAUTION When the unit is not used over an extended period of time, take the batteries out of the unit. Otherwise, the batteries may leak. Do not use the leaked batteries. Precautions Other Information Any changes or modifications not expressly approved by the party responsible for compliance could void the user’s authority to operate this device. Usage Note About Using the Battery If a battery is used improperly, the battery may leak, causing corrosion of the unit, or it may burst. To prevent this, always follow the precaution given below. • If the electronic pen ceases to function because the battery has run out, remove it immediately and dispose of it according to local regulations. Leaving a drained battery in the electronic pen may result in leakage. A nickel metal hydride battery that is recyclable powers the product you have purchased. Please call 1-800-8-BATTERY for information on how to recycle this battery. Operating the electronic pen and the electronic pen adapter near electrical appliances may cause interference. Move away from the electrical appliances such as TVs, radios, cordless phone, or wireless devices. MEDICAL Consult the manufacturer of any personal medical devices, such as pacemakers, to determine if they are adequately shielded from external RF (radio frequency) energy. (The unit operates in the frequency range of 2.405 GHz to 2.480 GHz, and the power output level is 1 milliwatts.) Do not use the unit in health care facilities if any regulations posted in the area instruct you not to do so. Hospitals or health care facilities may be using equipment that could be sensitive to external RF (radio frequency) energy. No responsibility will be taken by our company with respect to consequences resulting from the use, damage or both of the equipment. 7 Requests regarding handling • Do not push down hard on the Pen tip. • If there is surface contamination of the electronic pen, wipe it off with a soft cloth. • • • • • For heavy contamination, wipe it off with a soft cloth dampened with a mild soap solution after squeezing water out of the cloth, and then dry the surface with a soft, dry cloth. Ingress of water droplets may cause a failure. Do not drop the electronic pen because it may get broken or malfunction. Do not use the pen tip if foreign material is adhering to it or if it is deformed or damaged. Doing so may dirty or scratch the screen. Do not store the electronic pen with its pen tip pressed. If it is stored in an ordinary pen stand, the pen tip will be kept pressed and that may weaken the internal spring or damage the pen tip. Because it is protruding, be careful not to bump or catch any object on the pen tip of the electronic pen. Also if this part is covered, the electronic pen will not function correctly. Do not use the electronic pen for other purposes than operating the Interactive Plasma Display. 8 Accessories Supplied Usage Check that all of the following items are included with your Interactive Plasma Display. In the event that an item is missing, please contact your dealer. List of Accessories (Electronic Pen set) Recharger Cable 6.56 ft. (2m) 2 Electronic Pen Adapter 1 Rechargeable AAA Ni-MH Battery* 2 Pen Holder 2 N5EDZ0000006 Electronic Pen N2FZ00000007 2 Pen Tip (Replacement) 2 TKKL5543 Note • Store the extra pen tip along with this operating instructions. • To purchase separately sold items, contact your dealer. * The supplied rechargeable battery is only for this electronic pen. When replacing the rechargeable battery, replace it with a commercially available rechargeable AAA Ni-MH battery. (For Canada, HHR-4MRA) 9 Names and Uses of the Parts Light receiving window Pen tip In the electronic pen mode, you can draw by touching the screen with it. In the mouse mode, touching with it functions as a “left button of mouse”. Touching and holding with it in the mouse mode functions as a “right-click of mouse”. Pen tip cover Menu button Press and hold this button and touch the screen to display the drawing menu. Battery cover Power switch Turns the power of the electronic pen on/off. Slide it to the recharger port side to turn “on” and to the pen tip side to turn “off”. Mouse/pen switching button Switches the mode (mouse mode or electronic pen mode) of the electronic pen. Mouse mode: Select to work on the select function menu or elite Panaboard book. Electronic pen mode: Select to draw or erase drawn data. Function button Select the function (color or eraser) of the electronic pen. Strap loop Use it for attaching a strap. Recharger port Connect the included recharger cable when charging. 10 Power indicator Lights green when the power of the electronic pen is “on”. Blinks green when the battery of the electronic pen is low. Lights red during charging and turns off when charging is completed. Blinks red when no rechargeable battery is in during charging or when an incompatible battery is used. Power indicator Operation state Off Power “off” Lighting green Power “on” Blinking green Low battery Lighting red Charging Blinking red Charging error Function indicator Indicates the selected function of the electronic pen. Off/Red/Blue/Yellow Draws in the selected color using a marker. • When the indicator is off, the pen becomes a black marker pen. • When yellow is selected, the pen becomes a highlighter. • Line thickness of the marker/highlighter can be selected in the drawing menu. White Erases drawn data. • Size of the eraser can be selected in the drawing menu. White (Blinking) Mouse mode Blinking red and green alternately Electronic pen registration mode (see page 15) Electronic pen is not registered. Notice • Check that the power indicator is green when using the electronic pen. • Contact the pen tip to the screen when using the electronic pen. • Using the electronic pen with the wireless module (ET-WM200U) connected may result in malfunction of the electronic pen due to radio wave interference as an example. In that case, set “WIRELESS LAN” to “OFF” before using the electronic pen. (See Network Operations of the operating instructions) Notes • You can use up to three electronic pens at the same time. • If a certain time (approx. 5 seconds) has passed without operation, the electronic pen enters the sleep state to save power consumption. 11 Preparation Inserting (Replacing) Batteries 1. Unlock the battery cover (), and open the cover (). • When replacing the cover, follow the procedure in reverse. 2. Insert (replace) the battery, and then reattach the cover and lock it. • Make sure to use a rechargeable AAA Ni-MH battery or a AAA alkaline battery, and ensure that and face the correct directions. • Dispose of expired batteries quickly, by covering the terminals in tape and following the disposal regulations in your country/area. To remove the battery, pressing on the side, hold the battery down towards the side () and take it out (). • When replacing the rechargeable battery, replace it with a commercially available rechargeable AAA Ni-MH battery. (For Canada, HHR-4MRA) Note • If, after purchase, you insert the battery and turn on the electronic pen without registering it to the electronic pen adapter, the function indicator blinks green and red alternately. After turning the power off, put the electronic pen on charge or make other preparations. Then, follow the procedure shown on page 15 to set up, connect or register the electronic pen. 12 Charging After purchase, charge the electronic pen before use. • Charging is not necessary for an AAA alkaline battery. Connect the recharger port of the electronic pen to the USB port of the computer with the included recharger cable. • The power indicator lights red and charging starts. (It turns off when charging is completed.) COMPUTER Connect to the USB port Recharger cable Guide of charging time and duration time Charging time Duration time Approx. 4 h*1 Approx. 4 h*2 *1 The time to fully charge the empty battery. *2 The battery duration time may become shorter depending on the condition of use. Notice • If using a rechargeable battery, make sure to use the included or a commercially available rechargeable AAA Ni-MH battery. (For Canada, HHR-4MRA) • Do not connect the recharger cable to the Wireless Module connection terminal of the Interactive Plasma Display. • Alkaline batteries cannot be recharged. • When you store the electronic pen, avoid full charge and turn the power off. Note • You can not use the electronic pen while charging. 13 Installing the Software To install the elite Panaboard driver/software/book, follow the procedure below. Notice • Do not connect the electronic pen adapter until the installation is completed. 1. Turn on your computer and start the Windows operating system. • Log into an account with Administrator privileges. 2. Insert the included DVD-ROM into the DVD-ROM drive. • The setup screen will be displayed. • If the setup screen does not appear, select your DVD-ROM drive in Explorer and double-click [Menu.exe]. • In Windows Vista or Windows 7, if the Autoplay dialog box is displayed, click [Run Menu.exe]. 3. When the “elite Panaboard” screen is displayed, click the type of device you are using. 4. When the “Menu” screen is displayed, click [Read Me First]. Interactive Plasma Display Ver x.xx • After the system requirements are displayed, make sure that your computer meets the requirements. 5. Click [Install elite Panaboard] on the “Menu” screen. 14 6. If you agree to the terms in the “License Agreement”, click [Yes]. • In Windows Vista, if the “User Account Control” window is displayed, click [Continue] to continue with the installation. • In Windows 7, if the “User Account Control” window is displayed, click [Yes] to continue with the installation. 7. When the “Select Features” screen is displayed, select the required function or deselect a function that you do not want and then click [Next]. • Click the corresponding check box to select or deselect a function. • You cannot deselect a function that is shown with a gray check box because it is a mandatory function. • When you deselect a function that is already installed, this function will be deleted (uninstalled). 8. When the installation wizard is displayed, follow the on-screen instructions and continue with the installation. 9. When installation has finished, click [Finish]. • Restart your computer if you are prompted to do so. • The group [elite Panaboard] will be created in the [Panasonic] group in the program menu. • The following items will appear in the [elite Panaboard] group (A function that you deselected on the “Select Features” screen in step 7 will not be displayed.): – elite Panaboard software – elite Panaboard book – Pairing Tool – Software Help – Download the latest version Note • To view the Operating Instructions, you must have Adobe® Reader® installed on your computer. If your computer is connected to the Internet, you can download Adobe Reader from Adobe’s web site. Operation After finishing preparation of the electronic pen and installation of the software, make settings and connections according to the following procedure. 1. Connect a computer to the Interactive Plasma Display For connection of a computer and the Interactive Plasma Display, see Display Operations of the operating instructions. Before using the electronic pen, make the settings below on the Interactive Plasma Display. For how to make the settings, see Display Operations of the operating instructions. • Adjust “POS./SIZE” so that the screen of the computer can be correctly displayed on the screen of the Interactive Plasma Display. • Set “TOUCH-PEN MODE” in the “SETUP” menu of Interactive Plasma Display. 2. Connect the electronic pen adapter Connect the included electronic pen adapter to the USB port of computer. COMPUTER Connect to the USB port Connect to the Interactive Plasma Display • Connecting the electronic pen adapter starts up the elite Panaboard software automatically. • If the elite Panaboard software does not start automatically, disconnect and reconnect the electronic pen adapter. Notice • Do not connect the electronic pen adapter to the computer if the elite Panaboard driver/software/book has not been installed yet. Install the software referring to the procedure of “Installing the Software” before connecting the electronic pen adapter. (see page 14) 3. Register the electronic pen To use the electronic pen, you need to register it to the electronic pen adapter. 1. While pressing and holding the function button and Mouse/pen switching button together (), slide the power switch to “on” (). • The function indicator blinks green and red alternately. The power indicator stays off. 15 2. Bring the electronic pen to within 2 m from the electronic pen adapter (remove any obstacle between them) • Registration will be completed in a second. When registration is completed, the function indicator lights green for about one second and the power indicator (which was off) lights green. • If a registration error has occurred, the function indicator lights red for about one second. Turn off the electronic pen and perform registration again. Notes • See “Registering the Electronic Pen” and “Unregistering All Electronic Pens” in “Software Help” for instructions on unregistering the electronic pen or registering and unregistering the second and subsequent electronic pens. For details on accessing the help information, see “Viewing the Help of the Software” (see page 17). • If you turn on the electronic pen before registering it to the electronic pen adapter, the function indicator blinks green and red alternately. Turn the power off and register the electronic pen. 4. Starting the elite Panaboard software Connecting the electronic pen adapter starts up the elite Panaboard software automatically. The icon is displayed in the notification area, and you can use the elite Panaboard software. • To display the Select Function Menu, click the Menu Start Tab (left side: the screen. / right side: ) on • To display the Drawing Menu, touch the screen while holding the menu button on the electronic pen. Example of the Drawing Menu Example of the Select Function Menu Notes • You can also start up elite Panaboard software in either of the following procedures. a. From the Start menu of Windows, point to [All Programs] → [Panasonic] → [elite Panaboard] and click [elite Panaboard software]. b. Click the desktop icon of to start up. • When the elite Panaboard software is not installed, the icon is not displayed in the notification area. The Menu Start Tab and Drawing Menu of the electronic pen are not displayed on the screen. • For detailed information about using the elite Panaboard software, refer to the help menu. For details on accessing the help information, see “Viewing the Help of the Software” (see page 17). Exiting the elite Panaboard software Click on the icon in the notification area, and select [Exit] from the menu. 16 About software Viewing the Help of the Software Download the Latest Software Follow the procedure below to view the help of the software installed on your computer. Follow the procedure below to download the latest version of the software from the download web site. 1. Turn on your computer and start Windows. 2. Open “Software Help” from the Start menu. 1. Turn on your computer and start Windows. 2. On the Start menu, point to [All Programs] → ([Start] → [All Programs] → [Panasonic] → [elite Panaboard] → [Interactive Plasma Display] → [Software Help]) • General help information of the installed software is displayed. [Panasonic] → [elite Panaboard] → [Interactive Plasma Display], and click [Download the latest version]. Note • To access the help information of elite Panaboard software and Electronic Pen, click the icon in the notification area and select [Help] from the pop-up menu. • To access elite Panaboard book help information, select [Help...] from the elite Panaboard book [Help] menu. • We recommend that you view the help using Internet Explorer® 6.0 or later for Windows. Uninstalling the Software If it is necessary to uninstall the elite Panaboard driver/ software/book, follow the procedure below. 1. Turn on your computer and start Windows. • Log into an account with Administrator privileges. 2. Select [Add or Remove Programs] from the Control Panel. • In Windows Vista or Windows 7, select [Uninstall a program]. 3. Select Panasonic elite Panaboard, then remove it. 4. Follow the on-screen instructions. 5. When uninstallation is complete, restart your computer. 17 Additional Information Replacing the pen tip of the Electronic Pen As the pen tip of the electronic pen becomes worn, the pen tip will no longer slide easily across the screen. Continuing to use the electronic pen in this condition may make the screen dirty and cause malfunction. Replace the pen tip with a new one as soon as possible. 1. Remove the pen tip cover. 2. Remove the old pen tip and attach the new one. • Attach the pen tip in such a way that the projection of the pen tip is aligned with the cutout of the pen body. • Be careful not to lose the spring when replacing the pen tip. Spring Cutout 3. Reattach the pen tip cover. Projection ip. nt e . dp s e n ti p u e e p h w et ov e ne m h e t R h ac A tt Notice • Turn off the electronic pen before replacing the pen tip. Attaching the pen holder To store the electronic pen, attach the included pen holder to the Interactive Plasma Display. 1. From the eight positions below, select the position to attach the pen holder and remove the screws. 2. Attach the pen holder to the position where you removed the screws. • Fix the pen holder with the screws you removed. Notice • Attach two pen holders one on each side. If two pen holders are attached to the same side, one on top of the other, the lower pen holder cannot hold the pen. 18 Troubleshooting When experiencing problems, please refer to the table below for possible solutions. If the problem persists, contact your dealer. Symptom Possible cause and solution See page The power indicator blinks red No rechargeable battery is in during charging or a battery incompatible with this electronic pen is charged → Use a rechargeable AAA Ni-MH battery. 11, 12 The power indicator blinks green The rechargeable AAA Ni-MH battery or alkaline battery is low. → Charge the rechargeable AAA Ni-MH battery or replace the alkaline battery with a new one. 11, 12 The function indicator blinks red and green alternately The electronic pen is not registered to the electronic pen adapter. → Register the electronic pen to the electronic pen adapter. 11, 15 • Check that your computer satisfies the system requirements of Drawing response is slow the electronic pen. • Other applications or anti-virus software are active. 4 → Shut down the other applications and anti-virus software. • Check that the electronic pen adapter is correctly connected. • Check that the electronic pen is correctly registered to the 15 15 electronic pen adapter. • Other applications or anti-virus software are active. The electronic pen loses the functions. (Buttons are unresponsive.) (Lines written with the electronic pen are broken or colors change.) → Shut down the other applications and anti-virus software. • The rechargeable AAA Ni-MH battery or alkaline battery is low. → Charge the rechargeable AAA Ni-MH battery or replace the alkaline battery with a new one. • The electronic pen is used with the wireless module (ETWM200U) connected. → Using the electronic pen with the wireless module (ETWM200U) connected may result in malfunction of the electronic pen due to radio wave interference as an example. In that case, set “WIRELESS LAN” to “OFF” before using the electronic pen. 4 12 See Network Operations of the operating instructions 19 Specifications 20 Type Electronic pen Transmission system 2.4 GHz radio transmission Power source Rechargeable AAA Ni-MH battery x 1 or AAA alkaline battery x 1 External dimensions (L x H) 7.9" (198.5 mm) × 0.9" (22.1 mm) Weight Approx. 0.09 lb. (Approx. 40 g) (including the included rechargeable battery) Operation time Approx. 4 h (Rechargeable AAA Ni-MH battery) Approx. 4 h (AAA alkaline battery) Charging time Approx. 4 h (Rechargeable AAA Ni-MH battery) USA Only: Disposal may be regulated in your community due to environmental considerations. For disposal or recycling information, please visit Panasonic website: http://www.panasonic.com/environmental or call 1-888-769-0149. Customer’s Record The model number and serial number of this product can be found on its back cover. You should note this serial number in the space provided below and retain this book, plus your purchase receipt, as a permanent record of your purchase to aid in identification in the event of theft or loss, and for Warranty Service purposes. Model Number Serial Number ¤ Panasonic Corporation 2012 Panasonic System Communications Company of North America Unit of Panasonic Corporation of North America Executive Office : Three Panasonic Way 2F-5, Secaucus, NJ 07094 Panasonic Canada Inc. 5770 Ambler Drive Mississauga, Ontario L4W 2T3