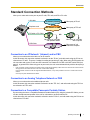
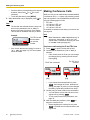
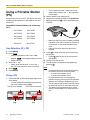
1
Operating Instructions
IP Conferencing Phone
Model No.
KX-NT700
Thank you for purchasing this Panasonic product.
Please read this document carefully before using this product and save for future use.
KX-NT700: Version 3.0 or later
Document Version
2011/06
Introduction
Introduction
Connection to a Panasonic Pure IP-PBX (IP-PBX
Mode)
The unit can be connected to a Panasonic KX-TDE or KX-NCP series PBX and used as a SIP extension. This
allows you to make and receive calls using the outside lines and IP network connected to the PBX, call other
extensions of the PBX by dialing their extension numbers, participate in conference calls with 4 or more other
participants, etc.
PC
IP-PT
IP Softphone
IP Network
Other party
of IP call
Outside Telephone
Lines
Other party
of TEL call
SIP Extension
KX-NT700
DPT
APT
SLT
CS
PS
The following features are available when the unit is used as a SIP extension. Refer to the PBX documentation
for details.
2
–
Account Code Entry
–
Personal Speed Dialing
–
Automatic Route Selection (ARS)
–
Redial
–
Conference (as a member only)
–
S-CO Line Access
–
DND Override
–
System Speed Dialing
–
Doorphone Call
–
TIE Line Call
–
Extension Block
–
Trunk Group Access
–
Operator Call
Operating Instructions
Document Version
2011/06
Introduction
Standard Connection Methods
Allow you to make and receive peer to peer IP calls, TEL calls, and PS or PC calls.
LAN cable
Telephone cord
PS Cable or PC Cable
IP Network (Intranet)
Other party of IP call
TEL Network or PBX
Other party of TEL call
OR
Other party of call made
with portable station
USB Cable
Other party of call made
with computer
Other party of call
made with computer
Connection to an IP Network (Intranet) and/or PBX
*1
Allows you to make and receive calls over an IP network.
In this document, this connection method is referred to as the "IP line", and calls made using the IP line are
referred to as "IP calls". There are 2 modes for making and receiving IP calls. When using IP-PBX mode, the
unit can make and receive IP calls as a SIP extension of a Panasonic KX-TDE or KX-NCP series PBX (see
page 2), or general PBX. When using peer to peer mode, the unit communicates directly with the other party's
device.
*1
If the IP network contains a firewall, the firewall must be configured appropriately to allow the unit to communicate over the network.
See page 58 for information about the unit's VoIP communication settings.
If the IP network contains a router that supports NAT/NAPT features, it may not be possible for the unit to communicate over the
network.
Consult your system administrator for details.
Connection to an Analog Telephone Network or PBX
Allows you to make and receive traditional phone calls.
In this document, this connection method is referred to as the "TEL line", and calls made using the TEL line
are referred to as "TEL calls".
Connection to a Compatible Panasonic Portable Station
By connecting the unit to a compatible Panasonic Portable Station (PS) using the included PS Cable, you can
use the microphones and speaker of the unit for calls made or received with the PS.
In this document, this connection method is referred to as the "PS line", and calls made using the PS line are
referred to as "PS calls".
Document Version
2011/06
Operating Instructions
3
Introduction
Connection to a Computer
By connecting the unit to a computer using the included PC Cable or the included USB Cable, you can use
the microphones and speaker of the unit for calls made or received with the computer using your preferred IP
phone software.
In this document, this connection method is referred to as the "PC line", and calls made using the PC line are
referred to as "PC calls".
Other Features
Conference Calls
While on a call, you can make or receive an additional call, creating a 3-party conference call (see
page 36 or page 38). Conference calls can be made using the following connection methods.
2 IP calls
While A and B are talking, A calls or is called by C.
B
C
A
1 IP call and 1 TEL call
While A and B are talking, A calls or is called by C.
B
A
C
1 IP call and 1 PS call or 1 PC call
While A and B are talking, A uses a PS or computer to
call C.
B
A
OR
C
C
High-quality Audio
The unit provides unparalleled audio quality and features, including:
4
Operating Instructions
Document Version
2011/06
Introduction
–
–
–
–
–
G.722 speech codec support
full-duplex communication
speech speed conversion (see page 39)
mic noise reduction (see page 39)
External Wired MIC connection (see page 32)
SD Memory Card Recording
Phone calls and voice memos can be recorded to, and played back from, a compatible SD memory card (see
page 42).
PoE (Power over Ethernet) Ready
The unit is compliant with PoE (IEEE 802.3af) standards, and contains a power receiving device that enables
it to receive power from the same Ethernet cable used for IP network connection. This allows you to use the
unit in locations where there is no AC outlet nearby, saving you the cost of installing a new AC outlet. PoE
connection requires a PoE-compliant hub or similar device. The included AC adaptor can be used instead of
a PoE connection if you want to connect the unit to a standard AC outlet.
Conferencing Phone Manager Software Features
The unit can be used in conjunction with Conferencing Phone Manager. This software can be found on the
included CD-ROM, and allows you to operate and program the unit using a computer (see the Operating
Instructions for Conferencing Phone Manager for more details).
Video Conference/Sharing application
By using Conferencing Phone Manager, you can create a video conference and share applications with the
other party.
IP Network
(Intranet)
LAN
USB
Video Conference Sharing application
Document Version
2011/06
Operating Instructions
5
Introduction
Other Information
Included Documentation
Quick Reference Guide
Briefly describes how to connect the unit and introduces commonly used features.
Operating Instructions (this document)
Describes how to connect, use, program, and maintain the unit.
Operating Instructions for Conferencing Phone Manager
Describes how to operate Conferencing Phone Manager, which is computer software that can be used in
conjunction with the unit.
Note
•
Certain products and features described in this document may not be available in your area. Consult
a certified Panasonic dealer for more information.
PBX Connection
•
•
If the unit is connected to a PBX, refer to the PBX documentation for information about making calls,
receiving calls, and other features.
Do not connect the unit to an analog telephone line to which other telephones are connected.
Trademarks
•
•
•
•
SD Logo is a trademark of SD-3C, LLC.
Windows Media® is either a registered trademark or trademark of Microsoft Corporation in the United States
and/or other countries.
QuickTime® is a trademark of Apple Inc., registered in the U.S. and other countries.
All other trademarks identified herein are the property of their respective owners.
MD5 Copyright Notice
This software uses the Source Code of RSA Data Security, Inc. described in the RFC1321 (MD5
Message-Digest Algorithm).
Copyright (C) 1991-2, RSA Data Security, Inc. Created 1991. All rights reserved.
License to copy and use this software is granted provided that it is identified as the "RSA Data Security, Inc.
MD5 Message-Digest Algorithm" in all material mentioning or referencing this software or this function.
License is also granted to make and use derivative works provided that such works are identified as "derived
from the RSA Data Security, Inc. MD5 Message-Digest Algorithm" in all material mentioning or referencing the
derived work.
RSA Data Security, Inc. makes no representations concerning either the merchantability of this software or
the suitability of this software for any particular purpose. It is provided "as is" without express or implied warranty
of any kind.
These notices must be retained in any copies of any part of this documentation and/or software.
NetBSD kernel Copyright Notice
This product uses a part of NetBSD kernel.
The use of a part of NetBSD kernel is based on the typical BSD style license below.
Copyright (c)
The Regents of the University of California. All rights reserved.
6
Operating Instructions
Document Version
2011/06
Introduction
Redistribution and use in source and binary forms, with or without modification, are permitted provided that
the following conditions are met:
1. Redistributions of source code must retain the above copyright notice, this list of conditions and the
following disclaimer.
2. Redistributions in binary form must reproduce the above copyright notice, this list of conditions and the
following disclaimer in the documentation and/or other materials provided with the distribution.
3. All advertising materials mentioning features or use of this software must display the following
acknowledgement:
This product includes software developed by the University of California, Berkeley and its contributors.
4. Neither the name of the University nor the names of its contributors may be used to endorse or promote
products derived from this software without specific prior written permission.
THIS SOFTWARE IS PROVIDED BY THE REGENTS AND CONTRIBUTORS ``AS IS'' AND ANY EXPRESS
OR IMPLIED WARRANTIES, INCLUDING, BUT NOT LIMITED TO, THE IMPLIED WARRANTIES OF
MERCHANTABILITY AND FITNESS FOR A PARTICULAR PURPOSE ARE DISCLAIMED. IN NO EVENT
SHALL THE REGENTS OR CONTRIBUTORS BE LIABLE FOR ANY DIRECT, INDIRECT, INCIDENTAL,
SPECIAL, EXEMPLARY, OR CONSEQUENTIAL DAMAGES (INCLUDING, BUT NOT LIMITED TO,
PROCUREMENT OF SUBSTITUTE GOODS OR SERVICES; LOSS OF USE, DATA, OR PROFITS; OR
BUSINESS INTERRUPTION) HOWEVER CAUSED AND ON ANY THEORY OF LIABILITY, WHETHER IN
CONTRACT, STRICT LIABILITY, OR TORT (INCLUDING NEGLIGENCE OR OTHERWISE) ARISING IN ANY
WAY OUT OF THE USE OF THIS SOFTWARE, EVEN IF ADVISED OF THE POSSIBILITY OF SUCH
DAMAGE.
However, parts of the NetBSD Kernel are provided with the following copyright notices.
Copyright (c) 1980, 1983, 1988, 1993 The Regents of the University of California. All rights reserved.
Copyright (c) 1980, 1986, 1989, 1993 The Regents of the University of California. All rights reserved.
Copyright (c) 1980, 1986, 1991, 1993 The Regents of the University of California. All rights reserved.
Copyright (c) 1980, 1986, 1993 The Regents of the University of California. All rights reserved.
Copyright (c) 1982, 1985, 1986, 1988, 1993, 1994 The Regents of the University of California. All rights
reserved.
Copyright (c) 1982, 1986, 1988, 1990, 1993 The Regents of the University of California. All rights reserved.
Copyright (c) 1982, 1986, 1988, 1990, 1993, 1994, 1995 The Regents of the University of California. All rights
reserved.
Copyright (c) 1982, 1986, 1988, 1990, 1993, 1995 The Regents of the University of California. All rights
reserved.
Copyright (c) 1982, 1986, 1988, 1991, 1993 The Regents of the University of California. All rights reserved.
Copyright (c) 1982, 1986, 1988, 1993 The Regents of the University of California. All rights reserved.
Copyright (c) 1982, 1986, 1988, 1993, 1995 The Regents of the University of California. All rights reserved.
Copyright (c) 1982, 1986, 1989, 1991, 1993 The Regents of the University of California. All rights reserved.
Copyright (c) 1982, 1986, 1989, 1993 The Regents of the University of California. All rights reserved.
Copyright (c) 1982, 1986, 1990, 1991, 1993 The Regents of the University of California. All rights reserved.
Copyright (c) 1982, 1986, 1990, 1993 The Regents of the University of California. All rights reserved.
Copyright (c) 1982, 1986, 1990, 1993, 1994 The Regents of the University of California. All rights reserved.
Copyright (c) 1982, 1986, 1991, 1993 The Regents of the University of California. All rights reserved.
Copyright (c) 1982, 1986, 1991, 1993, 1994 The Regents of the University of California. All rights reserved.
Copyright (c) 1982, 1986, 1991, 1993, 1995 The Regents of the University of California. All rights reserved.
Copyright (c) 1982, 1986, 1993 The Regents of the University of California. All rights reserved.
Copyright (c) 1982, 1986, 1993, 1994 The Regents of the University of California. All rights reserved.
Copyright (c) 1982, 1986, 1993, 1994, 1995 The Regents of the University of California. All rights reserved.
Copyright (c) 1982, 1986, 1993, 1995 The Regents of the University of California. All rights reserved.
Copyright (c) 1982, 1988, 1991, 1993 The Regents of the University of California. All rights reserved.
Copyright (c) 1983, 1990, 1993 The Regents of the University of California. All rights reserved.
Document Version
2011/06
Operating Instructions
7
Introduction
Copyright (c) 1983, 1993 The Regents of the University of California. All rights reserved.
Copyright (c) 1985, 1986, 1993 The Regents of the University of California. All rights reserved.
Copyright (c) 1985, 1986, 1993 The Regents of the University of California. All rights reserved.
Copyright (c) 1986, 1989, 1991, 1993 The Regents of the University of California. All rights reserved.
Copyright (c) 1986, 1993 The Regents of the University of California. All rights reserved.
Copyright (c) 1987, 1991, 1993 The Regents of the University of California. All rights reserved.
Copyright (c) 1987, 1993 The Regents of the University of California. All rights reserved.
Copyright (c) 1987, 1993 The Regents of the University of California. All rights reserved.
Copyright (c) 1988 Regents of the University of California. All rights reserved
Copyright (c) 1988 Stephen Deering.
Copyright (c) 1988 University of Utah.
Copyright (c) 1988, 1989, 1993 The Regents of the University of California. All rights reserved.
Copyright (c) 1988, 1991, 1993 The Regents of the University of California. All rights reserved.
Copyright (c) 1988, 1992, 1993 The Regents of the University of California. All rights reserved.
Copyright (c) 1988, 1993 The Regents of the University of California. All rights reserved.
Copyright (c) 1989 The Regents of the University of California. All rights reserved.
Copyright (c) 1989, 1991, 1993 The Regents of the University of California. All rights reserved.
Copyright (c) 1989, 1993 The Regents of the University of California. All rights reserved.
Copyright (c) 1989, 1993, 1994 The Regents of the University of California. All rights reserved.
Copyright (c) 1990, 1991, 1993 The Regents of the University of California. All rights reserved.
Copyright (c) 1990, 1993 The Regents of the University of California. All rights reserved.
Copyright (c) 1991, 1993 The Regents of the University of California. All rights reserved.
Copyright (c) 1991, 1993, 1994 The Regents of the University of California. All rights reserved.
Copyright (c) 1992 Regents of the University of California. All rights reserved.
Copyright (c) 1992, 1993 The Regents of the University of California. All rights reserved.
Copyright (c) 1993 The Regents of the University of California. All rights reserved.
Copyright (c) 1993 Adam Glass
Copyright (C) 1993 by Sun Microsystems, Inc. All rights reserved.
Copyright (c) 1994 Gordon W. Ross
Copyright (c) 1994 Winning Strategies, Inc. All rights reserved.
Copyright (c) 1995 The Regents of the University of California. All rights reserved.
Copyright (C) 1995, 1996, 1997, and 1998 WIDE Project. All rights reserved.
Copyright (c) 1996 The Regents of the University of California. All rights reserved.
Copyright (c) 1996 John S. Dyson All rights reserved.
Copyright (c) 1996 Matt Thomas. All rights reserved.
Copyright (c) 1996 Matthew R. Green. All rights reserved.
Copyright (c) 1996 Paul Kranenburg
Copyright (c) 1996, 1997, 1999, 2001 The NetBSD Foundation, Inc. All rights reserved.
Copyright (c) 1996, 2000 Christopher G. Demetriou. All rights reserved.
Copyright (c) 1996,1999 by Internet Software Consortium.
Copyright (c) 1996-1999 by Internet Software Consortium.
Copyright (c) 1997 Jonathan Stone and Jason R. Thorpe. All rights reserved.
Copyright (c) 1997 Christos Zoulas. All rights reserved.
Copyright (c) 1997 Manuel Bouyer. All rights reserved.
Copyright (c) 1997, 1998 The NetBSD Foundation, Inc. All rights reserved.
Copyright (c) 1997, 1998, 1999, 2000 The NetBSD Foundation, Inc. All rights reserved.
Copyright (c) 1997, 1998, 1999, 2001 The NetBSD Foundation, Inc. All rights reserved.
Copyright (c) 1997, 1998, 1999, 2002 The NetBSD Foundation, Inc. All rights reserved.
Copyright (c) 1997, 1998, 2000, 2001 The NetBSD Foundation, Inc. All rights reserved.
Copyright (c) 1997, 1998, 2001 The NetBSD Foundation, Inc. All rights reserved.
Copyright (c) 1997,98 The NetBSD Foundation, Inc. All rights reserved.
Copyright (C) 1997-2000 Sony Computer Science Laboratories Inc. All rights reserved.
Copyright (c) 1997-2002 The NetBSD Foundation, Inc. All rights reserved.
Copyright (c) 1998 The NetBSD Foundation, Inc. All rights reserved.
Copyright (c) 1998 Todd C. Miller <[email protected]> All rights reserved.
8
Operating Instructions
Document Version
2011/06
Introduction
Copyright (c) 1998, 1999 The NetBSD Foundation, Inc. All rights reserved.
Copyright (c) 1998, 1999, 2000 The NetBSD Foundation, Inc. All rights reserved.
Copyright (c) 1998, 1999, 2000, 2001 The NetBSD Foundation, Inc. All rights reserved.
Copyright (c) 1998, 2000 The NetBSD Foundation, Inc. All rights reserved.
Copyright (c) 1998, 2000, 2001 The NetBSD Foundation, Inc. All rights reserved.
Copyright (c) 1999 The NetBSD Foundation, Inc. All rights reserved.
Copyright (C) 1999 WIDE Project. All rights reserved.
Copyright (c) 1999, 2000 Jason L. Wright ([email protected]) All rights reserved.
Copyright (c) 1999, 2000 The NetBSD Foundation, Inc. All rights reserved.
Copyright (c) 1999, 2000, 2001 The NetBSD Foundation, Inc. All rights reserved.
Copyright (c) 1999, 2001 The NetBSD Foundation, Inc. All rights reserved.
Copyright (c) 2000 The NetBSD Foundation, Inc. All rights reserved.
Copyright (c) 2000, 2001 The NetBSD Foundation, Inc. All rights reserved.
Copyright (c) 2000, 2001, 2002 The NetBSD Foundation, Inc. All rights reserved.
Copyright (c) 2001 The NetBSD Foundation, Inc. All rights reserved.
Copyright (c) 2002 The NetBSD Foundation, Inc. All rights reserved.
Copyright 1998 Massachusetts Institute of Technology. All rights reserved.
Copyright 2001 Wasabi Systems, Inc. All rights reserved.
Portions Copyright (c) 1993 by Digital Equipment Corporation.
Portions Copyright (c) 1995 by International Business Machines, Inc.
Copyright (c) 1983, 1989 The Regents of the University of California. All rights reserved.
Copyright (c) 1996 by Internet Software Consortium. All rights reserved.
Copyright (c) 1980, 1986, 1989 Regents of the University of California. All rights reserved.
Copyright (c) 1988 The Regents of the University of California. All rights reserved.
Copyright (c) 1992, 1993 The Regents of the University of California. All rights reserved.
Copyright (c) 1994 Christopher G. Demetriou. All rights reserved.
Copyright (c) 1997 The NetBSD Foundation, Inc. All rights reserved.
Copyright (c) 1999 The NetBSD Foundation, Inc. All rights reserved.
Copyright (c) 2001 The NetBSD Foundation, Inc. All rights reserved.
Copyright (c) 1996 Gardner Buchanan <[email protected]> All rights reserved.
Parts of the NetBSD Kernel are provided with the licenses that are slightly different from the above
Berkeley-formed license. Please refer the source code of the NetBSD Kernel about the details.
The source code of the NetBSD Kernel is provided by the NetBSD CVS Repositories (http://cvsweb.netbsd.org/
bsdweb.cgi/), and this product includes parts of the source code in the following directories.
http://cvsweb.netbsd.org/bsdweb.cgi/src/sys/kern/
http://cvsweb.netbsd.org/bsdweb.cgi/src/sys/net/
http://cvsweb.netbsd.org/bsdweb.cgi/src/sys/netinet/
Firmware Notice
•
The unit's firmware is protected by copyright laws and international treaty provisions, and all other
applicable laws. It cannot be reverse engineered, decompiled or disassembled.
For Future Reference
Record the information in the space below for future reference.
Note
•
The serial number of this product may be found on the label affixed to the bottom of the unit. You should
note the serial number of this unit in the space provided and retain this manual as a permanent record
of your purchase to aid in identification in the event of theft.
Document Version
2011/06
Operating Instructions
9
Introduction
MODEL NO.
SERIAL NO.
DATE OF PURCHASE
NAME OF DEALER
DEALER’S ADDRESS
DEALER’S TEL. NO.
10
Operating Instructions
Document Version
2011/06
Introduction
For Your Safety
To reduce the risk of injury, loss of life, electric shock,
fire, malfunction, and damage to equipment or property,
always observe the following safety precautions.
Explanation of symbols
The following symbols are used to classify and describe
the level of hazard and injury caused when the
denotation is disregarded and improper use is
performed.
WARNING
General Safety
Do not disassemble this unit. Only qualified
personnel should service this unit.
Disassembling the unit may expose you to
dangerous voltages or other risks. Incorrect
reassembly can cause electric shock.
Do not insert foreign objects into the unit.
WARNING
Denotes a potential hazard that could result in
serious injury or death.
CAUTION
Denotes a hazard that could result in minor
injury or damage to the unit or other equipment.
The following symbols are used to classify and describe
the type of instructions to be observed.
This symbol is used to alert users to a specific
operating procedure that must not be
performed.
This symbol is used to alert users to a specific
operating procedure that must be followed in
order to operate the unit safely.
Do not connect or disconnect the AC plug with
wet hands.
Disconnect the unit from the AC outlet,
disconnect the LAN cable, and contact the
dealer if:
– The AC adaptor cord or AC plug becomes
damaged or frayed.
– The unit is exposed to rain, water, or any
other liquid.
– The unit is dropped or damaged.
– Internal components are exposed due to
damage.
– The unit does not operate properly.
– Performance deteriorates.
Disconnect the unit from the AC outlet and
disconnect the LAN cable if the unit emits
smoke, an abnormal smell, or makes unusual
noise. These conditions can cause fire or
electric shock. Confirm that smoke has
stopped and contact an authorized service
center.
Clean the AC plug periodically with a soft, dry
cloth to remove dust and other debris.
Installation
Do not connect the unit to the AC outlet, AC
extension cords, etc., in a way that exceeds
the power rating of, or does not comply with
the instructions provided with, the AC outlet,
AC extension cords, etc.
Do not touch the unit, AC adaptor, AC adaptor
cord, or telephone cord during a lightning
storm.
Do not install telephone jacks in wet locations
unless the jack is specifically designed for wet
locations.
Document Version
2011/06
Operating Instructions
11
Introduction
Disconnect the AC adaptor cord and all
cables from the unit before cleaning. Clean
the unit with a soft, dry cloth. Do not use liquid,
aerosol cleaners, abrasive powders, or
chemical agents to clean the unit.
Do not touch uninsulated telephone wires or
terminals unless the telephone line has been
disconnected at the network interface.
If using an AC adaptor, use only the included
AC adaptor (PQLV206).
The SD memory card poses a choking
hazard. Keep the SD memory card out of
reach of children.
The AC adaptor should be connected to a
vertically oriented or floor-mounted AC outlet.
Do not connect the AC adaptor to a
ceiling-mounted AC outlet, as the weight of
the adaptor may cause it to become
disconnected.
Only connect the unit to the type of electric
power specified on the label affixed to the unit.
Confirm the type of electric power supplied to
the installation site if necessary.
Use caution when installing or modifying
telephone lines.
Placement
When left unused for a long period of time,
disconnect the unit from the AC outlet. When
the unit receives power from a PoE power
supply, disconnect the LAN cable.
Notice
•
•
•
Do not expose the unit to contact with liquids
(rain, water, moisture, oil, etc.) or excessive
smoke or dust. Do not subject the unit to
excessive shock.
Do not allow anything to rest on the AC
adaptor cord or LAN cable. Do not locate this
unit where the AC adaptor cord or LAN cable
may be stepped on or tripped on.
•
•
•
Place this unit on a flat surface. Serious
damage and/or injury may result if the unit
falls.
Allow 10 cm (3 15/16 in) clearance around the
unit for proper ventilation.
CAUTION
Do not place heavy objects on top of this unit.
When the unit receives power from the AC
adaptor, the AC adaptor is the main
disconnect device. Ensure that the AC outlet
is installed near the unit and is easily
accessible, so that the unit can be
disconnected from the AC outlet if necessary.
•
•
•
12
Operating Instructions
Read and follow all instructions, warnings,
cautions, etc. including those marked on the
unit.
Before connecting the unit, confirm that the unit
supports the intended operating environment.
If the unit does not operate properly, disconnect
the AC adaptor cord and LAN cable, then
connect again.
The unit may not operate in the event of a power
failure. Ensure that a separate telephone, not
dependent on local power, is available for use
in case of emergency.
Do not move the unit while it is in use.
To prevent malfunction, deformity, overheating,
rust, and discoloration, do not install or place
equipment in the following types of locations:
– Locations exposed to direct sunlight.
– Locations where the temperature is less
than 0 °C (32 °F) or greater than 40 °C
(104 °F).
– Locations where there is high humidity.
– Locations where air ventilation is poor.
– Locations that may be exposed to
sulphurous gas, such as near hot springs.
– Near devices that emit heat, such as
heaters.
– Near devices that emit electromagnetic
noise, such as radios or televisions.
– Near devices that emit high-frequency
noise, such as sewing machines or welders.
Do not place credit cards, ATM cards, or other
magnetic cards near the unit. The magnets in
the unit’s speaker and microphones may
damage magnetic cards.
If an error message is shown on the unit’s
display, consult the network administrator.
Satisfactory operation, interoperability, and
compatibility cannot be guaranteed with all
Document Version
2011/06
Introduction
equipment connected to the unit, nor with all
services provided by telecommunications
providers over networks connected to the unit.
For Best Performance
•
•
•
•
Use the unit in a quiet room. Ambient noise of less
than 50 dBA is recommended.
Use the unit in a room with minimal echoing. Do not
place the unit near walls, windows, partitions, etc.
During the first 30 seconds of a TEL call, the unit
adjusts itself for optimal sound quality. Speak in
turns with the other party at the beginning of a
conversation. (The time required varies depending
on the condition of the telephone line and the audio
characteristics of the room.) During this time, sound
may cut out or fade in and out. This is normal.
Do not obstruct the unit during calls. Keep your
hands, as well as common objects such as folders,
cups, and coffee pots away from the unit during
calls.
Data Security
We recommend observing the security precautions
described in this section, in order to prevent the
following:
– loss, disclosure, falsification, or theft of user
information
– unauthorized use of the unit
– interference or suspension of use caused by an
unauthorized party
We cannot be responsible for damages resulting
from the misuse of this product.
Note
•
This product can be used to store and log user
information. User information is defined as the
following:
– phonebook entry names, phone numbers,
IP addresses, SIP extension numbers and
SIP URIs
– call history (redial list)
– recordings stored on the SD memory card
Preventing Data Loss
•
•
Use a computer to make periodic backups of
recordings stored on the SD memory card.
Keep a separate record of all information stored in
the phonebook.
Preventing Data Disclosure
•
•
•
•
•
Document Version
2011/06
Do not leave the unit or SD memory card in a
location where it can be accessed or removed
without authorization.
Store backups in a secure location.
Do not store sensitive personal information in the
unit.
In the following situations, make a record of
information stored in the phonebook, initialize the
unit (see page 65), and remove the SD memory
card from the unit.
– Before disposing of the unit
– Before handing the unit over to a third party
– Before having the unit serviced
Make sure the unit is serviced by only a certified
technician.
Operating Instructions
13
Introduction
Preventing Data Disclosure Over the
Network
•
•
•
14
To ensure the security of private conversations,
only connect the unit to a secure network.
To prevent unauthorized access, only connect the
unit to a network that is properly managed.
Make sure all computers connected to the unit
employ up-to-date security measures.
Operating Instructions
Document Version
2011/06
Additional Information
Additional Information
FCC Requirements
5.
1. Notification to the Telephone Company
This equipment complies with Part 68 of the FCC
rules and the requirements adopted by the ACTA.
On the bottom of this equipment is a label that
contains, among other information, a product
identifier in the format US: ACJTE04BKX-NT700. If
requested, this number must be provided to the
telephone company.
If required, provide the telephone company with the
following technical information:
– Telephone numbers to which the system will be
connected
– Make: Panasonic
– Model: KX-NT700
– Certification No.: found on the bottom of the unit
– Ringer Equivalence No.: 0.4B
– Facility Interface Code: 02LS2
– Service Order Code: 9.0F
– Required Network Interface Jack: RJ11
2. Ringer Equivalence Number (REN)
The REN is used to determine the number of
devices that may be connected to a telephone line.
Excessive RENs on a telephone line may result in
the devices not ringing in response to an incoming
call. In most but not all areas, the sum of RENs
should not exceed five (5.0). To be certain of the
number of devices that may be connected to a line,
as determined by the total RENs, contact the local
telephone company. The REN for this product is
part of the product identifier that has the format US:
ACJTE04BKX-NT700. The digits represented by 04
are the REN without a decimal point (e.g., 04 is a
REN of 0.4). For earlier products, the REN is
separately shown on the label.
3. Incidence of Harm to the Telephone Lines
If this equipment causes harm to the telephone
network, the telephone company will notify you in
advance that temporary discontinuance of service
may be required. But if advance notice isn't
practical, the telephone company will notify the
customer as soon as possible. Also, you will be
advised of your right to file a complaint with the FCC
if you believe it is necessary.
4. Changes in Telephone Company
Communications Facilities, Equipment,
Operations and Procedures
The telephone company may make changes in its
facilities, equipment, operations or procedures that
could affect the operation of the equipment. If this
Document Version
2011/06
6.
7.
8.
happens the telephone company will provide
advance notice in order for you to make necessary
modifications to maintain uninterrupted service.
Trouble with this Equipment
If trouble is experienced with this equipment, for
repair or warranty information, please see the
attached warranty, which includes the shipping
address of the Panasonic Service and Technology
Company BTS Center. If the equipment is causing
harm to the telephone network, the telephone
company may request that you disconnect the
equipment until the problem is resolved.
Connection to Party Line
Connection to party line service is subject to state
tariffs. Contact the state public utility commission,
public service commission or corporation
commission for information.
Combined Use with Alarm Equipment
If your home has specially wired alarm equipment
connected to the telephone line, ensure the
installation of this equipment does not disable your
alarm equipment. If you have questions about what
will disable alarm equipment, consult your
telephone company or a qualified installer.
Automatic Dialing Features
When programming emergency numbers and/or
making test calls to emergency numbers:
i. Remain on the line and briefly explain to the
dispatcher the reason for the call before
hanging up.
ii. Perform such activities in the off-peak hours,
such as early morning hours or late evenings.
Operating Instructions
15
Additional Information
Important Safety Instructions
When using this unit, basic safety precautions,
including those below, should always be followed to
reduce the risk of fire, electric shock and injury to
persons.
1. Do not use the unit near water, for example, near a
bathtub, wash bowl, kitchen sink, or laundry tub, in
a wet basement, or near a swimming pool.
2. Avoid using a wired telephone during an electrical
storm. There is a remote risk of electric shock from
lightning.
3. Do not use the telephone in the vicinity of a gas leak
to report the leak.
– Connect the equipment into an outlet on a circuit
–
different from that to which the receiver is
connected.
Consult the dealer or an experienced radio/TV
technician for help.
SAVE THESE INSTRUCTIONS
Required Telephone Cord
CAUTION
•
To reduce the risk of fire, use only No. 26 AWG
or larger telephone line cord.
Perchlorate Information
Notice
•
This product contains a CR Coin Cell Lithium
Battery which contains Perchlorate Material—
special handling may apply.
See
www.dtsc.ca.gov/hazardouswaste/perchlorate
Interference
This equipment has been tested and found to comply
with the limits for a Class B digital device, pursuant to
Part 15 of the FCC Rules. These limits are designed to
provide reasonable protection against harmful
interference in a residential installation. This equipment
generates, uses, and can radiate radio frequency
energy and, if not installed and used in accordance with
the instructions, may cause harmful interference to
radio communications. However, there is no guarantee
that interference will not occur in a particular installation.
If this equipment does cause harmful interference to
radio or television reception, which can be determined
by turning the equipment off and on, the user is
encouraged to try to correct the interference by one or
more of the following measures:
– Reorient or relocate the receiving antenna.
– Increase the separation between the equipment
and receiver.
16
Operating Instructions
Document Version
2011/06
Table of Contents
Table of Contents
Before Use ..............................................................................................19
Accessory Information ...................................................................................................19
Unit Overview ..................................................................................................................20
Main View .......................................................................................................................20
Front Panel .....................................................................................................................21
Understanding the Display .............................................................................................22
Function Buttons and Function Button Icons ..................................................................22
Preparation .............................................................................................25
Basic Connections ..........................................................................................................25
Setting the Date & Time ..................................................................................................26
TEL Line Settings ............................................................................................................26
IP Network Settings ........................................................................................................27
SIP Settings .....................................................................................................................28
Operation Mode ...............................................................................................................29
Using SD Memory Cards ................................................................................................30
Formatting SD Memory Cards ........................................................................................31
Using the Microphones ..................................................................................................32
Making and Answering Calls ................................................................33
Line Selection ..................................................................................................................33
Making Calls ....................................................................................................................34
Making Conference Calls ...............................................................................................36
Answering Calls ..............................................................................................................38
Useful Features Available During a Call .......................................................................39
Phonebook ..............................................................................................40
Adding Entries to the Phonebook .................................................................................40
Editing Entries .................................................................................................................41
Erasing Entries ................................................................................................................41
Recording ...............................................................................................42
Recording Features ........................................................................................................42
Recording Conversations ..............................................................................................42
Recording Voice Memos ................................................................................................42
Playing Back Recordings ...............................................................................................42
Erasing Recordings ........................................................................................................43
Using a Portable Station (PS) or Computer .........................................44
Using a Portable Station (PS) ........................................................................................44
Using a Computer ...........................................................................................................45
Connecting Using the USB Cable ..................................................................................45
Connecting Using the PC Cable .....................................................................................46
Programming the Unit ...........................................................................47
Changing and Confirming Settings ...............................................................................47
Changing Settings ..........................................................................................................47
Restarting the Unit ..........................................................................................................47
Parameter List .................................................................................................................49
Parameters .......................................................................................................................51
SIP Ext. No. ....................................................................................................................51
Show IP Address ............................................................................................................51
Document Version
2011/06
Operating Instructions
17
Table of Contents
Operation Mode ..............................................................................................................51
Basic Settings .................................................................................................................51
Line Selection .................................................................................................................53
TEL Settings ...................................................................................................................53
IP Network Settings ........................................................................................................54
Protocol Settings ............................................................................................................55
VoIP Settings ..................................................................................................................58
QoS Settings ..................................................................................................................59
System Status Confirmation ...........................................................................................60
System Options ..............................................................................................................60
Character Entry ......................................................................................62
Entering Characters ........................................................................................................62
Character Tables .............................................................................................................62
Initialization Features ............................................................................65
Erasing Data ....................................................................................................................65
Erasing the Redial List ...................................................................................................65
Erasing the Phonebook ..................................................................................................65
Resetting System Data ...................................................................................................65
Resetting All Data ...........................................................................................................65
Troubleshooting .....................................................................................66
Troubleshooting ..............................................................................................................66
General Use ...................................................................................................................66
Making and Receiving Calls ...........................................................................................66
Sound Quality .................................................................................................................69
SD Memory Cards ..........................................................................................................71
Phonebook .....................................................................................................................71
Programming ..................................................................................................................72
Display Messages ..........................................................................................................72
Other Information ...................................................................................75
Cleaning the Unit .............................................................................................................75
Specifications .........................................................................................76
Specifications ..................................................................................................................76
Index..............................................................................................................78
18
Operating Instructions
Document Version
2011/06
Before Use
Before Use
Accessory Information
Included Accessories
To order replacement accessories, call 1-800-332-5368.
USB Cable (1)
About 1.8 m (6 ft.)
PS Cable (1)
About 1 m (3 ft. 3 in.)
PC Cable (1)
About 1.8 m (6 ft.)
AC Adaptor (1)
Order no.
PSWE2NT700N
Order no.
PSJA1123Z
Order no.
PSJA1122Z
Order no.
PQLV206Y
Optional Accessories
External Wired MIC
Cord: About 3 m (10 ft.)
KX-NT701
Document Version
2011/06
Operating Instructions
19
Before Use
Unit Overview
Main View
D
A
B
C
CB
CB
G
B
C
F
E
A Speaker
B Indicators (4 locations)
Indicate the status of the unit.
Off: The unit is in standby mode (i.e., not in use).
Blue, flashing: A call is being received.
Blue, lit: The unit is on a call.
Red, lit: The microphones are muted, or an error
has occurred.
C Built-in Microphones (4 locations)
See page 32.
D USB Port (USB)
Used to connect the unit to a computer and use
the included Conferencing Phone Manager
software. Also used to connect the unit to a
computer to use the microphones and speaker of
the unit for your IP phone software (see
page 45).
H
I
J
G External Wired MIC Jacks (EXT MIC1, EXT
MIC2)
Allow you to connect an External Wired MIC to the
unit (see page 32). 2 mics can be connected.
H DC Input (DC IN)
Used to connect the unit to an AC outlet using the
included AC adaptor.
I LAN Port (LAN)
Used to connect the unit to an IP network. May
also be used to supply power to the unit using PoE
(Power over Ethernet) when the unit is connected
to a PoE-compatible switching hub or power
supply (see page 25).
J Telephone Jack (LINE)
Used to connect the unit to a telephone network
or PBX.
E SD Memory Card Slot
Allows you to insert a compatible SD memory
card and record conversations. See page 30 for
more information about SD memory cards.
F AUDIO IN/OUT Jack
Allows you to connect a compatible Panasonic
Portable Station (PS; see page 44) or a
computer (see page 46).
20
Operating Instructions
Document Version
2011/06
Before Use
Front Panel
D
E
F
G
A
B
C
H
I
J
K
L
Button (Speakerphone Button)
Used to make, answer, and end calls.
Navigator/Volume Buttons ([ ] and [ ])
Used to scroll through the items displayed on the display, such as phonebook entries, programmable
settings, etc. Also used to adjust the speaker volume during calls (see page 35) and the ringer volume
(see page 38).
Button (Mute/Clear Button)
Used to erase characters or numbers while storing a phonebook entry or making a call. Also used to mute
the unit’s microphones during a call (see page 39).
FLASH Button
Used to operate optional telephone company services, such as call waiting, or PBX features, such as
extension transfers (see page 39).
REDIAL/PAUSE Button
Used to call a previously called party again (see page 35) or to enter a dialing pause (see page 35).
Display
See page 22.
Function Buttons ([F1], [F2], and [F3])
Used to select the functions that correspond to the icons shown on the bottom of the display (see
page 22).
MIC NOISE CUT Button
Used to reduce noise in the audio signal sent to the other party during a call (see page 39).
BACK Button
Used to return to the previous screen.
MENU Button
Used to enter the programming menu or to return the unit to standby mode.
ENTER Button
Used to save or confirm information shown on the display.
Playback Control Buttons
Used to control playback when playing back recordings (see page 42).
Document Version
2011/06
Operating Instructions
21
Before Use
Understanding the Display
The display helps you operate and program the unit by displaying a variety of messages and icons.
Standby Mode
A B
Phonebook
C
D E
SD Icon
Indicates that a compatible SD memory card has been inserted in the unit (see page 30).
USB Icon
Indicates that a computer is connected to the USB port (see page 45).
Line Icon (IP, TEL, PS, PC, USB-AUDIO)
Indicates which line will be used when a call is made.
Function Button Icons
Indicates the functions currently available when the function buttons are pressed. The icons displayed vary
on the current state of the unit (e.g., the icons displayed when on a call are different from the icons displayed
when storing an entry in the phonebook).
Scroll Indicator
Indicates that [ ] or [ ] can be pressed to display the previous or next item.
Recording Icons
: Indicates a recorded conversation.
: Indicates a recorded voice memo.
Function Buttons and Function Button Icons
By pressing a function button ([F1], [F2], and [F3]) you can select the function displayed directly above it.
In this document, function buttons are referred to by their
corresponding icons.
In the example shown here,
"Press PLAY ",
"Press TEL ", or
"Press
"
would indicate pressing [F1], [F2], and [F3], respectively.
22
Operating Instructions
Document Version
2011/06
Before Use
Function Button Icons
Operation
Icon
TEL
Line Selection
Description
Used to select the TEL line.
Only displayed when the "Line Selection" setting is set to "IP +
TEL" (see page 26).
IP
Used to select the IP line.
PS
Used to select the PS line.
Only displayed when the "Line Selection" setting is set to "IP +
PS" (see page 44).
PC
Used to select the PC line.
Only displayed when the "Line Selection" setting is set to "IP +
PC" (see page 46).
LINE
Used to change the "Line Selection" setting (see page 33).
ANSWER
Used to answer an incoming call (see page 38).
REJECT
Used to reject an incoming call (see page 38).
Used to make a call (see page 34).
Starting and
Ending Calls
END
Used to end the current call.
CONF
Used to establish a conference call (see page 36 and page 38).
SPEED
Used to slow down the other party’s speech while on a call (see
page 39).
URI
Used when you want to enter a SIP URI.
Only displayed when making a call on an IP line when the "Operation
Mode" setting is set to "IP-PBX" (see page 34).
EXT.
Used when you want to enter a SIP extension number.
Only displayed when making a call on an IP line when the "Operation
Mode" setting is set to "IP-PBX" (see page 34).
Used to open the phonebook (see page 40).
Phonebook
ADD
Used to add an entry to the phonebook (see page 40).
EDIT
Used to edit a phonebook entry (see page 41).
CHAR
Used to switch between alphabet entry mode and extended entry mode (see
page 40).
Used to move the cursor to the left.
Used to move the cursor to the right.
ERASE
Document Version
2011/06
Used to erase an entry in the phonebook (see page 41).
Operating Instructions
23
Before Use
Operation
Recording and
Playback
Icon
Description
REC
Used to start recording to the SD memory card (see page 42).
PLAY
Used to play the selected recording (see page 42).
STOP
Used to stop recording (see page 42).
Used to rewind the current recording (see page 43).
Used to fast forward the current recording (see page 43).
ERASE
Used to erase a recording (see page 43).
BACK
Used to return to the previous screen.
SELECT
Other
SAVE
Used to save any changes made while programming the unit.
YES
Used to accept the displayed item or proceed with the current operation.
NO
Used to decline the displayed item or cancel the current operation.
FORMAT
24
Operating Instructions
Used to select the displayed item.
Used to format an SD memory card (see page 31).
Document Version
2011/06
Preparation
Preparation
Basic Connections
This section explains all connections needed to make and receive IP line and TEL line calls.
• To connect a Portable Station (PS) to the unit, see page 44.
• To connect a computer to the unit, see page 45 or page 46.
A AC Adaptor Cord
B LAN Cable
C 2-conductor Telephone
Cord
D To AC Outlet
F
F Groove
D
LINE
E To Switching Hub
G Telephone Jack or PBX
(RJ11C)
LAN DC IN
A
B
E
G
C
1. Connect the unit to the desired IP network and/or telephone line.
• To connect to an IP network, connect a category 5 LAN cable to the LAN port and to a switching hub.
• To connect to a telephone line, connect a telephone cord to the LINE jack and to a modular telephone
jack.
2. Connect the AC adaptor cord of the included AC adaptor to the unit’s DC input.
• To use PoE (Power over Ethernet), connect the LAN cable to a PoE-compatible (IEEE802.3af)
switching hub or power supply. The included AC adaptor does not need to be connected when using
PoE.
• If using an AC adaptor, use only the included AC adaptor (PQLV206).
• Pass the AC adaptor cord through the groove on the bottom of the unit.
3. Connect the AC adaptor to the AC outlet.
Note
•
The AC adaptor must remain connected at all times (unless the unit is powered by PoE). It is normal
for the adaptor to feel warm during use.
Document Version
2011/06
Operating Instructions
25
Preparation
Setting the Date & Time
TEL Line Settings
Set the unit's date and time setting before using the unit.
The date and time are shown on the display in standby
mode, and are displayed when playing conversations
that were recorded to an SD memory card.
1. Press [MENU].
2. Select "Basic Settings", then press SELECT .
Selecting the Available Lines
3. Select "Date & Time", then press SELECT .
4. Using the keypad, enter 2 digits each for the year,
month, day of the month, hour (24-hour format), and
minute.
Example: To enter "Jan. 23, 2011, 7:45 PM", press
[1101231945].
• If you make a mistake, press
to move
the cursor as needed, then enter the correct
number.
5. Press SAVE .
6. Press [MENU].
Note
•
•
26
You can select 12-hour or 24-hour time display
(see page 52).
The date format varies by the selection made
for the "Language" setting. See page 51 for
details.
Operating Instructions
To use the TEL line, the "Line Selection" setting
must be set to "IP + TEL". (This is the default setting.)
1. Press [MENU].
2. Press LINE .
3. Select "IP + TEL".
• When "Line Selection" is set to "IP +
PC" or "IP + PS", TEL calls cannot be made or
received.
4. Press SAVE .
5. Press [MENU].
Setting the Dial Mode
Set the dial mode to "Pulse" if the TEL line does not
support tone dialing.
1. Press [MENU].
2. Select "TEL Settings", then press SELECT .
3.
4.
5.
6.
Select "Dial Mode", then press
Select "Pulse" or "Tone".
Press SAVE .
Press [MENU].
SELECT
.
Document Version
2011/06
Preparation
Manual Assignment (Static)
IP Network Settings
To properly connect the unit to an IP network, the
following settings must be set to match the settings of
the IP network. Consult your system administrator for
the appropriate settings.
– IP address mode: Automatic (DHCP) or manual
(static) IP address assignment (default: static)
– IP address (when static connection mode is
selected; default: 192.168.0.2)
– Subnet mask (when static connection mode is
selected; default: 255.255.255.0)
– Default gateway (when static connection mode is
selected; default: 0.0.0.0)
Note
•
IP addresses can be entered using the keypad.
[0]–[9] are used to enter numbers and [ ] is
used to enter a period. For example, to enter
"192.168.0.1", press [192 168 0 1].
Automatic Assignment (DHCP)
SELECT
3.
4.
5.
6.
.
Select "IP Address Mode", then press
Select "Static", then press
SAVE
SELECT
.
.
Select "IP Address", then press SELECT .
Enter the IP address to be assigned to the unit, then
press SAVE .
7. Select "Subnet Mask", then press SELECT .
8. Enter the subnet mask, then press SAVE .
9. Select "Default Gateway", then press SELECT .
10. Enter the IP address of the default gateway, then
press
SAVE
.
11. Press [MENU].
Note
•
•
1. Press [MENU].
2. Select "IP Network Settings", then press
SELECT
1. Press [MENU].
2. Select "IP Network Settings", then press
If this setting is changed, the unit must be
restarted before the new setting becomes
effective (see page 47).
To confirm the IP address, press
[MENU]®[Show IP Address]® SELECT .
.
3. Select "IP Address Mode", then press
4. Select "DHCP", then press SAVE .
5. Press [MENU].
SELECT
.
Note
•
•
If this setting is changed, the unit must be
restarted before the new setting becomes
effective (see page 47).
To confirm the IP address, press
[MENU]®"Show IP Address"® SELECT .
Document Version
2011/06
Operating Instructions
27
Preparation
Note
SIP Settings
•
To use the unit as a SIP extension of the PBX, the unit
must be registered as a SIP extension through PBX
programming, the "Operation Mode" setting must be
set to "IP-PBX" (see page 29), and the following
settings must be set to match the settings of the PBX.
Consult your system administrator for the appropriate
settings. Refer to the PBX documentation to register the
unit as a SIP extension.
1. Press [MENU].
2. Select "Protocol Settings", then press
SELECT .
3. Select "SIP Ext. No.", then press SELECT .
4. Enter the unit’s extension number (max. 32
characters), then press
SAVE
.
• If this field is left empty, the value set for "SIP
Ext. No." will be used as the SIP
authentication ID.
6. Enter the SIP Authentication ID (max. 32
characters), then press SAVE .
SELECT
7. Select "SIP Password", then press SELECT .
8. Press EDIT .
9. Enter the password (max. 32 characters), then
press [ENTER].
10. Select "SIP User Domain Name", then press
SELECT .
11. Enter the IP address or domain name (max. 64
characters) of the PBX, then press SAVE .
12. Select "SIP Proxy Server IP Address", then
press SELECT .
13. Enter the IP address of the PBX, then press
SAVE .
14. Select "SIP Proxy Server Port Number",
then press SELECT .
15. Enter the SIP port number of the PBX or SIP proxy
server, then press SAVE .
16. Select "SIP Registrar IP Address", then
press SELECT .
17. Enter the IP address of the PBX, then press
SAVE .
18. Select "SIP Registrar Port Number", then
press SELECT .
19. Enter the SIP port number of the PBX or SIP
registrar server, then press SAVE .
20. Press [MENU].
Operating Instructions
•
•
.
5. Select "SIP Authentication ID", then press
28
•
When the unit is connected to a device other
than a Panasonic PBX, "Panasonic PBX
Compatibility" in "Protocol Settings"
must be set to "Off" (default: On).
You can switch between numeric and alphabet
entry modes by pressing CHAR , and change
between uppercase and lowercase character
entry by pressing [ ]. See page 64 for
information on entering characters.
If this setting is changed, the unit must be
restarted before the new setting becomes
effective (see page 47).
To confirm the SIP extension number, press
[MENU]®"SIP Ext. No."® SELECT .
Correcting a Mistake
To correct a mistake, press
or
to move
the cursor to the desired position, then follow one of the
procedures below.
– To add a character or number, press the
appropriate dial key.
– To erase the selected character or number, press
].
[
To erase all characters and numbers, press and hold
[
].
Document Version
2011/06
Preparation
Operation Mode
By selecting an operation mode, the unit can be
operated as a SIP extension of the PBX, a peer to peer
IP conferencing phone, or a computer's USB audio
device. The available line selection for each operation
mode is as follows:
Operation Mode
Available Line Selection
IP + TEL
IP + PS
IP-PBX
IP + PC
IP + TEL
Peer to Peer
IP + PS
IP + PC
USB Audio
–
1. Press [MENU].
2. Select "Operation Mode", then press SELECT .
3. Select the desired setting.
• "IP-PBX": The unit can make and receive IP
calls as a SIP extension of the PBX. To make a
call, the other party’s SIP extension number or
SIP URI is specified. (This is the default setting.)
• "Peer to Peer": Peer to peer IP calls are
possible. To make a call, the other party’s IP
address is specified.
• "USB Audio": The unit operates as the USB
audio device of a computer (see page 45).
4. Press SAVE .
5. Press [MENU].
Note
•
•
If this setting is changed, the unit must be
restarted before the new setting becomes
effective (see page 47).
When the operation mode is set to "USB
Audio", IP, TEL, PS or PC calls cannot be
made or received.
Document Version
2011/06
Operating Instructions
29
Preparation
Using SD Memory Cards
Conversations can be recorded to the SD memory card.
For information on recording conversations, see
page 42.
Inserting and Removing Cards
Insert the SD memory card as shown, with the label side
facing up. To remove the card, gently push the card to
release it, then remove the card.
• When an SD memory card is inserted, SD is shown
in the upper-left corner of the display.
SD flashes while reading the data.
•
Important Information
To prevent data corruption or damage to the SD
memory card, which may also affect the performance
of the unit, keep the following in mind.
• Do not remove the SD memory card, LAN cable, or
disconnect the unit from the AC outlet during
playback, recording, formatting, reading, or while
erasing data on the card.
• Do not move or bump the unit during playback,
recording, formatting, reading, or while erasing data
on the card.
• Do not touch the contacts on the bottom of the SD
memory card.
• To prevent damage to the unit, do not insert any
memory card other than a compatible SD memory
card.
Compatible Cards
The unit supports the following SD memory cards.
– SD, miniSD, and microSD memory cards.
• Use a miniSD or microSD adaptor when using
miniSD or microSD memory cards,
respectively, and always insert the miniSD or
microSD memory card into the adaptor before
inserting the adaptor into the unit.
– Cards with a capacity of 32 MB to 2 GB.
30
Operating Instructions
Note
•
•
The unit does not support SDHC, miniSDHC,
and microSDHC memory cards.
SD memory cards with a low minimum transfer
rate may not be able to record conversations.
Approximate Recording Time
Capacity
Approx. Recording
Time
2 GB
67 hours
1 GB
33 hours
512 MB
17 hours
256 MB
8 hours
128 MB
4 hours
64 MB
2 hours
32 MB
1 hour
Write-protection (LOCK)
SD memory cards can be locked to prevent formatting,
erasing, and recording. To lock an SD memory card,
slide the switch on the side of the card to the "LOCK"
position.
WRITE
LOCK
Backing Up Data
Data stored on SD memory cards can become
corrupted if the card is exposed to electromagnetic
fields, static electricity, etc. We recommend using a
computer to back up important data stored on SD
memory cards.
Document Version
2011/06
Preparation
Formatting SD Memory Cards
If
FORMAT
is displayed, the SD memory card must be
formatted; press
FORMAT
to format the card.
Notice
•
•
•
When an SD memory card is formatted, all
information on the card is erased.
Do not remove the SD memory card, LAN cable,
or disconnect the unit from the AC outlet while
formatting an SD memory card.
Do not move or bump the unit while formatting
an SD memory card.
Note
•
The unit cannot format cards that are not
already in FAT format. Use a computer to format
non-FAT formatted cards.
Formatting With a Computer
When formatting cards with a computer, select the FAT
(FAT16) format.
Notice
•
When an SD memory card is formatted, all
information on the card is erased.
Document Version
2011/06
Operating Instructions
31
Preparation
Using the Microphones
Built-in Microphones
For best performance when using the built-in
microphones, speak within about 3 m (about 10 ft.) of
the unit.
3 m (about 10 ft)
3 m (about 10 ft)
Note
•
The sensitivity of the built-in microphones may
vary depending on room characteristics.
External Wired MIC
An optional KX-NT701 External Wired MIC can be
connected to the unit using the EXT MIC1 (A) or EXT
MIC2 (B) jacks. 2 mics can be connected.
B
A
For best performance when using an External Wired
MIC:
– Do not move an External Wired MIC while on a call.
(Feedback may occur.)
– Place each External Wired MIC at least 1 m (about
3 ft.) away from the unit.
– Speak within about 2 m (about 6.5 ft.) of the External
Wired MIC.
2 m (about 6.5 ft)
2 m (about 6.5 ft)
Note
•
•
•
32
The sensitivity of an External Wired MIC may
vary depending on room characteristics.
The built-in microphones continue to function
when an External Wired MIC is connected.
The indicator of an External Wired MIC
indicates unit status the same as the built-in
indicators (see page 20).
Operating Instructions
Document Version
2011/06
Making and Answering Calls
Making and Answering Calls
Line Selection
The unit can make calls using the following lines.
– IP line (see page 34)
– TEL line (see page 34)
– PS line (see page 44)
– PC line (see page 46)
When you make a call, the line icon in the upper-right
corner of the display indicates the line that will be used,
therefore, you should confirm the line icon each time
you make a call.
You can change the selected line by pressing the center
function button ([F2]). The line that will be selected is
indicated by the function button icon.
Example:
1. The IP line is selected.
Selecting the Available Lines
The IP line is always available when the unit is
connected to an IP network; if it is not selected (i.e., if it
is not shown in the upper-right corner of the display),
you can select it by pressing
.
IP
Whether the TEL line, PS line, or PC line is available is
determined by the "Line Selection" setting. For
example, when it is set to "IP + PS", the IP and PS
lines are available.
You can change the "Line Selection" setting using
the following procedure.
1. Press [MENU].
2. Press LINE .
3. Select the desired setting.
• "IP + TEL": The IP and TEL lines are
available.
• "IP + PS": The IP and PS lines are available.
• "IP + PC": The IP and PC lines are available.
4. Press SAVE .
5. Press [MENU].
Note
2.
TEL
is pressed. The TEL line is now selected.
•
When the operation mode is set to "USB
Audio", the "Line Selection" setting is
disabled.
Note
•
If the unit is not connected to an IP network,
is not displayed and the IP line cannot
IP
be selected.
Document Version
2011/06
Operating Instructions
33
Making and Answering Calls
Making Calls
•
Making a Call to a Phone Number or
IP Address
•
1. Confirm that the desired line ("IP" or "TEL") is
selected.
• You can change the selected line by pressing
the center function button ([F2]).
The IP line is selected.
The TEL line is
selected.
If the unit is not connected to an IP network,
is not displayed and the IP line cannot
IP
be selected.
The call length shown on the display is an
approximation and may differ from the actual
length of the call. Call charges accumulate after
the called party answers.
Making a Call to a SIP Extension
Number or SIP URI
1. Confirm that the "IP" line is selected.
• You can change the selected line by pressing
the center function button ([F2]).
The IP line is selected.
[F2]
.
[F2]
•
If you cannot select the desired line, change the
"Line Selection" setting (see page 33).
2. Press [ ].
3. Enter the phone number or IP address.
• IP addresses can be entered using the keypad.
[0]–[9] are used to enter numbers and [ ] is
used to enter a period. For example, to enter
"192.168.0.1", press [192 168 0 1]. After
entering the IP address, press [#] or [ENTER].
• To temporarily use tone dialing when the line
mode is set to pulse mode, press [ ].
• After a call starts, the approximate length of the
call is shown on the display.
4. To end the call, press [ ].
Note
•
•
•
•
34
To make a call to a SIP extension number or
SIP URI, see page 34.
To make a call using the phonebook, see
page 35.
To make a call with a Portable Station (PS) or
computer connected to the unit, see page 44
or page 45.
During the first 30 seconds of a TEL call, the unit
adjusts itself for optimal sound quality. Speak in
turns with the other party at the beginning of a
conversation. (The time required varies
depending on the condition of the telephone line
and the audio characteristics of the room.)
During this time, sound may cut out or fade in
and out. This is normal.
Operating Instructions
[F2]
•
If you cannot select the desired line, change the
"Line Selection" setting (see page 33).
2. Enter the SIP extension number or SIP URI.
• To enter a SIP URI:
1. Press a dial key.
The center function button icon will change
to URI .
2. Press URI to select SIP URI.
3. "sip:" is displayed automatically. Enter the
SIP URI after the colon.
Example:
sip:User name*1@*2Domain name*3
(max. 32 characters) (max. 64 characters)
*1
You can also enter a SIP extension number
instead of a user name.
*2
To enter @, press CHAR to switch the
character entry mode to alphabet entry mode,
then press [#] once.
You can also enter an IP address instead of a
domain name.
*3
If a domain name is not entered after the @, the
value specified in "SIP User Domain
Name" is used as the domain name when dialing
(see page 56).
Document Version
2011/06
Making and Answering Calls
•
•
•
You can switch between numeric and alphabet
entry modes by pressing CHAR , and change
between uppercase and lowercase character
entry by pressing [ ]. See page 62 for
information on entering characters.
A period can be entered by pressing [1], when
the character entry mode is alphabet entry
mode.
If you make a mistake, press [
], then enter
the correct SIP extension number or SIP URI.
To erase all numbers, press and hold [
].
3. Press [ ] or
.
4. To end the call, press [
].
Adjusting the Speaker Volume
While on a call, press [ ] or [ ] repeatedly to adjust
the speaker volume. There are 8 levels of volume.
Quieter
•
Louder
If the other party has difficulty hearing you, press
[ ] to decrease the speaker volume. Your voice
heard by the other party will become louder.
Redialing
The last 10 calls made are stored in the redial list, in
order of newest to oldest call.
1. Press [REDIAL/PAUSE].
• The last call made is displayed.
2. Press [ ] or [ ] repeatedly to scroll through the
list.
• To erase the displayed item, press ERASE .
• To exit the redial list, press [MENU].
3. When the desired entry is displayed, press [ ] or
.
•
•
If the "Line Selection" setting is not set to
"IP + TEL" (see page 33), TEL line calls
cannot be redialed.
If the dialed number contains too many
characters, it cannot be redialed correctly. The
maximum for each type of number is as follows:
– TEL line: 128 digits
– IP line (SIP extension number): 32
characters
– IP line (SIP URI): 97 characters (excluding
"sip:")
Entering Dialing Pauses
A pause is sometimes required when making calls on
the TEL line using a PBX or a long distance service. For
example, if you must dial "9" before dialing an outside
phone number, you probably wait (pause) after dialing
"9" until you hear a dial tone.
By pressing the [REDIAL/PAUSE] button when dialing,
the unit will store the dialing pause along with the phone
number in the redial list. If you make a call from the
redial list later, the unit will dial the number wait for the
pre-programmed number of seconds (default: 3 s; see
page 54) for each dialing pause you entered.
Example:
1. Press [9] (to access an outside line of a PBX).
2. Press [REDIAL/PAUSE].
• Press [REDIAL/PAUSE] repeatedly to create
longer pauses. An additional pause is inserted
each time [REDIAL/PAUSE] is pressed.
3. Dial the phone number.
4. Press [ ] or
.
Making a Call from the Phonebook
Note
•
The TEL line will
be used when
you redial this
number.
The line that was used to make each call in the
redial list ("IP" or "TEL") is shown in the
lower-right corner of the display. This line will be
used when the call is redialed.
Example:
Document Version
2011/06
See page 40 to add entries to the phonebook.
1. Press
.
2. Press [ ] or [ ] repeatedly to scroll through the
phonebook entries.
• Entries are displayed in the following order
when [ ] is pressed.
Symbols®Numbers®Letters
Operating Instructions
35
Making and Answering Calls
•
Press the dial key corresponding to the desired
character, then press [ ] or [ ] to scroll if
necessary.
• To exit the phonebook, press [MENU].
3. When the desired entry is displayed, press [ ] or
.
The line that was selected when the entry was
stored in the phonebook ("IP" or "TEL") is
shown in the lower-right corner of the display.
This line will be used when the entry is called.
While on a call, you can make another call and establish
a conference call (i.e., a 3-party call) including yourself
and 2 other parties. You can establish a conference call
using the following types of calls.
– 2 IP calls
– 1 IP call and 1 TEL call
– 1 IP call and 1 PS call
– 1 IP call and 1 PC call
To establish a conference call when you receive a call,
see page 38.
Example:
Note
Note
•
Making Conference Calls
The TEL line will
be used when
you call this
number.
•
When "Panasonic PBX Compatibility" in
"Protocol Settings" is set to "On", you
cannot make a conference call using 2 IP lines
in "IP-PBX" mode (see page 58).
Conference calls using the IP and TEL lines
•
If the "Line Selection" setting is not set to
"IP + TEL" (see page 33), TEL line numbers
cannot be called.
1. Press CONF to put the current call on hold.
2. Confirm that the desired line ("IP" or "TEL") is
selected.
• If the current call is an IP call, you can change
the selected line by pressing the left function
button ([F1]).
The TEL line is
selected.
The IP line is selected.
[F1]
[F1]
•
If you cannot select the desired line, press
BACK , then change the "Line Selection"
setting (see page 33). After you have changed
the setting, repeat this procedure from step 1.
3. Call the party you want to add to the conversation.
• You can end the second call and return to the
original call by pressing BACK .
• To call a party stored in the phonebook, see
page 35.
4. After the called party answers, press CONF to
begin the conference call.
• Before beginning the conference call, press
to end the second call and return to the
END
original call.
36
Operating Instructions
Document Version
2011/06
Making and Answering Calls
Note
•
We recommend setting the "TEL Line Level
Reduction" setting to "On" when establishing
conference calls that use the TEL line (see
page 54).
Adding a PS or PC line call to an IP call
1. Confirm that the "Line Selection" setting is set
to "IP + PS" or "IP + PC" as necessary (see
page 33).
2. Press CONF to put the current call on hold.
3. Press the left function button ([F1]) to select the PS
or PC line.
Example: Pressing
PS
The IP line is selected.
to select the PS line.
The PS line is selected.
[F1]
4. Make a call using the PS or computer.
5. After the called party answers, press
CONF
to
begin the conference call.
• Before beginning the conference call, press
to end the second call and return to the
END
original call.
Note
•
When the operation mode is set to "USB
Audio", conference calls cannot be made.
Ending a Conference Call
Press [ ] to disconnect both parties.
or
1. Press END .
•
Press BACK to continue the call.
2. Press [ ] or [ ] to select the party you would like
to remove from the conference, then press SELECT .
• The selected party is disconnected and you can
continue to speak with the remaining party.
• To disconnect both parties, select "All", then
press SELECT .
Document Version
2011/06
Operating Instructions
37
Making and Answering Calls
Answering Calls
When a call is being received, the type of call being
received is shown on the display.
Example: "Incoming Call on IP Line"
Notice
•
•
When "Line Selection" (see page 33) is set
to "IP + PC" or "IP + PS", TEL calls cannot
be made or received.
When the operation mode is set to "USB
Audio", IP, TEL, PS or PC calls cannot be
made or received.
1. Press [ ] or ANSWER .
• The unit does not support Caller ID; caller
phone numbers are not displayed when calls
are received.
• You can refuse an incoming call by pressing
REJECT .
• After a call begins, the approximate length of the
call is shown on the display.
2. To end the call, press [ ].
Note
•
During the first 30 seconds of a TEL call, the unit
adjusts itself for optimal sound quality. Speak in
turns with the other party at the beginning of a
conversation. (The time required varies
depending on the condition of the telephone line
and the audio characteristics of the room.)
During this time, sound may cut out or fade in
and out. This is normal.
Adjusting the Ringer Volume
When the unit is in standby mode or is receiving a call,
press [ ] or [ ] repeatedly to adjust the ringer volume.
There are 4 levels of volume, including "Off".
Receiving a Second Call (Call
Waiting)
While on a call, you can receive a second call, and then
join the 2 calls and establish a conference call.
While on an IP call:
You can receive either a TEL or an IP call.
While on a TEL, PS, or PC call:
You can receive an IP call.
Note
•
•
•
In order to use this feature, the "Call
Waiting" setting (see page 53) must be set
to "Enable" (this is the default setting).
When a second call is received, a call waiting
tone will be heard. See page 53 to adjust the
call waiting tone volume.
When "Panasonic PBX Compatibility" in
"Protocol Settings" is set to "On", you
cannot receive a second call on an IP line in
"IP-PBX" mode (see page 58). You can only
receive a second call on a TEL line.
Refusing a second call
Press REJECT . The second caller is disconnected and
the current call continues.
Confirming the caller then creating a
conference call
1. Press ANSWER .
• The first call is put on hold, and you can talk to
the second caller.
To end the second call, press END , then
continue the first call.
2. Press CONF to establish a conference call.
•
Creating a conference call immediately
Press
CONF
.
Ending a conference call
Off
Low
High
Press [ ] to disconnect both parties.
or
1. Press END .
•
Press BACK to continue the call.
2. Press [ ] or [ ] repeatedly to select the party you
would like to remove from the conference, then
press SELECT .
• The selected party is disconnected and you can
continue to speak with the remaining party.
• To disconnect both parties, select "All", then
press SELECT .
38
Operating Instructions
Document Version
2011/06
Making and Answering Calls
Useful Features Available
During a Call
Conversion Mode
Talking Mode
¯
Mute
Conversion Mode
Listening Mode
You can mute your voice during a conversation. While
the mute is turned on, you will be able to hear the other
party, but the other party will not be able to hear you.
To mute your voice, press [
]. To return to the
conversation, press [
] again.
Note
•
•
Conversion Mode
Off
Note
•
While the mute is turned on, "Mute" is displayed
and the indicators light in red.
All built-in microphones and each External
Wired MIC are muted when the mute is turned
on.
•
•
Flash
Pressing [FLASH] allows you to use optional telephone
company services, such as call waiting, or PBX
features, such as extension transfers.
Note
•
•
¯
To change the flash time, see page 54.
This feature is not available for IP calls.
Mic Noise Reduction
You can press the [MIC NOISE CUT] button during a
call to reduce the ambient noise that is picked up by the
microphones and sent to the other party.
Each time the button is pressed, the setting changes
and is shown briefly on the display.
Mic Noise Cut
High
Speech Speed Conversion
You can adjust the speed of the other party's speech
down during a call by pressing SPEED .
The following speech speed modes are available.
– Talking Mode (slight speed reduction)
Recommended for calls in which you and the other
party are equally participating in the conversation.
– Listening Mode (greater speed reduction)
Recommended for calls in which the other party is
speaking more, and you are listening.
You can select the desired mode by pressing SPEED
during a call. Each time the button is pressed, the
setting changes and is shown briefly on the display.
Document Version
2011/06
"Slow" is shown on the display while this
feature is active.
If the other party speaks for more than 5
seconds without stopping, this feature will stop
functioning. Once the other party stops talking
for about 1 second, this feature will function
again.
When this feature is turned off, the other
party’s speech may cut out briefly.
¯
Mic Noise Cut
Low
¯
Mic Noise Cut
Off
Note
•
•
"Noise Cut ON" is shown on the display while
this feature is active.
The quality of the sound heard by the other
party may decrease slightly while this feature is
active, due to surrounding noise.
Operating Instructions
39
Phonebook
Phonebook
Adding Entries to the
Phonebook
You can add up to 100 entries to the phonebook.
To make a call from the phonebook, see page 35.
.
1. Press
• The display shows the number of entries in the
phonebook.
• Entries cannot be added to the phonebook
when the PS line or PC line is selected.
2. Press ADD .
3. Enter the name (max. 16 characters), then press
[ENTER].
• See page 63 for information on entering
characters.
• To insert a space when there is no character
under the cursor, press
.
• To insert a space after the last character
entered, press
two times.
4. Press [ ] or [ ] to select the line ("TEL", "IP(IP
Address)", "IP(SIP Ext. No.)", or "IP(SIP
URI)") that will be used when you call the entry,
then press SELECT .
• When the operation mode (see page 29) is set
to "Peer to Peer", select "TEL" or "IP(IP
Address)".
When the operation mode (see page 29) is set
to "IP-PBX", select "TEL", "IP(SIP Ext.
No.)" or "IP(SIP URI)".
5. Enter the phone number (max. 32 digits), IP
address, SIP extension number (max. 32
characters) or SIP URI (max. 97 characters), then
press [ENTER] or SAVE .
• IP addresses can be entered using the keypad.
[0]–[9] are used to enter numbers and [ ] is
used to enter a period. For example, to enter
"192.168.0.1", press [192 168 0 1].
• If you selected "IP(SIP URI)", "sip:" is
displayed automatically. Enter the SIP URI after
the colon.
Example:
sip:User name*1@*2Domain name*3
(max. 32 characters) (max. 64 characters)
*1
You can also enter a SIP extension number instead of
a user name.
*2
To enter @, press
*3
CHAR to switch the character
entry mode to alphabet entry mode, then press [#]
once.
You can also enter an IP address instead of a domain
name.
If a domain name is not entered after the @, the
value specified in "SIP User Domain
Name" is used as the domain name when dialing
(see page 56).
• A period can be entered by pressing [1], when
the character entry mode is alphabet entry
mode.
• To temporarily use tone dialing when the line
mode is set to pulse mode, press [ ].
• If a pause is required when making a call on the
TEL line (see page 35), press [REDIAL/
PAUSE] between digits as necessary.
• To add an another entry, press ADD , then
continue from step 3.
6. Press [MENU].
Note
•
•
If you do not press any buttons for 1 minute, the
unit will return to standby mode.
Only one type of destination (phone number, IP
address, SIP extension number or SIP URI) can
be stored in each phonebook entry.
Entering Characters
The dial keys are used to enter characters and
numbers. Each dial key has multiple characters
assigned to it. To enter a character, press the
appropriate dial key, repeatedly if necessary. To enter
another character that is assigned to the same dial key,
first press
to move the cursor to the right.
Character Entry Modes
When adding entries to the phonebook, the following
character entry modes are available. The current entry
mode is shown in the upper-right corner of the display.
[ABC2]: Displayed when alphabet entry mode is
selected.
40
Operating Instructions
Document Version
2011/06
Phonebook
[1234]: Displayed when numeric entry mode is
selected.
[AÄÅ2]: Displayed when extended entry mode is
selected.
Press CHAR to switch the character entry mode. Press
[ ] to change between uppercase and lowercase
character entry.
See page 63 for a list of all available characters.
Correcting a Mistake
or
to move
To correct a mistake, press
the cursor to the desired position, then follow one of the
procedures below.
– To add a character or number, press the
appropriate dial key.
– To erase the selected character or number, press
[
].
To erase all characters and numbers, press and hold
[
].
3. Press YES .
• To cancel, press
4. Press [MENU].
NO
.
Erasing All Entries
1.
2.
3.
4.
Press
Press
ERASE
.
.
Press YES .
Press [MENU].
Note
•
You can also erase entries using the "Erase
All Phonebook Data" feature (see
page 65).
Editing Entries
1. Search for the desired phonebook entry (see
2.
3.
4.
5.
6.
page 35).
Press EDIT .
Edit the name if necessary, then press [ENTER].
Press [ ] or [ ] to select the line ("TEL", "IP(IP
Address)", "IP(SIP Ext. No.)", or "IP(SIP
URI)") that will be used when you call the entry,
then press SELECT .
Edit the phone number, IP address, SIP extension
number or SIP URI if necessary, then press
[ENTER] or SAVE .
Press [MENU].
Note
•
If you do not press any buttons for 1 minute, the
unit will return to standby mode.
Erasing Entries
Erasing 1 Entry
1. Search for the desired phonebook entry (see
page 35).
2. Press
ERASE
Document Version
.
2011/06
Operating Instructions
41
Recording
Recording
Recording Features
Conversations and voice memos can be recorded to an
SD memory card.
SD Memory Card Information
Confirm the following before recording to an SD
memory card.
– A compatible card is inserted (see page 30)
• When an SD memory card is inserted, SD is
shown in the upper-left corner of the display.
– The card has been formatted using the correct
format (see page 31).
– The card is not locked (see page 30).
• If you insert a locked card, "Write
Protected" is displayed.
Note
•
•
•
•
•
No more than 100 recordings can be made,
regardless of the SD memory card capacity.
When "Memory Full" is displayed, recording
is not possible until other recordings are erased.
If the card becomes full while recording,
recording will stop.
See page 30 for information on approximate
recording time.
While recording, if the amount of recording time
available is less than 6 minutes, "Remaining
Time Less Than 6 Min." is displayed
briefly, and the display’s backlight flashes until
recording stops. When less than 1 minute is
available, "Remaining Time Less Than 1
Min." is briefly displayed.
When recording telephone conversations, we
recommend informing the other party that the
conversation is being recorded.
Be sure to comply with applicable local
regulations (laws, ordinances, guidelines, etc.)
regarding telephone conversation recording.
Recording
Conversations
1. Press REC during a conversation.
• "Remaining Time" and the approximate
recording time available are displayed briefly,
then "Conf Recording" and the approximate
length of the call are displayed.
2. To stop recording, press STOP .
•
Recording stops automatically when [
pressed.
] is
Recording Voice Memos
You can record a voice memo while the unit is in
standby mode.
1. Press [MENU] while the unit is in standby mode.
2. Select "Voice Memo", then press REC .
• "Remaining Time" and the approximate
recording time available are displayed briefly,
then "Memo Recording" and the approximate
length of the call are displayed.
3. To stop recording, press STOP .
• Recording stops automatically when a call is
received.
Playing Back Recordings
1. Press PLAY .
2. Press [ ] or [ ] repeatedly to scroll through the
list of recordings, then press SELECT .
• Recorded conversations are displayed as
plus the date and time of the recording.
plus the
Voice memos are displayed as
date and time of the recording.
3. Press PLAY .
• Press [BACK] to stop playback.
• If the selected recording is less than 1 second
long, "Unable To Use" is displayed and the
recording cannot be played back.
4. Press [MENU] to exit.
Note
•
42
Operating Instructions
Recordings are saved in PCM format and can
be played back on a computer using Windows
Media® Player or QuickTime®. Recordings are
Document Version
2011/06
Recording
•
•
stored on the SD memory card in the following
folder: "\\PRIVATE\MEIGROUP\PCC\IPSP".
When accessed by a computer, recordings are
displayed as "REC" plus a 3 digit number (000–
100; the lowest available number is used when
a file is saved on the SD memory card). The file
extension is ".WAV".
Example: "REC001.WAV"
If the names of files or folders are changed
using a computer, the recordings cannot be
played back using the unit.
Erasing Recordings
Erasing 1 Recording
1. Press PLAY .
2. Press [ ] or [ ] repeatedly to scroll through the
list of recordings, then press
ERASE
.
3. Press YES .
• "Erased" is displayed.
4. Press [MENU].
Note
Features Available During Playback
The following features are available during playback.
Operation
Feature
Press [
Play next
recording
Press [#] ([
]) then
PLAY
Play current
recording again
Press [ ] ([
]) then
PLAY
Play previous
recording
Press [ ] ([
]) 2 times, then
Fast forward
Press
Press
Press
]
1. Press PLAY .
2. Press ERASE .
3. Press YES .
• "All Erased" is displayed.
PLAY
Press
Press
Press
PLAY
for 4´ speed
again for 60´ speed
for playback
PLAY
for 4´ speed
again for 60´ speed
for playback
Pause
Press [0] ([ ])
Press PLAY to resume playback
Erase current
recording
Press
Document Version
To erase a recording while listening to it, press
ERASE , then press
YES .
Erasing All Recordings
Volume control
Rewind
] or [
•
2011/06
ERASE
, then
YES
.
Operating Instructions
43
Using a Portable Station (PS) or Computer
Using a Portable Station (PS) or Computer
Using a Portable Station
(PS)
By connecting the unit to a PS, you can use the unit’s
microphones and speaker for calls made or received
with the PS.
•
If you cannot select "PS", change the "Line
Selection" setting to "IP + PS" (explained
on this page).
2. Make or answer a call using the PS.
3. Connect the included PS Cable to the [AUDIO IN/
OUT] jack of the unit (A), and to the headset jack
of the PS.
Compatible Portable Stations (as of January,
2011)
–
KX-TD7680
–
KX-TD7685
–
KX-TD7690
–
KX-TD7695
–
KX-TD7684
–
KX-TD7696
–
KX-TD7694
–
KX-TD7896
A
•
–
KX-WT125
–
KX-WT126
Line Selection (IP + PS)
1. Press [MENU].
2. Press LINE .
• When the operation mode is set to "USB
Audio", LINE is not displayed and you cannot
select a line type.
3. Select "IP + PS".
• When "Line Selection" is set to "IP +
PS", TEL calls cannot be made or received.
4. Press SAVE .
5. Press [MENU].
Make sure the plug of the PS Cable is inserted
fully into the unit and PS, otherwise sound may
not be heard, or echoing and feedback may
occur.
• Place the PS as far away from the unit as
possible.
4. Press [ ] to begin using the unit’s microphones
and speaker.
• Press [ ] again to turn off the microphones
and speaker.
5. Use the PS to end the call.
6. Turn off the unit’s microphones and speaker by
pressing [ ].
Note
•
Using a PS
1. Confirm that "PS" is shown in the upper-right corner
of the display.
• You can change the selected line by pressing
the center function button ([F2]).
44
The IP line is selected.
The PS line is selected.
[F2]
[F2]
Operating Instructions
•
•
•
For best performance, we recommend setting
the receiver volume of the PS as follows:
– 4-volume level models: level 3
– 6-volume level models: level 4
For best performance, do not change the
speaker (receiver) volume of the PS frequently
during a call. Echoing or feedback may occur.
The microphone and receiver of the PS cannot
be used while the PS is connected to the unit.
This feature will not function when a mobile
phone or incompatible PS is connected to the
unit.
Document Version
2011/06
Using a Portable Station (PS) or Computer
Using a Computer
By connecting the unit to a computer, you can use the
unit’s microphones and speaker for calls made or
received with the computer using your preferred IP
phone software. You can connect using the included
USB Cable or PC Cable.
difficulties with your operating system. Click
[Continue Anyway] to proceed with
installation.
3. Click [Finish].
Using a Computer
1. Confirm that "USB-AUDIO" is shown in the
upper-right corner of the display.
Connecting Using the USB
Cable
"USB Audio" mode is selected.
Changing the Operation Mode
1.
2.
3.
4.
5.
Press [MENU].
Select "Operation Mode", then press
Select "USB Audio".
Press SAVE .
Press [MENU].
SELECT
.
•
Notice
•
•
If this setting is changed, the unit must be
restarted before the new settings becomes
effective (see page 47).
When the operation mode is set to "USB
Audio", IP, TEL, PS or PC calls cannot be
made or received. Also, Conferencing Phone
Manager cannot be operated.
Connecting to a Computer
1. Connect the included USB Cable to the USB port
(A) of the unit, and to the USB port of the computer.
2.
3.
4.
5.
If "USB-AUDIO" is not shown on the display,
change the operation mode to "USB
Audio" (explained on this page).
Press [ ] to begin using the unit’s microphones
and speaker.
• Press [ ] again to turn off the microphones
and speaker.
Use the desired computer software to make or
answer a call.
Use the software to end the call.
Turn off the unit’s microphones and speaker by
pressing [ ].
Note
•
•
A
USB
•
•
The new hardware wizard is displayed on the
computer. If the new hardware wizard is not
displayed automatically, set the operation mode
to "IP-PBX" or "Peer to Peer" (see
page 29).
2. Select [Install the software automatically
(Recommended)] and then click [Next].
• A dialog may be displayed that indicates the
software has not passed Windows logo testing.
This is normal. The software will not cause any
Document Version
2011/06
•
Change the settings of the following parameters
of the IP phone software while on a call.
– AGC (Automatic Gain Control): OFF
– Echo canceling: OFF
– Volume: Middle
When changing the speaker volume while on a
call, change the unit's volume setting. Keep the
volume of the IP phone software on the middle
level.
If feedback or echoing occurs while on a call,
decrease the speaker volume of the computer
or the IP phone software.
Leave at least 50 cm (about 20 in.) of space
between the unit and the computer.
Operating Instructions
45
Using a Portable Station (PS) or Computer
Connecting Using the PC Cable Using a Computer
1. Confirm that "PC" is shown in the upper-right corner
Connecting a Computer
of the display.
• You can change the selected line by pressing
the center function button ([F2]).
Connect the included PC Cable to the [AUDIO IN/
OUT] jack of the unit (A), and to the microphone jack
(red plug; B) and headphone jack (green plug; C) of
the computer.
The IP line is selected.
The PC line is selected.
[F2]
[F2]
B
A
C
Note
•
•
The microphone and speaker of the computer
cannot be used while the computer is
connected to the unit.
2.
Line Selection (IP + PC)
1. Press [MENU].
2. Press LINE .
• When the operation mode is set to "USB
Audio", LINE is not displayed and you cannot
select a line type.
3. Select "IP + PC".
• When "Line Selection" is set to "IP +
PC", TEL calls cannot be made or received.
4. Press SAVE .
5. Press [MENU].
46
Operating Instructions
3.
4.
5.
If you cannot select "PC", change the "Line
Selection" setting to "IP + PC" (explained
on this page).
Press [ ] to begin using the unit’s microphones
and speaker.
• Press [ ] again to turn off the microphones
and speaker.
Use the desired computer software to make or
answer a call.
Use the computer to end the call.
Turn off the unit’s microphones and speaker by
pressing [ ].
Note
•
Leave at least 50 cm (about 20 in.) of space
between the unit and the computer.
Document Version
2011/06
Programming the Unit
Programming the Unit
Changing and
Confirming Settings
Settings can be programmed and confirmed from the
front panel. To use Conferencing Phone Manager
(found on the included CD-ROM) to program the unit
from a computer, see the Operating Instructions for
Conferencing Phone Manager for more details.
– Line Selection
– TEL Settings (all parameters)
Using Conferencing Phone Manager
To use Conferencing Phone Manager (found on the
included CD-ROM) to program the unit from a
computer, see the Operating Instructions for
Conferencing Phone Manager for more details.
Changing Settings
Restarting the Unit
Using the Front Panel
After changing the following parameters, the unit must
be restarted in order for the new settings to take effect.
(Data is not erased when the unit is restarted.)
– Operation Mode (page 51)
– IP Address Mode (page 54)
– IP Address (page 55)
– Subnet Mask (page 55)
– Default Gateway (page 55)
– SIP Ext. No. (page 55)
– SIP Authentication ID (page 56)
– SIP Password (page 56)
– SIP User Domain Name (page 56)
– SIP Proxy Server IP Address (page 56)
– SIP Proxy Server Port Number (page 57)
– SIP Registrar IP Address (page 57)
– SIP Registrar Port Number (page 57)
– Hold Method (page 57)
– Panasonic PBX Compatibility (page 58)
– SIP Signaling Port Number (page 58)
– VLAN ID (page 59)
– VLAN Priority (page 59)
– SIP ToS Field (page 60)
– RTP ToS Field (page 60)
1. Press [MENU].
2. Press [ ] or [ ] to select the desired programming
3.
4.
5.
6.
category, then press SELECT .
Press [ ] or [ ] to select the desired parameter,
then press SELECT .
Adjust the settings as desired.
• To cancel without changing any settings, press
[MENU].
Press SAVE .
Press [MENU].
Note
•
•
•
•
When programming the unit from the front
panel, the current setting is indicated on the
display by "ü".
To return to the previous screen, press
[BACK].
If you do not press any buttons for 1 minute, the
unit will return to standby mode.
The following parameters cannot be
programmed, and are therefore not displayed,
when the unit is in use.
– Operation Mode
– Language
– Date & Time
– Time Format
– Ringer Volume
– Ringtone
– IP Network Settings (all parameters)
– Protocol Settings (all parameters)
– VoIP Settings (all parameters)
– QoS Settings (all parameters)
Additionally, the following parameters cannot
be programmed, and are therefore not
displayed, when the TEL, PS, or PC line is in
use.
Document Version
2011/06
1.
2.
3.
4.
Press [MENU].
Select "System Options", then press
Select "Reboot", then press
Select "Yes", then press
SELECT
SELECT
SELECT
.
.
.
Note
•
•
To use Conferencing Phone Manager to restart
the unit, see the Operating Instructions for
Conferencing Phone Manager for more details.
You can also restart the unit by turning it off and
on again:
– When using the AC adaptor: Disconnect
the AC adaptor from the AC outlet, then
connect it again.
Operating Instructions
47
Programming the Unit
– When using PoE: Disconnect the LAN
cable from the unit, then connect it again.
48
Operating Instructions
Document Version
2011/06
Programming the Unit
Parameter List
The following is a list of all programmable parameters. See the references listed here for information about
each parameter.
Programming Category
Parameter
Reference
SIP Ext. No. (IP-PBX mode only)
page 51
Show IP Address
page 51
Operation Mode
page 51
Basic Settings
Language
page 51
Date & Time
page 52
Time Format
page 52
Ringer Volume
page 52
Ringtone
page 52
LCD Contrast
page 52
Key Tones
page 53
Call Waiting Tone Volume
page 53
Call Waiting
page 53
Line Selection
TEL Settings
IP Network Settings
Protocol Settings
Document Version
2011/06
page 53
Dial Mode
page 53
Flash Time
page 54
Pause Time
page 54
TEL Line Level Reduction
page 54
IP Address Mode
page 54
IP Address
page 55
Subnet Mask
page 55
Default Gateway
page 55
SIP Ext. No.
page 55
SIP Authentication ID
page 56
SIP Password
page 56
SIP User Domain Name
page 56
SIP Proxy Server IP Address
page 56
SIP Proxy Server Port Number
page 57
Operating Instructions
49
Programming the Unit
Programming Category
VoIP Settings
QoS Settings
System Status
Confirmation
System Options
50
Operating Instructions
Parameter
Reference
SIP Registrar IP Address
page 57
SIP Registrar Port Number
page 57
Hold Method
page 57
Panasonic PBX Compatibility
page 58
Preferred CODEC
page 58
RTP Packet Size
page 58
SIP Signaling Port Number
page 58
RTP Port Number (Minimum)
page 59
RTP Port Number (Maximum)
page 59
DTMF Type
page 59
VLAN ID
page 59
VLAN Priority
page 59
SIP ToS Field
page 60
RTP ToS Field
page 60
Software Version
page 60
IP Address
page 60
Subnet Mask
page 60
Default Gateway
page 60
DHCP Server
page 60
MAC Address
page 60
Erase All Call Log Data
page 60
Erase All Phonebook Data
page 60
Reset System Data
page 61
Reset All Data
page 61
Reboot
page 61
Document Version
2011/06
Programming the Unit
Parameters
When programming the unit from the front panel, the current setting is indicated on the display by "ü".
SIP Ext. No.
Description
Allows you to confirm the unit's SIP extension number. This parameter is only available when the operation
mode is set to "IP-PBX".
To change the SIP extension number, see page 28.
Show IP Address
Description
Allows you to confirm the unit’s IP address.
To change the IP address, see page 27.
Available Settings
Default Setting
—
192.168.0.2
Available Settings
Default Setting
Operation Mode
Description
The unit can be operated as a SIP extension of the PBX, a
peer to peer IP conferencing telephone, or a computer's
USB audio device.
• If this setting is changed, the unit must be restarted
before the new setting becomes effective (see
page 47).
IP-PBX
Peer to Peer
USB Audio
IP-PBX
Basic Settings
Language
Description
Determines the display language.
Use the following procedure to change the language.
1. Press [MENU].
2. Press [ ] or [ ] repeatedly to select "Basic
Settings".
3. Press [ENTER] two times.
4. Press [ ] or [ ] repeatedly to select the desired
language.
5. Press [ENTER].
6. Press [MENU].
Document Version
2011/06
Available Settings
English(US)
Español
Français
Français(C)
Italiano
Nederlands
Português
Deutsch
English(UK)
Default Setting
English(US)
Operating Instructions
51
Programming the Unit
Date & Time
Description
The date and time are shown on the
display in standby mode, and are
displayed when playing
conversations that were recorded
to an SD memory card.
• Using the keypad, enter 2 digits
each for the year, month, day of
the month, hour (24-hour
format), and minute.
Example: To enter "Jan. 23,
2011, 7:45 PM", press
[1101231945].
• To correct a mistake, press
to move the cursor as
needed, then enter the correct
number.
Available Settings
Default Setting
Jan. 1, 2011, 12:00 AM
Year, month, day of the month,
hour (24-hour format), minute
Date format is determined by the
display language (see page 51).
English(US): MM/DD/YYYY
Español: DD/MM/YYYY
Français: DD/MM/YYYY
Français(C): YYYY-MM-DD
Italiano: DD/MM/YYYY
Nederlands: DD-MM-YYYY
Português: DD-MM-YYYY
Deutsch: DD.MM.YYYY
English(UK): DD/MM/YYYY
Time Format
Description
Determines the time format.
Available Settings
12-hour
24-hour
Default Setting
12-hour
Ringer Volume
Description
Determines the ringer volume.
Available Settings
Default Setting
4 levels including "Off"
High
Available Settings
Default Setting
Tone Pattern 1
Tone Pattern 2
Tone Pattern 3
Tone Pattern 1
Available Settings
Default Setting
6 levels
Level 3
Ringtone
Description
Determines the ringtone.
LCD Contrast
Description
Determines the LCD contrast.
52
Operating Instructions
Document Version
2011/06
Programming the Unit
Key Tones
Description
Determines whether tones are heard when the unit’s
buttons are pressed.
Available Settings
On
Off
Default Setting
On
Call Waiting Tone Volume
Description
Determines the volume of the call waiting tone heard when
a second call is received.
Available Settings
High
Low
Default Setting
High
Call Waiting
Description
Determines whether a call can be received when you are
already on another call.
Available Settings
Enable
Disable
Default Setting
Enable
Line Selection
Description
Determines which lines can be used to make and receive
calls.
Available Settings
IP + TEL
IP + PC
IP + PS
Default Setting
IP + TEL
TEL Settings
Dial Mode
Description
Determines the dial mode used for the TEL line.
• Set this parameter to match the specification of the TEL
line.
Document Version
2011/06
Available Settings
Pulse
Tone
Default Setting
Tone
Operating Instructions
53
Programming the Unit
Flash Time
Description
Determines the flash time.
• Set this parameter to match the specification of the TEL
line.
Available Settings
900 ms
700 ms
600 ms
400 ms
300 ms
250 ms
200 ms
160 ms
110 ms
100 ms
90 ms
80 ms
Default Setting
700 ms
Pause Time
Description
Determines the length of the dialing pause inserted when
[REDIAL/PAUSE] is pressed.
Available Settings
3 s
5 s
Default Setting
3 s
TEL Line Level Reduction
Description
Determines whether the incoming TEL line signal level is
reduced. Set this feature to "On" if the volume of your voice
heard from the speaker is too loud.
• When set to "On", the other party’s voice will be slightly
quieter.
• We recommend setting this feature to "On" when
establishing conference calls that use the TEL line.
Available Settings
On
Off
Default Setting
Off
IP Network Settings
Consult your system administrator for the appropriate settings.
IP Address Mode
Description
Determines whether the unit’s IP address is assigned
automatically (DHCP) or manually (static).
• If this setting is changed, the unit must be restarted
before the new setting becomes effective (see
page 47).
54
Operating Instructions
Available Settings
DHCP
Static
Default Setting
Static
Document Version
2011/06
Programming the Unit
IP Address
Description
Available Settings
Default Setting
Determines the unit’s IP address.
• This parameter is only available when "IP Address
Mode" is set to "Static".
• If this setting is changed, the unit must be restarted
before the new setting becomes effective (see
page 47).
—
192.168.0.2
Description
Available Settings
Default Setting
Set this parameter to match the IP address of the IP
network’s subnet mask.
• This parameter is only available when "IP Address
Mode" is set to "Static".
• If this setting is changed, the unit must be restarted
before the new setting becomes effective (see
page 47).
—
255.255.255.0
Description
Available Settings
Default Setting
Set this parameter to match the IP address of the IP
network’s default gateway.
• This parameter is only available when "IP Address
Mode" is set to "Static".
• If this setting is changed, the unit must be restarted
before the new setting becomes effective (see
page 47).
—
0.0.0.0
Available Settings
Default Setting
Max. 32 characters
—
Subnet Mask
Default Gateway
Protocol Settings
Consult your system administrator for the appropriate settings.
SIP Ext. No.
Description
Set this parameter to match the extension number
assigned to the unit through PBX programming.
• If this setting is changed, the unit must be restarted
before the new setting becomes effective (see
page 47).
Document Version
2011/06
Operating Instructions
55
Programming the Unit
SIP Authentication ID
Description
Available Settings
Default Setting
Max. 32 characters
—
Description
Available Settings
Default Setting
Set this parameter to match the password assigned to the
unit through PBX programming.
• If this setting is changed, the unit must be restarted
before the new setting becomes effective (see
page 47).
Max. 32 characters
—
Description
Available Settings
Default Setting
Set this parameter to match the IP address or domain name
of the IP-PBX.
• If this setting is changed, the unit must be restarted
before the new setting becomes effective (see
page 47).
Max. 64 characters
—
Description
Available Settings
Default Setting
Set this parameter to match the IP address of the IP-PBX.
• If this setting is changed, the unit must be restarted
before the new setting becomes effective (see
page 47).
—
0.0.0.0
Set this parameter to match the SIP authentication ID
assigned to the unit through PBX programming.
If this field is left empty, the value set for "SIP Ext.
No." will be used as the SIP authentication ID.
• If this setting is changed, the unit must be restarted
before the new setting becomes effective (see
page 47).
SIP Password
SIP User Domain Name
SIP Proxy Server IP Address
56
Operating Instructions
Document Version
2011/06
Programming the Unit
SIP Proxy Server Port Number
Description
Available Settings
Default Setting
1024–50999
5060
Description
Available Settings
Default Setting
Set this parameter to match the IP address of the IP-PBX.
• If this setting is changed, the unit must be restarted
before the new setting becomes effective (see
page 47).
—
0.0.0.0
Available Settings
Default Setting
1024–50999
5060
Available Settings
Default Setting
Set this parameter to match the SIP port number of the
IP-PBX or SIP proxy server.
The communication protocol used is UDP.
• If this setting is changed, the unit must be restarted
before the new setting becomes effective (see
page 47).
SIP Registrar IP Address
SIP Registrar Port Number
Description
Set this parameter to match the SIP port number of the
IP-PBX or SIP registrar server.
The communication protocol used is UDP.
• If this setting is changed, the unit must be restarted
before the new setting becomes effective (see
page 47).
Hold Method
Description
Determines the hold protocol used for the IP line.
• If this setting is changed, the unit must be restarted
before the new setting becomes effective (see
page 47).
Document Version
2011/06
RFC2543
RFC3264
RFC3264
Operating Instructions
57
Programming the Unit
Panasonic PBX Compatibility
Description
Determines whether the unit can be connected to a
Panasonic PBX.
• Set this setting to "On" when connecting to a Panasonic
PBX.
• If this setting is changed, the unit must be restarted
before the new setting becomes effective (see
page 47).
Available Settings
On
Off
Default Setting
On
VoIP Settings
Preferred CODEC
Description
Determines the preferred codec for IP calls.
Available Settings
G.722
G.711μ-law
G.711A-law
G.729a
Default Setting
G.722
RTP Packet Size
Description
Determines the size of outgoing RTP packets.
Available Settings
20
30
40
50
60
ms
ms
ms
ms
ms
Default Setting
20 ms
SIP Signaling Port Number
Description
Determines the port number used for SIP signaling.
The communication protocol used is UDP.
• If this setting is changed, the unit must be restarted
before the new setting becomes effective (see
page 47).
58
Operating Instructions
Available Settings
Default Setting
1024–50999
5060
Document Version
2011/06
Programming the Unit
RTP Port Number (Minimum)
Description
Available Settings
Default Setting
Determines the lowest port number used for RTP.
The communication protocol used is UDP.
• Set this parameter to a value lesser than the setting for
"RTP Port Number (Maximum)".
51000–51998
(even values only)
51000
Description
Available Settings
Default Setting
Determines the highest port number used for RTP.
The communication protocol used is UDP.
• Set this parameter to a value greater than the setting
for "RTP Port Number (Minimum)".
51002–52000
(even values only)
52000
Available Settings
Default Setting
RTP Port Number (Maximum)
DTMF Type
Description
Determines the type of DTMF signal sent during a call.
In-band
Out-of-band
Out-of-band
QoS Settings
VLAN ID
Description
Determines the VLAN ID.
• If this setting is changed, the unit must be restarted
before the new setting becomes effective (see
page 47).
Available Settings
Default Setting
0001–4095
4095
Available Settings
Default Setting
0–7
0
VLAN Priority
Description
Determines the VLAN priority.
• If this setting is changed, the unit must be restarted
before the new setting becomes effective (see
page 47).
Document Version
2011/06
Operating Instructions
59
Programming the Unit
SIP ToS Field
Description
Determines the value of the SIP ToS Field.
• If this setting is changed, the unit must be restarted
before the new setting becomes effective (see
page 47).
Available Settings
Default Setting
8-bit binary code
00000000
Available Settings
Default Setting
8-bit binary code
00000000
RTP ToS Field
Description
Determines the value of the RTP ToS Field.
• If this setting is changed, the unit must be restarted
before the new setting becomes effective (see
page 47).
System Status Confirmation
Description
The settings for the following parameters can be displayed for confirmation.
– Software Version
– IP Address
– Subnet Mask
– Default Gateway
– DHCP Server
– MAC Address
System Options
Erase All Call Log Data
Description
Allows you to erase all entries in the redial list.
Erase All Phonebook Data
Description
Allows you to erase all entries in the phonebook.
60
Operating Instructions
Document Version
2011/06
Programming the Unit
Reset System Data
Description
Allows you to reset all system data (i.e., the parameters described in this section) to the factory default settings.
• After executing this feature, the unit will restart automatically.
• The following data and settings are not erased when this feature is executed.
– "Date & Time" setting (note that the "Time Format" setting is reset)
– Phonebook entries
– Redial list
– SD memory card recordings
Reset All Data
Description
Allows you to reset all system data (i.e., the parameters described in this section), user data, and all settings.
The unit is returned to its factory default state when this feature is executed.
• After executing this feature, the unit will restart automatically.
• The following data and settings are not erased when this feature is executed.
– SD memory card recordings
• The following data and settings are erased when this feature is executed.
– "Date & Time" setting
– Phonebook entries
– Redial list
Reboot
Description
Allows you to restart the unit.
• No data is erased when this feature is executed.
Document Version
2011/06
Operating Instructions
61
Character Entry
C
h
Entering Characters
The dial keys can be used to enter characters on the unit.
Available characters depend on the type of entry being made, as follows:
• Making a call after entering a SIP extension number or SIP URI (see page 34)
• Storing a SIP extension number or SIP URI in the phonebook (see page 40)
• Storing a name in the phonebook (see page 40)
• Changing SIP settings ("SIP Ext. No.", "SIP Authentication ID", "SIP Password" or "SIP User
Domain Name") (see page 28)
a
r
a
c
t
e
r
E
n
t
r
y
Character Tables
SIP Extension Number or SIP URI Entry When Dialing or Storing in
Phonebook
Alphabet Entry Mode
Dial Key
Uppercase
Lowercase
0
1
2
A B C 2
a b c 2
3
D E F 3
d e f 3
4
G H I 4
g h i 4
5
J K L 5
j k l 5
6
M N O 6
m n o 6
7
P Q R S 7
p q r s 7
8
T U V 8
t u v 8
9
W X Y Z 9
w x y z 9
Changes between uppercase and lowercase character entry.
#
Note
•
•
62
"@" can only be used when entering a SIP URI.
A period can be entered by pressing [1], when the character entry mode is alphabet entry mode.
Operating Instructions
Document Version
2011/06
Character Entry
Phonebook Name Entry
Dial Key
Alphabet Entry Mode
Extended Character Entry Mode
0
1
A B C 2
2
a b c 2
D E F 3
3
d e f 3
G H I 4
4
g h i 4
J K L 5
5
j k l 5
M N O 6
6
m n o 6
P Q R S 7
7
p q r s 7
T U V 8
8
t u v 8
W X Y Z 9
9
w x y z 9
Changes between uppercase and lowercase
character entry.
Changes between uppercase and lowercase
character entry.
#
Note
•
•
A space counts as one character.
A period can be entered by pressing [1], when the character entry mode is alphabet entry mode or
extended character entry mode.
Document Version
2011/06
Operating Instructions
63
Character Entry
SIP Settings
Alphabet Entry Mode
Dial Key
Uppercase
Lowercase
0
1
2
A B C 2
a b c 2
3
D E F 3
d e f 3
4
G H I 4
g h i 4
5
J K L 5
j k l 5
6
M N O 6
m n o 6
7
P Q R S 7
p q r s 7
8
T U V 8
t u v 8
9
W X Y Z 9
w x y z 9
Changes between uppercase and lowercase character entry.
#
Note
•
64
A period can be entered by pressing [1], when the character entry mode is alphabet entry mode.
Operating Instructions
Document Version
2011/06
Initialization Features
Initialization Features
Erasing Data
2. Select "System Options", then press SELECT .
3. Select "Erase All Phonebook Data", then
The following features allow you to erase system data
and user data stored in the unit.
Erase All Call Log Data
Allows you to erase all entries in the redial list.
Erase All Phonebook Data
Allows you to erase all entries in the phonebook.
Reset System Data
Allows you to reset all system data to the factory
default settings.
• The following data and settings are not erased
when this feature is executed.
– "Date & Time" setting (note that the
"Time Format" setting is reset)
– Phonebook entries
– Redial list
– SD memory card recordings
Reset All Data
Allows you to reset all system data, user data, and
all settings. The unit is returned to its factory default
state when this feature is executed.
• The following data and settings are not erased
when this feature is executed.
– SD memory card recordings
• The following data and settings are erased
when this feature is executed.
– "Date & Time" setting
– Phonebook entries
– Redial list
press
SELECT
.
4. Select "Yes", then press
5. Press [MENU].
SELECT
.
Resetting System Data
1. Press [MENU].
2. Select "System Options", then press SELECT .
3. Select "Reset System Data", then press
SELECT
.
4. Select "Yes", then press SELECT .
• The unit will restart automatically.
Resetting All Data
Notice
•
1.
2.
3.
4.
The unit is returned to its factory default state
when this feature is executed. All user data
(except for the contents of the SD memory card)
will be erased.
Press [MENU].
Select "System Options", then press
SELECT
.
Select "Reset All Data", then press
SELECT
.
Select "Yes", then press SELECT .
• The unit will restart automatically.
Note
•
These features do not erase the contents of the
SD memory card. To erase the SD memory
card, see page 43.
Erasing the Redial List
1. Press [MENU].
2. Select "System Options", then press SELECT .
3. Select "Erase All Call Log Data", then press
SELECT
.
4. Select "Yes", then press
5. Press [MENU].
SELECT
.
Erasing the Phonebook
1. Press [MENU].
Document Version
2011/06
Operating Instructions
65
Troubleshooting
T
r
Troubleshooting
If you are experiencing trouble, refer to the information in this section. Before troubleshooting, confirm all
connections (see page 25) and confirm that the AC outlet or PoE device to which the unit is connected to is
receiving power.
o
u
b
l
e
s
h
General Use
o
Possible Cause & Solution
Issue
o
Reference
t
i
The display is blank.
•
The unit is not receiving power.
→ The unit is not designed to function when there is a power
failure. Make sure that the unit is connected to the AC
outlet and receiving power. If using PoE, confirm that the
device supplying PoE is receiving power and that the LAN
cable is properly connected.
page 25
•
Cables or cords are not connected properly.
→ Check all connections.
page 25
•
An error has occurred.
→ Reset the unit. Disconnect the unit from the AC outlet, wait
10 seconds, then connect the AC adaptor again. If using
PoE, disconnect the LAN cable, wait 10 seconds, then
connect the LAN cable again.
page 25
n
g
The unit is not performing
properly.
Making and Receiving Calls
Possible Cause & Solution
Issue
I cannot make IP calls.
•
•
•
•
66
Operating Instructions
Reference
The IP line is not selected.
→ Before dialing, confirm that "IP" is shown in the
upper-right corner of the display. Press the center function
button ([F2]) to change the line if necessary.
page 33
The IP address was entered incorrectly.
→ Confirm that you have entered the IP address of the other
party correctly.
page 34
The "Operation Mode" setting is not correct.
→ Change the setting to "Peer to Peer" if you want to
make or receive peer to peer IP calls (i.e., calls made by
specifying the called party's IP address).
→ Change the setting to "IP-PBX" if you want to make or
receive intercom and outside calls as a SIP extension (i.e.,
calls made by specifying the called party's SIP extension
number or SIP URI).
→ When the setting is "USB Audio", you cannot make or
receive IP calls. Change the setting to "Peer to Peer"
or "IP-PBX".
page 29
Consult your system administrator.
—
Document Version
2011/06
Troubleshooting
Issue
I cannot make TEL calls.
Possible Cause & Solution
•
•
•
•
I cannot receive IP calls.
I cannot receive TEL calls.
•
•
•
Document Version
2011/06
Reference
The TEL line is not selected.
→ Before dialing, confirm that "TEL" is shown in the
upper-right corner of the display. Press the center function
button ([F2]) to change the line if necessary.
page 33
The unit is not set to make TEL calls.
→ Make sure the "Line Selection" setting is set to "IP +
TEL".
page 26
The operation mode is set to "USB Audio".
→ When the operation mode is set to "USB Audio", you
cannot make or receive IP, TEL, PS or PC calls. Change
the setting to "Peer to Peer" or "IP-PBX".
page 29
The dial mode setting is incorrect.
→ Make sure that the dial mode matches the type of
telephone service you have (i.e., tone or pulse).
page 26
The "Operation Mode" setting is not correct.
→ Change the setting to "Peer to Peer" if you want to
make or receive peer to peer IP calls (i.e., calls made by
specifying the called party's IP address).
→ Change the setting to "IP-PBX" if you want to make or
receive intercom and outside calls as a SIP extension (i.e.,
calls made by specifying the called party's SIP extension
number or SIP URI).
→ When the setting is "USB Audio", you cannot make or
receive IP calls. Change the setting to "Peer to Peer"
or "IP-PBX".
page 29
The unit is not set to receive TEL calls.
→ Make sure the "Line Selection" setting is set to "IP +
TEL".
page 26
The operation mode is set to "USB Audio".
→ When the operation mode is set to "USB Audio", you
cannot make or receive IP, TEL, PS or PC calls. Change
the setting to "Peer to Peer" or "IP-PBX".
page 29
Operating Instructions
67
Troubleshooting
Issue
I cannot use the unit for PS
or PC calls.
Possible Cause & Solution
•
•
•
•
I cannot redial by pressing
[REDIAL/PAUSE].
•
•
•
•
68
Operating Instructions
Reference
The Portable Station (PS) or computer is not connected
correctly.
→ Confirm you are using the correct cable to connect to the
device, and that the cable is connected properly.
page 44
page 45
The operation mode is set to "USB Audio".
→ When the operation mode is set to "USB Audio", you
cannot make or receive IP, TEL, PS or PC calls. Change
the setting to "Peer to Peer" or "IP-PBX".
page 29
The PS or PC line is not selected.
→ Confirm that "PS" or "PC" is shown in the upper-right corner
of the display. Press the center function button ([F2]) to
change the line if necessary.
→ Make sure the "Line Selection" setting is set to "IP +
PS" (for PS calls) or "IP + PC" (for PC calls).
page 44
page 45
The PS or computer is not able to make or receive calls.
→ Disconnect the audio cable from the device and confirm
that the device is able to make or receive calls. If the
device cannot make calls, you cannot use the unit for PS
or PC calls. Refer to the operating instructions for the
device.
—
The number you are trying to redial is too long.
→ If the dialed number contains too many characters, it
cannot be redialed correctly. The maximum for each type
of number is as follows:
– TEL line: 128 digits
– IP line (SIP extension number): 32 characters
– IP line (SIP URI): 97 characters (excluding "sip:")
—
You pressed [REDIAL/PAUSE] after you began dialing.
→ If you press [REDIAL/PAUSE] after you begin dialing a
phone number, the button functions as the pause button.
To redial the last number dialed, press [ ] then [REDIAL/
PAUSE]. To redial one of the last 10 phone numbers
dialed, press [REDIAL/PAUSE], press [ ] or [ ] to
select the desired phone number, then press [ ].
page 35
You are trying to redial a TEL line call, but the unit is not set
to make TEL calls.
→ Make sure the "Line Selection" setting is set to "IP +
TEL".
page 26
The "Operation Mode" setting is not the same as when the
original call was made. (For example, you are trying to redial
an IP call made in IP-PBX mode, but the unit is now in peer to
peer mode.)
→ Change the setting.
page 29
Document Version
2011/06
Troubleshooting
Issue
I cannot make long
distance calls.
•
•
The unit does not ring
when a call is received.
•
I cannot make a 3-party
call using 2 IP lines in
"IP-PBX" mode.
•
Possible Cause & Solution
Reference
Your telephone service does not allow you to make long
distance calls.
→ Make sure that you have subscribed to your telephone
company's long distance service.
—
If the unit is connected to a PBX, your extension may not be
configured to make long distance phone calls.
→ Contact the PBX administrator.
—
The ringer is turned off.
→ Press [ ] while a call is being received, or change the
ringer volume setting.
page 38
The "Panasonic PBX Compatibility" setting is set to
"On".
→ Change the setting to "Off".
page 58
Sound Quality
Possible Cause & Solution
Issue
The other party cannot
hear my voice.
•
•
Document Version
2011/06
The unit is muted.
→ If "Mute" is displayed, press [
feature.
Reference
] to turn off the mute
Objects are obstructing the microphone.
→ Do not obstruct the unit or an External Wired MIC during
calls. Keep your hands, as well as common objects such
as folders, cups, and coffee pots away from the unit and
the External Wired MIC during calls.
page 39
—
Operating Instructions
69
Troubleshooting
Issue
Sound cuts out; I can hear
myself through the
speaker.
Possible Cause & Solution
•
•
•
Reference
The unit has not yet adapted to the environment for the current
call.
→ Speak in turns with the other party at the beginning of a
conversation. This allows the unit to adapt to its
environment so that both parties can speak effectively.
If using a PS, you are pressing [ ] before the PS call has
started.
→ Start the call using the PS, then press [ ].
—
page 44
If using a PS, the PS Cable is not firmly connected to the PS.
→ Make sure the plug of the PS Cable is inserted fully into
page 44
the PS, otherwise echoing and feedback may occur.
•
You are too far away from the microphone.
→ Try speaking closer to the microphone.
•
The environment is not suited to speakerphone calls.
→ Do not use the unit within 2 m (about 6.5 ft.) of projectors,
air conditioning devices, fans, or other audible or electrical
noise emitting devices.
→ If using the unit in a room with windows, close the curtains
or blinds to prevent echoes.
→ Use the unit in a quiet environment.
—
The unit or an External Wired MIC was moved during a call.
→ Do not move the unit or an External Wired MIC while on a
call.
—
Objects are obstructing the microphone.
→ Do not obstruct the unit or an External Wired MIC during
calls. Keep your hands, as well as common objects such
as folders, cups, and coffee pots away from the unit and
the External Wired MIC during calls.
—
The other party is using a half-duplex speakerphone.
→ If the other party is using a half-duplex speakerphone,
sound may cut out occasionally during calls. For best
performance, the other party should use a full-duplex
speakerphone.
—
•
•
Operating Instructions
—
•
•
70
If using DSL service, a device connected between the unit and
the telephone jack is causing interference.
→ Connect the unit directly to the telephone jack if possible,
and/or consult your DSL service provider.
page 32
Document Version
2011/06
Troubleshooting
SD Memory Cards
Issue
I cannot record to the SD
memory card.
Possible Cause & Solution
•
•
•
•
Reference
The SD memory card is not compatible with the unit.
→ Make sure that you are using a compatible SD memory
card. (SDHC, miniSDHC, and microSDHC memory cards
are not compatible with the unit.)
page 30
The SD memory card is not formatted or was not formatted
properly.
→ Format SD memory cards for use with this unit in FAT
format (FAT16) using a computer.
page 31
The SD memory card was not inserted properly.
→ Make sure that the SD memory card is inserted properly
by gently pushing it securely but gently toward the back of
the SD memory card slot.
page 30
The switch on the side of the SD memory card is in the
"LOCK" position.
→ Remove the card, slide the switch to unlock the card, then
insert the card again.
page 30
Phonebook
Possible Cause & Solution
Issue
I cannot add or edit entries
to the phonebook.
•
•
•
•
Document Version
2011/06
Reference
You are on a call or playing back recordings.
→ You cannot add or edit phonebook entries while on a call
or while playing back recordings.
—
The "Operation Mode" setting is not correct.
→ Change the setting to "Peer to Peer" if you want to add
or edit peer to peer IP call entries (i.e., entries stored by
specifying the called party's IP address).
→ Change the setting to "IP-PBX" if you want to add or edit
IP call entries that will be called when using the unit as a
SIP extension (i.e., entries stored by specifying the called
party's SIP extension number or SIP URI).
page 29
A call is being received.
→ The unit exits the phonebook automatically when a call is
received. Add or edit the phonebook entry again once you
have finished the call.
—
There are 100 entries in the phonebook.
→ The phonebook is full. Erase any unnecessary entries.
page 41
Operating Instructions
71
Troubleshooting
Issue
I cannot call entries in the
phonebook.
Possible Cause & Solution
•
•
The unit returns to standby
mode while adding or
editing phonebook entries.
•
Reference
You are trying to make a TEL line call, but the unit is not set
to make TEL calls.
→ Make sure the "Line Selection" setting is set to "IP +
TEL".
page 26
You are trying to make an IP line call, but the "Operation
Mode" setting is not correct.
→ Change the setting to "Peer to Peer" if you want to
make or receive peer to peer IP calls (i.e., calls made by
specifying the called party's IP address).
→ Change the setting to "IP-PBX" if you want to make or
receive intercom and outside calls as a SIP extension of
the connected PBX.
page 29
1 minute has passed since you pressed a button.
→ If you pause for over 1 minute while adding or editing
phonebook entries, the unit returns to standby mode.
—
Possible Cause & Solution
Reference
Programming
Issue
The unit returns to standby
mode while programming
the unit.
•
I cannot program the unit.
1 minute has passed since you pressed a button.
→ If you pause for over 1 minute while programming the unit,
the unit returns to standby mode.
—
•
You are on a call.
→ Program the unit once you have finished the call.
—
•
A call is being received.
→ The unit exits programming mode automatically when a
call is received. Program the unit again once you have
finished the call.
—
The unit must be restarted before the new setting becomes
effective.
→ Restart the unit.
page 47
The DTMF type differs from the type used by the other party
or PBX.
→ Make sure that the "DTMF Type" setting matches the
other party's or other PBX's setting.
page 59
After I changed the
settings, the changes do
not take effect.
•
The DTMF tone signal
sent from the unit is not
detected by the other party
or PBX.
•
Display Messages
Possible Cause & Solution
Message
Busy
72
Operating Instructions
•
The called party is busy (displayed for IP calls only).
→ Try again later.
Reference
—
Document Version
2011/06
Troubleshooting
Message
Possible Cause & Solution
Reference
Reject Call
•
The called party rejected your call (displayed for IP calls only).
→ Try again later.
—
Not Found
•
The called party cannot be connected (displayed for IP calls
only).
→ Confirm that you have entered the IP address, SIP
extension, or SIP URI of the other party correctly.
→ Try again later.
—
The phonebook contains no entries.
→ You must store entries in the phonebook before you can
make a call from the phonebook.
page 40
An error has occurred.
→ Press [BACK], then erase all phonebook entries using the
"Erase All Phonebook Data" feature.
page 65
An error has occurred.
→ Press [BACK], then erase the redial list using the "Erase
All Call Log Data" feature.
page 65
Phonebook
No Items Stored
•
Phonebook Error
•
Call Log Error
•
Please Wait
•
An SD memory card was inserted.
→ Wait while the unit checks the card.
—
Format Error
•
An error occurred while formatting the SD memory card.
→ Remove the SD memory card and use a different card.
—
Unable To Use
•
The SD memory card is not compatible with the unit.
→ Make sure that you are using a compatible SD memory
card.
→ SDHC, miniSDHC, and microSDHC memory cards are not
compatible with the unit.
page 30
•
The SD memory card is not formatted in FAT format.
→ Use a FAT format SD memory card.
page 31
•
The selected recording is less than 1 second long.
→ Recordings less than 1 second long cannot be played
back.
Memory Full
•
Write Protected
System Data Err
Clear Data?
•
•
The SD memory card cannot be used for recording because
it is full.
→ Erase unneeded recordings.
page 43
The switch on the side of the SD memory card is in the
"LOCK" position.
→ Remove the card, slide the switch to unlock the card, then
insert the card again.
page 30
An error has occurred.
→ Press YES to reset all system data and restart the unit.
Press
Document Version
2011/06
—
NO
—
to restart the unit without resetting any data.
Operating Instructions
73
Troubleshooting
Message
Possible Cause & Solution
No Connection To
Analog Line
•
No Connection To
SIP Server
No Connection To IP
Network
Hold Failure
Resume Failure
74
Operating Instructions
Reference
You tried to make a call immediately after refusing a call.
→ Wait until "TEL" is shown on the display, then make the
call.
—
•
The unit’s network settings and/or SIP settings are incorrect.
→ Consult your system administrator.
—
•
The LAN cable is not connected.
→ Check all connections.
•
The unit cannot receive IP settings from the DHCP server.
→ Consult your system administrator.
—
•
The call could not be put on hold.
→ Check the status of the other party (or IP-PBX).
→ Wait a while and try again.
—
The call could not be retrieved from hold status.
→ Check the status of the other party (or IP-PBX).
→ Wait a while and try again.
—
•
page 25
Document Version
2011/06
Other Information
Other Information
Cleaning the Unit
Clean the unit periodically with a soft, dry cloth.
Keep the following in mind when cleaning the unit.
• To avoid damaging the unit, disconnect the AC
adaptor cord and all cables from the unit before
cleaning.
• If the unit becomes particularly dirty, apply a light
kitchen cleanser to a soft cloth, wring the cloth
thoroughly, and wipe the unit. When finished, dry
the unit with a soft, dry cloth.
• To avoid damage or discoloration, do not clean the
unit with the following materials, or with cleaners
containing the following materials.
– Petroleum
– Scouring powder
– Alcohol
– Paint thinner
– Benzine
– Wax
– Hot water
– Powdered soap
• When using chemical cleansers, follow the
instructions on the label carefully.
Document Version
2011/06
Operating Instructions
75
Specifications
S
p
Specifications
e
Item
c
Specification
i
Communication Lines
4 (IP, TEL, PS, PC)
IP: Communication via IP network, available in peer to peer mode
and IP-PBX mode
TEL: Communication via telephone line
PS: Communication via audio connection to a compatible Portable
Station
PC: Communication via audio connection to a computer
Maximum No. of Parties
3
f
i
c
a
t
i
o
n
–
–
–
–
s
Main unit user + 2 IP calls
Main unit user + 1 IP call + 1 TEL call
Main unit user + 1 IP call + 1 PS call
Main unit user + 1 IP call + 1 PC call
VoIP Connection Method
SIP
VoIP Audio Codec
G.722, G.711 (µ-law/A-law), G.729a
LAN Interface
IEEE802.3/IEEE802.3u (10/100Base-TX)
Straight/cross automatic crossover (Auto MDI/MDX)
IP Address Mode
Automatic (DHCP), manual (static)
DTMF
Out-of-band (RFC2833), In-band
Dial Mode
Tone, pulse
Speaker
1 (Output: 85 dB; Frequency range: 300 Hz–7000 Hz)
Built-in Microphone
4 locations, 8 total (Sensitivity area: about 3 m [about 10 ft.])
IP Network Interface Jack (LAN)
1 (RJ45)
Telephone Interface Jack (LINE)
1 (RJ11)
USB Port
1 (USB 2.0, Full speed)
SD Memory Card Slot
1 (32 MB–2 GB)
Audio Interface Jack (AUDIO IN/OUT)
1 (ø 3.5 mm, monaural)
External Wired MIC Jack (EXT MIC1,
EXT MIC2)
2 (Modular jack)
Main Unit Dimensions
About 55 mm (H) ´ 275 mm (W) ´ 275 mm (D)
About 2 3/16 in. (H) ´ 10 1/16 in. (W) ´ 10 1/16 in. (D)
Main Unit Mass
About 1300 g (2.87 lb.)
AC Adaptor
Input: AC 120 V, 60 Hz
Output: DC 9 V 750 mA
PoE Interface
Compliant with IEEE802.3af
Power Consumption
Standby mode: about 4.8 W
Talk mode: about 6.5 W
76
Operating Instructions
Document Version
2011/06
Specifications
Item
Operating Environment
Document Version
2011/06
Specification
Temperature: 0 °C–40 °C (32 °F–104 °F)
Humidity: Less than 90% (with no condensation)
Ambient noise: Less than 50 dBA (recommended)
Operating Instructions
77
Index
Index
IP Network Settings
IP-PBX Mode 29
A
K
Key Tones
AC Adaptor 19, 25
Accessories 19
Answering Calls 38
AUDIO IN/OUT Jack 20
LAN Cable 25
LAN Port 20
Language 51
LCD Contrast 52
Line Icon (IP, TEL, PS, PC, USB-AUDIO)
Line Selection 33, 53
20, 32
22
M
C
Call Waiting 21, 38, 53
Call Waiting Tone Volume
Characters 62
Cleaning 75
Computer 45
Conference Calls 36, 38
Connections 25
Making Calls 34
MENU Button 21
MIC NOISE CUT Button
Microphones 32
Mute 39
Mute/Clear Button 21
53
Navigator/Volume Buttons
Noise Reduction 39
Date & Time 26, 52
Default Gateway 55
Dial Mode 53
Dialing Pause 35
Display 21, 22
Display Messages 72
DTMF Type 59
Operation Mode
F
Hold Method
57
I
Indicators 20
Initialize 65
IP Address 55
IP Address Mode
54
Operating Instructions
29, 51
P
ENTER Button 21
Erase All Call Log Data 60
Erase All Phonebook Data 60
Erasing Data 65
Error Messages 72
External Wired MIC 19, 32
External Wired MIC Jacks (EXT MIC1, EXT MIC2)
H
21
O
E
Feature List 49
FLASH Button 21, 39
Flash Time 54
Format 31
Function Buttons ([F1], [F2], [F3])
21
N
D
78
53
L
B
BACK Button 21
Built-in Microphones
Buttons 21
27
20
Panasonic PBX Compatibility 58
Parameter List 49
Pause Time 54
PC Cable 19
Peer to Peer Mode 29
Phonebook 35, 40
Playback 42
Playback Control Buttons 21
Portable Station (PS) 44
Preferred CODEC 58
Programming 47
PS Cable 19
R
22
Reboot 61
Recording 42
Recording Time 30
Redial 35
REDIAL/PAUSE Button 21
Reset 65
Reset All Data 61
Reset System Data 61
Restart 47
Ringer Volume 38, 52
Ringtone 52
RTP Packet Size 58
RTP Port Number (Maximum)
59
Document Version
2011/06
Index
RTP Port Number (Minimum)
RTP ToS Field 60
59
S
SD Icon 22
SD Memory Card 30
SD Memory Card Slot 20
Security 13
Settings 47
Show IP Address 51
SIP Authentication ID 56
SIP Ext. No. 51, 55
SIP Password 56
SIP Proxy Server IP Address 56
SIP Proxy Server Port Number 57
SIP Registrar IP Address 57
SIP Registrar Port Number 57
SIP Settings 28
SIP Signaling Port Number 58
SIP ToS Field 60
SIP User Domain Name 56
Speaker 20
Speaker Volume 35, 38
Speakerphone Button 21
Specifications 76
Speech Speed 39
Subnet Mask 55
System Status Confirmation 60
T
TEL Cord 25
TEL Line Level Reduction 54
Telephone Line Jack (LINE) 20
Time Format 52
Troubleshooting 66
U
USB Audio mode
USB Cable 19
USB Icon 22
USB Port 20
29
V
VLAN ID 59
VLAN Priority 59
Voice Memo 42
Document Version
2011/06
Operating Instructions
79
When you ship the product
Carefully pack and send it prepaid, adequately insured and preferably in the original
carton. Attach a postage-paid letter, detailing the symptom to the outside of the carton.
DO NOT send the product to the Executive or Regional Sales offices. They are NOT
equipped to make repairs.
Product service
For product service, ship the product to the address listed in the Limited Warranty.
Consult your authorized Panasonic dealer for detailed instructions.
One Panasonic Way, Secaucus, New Jersey 07094
http://www.panasonic.com/csd
Copyright:
This material is copyrighted by Panasonic System Networks Co., Ltd., and may be reproduced for internal use only. All other
reproduction, in whole or in part, is prohibited without the written consent of Panasonic System Networks Co., Ltd.
© Panasonic System Networks Co., Ltd. 2010
PSQX4655WA KK1008HF3061