Transcript
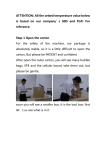
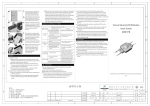
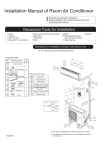
1. SELECTING THE INSTALLATION LOCATION
B. IF REMOTE CONTROLLER CABLE IS EXPOSED
F616499
Wired Remote Controller Installation Manual
Remote controller 1
1 3/16" or more
(30mm)
1 3/16"
(30mm)
or more
or more
SAFETY PRECAUTIONS
Upper case
•
•
•
Read the following “SAFETY PRECAUTIONS” carefully before installation.
Electrical work must be installed by a licensed electrician.
The caution items stated here must be followed because these important contents are related to safety. The meaning
of each indication used is as below.
Incorrect installation due to the non-observance of the instructions will cause harm or damage, and the seriousness is
classified by the following indications.
WARNING
This indication shows the possibility of causing death or serious injury.
CAUTION
This indication shows the possibility of causing injury or damage to properties only.
The items to be followed are classified by the symbols:
Symbol with white background denotes item that is PROHIBITED from doing.
1.
2.
1 3/16"
(30mm)
Mounting plate
Remote
controller
mounting
plate
Install the remote controller mounting plate to the wall with the two accessory screws 4.
Fasten the screws properly until screw head is lower than the rib and reach the base of remote controller
mounting plate to ensure they do not damage the PCB inside the remote controller 1.
4 23/32"
(120mm)
Perform a functional test to confirm that no abnormality occurs after the installation. Then, explain the operation,
care and maintenance to user as stated in instructions. Please remind the customer to keep the operating
instructions and installation instruction for future reference.
WARNING
•
•
Allow sufficient space around the remote controller 1 as shown in the illustration above.
Install in a place which is away from direct sunlight and high humidity.
Install on a flat surface to avoid warping of the remote controller. If installed to a wall with an uneven surface,
damage to the LCD case or operation problems may result.
Install in a place where the LCD can be easily seen for operation. (Standard height from the floor is 3.9ft to 4.9ft
(1.2 to 1.5 meters.))
Avoid installing the remote controller cable near refrigerant pipes or drain pipes, otherwise it will cause electrical
shock or fire.
The feeding-out direction for the remote controller cable can be either via top, left or right side.
Use nipper to cut a notch at the upper case. (Select the intended feeding-out position)
Route the remote controller cable 2 inside the mounting plate in accordance with the intended feeding-out
direction. (Refer to the illustration at below)
6. Insert firmly the connector of remote controller cable 2 to connector (CON1) in the upper case circuit board.
(Refer to the illustration at below)
7. Secure the remote controller upper case to the mounting plate with the tabs provided.
3.
4.
5.
Top feeding-out
position
Do not modify the length of the remote controller cable. Otherwise, it will cause fire or electrical shock.
Be sure to turn off the main power before installing and connecting the remote controller. Otherwise, it will
cause electrical shock.
Install strictly according to these installation instructions. If installation is defective, it will cause electrical shock
or fire.
2.
3.
Use specified accessories and parts for installation. Otherwise, it will cause the set to fall, fire or electrical
shock.
For electrical work, follow the local national wiring standards and regulations, and these installation
instructions. Otherwise, it will cause electrical shock or fire.
4.
5.
Wire routing must be properly arranged so that control board cover is affixed properly. If control board cover is
not affixed perfectly, it will cause fire or electrical shock.
Remove the remote controller 1 mounting plate.
(Insert a flat-tipped screw driver or similar tool 3/32" to 1/8" (2 to
3 mm) into one of the gaps at the bottom of the case, and twist
to open. Refer to the illustration at right.)
Be careful not to damage the mounting plate.
Do not remove the protective tape which is affixed to the
upper case circuit board when removing the remote controller
mounting plate.
Secure the mounting plate to an outlet box or wall. Refer to (A)
or (B) instructions below depending on your choice of cable
installation.
Be sure to use only the screws provided.
Do not over tighten the screws, as it may result in damage to
the mounting plate.
1.
Install on a flat surface to avoid warping of remote controller, or else damage to the LCD case or operation
problems may result.
2.
Avoid installing the remote controller cable near refrigerant pipes or drain pipes, otherwise it will cause
electrical shock or fire.
3.
Install the remote controller cable at least 1 31/32"(5cm) away from electric wires of other appliances to avoid
misoperation (electromagnetic noise).
5.
Be sure to use only the accessory screws to avoid damage of remote controller PCB.
6.
4.
Mounting plate
3. CONNECTING THE REMOTE CONTROLLER CABLE TO INDOOR UNIT
Gaps
Mounting plate
CAUTION
Screw 3
or
Screw 4
Embed an outlet box into the wall. Outlet box may be purchased separately. Medium-sized square outlet box
(obtain locally) Part No. DS3744 (Panasonic Corporation) or equivalent.
Secure the remote controller mounting plate to the outlet box with the two accessory screws 3 .
Make sure that the mounting plate is flat against the wall at this time, with no bending.
Pass the remote controller cable 2 into the box.
Route the remote controller cable 2 inside the mounting plate through rear feeding-out direction.
Insert firmly the connector of remote controller cable 2 to connector (CON1) in the upper case circuit board.
[Refer to the illustration at below.]
Secure the remote controller upper case to the mounting plate with the tabs provided.
Wall
ATTACHED ACCESSORIES
Be sure to turn off the main power before installing and connecting the remote controller.
Otherwise, it will cause electrical shock.
1.
Open front grille.
(Please refer to HOW TO TAKE OUT FRONT GRILLE in the
Service manual.)
2.
Open the control board cover and terminal board cover.
3.
Connect remote controller cable 2 to remote controller 1 and
guide the remote controller cable 2 into the unit through the
wire insertion hole.
4.
Guide the remote controller cable 2 into the remote controller
cable holder 5 and tighten with screws 6. Fasten the remote
controller cable holder with screw 7.
5.
Firmly insert the connector of remote controller cable 2 into
indoor PCB connector (CN-RMT) and tighten green wire from
remote controller cable 2 with screw 8 to the grounding
location provided.
6.
Reinstall the terminal board cover. Be careful not to clamp the cable between terminal board cover and control
board.
7.
After completion, reinstall the removed parts by following the reverse procedure.
* Make sure the remote control cable
wire is not touching the wire connected
to terminal board, as shown
Green wire
Connector
Control board cover (Remote controller)
(CN-RMT)
Front grille
Terminal
board cover
Upper case
No.
Name
Qty
Diagram
Remark
Remote controller
1
2
Remote controller cable
1
3
Screw
(M4 machine pitched - 1 3/16"
(30mm))
4
Screw
(M4 self tapping - 9/16"(14mm)
Length 32.5ft (9.9m)
3
Installing the remote controller to an outlet box
(embedded cable)
3
Installing the remote controller to the wall
(exposed cable)
5
Remote controller cable holder
1
6
Screw
(M4 machine screw & washer 13/32"(10mm))
1
Tighten remote controller cable with holder
7
Screw
(M3 self tapping - 5/16"(8mm))
1
Installing the remote controller cable to control
board
8
Screw
(M4 self tapping - 5/16"(8mm))
1
When the wall is hollow, please be sure to use
the sleeve for remote controller cable to prevent
dangers caused by mice biting the cable.
Connector (CON1)
Mounting plate
Terminal
board cover
CAUTION
Upper tab
1
Screw 8
Remote
controller
cable 2
Screw 6
Screw 3
Remote controller cable 2
Lower tab
Outlet box
Remote controller
cable holder 5
Holder for remote controller cable at control board
Installing the green wire to terminal board
Upper case
Upper case
Mounting plate
A. IF REMOTE CONTROLLER CABLE IS EMBEDDED
Do not touch the sharp aluminium fin of air conditioner unit during wired remote controller installation, sharp
parts may cause injury.
Remote controller 1
Connector
(CON1)
Tabs
If passing the remote controller cable through a wall, be sure to install a water trap above the cable.
Otherwise, it will cause electrical shock.
CAUTION
Notches
Right
feeding-out
Upper case
Screw
driver
Remote
controller
cable 2
Left feeding-out
position
2. INSTALLING THE REMOTE CONTROLLER UNIT TO THE WALL
1.
Engage an authorized dealer or specialist for installation. If installation done by the user is defective, it will
cause electrical shock or fire.
Connector (CON1)
Mounting plate
Screws 4
Lower tab
Remote controller
mounting plate
or more
•
•
•
Wall
Upper case
Upper tab
Screws 4
Symbol with dark background denotes item that must be carried out.
•
Remote controller cable 2
Wall
Rib
Connector
(CON1)
Remote
controller
cable 2
Rear feeding-out
position
Screw 7
Remote controller cable 2
Upper case
Remote controller 1
Upper case
Tabs
Mounting plate
Note: Remote controller cable cannot be extended.
ENGLISH
Mounting plate
F616499
1
2