1
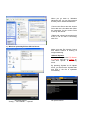
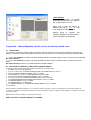
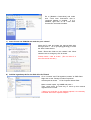
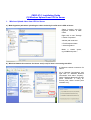
CMS3.0/3.1 Installation Guide
(3) Wireless Upload from VPU to Server
1. Wireless Upload video from VPU to Server
a) Make Ingestion path when uploading the video wirelessly from P2 card in VPU to Server
Select “Location” and “File
Ingestion Location” in CMS
Client.
Right click to see “Storage
Location Properties”.
Add the path as shown.
\\ Full Computer Name
\ videos\Ingestion\
Make a certain space,
eg.100MB and press +.
b) Wireless Network Connections for Server and (in car) PC that is connecting with VPU.
a) Wireless network connection for
Server
Go to “Network Connections” and
right click on “Wireless Network
Connection” and select “Property”.
Select “Wireless Networks” tab and
press “Advanced”. If using an
access point, select “access point
networks only”
When you go back to “Wireless
Networks” tab, you can find network
access point in Preferred Networks.
*Connect the Server and the Access
Point with the LAN cable and follow
the instruction for the Access Point
to set up with Server.
*Select and connect the access point
at the in car PC that is connecting
with VPU.
c) Wireless upload by SI from VPU to Server
Make sure that File integrity Check
and Parser Service is running at
Insight Watchdog.
<Manual Upload>
Make sure to input the FTP Server
IP address and set up “False” on
“Use Auto Upload” at SI Config
menu.
By pressing “Upload” at SI Upload
menu, you will find the “Upload Start
and End” if the file is uploaded
successfully.
<SI Config menu>
“Config” – “File Transfer” – “Upload”
<SI Upload menu>
<Auto Upload>
Go to “Configuration” at Insight
Watchdog and set up the IP range for
the access points/ in car PC.
Make sure to input the Server IP
address and set up “True” on “Use
Auto Upload” at SI Config menu.
Without going to “Upload” and
pressing “Upload” at SI Upload menu,
it will be uploaded automatically.
2) Appendix: Manual Migration from P2 card for the wireless upload users
a)
Introduction
If you usually use wireless upload to transfer the video from P2 card in VPU to Server but sometimes need manually
taking P2 card out from VPU and ingest the video from P2 card to Server, it is necessary to follow the instruction below.
1. If you have enabled the network connection between the Server and the wireless router / access point via LAN cable,
GO TO the below c).
2. If you have disabled the network connection between the Server and the wireless router / access point via LAN
cable,
GO TO the below b) and then c) to install “Microsoft Loopback adaptor”.
b) Get virtual IP address by “Microsoft Loopback adapter”
To manually install the Microsoft Loopback adapter in Windows XP, follow these steps:
1. Click Start, and then click Control Panel.
2. If you are in Classic view, click Switch to Category View under Control Panel in the left pane.
3. Double-click Printers and Other Hardware, and then click Next.
4. Under See Also in the left pane, click Add Hardware,and then click Next.
5. Click Yes, I have already connected the hardware, and then click Next.
6. At the bottom of the list, click Add a new hardware device, and then click Next.
7. Click Install the hardware that I manually select from a list, and then click Next.
8. Click Network adapters, and then click Next.
9. In the Manufacturer box, click Microsoft.
10. In the Network Adapter box, click Microsoft Loopback Adapter, and then click Next.
11. Click Finish.
After the adapter is installed successfully, you can manually configure its options, as with any other adapter. If the TCP/IP properties are
configured to use DHCP, the adapter will eventually use an autonet address (169.254.x.x/16) because the adapter is not actually connected to
any physical media.
Note By default, TCP/IP properties are configured to use DHCP.
Make sure that “Loopback Adaptor” is enabled.
Go to [Network Connections] and make
sure “Local Area Connection” that is
Loopback Adaptor is enabled. If it is
disabled, right click on its “Local Area
Connection” and make it enable.
c) Insert P2 card into PCMCIA and make the port “shared”
Insert the P2 card and select the removal disk drive
and right click it. Go to [Property]-[Sharing] to make
the “Data” folder shared.
Check “Share this folder on the network” and “Allow
network users to change my file” as shown.
*Please insert 1 card at a time.
more P2 card at one time.)
(Do not insert 2 or
d) Add the Ingestion path for the disk drive for P2card
Go to “Location” and “File Ingestion Location” in CMS Client.
Right click to see “Storage Location Properties”.
Add the path as shown. \\ Full Computer Name\ Data\
Make a certain space, eg.100MB and press +.
Then, press move up arrow key to move up this manual
ingestion from P2 card.
**When you would like to use wireless upload, it is necessary
to disable “Microsoft Loopback Adaptor”.