1
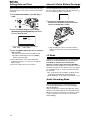
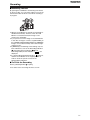
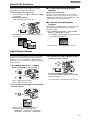
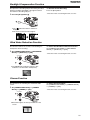
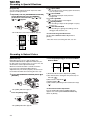
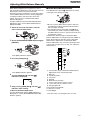
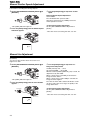
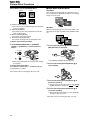
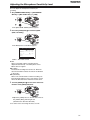
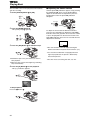
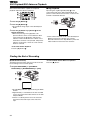
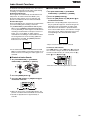
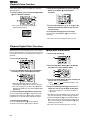
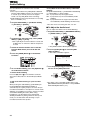
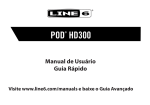
Panasonic Broadcast
AG-DVC7
Menu Information
Before Use
Using the Menu Screen
To facilitate the selection of a desired function or
setup, this Camera Recorder displays various function
setups on Menus.
1
Press the [MENU] Button B.
MENU
B
OThe Menu corresponding to the Mode selected
by using the [MODE] Button _ is displayed.
_
MODE
2
Turn the [PUSH] Dial > to select a desired SubMenu.
>
PUSH
W.B/SHUTTER/IRIS
3
Press the [PUSH] Dial > to display the selected
Sub-Menu.
4
Turn the [PUSH] Dial > to select the item to be
set.
5
Press the [PUSH] Dial > to set the selected
item to a desired mode.
OWith each press of the [PUSH] Dial, the cursor
[1] moves to the next mode. Menu items that
cannot be used in combination with the selected
item are displayed in dark blue.
OWhile a Menu is displayed, you cannot record or
play back. Menus can be displayed during playback
but not during recording. The above operations can
be done using the [MENU] Button, [SET] Button
and [ITEM] Button on the Remote Controller. (-11-)
To Exit the Menu Screen
Press the [MENU] Button again.
About the Menu Mode Setting
The setting selected on the Menu will be retained
even when the Camera Recorder is turned off.
However, if the Battery or AC Adaptor is disconnected
before turning off the Camera Recorder, the selected
setup may not be retained. (But, the setups of
[NEGA], [SEPIA], [MONO] or [SOLARI] (-29-) are not
retained.)
VOL/JOG
OMenu operation flow is shown in this text by >>.
OTurn the [PUSH] Dial > to display the
highlightened item.
List of Menus
The figures of the Menus are for explanation purposes
only, and they are different from the actual Menus.
$ [CAMERA FUNCTIONS]
Camera Mode Main-Menu
CAMERA FUNCTIONS
1.CAMERA SETUP
2.RECORDING SETUP
3.DISPLAY SETUP
4.OTHER FUNCTIONS
PUSH MENU TO EXIT
[1. CAMERA SETUP]
Camera Setup Sub-Menu
[PROGRESSIVE]
Progressive Photoshot Mode -22[D.ZOOM]
Digital Zoom -23[CINEMA]
Cinema-like Format Recording -25[P.EFFECT]
Picture Effects -29[RETURN]
Returning to the Main-Menu
OIf you set [RETURN] to [YES], the menu changes
back to the Main-Menu.
16
[2. RECORDING SETUP]
Recording Setup Sub-Menu
[REC SPEED]
Recording Speed Mode -18[AUDIO REC]
Audio Recording Mode -18[SCENEINDEX]
Scene Index Mode -35[WIND CUT]
Wind Noise Reduction -25[ZOOM MIC]
Zoom Microphone -23[MIC LEVEL ADJ.]
Microphones Sensitivity Level -31[RETURN]
Returning to the Main-Menu
Before Use
List of Menus
[3. DISPLAY SETUP]
Display Setup Sub-Menu
[DATE/TIME]
Date and Time Indication -41[C.DISPLAY]
Counter Display Mode -41[C.RESET]
Counter Reset -52OIt resets the counter to zero. However, it cannot
reset the Time Code.
[DISPLAY]
Display Mode -41[LCD MODE]
LCD Lighting Mode -15[LCD/EVF SET]
LCD and Viewfinder Adjustment -15[RETURN]
Returning to the Main-Menu
[4. OTHER FUNCTIONS]
Other Functions Sub-Menu
[REMOTE]
Remote Controller Mode -11[REC LAMP]
Recording Lamp -20[BEEP SOUND]
Beep Sound -42[SHTR EFFECT]
Shutter Effect -22[CLOCK SET]
Date and Time Setting -18[SELF REC]
Recording Yourself -21[RETURN]
Returning to the Main-Menu
$ [VCR FUNCTIONS]
[2. DIGITAL EFFECT]
Playback Digital Effect Functions Sub-Menu
[EFFECT]
Digital Effect On/Off -36[EFFECT SELECT]
Digital Effect Selection -36[RETURN]
Returning to the Main-Menu
[3. RECORDING SETUP]
Recording Setup Sub-Menu
[REC SPEED]
Recording Speed Mode -18[AUDIO REC]
Audio Recording Mode -18[AUDIO LEVEL]
Audio Level Setting -38[RETURN]
Returning to the Main-Menu
[4. AV IN/OUT SETUP]
Audio-Video Input/Output Setup Sub-Menu
[AV JACK]
AV Socket -38[A.DUB INPUT]
Audio Dubbing Input -38[DV OUT]
Analog-Digital Conversion Output -45[RETURN]
Returning to the Main-Menu
[5. DISPLAY SETUP]
Display Setup Sub-Menu
OAll of the items on the [DISPLAY SETUP] SubMenu are the same as those on the [DISPLAY
SETUP] Sub-Menu of the [CAMERA FUNCTIONS]
Main-Menu.
VCR Mode Main-Menu
VCR FUNCTIONS
1.PLAYBACK FUNCTIONS
2.DIGITAL EFFECT
3.RECORDING SETUP
4.AV IN/OUT SETUP
5.DISPLAY SETUP
6.OTHER FUNCTIONS
PUSH MENU TO EXIT
[1. PLAYBACK FUNCTIONS]
Playback Functions Sub-Menu
[BLANK SEARCH]
Blank Search -34[SEARCH]
Index Search Mode -35[12bit AUDIO]
Audio Selector -38[AUDIO OUT]
Audio Output Mode -44[RETURN]
Returning to the Main-Menu
[6. OTHER FUNCTIONS]
Other Functions Sub-Menu
[REMOTE]
Remote Controller Mode -11[CLOCK SET]
Date and Time Setting -18[RETURN]
Returning to the Main-Menu
17
Before Use
Setting Date and Time
Internal Lithium Battery Recharge
Since the internal clock of the Camera Recorder has a
slight imprecision, make sure to check the time before
recording.
The internal lithium battery sustains the operation of
the clock. When the Date/Time Indication becomes [--],
the internal lithium battery is exhausted.
1
Set [OTHER FUNCTIONS] >> [CLOCK SET] >>
[YES].
--:--:---.--.----
>
PUSH
W.B/SHUTTER/IRIS
1
VOL/JOG
MENU
Connect the AC Adaptor to the Camera
Recorder with the power turned off and then
connect to the AC Mains socket.
B
2
Press the [PUSH] Dial > to select [YEAR]/
[MONTH]/[DAY]/[HOUR]/[MINUTE] and turn to
set it to a desired value.
CLOCK SET
YEAR 2002
MONTH OCT
DAY
08
HOUR
10AM
MINUTE 30
PUSH MENU TO RETURN
OYear will cycle in the order shown below.
2000, 2001, ..., 2089, 2000, ...
3
Press the [MENU] Button B to finish setting the
date and time.
OThe clock operation starts from [00] second.
OThe Menu will disappear when the [MENU]
Button is pressed again.
OIf the built-in battery is weak, the Date/Time
Indication becomes [--]. In this case, charge the
built-in battery.
OThe clock employs the 12-hour system.
OAfter charging for 4 hours, the built-in lithium
battery can power the clock for approximately 3
months.
LP Mode
A desired recording speed can be selected with [REC
SPEED] on the [RECORDING SETUP] Sub-Menu.
If LP Mode is selected, the recording time
becomes 1.5 times longer than that of SP Mode.
Although the image quality does not decrease with the
LP Mode recording, mosaic-pattern noise may appear
on a playback image, or some normal functions may
be restricted.
OThe contents that are recorded in LP Mode are not
completely compatible with other equipment.
OAudio dubbing is not possible with LP Mode. (-38-)
Audio Recording Mode
The sound quality of the recorded sound can be
selected with [AUDIO REC] on the [RECORDING
SETUP] Sub-Menu.
High sound-quality recording is possible with “16 bit
48 kHz 2 track” Mode. With the “12 bit 32 kHz 4 track”
Mode, the original sound can be recorded on 2 tracks
in stereo, while the other 2 tracks can be used for
Audio Dubbing.
18
Before Use
Holding the Camera Recorder for Recording
Normal Recording.
OWhen walking while recording, keep both eyes
open so that you can see where you are going and
what is happening around you.
OPlace the Camera Recorder on your right shoulder
and hold it firmly with both hands.
OHold the Eyecup of the Viewfinder as close as
possible to your right eye.
OTake a firm stance with the legs slightly apart.
OFor stable images, it is recommended to use a
tripod (optional) whenever possible.
For More Stable Pictures.
OStabilize the Camera Recorder by resting your
elbows on a table or other stable horizontal surface.
Low-Angle Recording.
Adjust the angle of the LCD Monitor according to the
position in which the Camera Recorder is held.
OIf the Camera Recorder is not held firmly in stable
position, the picture in the LCD Monitor cannot be
watched properly.
OFor easier long-angle recording, the Sub Recording
Start/Stop Button and the Sub Zoom Lever on the
front of the Camera Recorder can be used.
Recording from a high position.
19
Camera Mode
Recording
When recording with the [AUTO/MANUAL/PROG.AE]
Switch ? set to [AUTO], the Camera Recorder
automatically adjust the focus and white balance. In
some cases, they cannot be adjusted automatically
and need to be adjusted manually. (-27-, -29-)
$ To Pause the Recording
Press the Recording Start/Stop Button a (or R)
again.
The [PAUSE] Indication is displayed.
PAUSE
PAUSE
?
AUTO
MANUAL
PROG. AE
1
Set the [OFF/ON] Switch b to [ON].
OThe [CAMERA] Lamp ` lights up.
$ To Check the Recording
`
CAMERA
By pressing the Recording Check Button [
]D
briefly in the Recording Pause Mode, you can play
back the last few seconds of the recorded scene.
VCR
b
2
OIf the Recording Pause Mode continues for more
than 5 minutes, the power is turned off
automatically for tape protection and power
conservation. To resume recording from this
condition, turn off, then turn on the power again.
OFF ON
Press the Recording Start/Stop Button a (or
Sub Recording Start/Stop Button R).
ORecording starts.
OAfter the [RECORD] is displayed, it changes to
[REC].
D
SEARCH
OThe [CHK] Indication is displayed. After checking,
the Camera Recorder resumes the Recording
Pause Mode.
R
$ To View the Recorded Scene while the
Recording is Paused (Camera Search)
The recorded scene can be viewed by keep pressing
the [SEARCH –] Button D or [SEARCH +] Button G
in the Recording Pause Mode.
a
REC
RECORD
D
SEARCH
G
SEARCH
$ Recording Lamp (Tally Lamp)
The Recording Lamp 2 lights up during recording and
alerts those being recorded that recording is in
progress.
2
OThe Recording Lamp does not light up if the [REC
LAMP] on the [OTHER FUNCTIONS] Sub-Menu is
set to [OFF].
20
OWhen the [SEARCH –] Button is pressed, images
are played back in the reverse direction.
OWhen the [SEARCH +] Button is pressed, images
are played back in the forward direction.
Camera Mode
Recording
$ Recording Yourself
By opening the LCD Monitor and rotating it frontward
(to the lens side), you can let the subject in front of the
Camera Recorder monitor the shot while recording is
in progress.
OWhen the LCD Monitor is opened, the Viewfinder is
disabled automatically. However, when the LCD
Monitor is rotated frontward, the image is also
shown in the Viewfinder.
OIf you prefer to have the image on the LCD Monitor
to look like an image in a mirror, set [SELF REC] on
the [OTHER FUNCTIONS] Sub-Menu to [MIRROR].
Images are recorded normally and no left and right
reversal occurs.
OIf [MIRROR] is used during self-recording, only the
basic indications, such as the Recording Indication
[¥], Recording Pause Indication [¥;] and
Remaining Battery Power Indication [
], are
displayed.
OIf a general Warning/Alarm Indication [ ] appears,
return the LCD Monitor to the original position in
order to check the specific content of the
Warning/Alarm Indication.
$ To Finish the Recording
Set the [OFF/ON] Switch b to [OFF].
OFor other notes concerning this item, see -42-.
21
Camera Mode
Photoshot
This Camera Recorder can take approximately 7
seconds still pictures containing sound.
1
Press the [PHOTO SHOT] Button M in the
Recording Pause Mode.
$ Digital Still Picture
When the [STILL] Button H is pressed, images
become still pictures. When the button is pressed
again, the Digital Still Picture Mode is cancelled.
H
STILL
PHOTO SHOT
M
OThe Camera Recorder records a still picture for
about 7 seconds and then switches back to the
Recording Pause Mode.
OFor other notes concerning this item, see -42-, -43-.
PHOTO
PHOTO
PHOTO
$ Progressive Photoshot
With the Progressive Photoshot Function, you can
record still pictures with higher resolution than with the
normal Photoshot Function.
OWhen [PROGRESSIVE] on the [CAMERA SETUP]
Sub-Menu is set to [AUTO], the [3] Indication is
displayed. When the [3] Indication is displayed,
press the [PHOTO SHOT] Button in the Recording
Pause Mode.
PHOTO
OThis function may not work with some function
setups.(-64-)
$ Continuous Photoshot
If you set [SHTR EFFECT] on the [OTHER
FUNCTIONS] Sub-Menu to [ON] and keep the
[PHOTO SHOT] Button pressed, the Camera
Recorder will continuously record still pictures in
approximately 0.7 seconds intervals until the button is
released. (However, this does not operate when using
Progressive Photoshot.)
OThe screen blinks and, at the same time, a shutter
clicking sound is recorded.
22
OWe recommend that you press the [STILL] Button
first at the position where you wish to record the
picture so as to enter the Digital Still Picture Mode
and then press the [PHOTO SHOT] Button.
Camera Mode
Zoom In/Out Functions
It gives special effects to the video by recording
objects close by or with wide-angle shot.
$ To Take Close-up Shots of Small
Subjects
1
(Macro Close-up Function)
When the zoom magnification is 1a, the Camera
Recorder can focus on a subject that is as close as
approximately 20 mm from the Lens. With this, small
subjects like insects can be recorded.
For wide-angle shots (zoom out):
Push the [W/T] Lever N (or Sub Zoom Lever Q)
towards [W].
For close-ups (zoom in):
Push the [W/T] Lever towards [T].
$ To Use the Zoom Microphone
Function
T
Q
W
N
W
T
OZoom Magnification Indication is displayed for a
few seconds.
1tW
Along with the zooming operation, the microphone’s
directional angle and sensitivity are varied for
recording sounds.
OSet [CAMERA FUNCTIONS] >> [RECORDING
SETUP] >> [ZOOM MIC] >> [ON].
OThe [Z.MIC] Indication appears. (The Indication is
for the built-in microphone.)
T
5tW
T
15tW
Z.MIC
T
OFor other notes concerning this item, see -43-.
Digital Zoom Function
This function is useful when you want to record closeup shots of subjects located beyond a normal zoom
range of 1a to 15a magnification. With the Digital
Zoom Function, you can select a magnification of 30a
or even to 750a.
1
Push the [W/T] Lever N (or Q) towards [W] or
towards [T] to zoom in or out.
T
Q
W
Set [CAMERA FUNCTIONS] >> [CAMERA
SETUP] >> [D.ZOOM] >> [30a] or [750a].
N
>
W
T
PUSH
W.B/SHUTTER/IRIS
To Cancel the Digital Zoom Function
Press the [DIG.E.] Button @ until the [D.ZOOM]
Indication disappears.
VOL/JOG
MENU
B
O30a: Digital zooming to 30a
O750a: Digital zooming to 750a
2
3
OFor other notes concerning this item, see -43-.
Press the [DIG.E.] Button @ until the [D.ZOOM]
Indication appears.
@
DIG.E.
20tW
T
D.ZOOM
OWhen you press the [DIG.E] Button, the
Indications change in following order.
[AUTO EIS] # [AUTO EIS] + [D.ZOOM] #
[D.ZOOM] # no Indication #[AUTO EIS]...
23
Camera Mode
Image Stabilizer Function
If the Camera Recorder might be shaken while
recording, the camera shake in the image can be
corrected.
OIf the Camera Recorder shakes too much, this
function may not be able to stabilize images.
1
To Cancel Image Stabilizer
Press the [DIG.E.] Button @ until the [AUTO EIS]
Indication disappears.
OFor other notes concerning this item, see -43-.
Press the [DIG.E.] Button @ until the [AUTO
EIS] Indication appears.
@
DIG.E.
AUTO EIS
Fade In/Out Functions
Fade In
Fade In brings out images and sounds gradually from
a black screen at the beginning of a scene.
1
Keep pressing the [FADE] Button E during the
Recording Pause Mode.
E
Fade Out
Fade Out causes images and sounds to disappear
gradually, leaving a black screen at the end of a
scene.
1
Keep pressing the [FADE] Button E while
recording.
FADE
E
FADE
OThe image fades out gradually.
2
When the image is completely gone, press the
Recording Start/Stop Button a to start
recording.
OThe image fades out gradually.
2
When the image is completely gone, press the
Recording Start/Stop Button a to stop
recording.
a
a
3
Release the [FADE] Button E about 3 seconds
after starting recording.
OThe image reappears gradually.
24
3
Release the [FADE] Button E.
OThe still picture cannot fade in or fade out.
Camera Mode
Backlight Compensation Function
This prevents a recording subject from being recorded
darker in backlight. (Backlight is the light that shines
from behind a recording subject.)
1
Press the [BLC] Button F.
F
To Resume Normal Recording
Press the [BLC] Button.
OFor other notes concerning this item, see -43-.
BLC
OThe [ ] Indication flashes and then is
displayed.
OThe entire screen becomes brighter.
Wind Noise Reduction Function
This function reduces the sound of a wind hitting the
microphone when recording.
1
Set [CAMERA FUNCTIONS] >> [RECORDING
SETUP] >> [WIND CUT] >> [ON].
To Cancel the Wind Noise Reduction Function
Set [CAMERA FUNCTIONS] >> [RECORDING
SETUP] >> [WIND CUT] >> [OFF].
OFor other notes concerning this item, see -43-.
>
PUSH
W.B/SHUTTER/IRIS
VOL/JOG
MENU
B
OThe [WIND CUT] Indication appears. (The
Indication is for the built-in microphone.)
WIND CUT
Cinema Function
This function is for recording in a cinema-like wide
screen.
1
Set [CAMERA FUNCTIONS] >> [CAMERA
SETUP] >> [CINEMA] >> [ON].
To Cancel the Cinema Mode
Set [CAMERA FUNCTIONS] >> [CAMERA SETUP]
>> [CINEMA] >> [OFF].
OFor other notes concerning this item, see -43-.
>
PUSH
W.B/SHUTTER/IRIS
VOL/JOG
MENU
B
OBlack bars appear at the top and bottom of the
screen.
CINEMA
25
Camera Mode
Recording in Special Situations
(Program AE)
You can select optimal automatic exposures under
specific recording situations.
1
Repeatedly slide the [AUTO/MANUAL/PROG.AE]
Switch ? downwards from the [MANUAL]
position until a desired mode [
], [
], [ ],
[ ] or [
] appears.
?
AUTO
MANUAL
PROG. AE
OThe Indication of the selected Mode appears.
1) [
] Sports Mode
OFor recording scenes involving quick movements,
such as sports scenes.
2) [
] Portrait Mode
OFor bringing up people clearly from the
background.
3) [ ] Low Light Mode
OFor recording a dark scene brighter.
4) [ ] Spotlight Mode
OFor recording a subject under spotlight in a party,
theatre, etc.
5) [
] Surf & Snow Mode
OFor recording in a glaring surrounding, such as
skiing grounds, beaches, etc.
1)
2)
To Cancel the Program AE Function
Set the [AUTO/MANUAL/PROG.AE] Switch to
[AUTO].
3)
4)
OFor other notes concerning this item, see -43-.
5)
Recording in Natural Colors
(White Balance)
Depending on the scene or light condition, the
Automatic White Balance Adjustment Mode may not
be able to bring out natural colors. In such a case, the
white balance can be adjusted manually.
When the Camera Recorder is turned on with the
Lens Cap on, the Automatic White Balance
Adjustment may not function properly. Please turn on
the Camera Recorder after removing the Lens Cap.
3
1
1) Automatic White Balance Adjustment [AWB]
2) The white balance setting that was previously set
manually [
]
3) Fluorescent Lamp Mode [ ]
4) Outdoor Mode [ ]
5) Indoor Mode (recording under incandescent lamp)
[ ]
Set the [AUTO/MANUAL/PROG.AE] Switch ? to
[MANUAL].
?
AUTO
MANUAL
PROG. AE
OThe [MNL] Indication appears.
2
Press the [PUSH] Dial >.
PUSH
W.B/SHUTTER/IRIS
>
VOL/JOG
OThe [AWB] Indication appears.
26
Turn the [PUSH] Dial > to set a desired White
Balance Mode.
1)
1AWB
2)
1
4)
1
5)
1
3)
To Resume Automatic Adjustment
Turn the [PUSH] Dial until the [AWB] Indication
appears. Or, set the [AUTO/MANUAL/PROG.AE]
Switch to [AUTO].
Camera Mode
Adjusting White Balance Manually
White Balance Adjustment recognizes the color of
light and makes adjustment so that the white color will
become pure white. The Camera Recorder
determines the hue of light that it receives through the
Lens and White Balance Sensor, thereby judging the
recording condition, and selects the closest hue
setting. This function is called Automatic White
Balance Adjustment.
For light outside the functional Auto White Balance
Adjustment range, use the Manual White Balance
Adjustment Mode.
1
Attach the Lens Cap and zoom in until the
entire screen becomes white.
N
T
W
2
Set the [AUTO/MANUAL/PROG.AE] Switch ? to
[MANUAL].
?
$ About White Balance Sensor
The White Balance Sensor 1 determines the nature
of the light source during recording.
1
2
ODo not cover the White Balance Sensor with your
hand during recording. Otherwise, White Balance
will not function normally.
OThe red light from the Recording Lamp 2 will be
reflected off your hand or object, possibly causing
the White Balance sensor to operate incorrectly and
changing the coloring.
Outside of the effective range of Automatic White
Balance Adjustment, the image will become reddish or
bluish. Even within the effective range of Automatic
White Balance Adjustment, the Automatic White
Balance Adjustment may not function properly if there
is more than one light source. In this case, adjust the
White Balance.
10 000K
9 000K
8 000K
7 000K
6 000K
AUTO
MANUAL
PROG. AE
5 000K
OThe [MNL] Indication appears.
3
1) 4 000K
Press the [PUSH] Dial >.
3 000K
2)
3)
4)
5)
6)
7)
8)
9)
10)
W.B/SHUTTER/IRIS
2 000K
PUSH
>
12)
VOL/JOG
1 000K
OThe [AWB] Indication appears.
4
Turn the [PUSH] Dial > until the [
Indication is displayed.
]
MNL
1
5
11)
Keep pressing [PUSH] Dial > until the [
Indication stops flashing.
]
To Resume Automatic Adjustment
Turn the [PUSH] Dial until the [AWB] Indication is
displayed. Or, set the [AUTO/MANUAL/PROG.AE]
Switch to [AUTO].
1) The effective range of Automatic White Balance
Adjustment on this Camera Recorder
2) Blue sky
3) Cloudy sky (Rain)
4) TV screen
5) Sunlight
6) White fluorescent lamp
7) 2 hours after sunrise or before sunset
8) 1 hour after sunrise or before sunset
9) Halogen light bulb
10) Incandescent light bulb
11) Sunrise or sunset
12) Candlelight
OFor other notes concerning this item, see -44-.
27
Camera Mode
Manual Shutter Speed Adjustment
It is useful for recording fast-moving subjects.
1
Set the [AUTO/MANUAL/PROG.AE] Switch ? to
[MANUAL].
?
Turn the [PUSH] Dial > to adjust the shutter
speed.
Range of Shutter Speed Adjustment
1/60–1/8000 s
The standard shutter speed is 1/60 s.
Selecting a speed closer to [1/8000] causes the
shutter speed to be faster.
AUTO
MANUAL
PROG. AE
OThe [MNL] Indication appears.
2
3
Press the [PUSH] Dial > until the Shutter Speed
Indication appears.
To Resume Automatic Adjustment
Set the [AUTO/MANUAL/PROG.AE] Switch to
[AUTO].
OFor other notes concerning this item, see -44-.
PUSH
W.B/SHUTTER/IRIS
>
VOL/JOG
MNL
1/1000
Manual Iris Adjustment
(F Number)
You can use this function when the screen is too
bright or too dark.
1
Set the [AUTO/MANUAL/PROG.AE] Switch ? to
[MANUAL].
?
AUTO
MANUAL
PROG. AE
OThe [MNL] Indication appears.
2
Press the [PUSH] Dial > until the Iris Indication
appears.
Turn the [PUSH] Dial > to adjust the iris.
To Resume Automatic Adjustment
Set the [AUTO/MANUAL/PROG.AE] Switch to
[AUTO].
PUSH
W.B/SHUTTER/IRIS
>
3
Range of Iris Adjustment
CLOSE (Closed), F16, ..., F2.0,
OP (Opened)+0dB, ..., OP+18dB
When the Gain-up Mode [GAIN-UP] (-29-) is used, Iris
adjustment is by OP+15dB.
When a value closer to [CLOSE] is selected, the
image becomes darker.
When a value closer to [OP+18dB] is selected, the
image becomes brighter.
The value to which +dB is attached indicates a Gainup value. If this value is too large, the quality of the
image deteriorates.
VOL/JOG
OFor other notes concerning this item, see -44-.
MNL
1/50
F2.4
28
Camera Mode
Manual Focus Adjustment
Focus can be adjusted manually for recording in a
situation where auto focus may not function well.
1
3
Turn the Focus Ring 7 o adjust the focus.
Set the [AUTO/MANUAL/PROG.AE] Switch ? to
[MANUAL].
7
?
AUTO
MANUAL
PROG. AE
OThe [MNL] Indication appears.
2
Press the [FOCUS] Button C.
OThe [1MF] Indication (Manual Focus Mode)
appears.
C
In the following cases, the Focus Ring cannot be
used.
OWhen the Menu Screen is displayed.
OWhen you are adjusting the White Balance shutter
speed or Iris.
To Resume Automatic Adjustment
Set the [AUTO/MANUAL/PROG.AE] Switch to [AUTO]
or press the [FOCUS] Button.
FOCUS
MNL
MF
Picture Effect Functions
This Camera Recorder is equipped with Picture Effect
Functions that add special effects to the scene.
Picture Effects (With [PIC.E.] Button)
1) WIPE
2) MIX
To Select a Desired Picture Effect
1
Press the [PIC.E.] Button A until a desired
effect appears.
3) STROBE
A
4) GAIN-UP
5) TRAIL
6) MOSAIC
7) MIRROR
PIC.E.
To Cancel the Picture Effect
Press the [PIC.E.] Button a until the Picture effect
disappeared.
1) Wipe Mode [WIPE]
2) Mix Mode [MIX]
3) Strobe Mode [STROBE]
OIt records images with a stroboscopic effect.
4) Gain-up Mode [GAIN-UP]
OIt brightens images electronically.
OAdjust focus manually when using this mode.
(-29-)
5) Trailing Effect Mode [TRAIL]
OIt records images with a trailing effect.
6) Mosaic Mode [MOSAIC]
OIt produces a mosaic-like image.
7) Mirror Mode [MIRROR]
OThe right half of an image becomes a mirror
image of the left half.
29
Camera Mode
Picture Effect Functions
Picture Effects (From [P.EFFECT] Menu)
1) NEGA
2) SEPIA
3) MONO
4) SOLARI
$ Wipe Mode and Mix Mode
Wipe Mode:
Like a curtain is being pulled, the still picture of the
last recorded scene gradually changes to the moving
image of a new scene.
WIPE
WIPE
WIPE
1) Negative Mode [NEGA]
OThe colors of the recorded image are inverted as
seen in a negative.
2) Sepia Mode [SEPIA]
OIt records a scene with a brownish tint, like the
color of old pictures.
3) Monotone Mode [MONO]
OIt records a monotone image.
4) Solarisation Mode [SOLARI]
OIt records an image with a painting-like effect.
Mix Mode:
While the moving image of a new scene fades in, the
still image of the last recorded scene gradually fades
out.
MIX
MIX
MIX
To Select a Desired Picture Effect
1
Set [CAMERA FUNCTIONS] >> [CAMERA
SETUP] >> [P.EFFECT] >> a desired Picture
Effect.
1
Press the [PIC.E.] Button A until the [WIPE] or
[MIX] Indication is displayed.
PUSH
W.B/SHUTTER/IRIS
>
A
VOL/JOG
MENU
PIC.E.
B
OIf the Camera Recorder is turned off, this setting
is cancelled.
OThe [WIPE] or [MIX] Indication appears.
2
To Cancel the Picture Effect
Set [CAMERA FUNCTIONS] >> [CAMERA SETUP]
>> [P.EFFECT] >> [OFF].
Press the Recording Start/Stop Button a to
start recording.
OFor other notes concerning this item, see -44-.
a
3
Press the Recording Start/Stop Button a to
pause the recording.
OThe last scene is stored in memory. The [WIPE]
or [MIX] Indication changes to [ WIPE ] or [ MIX ].
4
Press the Recording Start/Stop Button a to
restart the recording.
OThe last image of the previous scene gradually
changes to the new scene.
OFor other notes concerning this item, see -44-.
30
Camera Mode
Adjusting the Microphone Sensitivity Level
You can adjust the microphone sensitivity for
recording.
1
Set [CAMERA FUNCTIONS] >> [RECORDING
SETUP] >> [MIC LEVEL ADJ.] >> [YES].
PUSH
W.B/SHUTTER/IRIS
>
VOL/JOG
MENU
B
OThe [MIC LEVEL SETUP] Menu appears.
2
Press the [PUSH] Dial > to select the [MNL
(AGC*, NO-AGC)].
PUSH
W.B/SHUTTER/IRIS
>
VOL/JOG
OThe Microphone Level Meter appears.
MIC LEVEL SETUP
MODE
AUTO
MNL
MNLŁ
(AGC)(NO–AGC)
0
+6Ł
(dB) –30
GAIN |||||||||||–––
(dB) –30
0
+6Ł
LEVEL |||••••••••••
(MIC)
PRESS MENU TO RETURN
OAGC* : Auto Gain Control
AUTO:
AGC is activated, and the recording level is
adjusted automatically. The Microphone Level
Meter does not appear.
MNL (AGC):
The desired recording level can be set. AGC will
also be activated to reduce the amount of distortion
in the music.
MNL (NO-AGC):
AGC is not activated and so natural recording can
be performed. Adjust in such a way that the sound
will not be distorted at the maximum volume level.
3
Turn the [PUSH] Dial > to increase or decrease
the bars of the [GAIN] Indication.
PUSH
W.B/SHUTTER/IRIS
>
VOL/JOG
OAdjust the [GAIN] value so that the last 3 Bars of
the [LEVEL (MIC)] will not light red.
(Otherwise,the Sound is distorted.)
OFor other notes concerning this item, see -44-.
31
VCR Mode
Playing Back
The recorded scene can be played back immediately
after the recording.
1
Set the [OFF/ON] Switch b to [ON].
CAMERA
$ Adjusting the Sound Volume
Until the [VOLUME] Indication appears, keep pressing
the [PUSH] Dial >. Then, turn the [PUSH] Dial to
adjust the volume. After the adjustment, press the
[PUSH] Dial to make the [VOLUME] Indication
disappear.
VCR
OFF ON
b
PUSH
W.B/SHUTTER/IRIS
>
VOL/JOG
2
Press the [MODE] Button _.
OThe [VCR] Lamp ` lights up.
_
`
CAMERA
MODE
3
VCR
To adjust the volume with the Remote Controller,
press the [T] or [W] Button to display the [VOLUME]
Indication. Press the [T] Button to increase the volume
or press the [W] Button to decrease the volume. The
[VOLUME] Indication goes off a few seconds after the
adjustment is finished.
Press the [6] Button D to rewind the tape.
OThe sound volume cannot be adjusted using the
Remote Controller in Playback Zoom Function. (-36-)
D
OIf a cassette recorded with a copyright protection
signal is played back, the picture is distorted by
mosaic-like patterns.
SEARCH
ORewind the tape to the point where you want to
start playback.
OWhen the tape reaches the beginning, rewinding
stops automatically.
4
Press the [1] Button F to start playback.
OThe [!] Indication appears.
F
BLC
!
To Stop Playback
Press the [$] Button E.
E
32
FADE
OFor other notes concerning this item, see -44-.
VCR Mode
Finding a Scene You Want to Play Back
2
$ Cue/Review Playback
D
SEARCH
G
SEARCH
Turn the [PUSH] Dial > to select a desired
search speed.
PUSH
W.B/SHUTTER/IRIS
>
VOL/JOG
If the [5] Button G or [6] Button D is pressed
during Playback, it turns to Cue Playback A or
Review Playback B.
A
B
OIf the Button is held continuously, it turns to Cue
Playback or Review Playback until you release it.
$ Variable Speed Search Function
The speed of Cue Playback or Review Playback can
be varied.
1
During playback, press the [1] Button F.
OThe [1a!] Indication appears.
F
The following 6 playback speeds are available for the
Variable Speed Search Function in both the fastforwarding and rewinding directions: 1/5a (slow
playback in SP Mode only), 1/3a (slow playback in LP
Mode only), 1a, 2a, 5a, 10a and 20a.
OOn the Remote Controller this function can be done
by pressing the [VAR.SEARCH] and cursor buttons
([V,B]) .
To Resume Normal Playback
Press the [1] Button F.
ODuring Cue or Review Playback, fast-moving
images may show mosaic-pattern noise.
OThe sound is muted during search even in the
[a11] speed mode.
BLC
Slow Motion Playback
–V
This Camera Recorder can play back at a slow speed.
x
k
C/REW
FF/ B
PLAY
STILL ADV PAUSE STILL ADV
INDEX
STOP
k
INDEX
To Resume Normal Playback
Press the [1] Button x.
SELECT
1
2
Scenes recorded in the SP Mode are played back at
approximately 1/5th of the normal speed.
Scenes recorded in the LP Mode are played back at
approximately 1/3rd of the normal speed.
Press the [1] Button x.
Press the [E] Button or [D] Button k on the
Remote Controller.
OThe [?!] or ["?] Indication appears.
?!
OWhen the [E] Button is pressed, Slow Motion
Playback proceeds in the reverse direction.
When the [D] Button is pressed, Slow Motion
Playback proceeds in the forward direction.
33
VCR Mode
Still Playback/Still Advance Playback
–V
This Camera Recorder is capable of still picture
playback and frame-advance playback.
x
C/REW
u
FF/ B
PLAY
STILL ADV PAUSE STILL ADV
k
INDEX
STOP
INDEX
$ Jog Playback
By turning the Jog Dial ([PUSH] Dial) > of the
Camera Recorder in the Still Playback Mode, still
pictures can be advanced one frame at a time in the
forward or backward direction.
k
SELECT
Press the [1] Button x.
3
Press the [E] Button or [D] Button k on the
Remote Controller.
OWith each pressing of the [E] Button, still
pictures advance in the reverse direction. With
each pressing of the [D] Button, still pictures
advance in the forward direction. If either one of
the buttons continues to be pressed, still pictures
advance continuously 1 frame at a time until the
button is released.
Press the [;] Button u.
OThe playback image stops in the Still Playback
Mode.
>
PUSH
W.B/SHUTTER/IRIS
1
2
VOL/JOG
;!
OIf the Camera Recorder is left in the Still Playback
Mode for more than 5 minutes, the Camera
Recorder switches to the Stop Mode to protect the
video heads from excessive wear and tear.
To Resume Normal Playback
Press the [1] Button x.
Finding the End of Recording
(Blank Search Function)
The Blank Search Function aids you locate the end of
the recording on the Cassette quickly.
1
Set [VCR FUNCTIONS] >> [PLAYBACK
FUNCTIONS] >> [BLANK SEARCH] >> [YES].
PUSH
W.B/SHUTTER/IRIS
>
VOL/JOG
MENU
B
BLANK
OThe [BLANK] Indication appears during the Blank
Search.
OApproximately 1 second before the last recorded
scene, the Camera Recorder switches to the Still
Playback Mode.
OIf there is no blank portion left on the Cassette,
the Camera Recorder stops at the end of the
tape.
34
To Cancel Blank Search Before Completion
Press the [$] Button.
VCR Mode
Index Search Functions
To facilitate searching of desired scene, this Camera
Recorder automatically records index signals during
recording, as explained in the following.
Photoshot Index Signal
These signals are automatically recorded whenever
still pictures are taken in Photoshot Mode. (-22-)
Photoshot Index Signals are not recorded on still
pictures recorded in Continuous Photoshot Mode.
Scene Index Signal
Scene Index Signals are automatically recorded when
you start recording after inserting a Cassette.
OIf [SCENEINDEX] of [RECORDING SETUP] SubMenu on the [CAMERA FUNCTIONS] Main-Menu
is set to [2HOUR], an index signal is recorded when
recording is restarted after an elapse of 2 hours or
longer. If it is set to [DAY], an index signal is
recorded when recording is restarted after the date
has changed since the last recording. (While the
index signal is recorded, the [INDEX] Indication
flashes for a few seconds.)
$ Scene Index Search
1
Set [VCR FUNCTIONS] >> [PLAYBACK
FUNCTIONS] >> [SEARCH] >> [SCENE].
2
3
Press the [MENU] Button B.
Press the [9] Button or [:] Button l on
the Remote Controller.
OWhen the corresponding button is pressed once,
the [S 1] Indication appears, and searching of the
subsequent scene marked with an index signal
starts. Each time the button is pressed after the
start of Scene Index Search, the indication changes
from [S 2] to [S 9], and the beginning of the scene
corresponding to the selected number will be
searched.
S 1
INDEX
OUp to 9 scene numbers can be selected.
$ Photoshot Index Search
1
x
Set [VCR FUNCTIONS] >> [PLAYBACK
FUNCTIONS] >> [SEARCH] >> [PHOTO].
C/REW
PLAY
FF/ B
STILL ADV PAUSE STILL ADV
INDEX
STOP
INDEX
v
SELECT
W.B/SHUTTER/IRIS
OFor other notes concerning this item, see -44-.
PUSH
>
Continuous Index Search
If the [9] Button or the [:] Button l is pressed
for 2 seconds or longer, search can be continued at
several-second intervals. (To cancel, press the [1]
Button x or the [$] Button v.)
–V
OIf the Camera Recorder is switched from the VCR
Mode to Camera Mode or if the date and time is set
before the start of recording, the index signal is not
recorded.
VOL/JOG
MENU
B
Press the [MENU] Button B.
Press the [9] Button or [:] Button l on
the Remote Controller.
–V
2
3
C/REW
PLAY
FF/ B
STILL ADV PAUSE STILL ADV
INDEX
l
STOP
INDEX
l
SELECT
OWith each press of the corresponding button, still
pictures recorded in Photoshot Mode are searched.
OSounds are played back for approximately 4
seconds.
35
VCR Mode
Playback Zoom Function
1
2
During playback, press the [P.B. ZOOM] Button
r on the Remote Controller.
SELECT
j
VAR.
SEARCH
PB.
ZOOM
STORE
Change the magnification by pressing the [W]
Button or [T] Button p on the Remote
Controller.
OSD
COUNTER RESET
r
j
MENU
SET
OFF/ON
DATE/
TIME
PHOTO
SHOT
START/
STOP
TITLE
MULTI/
P-IN-P
REC
A.DUB
C/REW
PLAY
FF/ B
ZOOM
– VOL +
A part of the image can be enlarged up to 10 times
during playback.
p
ITEM
P.B.DIGITAL
OThe center of the image is enlarged to
approximately 2 times.
ZOOM 2t
3
Press the Arrow Button (V,B, N, M) j on the
Remote Controller that points to the area you
want to enlarge.
To Change the Enlarging Area of an Image
Press the [P.B. ZOOM] Button r on the Remote
Controller.
OFor other notes concerning this item, see -45-.
Playback Digital Effect Functions
1
Press the [1] Button x.
x
Press the [1] Button x.
C/REW
PLAY
FF/ B
STILL ADV PAUSE STILL ADV
–V
1
$ Wipe Mode and Mix Mode
–V
During playback, special digital effects can be added
to the recorded pictures. The same effects as those of
Picture Effects, which are used during recording, are
obtained.
x
C/REW
PLAY
INDEX
FF/ B
STOP
2
INDEX
SELECT
2
Press the [SELECT] Button m on the Remote
Controller to select a desired digital effect.
Press the [SELECT] Button m on the Remote
Controller and select [WIPE] or [MIX].
m
n
m
SELECT
VAR.
SEARCH
INDEX
SELECT
STILL ADV PAUSE STILL ADV
INDEX
STOP
o
PB.
ZOOM
SELECT
PB.
ZOOM
MENU
SET
OFF/ON
P.B.DIGITAL
STORE
VAR.
SEARCH
STORE
ITEM
MENU
o
SET
OFF/ON
P.B.DIGITAL
OWhen the [SELECT] Button is pressed
repeatedly, the digital effect selection changes.
OThe same setting can be done using [DIGITAL
EFFECT] Sub-Menu on the [VCR FUNCTIONS]
Main-Menu.
To suspend Playback Digital Effect Temporarily
Press the [OFF/ON] Button o to suspend or restart
the digital effect. When the digital effect is paused
temporarily, the selected effect’s indication flashes.
To Cancel the Digital Effect
Press the [SELECT] Button m on the Remote
Controller and clear the digital effect indication.
36
3
Press the [STORE] Button n at the moment you
want to save as a still picture.
OThe [ WIPE ] or [ MIX ] Indication appears, and
the image is saved.
4
Press the [OFF/ON] Button o in the scene in
which you want to use the Wipe or Mix effect.
OThe scene changes as a result of the Wipe or
Mix effect.
ITEM
OThe Wipe Function and Mix Function can be used
only from the Remote Controller during playback.
OIf the [OFF/ON] Button o is pressed while Wipe or
Mix is carried out, the effect will stop temporarily at
that point. Pressing the [OFF/ON] Button o again
will bring back the effect.
OFor other notes concerning this item, see -45-.
VCR Mode
Playing Back on Your TV
By connecting your Camera Recorder with your TV,
the recorded scenes can be viewed on your TV
screen.
OBefore connecting them, turn off the power of both
the Camera Recorder and TV.
After connecting the Camera Recorder and the TV
as illustrated, start playback.
[VIDEO IN]
[S-VIDEO IN]
[AUDIO IN]
2
1
S-VIDEO
VIDEO
IN/OUT IN/OUT
L–
AUDIO
IN/OUT –R
OUsing the AV Cable 1, make a connection with
the TV. If the TV has an S-Video Socket, connect
the S-Video Cable 2, too.
To Make the Indications Appear on the TV Screen
Press the [OSD] Button e on the Remote Controller.
e
OSD
DATE/
TIME
PHOTO
SHOT
START/
STOP
OFor other notes concerning this item, see -45-.
37
VCR Mode
Audio Dubbing
You can add music or narration to the recorded
Cassette.
OIf the tape recorded in the [16bit] Mode is dubbed
with the Audio Dubbing function, the original sound
is erased. (If you wish to preserve the original
sound, use the [12bit] Mode when recording.)
OAudio Dubbing cannot be performed on a recording
done in LP Mode. (-18-)
1
Set [VCR FUNCTIONS] >> [AV IN/OUT SETUP]
>> [AV JACK] >> [IN/OUT].
OFor other notes concerning this item, see -45-.
$ To Adjust the Audio Level
PUSH
W.B/SHUTTER/IRIS
>
To Play Back the Sound Recorded by 12bit Audio
Dubbing
Set [VCR FUNCTIONS] >> [PLAYBACK FUNCTIONS]
>> [12bit AUDIO] >> [ST2] or [MIX].
ST1: It plays back only the original sound.
ST2: It plays back only the sound added by Audio
Dubbing.
MIX: It plays back both the original sound and the
sound added by Audio Dubbing simultaneously.
You can adjust the Audio Level for Audio Dubbing.
1
VOL/JOG
MENU
B
Set [VCR FUNCTIONS] >> [RECORDING SETUP]
>> [AUDIO LEVEL] >> [YES].
VOL/JOG
MENU
B
OThe [AUDIO LEVEL SETUP] Menu appears.
2
Press the [A.DUB] Button i on the Remote
Controller.
AUDIO LEVEL SETUP
MODE
MULTI/
P-IN-P
REC
A.DUB
C/REW
PLAY
FF/ B
STILL ADV PAUSE STILL ADV
INDEX
STOP
AUTO
MNL
MNLŁ
(AGC)(NO–AGC)
0
+6Ł
(dB) –30
GAIN |||||||||||–––
i
u
PUSH MENU TO RETURN
INDEX
3
5
To start Audio Dubbing, press the [;] Button u
on the Remote Controller.
To Cancel Audio Dubbing
Press the [;] Button u on the Remote Controller.
The Camera Recorder is in the Still Playback Mode
again.
To dub audio while listening to a pre-recorded
sound
When pausing the audio dubbing, [12bit AUDIO] on
the [PLAYBACK FUNCTIONS] Sub-Menu is
automatically set to [ST2] and you can check the prerecorded sound. When a microphone is used for audio
dubbing, use headphones to listen to the pre-recorded
sound while dubbing the audio. (When using
headphones, set [AV JACK] on the [AV IN/OUT
SETUP] Sub-Menu to [OUT].) When the line input is
used, you can dub audio while listening to a prerecorded sound from the speaker.
38
Press the [PUSH] Dial > to select the [MNL
(AGC, NO-AGC)].
OThe Audio Level Meter appears.
Turn the [PUSH] Dial > to increase or decrease
the bars of the [GAIN] Indication.
W.B/SHUTTER/IRIS
>
PUSH
4
Switch the Camera Recorder over to the Still
Playback Mode where you want to add new
sound.
– VOL +
3
>
Continuing the aforesaid setup, select [A.DUB
INPUT] >> [MIC] or [AV IN].
OSet to [AV IN] when external device is used, and
to [MIC] when an external or built-in microphone
is used.
PUSH
W.B/SHUTTER/IRIS
2
VOL/JOG
OFor details, refer to the [MIC LEVEL ADJ.] on the
[RECORDING SETUP] Sub-Menu of the [CAMERA
FUNCTIONS] Main-Menu (-31-).