1
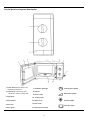
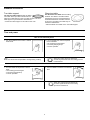
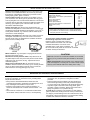
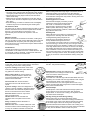
Instruction
for
Use
For customer service or product assistancs
please telephone our call centre
1300 657 888
PMO-500
ENGLISH
Content
Electrical connection
Before you operate the oven
Important when using your microwave oven
Control panel and symbol description
Standard accessories
Time and power
Cooking interruption
page
1
1
2
3
4
4
5
page
How to choose power level?
Working with microwaves
Technical specifications
Electrical connection
Maintenance
Service
Declaration of conformity
5
5
10
10
11
11
11
Electrical connection
The earthing of this appliance is compulsory by law. The
manufacturer will accept no responsibility for injury to persons
or damage to objects arising from the non-observance of this
requirement.
Prior to connecting, check that the voltage on the rating plate
corresponds to the voltage in your home.
WARNING!
THIS APPLIANCE MUST BE EARTHED
Before you operate the oven
Please read the instructions and guarantee information
and keep for future reference.
The packaging material is recyclable and marked with the
symbol for recycling
Please complete the guarantee card and send to our
Service Department.
Do not operate this appliance if it has a damaged mains cord
or plug, if it is not working properly, or if it has been damaged
or dropped. Electrical shock, fire or other hazards may result.
Make sure that the appliance is not
damaged. Check that the oven door closes
firmly against the door support and that the
internal door seal is not damaged. Empty the
oven and clean inside it with a soft, damp
cloth.
Do not immerse the mains cord or plug in water. Keep the
cord away from hot surfaces.
Do not let the mains cord hang over edge of table or counter.
Do not store or use this appliance outdoors. Do not use this
product near a kitchen sink, in a wet basement, or near a
swimming pool, or similar.
Place the oven on a stable, even surface that is strong
enough to hold the oven and the food utensils you put in it.
The control side of the unit is the heavy side. Use care
when handling.
Do not use the cavity for storage purposes.
Do not leave paper products, cooking
utensils, or food in the cavity when not in
use.
Place the oven at a distance from other
heating sources. The cooling air, which is
taken in by the oven, must not exceed 35°C
temperature. For sufficient ventilation there
must be a space of at least 10 cm above the
oven.
Never lean on the door or allow a child to
swing on it when the door is open. Injury
could result.
The ventilation openings on the oven must
not be covered. Blocking the air intake or
exhaust vents may cause damage to the
oven and poor cooking results. Make sure
the microwave oven feet are in place to
ensure proper airflow.
WARNING!
The appliance should not be operated
without food in the oven when using
microwaves. Operating in this manner is
likely to damage the appliance.
If you practice operating the oven, put a
glass of water inside. The water will
absorb the microwave energy and the
oven will not be damaged.
The oven can be operated only if the oven door is firmly
closed.
Poor television reception and radio
interference may result if the oven is located
close to a TV, radio or aerial.
1
Important when using your microwave oven
Do not use your microwave oven for
cooking or reheating whole eggs with or
without shell.
Do not heat, store or use flammable
materials in or near the oven. Fumes can
create a fire hazard or explosion.
Use this appliance only for its intended use as described in
this manual.
Do not use your microwave oven for heating
food or liquids in airtight sealed containers.
The pressure increases and may cause
damage when opening or may explode.
Do not use corrosive chemicals or vapours in this appliance.
This type of oven is specifically designed to heat or cook food.
It is not designed for industrial or laboratory use.
Do not over-cook food. Fire could result.
Some foods which has a low water content e.g. oil, chocolate
and some pastries with sweet fillings, must be heated carefully.
Do not use your microwave oven for drying
textiles, paper, spices, herbs, wood, flowers,
fruit or other combustible materials. Fire could
result.
Do not use your microwave oven for deep frying, because
you cannot control the oil temperature.
Do not leave the oven unattended, especially when using
paper, plastic or other combustible materials in the cooking
process. Paper can char or burn, and some plastics can melt if
used when heating foods. As with any appliance, close
supervision is necessary when used by children.
One of the major advantages of microwave ovens is the
short cooking time. Therefore, do not exceed recommended
times for cooking or re-heating food.
Always refer to a microwave cookbook for details. Especially,
if cooking or reheating food that contains alcohol.
Remove wire twist-ties from paper or plastic bags before
placing bag in the oven.
After heating baby food or liquids in a baby
bottle, always stir and check the temperature
before serving. This will ensure that the heat
is evenly distributed and the risk of scalding
or burns can be avoided.
Ensure the Lid and the Teat is removed
before heating!
If material inside the oven should ignite,
keep oven door closed, turn the oven off and
disconnect, the power cord or shut off power
at the fuse or circuit breaker panel.
When heating liquids, e.g. beverages or water in your
microwave oven, overheating the liquid beyond boiling point
can occur without evidence of bubbling. This could result in a
sudden boil over of the hot liquid.
To prevent this possibility the following steps should be taken:
1. Avoid using straight-sided containers with narrow necks.
2. Stir the liquid before placing the container in the oven and
let the teaspoon remain in the container.
3. After heating, allow to stand for a short time, stirring again
before carefully removing the container from the oven.
Use hot pads. Microwave energy does not
heat containers, but the hot food does.
Use oven mitts when touching containers,
oven parts, and pan after cooking to prevent
burns.
2
Control panel and symbol description
8
1 Power knob.Use this knob to set
the desired power level.
2 Timer knob. 0-60 minutes. Use
- this knob to set the cooking time.
3 Open door
7 Ventilation openings
Cooking time symbol
8 Cabinet
Microwave symbol
9 Service code
10 Control panel
Defrost symbol
4 Door latches
11 Mains cord
5 Door seal
12 Door locks
6 Door glass
13 Roller Cross Locator
Acoustic signal
3
Standard accessories
Turn table support
Glass turn-table
Use the Turn table support under the Glass
Turn-table. Never put other utensils than the
Glass Turn-table directly on the Turn table support. The Turn
table support may be cleaned in dishwashers.
* Fit the Turn table support on its locator in the oven.
Use the Glass Turn-table with all cooking
methods. The Glass Turn-table collects
the dripping juices and food particles that
otherwise would stain and soil the interior
of the oven. The Glass Turn-table may be
cleaned in dishwashers.
* Place the Glass Turn-table on the Turn table support.
Time and power
How to use time and power
l 2. Turn the TIMER knob until the required
1. Turn the POWER knob to select a desired
Power level.
time is indicated.
* The Cooking process begins.
* The Cavity lamp lights up.
* The Fan operates.
When the cooking time has elapsed an
acoustic signal sounds and the cooking process
is switched off.
Note:
Both Time and Power are possible to change during cooking.
How to set times less than 1 minute
2. Turn the TIMER knob back to the desired
time.
1. Turn the TIMER knob past the 5 minute
mark.
* The Cooking process begins.
* The Cavity lamp lights up.
* The Fan operates.
When the cooking time has elapsed an
acoustic signal sounds and the cooking
process is switched off.
4
Cooking interruption
To interrupt the cooking process:
If you wish to check, stir or turn the food just open the door and
the cooking process automatically stops.
If you don’t want to continue cooking:
Remove the food, turn the TIMER knob to "0" and close the
door.
To restart the cooking process:
Close the door. The oven starts automatically.
If you don’t interrupt the cooking process:
When the cooking process is finished an acoustic
signal sounds and the cooking process is switched off.
Note: The cooking process continues from where it was
interrupted.
Note:
It is possible to change both time and power during cooking.
How to choose power level?
High
Medium
- Fast reheat of beverages, water, clear soups, coffee, tea or
other food with a high water content. If the food contains egg
or cream choose a lower power.
- To be used for cooking of vegetables, fish, meat etc.
- To be used when simmering stews.
Med High
- Keep warm. To be used for softening butter, cheese and ice
cream.
- To be used when cooking dishes not possible to stir.
- To be used when more careful cooking is required e.g. high
protein sauces, cheese and egg dishes and to finish
cooking casseroles.
Defrost
- To be used for manual defrosting.
Warm
Working with microwaves
Microwaves - what are they?
Food always contains water. When we
heat the food with microwaves the water
molecules in the food are excited and
heat is produced. The microwaves reach
into the food and at the same time
enters the food from all directions.
Microwaves are like TV waves or light
waves. You cannot see them, but you can
see their effect.
Just like ordinary daylight passes through
glass, clear plastic and air, the microwaves
have the ability to go through materials like
paper, glass, porcelain, plastic and air.
These materials do not contain water or
metal and will consequently not be heated up
by the microwaves. The microwaves are
reflected by metal in the same way as light is reflected by a
mirror.
That’s why the food is heated so rapidly.
You save time when cooking with a microwave oven. You
usually also save energy, especially when cooking small
amounts of food.
If you boil fish in a sauce-pan with water, the electrical energy
must first heat the hot-plate. The heat must transfer from the
hot-plate to the sauce-pan and from the sauce-pan to the water
which then will heat the fish.
In a microwave oven the electrical energy is converted to
microwaves and almost all of the microwave energy is then
converted to heat inside the food
Microwaves are absorbed by water, oil and fat. The water, oil
and fat molecules are exited by microwaves and rub against
each other, just like when you rub your hands quickly against
each other and heat is produced. The speed of rubbing
determines the temperature. Microwave energy is not hot. It
simply causes the food to make its own heat.
When we heat food with infra waves
(Grill or hot air), in a normal oven, the
heat is applied on the surface of the
food and then conducts (transfers) to
the centre of the food. Food has a
rather poor ability to conduct heat and it
therefore takes a long time to heat the
food.
Microwave heating
Grill heating
Cook time
20 - 25 min.
5
Cook time
10 min.
Which utensils can be used in the oven?
Utensils and cooking containers used in a microwave oven
should be of a material that allows microwaves to pass freely
through them. Generally this means that you should cook in
either (paper), plastic, glass or ceramic.
Utensils made of china and ceramic are excellent to use in
your microwave oven. Most types of glass are also very good.
Lead crystal glass can crack and should therefore, not be used.
Coloured glass or glass with decorations shall be avoided since
metal e.g. gold, might be part of the decoration and such
decorations will be damaged.
Plastics and paper can also be used, provided they can
withstand the temperature of the heated food. For cooking only
use plastics, which will withstand a temperature of over 1200 C
Some plastic materials, e.g. melamine, will be heated by the
microwaves, and be damaged.
Round or oval shapes give the most even cooking. Square or
rectangular containers may over-cook foods in the corners
because more energy is absorbed there. Shallow containers
give more even cooking results.
Suitable
Microwave cooking
Material
Glass (general)
Glass (heat resistant)
Glass-ceramic and ceramic (heat resistant)
Earthenware
China (heat resistant)
Plastic (general)
Plastic (heat resistant)
Aluminium foil containers / aluminium foil
Metal (pots or pans)
Paper
Yes (1)
Yes
Yes (1)
Yes
Yes
Yes (2)
Yes (2)
Yes (3)
No
Yes
1. Without metal parts or metal trims.
2. Some plastics are heat-proof only to certain temperatures.
3. It is possible to use aluminium foil to shield delicate areas of
food (this prevents over-cooking).
To find out if a certain container is suitable,
the following simple test can be made:
Place the empty container and a glass of
water inside the microwave oven. The water
is needed because the oven must not be
operated empty or with empty containers. Let
the oven work on full power for one minute. A suitable
container will only be lukewarm.
Not suitable
Metal containers, e.g. saucepans or frying pans should not
be used in microwave ovens.
Microwaves cannot penetrate metal. They will bounce off
any metal object in the oven just as they bounce off the metal
walls of the oven and cause “arcing”, a phenomenon that
resembles lightning.
Small pieces of aluminium foil can be used, but only to
shield the areas that would over-cook (e.g. for covering chicken
wings, leg tips and fish tails) but the foil must not touch the
side of the oven as arcing (damage) may occur.
CAUTION!
There are a number of accessories avaliable on the market
Before you buy, make sure they are suitable for microwave
use.
When you put food in the microwave oven, make sure that
food, food supports or covering do not come in direct contact
with any of the internal walls or the ceiling of the cavity.
Aluminium foil containers and microwaves
* Aluminium foil containers should always be used singly in a
microwave oven, and placed on the glass turn-table
provided.
* Follow the instructions provided by the food producer to
ensure thorough heating of the food product throughout.
If you are using a foil container for self produced foods they
* may take longer to heat than when using plastic, glass,
porcelain or paper containers. Always ensure the food is
piping hot (minimum 720 C) before serving.
A useful tip is to place the foil container in a heat resisting
glass or plastic bowl, adding some hot water (not more than 1
cm deep) to provide heating for the foil container base. Stir if
appropriate or let the food stand for 2-3 minutes after heating,
to assist heat distribution within the container.
It is now possible to use disposable aluminium foil containers
in this new generation of microwave ovens, providing these
simple rules are followed:
* Always remove foil-laminated fibre board lid from the
container before heating, otherwise oven damage can occur.
* Only undamaged foil containers may be used.
* Aluminium foil containers with a height exceeding 3 cm
should be avoided and the container must be at leas t 2/3
full.
* There must be a minimum of 1 cm between the aluminium
foil container and the walls of the oven, to avoid sparking.
6
Hints
Sugar:
When cooking foods with a high sugar or fat content, such as
Christmas pudding, mince pies and fruit cake follow the
recommended cooking instructions carefully. Exceeding the
recommended cooking times may result in burning of the food
and damage to the oven.
Releasing pressure in foods
Several foods are tightly covered by a skin or
membrane. These foods should be pricked
with a fork or cocktail stick to relieve the
pressure and to prevent bursting, as steam
builds-up within them during cooking. This
applies to jacket potatoes, potatoes, chicken livers, sausages,
egg yolks and some fruits.
Points to remember when defrosting manually
* The shape of the package alters the defrosting time. Shallow
rectangular packets defrost more quickly than a deep block.
* Separate pieces as they begin to defrost; free-flow slices
defrost more easily.
* Shield areas of food with small pieces of foil if they start to
become warm. Wooden toothpicks may be used to hold the
foil in place.
* When defrosting, it is better to under-thaw the food slightly
and allow the process to finish during the standing time.
The amount of food
The more food you want to prepare the longer it takes. A rule of
thumb is that double amount of food requires almost double
the time. If one potato takes four minutes to cook,
approximately seven minutes are required to cook two
potatoes.
Standing time
Always allow the food to stand for some time after
using the oven. Standing time after defrosting,
cooking/reheating always improves the
result since the temperature will then be
evenly distributed through out the food.
In a microwave oven foods continue to cook even when the
microwave energy is turned off. They are no longer cooked by
microwaves, but they are still being cooked by the conduction
of the high residual heat to the centre of the food. The length of
the standing time depends on the volume and density of the
food. Sometimes it can be as short as the time it takes you to
remove the food from the oven and take it to the serving table.
However, with larger, denser foods, the standing time may be
as long as 10 minutes. The food will finish cooking during this
time.
Moisture content:
Because microwaves are attracted to moisture, cooking time
will vary according to water content. Naturally moist foods such
as vegetables, fish and poultry will cook quickly and evenly;
drier foods such as rice or dried beans require added moisture
for microwave cooking.
Condensation:
Humidity and moisture in foods will sometimes cause
condensation on the walls of the oven or inside the door. This
is normal with cooking. Generally, covered foods will cause
less condensation than uncovered foods.
Arranging Food
When you cook or reheat whole fish, score
the skin - this prevents cracking.
The best results are achieved if the food is evenly distributed
on the plate. This is done in several ways in microwave
cooking to give more even cooking results.
If you are cooking several items of the same
food such as jacket potatoes, place them in a
ring pattern for uniform cooking.
Shield the tail and head with small pieces of
foil to prevent over-cooking but ensure the foil
does not touch the sides of the oven.
When cooking foods of uneven shapes or
thickness, place the smaller or thinner area
of the food towards the centre of the dish
where it will be heated last.
Composition of the food
Food with a lot of fat and sugar will be heated faster than food
containing a lot of water. Fat and sugar will also reach a higher
temperature than water in the cooking process.
The more dense the food, the longer it takes to heat. “Very
dense” food like meat takes longer time to reheat than lighter,
more porous food like bread.
Uneven foods such as fish should be
arranged in the oven with the tails to the
centre.
If you are saving a meal in the refrigerator or
“plating” a meal for reheating, arrange the thicker,
denser foods to the outside of the plate and the
thinner or less dense foods in the middle.
Size and shape
Smaller pieces of food will cook faster than larger pieces and
uniform pieces of food cook more evenly than irregularly
shaped foods. To ensure even cooking, cut all pieces of food
into similar sizes and shapes.
Place thin slices of meat on top of each
other or interlace them.
Thicker slices such as meat loaf and
sausages have to be placed close to each
other.
Gravy or sauce should be reheated in a
separate container.
Stirring, turning of foods during cooking
Stirring and turning of foods are techniques used in
conventional as well as in microwave cooking to distribute the
heat quickly to the centre of the dish and avoids over-cooking
at the outer edges of the food. turning foods is especially
important here because it allows for more even cooking. As in
conventional cooking, foods such as roasts need to be elevated
so they are not allowed to steam in their own juices.
Choose a tall, narrow container rather than a low
and wide container. When reheating gravy, sauce
or soup, do not fill the container more than 2/3
7
COOKING CHART
Food
BEEF
1 lb (500g) ground beef
1 lb (500g) meatballs
1 lb (500g) hamburgers
1 lb (500g) meat loaf
Steaks
PORK
Bacon
1/2 lb (225g) pork sausages, raw
Pork chops
Pork roast
LAMB
Cooking time
Power level
750W
3-5 minutes
750W
9-12 minutes
750W
750W
15-20 minutes
750W
2-4 minutes per lb (500g)
750W
1/2-3/4 minutes per slice
750W
2-4 minutes
750W
750W
10-12 minutes per lb (500g)
10-12 minutes per lb (500g)
4-5 minutes
Roast leg or shoulder
VEAL
Roast shoulder
500-750W
8-10 minutes per lb (500g)
500-750W
9-10 minutes per lb (500g)
Lamb/veal cutlets/chops (3-4 pieces)
750W
6-8 minutes
POULTRY
Chicken pieces
Whole chicken
Stewing, cut up
Turkey breasts
750W
750W
500W
2-3 minutes per piece
9-10 minutes per lb (500g)
12-14 minutes per lb (500g)
500W
8-9 minutes per lb (500g)
1 lb (500g) fillets/steaks
750W
1 lb (500g) whole fish
EGGS
Scrambled
Poached
750W
7-9 minutes
7-9 minutes
FISH
Omelette
750W
1-2 minutes per egg
1-2 minutes per egg
3/4-1 1/2 minutes to melt butter
1-2 minutes per egg
750W
750W
Custard (8x8 in)
500W
15-19 minutes
750W
8-19 minutes
750W
8-16 minutes
750W
750W
5-5 1/2 minutes
4-6 minutes
750W
750W
750W
1-2 minutes
2-5 minutes
750W
750W
9-12 minutes
5-6 minutes
Cupcakes (6)
Bar cookies 8 in (20cm) square dish
750W
350W
500W
5-5 1/2 minutes
2-2 1/2 minutes
SOUP/BEVERGE
1 cup water based
1 cup milk based
750W
500W
(20x20 cm)
VEGETABLES
Vegetables (1-2 lb) (500-1000g)
water 1/4 cup
Potatoes (1 lb) (500g) baked
Corn-on-the-cob
- fresh husk 2
- frozen 2
CEREAL
1/2 cup quick oatmeal, water 1 cup
1/2 cup long cooking oatmeal, water 1 cup
1/2 cup cornmeal, water 2 cups
CAKES
Carrot cake (10x6 in) (25cm x 15cm)
Basic butter or chocolate
8-1/2 in (21cm) round dish
Ring cake
2-3 minutes
3-6 minutes
1-2 minutes
1-2 minutes
8
DEFROSTING CHART
Food
MEAT
Recommended Time
Suggestions
1 pack bacon
2-3 1/2 minutes
Leave packages unopened when defrosting. Microwave till foods
can be separated.
Frankfurters
2-3 1/2 minutes per lb (500g)
"
Spare-ribs
Ground meat
5-6 minutes per lb (500g)
6-8 minutes per lb (500g)
"
Turn over after half of defrosting time.
Roast beef
4-6 minutes per lb (500g)
Unwrap roast and place in cooking dish. Defrost till half of
defrosting time and turn it over. Stand for ten minutes
Pork
Lamb
Steaks, chops and cutlets
Sausages
7-9 minutes per lb (500g)
7-9 minutes per lb (500g)
"
"
3-6 minutes per lb (500g)
3-4 minutes per lb (500g)
Separate pieces after half of defrosting time.
Turn over after half of defrosting time.
POULTRY
1 whole chicken
(2 1/2-3 1/2 lb)
(1 1/4-1 1/2 kg)
13-16 minutes
Place wrapped whole bird in oven when defrosting.
Turkey
6-8 minutes per lb (500g)
Chicken pieces
4-6 minutes per lb (500g)
"
Separate during half of defrosting time. Stand to complete
defrosting
Turkey parts
FISH AND SEAFOOD
1 lb (500g) fillets
6-8 minutes per lb (500g)
6-7 minutes
Leave package unopened when defrosting. Stand in cold water
to separate
1 lb (500g) steaks
1-2 minutes
No manipulation
8-10 oz (225-282) whole fish
2-4 minutes
Place fish in cooking dish. Turn over once half way through
defrosting time. Rinse cavity of fish with cold water.
1 lb (500g) small pieces of seafood,
e.g. shellfish, shrimps, crab meat,
oysters, etc.
4-6 minutes
6-9 oz (170-255g) lobster tails
4-6 minutes
1 1/2 lb (750g) whole lobster or crab
BREAD AND CAKES
12-13 minutes
Break-up after half of defrosting time.
No manipulation
Turn over after half of defrosting time
7 oz-1 lb (190-500g) bread, buns, rolls
Doughnuts
12-17 oz (340-482g) pound
cake/coffee cake, frosted, cream filled,
or topped
17-19 oz (482-539g) cheesecake
8 in (20 cm) fruit or nut pie
14 oz (395g) cream or custard pie
Cup cakes
VEGETABLES
"
1-3 minutes
1/4 minute each
1-3 minutes
3-5 minutes
6-7 minutes
1-2 minutes
1/4/3/4 minute
Vegetables are preferably cooked from frozen. Add 1-2 tablespoons of water
RE-HEATING CHART
1 serving
1-2 servings
2-4 servings
2-3 servings
2-3 servings
2 servings
2 servings
1-2 ears
2-3
1
1-2 slices
3-4
4
Food
Plate of food
Saucy main dish
Thick meat slices, such as hamburaers. meat loaf slices
Thin meat slices, such as beef, ham, pork, turkey
Chicken pieces
Casserole
Vegetables
Corn-on-the-cob
Rolls
Whole pie
Pie
Sausages
Hot dogs
Power level
750W
Cooking time
750W
750W
500W
7-9 minutes
3-5 minutes
500W
500W
750W
750W
750W
750W
9
2-3 minutes
2-3 minutes
3-4 minutes
9-12 minutes
3-4 minutes
750W
3-4 minutes
3/4-1 minute
3-7 minutes
1-2 minutes
750W
750W
1-2 minutes
1-2 minutes
Electrical connection
FOR THE REPBLIC OF IRELAND ONLY
The information given in respect of Great Britain will
frequently apply, but a third type of plug and socket is also
used, the 2-pin, side earth type. In this case, the wire which is
coloured GREEN AND YELLOW MUST BE CONNECTED TO
THE EARTH contact and the other two wires to the pins,
irrespective of colour. The supply to the socket must be fitted
with a 16 Amp fuse.
For replacement fuse covers please consult your guarantee
card for the address of your local Service Centre.
Please state the colour of the plug insert.
WARNING!
THIS APPLIANCE MUST BE EARTHED
Electrical connection
FOR GREAT BRITAIN ONLY
The earthing of this appliance is compulsory by law. The
manufacturer will accept no responsibility for injury to persons
or damage to objects arising from the non-observance of this
requirement.
Prior to connecting, check that the voltage on the rating plate
corresponds to the voltage in your home. Then follow the
appropriate procedure for wiring.
WARNING!
THIS APPLIANCE MUST BE EARTHED
MOULDED PLUGS For Great Britain only
This appliance is fitted with a
B.S. 1363A 13 Amp fused
plug. To change a fuse in this
type of plug proceed as
follows:
1. Remove the fuse cover (A)
and the fuse (B).
2. Fit a replacement fuse
which should be a BS 1362
13A.A.S.T.A. item (B).
Important:
* The fuse cover must be refitted when changing a fuse.
* In the event of a fuse cover being misplaced, the plug must
not be used until a correct replacement is fitted.
* Please ensure that the replacement fuse cover is of the
same colour as the insert or, as the colour embossed in
words on the base of the plug.
For replacement fuse covers please contact your local
electrical store.
Please state the colour of the plug insert.
If the fitted plug is not suitable for your socket outlets, it must
be disposed of in order to avoid a shock hazard.
A suitable alternative plug should then be fitted to the cable.
A suitable plug should be fitted to the mains cable. If a 13
Amp plug is to be fitted, then a 13 Amp fuse should be used in
the plug.
Important:
The wires of the mains lead fitted to this
appliance are coloured in accordance with the
following code:
GREEN AND YELLOW - EARTH
BLUE - NEUTRAL
BROWN - LIVE
As the colours of the wires in the mains lead
fitted to this appliance may not correspond with the coloured
markings identifying the terminals in the plug, proceed as
follows:
The wire which is coloured GREEN AND YELLOW must be
connected to the terminal in the plug which is marked with the
letter "E" or by the earth symbol or coloured GREEN or
GREEN AND YELLOW.
The wire which is coloured BLUE must be connected to the
terminal which is marked with the letter "N" or coloured BLACK.
The wire which is coloured BROWN must be connected to the
terminal which is marked with the letter "L" or coloured RED.
If the terminals in the plug are unmarked or you are in any
doubt as to the correct connections, consult a qualified
electrician.
N.B. We recommend the use of a good quality plug.
10
Maintenance
Cleaning is the only maintenance normally
required. It must be carried out with the
microwave oven disconnected.
For stubborn soil, boil a cup of water in the oven for 2 or 3
minutes. Steam will soften the soil.
Do not use metal scouring pads on the
inside of the oven cavity. They will scratch
the surface.
Odours inside the oven can be eliminated
by placing a cup of water with lemon juice
added into the oven and boiling the mixture.
Important:
The door seals and the door seal areas must be regularly
inspected for damage. If these areas are damaged the
appliance should not be operated until it has been repaired by a
service technician trained by the manufacturer.
At regular intervals, especially if spillovers have
occurred, remove the turn-table and wipe clean
the base of the oven.
This oven is designed to operate with the turn-table in place.
WARNING!
Do not operate the microwave oven when the turn-table is
removed for cleaning.
Use a mild detergent, water and a soft cloth to clean the
interior surfaces front and rear of the door and the door
opening.
Abrasive cleaners, steel-wool pads, gritty wash cloths,
etc can damage the control panel, and the interior and
exterior oven surfaces. Use a sponge with a mild detergent
or paper towel with spry glass cleaner. Apply spray glass
cleaner to paper towel.
Do not spray directly on the oven
Do not allow grease or food particles to build up around the
door.
Service
If the oven does not work, do not make a service call until
youhave made the following checks:
* The Turn-table and turn-table support is in place.
* The Plug is properly inserted in the wall socket.
* The Door is properly closed.
* Check your Fuses and make sure that there is power
available.
* Wait for ten minutes and then try to operate the oven once
more.
Important:
If the mains cord needs replacing it should be replaced by the
original mains cord which is available via our service
organisation. The mains cord must only be replaced by a
trained service technician.
WARNING!
Service only to be carried out by a service technician
trained by the manufacture. It is dangerous for anyone other
than a service technician trained by the manufacture to
perform repair service.
This is to avoid unnecessary calls for which you will be
charged.
When calling for Service, please give the serial number and
type number of the oven (see Service label).
Technical specifications
PMO-500
Model
240V / 50Hz
Supply voltage
1250 W
Current consumption
10A
Fuse
Microwave power i(acc. to IEC 705. 1000g water)
Full power
750 W
Mechnical
Timer
Dimensions (Height x Width x Depth) in mm
Outside dimensions
286 x 463 x 339
Oven cavity dimensions
249 x 276 x 264
11
Palsonic Corporation Pty Ltd
1 Joynton Avenue
Waterloo NSW 2017
Australia
Tel: 02-9313 7111
Fax: 02-9313 7555
www.palsonic.com.au
4619-652-58391