1
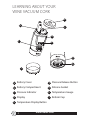
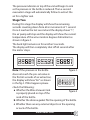
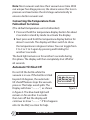
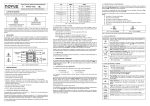
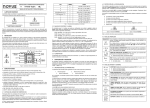
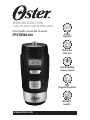
WINE VACUUM CORK
CORCHO EVACUADOR PARA VINO
User Guide/ Guía del Usuario:
FPSTBW8100
Safety
Seguridad
How to use
Cómo usar
Care & Cleaning
Cuidado y Limpieza
FAQs
Preguntas frecuentes
Warranty
Garantía
www.oster.com
IMPORTANT SAFEGUARDS
When using the Wine Vacuum Cork, basic safety precautions should always
be followed including the following:
1. READ ALL INSTRUCTIONS BEFORE USE
2. Do not operate WINE VACUUM CORK after the appliance malfunctions
or if it is dropped or damaged in any manner. Refer to warranty section.
3. To protect against risk of electrical shock, do not put the
WINE VACUUM CORK in water or other liquid. This may cause
personal injury and/or damage to the product.
4. To protect against fire, do not operate the unit in the presence of
explosive and/or flammable fumes.
5. Do not use the WINE VACUUM CORK for other than intended use.
6. For household indoor use only. Do not expose the
WINE VACUUM CORK to rain or other extreme conditions.
7. Do not attempt to disassemble the WINE VACUUM CORK. It has no
serviceable parts. Your WINE VACUUM CORK is guaranteed for one
year. In the event of a malfunction in this time please contact our
customer services department.
8. Use only AAA ALKALINE BATTERIES IN THE UNIT.
9. Make sure the battery cover is securely locked in place before operating.
10. Remove batteries from battery compartment if storing unit for
extended periods of time.
11. Maintain Appliance away from face and eyes.
2
www.oster.com
THIS PRODUCT IS FOR HOUSEHOLD USE ONLY
SAVE THESE INSTRUCTIONS
Thank you for purchasing the OSTER™
Wine Vacuum Cork. Before you use this product
for the first time, please take a few moments to
read these instructions and keep it for reference.
Pay particular attention to the Safety Instructions
provided. Please review the product service and
warranty statements. To learn more about Oster™
products, please visit us at www.oster.com or
call us at 1-800-334-0759.
www.oster.com
3
LEARNING ABOUT YOUR
WINE VACUUM CORK
a
b
c
d
f
e
g
h
i
a Battery Cover
f Pressure Release Button
b Battery Compartment
g Silicone Gasket
c Pressure Indicator
h Temperature Gauge
d Display
i Bottom Cap
e Temperature Display Button
4
www.oster.com
HOW TO:
Installing the Batteries
Before using your Wine Vacuum Cork for the first time
install a fresh set of batteries in the battery compartment
as shown here:
1 Remove the battery cover by
twisting it counterclockwise
toward the unlock icon.
2 Insert 2 AAA alkaline batteries
into the battery compartment,
observing proper +/- polarities
3 Replace the battery cover by
twisting it clockwise toward
the lock icon until the cover
clicks into place.
4 Replace batteries when
required with only AAA
alkaline batteries.
5 Dispose old batteries per
local and national laws
and regulations.
www.oster.com
5
Operating the Wine Vacuum Cork
1 Remove bottom cap. Fully place the
wine vacuum cork on top of the neck
of an opened bottle of wine. Hold
the bottle of wine securely with
one hand and push the unit down
firmly and twist slightly to secure
the seal with the other hand. This
will activate the pump as shown in
figure 1. Repeat if necessary.
Note: It is not necessary to press
any buttons to activate the pump.
Once vacuum process starts, you
can release the vacuum cork.
figure 1
Vacuum process has two stages.
Stage One
The automatic vacuum pump activates, evacuating excess
air from inside the wine bottle. The “o” icon will move across
the display while the motor is running as shown in figure 2.
The blue back light will remain on during this time.
figure 2
6
www.oster.com
The pressure indicator on top of the unit will begin to sink
as the pressure in the bottle is reduced. Then a second
evacuation stage will automatically follow to extract the
air for a tighter seal.
Stage Two
During this stage the display will show the remaining
seconds counting down from 60 in increments of 1 second.
Once it reaches the last second and the display shows “1”,
the air pump will stop and the display will show the current
temperature of the wine inside in degrees Fahrenheit as
shown in figure 3.
The back light remains on for another 5 seconds.
The display will then completely shut off 60 seconds after
the motor stops.
figure 3
Note: If the pressure in the bottle
does not reach the pre-set value in
the first 60 seconds of air extraction,
the display will show “Err” as shown
in the fig 4. If this happens please
check the following:
a Whether the Wine Vacuum Cork
figure 4
is properly placed on top of the
neck of the bottle.
b Whether the silicone gasket fits the opening of the bottle.
c Whether there are any external objects on the opening
or neck of the bottle.
www.oster.com
7
Note: Most vacuum seals lose their vacuum over time. With
our unique Two Stage process, the device senses this loss in
pressure and reactivates the 2nd stage automatically to
ensure a better vacuum seal.
Converting the Temperature from
Fahrenheit to Celsius
(The default temperature unit is Fahrenheit)
1 Press and hold the temperature display button for about
2 seconds in stand by mode to activate the display.
2 Next press and hold the temperature display button for
about 5 seconds. The display will then switch to show
the temperature in degrees Celsius. You can toggle from
F to C or C to F again by pressing and holding for
another 5 seconds.
The back light remains on for another 5 seconds during
this phase. The display will then completely shut off after
60 seconds.
Automatic Tilt Shut Off
Do not tilt the bottle while the
vacuum is in use. If the bottle is tilted
beyond 45 degrees, the automatic
tilt shutoff feature stops the vacuum
process. This helps avoid spills. The
Display will show “– – – – “, as shown
in figure 5. The blue back light will
remain on for another 5 seconds
then turn off but the display will
continue to show “– – – – “. If this happens
refer to the FAQ’s section for help.
8
www.oster.com
figure 5
Low battery warning
When the batteries are low the
display will show a low battery
warning as shown in figure 6.
The blue back light will remain on
for another 5 seconds then turn off
but the display will continue to
show “Lo”. If this happens refer to the
FAQ’s section for help
figure 6
Releasing vacuum seal and removing the unit
from bottle
1 Press the pressure release button. Wait for the vacuum
to be released from the bottle (this will take a few seconds).
2 Hold bottle with one hand, then pull unit off with
the other.
3 Pour and enjoy.
Storing your wine with the
Wine Vacuum Cork attached
1 It is recommended to store your bottle in the upright
position for an optimal seal.
2 Bottles can be stored on their sides once they are vacuum
sealed, however the re-evacuation process will not occur
as the bottle has been tilted past the 45 degree angle.
Note: A bottle sealed with the unit may be stored in
the refrigerator however, cold temperatures may reduce
the battery performance. Do not operate the unit in
freezing temperatures.
www.oster.com
9
CARE & CLEANING
The following suggestions will help you care for your Oster™
Wine Vacuum Cork.
1 Wipe Wine Vacuum Cork with a cloth to clean.
2 Do not immerse Wine Vacuum Cork in water.
3 Do not place Wine Vacuum Cork in the dishwasher.
FAQs
What do I do if the display reads “Err”?
This means the pressure inside the bottle has not reached
the preset value. If this happens please check the following:
a Whether the Wine Vacuum Cork is properly placed on
top of the neck of the bottle.
b Whether the silicone gasket fits the opening of the
bottle.
c Whether there is any external objects on the opening
or neck of the bottle.
What do I do if the display reads “––––”?
This means the bottle was probably tilted more than
45 degrees during the evacuation process. Remove the
Wine Vacuum Cork from the bottle and start over
keeping the bottle upright.
10
www.oster.com
What do I do if the display reads “Lo”?
This means the batteries are low and should be changed.
Remove old batteries and replace with new AAA alkaline
batteries (refer to the “Installing the Batteries” section of
this Instruction Booklet).
What do I do if the device reactivates itself?
This is normal. Most vacuum seals lose their vacuum over
time. With our unique Two Stage process, the device
senses this loss in pressure and reactivates the 2nd stage
automatically to ensure a better vacuum seal.
Can I store my wine bottle with vacuum cork in the
refrigerator on its side?
The unit is leak resistant and can be laid on its side; however,
because of the automatic tilt shut off feature the unit will
not be able to perform the vacuum process. Also note that
cold temperatures may reduce the battery’s performance.
www.oster.com
11
1 Year Limited Warranty
Sunbeam Products, Inc. doing business as Jarden Consumer Solutions
or if in Canada, Sunbeam Corporation (Canada) Limited doing business
as Jarden Consumer Solutions (collectively “JCS”) warrants that for a
period of one year from the date of purchase, this product will be free
from defects in material and workmanship. JCS, at its option, will repair
or replace this product or any component of the product found to be
defective during the warranty period. Replacement will be made with
a new or remanufactured product or component. If the product is no
longer available, replacement may be made with a similar product
of equal or greater value. This is your exclusive warranty. Do NOT
attempt to repair or adjust any electrical or mechanical functions on
this product. Doing so will void this warranty.
This warranty is valid for the original retail purchaser from the date of
initial retail purchase and is not transferable. Keep the original sales
receipt. Proof of purchase is required to obtain warranty performance.
JCS dealers, service centers, or retail stores selling JCS products do
not have the right to alter, modify or any way change the terms and
conditions of this warranty.
This warranty does not cover normal wear of parts or damage resulting
from any of the following: negligent use or misuse of the product,
use on improper voltage or current, use contrary to the operating
instructions, disassembly, repair or alteration by anyone other than
JCS or an authorized JCS service center. Further, the warranty does not
cover: Acts of God, such as fire, flood, hurricanes and tornadoes.
What are the limits on JCS’s Liability?
JCS shall not be liable for any incidental or consequential damages
caused by the breach of any express, implied or statutory warranty
or condition.
Except to the extent prohibited by applicable law, any implied warranty
or condition of merchantability or fitness for a particular purpose is
limited in duration to the duration of the above warranty.
12
www.oster.com
JCS disclaims all other warranties, conditions or representations,
express, implied, statutory or otherwise.
JCS shall not be liable for any damages of any kind resulting from the
purchase, use or misuse of, or inability to use the product including
incidental, special, consequential or similar damages or loss of profits,
or for any breach of contract, fundamental or otherwise, or for any
claim brought against purchaser by any other party.
Some provinces, states or jurisdictions do not allow the exclusion
or limitation of incidental or consequential damages or limitations
on how long an implied warranty lasts, so the above limitations or
exclusion may not apply to you.
This warranty gives you specific legal rights, and you may also have
other rights that vary from province to province, state to state or
jurisdiction to jurisdiction.
How to Obtain Warranty Service
In the U.S.A.
If you have any question regarding this warranty or would like to
obtain warranty service, please call 1-800-334-0759 and a convenient
service center address will be provided to you.
In Canada
If you have any question regarding this warranty or would like to
obtain warranty service, please call 1-800-667-8623 and a convenient
service center address will be provided to you.
In the U.S.A., this warranty is offered by Sunbeam Products, Inc. doing
business Jarden Consumer Solutions located in Boca Raton, Florida
33431. In Canada, this warranty is offered by Sunbeam Corporation
(Canada) Limited doing business as Jarden Consumer Solutions,
located at 20 B Hereford Street, Brampton, Ontario L6Y 0M1. If you
have any other problem or claim in connection with this product,
please write our Consumer Service Department.
PLEASE DO NOT RETURN THIS PRODUCT TO ANY OF THESE
ADDRESSES OR TO THE PLACE OF PURCHASE.
www.oster.com
13
PRECAUCIONES IMPORTANTES
Cuando use el Corcho Evacuador Para Vino, siempre debe seguir
precauciones básicas de seguridad, incluyendo las siguientes:
1. LEA TODAS LAS INSTRUCCIONES ANTES DE USAR.
2. No opere el Corcho Evacuador Para Vino después de que el aparato
haya tenido una falla o se haya dejado caer o haya sido dañado de
alguna manera. Refiérase a la sección de Garantía.
3. Para protegerse del riesgo de un choque eléctrico, no sumerja el
Corcho Evacuador Para Vino en agua u otro líquido. Esto podría causar
lesiones o podría dañar el producto.
4. Para protegerse de fuego, no opere la unidad en la presencia de
explosivos y/o gases inflamables.
5. No use el Corcho Evacuador Para Vino para otro uso que no sea el
recomendado.
6. Solo para uso doméstico. No use al aire libre. No exponga el Corcho
Evacuador Para Vino a la lluvia u otras condiciones extremas.
7. No intente desarmar el Corcho Evacuador Para Vino. No tiene partes
reparables. Su Corcho Evacuador Para Vino esta garantizado por un
año. En caso de que tenga una falla en este tiempo por favor contacte
nuestro departamento de servicio al cliente.
8. Use BATERIAS ALCALINAS tipo AAA solamente en esta unidad.
9. Asegúrese de que la cubierta de la batería este colocada seguramente
en su lugar antes de operar.
10. Remueva las baterías del compartimiento de baterías se va a
almacenar su unidad por un largo periodo de tiempo.
11. Mantenga este aparato lejos de la cara y los ojos.
14
www.oster.com
ESTE PRODUCTO ES SOLO PARA USO DOMÉSTICO
GUARDE ESTAS INSTRUCCIONES
GRACIAS por comprar el Corcho Evacuador
Para Vino Oster™. Antes de usar este producto
por primera vez, por favor tome un momento
para leer estas instrucciones y manténgalas
como referencia. Ponga especial atención a las
Instrucciones de Seguridad que se proveen.
Por favor revise las secciones de servicio del
producto y de garantía. Para aprender más acerca
de los productos Oster™ por favor vístenos en
www.oster.com o llámenos al 1-800-334-0759.
www.oster.com
15
APRENDIENDO ACERCA DE SU
CORCHO EVACUADOR PARA VINO
a
b
c
d
f
e
g
h
i
a Cubierta de la batería
b Compartimiento de
c Indicador de presión
d Visualizador
e Botón visualizador
16
de presión
g Empaquetadura de
la batería
de temperatura
f Botón de liberación
silicona
h Medidor de
temperatura
i Tapa inferior
www.oster.com
INSTRUCCIONES:
Instalando las baterías
Antes de usar su Corcho Evacuador Para Vino por primera
vez instale un juego nuevo de baterías en el compartimiento
de la batería como se muestra aquí:
1 Remueva la cubierta de la
batería girándola en sentido
contrario a las manecillas del
reloj hacia el símbolo de
abierto.
2 Inserte 2 baterías alcalinas tipo
AAA en el compartimiento de
la batería, teniendo en cuenta
la polarización apropiada +/-.
3 Reemplace la tapa de la
cubierta de las tuberías
en sentido horario hacia
el símbolo de cerrado hasta
que la cubierta haga un
ruido seco con la base.
4 Reemplace las baterías cuando
se requiera usando solamente
baterías alcalinas tipo AAA.
5 Deseche las baterías viejas de
acuerdo a las reglas y leyes
locales y nacionales.
www.oster.com
17
OPERANDO EL CORCHO EVACUADOR
PARA VINO
1 Retire la tapa inferior. Coloque el
corcho evacuador sobre el cuello de
una botella de vino abierta.
Sostenga la botella de vino de
manera segura con una mano,
empuje la unidad firmemente
hacia abajo y gírela levemente
para asegurar el sello con la otra
mano. Esto activa bomba como se
muestra en la figura 1. Repita el
procedimiento si es necesario.
Nota: No es necesario presionar
figura 1
ningún botón para activar la
bomba. Una vez que comienza el proceso de vacío,
puede liberar el corcho evacuador.
El proceso de vacío tiene dos etapas.
Etapa Uno
La bomba automática del Evacuador se activa, evacuando
el exceso de aire del interior de la botella. El símbolo “O” se
moverá a lo largo del visualizador mientras que el motor esté
funcionando como se muestra en la figura 2. La luz azúl en la
parte de atrás se mantendrá prendida durante este tiempo.
figura 2
18
www.oster.com
El indicador de presión en la parte superior de la unidad
empezará a hundirse a medida que la presión en la botella
se va reduciendo. Luego una segunda fase de evacuación
seguirá automáticamente para extraer el aire para un
sellado más ajustado.
Etapa Dos
Durante esta etapa el visualizador mostrará los segundos
restantes contando de forma regresiva desde 60 en incrementos
de 1 segundo. Una vez que haya alcanzado el último segundo y
el visualizador muestre “1”, la bomba de aire se detendrá y el
visualizador mostrara la temperatura actual del vino dentro de la
botella en grados Fahrenheit como se muestra en la figura 3.
La luz en la parte de atrás se mantiene prendida por otros
5 segundos. El visualizador se apagará entonces completamente
60 segundos después de que el motor se detenga.
figura 3
Nota: Si la presión en la botella no
alcanza el valor pre-fijado durante los
primeros 60 segundos de extracción
de aire, el visualizador mostrará “Err”
como se muestra en la figura 4.
Si esto sucede, por favor controle lo
siguiente:
a Si el Corcho Evacuador para Vino
figura 4
esta colocado apropiadamente
sobre el cuello de la botella.
b Si la empaquetadura de silicona entra en la abertura
de la botella.
c Si hay algún objeto externo en la abertura o el cuello
de la botella.
www.oster.com
19
Nota: La mayoría de los sellos de vacío pierden el vacío con
el tiempo. Con nuestro proceso único de Dos Etapas, el
dispositivo detecta esta pérdida de presión y reactiva la
segunda etapa de manera automática para asegurar un
sello de vacío óptimo.
Convirtiendo la Temperatura de
Fahrenheit a Celsios
(La unidad de temperatura por defecto es la Fahrenheit)
1 Presione y sostenga el botón visualizador de
temperatura por unos 2 segundos en modo de espera
para activar el visualizador.
2 Luego presione y sostenga el botón visualizador de
temperatura por unos 5 segundos. Entonces, el visualizador
cambiará a mostrar la temperatura en grados centígrados.
Usted puede cambiar de F a C o de C a F nuevamente
presionando y sosteniendo por otros 5 segundos.
La luz en la parte de atrás se mantiene prendida por otros
5 segundos durante esta fase. El visualizador se apagará
entonces por completo después de 60 segundos.
Apagado de inclinación automático
No incline la botella mientras el
Evacuador está en uso. Si la botella
se inclina mas allá de 45 grados,
la característica de apagado de
inclinación automático detendrá el
proceso de evacuado. Esto ayuda
figura 5
a evitar derrames. El visualizador
mostrará “ – – – – “, como se muestra
en la figura 5. La luz azul en la parte de atrás se mantendrá
prendida por unos 5 segundos más y luego se apagará
pero el visualizador continuará mostrando “ – – – – “. Si esto
sucede, consulte la sección de Preguntas Frecuentes para
obtener ayuda.
20
www.oster.com
Advertencia de batería baja
Cuando las baterías estén bajas
el visualizador mostrará una señal
de batería baja como se muestra
en la figura 6.
La luz azul en la parte de atrás se
figura 6
mantendrá prendida por unos
5 segundos mas luego se apagará
pero el visualizador continuará mostrando “Lo“. Si esto
sucede, consulte la sección de Preguntas Frecuentes para
obtener ayuda.
Liberando el sellado al vacío y removiendo la
unidad de la botella
1 Presione el botón de liberación de presión.
Espere que el aire se libere de la botella
(esto tomara unos pocos segundos).
2 Agarre la botella con una mano, luego jale
la unidad con la otra mano.
3 Sirva y disfrute.
Guarde su vino con el Corcho Evacuador
para Vino colocado.
1 Se recomienda guardar su botella en posición vertical
para un sellado óptimo.
2 Las botellas pueden guardarse en posición horizontal una
vez que están selladas al vacío. Sin embargo, el proceso
de re-evacuación no se produce si la botella estuvo
inclinada a más de 45 grados.
Nota: Una botella sellada con la unidad puede ser almacenada
en el refrigerador, sin embargo las temperaturas frías pueden
reducir el rendimiento de las baterías. No opere la unidad en
temperaturas congeladas.
www.oster.com
21
CUIDAD Y LIMPIEZA
Las siguientes sugerencias le ayudarán a cuidar su Corcho
Evacuador para Vino Oster™:
1 Pase una tela sobre el Corcho Evacuador para Vino para
limpiarlo.
2 No sumerja el Corcho Evacuador para Vino en agua.
3 No coloque el Corcho Evacuador para Vino
en el lavaplatos.
PREGUNTAS FRECUENTES
¿Que hago si el visualizador muestra “Err”?
Esto significa que la presión dentro de la botella no ha
alcanzado el valor pre-fijado. Si esto sucede por favor revise
lo siguiente:
a Si el Corcho Evacuador para Vino está colocado
apropiadamente en la parte superior del cuello
de la botella.
b Si la empaquetadura de silicona entra en la abertura
de la botella.
c Si hay algún objeto externo en la abertura o el cuello
de la botella.
¿Que hago si el visualizador muestra “– – – – ”?
Esto significa que la botella estaba probablemente
inclinada más de 45 grados durante el proceso de
evacuación. Remueva el Corcho Evacuador para Vino
22
www.oster.com
de la botella y empiece nuevamente manteniendo
la botella recta.
¿Que hago si el visualizador muestra “Lo”?
Esto significa que las baterías están bajas y deben ser
cambiadas. Remueva las batería viejas y remplácelas
con baterías alcalinas tipo AAA (refiérase a la sección
“Instalando las baterías” de este manual de instrucción).
¿Qué debo hacer si el dispositivo se reactiva solo?
Esto es normal. La mayoría de los sellos de vacío pierden
el vacío con el tiempo. Con nuestro proceso único de Dos
Etapas, el dispositivo detecta esta pérdida de presión y
reactiva la segunda etapa de manera automática para
asegurar un sello de vacío óptimo.
¿Puedo guardar mi botella de vino con el corcho
evacuador en posición horizontal en el refrigerador?
La unidad es resistente a las pérdidas y puede colocarse
en posición horizontal. Sin embargo, debido a la función
de apagado automático de inclinación, la unidad no podrá
realizar el proceso de vacío. Además, tenga en cuenta que
las temperaturas frías pueden disminuir el rendimiento de
las baterías.
www.oster.com
23
24
www.oster.com
NOTAS
__________________________________________________________
__________________________________________________________
__________________________________________________________
__________________________________________________________
__________________________________________________________
__________________________________________________________
__________________________________________________________
__________________________________________________________
__________________________________________________________
__________________________________________________________
__________________________________________________________
__________________________________________________________
__________________________________________________________
__________________________________________________________
__________________________________________________________
__________________________________________________________
__________________________________________________________
__________________________________________________________
__________________________________________________________
__________________________________________________________
www.oster.com
25
Garantía Limitada de 1 Año
Sunbeam Products, Inc. operando bajo el nombre de Jarden
Consumer Solutions, o en Canadá, Sunbeam Corporation (Canada)
Limited operando bajo el nombre de Jarden Consumer Solutions,
(en forma conjunta, “JCS”), garantiza que por un período de un
año a partir de la fecha de compra, este producto estará libre de
defectos de materiales y mano de obra. JCS, a su elección, reparará
o reemplazará este producto o cualquier componente del mismo
que presente defectos durante el período de garantía. El reemplazo
se realizará por un producto o componente nuevo o reparado.
Si el producto ya no estuviera disponible, se lo reemplazará por
un producto similar de valor igual o superior. Ésta es su garantía
exclusiva. No intente reparar o ajustar ninguna función eléctrica o
mecánica de este producto. Al hacerlo elimínará ésta garantía.
La garantía es válida para el comprador minorista original a partir
de la fecha de compra inicial y la misma no es transferible. Conserve
el recibo de compra original. Para solicitar servicio en garantía se
requiere presentar un recibo de compra. Los agentes y centros de
servicio de JCS o las tiendas minoristas que venden productos de
JCS no tienen derecho a alterar, modificar ni cambiar de ningún otro
modo los términos y las condiciones de esta garantía.
Esta garantía no cubre el desgaste normal de las piezas ni los daños
que se produzcan como resultado de uso negligente o mal uso
del producto, uso de voltaje incorrecto o corriente inapropiada,
uso contrario a las instrucciones operativas, y desarme, reparación
o alteración por parte de un tercero ajeno a JCS o a un Centro de
Servicio autorizado por JCS. Asimismo, la garantía no cubre actos
fortuitos tales como incendios, inundaciones, huracanes y tornados.
¿Cuál es el límite de responsabilidad de JCS?
JCS no será responsable de daños incidentales o emergentes
causados por el incumplimiento de alguna garantía o condición
expresa, implícita o legal.
Excepto en la medida en que lo prohíba la ley aplicable, cualquier
garantía o condición implícita de comerciabilidad o aptitud para
un fin determinado se limita, en cuanto a su duración, al plazo de la
garantía antes mencionada.
26
www.oster.com
JCS queda exenta de toda otra garantías, condiciones o manifestaciones,
expresa, implícita, legal o de cualquier otra naturaleza.
JCS no será responsable de ningún tipo de daño que resulte de la
compra, uso o mal uso del producto, o por la imposibilidad de usar
el producto, incluidos los daños incidentales, especiales, emergentes
o similares, o la pérdida de ganancias, ni de ningún incumplimiento
contractual, sea de una obligación esencial o de otra naturaleza, ni de
ningún reclamo iniciado contra el comprador por un tercero.
Algunas provincias, estados o jurisdicciones no permiten la exclusión
o limitación de los daños incidentales o emergentes ni las limitaciones
a la duración de las garantías implícitas, de modo que es posible que
la exclusión o las limitaciones antes mencionadas no se apliquen en
su caso.
Esta garantía le otorga derechos legales específicos y es posible que
usted tenga otros derechos que varían de un estado, provincia o
jurisdicción a otro.
Cómo solicitar el servicio en garantía
En los Estados Unidos.
Si tiene alguna pregunta sobre esta garantía o desea recibir servicio
de garantía, llame al 1-800-334-0759 y podrá obtener la dirección del
centro de servicio que le resulte más conveniente
En Canadá
Si tiene alguna pregunta sobre esta garantía o desea recibir servicio
de garantía, llame al 1-800-334-0759 y podrá obtener la dirección del
centro de servicio que le resulte más conveniente
En los Estados Unidos, esta garantía es ofrecida por Sunbeam Products,
Inc. operando bajo el nombre de Jarden Consumer Solutions, Boca
Ratón, Florida 33431. En Canadá, esta garantía es ofrecida por
Sunbeam Corporation (Canada) Limited operando bajo el nombre
de Jarden Consumer Solutions, 20 B Hereford Street, Brampton,
Ontario L6Y 0M1. Si usted tiene otro problema o reclamo en conexión
con este producto, por favor escriba al Departamento de Servicio al
Consumidor.
POR FAVOR NO DEVUELVA ESTE PRODUCTO A NINGUNA DE ESTAS
DIRECCIONES NI AL LUGAR DE COMPRA
www.oster.com
27
For product questions contact:
Sunbeam Consumer Service
USA : 1.800.334.0759
Canada : 1.800.667.8623
www.oster.com
©2009 Sunbeam Products, Inc. doing business as
Jarden Consumer Solutions. All rights reserved.
Distributed by Sunbeam Products, Inc. doing business as
Jarden Consumer Solutions, Boca Raton, Florida 33431.
Para preguntas sobre los productos llame:
Sunbeam Consumer Service
EE.UU.: 1.800.334.0759
Canada : 1.800.667.8623
www.oster.com
©2009 Sunbeam Products, Inc. operando bajo el nombre de Jarden
Consumer Solutions. Todos los derechos reservados. Distribuido
por Sunbeam Products, Inc. operando bajo el nombre de Jarden
Consumer Solutions, Boca Raton, Florida 33431.
SPR-041609
P.N. 133710
Printed in China
Impreso en China