1
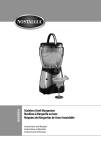
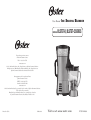
User Manual
MODELS
ICE SHAVING BLENDER
BLSTET-B, BLSTET-C SERIES
For product questions contact:
Sunbeam Consumer Service
USA : 1.800.334.0759
www.oster.com
© 2010 Sunbeam Products, Inc. doing business as Jarden Consumer Solutions.
All rights reserved. Distributed by Sunbeam Products, Inc. doing business as
Jarden Consumer Solutions, Boca Raton, Florida 33431.
Para preguntas sobre los productos llame:
Jarden Consumer Service
EE.UU.: 1.800.334.0759
Canadá: 1.800.667.8623
www.oster.com
©2010 Sunbeam Products, Inc. operando bajo el nombre de Jarden Consumer Solutions.
Todos los derechos reservados.
Distribuido por Sunbeam Products, Inc. operando bajo el nombre
de Jarden Consumer Solutions, Boca Raton, Florida 33431.
Printed in U.S.A.
SPR092010
Visit us at www.oster.com
P.N. 142666
IMPORTANT SAFEGUARDS
When using electrical appliances, basic safety precautions should be followed,
including the following:
READ ALL INSTRUCTIONS BEFORE USE
1. To protect against electric shock, do not immerse appliance, cord or plug in
water or other liquids.
2. Close supervision is necessary when any appliance is used near children. This
appliance should not be used by children.
3. Unplug from outlet when not in use, before putting on or taking off parts, and
before cleaning.
4. Avoid contact with moving parts.
5. Do not operate any appliance with damaged cord or plug, after the appliance
malfunctions, or is dropped or damaged in any manner. Return the appliance
to the nearest authorized service facility for examination, repair or electrical or
mechanical adjustment.
6. Do not use outdoors.
7. Do not let cord hang over the edge of a table or counter or touch hot surfaces,
including the stove.
8. Keep hands and utensils out of container while blending and/or ice shaving to
reduce risk of severe injury to persons or damage to the unit. A rubber spatula
may be used but must be used only when the appliance is not running.
9. Blades are sharp; handle carefully.
10. Always operate appliance with Jar Lid and Ice Reservoir Lid securely locked in
place.
11. The use of attachments not recommended or sold by the manufacturer may cause
fire, electric shock, or injury.
12. Do not use broken, chipped, or cracked Blending Jar or Ice Reservoir.
13. To reduce risk of injury to persons, never place Blending Blade Assembly on base
without the Blending Jar properly attached.
14. Do not leave appliance unattended while it is operating.
15. To disconnect, ensure appliance is off, then remove plug from wall outlet.
16. Do not use appliance for other than intended use.
17. Never place fingers or other utensils into feed or discharge areas.
18. Check Ice Reservoir for presence of foreign objects before using.
19. Do not blend hot liquids or run the appliance empty.
20. Do not let cord hang over edge of table or counter.
NOTE: Never shake or remove blender jar during operation as jar blade assembly can
get damaged.
2
This Product Is for Household Use Only
Power Cord Instructions
This appliance has a polarized plug (one blade is wider than the other). As a safety
feature, this plug will fit in a polarized outlet only one way. If the plug does not
fit fully into the outlet, reverse the plug. If it still does not fit, contact a qualified
electrician. Do not attempt to defeat this safety feature.
SAVE THESE INSTRUCTIONS
3
Welcome
Features
Congratulations on your purchase of the OSTER® Ice Shaving Blender! To
learn more about OSTER® products, please visit us at www.oster.com.
of
Your Ice Shaving Blender
A.Ice Reservoir Lid – Covers the Ice Reservoir.
B.Ice Reservoir – Holds the ice for making frozen drinks.
C.Shaving Paddle – Moves ice across the Shaving Blade.
D. Inner Ice Bowl
E.Ice Shaver Main Body
F. Shaving Blade Assembly Clip – Holds Shaving Blade in place.
A
G.Ice Shaving Blade – Shaves ice.
H.Ice Chute – Directs ice from Ice Bowl into Blending Jar.
I. Ice Melt Reservoir – Catches water from melted ice.
J.Motor Base – Holds Blending Jar and Ice Shaver assembly securely in place.
B
K. Control Panel – Contains all necessary controls to operate your unit.
L. Jar Lid – Seals the blending jar.
M.Blending Jar – Maximum capacity of 40 oz.
N.Blending Blade Sealing Ring – Seals the Blending Jar and Jar Base.
F
C
These items come
pre-assembled
D
O. Blending Blade
P. Jar Base
G
H
Ice
Shaver
Assembly
I
L
M
E
Blender
Assembly
N
J
Motor
Assembly
K
O
P
4
5
Control Panel
1.ON/OFF Button – Press this button to turn the
unit “On” or “Off”.
For best results, use store-bought ice that has been out
of the freezer between 20-30 minutes.
2.Power Indicator Light – Turns on and blinks
rapidly indicating unit has power.
3.Auto Shave/Auto Blend – Activates auto
shaving and blending cycles.
4.Status Indicator Lights
• Blue Lights – Pulse slowly to indicate which
button to press during auto cycle OR remain
illuminated during auto cycle.
5. Fill the Ice Reservoir with ice cubes.
1
2
3
4
• Red Lights – shows product safety interlocks 5
are not engaged.
6
5. Pulse Button
6. Stop Button
7
7. Low Button – Blender low speed
8
8. Med Button – Blender medium speed
9
9. High Button – Blender high speed
Making Frozen Drinks
NOTE: NEVER PUT ANYTHING BUT ICE IN THE ICE RESERVOIR.
1.Place the motor base on a clean dry flat surface with control panel
facing you.
2. With handle on the LEFT, place the Ice Shaver Main Body on top of
Motor Base and lock into position
by turning counter-clockwise (use
aligning arrows).
3.Install the Ice Reservoir to Ice Shaver
Main Body by first removing the Ice
Reservoir Lid (turning it clockwise to
the Unlock position). Then place the
Ice Reservoir on top of the unit and
lock into position by turning counterclockwise (use aligning arrows)
4. Plug the unit into a standard 120 Volt wall socket.
6.Replace the Ice Reservoir Lid and rotate counterclockwise to the
locked position.
7. Remove Blending Jar Lid.
8.Add appropriate amount of liquid ingredients to the Blending Jar.
9.Replace Blending Jar Lid and position Blending Jar under the Ice Chute
by aligning the chute with the Blending Jar Lid.
10. Push the ON/OFF button to turn the unit on. Power Indicator Light will
blink slowly until the ice shaver or blender is placed on Motor Base.
The Best Margarita Recipe
Ingredients
fl oz
ml
Tequila
4
120
Triple Sec
3
90
Lime Juice
1-2 squirts
Margarita Mix
7
Strawberry Daiquiri Recipe
210
(Makes 3-4 Drinks)
Ingredients
fl oz
ml
Light Rum
4
120
Cranberry Juice
8
240
Sugar
3 Tbsp
45
Frozen Strawberries - sliced
1.5 cups
360
NOTE: In order to properly install the
Ice Reservoir to the unit, make sure to first
remove the Ice Reservoir Lid from the
Ice Reservoir.
6
(Makes 3-4 Drinks)
7
Automatic Frozen Drink Making
1.If you want to use the automatic frozen drink
cycle, start by pushing the “Auto Shave/Auto
Blend” button.
2.The unit will shave ice for the appropriate time.
The unit will stop at the completion of the cycle.
3.When ice shaving is complete, the lights under
Auto Blend will flash slowly.
4.Remove ice shaver assembly from Motor Base.
5. Place Blending Jar assembly on Motor Base.
6.Restart frozen drink cycle by pushing the “Auto
Shave/Auto Blend” button again.
NOTE: To customize your drink, after either the auto shave or auto blend
cycle, you can pulse manually. Add more shaved ice or blend longer by
pushing the “Pulse” button. (See page 9)
Customizing Your Drink
To make a thicker drink:
NOTE: Use LESS liquid when adding ingredients to
blending jar.
1.Press and hold the “Pulse” button to add more
ice to the blending jar.
2.To stop adding shaved ice, release the “Pulse”
button.
3.To blend the added shaved ice, remove the Ice
Shaver assembly from the Motor Base and place
the Blender assembly on the Motor Base.
4.Hold the “Pulse” button until the desired consistency is achieved.
To make a thinner drink:
Note: Use MORE liquid when adding ingredients to blending jar.
7.Status Indicator Lights will be illuminated during auto cycle.
1.If you have already made your drink using the Auto mode, make sure
your drink is blended to the desired consistency.
8. To serve:
2. Add more liquid ingredients to the Blending Jar assembly.
A. Turn the unit off.
B. Open Lid Cap (make sure Blender Jar Lid is secure).
C. Lift and remove Blending Jar.
3.Press and hold the “Pulse” button until the desired consistency is
achieved (you may also use the Low, Med, or High buttons to blend your
drink).
D. Pour and serve.
Manual Drink Making
NOTE: To remove excess ice from the Ice Reservoir, remove Ice Shaver Lid
from Ice Shaver Reservoir. Remove Ice Shaver Assembly from Motor Base.
Tilt unit enough to allow excess ice to pour out of the unit. WARNING: DO
NOT PLACE FINGERS IN THE ICE HOPPER. THE SHAVING BLADE IS
SHARP AND COULD CAUSE INJURY.
10. Periodically check the Ice Melt Reservoir and
empty as needed.
Blending Operation
Fill the Blending Jar with desired contents, use less ice for thinner drink, use
more ice for thicker drink.
1.With Ice Shaver assembly on Motor Base, position Blending Jar under Ice
Chute.
2.Press and hold the “Pulse” button until the desired amount of shaved ice
is added to the Blending Jar.
3. Remove Ice Shaver assembly from Motor Base.
4. Place Blending Jar assembly on Motor Base.
1. Place Blending Jar assembly on Motor base.
5. To start blending, press “Low”, “Med”, or “High”.
2.To start blending, press “Low”, “Med”, or
“High”.
6. To stop blending, press the “Stop” button.
3. To stop blending, press the “Stop” button.
8
9
Cleaning
and
Maintenance
IMPORTANT: Your Blending Jar, Shaving and Blending Blades are subject
to wear during normal use. Always inspect for nicks, chips, or cracks.
Always inspect for broken, cracked, or loose blades. If the Jar or Shaving
and/or Blending Blades are damaged, do not use.
1.Make sure unit is unplugged. Place on a clean dry surface. Turn the
unit so the back is facing you. Remove the Ice Reservoir Lid by turning
clockwise to the unlock position.
2.To remove the Ice Reservoir, grasp the Reservoir Handle with your hand,
turn clockwise, and lift to remove.
Note the location of the Shaving Blade inside the Ice Hopper.
WARNING: Do not place fingers inside the Ice Hopper near the Shaving
Blade. Blade is sharp – handle carefully.
NOTE: To reassemble, install Ice Reservoir to the unit first, then attach Ice
Reservoir Lid.
3.R inse the Shaving Paddle assembly with water and dry thoroughly before
storing.
4.Turn the Blending Jar upside down and unscrew the Jar Base. Carefully
remove the Blending Blade and Blending Blade Sealing Ring.
WARNING: The Blending Blade is sharp. Handle with care.
5.To remove the Ice Melt Reservoir, hold the unit still and pull straight out
on the handle.
6.Blending Jar Lid, Blending Jar, Blending Blade, Blending Blade Sealing
Ring, Jar Base and Ice Melt Reservoir can be safely washed in the top
rack of your dishwasher. Use only top rack. Failure to do so will result in
damage. The Ice Reservoir Lid, Ice Reservoir, Shaving Paddle, Ice Bowl,
Ice Deflector Blade Assembly, Shaving Blade and Ice Melt Reservoir are
only exposed to ice and water and they should be rinsed with soap and
warm water and allowed to air dry.
7. Use a damp cloth to clean the outside of the unit.
Warning: Unplug unit before cleaning. Do not use solvents. Never
immerse the unit in water.
1-Year Limited Warranty
Sunbeam Products, Inc. doing business as Jarden Consumer Solutions or if in Canada, Sunbeam
Corporation (Canada) Limited doing business as Jarden Consumer Solutions (collectively
“JCS”) warrants that for a period of one year from the date of purchase, this product will be
free from defects in material and workmanship. JCS, at its option, will repair or replace this
product or any component of the product found to be defective during the warranty period.
Replacement will be made with a new or remanufactured product or component. If the product
is no longer available, replacement may be made with a similar product of equal or greater
value. This is your exclusive warranty. Do NOT attempt to repair or adjust any electrical or
mechanical functions on this product. Doing so will void this warranty.
This warranty is valid for the original retail purchaser from the date of initial retail purchase
and is not transferable. Keep the original sales receipt. Proof of purchase is required to obtain
warranty performance. JCS dealers, service centers, or retail stores selling JCS products do not
have the right to alter, modify or any way change the terms and conditions of this warranty.
This warranty does not cover normal wear of parts or damage resulting from any of the
following: negligent use or misuse of the product, use on improper voltage or current, use
contrary to the operating instructions, disassembly, repair or alteration by anyone other than
JCS or an authorized JCS service center. Further, the warranty does not cover: Acts of God,
such as fire, flood, hurricanes and tornadoes.
What are the limits on Sunbeam’s Liability?
JCS shall not be liable for any incidental or consequential damages caused by the breach of any
express, implied or statutory warranty or condition.
Except to the extent prohibited by applicable law, any implied warranty or condition of
merchantability or fitness for a particular purpose is limited in duration to the duration of the
above warranty.
JCS disclaims all other warranties, conditions or representations, express, implied, statutory or
otherwise.
JCS shall not be liable for any damages of any kind resulting from the purchase, use or misuse of,
or inability to use the product including incidental, special, consequential or similar damages or
loss of profits, or for any breach of contract, fundamental or otherwise, or for any claim brought
against purchaser by any other party.
Some provinces, states or jurisdictions do not allow the exclusion or limitation of incidental
or consequential damages or limitations on how long an implied warranty lasts, so the above
limitations or exclusion may not apply to you.
This warranty gives you specific legal rights, and you may also have other rights that vary from
province to province, state to state or jurisdiction to jurisdiction.
How To Obtain Warranty Service
In the U.S.A.
If you have any question regarding this warranty or would like to obtain warranty service, please
call 1 800-334-0759 and a convenient service center address will be provided to you.
In Canada
If you have any question regarding this warranty or would like to obtain warranty service, please
call 1 800-667-8623 and a convenient service center address will be provided to you.
In the U.S.A., this warranty is offered by Sunbeam Products, Inc. doing business as Jarden
Consumer Solutions located in Boca Raton, Florida 33431. In Canada, this warranty is offered by
Sunbeam Corporation (Canada) Limited doing business as Jarden Consumer Solutions, located at
20 B Hereford Street, Brampton, Ontario L6Y 0M1. If you have any other problem or claim in
connection with this product, please write our Consumer Service Department.
PLEASE DO NOT RETURN THIS PRODUCT TO ANY OF
THESE ADDRESSES OR TO THE PLACE OF PURCHASE.
10
11