1
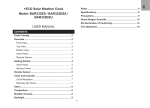
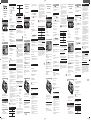
ALARM
Weight
To set the alarm:
LCD Clock with Projection &
1.
Press and hold desired SET
2.
Press + / - to set hour / minute.
3.
Analogue AM/FM Radio
Press
/
.
Power
(or 10 seconds of inaction) to return
EN
OVERVIEW
•
OFF – disable alarm
•
BEEP - beep alarm
•
RADIO – Radio alarm
•
3
4
5
6
1
2
Press SNOOZE / SLEEP to silence it for 8 minutes
•
Press
, SET
/
, + / - to turn the
Orologio
is available on request via our Oregon Scientific Customer
3.
Radio ON
Service.
4.
Modo Sleep ON
5.
Allarme ON 1 / 2
6.
Indicatore batteria basso
2.
Clock
3.
Radio ON
4.
Sleep mode ON
To adjust volume:
Turn VOL rotary dial to mute / adjust volume.
To activate sleep timer:
Low Battery indicator
Press SNOOZE / SLEEP to enter sleep mode.
•
Press SNOOZE / SLEEP to change the sleep time.
This unit projects time information for your convenience.
For continuous projection:
WARNING Changes or modifications not expressly
setting (120, 90, 60, 30, 15, 0 min).
PROJECTION
1
2
3
4
•
5
6
8
9
10
•
2.
RADIO: Turn radio On / Off, Select AM / FM
3.
ALARM 1 and 2: Select alarm type, BEEP / OFF /
RADIO
+ / - : Increase / decrease values of the selected
setting
/
, : Change settings /
display / View respective alarm status; set alarm
•
Turn FOCUS wheel.
NOTE If projection is illuminated, do not look directly into
the projector.
RESET
Press RESET to return to the default settings.
DIMMER: Select display brightness LO / HI
PROJECTION ON: Enable / disable continuous
PRECAUTIONS
projection
•
180° ROTATION: flip image180°
RESET: Reset unit to default settings
is
•
10. AC / DC Socket
11. Battery compartment
TOP VIEW (FIG. 3)
2
3
•
Do not clean the unit with abrasive or corrosive materials.
•
Do not tamper with the unit ’s internal components. This
invalidates the warranty.
•
•
•
VOL: Mute / adjust radio volume
2.
SNOOZE / SLEEP: silence alarm for 8 minutes
3.
TUNE: Select radio frequency
GETTING STARTED
INSERT BATTERIES
Plug AC / DC adaptor into socket.
Memory backup:
2.
Remove the battery compartment cover.
3.
Insert the batteries, matching the polarities (FIG. 2).
Do not cover the ventilation holes with any items such
as newspapers, curtains etc.
Do not immerse the unit in water. If you spill liquid over
it, dry it immediately with a soft, lint-free cloth.
•
1.
Do not subject the unit to excessive force, shock, dust,
temperature or humidity.
•
1
Only use fresh batteries. Do not mix new and old
batteries.
NOTE This equipment has been tested and found to
comply with the limits for a Class B digital device, pursuant
to Part 15 of the FCC Rules. These limits are designed to
provide reasonable protection against harmful interference
in a residential installation.
This equipment generates, uses and can radiate radio
frequency energy and, if not installed and used in accordance
with the instructions, may cause harmful interference to
radio communications. However, there is no guarantee
that interference will not occur in a particular installation.
If this equipment does cause harmful interference to radio
or television reception, which can be determined by turning
the equipment off and on, the user is encouraged to try to
correct the interference by one or more of the following
measures:
•
Reorient or relocate the receiving antenna.
•
Increase the separation between the equipment and
receiver.
•
Connect the equipment into an outlet on a circuit
different from that to which the receiver is connected.
•
Consult the dealer or an experienced radio / TV
technician for help.
When disposing of this product, ensure it is collected
separately for special treatment.
the warranty card for this product) for all inquiries instead.
Placement of this product on certain types of wood
may result in damage to its finish for which Oregon
Scientific will not be responsible. Consult the furniture
manufacturer’s care instructions for information.
The contents of this manual may not be reproduced
without the permission of the manufacturer.
•
Do not dispose old batteries as unsorted municipal
waste. Collection of such waste separately for special
treatment is necessary.
Please note that some units are equipped with a
battery safety strip. Remove the strip from the battery
compartment before first use.
NOTE The technical specifications for this product and the
contents of the user manual are subject to change without
notice.
TYPE
1.
Press
.
2.
Press + or - to change the settings.
3.
The settings order is: 12/24 hr format, hour, minute.
RRA320P EU MANUAL R12.indd 1
MAIN UNIT
LxWxH
BEEP – allarme beep
•
RADIO – allarme radio
Premere SNOOZE / SLEEP per spegnere l’allarme
per 8 minuti
, SET
/
, + / - per disattivare
Premere
l’allarme e riattivarlo dopo 24 ore.
1.
Scorrere RADIO ON/OFF per accendere la radio.
1
2.
Scorrere AM / FM per selezionare.
2
3
4
3.
Ruotare il selettore TUNE per selezionare la
frequenza.
Per regolare il volume:
7
8
9
10
•
11
1.
SINTONIZZATORE: regola la proiezione
2.
RADIO: accende/spegne la radio, seleziona AM /
FM
3.
ALLARMI 1 e 2: seleziona il tipo di allarme, BEEP /
OFF / RADIO
4.
+ / - : aumenta/diminuisce i valori dell’impostazione
selezionata
5.
/ SET
/
: modifica impostazioni /
display / stato dell’allarme; impostazione allarme
6.
DIMMER: seleziona la luminosità del display LO / HI
(alta/bassa)
7.
Name:
Oregon Scientific, Inc.
Address:
19861 SW 95th Ave.,Tualatin,
•
Non smaltire le batterie vecchie come rifiuto non
differenziato. È necessario che questo rifiuto venga
smaltito mediante raccolta differenziata per essere
trattato in modo particolare.
Alcune unità sono dotate di una striscia di sicurezza
per le batterie. Rimuovere la striscia dal vano batterie
prima del primo utilizzo.
NOTA Le specifiche tecniche del prodotto e il contenuto
del manuale per l’utente possono essere modificati senza
preavviso.
PROJECTION ON: attiva/disattiva la proiezione
continua
8.
180° ROTATION: ruota l’immagine di 180°
9.
RESET: ripristina le impostazioni iniziali dell’unità
Ruotare il selettore VOL per rendere silenzioso/
regolare il volume.
3.
Les réglages s’effectuent dans l’ordre suivant : Format
12/24 h, heure, minute.
Lung x Larg x Alt
Peso
Alimentazione
DESCRIZIONE
183 x 67 x 81 mm
(72 x 26.4 x 31.9 in)
386 g (13.6 oz)
senza batteria
Adattatore CA 6 V
Batterie: 2 x UM-4 (AAA) 1,5 V
INFORMAZIONI SU OREGON SCIENTIFIC
Pour régler l’alarme :
FR
VUE D’ENSEMBLE
FACE AVANT (FIG.1)
3
4
5
6
1
2
SNOOZE / SLEEP: intervallo allarme di 8 minuti
3.
TUNE: seleziona la frequenza della radio
LCD Clock with Projection &
IDT Technology Limited
Address:
Block C, 9/F, Kaiser Estate,
Phase 1,41 Man Yue St., Hung
Hom, Kowloon,
•
3.
Radio activée
4.
Mode sleep activé
5.
Alarme 1/2 activée
6.
Indicateur de faiblesse des piles
Pour couper le son de l’alarme :
•
•
Pour activer/ désactiver la radio :
1. Positionnez l’encoche RADIO sur ON pour activer la
radio.
8
9
10
2. Positionnez l’encoche sur AM / FM pour sélectionner la
bande désirée.
11
3. Tournez la molette TUNE pour sélectionner la
fréquence.
Molette FOCUS : ajuste la mise au point de la
projection
PROJECTION ON : active / désactive la projection
continue
Per la proiezione continua:
8.
180° ROTATION : permet de renverser l’image à
180°
9.
RESET (REINITIALISER) : réinitialise l’appareil aux
réglages par défaut
10. Prise adaptateur
VUE DU HAUT (FIG. 3)
Ruotare il selettore FOCUS.
Pour ajuster le volume :
• Tournez la molette VOL pour mettre le volume sur muet
ou pour l'ajuster.
Pour activer le compteur sleep :
PROJECTION
Cet appareil projette l’heure pour votre commodité.
Projection continue :
• Positionnez l’encoche PROJECTION sur ON une
fois l’adaptateur branché, pour activer / désactiver la
projection continue.
11. Compartiment des piles
NOTE Se la proiezione è illuminata, non guardare
Renverser l’image projetée par 180° :
1
•
•
Veuillez remarquer que certains appareils sont
équipés d’une bande de sécurité. Retirez la bande du
compartiment des piles avant la première utilisation.
2
3
Mettre au point l’image :
FUNZIONE RESET
REMARQUE Si la projection est activée, ne regardez pas
Setzen Sie das Gerät keiner extremen Gewalteinwirkung
und keinen Stößen aus, und halten Sie es von
übermäßigem Staub, Hitze oder Feuchtigkeit fern.
•
Sie dürfen die Belüftungsöffnungen nicht mit Gegenständen
abdecken, wie z.B. Zeitungen, Vorhänge, usw.
•
Tauchen Sie das Gerät niemals in Wasser. Falls Sie
eine Flüssigkeit über das Gerät verschütten, trocknen
Sie es sofort mit einem weichen, fusselfreien Tuch.
•
Reinigen Sie das Gerät keinesfalls mit scheuernden
oder ätzenden Mitteln.
oder
•
2.
Drücken Sie auf + / -, um Stunde / Minute
einzustellen.
Machen Sie sich nicht an den internen Komponenten
des Geräts zu schaffen, da dies zum Verlust der
Garantie führen kann.
•
Verwenden Sie nur neue Batterien. Verwenden Sie
keinesfalls neue und alte Batterien gemeinsam.
3.
(oder bei Inaktivität von
Drücken Sie auf
10 Sekunden), damit die Anzeige zum Uhrmodus
zurückkehrt.
•
Die in dieser Anleitung dargestellten Abbildungen
können sich vom Original abweichen.
•
Entsorgen Sie das Gerät ausschließlich in den dafür
vorgesehenen, kommunalen Sammelstellen, die Sie
bei Ihrer Gemeinde erfragen können.
•
Wenn dieses Produkt auf bestimmte Holzflächen gestellt
wird, kann die Oberfläche beschädigt werden. Oregon
Scientific ist nicht haftbar für solche Beschädigungen.
Entsprechende Hinweise entnehmen Sie bitte der
Pflegeanleitung Ihres Möbelherstellers.
•
Der Inhalt dieser Anleitung darf ohne Genehmigung
des Herstellers nicht vervielfältigt werden.
•
Verbrauchte Batterien gehören nicht in den Hausmüll.
Bitte geben Sie sie bei einer Sammelstelle für
Altbatterien bzw. Sondermüll ab.
•
Bitte beachten Sie, dass manche Geräte mit einem
Batterieunterbrechungsstreifen bestückt sind. Vor dem
ersten Gebrauch müssen Sie den Streifen aus dem
Batteriefach ziehen.
Drücken Sie auf
Modell: RRA320P
2.
Drücken Sie auf + oder -, um die Einstellungen zu
ändern.
3.
Die Reihenfolge der Einstellungen lautet: 12-/24Stundenformat, Stunde, Minute.
BEDIENUNGSANLEITUNG
.
ALARM
DE
So stellen Sie den Alarm ein:
ÜBERSICHT
1.
Halten Sie die gewünschte Taste SET
gedrückt.
VORDERANSICHT (ABB.1)
3
4
5
6
1
2
REMARQUE Les caractéristiques techniques de ce produit
et le contenu de ce manuel peut être soumis à modifications
sans préavis.
So aktivieren / deaktivieren Sie den Alarm:
TYPE
DESCRIPTION
APPAREIL PRINCIPAL
183 x 67 x 81mm
LxlxH
(72 x 26,4 x 31,9 pouces)
386 g (13,6 onces)
Poids
sans les piles
Adaptateur CA 6 V
Alimentation
2 piles UM-4 (AAA) 1,5V
1.
Verschieben Sie den Schalter auf:
AM / PM
2.
Uhr
•
3.
Radio EIN
•
BEEP – Signaltonalarm
4.
Einschlafmodus EIN
•
RADIO – Radioalarm
5.
Alarm 1 / 2 EIN
6.
Batterieladeanzeige
•
RÜCKANSICHT (ABB. 2)
Pour plus d‘informations sur les produits Oregon Scientific
France, rendez-vous sur notre site www.oregonscientific.fr.
1
2
3
4
8
9
10
ÜBER OREGON SCIENTIFIC
11
1.
FOCUS-Rad: Projektionsschärfe einstellen
par téléphone au: 1-800-853-8883
2.
RADIO:
Radio ein- / ausschalten, AM / FM
auswählen
3.
ALARM 1 and 2: Alarmtyp auswählen, BEEP / OFF
/ RADIO
4.
+ / - : Werte der gewählten Einstellung erhöhen /
verringern
5.
/ SET
,
: Einstellungen / Anzeige
ändern / betreffenden Alarmstatus anzeigen; Alarm
einstellen
EUROPE - DÉCLARATION DE CONFORMITÉ
Par la présente, Oregon Scientific déclare que Horloge
de projection LCD avec Radio AM / FM analogique
Model: RRA320P est conforme à la directive européenne
89/336/CE. Une copie signée et datée de la déclaration
de conformité est disponible sur demande auprès de notre
Service Client.
HINWEIS Die technischen Daten für dieses Produkt
und der Inhalt der Bedienungsanleitung können ohne
Benachrichtigung geändert werden.
So aktivieren / deaktivieren Sie das Radio:
7
OU
Pour des renseignements internationaux, rendez vous sur
le site: www2.oregonscientific.com/about/international.asp.
, SET
/
, + / - um
Drücken Sie auf
den Alarm auszuschalten, und ihn nach 24 Stunden
erneut zu aktivieren.
RADIO
5
6
Si vous êtes aux Etats-Unis, vous pouvez contacter notre
support consommateur directement : sur le site
www2.oregonscientific.com/service/support.asp
Drücken Sie auf SNOOZE / SLEEP, um den Alarm
8 Minuten lang stummzuschalten
ODER
•
A PROPOS D’OREGON SCIENTIFIC
OFF – Alarm deaktivieren
So schalten Sie den Alarm stumm:
1.
Verschieben Sie RADIO ON/OFF, um das Radio
einzuschalten.
2.
Wählen Sie AM / FM aus.
3.
Drehen Sie das Einstellrad TUNE, um die Frequenz
auszuwählen.
So regulieren Sie die Lautstärke:
•
Drehen Sie das Einstellrad VOL, um die Lautstärke
stummzuschalten / zu regulieren.
So aktivieren Sie den Einschlaftimer:
6.
DIMMER: Anzeigehelligkeit LO / HI auswählen
7.
PROJECTION ON: Dauerprojektion aktivieren /
deaktivieren
•
Drücken Sie auf SNOOZE / SLEEP, um den
Einschlafmodus aufzurufen.
8.
180° ROTATION: Bild um 180° drehen
•
9.
RESET:
Gerät
zurücksetzen
Drücken Sie auf SNOOZE / SLEEP, um die
Einstellung der Einschlafzeit zu ändern (120, 90, 60,
30, 15, 0 Min.).
auf
Standardeinstellungen
Besuchen Sie unsere Website www.oregonscientific.de und
erfahren Sie mehr über unsere Oregon Scientific-Produkte.
Auf der Website finden Sie auch Informationen, wie Sie im
Bedarfsfall unseren Kundendienst erreichen und Daten
herunterladen können.
Für internationale Anfragen besuchen Sie bitte unsere
Website:
www2.oregonscientific.com/about/international.asp.
EU - KONFORMITÄTSERKLÄRUNG
Hiermit erklärt Oregon Scientific, dass die Uhr mit
Radiowecker, Projektion und analogem MW-/UKW-Radio
Modell RRA320P mit den grundlegenden Anforderungen
und anderen relevanten Vorschriften der Richtlinien EMC
89/336/CE übereinstimmt. Eine Kopie der unterschriebenen
und mit Datum versehenen Konformitätserklärung
erhalten Sie auf Anfrage über unseren Oregon Scientific
Kundendienst.
10. Anschluss für Netzadapter
PROJEKTION
11. Batteriefach
Dieses Gerät projiziert die Uhrzeit zu Ihrem Komfort.
OBERE ANSICHT (ABB. 3)
Für Dauerprojektion:
•
1
•
•
1.
Appuyez sur 180° Flip.
direttamente nel proiettore.
2
3
Tournez la molette FOCUS.
•
directement dans le projecteur.
Verschieben Sie den Schalter PROJECTION bei
angeschlossenem Netzadapter auf ON, um diese zu
aktivieren / deaktivieren.
PER INIZIARE
1.
Inserire l’adattatore CA/DC nella presa.
Backup di memoria:
2.
Rimuovere il coperchio del vano batteria.
3.
Inserire le batterie, facendo corrispondere i poli (FIG.
2).
IMPOSTARE L’OROLOGIO
1.
Premere
.
•
Non otturare i fori di aerazione con oggetti come
giornali, tende, etc.
•
Non immergere l’unità in acqua. Se si versa del liquido
sul prodotto, asciugarlo immediatamente con un panno
morbido e liscio.
POUR COMMENCER
•
Ne pas couvrir les trous de ventilation avec des
journaux, rideaux etc…
•
Non pulire l’unità con materiali abrasivi o corrosivi.
MISE EN PLACE DES PILES
•
•
Non manomettere i componenti interni. In questo modo
si invalida la garanzia.
Ne pas immerger le produit dans l’eau. Si vous
renversez du liquide sur l’appareil, séchez-le
immédiatement avec un tissu doux.
•
Utilizzare solo batterie nuove. Non mescolare batterie
nuove con batterie vecchie.
1.
VOL : muet / ajuste le volume de la radio
2.
SNOOZE / SLEEP : éteint l’alarme pour 8 minutes
3.
TUNE : sélectionne la fréquence radio
1.
PRECAUTIONS
1.
VOL: Radiolautstärke stummschalten / regulieren
•
2.
SNOOZE /
ausschalten
3.
TUNE: Radiofrequenz auswählen
Branchez l’adaptateur CA/CC dans la prise.
Protection de la mémoire :
Ne pas soumettre le produit à une force excessive, au
choc, à la poussière, aux changements de température
ou à l’humidité.
•
Ne pas nettoyer l’appareil avec des matériaux corrosifs
ou abrasifs.
Le immagini del manuale possono differire dalla realtà.
2.
Retirez le couvercle du compartiment des piles.
•
Al momento dello smaltimento del prodotto, utilizzare la
raccolta differenziata.
3.
Insérez les piles, en respectant les polarités (voir FIG.
2).
Ne pas trafiquer les composants internes. Cela
invalidera votre garantie.
•
N’utilisez que des piles neuves. Ne pas mélanger des
piles neuves et usagées.
Oregon Scientific declina ogni responsabilità per
Drehen Sie das FOCUS-Rad.
HINWEIS Blicken Sie nicht direkt in den Projektor, wenn
Non sottoporre il prodotto a forza eccessiva, urti,
polvere, temperatura o a umidità.
•
•
Appuyer sur RESET pour revenir aux réglages par défaut.
•
INSERIRE LE BATTERIE
Drücken Sie auf 180° Flip.
So verstellen Sie die Schärfe des Bildes:
AVVERTENZE
•
cause undesired operation.
, SET
/
, + / -, pour
Appuyez sur
éteindre l’alarme et pour qu’elle se déclenche 24
heures plus tard.
7.
•
Ne pas jeter les piles usagées dans les containers
municipaux non adaptés Veuillez effectuer le tri de ces
ordures pour un traitement adapté si nécessaire.
RADIO
5
6
1.
Appuyez sur SNOOZE / SLEEP, pour éteindre l’alarme
pendant 8 minutes
OU
FACE ARRIERE ( FIG. 2)
7
•
CARACTERISTIQUES
Questo prodotto proietta informazioni utili sull’orario.
•
(72 x 26.4 x 31.9in)
RADIO – pour l’alarme par radio
Horloge
• Appuyez sur SNOOZE / SLEEP pour modifier le réglage
du temps sleep (120, 90, 60, 45, 30, 15, 0 minutes).
not cause harmful interference. 2) This device must accept
any interference received, including interference that may
BEEP – pour l’alarme par bip
DIMMER : ajuste la clarté de l’affichage HI / LO
subject to the following two conditions: 1) This device may
183 x 67 x 81mm
OFF – pour désactiver l’alarme
AM / PM
2
3
4
Le contenu du présent manuel ne peut pas être
reproduit sans la permission du fabriquant.
VORSICHTSMASSNAHMEN
UHR EINSTELLEN
analogem MW-/UKW-Radio
REINITIALISATION
2.
Manufacturer:
•
2.
Premere RESET per ripristinare le impostazioni predefinite
dell’unità.
Product No.:
Analogue AM/FM Radio
Placez l’encoche sur :
6.
Premere ruota di 180°.
Le poser sur certaines surfaces en bois peut
endommager la finition du meuble, et Oregon Scientific
ne peut en être tenu responsable. Consultez les mises
en garde du fabricant du meuble pour de plus amples
informations.
Pour activer/ désactiver l’alarme :
1.
Per ricerche di tipo internazionale puoi visitare invece il sito
www2.oregonscientific.com/about/international.asp.
(ou ne rien faire pendant 10
Appuyez sur
secondes) pour revenir à l’affichage du mode horloge.
PROIEZIONE
Scorrere l’interruttore PROJECTION su ON quando
l’adattatore è collegato, per attivare/disattivare.
•
Uhr mit Radiowecker, Projektion und
So drehen Sie das projizierte Bild um 180°:
declare that the product
Product Name:
Appuyez sur + / - pour régler l’heure / les minutes.
• Appuyez sur SNOOZE / SLEEP pour entrer dans le
mode sleep.
•
Lorsque vous désirez vous débarrasser de ce produit,
assurez-vous qu’il soit collecté séparément pour un
traitement adapté.
.
/ SET
,
: modifie les réglages /
l’affichage / le statut de l’alarme ; règle l’alarme
1
VOL: silenzioso/regola il volume della radio
RRA320P
2.
•
1
ou
5.
Per focalizzare l’immagine:
1.
1-800-853-8883
Maintenez appuyé SET
3.
Oregon 97062 USA
Telephone No.:
1.
+ / - : Augmente / diminue les valeurs du réglage
sélectionné
Premere SNOOZE / SLEEP per modificare
l’impostazione oraria sleep (120, 90, 60, 30, 15, 0
minuti).
•
•
4.
•
Premere SNOOZE / SLEEP per inserire il modo
sleep.
Les images de ce manuel peuvent différer de l’aspect
réel du produit.
ALARME
ALARME 1 et 2 : sélectionne le type d’alarme, par
BIP, RADIO ou désactivée
•
•
MANUEL DE L’UTILISATEUR
Per avere maggiori informazioni sui nuovi prodotti Oregon
Scientific visita il nostro sito internet www.oregonscientific.it,
dove potrai trovare tutte le informazioni di cui hai bisogno.
Con la presente Oregon Scientific dichiara che questo
Orologio LCD con Proiezione e Radio AM/FM analogica
(modello: RRA320P) è conforme alla direttiva EMC 89/336/
CE. Una copia firmata e datata della Dichiarazione di
Conformità è disponibile, su richiesta, tramite il servizio
clienti della Oregon Scientific.
.
3.
Per attivare il timer sleep:
•
2
3
Modèle : RRA320P
Appuyez sur + ou – pour modifier les réglages.
RADIO: active / désactive la radio, sélectionne la
bande AM/FM
Per ruotare l’immagine proiettata di 180°:
VISTA DALL’ALTO (FIG. 3)
Appuyez sur
2.
2.
10. Presa CA / DC
11. Vano batteria
1.
SPECIFICHE TECNICHE
TIPO
UNITA’ PRINCIPALE
RÉGLER L’HORLOGE
Radio AM / FM analogique
Il contenuto di questo manuale non può essere
ristampato senza l’autorizzazione del produttore.
DICHIARAZIONE DI CONFORMITA’ UE
5
6
We
Hong Kong
DESCRIPTION
OFF – disattiva allarme
•
Per accendere/spegnere la radio:
(listed on our website at www.oregonscientific.com), or on
is in conformity with Part 15 of the FCC Rules. Operation is
SET CLOCK
•
•
The following information is not to be used as contact for
support or sales. Please call our customer service number
SPECIFICATIONS
Utilizzare:
OPPURE
DECLARATION OF CONFORMITY
Images shown in this manual may differ from the actual
display.
•
•
(o 10 secondi di inattività) per
Premere
ritornare al display del modo orologio.
•
VISTA POSTERIORE (FIG. 2)
approved by the party responsible for compliance could
void the user’s authority to operate the equipment.
To focus image:
7.
9.
adaptor
Press 180° Flip.
6.
8.
when
To flip projected image by 180°:
11
FOCUS Wheel: Adjust Projection Focus
/ SET
Slide PROJECTION switch
connected, to enable / disable.
3.
RADIO
This device complies with Part 15 of the FCC Rules.
Operation is subject to the following two conditions: (1)
This
device may not cause harmful interference, and (2) This
device must accept any interference received, including
interference that may cause undesired operation.
BACK VIEW (FIG. 2)
Premere + / - per impostare ora/minuti.
.
Per rendere l’allarme silenzioso:
FCC STATEMENT
•
2.
or
Hereby, Oregon Scientific, declares that this LCD Clock with
2.
Turn TUNE rotary dial to select frequency
Alarm 1 / 2 ON
3
4
5
6
1
2
AM / PM
3.
Tenere premuto SET
Per attivare/disattivare l’allarme:
1.
Slide RADIO ON/OFF to turn on the radio.
1.
VISTA ANTERIORE (FIG.1)
compliance with EMC directive 89/336/CE.
A copy of the signed and dated Declaration of Conformity
Slide AM / FM to select.
6.
PANORAMICA
Projection & Analogue AM/FM Radio (Model: RRA320P) is in
1.
•
Per impostare l’allarme:
IT
To activate / deactivate radio:
•
•
MANUALE UTENTE
Horloge de projection LCD avec
eventuali danni alle finiture causati dal posizionamento
del prodotto su determinati tipi di legno. Consultare le
istruzioni fornite dal fabbricante del mobile per ulteriori
informazioni.
ALLARME
RADIO
2.
5.
Modello: RRA320P
EU-DECLARATION OF CONFORMITY
alarm off and activate it again after 24 hours.
AM / PM
1.
Radio AM/FM analogica
6 V AC adaptor
Visit our website (www.oregonscientific.com) to learn more
about Oregon Scientific products.
If you’re in the US and would like to contact our Customer
Care department directly, please visit:
www2.oregonscientific.com/service/support.asp
OR
Call 1-800-853-8883.
For international inquiries, please visit:
www2.oregonscientific.com/about/international.asp.
OR
5.
without battery
ABOUT OREGON SCIENTIFIC
To silence the alarm:
FRONT VIEW (FIG. 1)
4.
Premere + o – per cambiare le impostazioni.
L’ordine delle impostazioni è: formato 12/24 hr, ora,
minuti.
1.5 V batteries
To activate / deactivate alarm:
USER MANUAL
1.
2.
3.
2 x UM-4 (AAA)
Slide to:
7
Orologio LCD con Proiezione e
display to clock mode.
Model: RRA320P
1.
386 g (13.6 oz)
SLEEP:
Alarm
8
Minuten
ERSTE SCHRITTE
BATTERIEN EINLEGEN
1.
die Projektion beleuchtet ist.
lang
Stecken Sie den Netzadapter in den dafür
vorgesehenen Anschluss.
Speichersicherung:
2.
Öffnen Sie die Batteriefachabdeckung.
3.
Legen Sie die Batterien ein und achten Sie auf die
Übereinstimmung der Polaritäten (ABB. 2).
RESET
Drücken Sie auf RESET, um das Gerät auf die
Standardeinstellungen zurückzusetzen.
TECHNISCHE DATEN
TYP
BASISEINHEIT
LxBxH
Gewicht
Stromversorgung
BESCHREIBUNG
183 x 67 x 81mm
386 g (ohne Batterie)
Netzadapter 6 V
2 Batterien UM-4 (AAA) 1,5 V
8/29/07 3:17:03 PM
Reloj proyector LCD y radio analógica
AM / FM
•
AJUSTE DEL RELOJ
Model: RRA320P
1.
Pulse
2.
Pulse + o - para modificar la configuración.
.
3.
La secuencia de configuración es: formato de 12 ó 24
horas, hora, minuto.
•
USER MANUAL
ALARMA
ES
Para configurar la alarma:
1.
RESUMEN
VISTA FRONTAL (FIG. 1)
3
4
5
6
1
2
1.
AM / PM
2.
Reloj
3.
Radio ON (encendida)
4.
Temporizador de desconexión ON
5.
Alarma 1/2 ON
6.
Indicador de pila gastada
Pulse + / - para configurar hora / minuto.
(o no pulse ningún botón en 10
Pulse
segundos) para volver al Modo Reloj.
Para activar o desactivar la alarma:
OFF – desactivar la alarma
•
PITIDO – alarma de pitido
•
RADIO – Alarma de radio
Para silenciar la alarma:
•
O bien
, SET
/
, + / - para silenciar la
Pulse
alarma y que se active de nuevo pasadas 24 horas.
Para activar o desactivar la radio:
2
3
4
5
6
1.
Deslice el interruptor RADIO ON / OFF para encender
la unidad.
2.
Deslice AM / FM para elegir.
3.
8
9
POR
Tenga en cuenta que algunas unidades disponen de
una cinta de seguridad para las pilas. Retire la cinta de
compartimiento para pilas antes de usarlo por primera
vez.
VISTA FRONTAL (FIG. 1)
SOBRE OREGON SCIENTIFIC
1
10
Gire el dial rotatorio TUNE para elegir la frecuencia.
11
1.
Rueda FOCUS: ajuste del enfoque del proyector
2.
RADIO: Encender / Apagar la radio, seleccionar AM
/ FM
3.
ALARM 1 y 2: elegir tipo de alarma, PITIDO / OFF /
RADIO
6.
Pulse SNOOZE/SLEEP para silenciarla durante 8
minutos
RADIO
7
No elimine las pilas gastadas con la basura normal.
Es necesario desecharlo separadamente para poder
tratarlo.
TYPE TIPO
DESCRIPTION DESCRIPCIÓN
MAIN UNIT UNIDAD PRINCIPAL
183 x 67 x 81mm
LXAXA
(72 x 26,4 x 31,9 pulgadas)
Peso
386 g (13,6 oz) sin pilas
Adaptador CA de 6 V
Alimentación
2 pilas UM-4 (AAA) de 1,5 V
Cómo ajustar el volumen:
•
Gire el dial rotatorio VOL para silenciar o ajustar el
volumen.
Para activar el temporizador de desconexión:
+ / - : Incrementa / disminuye los valores de los
ajustes seleccionados
•
Pulse SNOOZE / SLEEP para acceder al Modo de
desconexión automática.
/ SET
,
: Cambiar ajustes / pantalla /
Ver estado de la alarma; ajustar la alarma
•
Pulse SNOOZE / SLEEP para cambiar el ajuste de
desconexión automática (120, 90, 60, 30, 15, 0 min).
ATENUADOR: Seleccione si la luminosidad de la
pantalla será LO / HI
7.
Proyección ON: activar / desactivar proyección
continua
8.
ROTACIÓN 180°: girar la imagen 180°
9.
RESET: La unidad
predeterminados
vuelve
a
los
ajustes
PROYECCIÓN
1. Pressione e segure SET
(ou 10 segundos de inação) para
3. Pressione
retornar ao modo Relógio.
3
4
5
6
2.
Relógio
•
5.
Alarme 1 / 2 ativado (ON)
6.
Indicador de pilha fraca
•
RÁDIO
1
Para ativar / desativar o rádio:
2
3
4
1. Deslize RADIO ON/OFF para ativar o rádio.
2. Deslize AM / FM para selecionar.
5
6
3. Gire TUNE para selecionar a freqüência.
8
9
10
Roda de FOCUS: ajusta o foco da projeção
2.
RADIO: ativa/desativa o rádio, seleciona AM / FM
3.
ALARM 1 e 2: seleciona o tipo de alarme, BIPE /
DESATIVADO / RÁDIO
EU - DECLARACIÓN DE CONFORMIDAD
5.
/ SET
,
: altera os ajustes / display e
exibe o status do alarme respectivo; ajusta o alarme
•
6.
DIMMER: seleciona o brilho do display LO / HI (baixo/
alto)
PROJECTION ON: ativa / desativa a projeção
contínua
10. Tomada CA / CC
2.
REPETICIÓN DE ALARMA / TEMPORIZADOR
DE DESCONEXIÓN: silencia la alarma durante 8
minutos
•
No exponga el producto a fuerza extrema, descargas,
polvo, fluctuaciones de temperatura o humedad.
•
No cubra los orificios de ventilación con objetos como
periódicos, cortinas, etc.
•
No sumerja el dispositivo en agua. Si se vertiera
líquido en la unidad, límpiela con un paño suave y sin
electricidad estática.
3.
TUNE: Selección de frecuencia de radio
PARA EMPEZAR
CÓMO INTRODUCIR LAS PILAS
1.
Conecte el adaptador de corriente AC/CC a la toma.
Recuperar memoria:
2.
3.
Retire la cubierta del compartimento para pilas.
Introduzca las pilas hacienda coincidir la polaridad
(FIG. 2).
RRA320P EU MANUAL R12.indd 2
•
No limpie la unidad con materiales abrasivos o
corrosivos.
•
No manipule los componentes internos. De hacerlo se
invalidaría la garantía.
•
Use siempre pilas nuevas. No mezcle pilas viejas con
pilas nuevas.
•
Las imágenes de esta guía para el usuario puede ser
distintas al producto en sí.
1. VOL: mudo / ajusta o volume do rádio
2. SNOOZE / SLEEP: silencia o alarme por 8 minutos
3. TUNE: seleciona a freqüência de rádio
INTRODUÇÃO
INSERÇÃO DAS PILHAS
1. Conecte o adaptador CA/CC na tomada.
(of doe 10 seconden niets) om terug te
Druk
keren naar klokmodus.
•
OFF - uitschakelen alarm
•
BEEP – zoemeralarm
•
RADIO – Radioalarm
2.
Klok
of
knop ingedrukt.
3.
Radio AAN
4.
Slaapmodus AAN
5.
Alarm 1 / 2 AAN
OF
6.
Batterij-indicator
•
Om het alarm te stoppen:
•
Druk SNOOZE / SLEEP om het alarm 8 minuten uit
te zetten
, SET
/
, + / - om het alarm
Druk op
helemaal te stoppen, waarna het pas na 24 uur weer
zal afgaan.
ACHTERKANT (FIG. 2)
SOBRE A OREGON SCIENTIFIC
Visite nosso site (www.oregonscientific.com.br) para saber
mais sobre os produtos Oregon Scientific.
Caso você necessite de mais informações ou tenha dúvidas,
entre em contato com o nosso Serviço de Atendimento ao
Consumidor através do telefone 11 5095-2329 ou e-mail
sac@oregonscientific.com.br.
RADIO
1
Activeren / deactiveren radio:
2
3
4
5
6
7
CE – DECLARAÇÃO DE CONFORMIDADE
8
9
10
7.
PROJECTION
uitschakelen
8.
180° ROTATIE: beeld 180° omklappen
9.
RESET:
Het
apparaat
standaardinstellingen
AAN:
Continue
Schuif RADIO ON / OFF om de radio aan te zetten.
2.
Schuif de schakelaar naar AM / FM om te kiezen.
3.
Draai de TUNE knop om de frequentie te kiezen.
Het volume aanpassen:
DIMMER: Selecteer helderheid scherm LO / HI
A Oregon Scientific declara que este Relógio LCD com
projeção e rádio AM/FM analógico (Modelo: RRA320P)
está de acordo com a EMC diretiva 89/336/CE. Uma cópia
assinada e datada da Declaração de Conformidade está
disponível para requisições através do nosso SAC.
1.
11
6.
•
projectie
Draai de VOL knop om het volume te kiezen / uit te
zetten.
Om de slaaptimer te activeren:
in-
•
Druk SNOOZE / SLEEP om de slaapmodus te
openen.
•
Druk de SNOOZE / SLEEP knop om de slaaptimer in
te stellen (120, 90, 60, 30, 15, 0 min).
/
PROJECTIE
terugzetten
op
10. Adapteringang
Dit apparaat projecteert de tijd voor uw gemak.
Voor continue projectie:
11. Batterijvak
•
•
De inhoud van deze handleiding mag niet worden
vermenigvuldigd zonder toestemming van de fabrikant.
•
Gooi lege batterijen niet bij het huisvuil. Dergelijk afval
moet gescheiden verwerkt worden.
•
Let op, sommige apparaten zijn voorzien van een
batterijstrip. Verwijder deze strip uit het batterijvak
alvorens het apparaat te gebruiken.
NB De technische specificaties van dit product en de
inhoud van de handleiding zijn zonder voorafgaande
waarschuwing aan veranderingen onderhevig.
Schuif de PROJECTION schakelaar naar ON
wanneer de adaptor is aangesloten, om aan / uit te
zetten.
SPECIFICATIES
TYPE
BASISSTATION
LxBxH
Gewicht
BESCHRIJVING
1.
Tryck
Modell: RRA320P
2.
Tryck + eller - för att ändra inställningar.
3.
Ordningen för inställningarna är: 12/24 timformat,
timme, minut.
ALARM
PRODUKTÖVERSIKT
VY FRAMSIDA (FIG. 1)
3
4
5
6
1
2
AM / PM
2.
Klocka
3.
Radio ON
4.
Sleepläge ON
OVER OREGON SCIENTIFIC
5.
Alarm 1 / 2 ON
Bezoek onze website (www.oregonscientific.com) om meer
te weten over uw nieuwe product en andere Oregon Scientific
producten zoals digitale fototoestellen, gezondheids- en
fitnessuitrusting en weerstations. Op deze website vindt
u tevens de informatie over onze klantendienst, voor het
geval u ons wenst te contacteren.
6.
Indikator för låg batterinivå
1
Om het geprojecteerde beeld 180° om te klappen:
•
2
3
Não submeta a unidade a forças excessivas, impactos,
poeiras, oscilações de temperatura ou umidade.
•
Não obstrua as aberturas de ventilação com itens
como jornais, cortinas, etc.
•
Não mergulhe a unidade na água. Se respingar líquido
nela, seque-a imediatamente com um pano macio e
que não solte fiapos.
•
Não limpe a unidade com material abrasivo ou
corrosivo.
•
Não altere os componentes internos da unidade. Isso
invalidará sua garantia.
2. Remova a tampa do compartimento de pilhas.
•
3. Insira as pilhas, fazendo a correspondência das
polaridades (FIG. 2).
Utilize apenas pilhas novas. Não misture pilhas novas
e usadas.
•
As imagens mostradas neste manual podem diferir da
imagem real.
•
Ao descartar este produto, certifique-se de que ele seja
Backup de memória:
(eller 10 sekunders inaktivitet) för
Tryck
återvända till klockläget.
Släng inte förbrukade batterier som vanligt
restavfall. De bör slängas i avsedd behållare på en
återvinningsstation.
•
Observera att vissa enheter har en plastremsa för att
spara batteri. Ta bort plastremsan i batteriluckan innan
första användning.
OFF – avaktivera alarm
•
BEEP – pipalarm
•
RADIO – Radioalarm
Vikt
Drift
, SET
/
, + / - för att slå av
Tryck
alarmet och återaktivera det efter 24 timmar.
För att aktivera / avaktivera radio:
5
6
8
9
10
1.
Skjut RADIO TILL / FRÅN för att slå på radion.
2.
Skjut AM / FM för att välja.
3.
Vrid TUNE-ratten för att välja frekvens.
RADIO: Slå PÅ / AV radion, välj AM / FM
3.
ALARM 1 och 2:
RADIO
4.
+ / - : Öka / minska värden för den valda
inställningen
•
Besök vår hemsida (www.oregonscientific.se) för att se
mer av våra produkter såsom digitalkameror; MP3 spelare;
projektionsklockor; hälsoprodukter; väderstationer; DECTtelefoner och konferenstelefoner. Hemsidan innehåller
också information för våra kunder i de fall ni behöver ta
kontakt med oss eller behöver ladda ner information.
Oregon Scientific intygar härmed att LCD Projektionsklocka
& analog AM/FM radio Modell: RRA320P överensstämmer
med EMC direktivet 89/336/CE. En signerad kopia av
“Declaration of Conformity” kan erhållas vid hänvändelse till
Oregon Scientific servicecenter.
Att justera volymen:
Vred: Justera fokus för projektion
2.
(7,2 x 2,64 x 3,19 tum)
386 g utan batteri
6 V•AC adapter
2 x UM-4 (AAA) 1.5V batterier
EU-FÖRSÄKRAN OM ÖVERENSSTÄMMELSE
11
1.
183 x 67 x 81mm
Vi hoppas du hittar all information du behöver på vår
hemsida och om du vill komma i kontakt med Oregon
Scientific kundkontakt besöker du vår lokala hemsida www.
oregonscientific.se eller www.oregonscientific.com för att
finna telefonnummer till respektive supportavdelning.
RADIO
2
3
4
BESKRIVNING
OM OREGON SCIENTIFIC
Tryck SNOOZE / SLEEP för att stänga av alarmet i
8 minuter
ELLER
1
SPECIFIKATIONER
TYP
HUVUDENHET
VY BAKSIDA (FIG. 2)
5.
•
LxBxH
•
•
Vrid VOL-ratten för att justera volymen.
Välj alarmtyp, PIP / FRÅN /
Att aktivera sleeptimer:
•
Tryck SNOOZE / SLEEP för att gå in i sleep-läget.
•
Tryck SNOOZE / SLEEP för att ändra
sleepinställningen (120, 90, 60, 30, 15, 0 min).
/ SET
/
: Ändra inställningar/ display
/ visa respektive alarmstatus; alarminställning
6.
DIMMER: Välj displayintensitet LÅG / HÖG
7.
PROJEKTION PÅ: Aktivera / Inaktivera kontinuerlig
projektion
8.
180° ROTATION: flippa bilden 180°
9.
RESET: Återställ enheten till fabriksinställning
PROJEKTION
Denna enhet projicerar tiden bekvämt för dej.
För kontinuerlig projektion:
•
10. AC/DC uttag
11. Batterifack
Skjut PROJEKTIONSKNAPPEN till ON när adaptern
är ansluten, för att aktivera.
Att flippa projektionen 180°:
VY UPPIFRÅN (FIG. 3)
•
Draai aan het FOCUS Wiel.
Tryck 180° Flip.
Fokusering av projektionsbilden:
2
3
Gire a roda de FOCUS.
•
Tryck + / - för att ställa timme / minut.
3.
Välj för att:
Druk op 180° Flip.
•
2.
•
7
Innehållet i denna manual får ej kopieras utan
tillverkarens medgivande.
NOTERING De tekniska specifikationerna och innehållet
i denna manual kan komma att ändras utan vidare
upplysning.
.
Tryck och håll inne önskad SET
För att stänga av alarmet:
1
Para focalizar a imagem:
eller
1.
För att aktivera / avaktivera alarmet:
EU CONFORMITEITS VERKLARING
Bij deze verklaart Oregon Scientific dat deze LCD Klok
met Projectie & Analoge AM/FM Radio (Model: RRA320P)
voldoet aan de essentiële eisen en aan de overige relevante
bepalingen van EMC richtlijn 89/336/CE. Een kopie van de
getekende en gedateerde Conformiteits verklaring is op
verzoek beschikbaar via onze Oregon Scientific klanten
service.
•
Att ställa alarmet:
SWE
183 x 67 x 81mm
(72 x 26,4 x 31,9 in)
386 g (13,6 oz)
zonder batterij
6 V Wisselstroomadaptor
2 x UM-4 (AAA)1,5 V batterijen
For international inquiries, please visit:
www2.oregonscientific.com/about/international.asp
.
BRUKSANVISNING
1.
Voeding
ansvarar. Konsultera möbeltillverkaren för information.
analog AM/FM radio
Om het beeld scherp te stellen:
•
STÄLL IN KLOCKAN
BOVENKANT (FIG. 3)
Pressione o giro de 180°.
PRECAUÇÕES
PRECAUCIÓN
Druk + / - om uren / minuten in te stellen.
3.
AM / PM
Pressione SNOOZE / SLEEP para alterar o ajuste do
tempo para dormir (120, 90, 60, 30, 15, 0 min).
Deslize o interruptor de PROJECTION para ON quando
o adaptador estiver conectado, para ativar / desativar.
2.
1.
Pressione SNOOZE / SLEEP para entrar no modo
Sleep (Dormir).
Pressione RESET para retornar aos ajustes padrão.
configuración
VOL: Silenciar / ajustar el volumen de la radio
TIPO
DESCRIÇÃO
UNIDADE PRINCIPAL
183 x 67 x 81mm
CxLxA
(72 x 26,4 x 31,9 pol)
386 g (13,6 oz)
Peso
sem pilha
Adaptador de 6 V CA
Energia
2 pilhas UM-4 (AAA) de 1,5 V
Houd gewenste SET
Schuif naar:
/ SET
,
: Wijzig instelling / scherm /
Alarmstatus bekijken; alarm instellen
Para projeção contínua:
•
ESPECIFICAÇÕES
1.
LCD Projektionsklocka &
laklaag van bepaalde houtsoorten. Oregon Scientific is
hiervoor niet aansprakelijk. Lees de instructies van de
fabrikant van het meubel voor meer informatie.
Activeren / deactiveren alarm:
+ / - : Verhoog /verlaag geselecteerde waarden
REINICIO
1.
3
4
5
6
1
2
5.
RESET
la
VOORKANT (FIG.1)
4.
diretamente para o projetor.
a
OVERZICHT
ALARM 1 en 2: Selecteer alarmtype, ZOEMER / UIT
/ RADIO
al interior del proyector.
volver
NL
•
Justera FOKUS vredet.
NOTERA Titta ej in i projektorn när projektorn är på.
NB Kijk niet rechtstreeks in de projector wanneer deze aan
NOTA Se a projeção estiver iluminada, não olhe
NOTA Si la proyección está iluminada, no mire directamente
para
NOTA As especificações técnicas para este produto e o
conteúdo do manual do usuário estão sujeitos à alteração
sem aviso prévio.
Om het alarm in te stellen:
3.
Gire VOL para mudo / ajustar o volume.
Esta unidade projeta as informações de hora para sua
conveniência.
•
2
3
Haga girar la rueda FOCUS.
Pulse RESET
predeterminada.
Observe que algumas unidades estão equipadas com
uma tira de segurança da bateria. Remova a tira do
compartimento de bateria antes do primeiro uso.
ALARM
Para girar a imagem projetada em 180°:
VISTA SUPERIOR (FIG. 3)
Para enfocar la imagen:
•
Não descarte baterias usadas em locais não
apropriados. É necessária a coleta do lixo em questão
de maneira separada para tratamento especial.
HANDLEIDING
RADIO: Zet radio Aan / Uit, Kies AM / FM
PROJEÇÃO
11. Compartimento de pilha
1
2
3
•
Model: RRA320P
2.
Para ativar o temporizador de dormir:
•
Para dar la vuelta en 180º a la imagen proyectada:
1
•
+ / - : aumenta/diminui os valores do ajuste
selecionado
4.
De volgorde van instellingen is: 12 / 24-uurs formaat,
uren, minuten.
FOCUS Wiel: Stelt projectie scherp
Para ajustar o volume:
1.
Druk op + of - om de instellingen te wijzigen.
3.
1.
11
RESET: retorna a unidade aos valores de ajuste
padrão
Pulse 180º Flip.
, SET
/
, + / - para desativar
Pressione
o alarme e ativá-lo novamente após 24 horas.
VISTA TRASEIRA (FIG. 2)
180° ROTATION: gira a imagem 180°
•
Pressione SNOOZE / SLEEP para silenciá-lo por 8
minutos
OU
9.
VISTA SUPERIOR (FIG. 3)
RADIO – alarme de rádio
Modo Sleep (Dormir) ativado (ON)
8.
11. Compartimento para las pilas
BEEP – alarme de bipe
•
4.
Proyección continua:
10. Toma CA/CC
•
Rádio ativado (ON)
7.
Deslice el interruptor PROJECTION a ON con el
adaptador conectado para activar o desactivar la
proyección.
OFF – desativa o alarme
3.
7
O conteúdo deste manual não pode ser reproduzido
sem a permissão do fabricante.
•
2.
Analoge AM/FM Radio
Deslize para:
Para silenciar o alarme:
Esta unidad proyecta la hora para que le sea más cómodo
verla.
•
Para ativar / desativar o alarme:
•
AM / PM
desejado.
2. Pressione + / - para ajustar a hora / minuto.
1
2
1.
ou
LCD Klok met Projectie &
A colocação deste produto sobre certos tipos de
madeira pode resultar em danos ao seu acabamento,
pelos quais a Oregon Scientific não se responsabilizará.
Consulte as instruções de cuidados do fabricante do
móvel para obter informações.
•
Para ajustar o alarme:
VISÃO GERAL
Si está en España y quiere contactar directamente con
nuestro Departamento de Atención al Cliente, por favor
visite www.oregonscientific.es o llame al 902 338 368
Por medio de la presente Oregon Scientific declara que el
Reloj proyector LCD y radio analógica AM / FM (Modelo:
RRA320P) cumple con los requisitos esenciales de la
directiva EMC 89/336/CE. Tiene a su disposición una
copia firmada y sellada de la Declaración de Conformidad,
solicítela al Departamento de Atención al Cliente de Oregon
Scientific.
3. A ordem de ajuste é: formato de 12/24 horas, hora,
minuto.
ALARME
Visite nuestra página web (www.oregonscientific.com) para
conocer más sobre los productos de Oregon Scientific. Si
está en EE.UU y quiere contactar directamente con nuestro
Departamento de Atención al Cliente, por favor visite www2.
oregonscientific.com/service/support.asp o llame al 1-800853-8883.
Para consultas internacionales, por favor visite www2.
oregonscientific.com/about/international.asp.
.
MANUAL DO USUÁRIO
•
FICHA TÉCNICA
coletado separadamente para tratamento especial.
•
2. Pressione + ou - para alterar os ajustes.
Modelo: RRA320P
NOTA La ficha técnica de este producto y los contenidos
de este manual de usuario pueden cambiarse sin aviso.
Deslice el interruptor a:
•
La colocación de este producto encima de ciertos tipos
de madera puede provocar daños a sus acabados.
Oregon Scientific no se responsabilizará de dichos
daños. Consulte las instrucciones de cuidado del
fabricante para obtener más información.
Los contenidos de este manual no pueden reproducirse
sin permiso del fabricante.
•
1. Pressione
rádio AM/FM analógico
•
y manténgalo pulsados.
2.
VISTA TRASERA (FIG. 2)
5.
o
3.
•
4.
Pulse SET
AJUSTE DO RELÓGIO
Relógio LCD com projeção e
Cuando elimine este producto, asegúrese de que no
vaya a parar a la basura general, sino separadamente
para recibir un tratamiento especial.
staat.
RESET (ÅTERSTÄLLNING):
Tryck RESET
grundinställning.
RESET
Druk RESET om de standaardinstellingen te gebruiken.
1.
VOL: Mute / radiovolume aanpassen
2.
SNOOZE / SLEEP: het alarm gedurende 8 minuten
uitzetten
KENMERKEN
1.
VOL: Mute / justera radiovolym
3.
TUNE: Selecteer Radiofrequentie
•
2.
SNOOZE / SLEEP: tysta alarmet i 8 minuter
3.
FREKVENSINSTÄLLNING: Välj radiofrekvens
STARTEN
•
Dek de ventilatiegaten niet af met kranten, gordijnen etc..
•
Dompel het product nooit onder in water. Als u water
over het apparaat morst, droog het dan onmiddellijk af
met een zachte stofvrije doek.
•
Reinig het apparaat niet met krassende of bijtende
materialen.
•
Laat de interne componenten met rust. Anders kan dit
de garantie beïnvloeden.
•
Gebruik alleen nieuwe batterijen. Gebruik nooit oude
en nieuwe batterijen door elkaar.
PLAATS DE BATTERIJEN.
1.
Sluit de wisselstroomadapter aan.
Geheugenreserve:
2.
Verwijder het klepje van het batterijvak.
3.
Plaats de batterijen volgens de aangegeven polariteit
(FIG. 2).
KLOK INSTELLEN
1.
Druk
.
Stel het apparaat niet bloot aan extreme klappen,
schokken, stof, temperatuur of vochtigheid.
•
De in deze handleiding weergegeven plaatjes kunnen
afwijken van de werkelijkheid.
•
Wanneer u dit product weg gooit, zorg dan dat het
opgehaald wordt door de daarvoor bestemde afvaldienst.
•
Dit product kan eventueel schade veroorzaken aan de
ATT KOMMA IGÅNG
Sätt AC/DC adaptern i uttaget.
Minnesbackup:
att
återställa
produkten
till
FÖRSIKTIGHETSÅTGÄRDER
•
Utsätt inte produkten för extrema krafter, stötar, damm
eller kraftiga variationer i temperatur eller luftfuktighet.
•
Övertäck inte ventilationshål med tidningar, gardiner
e.d.
•
Lägg aldrig ner produkten i vatten. Om du spiller vätska
på produkten skall den omedelbart torkas torr med en
luddfri trasa.
•
Rengör inte produkten med rengöringsmedel som
innehåller repande eller korroderande material.
•
Mixtra inte med interna komponenter. Detta förverkar
garantin.
SÄTTA I BATTERIER.
1.
för
2.
Öppna batteriluckan.
•
3.
Se till att batterierna sätts in med rätt polaritet (se
figur 2).
Använd endast nya batterier. Blanda inte gamla och
nya batterier.
•
Bilder i manualen kan skilja sig från verkligheten.
•
Denna produkt skall vid kassering sorteras som
elektronikskrot.
•
Placering av denna produkt på vissa träytor kan
resultera i skador på ytan, för vilka Oregon Scientific ej
© 2007 Oregon Scientific. All rights reserved.
086L005040-013
8/29/07 3:17:14 PM