1
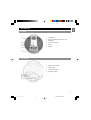
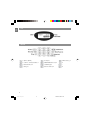
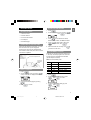
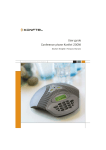
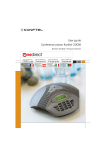
EN
Model : OS200
User Manual
Mode d’emploi
Manual de Usuario
Bedienungsanleitung
Gebruiksaanwijzing
Bruksanvisning
Manuale
manual-E.p65
1
2004/5/18, PM 12:17
EN
manual-E.p65
2
2004/5/18, PM 12:17
MODEL: OS200
USER MANUAL
Removing a Contact ................................ 7
Speed Dial ............................................... 7
Accessories and Spare Parts ....................... 8
Accessory Descriptions ................................. 8
Acoustics ................................................... 8
TABLE OF CONTENTS
Troubleshooting ........................................... 8
Introduction .................................................. 1
Technical Information ................................. 9
Safety and Care ........................................... 1
About Oregon Scientific .............................. 9
Key Features ................................................ 2
Getting Started ............................................ 4
Package Contents .................................... 4
Connecting for the First Time ................. 4
Selecting Language ................................ 4
Setting Time and Date ........................... 4
Programming the R Key .......................... 4
Making Phone Calls .................................... 5
Incoming Calls ......................................... 5
Outgoing Calls ......................................... 5
3-Way Calling .......................................... 5
Call Settings ................................................. 5
Speaker Volume ...................................... 5
Manual Tuning ........................................ 5
Keypad Tone ........................................... 5
Ring Volume ............................................ 6
Call Functions .............................................. 6
Redial ....................................................... 6
Mute ......................................................... 6
Using the Phonebook .................................. 6
Adding Contacts to Phonebook .............. 6
Editing Contact List ................................. 7
manual-E.p65
3
2004/5/18, PM 12:17
EN
CONFERENCE PHONE
EN
INTRODUCTION
CARE AND MAINTENANCE
This product integrates a highly sensitive
microphone set-up and three built-in surround
To clean the unit use a soft dry cloth, always
keep it away from moisture.
sound speakers, allowing users from all around the
room to participate in conference discussions.
Some features of this product include:
•
Backlit LCD
•
Time, date, and language settings
•
Tape recorder connectivity
•
Contact list
•
Acoustic and line echo elimination
SAFTEY AND CARE
Your OS200 conference phone has been designed
to provide you with many years of reliable
service. To ensure that you use the product
safely and correctly, observe the following safety
warnings:
•
Your OS200 conference phone is dependent
on AC power source for operation, and may
not work during power and telephone outages.
•
Do not use your OS200 conference phone in
or near water, as this can cause damage to
the unit and personal injury through electric
shock.
•
Do not attempt to open or modify your
telephone.
•
The product, specifications and contents of this
user manual are subject to change without
further notice.
•
Figures and display examples in this user
manual are for reference only, and may differ
slightly from the actual product.
1
manual-E.p65
4
2004/5/18, PM 12:18
EN
KEY FEATURES
TOP VIEW
1. Loudspeaker
2. Microphone status indicators (blue / red)
3. Microphone
4. Remote control sensor
5. Display
6. Keypad
BOTTOM VIEW
1. Output for tape recorder
2. Power supply
3. Telephone line input
4. Microphone inputs
2
manual-E.p65
5
2004/5/18, PM 12:18
EN
LCD
KEYPAD
1, space, . (period)
5, J,K,L,j,k,l
9,W,X,Y,Z,w,x,y,z
2, A, B, C, Å, Ä, Á,À,a,b,c,å,ä,á, à
6,M,N,O,Ö,Ø,Ñ,m,n,o,ö,ø,ñ
0
3, D,E,F,É,È,d,e,f,é,è
7,P,Q,R,S,p,q,r,s
*
4, G,H,I,g,h,i
8,T,U,V,Ü,Ú,t,u,v,ü,ú
#
3
manual-E.p65
6
2004/5/18, PM 12:18
GETTING STARTED
1. Press
PACKAGE CONTENTS
•
Conference Phone
•
Instruction Manual
•
Power and network cable
•
Power adaptor
•
Intermediate plugs
2
.
Scroll to Time/Date menu by pressing
Press
to confirm.
3. Press
to scroll between the DATE,
MONTH, YEAR, HOUR, and MINUTES fields.
to select a field to adjust. Use
to adjust values, then
to
4. Press
CONNECTING FOR THE FIRST TIME
When using the OS200 for the first time, you must
first connect the unit to a power supply and
analogue phone line using the supplied adaptor
and connection cables. This phone does not work if
connected to a digital line.
Power
adaptor
connects to
mains outlet
Connect to telephone line
Connectors
underneath
OS200
SELECT LANGUAGE
1. Press
2. Scroll to Language menu by pressing
until you reach the icon display below. Press
to confirm.
3. Choose the desired language by pressing
.
4. Press
EN
SETTING THE TIME AND DATE
to confirm.
confirm.
5. Select other fields as necessary. Press
go back to the main menu.
to
PROGRAMMING THE R KEY
Depending on what region the phone will be used
in, the R key should be programmed to make sure
R-Pulse times are compatible with most PBXs
(private telephone networks).
NOTE: The default setting is R2
Value
Time (ms)
R1
65
Ericsson MD110
R2
100
Scandinavia, Europe
R3
150
Reserved
R4
270
Germany, France
R5
600
USA
1. Press
PBX / country
.
2. Scroll to Special Settings menu by press
. Press
to confirm.
3. Scroll to the R-function setting by press
. Press
.
4
manual-E.p65
7
2004/5/18, PM 12:18
EN
4. Choose the required R-pulse value with
.
4. Enter the second phone number.
5. When the second call is connected press
and then
to connect all parties.
5. Press
NOTE: If your second call was not answered, press
and then
to return to the first call.
to save changes and exit.
MAKING PHONE CALLS
CALL SETTINGS
INCOMING CALLS
When an incoming call is
received, a ringing tone will
be heard and the microphone indicator light will
light up.
1. Press
SPEAKER VOLUME
During a call, you can
press
to change
the volume.
MANUAL TUNING
to answer.
The OS200 will automatically modify its properties
for better quality sound in the room and over the
2. Press
telephone line. However, tuning can be initiated
manually by pressing
simultaneously (brief
to end the call.
noise will be heard).
OUTGOING CALLS
To make an outgoing call:
KEY PAD TONE
1. Press
.
When dialling a number, touch-tones will still be
heard even though the keypad tone function is
switched off.
2. Dial the desired number.
3. Press
to connect.
Indicates the duration of
the call.
4. Press
1. Press
.
.
2. Scroll to Special Settings menu
to end the call.
TIP: To preview, first enter the phone number.
3. Press
3-WAY CALLING
.
4. Scroll to Keypad Tone setting
This feature allows you to talk with up to two other
parties simultaneously, contact your local telephone
operator for the availability of this service.
5. Press
1. Enter the first phone number.
2. Press
.
.
3. After the first call is connected, press
get a new dial tone.
to
5
manual-E.p65
8
2004/5/18, PM 12:18
.
6. Select to turn keypad tone on/off:
EN
USING THE PHONEBOOK
•
ADDING CONTACTS TO PHONE BOOK
Add numbers to your phone book to organize your
contacts and enjoy the convenience of speed dial.
•
1. Press
to save changes.
7. Press
.
2. Scroll to the Phone Book menu
.
RING VOLUME
1. Press
.
2. Scroll to Ring Signal Volume menu
.
3. Press
.
4. Scroll to “Add entry”
3. Press
.
4. Press
ringer off .
to adjust the volume or switch the
5. Press
to save changes
.
The either:
and the number last dialled will
• Press
appear automatically.
or
• Enter a telephone number using the keypad.
CALL FUNCTIONS
5. Press
.
REDIAL
You can call the last number dialled by:
1. Press UP to display the last number dialled.
2. Press
to dial the number.
3. Press
to end the call.
MUTE
Press the number that corresponds with the
desired letter until you find the right one, pause
and then enter the next letter.letter. For more
information about how to enter a name using
the keypad, please refer to the “Keypad”
subsectonsubsection in “Key Features”.
7. Press
This feature allows you to turn the microphone off
during private discussions.
to activate.
1. Press
2. Press
6. Enter a name using the keypad:
to deactivate.
ON
LED (red)
OFF
LED (blue)
TIP: • Press
• Press
number.
• Press
to save changes.
to change caps.
key to delete a character/
to cancel.
NOTE: You can save up to 50 messages in your
phonebook.
6
manual-E.p65
9
2004/5/18, PM 12:18
EN
7. Press
EDITING CONTACT LIST
1. Press
.
.
2. Scroll to the Phone Book menu
3. Press
to select.
Confirmation appears in the display
.
4. Using the
• Press
key select EDIT.
• Press
to cancel.
to confirm the deletion.
SPEED DIAL
5. Press
.
You can dial previously stored numbers in your
book by:
.
6. Scroll to the name you want to edit
1. Scroll through witht
contact .
7. Press
to find the desired
.
8. Edit number using the keypad.
9. Press
.
2. Press
to call contact.
3. Press
to end call.
10. Edit name using the keypad.
11. Press
to save changes.
TIP: • Press
number.
key to delete a character/
to cancel.
• Press
REMOVING A CONTACT
1. Press
.
2. Scroll to the Phone Book menu
3. Press
.
.
4. Select “Erase”
5. Press
.
.
6. Scroll to the name you wish to delete
.
7
manual-E.p65
10
2004/5/18, PM 12:18
Please contact your local distributor for details
about the availability of accessories and spare
parts.
TELE PLUGS
Item No.
ACCESSORIES DESCRIPTIONS
EN
ACCESSORIES AND SPARE PARTS
ACOUSTICS
The OS200 delivers clear audible sound to the
user. For optimum results the unit should be
positioned accordingly as shown here:
Description
Denmark
Finland
France
Germany
UK
Netherlands
Norway
•
Layout for room sizes up to 30m2 (323 sq. feet).
Spain
Sweden
TROUBLESHOOTING
Switzerland
SPARE PARTS
Item No.
Description
Power supply and analogue
POTS network cable, 7.5m
(25ft)
PROBLEM
CHECK THIS
Third party called
does not answer
Press
and then 1
to return to the first call.
Audio quality is not
Manually tune the
clear
acoustics (
Called party cannot
Check that the micro-
hear you
phone is active (red light /
)
Unit not functioning
Bypass any extension
correctly
cables and connect your
unit to the phone socket
Mains transformer 12V DC
(Europe)
Mains transformer 12V DC
(UK)
Mains transformer 12V DC
(US)
)
directly
Disconnect any extra
microphnoes attached
and try again
When using the
Insert a pause using the
3-way calling
function and you
key when entering
numbers in the phone
cannot get a
second dial tone
book.
8
manual-E.p65
11
2004/5/18, PM 12:18
EN
Cannot save a
contact “Memory
Phone book is full (
),
delete a contact to make
Full” is displayed
on LCD
room (
condensing.
EMC
: EN 50 081-1:1992
EN 55 024-1:1998
EN 60950
).
TECHNICAL INFORMATION
MAIN UNIT
Mains transformer
(Europe)
: DC transformer240V
AC/12 V DC; 700
mA.
Mains transformer (UK)
: DC transformer240V
AC/12 V DC; 700
mA.
Network interface
: Analogue PBX or
PSTN, RJ-11.
Power supply and
network cable
: 7.5 metres, RJ-11
(line), EIAJ Class IV
(power).
Recommended room
conditions
: Reverberation time:
<0.5 sec.
Background noise
: <45 dB(A).
Frequency response
: 200 – 3700 Hz.
Loudspeaker volume
: 85 dB SPL
(increased if extra
microphones are
used).
Room echo suppression
: 208 ms.
Line echo suppression
: 25 ms.
Automatic calibration
: <1 ms impulse (not
discernible).
Tape recorder output
: 3.5 mm tele jack.
Contact for connection of tape
recorder may only be
connected to a SELV
voltage in accor
dance with SS-EN 60
950.
Dimensions
: Diameter 232 mm.
Weight
: 700 g.
Temperature range
: 5 – 40°C in operation.
Humidity
: 20 % – 80 % non-
Electrical safety
: EN 60950.
Telecom approval POTS
: EUROPEAN TBR21.
Keyboard
: 19 keys.
Compatibility
: OS200 can be connected to any PBX
equipped with a
POTS extension, for
example Ericsson:
MD110, Fenix.
Siemens: Hicom.
Nortel: Meridan.
Philips:Sopho.
Alcatel: 4200, 4400.
Ascom: Ascotel.
ABOUT OREGON SCIENTIFIC
Visit our website www.oregonscientific.com to
learn more about your voice recorder and other
Oregon Scientific products such as hand-held
organizers, alarm clocks, and weather stations.
The website also includes contact information for
our customer service department, in case you
need to reach us.
© 2004 Oregon Scientific. All rights reserved.
9
manual-E.p65
12
2004/5/18, PM 12:18
EN
manual-E.p65
13
2004/5/18, PM 12:18
EN
0681
086-00XXXX-XXX
manual-E.p65
14
2004/5/18, PM 12:18