1
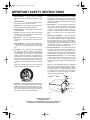
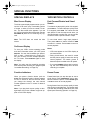
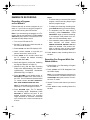
16-547.fm Page 1 Tuesday, July 20, 1999 4:45 PM
Cat. No. 16-547/630
OWNER’S MANUAL
Please read before using this equipment.
MODEL 110/MODEL 60
4-Head VHS HQ VCR
4-Head VHS HQ Hi-Fi VCR
16-547.fm Page 2 Tuesday, July 20, 1999 4:45 PM
IMPORTANT SAFETY INSTRUCTIONS
1. Read instructions — All the safety and operating
instructions should be read before the appliance is operated.
2. Retain Instructions — The safety and operating instructions should be retained for future reference.
3. Heed Warnings — All warnings on the appliance and in
the operating instructions should be adhered to.
4. Follow Instructions — All operating and use instructions
should be followed.
5. Cleaning — Unplug the VCR from the wall outlet before
cleaning it. Do not use liquid cleaners or aerosol cleaners. Use a damp cloth for cleaning.
6. Attachments — Do not use attachments not recommended by the VCR manufacturer as they may cause
hazards.
7. Water and Moisture — Do not use this VCR near water
— for example, near a bath tub, wash bowl, kitchen sink,
or laundry tub, in a wet basement, or near a swimming
pool.
8. Accessories — Do not place this VCR on an unstable
cart, stand, tripod, bracket, or table. The VCR may fall,
causing serious injury to someone and serious damage
to the appliance. Use only with a cart, stand, tripod,
bracket, or table recommended by the manufacturer or
sold with the VCR. Any mounting of the appliance should
follow the manufacturer’s instructions and should use a
mounting accessory recommended by the manufacturer.
An appliance and cart combination should be moved with
care.
Quick stops, excessive force, and uneven surfaces may
cause an appliance and cart combination to overturn.
This VCR should never be placed near or over a radiator
or heat register. This VCR should not be placed in a builtin installation such as a bookcase or rack unless proper
ventilation is provided or the manufacturer’s instructions
have been adhered to.
10. Power Sources — This VCR should be operated only
from the type of power source indicated on the marking
label. If you are not sure of the type of power supplied to
your home, consult your appliance dealer or local power
company. For VCRs intended to operate from battery
power or other sources, refer to the operating instructions.
11. Grounding and Polarization — This VCR is equipped
with a polarized alternating-current line plug (a plug having one blade wider than the other). This plug will fit into
the power outlet only one way. This is a safety feature. If
you are unable to insert the plug fully into the outlet, try
reversing the plug. If the plug should still fail to fit, contact
your electrician to replace your obsolete outlet. Do not
defeat the safety purpose of the polarized plug.
12. Power-Cord Protection — Power-supply cords should
be routed so they are not likely to be walked on or
pinched by items placed upon or against them, paying
particular attention to cords at plugs, convenience receptacles, and the point where they exit from the appliance.
13. Outdoor Antenna Grounding — If an outside antenna
or cable system is connected to the VCR, be sure the
antenna or cable system is grounded so as to provide
some protection against voltage surges and built-up static
charges.
Section 810 of the National Electrical Code, ANSI/NFPA
No. 70-1984, provides information with respect to proper
grounding of the mast and supporting structure, grounding of the lead-in wire to an antenna discharge unit, size
of grounding conductors, location of antenna-discharge
unit, connection to grounding electrodes, and requirements for the grounding electrode.
F IGURE A
EXAMPLE OF ANTENNA GROUNDING AS PER
NATIONAL ELECT RICAL CODE
ANTE NNA
L EAD I N
WI RE
GROUND
CLAMP
9. Ventilation — Slots and openings in the cabinet and the
back or bottom are provided for ventilation and to ensure
reliable operation of the VCR and to protect it from overheating. These openings must not be blocked or covered.
The openings should never be blocked by placing the
VCR on a bed, sofa, rug, or other similar surface.
A NTENNA
DI SCHARG E UN I T
(NEC SECTION 8 10 -2 0)
EL ECT RI C
SE RV I CE
EQ U I PM EN T
G RO UNDI NG CO NDUCT ORS
(NEC SECTION 8 10 -2 1)
G RO UND CL AM PS
NEC - NATI O NAL EL ECTRI CAL CO DE
S2 8 9 8 A
© 1996 Tandy Corporation.
All Rights Reserved.
Optimus is a registered trademark used by Tandy Corporation
RadioShack is a trademark used by Tandy Corporation.
2
POWER SERVI C E G RO UNDI NG
EL EC TR O DE SYST EM
(NEC ART 2 50 , PART H)
16-547.fm Page 3 Tuesday, July 20, 1999 4:45 PM
14. Lightning — For added protection for this VCR receiver
during a lightning storm, or when it is left unattended and
unused for long periods of time, unplug it from the wall
outlet and disconnect the antenna or cable system. This
will prevent damage to the VCR due to lightning and
power-line surges.
15. Power Lines — An outside antenna system should not
be located in the vicinity of overhead power lines or other
electric light or power circuits, or where it can fall into
such power lines or circuits. When installing an outside
antenna system, extreme care should be taken to keep
from touching such power lines or circuits as contact with
them might be fatal.
16. Overloading — Do not overload wall outlets and extension cords as this can result in a risk of fire or electric
shock.
21. Safety Check — Upon completion of any service or
repairs to this VCR, ask the service technician to perform
routine safety checks to determine that the VCR is in
proper operating condition.
22. Heat — This VCR product should be situated away from
heat sources such as radiators, heat registers, stoves, or
other products (including amplifiers) that produce heat.
Note to the cable TV system installer:
18. Servicing — Do not attempt to service this VCR yourself
as opening or removing covers may expose you to dangerous voltage or other hazards. Refer all servicing to
qualified service personnel.
This reminder is to call the CATV system installer’s attention to Section 820-40 of the National Electrical Code, which provides
guidelines for proper grounding and, in particular, specifies that the cable ground shall be
connected to the grounding system of the
building, as close to the point of cable entry as
practical.
19. Damage Requiring Service — Unplug this VCR from
the wall outlet and refer servicing to qualified service personnel under the following conditions:
WARNING: To prevent fire or shock hazard,
do not expose this VCR to rain or moisture.
17. Object and Liquid Entry — Never push objects of any
kind into this VCR through openings as they may touch
dangerous voltage points or short out parts that could
result in a fire or electric shock. Never spill liquid of any
kind on the VCR.
•
When the power-supply cord or plug is damaged or
frayed.
•
If liquid has been spilled or objects have fallen into the
VCR.
•
If the VCR has been exposed to rain or water.
•
If the VCR does not operate normally by following the
operating instructions. Adjust only those controls that
are covered by the operating instructions, as improper
adjustment of other controls may result in damage
and will often require extensive work by a qualified
technician to restore the VCR to its normal operation.
•
If the VCR has been dropped or the cabinet has been
damaged.
•
When the VCR exhibits a distinct change in performance — this indicates a need for service.
20. Replacement Parts — When replacement parts are
required, be sure the service technician has used
replacement parts, specified by the manufacturer, that
have the same characteristics as the original part. Unauthorized substitutions may result in fire, electric shock,
injury to persons or other hazards.
CAUTION
RISK OF ELECTRIC SHOCK.
DO NOT OPEN.
!
CAUTION: TO REDUCE THE RISK OF ELECTRIC
SHOCK, DO NOT REMOVE COVER OR BACK. NO
USER-SERVICEABLE PARTS INSIDE. REFER SERVICING TO QUALIFIED SERVICE PERSONNEL.
This symbol is intended to alert you to the
presence of uninsulated dangerous voltage
within the VCR’s enclosure that might be of
sufficient magnitude to constitute a risk of
electric shock. Do not open the VCR’s case.
!
This symbol is intended to inform you that important operating and maintenance instructions are included in the literature
accompanying this VCR.
3
16-547.fm Page 4 Tuesday, July 20, 1999 4:45 PM
FEATURES
Your Optimus Model 110 4-Head VHS HQ
VCR/Model 60 4-Head VHS HQ Hi-Fi Stereo
VCR offers some of the most advanced features available in home video cassette recorders.
Your VCR’s PLL (phase-locked loop) tuning
ensures extremely accurate tuning of up to 68
VHF and UHF channels and up to 125 cable
channels. The VCR’s full-function universal remote control and on-screen programming
make the VCR easy to use.
Your VCR offers all these features:
Note: The Model 60 includes all of the Model
110’s features, but adds Hi-Fi stereo that delivers CD-quality sound for audio/video or audioonly recordings. The Model 60 also includes
front panel audio/video jacks that make it easy
to connect to a camcorder.
Easy-to-Use Immediate Recording — lets
you start a recording immediately and have the
VCR automatically stop recording after a length
of time you select.
1-Month, 8-Event, Digital Timer — lets you
program the VCR to make up to eight unattended recordings (daily, weekly, or one-time)
within a 1-month period.
Automatic Playback/Rewind/Eject — automatically plays, rewinds, and ejects a tape.
Fast-Response System — positions the video
cassette’s tape next to the playback/record
head for immediate playback or recording.
Real-Time Counter with Memory — displays
the actual length of time a tape plays or
records, and allows you to mark and return to a
location on the tape.
RECORDING/PLAYBACK
TUNING
26-Micron Record/Play Head — enhances
the picture quality at the EP (Extended Play)
playback speed.
179-Channel, Digital-PLL, Cable-Compatible
Tuner — lets you tune to up to 68 VHF and
UHF channels and up to 125 cable channels.
Four Double-Azimuth Video Heads — provide superior picture quality and special effects
compared with standard single-azimuth fourhead VCRs.
Tuner Memory Programming — automatically stores all the active channels in your area
into memory.
AI (Artificial Intelligence) Video Noise Reduction System — reduces noise on the
screen when playing back a worn or partially
damaged tape.
TAPE CONTROL
Auto Tracking System — automatically adjusts tracking when you start playback.
Auto Repeat Playback — automatically rewinds the tape for repeat playback when the
tape reaches the end of the tape or the recording.
4
One-Minute Skip — lets you fast-forward the
tape for exactly 1 minute to let you easily skip
over commercials.
Fast-Forward/Rewind with Visual Search
Freeze-Frame/Frame Advance/Slow-Motion
Automatic Rewind
16-547.fm Page 5 Tuesday, July 20, 1999 4:45 PM
OTHER FEATURES
Multichannel Television Sound (MTS) (Model 60 only) — decodes stereo broadcasts for
listening or recording. This VCR can also receive and record special audio programs (SAP)
that accompany some MTS broadcasts.
We recommend you record the VCR’s model
and serial number here. This information is on
the VCR’s back panel.
Model: _______________________________
Serial Number _________________________
Front and Rear Audio/Video Input Jacks
(Model 60 only) — let you quickly connect an
audio/video device such as a camcorder to the
VCR without disconnecting other devices.
Trilingual On-Screen Programming — provides helpful instructions on the TV screen for
setting the clock, programming timers, and
starting quick timer recordings. You can select
English, French, or Spanish instructions.
Universal Remote Control — lets you control
your VCR, plus TVs and cable boxes produced
by other manufacturers.
Memory Sentinel — protects clock settings,
tuner programming information, and timer
memory settings in case of a power loss. The
clock continues to run for 3 minutes and tuner
programming information and timer memory
settings are kept for 24 hours.
Automatic/Manual Clock Setting — lets you
set the VCR to automatically update its clock
using EDS (Extended Data Service) signals
sent by some stations. You can also manually
set the clock.
Note: EDS is provided by some broadcasters
and includes various types of information, including the current time. If no broadcasters in
your area transmit EDS signals, you must manually set the clock.
Automatic DST (Daylight Saving Time) Adjustment — lets you set the VCR to automatically adjust the displayed time for Daylight
Saving Time.
5
16-547.fm Page 6 Tuesday, July 20, 1999 4:45 PM
CONTENTS
Before You Begin .........................................................................................................................
Accessories .............................................................................................................................
Moisture Condensation ............................................................................................................
Using This Manual ...................................................................................................................
7
7
7
7
Installation .................................................................................................................................... 8
Common Connections ............................................................................................................. 8
Model 110 Connections ......................................................................................................... 10
Home Theater Connections (Model 60 Only) ........................................................................ 11
Camcorder Connections (Model 60 Only) ............................................................................. 12
Connecting Power .............................................................................................................. ... 12
VCR Setup ..................................................................................................................................
Setting the 3 CH. 4 Switch .....................................................................................................
Remote Control .....................................................................................................................
Initial Set Up ..........................................................................................................................
Setting the Remote Control’s Codes .....................................................................................
13
13
13
14
19
Operation .................................................................................................................................... 21
Watching TV .......................................................................................................................... 21
Viewing a Video Tape ............................................................................................................ 22
Special Functions ......................................................................................................................
Special Displays ....................................................................................................................
Tape Motion Controls .............................................................................................................
Real-Time Counter ................................................................................................................
Repeat Play ...........................................................................................................................
Tracking .................................................................................................................................
23
23
23
24
25
25
Recording ...................................................................................................................................
Recording Speeds .................................................................................................................
Tape Selection .......................................................................................................................
Erase Protection ....................................................................................................................
Selecting the Signal to Record ..............................................................................................
Receiving/Recording Stereo/SAP Broadcasts (Model 60 Only) ............................................
Immediate Recording ............................................................................................................
Automatic Timer Recording ...................................................................................................
Dubbing .................................................................................................................................
Audio-Only Recording (Model 60 Only) .................................................................................
26
26
26
26
27
27
28
29
32
32
Additional Information ...............................................................................................................
Troubleshooting .....................................................................................................................
Care and Maintenance ..........................................................................................................
Specifications ........................................................................................................................
33
33
34
36
6
16-547.fm Page 7 Tuesday, July 20, 1999 4:45 PM
BEFORE YOU BEGIN
ACCESSORIES
Recording — describes the different methods
for recording.
Be sure to remove these items before you
store the packing material.
Additional Information — includes a troubleshooting section, care and maintenance procedures, and the VCR’s specifications.
• Remote Control
• 75-ohm Coaxial Cable
Depending upon your audio/video system setup, you might need additional cables or adapters. Read “Installation” on Page 8 to determine
your specific needs.
MOISTURE CONDENSATION
Condensation inside the VCR can cause tape
jams or video head damage. When you move
the VCR from a cold area to a warmer one, let
it sit for about 2 hours before you plug it in and
begin operation. This allows any moisture inside the VCR to completely evaporate.
USING THIS MANUAL
This manual has these major sections:
Installation — shows you how to connect the
VCR to your audio/video system.
Setup — includes procedures for preparing
and using the remote control, setting the onscreen programming language, setting the
channels your VCR can tune, and setting the
clock.
Basic Operation — explains how to watch TV
using the TV’s or VCR’s tuner, select channels
using the VCR’s tuner, and load and play a video tape.
Special Functions — describes what appears
on the VCR’s display and the TV screen and
how to fast-forward and rewind a tape, use the
VCR’s special playback, display, and search
features, set the tracking manually, improve
playback of worn or damaged video tapes, and
use skip search.
We recommend that you read through at least
“Installation” on Page 8 and “VCR Setup” on
Page 13 thoroughly, to be sure you correctly
install and set up your VCR.
When reading through this manual, keep the
following in mind:
• Some buttons on the remote control also
appear on the VCR. You can use these
buttons to operate the same functions.
Other procedures use only the VCR’s buttons, or only the remote control’s.
• Some buttons are labeled differently on the
VCR and on the remote control. Since you
use the remote control most often to
change settings and functions, this manual
only refers to the remote control’s labels.
But, unless otherwise noted, you can use
either the remote control’s or the VCR’s
buttons at any time.
• All buttons, switches, and jacks on the
VCR and all buttons on the remote control
are shown in BOLD UPPERCASE letters in
this manual.
• Information that appears on the TV screen
is shown in this typeface: PLAY
• Information that appears on the VCR’s display is shown in this typeface: VCR
• The VCR displays menus and options on
the TV you connect it to, and other information (such as tape motion indicators, the
real-time counter, etc.) on its display.
If a menu disappears before you finish entering
information, simply locate the step where you
first pressed MENU on the remote control, then
repeat that step and all steps that follow.
7
16-547.fm Page 8 Tuesday, July 20, 1999 4:45 PM
INSTALLATION
Caution: Some state laws restrict
direct connections to cable wires
(connections that do not go through a
cable box). Check the laws in your
area before you make connections.
COMMON CONNECTIONS
Refer to the illustrations on Pages 8 and 9 for
these connections.
Note: Some connections shown in this section
might require additional supplies, available
from your local RadioShack store.
þ
• A cable converter box to the VCR’s IN
FROM ANT jack
Note: There are many Cable TV systems in use. If you subscribe to Cable
TV service and cannot record Cable TV
programs, contact your local Cable TV
service provider. Most Cable TV service providers offer connection help.
Connect the VCR to your TV for
playback. You can connect:
• Your VCR’s OUT TO TV jack to your
TV’s antenna jack, using a 75-ohm
coaxial cable
Caution: Never connect the VCR’s
OUT TO TV jack to a terminal that has
an antenna connected. Doing so can
interfere with other receivers.
• Your VCR’s OUT TO TV jack to your
TV’s separate VHF/UHF antenna
jacks, using a 75-ohm coaxial cable
and a VHF/UHF splitter/combiner
• Your VCR’s AUDIO/VIDEO OUT jacks
to your TV’s audio/video jacks, using
a stereo audio/video cable
Note: For the best quality recordings,
use high-quality A/V cables to make
these connections.
À
Connect a signal source to the VCR
for recording. You can connect
(choose one):
• An outside antenna, using a 75-ohm
coaxial cable, to the VCR’s IN FROM
ANT jack
• An outside antenna, using 300-ohm
lead-in wire and a 300-to-75 ohm
transformer, to the VCR’s IN FROM
ANT jack
• Your CATV (cable) company, using
the 75-ohm coaxial cable directly
from the cable company, to the
VCR’s IN FROM ANT jack
8
Ã
You can also connect an optional
video source, such as a camcorder,
another VCR, or a DSS system to
your VCR using A/V cables. Simply
connect it as shown.
Connection Notes:
• You can connect two video sources (three
sources for the Model 60) directly to your
VCR. To do so, you connect one source to
the AUDIO 1/VIDEO 1 IN jacks on the back
of the VCR using A/V cables and the other
to the IN FROM ANT jack using a 75-ohm
coaxial cable (and, with the Model 60,
another source to the AV2 AUDIO/VIDEO IN
jacks on the front of the VCR, see “Camcorder Connections (Model 60 Only)” on
Page 12).
• You can connect additional 75-ohm coax
sources to your system using a high-isolation A/B switch to switch between the
sources.
• You can connect one 75-ohm coax source
to more than one device using a video
splitter.
Because of the complexity of the variations
possible when using additional video accessories, such as video signal switches, splitters,
and combiners, such configurations are not
shown in this manual.
16-547.fm Page 9 Tuesday, July 20, 1999 4:45 PM
Model 60 Connections
Outside
Antenna
75-Ohm
Coax Cable
Cable
(CATV)
Company
75-Ohm
Coax Cable
Cable Box
IN
300-Ohm
Lead-In Wire
300-to-75 Ohm
Transformer
OUT
or
(Optional Camcorder/2nd VCR/DSS System)
or
or
Stereo
Audio/Video
Cable
L
Audio
2
R
Video
3
VCR
R
IN FROM
ANT.
AUDIO 1
L
OUT
VIDEO 1
Stereo
Audio/Video
Cable
1
VHF/UHF
IN
OUT TO TV
3 CH. 4
75-Ohm
Coax Cable
Optional TV
Antenna In
Connection
VHF/UHF
Splitter/Combiner
UHF
TV
VHF
Video In
L
R
Audio In
Antenna In
Antenna In
9
16-547.fm Page 10 Tuesday, July 20, 1999 4:45 PM
Model 110 Connections
Outside
Antenna
75-Ohm
Coax Cable
Cable
(CATV)
Company
75-Ohm
Coax Cable
Cable Box
IN
300-to-75 Ohm
Transformer
OUT
or
(Optional Camcorder/2nd VCR/DSS System)
L
300-Ohm
Lead-In Wire
or
or
Audio/Video
Cable
Audio
2
R
Video
3
VCR
IN FROM
ANT.
AUDIO 1
IN
OUT
VIDEO 1
IN
OUT
1
VHF/UHF
OUT TO TV
3 CH. 4
75-Ohm
Coax Cable
Audio/Video
Cable
Optional TV
Antenna In
Connection
VHF/UHF
Splitter/Combiner
UHF
TV
VHF
Video In
10
L
R
Audio In
Antenna In
Antenna In
16-547.fm Page 11 Tuesday, July 20, 1999 4:45 PM
HOME THEATER CONNECTIONS (MODEL 60 ONLY)
Refer to this illustration to connect your VCR to a home theater system.
Outside
Antenna
75-Ohm
Coax Cable
Cable
(CATV)
Company
75-Ohm
Coax Cable
Cable Box
IN
300-Ohm
Lead-In Wire
300-to-75 Ohm
Transformer
OUT
or
or
or
Select the signal
source you have
Stereo
Audio/Video
Cable
A/V RECEIVER
Speakers
Stereo
Audio/Video
Cable
Front
Left
–
Right
–
+
R
+
Center
–
Left
TV/Monitor
Right
+
–
L
+
Rear
–
AUDIO 1
+
OUT
VCR
R
IN FROM
ANT.
AUDIO 1
L
VHF/UHF
OUT
IN
IN
OUT TO TV
3 CH. 4
VIDEO 1
VIDEO 1
Video Cable
75-Ohm
Coax Cable
TV
Speakers
Video In
L
R
Audio In
Antenna In
11
16-547.fm Page 12 Tuesday, July 20, 1999 4:45 PM
CAMCORDER CONNECTIONS (MODEL 60 ONLY)
Your Model 60 VCR has jacks on its front panel that let you easily connect a camcorder or other
video source.
You need a stereo A/V cable for this connection.
RECORD/TIME
PLAY
REWIND
FAST-F
AV 2
VIDEO IN
L – AUDIO IN – R
TV/VCR
POWER
STOP
EJECT
CHANNEL
MEMORY SENTINEL
1. Insert the plugs at one end of the cable into the AV 2 AUDIO and VIDEO IN jacks on the Model
60’s front panel.
2. Insert the plugs at the other end of the cable into the AUDIO/VIDEO OUT jacks on your camcorder or other video source. Be sure to connect Video to Video and Audio to Audio (use the
plug’s color codes as a guide).
CONNECTING POWER
To power the VCR, plug its power cord into a standard AC outlet. --:-- appears on the display.
Note: When you plug in the VCR for the first time or when you unplug the VCR and reconnect it
(within 24 hours) or after a power failure (of less than 24 hours), the VCR starts to search for a
channel that has an Extended Data Service (EDS) signal (see “Turning On Auto Clock Set” on
Page 17).
12
16-547.fm Page 13 Tuesday, July 20, 1999 4:45 PM
VCR SETUP
SETTING THE 3 CH. 4 SWITCH
If you connected the VCR’s OUT TO TV terminal to a TV or another VCR, set the VCR’s
3 CH. 4 switch (on the back of the VCR) to 3 or
4, whichever is not an active channel in your
area.
When VCR appears on the display, the VCR
sends the signal from the video source connected to its IN FROM ANTENNA or AUDIO 1/
VIDEO 1 IN (or AV2 for the Model 60) terminals
to the TV on the channel you selected.
1. Press the tab on the battery compartment
cover and lift off the cover in the direction
of the arrow.
2. Put fresh batteries in the compartment, as
indicated by the polarity symbols (+ and –)
marked inside.
Note: The 3 CH. 4 switch has no effect on the
TV when the VCR is off or if you connected a
TV with separate audio/video input jacks to the
VCR’s AUDIO 1/VIDEO 1 OUT jacks.
REMOTE CONTROL
3. Replace the cover.
Installing the Batteries
The remote control requires two AA batteries
(not supplied). For the longest operation and
best performance, we recommend alkaline batteries (such as RadioShack Cat. No. 23-557).
Cautions:
Note: If the remote control does not work or
operates poorly, replace both batteries.
• Use only fresh batteries of the required
size and type.
Using the Remote Control
• Never leave dead or weak batteries in the
remote control. Batteries can leak chemicals that can damage your remote control.
To use the remote control, aim it at the front of
the VCR and press the desired function buttons.
• Dispose of dead batteries promptly and
properly; do not bury or burn them.
13
16-547.fm Page 14 Tuesday, July 20, 1999 4:45 PM
INITIAL SET UP
Notes:
Setting the On-Screen Language/
Channels/Clock
When you first plug in the VCR and turn it on,
or when you turn it on after a power interruption
longer than 24 hours, the VCR automatically
prompts you to select a language, and then automatically scans for active channels in your
area and stores them. If a station in your area
transmits EDS signals, the VCR automatically
sets the clock.
• Your VCR protects tuner programming
for up to 24 hours in case a power failure
occurs or if the power cord becomes
unplugged. After about 24 hours without
power, the VCR loses the tuner programming.
• If you have not connected the VCR to an
antenna, cable TV, or other signal
source through the IN FROM ANT terminal, the VCR does not store any channel
in memory. The VCR displays the following:
1. Press POWER to turn on the VCR.
2. Turn on your TV and set it to the same
channel as the VCR’s 3-CH-4 switch or
select its line input if you connected the
VCR to the TV’s audio/video input jacks.
Then press TV/VCR so VCR appears on
the VCR’s display.
3. Select the on-screen instruction language:
press CHs for English, CHt for Spanish, or
TV/VCR for French.
SELECT LANGUAGE
PUSH VCR CH
: ENGL I SH
PULSE VCR CH
: E SPAÑOL
APP. VCR/ TV
: F RANÇA I S
NO CH FOUND
PLEASE CHECK ANTENNA
CABLE CONNECTION THEN
PUSH VCR CH UP KEY AGAIN
To skip tuner programming, press MENU.
Then see “Manually Setting the Clock” on
Page 16 to set the clock.
5. Press MENU. The SET CLOCK menu
appears.
– – – – – SET CLOCK – – – – –
AUTO SET
MANUAL SET
4. When the on-screen display prompts you
to connect an antenna cable, press CHs.
CHANNEL AUTO SET
CONNECT ANTENNA CABLE
THEN...
PUSH VCR CH UP KEY
After you press CHs, the VCR scans
through the channels and memorizes all
the active channels in your area. When
that finishes, the VCR prompts you to set
the clock.
14
SELECT : PUSH SELECT /
SET
: PUSH SET KEY
END
: PUSH MENU KEY
In many areas, the local Public Broadcasting Service (PBS) station broadcasts a
special data signal along with its regular
broadcast. This data signal can automatically set your VCR’s clock to the correct
time.
If your local PBS station has this signal,
proceed to Step 6.
16-547.fm Page 15 Tuesday, July 20, 1999 4:45 PM
If no station broadcasts the EDS signal (or
if you do not know which channel sends an
EDS signal), press SEL t to select MANUAL
SET and skip to Step 2 under “Manually
Setting the Clock” on Page 16.
Note: Your VCR has a memory sentinel
feature that protects clock settings for up to
3 minutes if a power failure occurs or if the
power cord becomes unplugged. After
about 3 minutes without power, the VCR
loses the clock setting. If EDS is available
in your area, the VCR automatically
updates the clock setting according to the
EDS signal when power is restored.
6. Be sure AUTO SET is highlighted, then
press SET. The VCR asks if you are using
a cable box.
– – – – – SET CLOCK – – – – –
ARE YOU USING
A CABLE BOX ?
YES
NO
SELECT : PUSH SELECT /
SET
: PUSH SET KEY
END
: PUSH MENU KEY
• If you connected your VCR to an
antenna or to cable TV without a cable
box, highlight NO and press SET. The
VCR prompts you to enter the local PBS
channel. Use SEL s/t to select the channel, then press SET. It takes up to 10
minutes for the VCR to set the clock
using the EDS signal.
– – – – – SET CLOCK – – – – –
PLEASE SET YOUR CABLE
BOX TO YOUR LOCAL PBS
CHANNEL
NEXT
• If you connected your VCR to a cable
system with a cable box, highlight YES
and press SET. The VCR asks you to
select your cable system setup.
– – – – – SET CLOCK – – – – –
PLEASE SELECT YOUR
CABLE BOX SET UP
CABLE BOX VCR TV
VCR CABLE BOX TV
SELECT : PUSH SELECT /
SET
: PUSH SET KEY
END
: PUSH MENU KEY
If you connected the cable box’s output
to the VCR’s input:
a. Highlight CABLE BOX -> VCR -> TV,
then press SET.
b. Set your cable box to the local PBS
channel, then press SET.
c. Use SEL s/t to select the cable box’s
output channel. If you use an audio/
video connection between the cable box
and VCR, select VIDEO OUT. Then
press SET.
If you connected a cable box between
the VCR and your TV:
a. Highlight VCR -> CABLE BOX -> TV,
then press SET.
b. Use SEL s/t to select the local PBS
channel, then press SET.
It takes up to 10 minutes for the VCR to set
the clock using the EDS signal. If the VCR
does not detect an EDS signal within about
30 seconds, it automatically displays the
manual clock setting screen.
: PUSH SET KEY
15
16-547.fm Page 16 Tuesday, July 20, 1999 4:45 PM
Manually Setting the Clock
Note: The clock must be accurately set for
proper automatic timer and quick timer recording. We suggest you refer to a radio station or
time/temperature service for the correct time.
If the SET CLOCK menu already appears on
the screen, skip to Step 3.
1. Press MENU. Use SEL s/t to highlight SET
CLOCK, then press SET.
2. Use SEL s/t to highlight MANUAL SET, then
press SET.
– – – – – SET CLOCK – – – – –
AUTO SET
MANUAL SET
SELECT : PUSH SELECT /
SET
: PUSH SET KEY
END
: PUSH MENU KEY
3. Use SEL s/t to select the correct month,
then press SET.
SET CLOCK
:
1/ /
DST : ON
SELE CT MONTH
BY SELECT /
KEY
: PUSH SET
TO END PUSH MENU KEY
4. Use SEL s/t to select the correct date, then
press SET.
5. Use SEL s/t to select the correct year, then
press SET.
6. Use SEL s/t to select the correct hour, then
press SET. Your VCR uses a 12-hour clock.
Be sure you correctly set AM or PM.
7. Use SEL s/t to select a time 1 or 2 minutes
after the current time, then press SET. (For
example, if it is 42 minutes past the hour
right now, enter 43 or 44 minutes now.)
This gives you time to complete this procedure before starting the clock.
16
8. Use SEL s/t to set DST (daylight saving
time) to ON or OFF.
When you set DST to ON, the VCR automatically adds 1 hour on the first Sunday in
April, and subtracts 1 hour on the last Sunday in October.
9. Review the entered information.
SET CLOCK
2 / 2 / 1996 FR I 1:30PM
DST : ON
SET COMPLETED
TO CORRECT
PUSH SET OR CLEAR KEY
TO START PUSH MENU KEY
If the information is not correct, move the
cursor to the wrong entry using SET or
CLEAR and enter the correct information.
When the information is correct, press
MENU twice when the time reaches the
minute you set in Step 7. The clock-setting
mode display changes to the normal display and the clock starts running.
Note: Seconds begin counting from 00
when you press MENU twice.
16-547.fm Page 17 Tuesday, July 20, 1999 4:45 PM
Adding/Erasing Channels
We recommend you check the channels the
VCR automatically stored. It might have stored
a distant, weak channel that you normally
would not watch, or it might have missed a
channel you want to store.
CHANNEL 08 DELE TED
or
ADDED
If the tuner stores a channel that you do not
want, tune to that channel and press ADD/DLT.
CHANNEL nn DELETED appears on the TV,
and the unwanted channel is erased from the
tuner’s memory.
If you want to program a weak channel that automatic programming missed, enter the desired
channel number using the remote control’s
number buttons. Then press ADD/DLT. CHANNEL nn ADDED appears on the TV, and the
channel is added to the memory.
Reprogramming Tuner Memory
You might want to reprogram the VCR’s tuner
memory if you move or change from an antenna connection to a cable TV connection.
Follow these steps to reprogram the tuner.
1. Press MENU to display the main menu.
2. Use SEL s/t to highlight SET UP CHANNEL, then press SET.
– – – – – – – MENU – – – – – – –
SET UP VCR
SET CLOCK
SET UP CHANNEL
IDIOMA/LANGUE
(ENGLISH)
SELECT : PUSH SELECT /
SET
: PUSH SET KEY
END
: PUSH MENU KEY
3. Press SET to select the broadcast system,
either TV or CATV.
SET UP CHANNEL
ANTENNA SYSTEM : CATV
AUTO SET
SELECT : PUSH SELECT /
SET
: PUSH SET KEY
END
: PUSH MENU KEY
4. Press SEL t to highlight AUTO SET, then
press SET. The VCR starts scanning for
and storing active channels.
Note: To exit the programming mode, press
MENU at any time.
Turning On Auto Clock Set
If you manually set the VCR’s clock, then find
that EDS is available in your area, you can turn
on the auto clock set feature. This ensures that
the VCR sets itself to the correct time after a
power failure of less than 24 hours.
1. Press MENU to display the main menu.
2. Use SEL s/t to highlight SET CLOCK, then
press SET.
3. Use SEL s/t to highlight AUTO SET, then
press SET.
– – – – – SET CLOCK – – – – –
AUTO SET
MANUAL SET
SELECT : PUSH SELECT /
SET
: PUSH SET KEY
END
: PUSH MENU KEY
4. Follow Step 6 under “Setting the OnScreen Language/Channels/Clock” on
Page 14.
17
16-547.fm Page 18 Tuesday, July 20, 1999 4:45 PM
Changing the On-Screen Language
Resetting the VCR’s Memory
You can change the on-screen programming
language at any time.
If at any time you want to erase all settings, including the time, local channels, and programmed events, eject any loaded tape then
press and hold PLAY and REW on the VCR for
at least 5 seconds. The VCR clears all settings
and turns off.
1. Press MENU to display the main menu.
2. Use SEL s/t to highlight the fourth item,
then press SET.
– – – – – – – MENU – – – – – – –
SET UP VCR
SET CLOCK
SET UP CHANNEL
IDIOMA/LANGUE
(ENGLISH)
SELECT : PUSH SELECT /
SET
: PUSH SET KEY
END
: PUSH MENU KEY
– – – – – – – MENU – – – – – – –
PREPARAR VCR
FIJAR RELOJ
FIJAR CANAL
LANGUE/LANGUAGE
(ESPAÑOL)
ELEGIR : PULSE SELECT /
FIJAR
: PULSE SET
TERMINAR : PULSE MENU
– – – – – – – MENU – – – – – – –
REGLAGE MAGNETOSCOPE
REGLAGE HORLOGE
REGLAGE CANAL
LANGUAGE/IDIOMA
(FRANÇAIS)
SEL.
: APP. SELECT /
REGLER : APP. SET
FIN
: APP. MENU
Note: The title of the fourth item differs
depending on the current language. If the
current language is English, the title shows
in Spanish and French ( IDIOMA/
LANGUE). If it is in French, the title shows
in English and Spanish ( LANGUAGE/
IDIOMA). If it is in Spanish, the title shows
in French and English (LANGUE/LANGUAGE).
3. Press SET so the desired language
appears in parentheses below the title.
4. Press MENU to return to the normal screen.
18
The next time you turn on the VCR, it performs
its initial setup sequence.
16-547.fm Page 19 Tuesday, July 20, 1999 4:45 PM
SETTING THE REMOTE
CONTROL’S CODES
In addition to controlling your VCR, the remote
control can operate the basic functions of your
TV or cable box.
To use the remote control with your TV or cable box, follow these steps to program the remote control with the correct manufacturer’s
code number for the TV or cable box.
Note: Some brands have more than one code
listed in the charts. If a code does not work with
your TV or cable box, try another code. The
listed codes might not work with all models
from the listed manufacturers.
1. Find the code for your TV and cable box in
the following charts.
TV BRAND
CODE
CABLE BOX
BRAND
CODE
Archer
01, 29, 44, 88, 91
Cableview
4, 30, 42, 44, 52, 63,
85, 88
Curtis
08, 09, 56, 61, 87, 90
Diamond
01, 29, 44, 88, 91
Drake
37
Eagle
13, 20, 22, 26, 40, 58,
62, 98
Eastern
28
GC Brand
4, 30, 42, 44, 52, 63,
85, 88
GeminiRegal
04, 85
General Electric
57
General Instruments
01, 02, 03, 04, 34, 55,
83, 85, 91, 93, 95
Hamlin
14, 15, 28, 41, 97
Hitachi
31, 79
Jerrold
01, 02, 03, 04, 34, 55,
83, 85, 91, 93, 95
Fisher
10
GE
13
Gold Star
15, 16, 17
Hitachi
12
Macom
31, 79
JVC
11
Magnavox
25, 26
Magnavox
05
Matsushita
16, 17
Mitsubishi
13
Movietime
32, 38, 40
Panasonic
01, 02
Movietime
29, 32, 39, 42, 44, 88
Quasar
01, 02
Optimus
44, 88
RCA
03
Panasonic
16, 17
Samsung
14
Philips
13, 20, 23, 24, 96
Sanyo
10
Pioneer
05, 06, 78
Sharp
06, 07
Pulser
Sony
08
4, 30, 42, 44, 52, 63,
85, 88
Sylvania
05
RadioShack
44, 88
Toshiba
09
RCA
16, 17
Zenith
04
Realistic
44, 88
19
16-547.fm Page 20 Tuesday, July 20, 1999 4:45 PM
CABLE BOX
BRAND
CODE
2. While pressing and holding down TV
POWER, enter the code number for your
TV using the number buttons.
Regal
14, 41
Regency
28
While pressing and holding down CATV
POWER, enter the code number for your
Rembrandt
29, 32, 39, 42, 44, 88
cable box using the numbered buttons.
Samsung
32, 40, 42, 78, 94
Scientific Atlantic
08, 09, 56, 61, 87, 90
Sheritech
27
SL Marx
32, 40, 42, 78, 94
Sprucer
16, 17
Stargate
32, 40, 42, 78, 94
Stargate
4, 30, 42, 44, 52, 63,
85, 88
Sylvania
19
Telecaption
77, 92
Teleview
32, 40, 42, 78, 94
Texscan
18, 19
Tocom
01, 33, 34, 42, 48, 49,
91
Toshiba
36
Unika
01, 29, 44, 88, 91
Universal
42, 43, 44, 52, 63, 88
Viewstar
13, 20, 22, 26, 40, 58,
62, 93
Videoway
07, 23, 50
Zenith
07, 23, 50
20
3. Try operating your TV or cable box using
the VCR’s remote control (TV POWER, TV
CH s/t, and TV VOL +/– for TV operation;
CATV POWER and CATV CH s/t for cable
box operation).
If the device does not function, repeat Step
2 and try other codes for the manufacturer.
If it still does not function, you must use the
original remote control supplied with your
TV or cable box.
Notes:
• The codes you programmed might be
erased if you remove the batteries from the
remote control. If this happens, re-enter
the codes after you replace the batteries.
• Some TVs and cable boxes might require
that you manually turn on the power.
• Your TV or cable box might have functions
that the remote control will not operate.
16-547.fm Page 21 Tuesday, July 20, 1999 4:45 PM
OPERATION
WATCHING TV
Using the TV’s Tuner
your cable box. You might need to experiment to determine the proper cable channel designations for your cable system. For
more information, contact your local cable
company.
To watch a broadcast using the TV’s tuner, turn
off the VCR, or press TV/VCR until VCR does
not appear on the VCR’s display.
• Two of the cable channels are designated
for audio only.
Note: If you are using a TV/monitor connected
to the VCR’s AUDIO/VIDEO OUT jacks, be sure
to set the TV/monitor to the TV mode.
To manually select a channel, press CH s/t.
The tuner automatically advances to the next
channel stored in the tuner’s memory.
The antenna or cable signals pass through the
VCR unaffected, as if the antenna or cable
were connected directly to the TV. Use the TV
as you normally would.
Note: If you press CH s when the tuner is at the
highest programmed channel or CH t when the
tuner is at the lowest programmed channel, the
VCR enters the audio/video mode and L (L1 or
L2 on Model 60) appears on the TV (see “Selecting the Signal to Record” on Page 27).
Continue to press CH s/t until the highest or
lowest programmed channel appears.
Using the VCR’s Tuner
1. Turn on the TV and set it to the same channel as the VCR’s 3 CH. 4 switch.
Note: If you are using a TV/monitor connected to the VCR’s AUDIO/VIDEO OUT
jacks, set the TV/monitor to the video
mode.
2. Press TV/VCR until VCR appears on the
VCR’s display.
Selecting Channels
Your VCR can receive up to 68 VHF and UHF
channels, and up to 125 cable channels. The
VCR displays the channels as 1–125.
Notes:
To directly select a channel, press the number
buttons on the remote control for the desired
channel.
Notes:
• Precede a single-digit number with a 0 —
for example 01, 02, and so on.
• To enter a three-digit number, press 100.
Then enter the second and third digits in
the channel number.
• (Model 60 only) If you receive MTS stereo
or SAP broadcasts, see “Receiving/
Recording Stereo/SAP Broadcasts (Model
60 Only)” on Page 27.
• Channels 2–13 are the same for VHF and
cable TV, and cable companies usually
number them as they appear on the display.
• Since cable companies sometimes designate cable channels with letters or letternumber combinations, a channel number
you see on the VCR’s display might differ
from the channel number displayed on
21
16-547.fm Page 22 Tuesday, July 20, 1999 4:45 PM
VIEWING A VIDEO TAPE
NO CASSETTE
Loading a Video Tape
PLEASE INSERT A CASSETTE
1. Turn on the TV and set it to the same channel as the VCR’s 3 CH. 4 switch.
Note: If you are using a TV/monitor that is
connected to the VCR’s AUDIO/VIDEO OUT
jacks, set the TV/monitor to the video
mode.
2. Hold the cassette with the main label facing up and the spine facing out from the
VCR. Then insert the cassette into the
VCR’s compartment and gently push the
center of its spine until the VCR draws it in.
• During playback, the VCR automatically
adjusts tracking, but you can manually
adjust it if necessary (see “Manually
Adjusting Tracking” on Page 25).
3. (Model 60 only) Follow these steps to
choose the type of audio you want the
Model 60 to play back.
To select the audio output option:
a. Press MENU, hightlight SET UP VCR
using SEL s/t, then press SET.
b. Highlight SET AUDIO MODE using SEL
s/t, then press SET.
c. Highlight PLAY AUDIO using SEL s/t,
then press SET until the desired option
— HIFI or NORMAL — appears.
The VCR automatically turns on. If the eraseprotection tab has been removed from the cassette, playback automatically begins (see
“Erase Protection” on Page 26).
d. Repeatedly press MENU to return to the
normal screen.
Note: If you play a tape recorded on a
standard VCR, the Model 60 plays the
standard audio track, regardless of the
audio output setting.
Caution: Never insert anything except a VHS
video cassette into the cassette compartment.
Anything else might damage the VCR.
4. To stop playback before the end of the
tape, press STOP.
Playing a Video Tape
5. To eject the tape, press STOP/EJECT on
the VCR.
1. Load a video tape.
2. If playback does not automatically begin,
press PLAY. The VCR plays the tape.
Notes:
• The following screen appears when you
press PLAY, FF, REW, or REC/TIME without inserting a cassette.
22
Notes:
• If the tape reaches the end before you
press STOP, the VCR automatically
stops the tape and completely rewinds it.
If the erase-protection tab has been
removed, the VCR then ejects the cassette.
• When the VCR is off, you can press
STOP/EJECT to eject a tape. The VCR
ejects the tape then turns itself off.
16-547.fm Page 23 Tuesday, July 20, 1999 4:45 PM
SPECIAL FUNCTIONS
SPECIAL DISPLAYS
TAPE MOTION CONTROLS
Blue Screen Display
Fast-Forward/Rewind and Visual
Search
The blue screen display appears when you select the VCR mode, play unrecorded portions
of a tape, or when you tune to a weak TV station. The blue screen also appears if you set
the VCR to the audio/video mode when the AUDIO/VIDEO IN jacks are not receiving any signals.
Note: The VCR does not record the blue
screen.
On-Screen Display
To view your VCR’s current operating mode
and other information about your VCR, press
DISPLAY. You see the broadcast type (stereo,
SAP, or both — Model 60 only), current function, time, channel, counter, and tape speed on
the TV screen. Press DISPLAY again to clear
the display.
Note: You also see the remaining recording
time while a timed recording is in progress (see
“Immediate Recording” on Page 28).
To advance the tape quickly when it is stopped,
press FAST-F. To rewind the tape quickly when
it is stopped, press REW. You cannot see the
tape picture or hear the tape sound when you
use fast-forward or rewind, but you can use the
counter to locate a specific section of tape.
To use visual search, begin tape playback.
Then press FAST-F to search forward or REW
to search in reverse. Press PLAY to return to
normal playback.
Notes:
• VCR must appear on the VCR’s display to
use visual search.
• During visual search, the sound is muted
and the picture quality is lower than during
normal playback. The search picture is
best with tapes recorded at the SP speed.
• If you press POWER while a tape is rewinding, the VCR automatically turns off when
rewinding is complete.
Function Indicators
Freeze-Frame
When you press a function button (such as
STOP ), the selected function indicator appears
on the TV screen for about 4 seconds. When
you change the channel, the new channel
number appears on the TV screen for about 4
seconds.
Freeze-frame lets you stop the tape to view a
single frame. Press PAUSE/STILL during playback to freeze the picture. Press PAUSE again
or PLAY to return to normal playback.
Note: If you play back a poor quality or damaged tape, the function indicator might not appear on the VCR’s display.
During freeze-frame, the picture quality is lower
than during normal playback, The picture quality is best with recordings made at the SP or EP
speed (see “Recording Speeds” on Page 26).
23
16-547.fm Page 24 Tuesday, July 20, 1999 4:45 PM
Notes:
• If you leave the VCR in the freeze-frame
mode for 3 minutes, the VCR stops playing
the tape.
• To reduce or eliminate jitter in the freezeframe picture, press and hold CH s/t until
the picture is clear.
Frame Advance
During freeze-frame, you can advance the picture one frame at a time by repeatedly pressing
SLOW . This feature works best with video cassettes recorded at the SP or EP speed. Press
PAUSE to return to normal playback.
Slow Motion
To start slow motion playback, while a tape is
playing, press SLOW. Press SLOW again or
PLAY to return to normal playback.
Notes:
• During slow motion, the sound is muted
and the picture quality is lower than during
normal playback. Slow motion picture quality is best with tapes recorded at the SP or
EP speed.
• If you leave the VCR in the slow-motion
mode for 3 minutes, the VCR stops playing
the tape.
• If the slow-motion picture is poor, press
and hold CH s/t until the picture improves.
One Minute Skip
You can skip over unwanted material on the recorded tape, such as commercials. Press
ZERO/1MIN during playback. The VCR fast forwards over 1 minute of recording, then resumes normal playback.
24
REAL-TIME COUNTER
Using the Counter
Your VCR’s counter shows how long a tape
has been running. To display the counter on
the TV screen, press DISPLAY on the remote
control.
Notes:
• The real-time counter might stop if you
fast-forward or rewind through a blank section on the tape. This is normal.
• You can press COUNTER RESET to reset
the counter to 0:00:00.
Using the Zero Search Function
You can reset the counter to 0:00:00 at any
position on the tape and then return to that position.
Follow these steps to use the zero search function.
1. Press COUNTER RESET once so the
counter appears on the TV screen.
2. Within 5 seconds, press COUNTER RESET
again at the location you want to return to
later. The counter resets to 0:00:00.
3. When you want to return to the selected
location, stop the tape, then press ZERO/
1MIN. The tape rewinds or fast-forwards
and automatically stops at the location you
selected in Step 2.
16-547.fm Page 25 Tuesday, July 20, 1999 4:45 PM
TRACKING
Notes:
• If you rewind the tape past the zero point,
the TV displays the time with a minus (–)
sign.
• The counter does not work with blank
tapes or blank portions of partially
recorded tapes.
REPEAT PLAY
This function lets you automatically repeat
playback of a tape from the beginning to the
end (or to a blank part), instead of having the
tape automatically rewind and eject.
1. While the tape is stopped, press MENU to
display the main menu.
2. Press SEL s/t to highlight SET UP VCR,
then press SET.
3. Press SEL s/t to highlight REPEAT PLAY.
Then press SET so ON appears.
– – – – – SET UP VCR – – – – –
REPEAT PLAY : ON
INPUT SELECT : TUNER
SET AUDIO MODE
SELECT : PUSH SELECT /
SET
: PUSH SET KEY
END
: PUSH MENU KEY
Digital Auto Tracking System
The auto tracking system automatically adjusts
tracking when you start playback.
When different parts of the tape are recorded
at different speeds, the VCR automatically readjusts the tracking at the beginning of each
recording. If you need to manually adjust the
tracking, see “Manually Adjusting Tracking.”
Manually Adjusting Tracking
If the VCR’s picture is poor, press and hold
down CH s or t to manually adjust the tracking.
To return to the automatic tracking system,
press CH s and t at the same time or turn power off then back on.
Notes:
• You might need to slightly readjust tracking
for each tape you load.
• If the sound of a recording made on
another VHS Hi-Fi VCR is poor, you might
improve it by adjusting the tracking. If
tracking is incorrect, the HI-FI indicator
(Model 60 only) does not appear on the
display.
4. Repeatedly press MENU to return to the
normal display.
5. Press PLAY to start repeat playback. REP
appears on the VCR’s display.
The VCR repeats playback from the beginning
to the end of the tape, or to the first unrecorded
portion that is at least 30 seconds long. The TV
displays AUTO REPEAT while the VCR rewinds the tape to the beginning.
Once you select the repeat play mode, it stays
in effect even after you turn off the VCR. To
turn off repeat play, select OFF in Step 3.
25
16-547.fm Page 26 Tuesday, July 20, 1999 4:45 PM
RECORDING
There are three ways to record using your VCR
— immediate recording, automatic timer recording, and dubbing.
Your VCR automatically records the audio signal and adjusts the sound level while it records.
The following chart shows the maximum recording times for different-length tapes at the
recording speeds.
TAPE
LENGTH
SP
LP
EP
The video cassette you use for recording must
have the erase-protection tab in place. If the
tab is removed, the cassette automatically
ejects if you try to record on it (see “Erase Protection” on Page 26).
T-60
1 hour
(60 minutes)
2 hours
(120 minutes)
3 hours
(180 minutes)
T-120
2 hours
(120 minutes)
4 hours
(240 minutes)
6 hours
(360 minutes)
RECORDING SPEEDS
T-160
22/3 hours
(160 minutes)
51/3 hours
(320 minutes)
8 hours
(480 minutes)
You can select one of three VHS recording/
playback speeds: SP (standard play), LP (long
play), and EP (super long play).
ERASE PROTECTION
SP is the fastest recording speed and results in
the highest quality picture. LP and EP record
more slowly and use less tape, but the picture
quality is not as high as a recording made at
the SP speed.
Video cassettes have an erase-protection tab
to prevent accidental erasure of a tape. To prevent recording, break off the tab using a screwdriver. The cassette automatically ejects if you
try to record on the tape.
TAPE SELECTION
The quality of tape you use greatly affects
record/playback quality and the life of the VCR.
Use only video cassettes that display the official (VHS) logo. High-grade tape has a better
oxide coating that helps prevent dirty video
heads and gives the best results.
Although T-160 video cassettes offer the longest recording time, they contain thinner tape
that is more likely to jam. We suggest you use
T-120 or shorter length tape.
26
Tape
If you want to record on a video cassette that
does not have the tab, put a piece of heavy
plastic tape over the erase-protection tab hole.
16-547.fm Page 27 Tuesday, July 20, 1999 4:45 PM
SELECTING THE SIGNAL
TO RECORD
Follow these steps to select the signal to
record — from the IN FROM ANT jack or an audio/video source.
1. Press MENU. The TV displays the main
menu.
2. Press SEL s/t to highlight SET UP VCR,
then press SET. The TV displays the SET
UP VCR menu.
SEL s/t to highlight INPUT
SELECT, then press SET so the TV displays the desired indicator: TUNER to
3. Press
record from a source connected to the IN
L (L1 or L2 for Model
60) to record from a source connected to
the AUDIO 1/VIDEO 1 IN jacks (or AV2 jacks
on the Model 60).
FROM ANT terminal,
Notes:
• To select L1 (or L2 on the Model 60), you
can also press CH s/t to set the VCR to one
channel higher than the highest channel
number (or one channel lower than the
lowest channel number).
• (Model 60 only) Select L1 for recording
signals from the back AUDIO 1/VIDEO 1 IN
jacks, or L2 for recording signals from the
front AV2 jacks.
RECEIVING/RECORDING
STEREO/SAP BROADCASTS
(MODEL 60 ONLY)
The Model 60 has 3 channels for audio recording — two (left and right) stereo channels on
the Hi-Fi track, and one monaural channel on
the standard track.
Press DISPLAY to display the audio programs
available on the broadcast you are currently
tuned to. STEREO and SAP appear when the
broadcast is in stereo and accompanied by
SAP. Only STEREO appears when the broadcast is in stereo. Only SAP appears when the
station broadcasts only mono (monaural) and
SAP signals. MONO appears for regular monaural broadcasts.
When the broadcast contains a SAP signal,
you can choose to record the main stereo signal, the SAP signal, or a mono signal by
changing the setting in the SET UP VCR menu.
1. Press MENU, highlight SET UP VCR using
SEL s/t, then press SET.
2. Highlight SET AUDIO MODE using SEL s/t,
then press SET.
3. Highlight AUDIO MODE using SEL s/t, then
press SET until the desired option — STEREO, SAP, or MONO — appears on the
screen.
4. Repeatedly press MENU to return to the
normal screen.
27
16-547.fm Page 28 Tuesday, July 20, 1999 4:45 PM
IMMEDIATE RECORDING
Notes:
Recording a Program
as You Watch It
• To ensure that you record all the desired
program, set the recording length longer
than the program length.
Follow these step to record a program as you
watch it. If you know how long the program is,
you can set how long the VCR records.
Note: If you are watching the program on a TV/
monitor that is connected to the VCR’s AUDIO/
VIDEO OUT jacks, set the TV/monitor to the video mode and skip Steps 2 and 3.
1. Turn on the VCR and the TV.
2. Set the TV’s tuner to the same channel as
the VCR’s 3 CH. 4 switch.
3. Press TV/VCR until the VCR displays VCR.
4. Insert a blank cassette, or one that you
want to record over, into the VCR.
5. Press SPEED on the remote control until
the TV displays the desired recording
speed (SP, LP, or EP).
6. Select the signal to record (see “Selecting
the Signal to Record” on Page 27).
7. (Model 60 only) Set the audio recording
mode to the desired setting. See “Receiving/Recording Stereo/SAP Broadcasts
(Model 60 Only)” on Page 27.
8. Press REC/TIME on the remote control, or
REC/TIME and PLAY at the same time on
the VCR. The VCR starts to record and the
TV screen shows TO SET SPECIFIC
REC TIME PLEASE PUSH REC KEY.
Note: To record without a set duration, just
skip Step 9. The VCR begins to record.
9. Press REC/TIME again. The TV displays
the recording length. Repeatedly press
REC/TIME to advance the timer to the
desired recording length. The recording
length advances in 30-minute increments
up to 2 hours, then 1-hour increments up to
4 hours.
28
• To display the remaining recording time,
press DISPLAY during a timed recording.
• To temporarily stop the tape during a
recording, press PAUSE/STILL. Press
PAUSE/STILL again to resume recording.
If you leave the VCR paused for 3 minutes, the VCR automatically stops.
• If the cassette’s erase protection tab has
been removed, the screen shows
CHECK CASSETTE RECORD TAB and
ejects the cassette. Use another cassette, or place a piece of heavy plastic
tape over the erase protection tab hole.
10. Press STOP to stop recording before the
set time.
Recording One Program While You
Watch Another
1. Follow Steps 1-9 of “Recording a Program
as You Watch It.”
2. Press TV/VCR until VCR disappears from
the VCR’s display.
Note: If you are watching the program on a
TV/monitor that is connected to the VCR’s
AUDIO/VIDEO OUT jacks, set the TV/monitor to the TV mode.
3. Set the TV tuner to the channel you want to
watch.
4. Press STOP to stop recording before the
set time.
16-547.fm Page 29 Tuesday, July 20, 1999 4:45 PM
AUTOMATIC TIMER
RECORDING
The VCR’s automatic timer lets you program it
to select an input source, start recording from
that source at a time you set, then stop recording at a time you set. You can set up to eight
program timers to record any combination of
weekly, daily, or one-time events.
You can set the VCR to record at any time on a
specific day within a 1-month period, at the
same time Monday through Friday (DAILY), or
at the same time on the same day every week
(WEEKLY).
Setting the Program Timer
Note: To program the timers, you can use the
VCR’s front panel buttons instead of the remote control. Use PLAY as SEL s, REW as SEL
t, and FF as SET.
1. Turn on the VCR and the TV.
Note: If you use a TV/monitor that is connected to the VCR’s AUDIO/VIDEO OUT
jacks, set it to the video mode and skip
Steps 2 and 3.
2. Set the TV to the same channel as the
VCR’s 3 CH. 4 switch.
3. Press TV/VCR until the VCR displays VCR.
Notes:
• The VCR can record only one broadcast at
a time. If you program the VCR’s timer to
record broadcasts on different channels
that start at the same time, the VCR only
records the program that has the lowest
program number.
• If two timer programs overlap, the one that
starts first has priority. The VCR begins
recording the second program after the
first program ends.
• The VCR must be off at the programmed
time for it to make an automatic timer
recording.
• If there is a power failure of more than 3
minutes during a timer recording, the
recording does not resume after power is
restored.
• If there is a power failure of more than 3
minutes before a programmed start time,
the VCR loses the clock setting and therefore does not start automatic timer recording. However, if you have an EDS channel
in your area and set the VCR to automatically set the clock from the EDS signal, the
clock is reset within 10 minutes after power
is restored, and the VCR records at the
programmed time(s).
4. (Model 60 only) Set the audio recording
mode to the desired setting. See “Receiving/Recording Stereo/SAP Broadcasts
(Model 60 Only)” on Page 27.
5. Insert a blank cassette, or one that you
want to record over, into the VCR.
6. Press PROG on the remote control. The TV
displays the timer setting menu.
Note: If the clock is not set, the screen
shows PLEASE SET CLOCK BEFORE
PROGRAMMING and then goes to the
clock-setting screen. Set the clock as
described under “Manually Setting the
Clock” on Page 16.
7. If you have already entered a program(s),
the current settings for the first four programs appear on the display. Press SEL s/t
to select an empty program number, then
press SET. The TV displays the program
menu.
DATE
START
STOP
CH
8 SAT 10:00P 12:00P 125
SLP
SELE CT START DATE
BY SELECT / KEY
PUSH CLEAR : PUSH SET
TO END PUSH PROG KEY
29
16-547.fm Page 30 Tuesday, July 20, 1999 4:45 PM
If you have not yet entered any programs,
the TV displays the program entry menu
when you press PROG .
8. Use SEL s/t to select the date when you
want to record.
To record a program at the same time on
the same day every week, press either button until the TV displays WEEKLY and the
desired day of the week.
DATE
START
STOP
CH
WEEKLY --:-- --:-- -SLP
SUN
SELE CT START DATE
BY SELECT / KEY
: PUSH SET
TO END PUSH PROG KEY
To record a program at the same time
Monday through Friday, press either button
until the TV displays DAILY MON-FRI.
DATE
START
STOP
CH
DAILY --:-- --:-- -MON-FRI
SLP
SELE CT START DATE
BY SELECT / KEY
: PUSH SET
TO END PUSH PROG KEY
13. Double-check all the set information.
• If the information is correct, press PROG.
• If an entry is not correct, press SET or
CLEAR to move the cursor to the wrong
entry, enter the correct information, then
press PROG .
Note: The TV displays PROGRAM IS
INCOMPLETE if you did not correctly
enter a timer program before pressing
PROG. Check and correct the program,
then press PROG again.
The TV displays the timer program settings. To enter more programs, use SEL s/t
to select another program number and
repeat Steps 7–13.
14. Press PROG again. The TV briefly displays
TURN VCR OFF FOR TIMER RECORDING.
15. Press POWER to turn off the VCR. The
VCR displays TIMER.
Notes:
To record a program at a set time today,
press either button until the TV displays
TODAY and today’s date.
• Be sure that the VCR displays TIMER
when you turn it off. If it does not appear,
check your programming.
To record a program at a specific time and
date, press SEL s/t to select the specific
date.
• If you insert a cassette with its eraseprotection tab removed and set the VCR’s
timer, the VCR ejects the cassette and
flashes TIMER on the display.
Press SET to enter your selection.
9. Use SEL s/t to select the start hour. When
the correct hour appears, press SET. Then
use SEL s/t to select the minute, and press
SET.
10. Repeat Step 9 to set the end time.
11. Use SEL s/t to select the channel.
To record from a source connected to the
AUDIO 1/VIDEO 1 IN (or AV2 for the Model
60) jacks, press SEL s/t until the TV displays L (L1 or L2 on the Model 60).
30
12. Use SEL s/t to select the tape speed ( SP,
LP, or EP).
• If you set up the VCR to record a cable
program through a cable box, be sure to
leave the cable box turned on and tuned to
the desired station before the timer program starts.
• You can manually turn on and operate the
VCR before the set times, but the VCR
starts an automatic timer recording only if
the power is off at the set start time.
16-547.fm Page 31 Tuesday, July 20, 1999 4:45 PM
Monitoring an Automatic Timer
Recording
Clearing a Program Timer
If the timer recording has not yet started:
1. Turn on the TV and set it to the same channel as the VCR’s 3 CH. 4 switch.
1. Follow Steps 1–3 under “Checking/Changing Program Timers.”
Note: If you are using a TV/monitor that is
connected to the VCR’s AUDIO/VIDEO OUT
jacks, set the TV/monitor to the video
mode.
2. Highlight the program you want to clear,
then press CLEAR .
2. Press TV/VCR until the VCR displays VCR.
Checking/Changing Program Timers
1. Turn on the TV and set it to the same channel as the VCR’s 3 CH. 4 switch.
Note: If you are using a TV/monitor that is
connected to the VCR’s AUDIO/VIDEO OUT
jacks, set the TV/monitor to the video
mode.
3. Press PROG to return to the normal screen.
Turn off the VCR if you still have at least one
timer program entered.
If a timer recording is in progress:
1. Press POWER to stop timer recording. The
TV displays TO CANCEL TIMER REC
PUSH POWER THEN STOP KEY if are
watching the signal from the VCR.
2. Within 10 seconds, press STOP. TIMER
disappears from the VCR’s display.
2. Turn on the VCR and press TV/VCR until
the VCR displays VCR.
3. Press PROG. The TV displays the first four
programs.
P DT STRAT STOP CH SPD
1 DAY 9 : 00 A 12 : 00 A 08 SP
2 8 1 0 : 00 P 12 : 00 P 125 SLP
3 10 8 : 00 P 9 : 00 P 10 SP
4 SU 9 : 00 P 10 : 00 P L SLP
SELECT
ENTER
CANCEL
END
1-8 : PUSH / KEY
: PUSH SET
KEY
: PUSH CLEAR KEY
: PUSH PROG KEY
4. Select the program you want to change
using SEL s/t, then press SET.
5. Follow Steps 8–12 under “Setting the Program Timer” on Page 29 to correct the
entry you want.
6. After checking or correcting a program,
press PROG again, then turn off the VCR.
31
16-547.fm Page 32 Tuesday, July 20, 1999 4:45 PM
DUBBING
The process of recording from one audio/video
device to another is called dubbing.
An audio/video device where a signal originates is called the dubbing source. You can
use another VCR, camcorder, satellite receiver, or other device with A/V outputs as the dubbing source, connect the dubbing source and
the VCR, then use your VCR to record the signal from the dubbing source.
Or, you can use this VCR as the dubbing
source for another VCR. See “Installation” for
the various possible connections.
Notes:
• Always use video-quality shielded cables
with phono-type connectors to connect the
device to the VCR. Do not use standard
audio patch cords.
• Most material performed in public, such as
concerts, plays, and movies, or distributed
on prerecorded video tapes is copyrighted.
The unauthorized recording or duplication
of copyrighted material is a violation of the
copyright laws of most countries and such
duplication may result in fines, imprisonment, or both. Note, however, that in the
United States, it is not a violation of U.S.
copyright laws for a consumer to record a
broadcast television program for private
(in-home) viewing.
To dub a tape, start the program playing on the
dubbing source (see that device’s instructions)
and start recording on the recording VCR, following its recording instructions.
32
AUDIO-ONLY RECORDING
(MODEL 60 ONLY)
Because of the superior quality of VHS Hi-Fi
audio recordings, you might want to use your
VCR as an audio-only recorder. You can also
make live recordings by connecting a preamplifier or mixer to the VCR’s AUDIO IN jacks.
Simply select the line input and record as usual.
Caution: Do not directly connect a microphone
to the VCR.
Note: For the best audio fidelity, we recommend you use high-quality video tape (such as
Cat. No. 44-410) to make audio-only recordings.
16-547.fm Page 33 Tuesday, July 20, 1999 4:45 PM
ADDITIONAL INFORMATION
TROUBLESHOOTING
If you follow the instructions in this manual and still have trouble operating your VCR, refer to the
following troubleshooting chart.
PROBLEM
No power.
Cannot make a timer recording.
Cannot record.
POSSIBLE SOLUTION
The power cord is not connected. Plug the power cord into an AC
outlet.
• The program timer is not set or is set incorrectly. Check the
program timer.
• The power is on. Turn off the power.
The erase-protection tab is missing. Place a piece of tape over the
tab hole.
Picture is poor on playback.
• The TV’s channel selector is not set to the proper channel. Set
the TV to Channel 3 or 4.
• The TV’s fine tuning is not set correctly. Fine tune your TV.
• Audio/video connections are incorrect. Check all connections.
The playback picture is distorted.
• The video heads are dirty. See “Cleaning the Video Heads” on
Page 35.
• Tracking is not properly adjusted. Adjust the tracking.
No picture on playback.
• The TV is not set to the proper channel. Set it to Channel 3 or
4 or to its audio/video input if you connected it to the VCR’s
AUDIO/VIDEO OUT jacks.
• Audio/video connections are incorrect. Check all connections.
Remote control buttons do
not work when the power is
on and a cassette is inserted.
• The remote control’s batteries might be weak. Replace the
batteries.
• Something is blocking the path from the remote control to the
VCR.
• Bright light is shining on the VCR’s remote control sensor window. Come closer to the VCR, or change the VCR’s location.
Cannot see broadcast TV
programs using the VCR’s
tuner.
• TV/VCR is not set correctly. Press TV/VCR so the VCR displays
VCR.
• Audio/video connections are incorrect. Check all connections.
Cannot record from the input
jacks.
• Connections are incorrect. Use shielded audio/video cables
with phono-type connectors to connect the source to the
VCR’s input jacks.
• INPUT is not set correctly. Select L (L1 or L2 for the Model
60).
No stereo sound for a stereo
recording (Model 60 only).
• You have not connected the VCR’s AUDIO OUT jacks to a stereo system or stereo TV. Connect the jacks to a stereo output.
• The audio out setting is not correctly set. Set it to STEREO.
• The tracking is not properly adjusted. Adjust the tracking.
33
16-547.fm Page 34 Tuesday, July 20, 1999 4:45 PM
CARE AND MAINTENANCE
Your Optimus Model 110 4-Head VHS HQ VCR/Model 60 4-Head VHS HQ Stereo Hi-Fi VCR is an
example of superior design and craftsmanship. The following suggestions will help you care for the
VCR so you can enjoy it for years.
Keep the VCR dry. If it gets wet, wipe it dry immediately. Liquids might contain minerals that can corrode the electronic circuits.
Use and store the VCR only in normal temperature environments. Temperature extremes can shorten the life of electronic devices and distort or melt plastic parts.
Keep the VCR away from dust and dirt, which can cause premature wear of parts.
Handle the VCR gently and carefully. Dropping it can damage circuit boards and cases and can cause the VCR to work improperly.
Use only fresh batteries of the required size and type. Old batteries can leak chemicals that damage your VCR remote control’s electronic parts.
CLEANER
Wipe the VCR with a damp cloth occasionally to keep it looking new. Do not use
harsh chemicals, cleaning solvents, or strong detergents to clean the VCR.
Modifying or tampering with the VCR’s internal components can cause a malfunction and might invalidate your VCR’s warranty (and void your FCC authorization to operate it). If your VCR is not performing as it should, take it to your local RadioShack store for assistance.
34
16-547.fm Page 35 Tuesday, July 20, 1999 4:45 PM
Servicing Your VCR
Storing Your Video Cassettes
There are no user-serviceable parts inside your
VCR. If you encounter a problem that you cannot correct using this manual and its troubleshooting guide, take the VCR to your local
RadioShack store for assistance.
Unless you are making an automatic timer recording, eject and store the cassette before
you turn off the VCR. This helps protect the
cassette and the VCR’s internal mechanisms.
Cleaning the Video Heads
Dirty video heads can cause the playback picture to become blurred even though the audio
signal is clear. Video head cleaning kits are
available from your local RadioShack store.
Clean the heads only when picture quality is affected.
Serious problems require cleaning by a trained
technician. For more head cleaning information, contact your local RadioShack store.
Place your video cassettes in their protective
boxes and store them in a cool, dry, dust-free
environment. Store the cassettes on end, not
on their sides, to prevent improper settling of
the cassette’s spools.
Note: Tape can become wound too tightly
around the cassette’s spools after many playings. This can make the cassette improperly
load and automatically eject when you insert it.
On most cassettes there is a brake-release
plunger on the bottom center of the cassette.
Use the tip of a pen or pencil to press the
plunger. This loosens the tape.
35
16-547.fm Page 36 Tuesday, July 20, 1999 4:45 PM
SPECIFICATIONS
Television System ............................................................................... NTSC Standard Color Signal
Recording System................................................................................. Four-Head Double Azimuth
Tape Width ............................................................................................................................. 1/2 Inch
Tape Speed:
SP............................................................................................. 1.31 Inch/second (33.35 mm/s)
LP ............................................................................................. 0.65 Inch/second (16.67 mm/s)
EP.............................................................................................. 0.43 Inch/second (11.12 mm/s)
Tuner Channels:
VHF .................................................................................................................................... 2–13
UHF .................................................................................................................................. 14–69
CATV .................................................................................................................................... 125
RF Converter ................................................................................................ Built-in VHF Converter
Converter Output ...................................................................................................... Channel 3 or 4
Terminals:
Antenna Input ................................................................................................ VHF/UHF: F Type
Antenna Output ............................................................................................. VHF/UHF: F Type
Video Input/Output.......................................................................................... Phono Connector
Audio Input/Output.......................................................................................... Phono Connector
Video Output Level .............................................................................................................. 1.0 Vp-p
Video Output Impedance .......................................................................................................... 75 Ω
Audio Output Level ............................................................................................................... –8 dBV
Audio Output Impedance .......................................................................................................... 1 kΩ
Video Input Level ............................................................................................................ 0.5-2.0 Vp-p
Video Input Impedance ........................................................................................................... 50 kΩ
Audio Input Level ................................................................................................................ –10 dBV
Audio Input Impedance ........................................................................................................... 47 kΩ
Video S/N Ratio (weighted):
SP...................................................................................................................................... 42 dB
EP...................................................................................................................................... 40 dB
Audio S/N Ratio:
Regular Audio (weighted)
SP...................................................................................................................................... 43 dB
EP...................................................................................................................................... 40 dB
Hi-Fi Audio (Model 60 only): (Dynamic Range):
SP.................................................................................................................... More than 90 dB
LP .................................................................................................................... More than 90 dB
EP.................................................................................................................... More than 90 dB
36
16-547.fm Page 37 Tuesday, July 20, 1999 4:45 PM
Frequency Response:
Regular Audio
SP.................................................................................................................. 80 Hz–10 k Hz
EP.................................................................................................................... 80 Hz–5 kHz
Hi-Fi Audio (Model 60 only) In All Modes.............................................................. 20 Hz–20kHz
Power Requirement ...................................................................................................... 120 V, 60 Hz
Power Consumption
Model 110 .................................................................................................................... 18 Watts
Model 60 ..................................................................................................................... 23 Watts
Dimensions (H x W x D) .......................................... 31/2 × 143/16 × 111/4 Inches (8.9 × 36 × 28.5 cm)
Weight:
Model 110 ................................................................................................... 7 lbs, 15 oz (3.6 kg)
Model 60 ...................................................................................................... 8 lbs, 3 oz (3.7 kg)
Specifications are typical; individual units may vary. Specifications are subject to change and
improvement without notice.
37
16-547.fm Page 38 Tuesday, July 20, 1999 4:45 PM
NOTES
38
16-547.fm Page 39 Tuesday, July 20, 1999 4:45 PM
39
16-547.fm Page 40 Tuesday, July 20, 1999 4:45 PM
RadioShack Limited Warranty
This product is warranted against defects for 90 days from date of purchase from RadioShack companyowned stores and authorized RadioShack franchisees and dealers. Within this period, we will repair it without charge for parts and labor. Simply bring your RadioShack sales slip as proof of purchase date to any
RadioShack store. Warranty does not cover transportation costs. Nor does it cover a product subjected to
misuse or accidental damage.
EXCEPT AS PROVIDED HEREIN, RadioShack MAKES NO EXPRESS WARRANTIES AND ANY IMPLIED
WARRANTIES ARE LIMITED IN DURATION TO THE DURATION OF THE WRITTEN LIMITED WARRANTIES CONTAINED HEREIN. Some states do not permit limitation or exclusion of implied warranties; therefore, the aforesaid limitation(s) or exclusion(s) may not apply to the purchaser.
This warranty gives you specific legal rights and you may also have other rights which vary from state to state.
We Service What We Sell
10/95
RadioShack
A Division of Tandy Corporation
Fort Worth, Texas 76102
7A6
TINS –2860AJZZ
Printed in Malaysia