1
OpenOffice.org 1.1 Impress
QuickStart Guide
Title:
OpenOffice.org 1.1 Impress QuickStart Guide
Version:
0.6
First edition: March 2004
Contents...........................................................................................................................................1
Overview..........................................................................................................................................4
Copyright and trademark information.........................................................................................4
Feedback.....................................................................................................................................4
Acknowledgments.......................................................................................................................4
Modifications and updates..........................................................................................................5
Introduction......................................................................................................................................6
Prerequisites................................................................................................................................6
Creating a new presentation.............................................................................................................1
Starting the AutoPilot presentation ............................................................................................1
Modifying a slide during AutoPilot........................................................................................3
Inserting new slides.....................................................................................................................4
Formatting a page........................................................................................................................5
Formatting slides.........................................................................................................................5
Modifying slides.....................................................................................................................5
Deleting slides........................................................................................................................6
Renaming slides......................................................................................................................6
Rearranging slides..................................................................................................................6
Workspace views........................................................................................................................7
Changing workspace views....................................................................................................8
Running the slide show...............................................................................................................8
Creating and editing slides...............................................................................................................9
Inserting text................................................................................................................................9
Insert text in text boxes created by AutoLayout.....................................................................9
Creating a text box..................................................................................................................9
Moving a text box.................................................................................................................10
Resizing a text box...............................................................................................................10
Deleting a text box................................................................................................................10
Formatting text..........................................................................................................................10
Selecting text........................................................................................................................10
!#" $%'& ()*+,&-+/. 01)232546" $87:9;#<);>=?6" @
"
Formatting characters...........................................................................................................11
Inserting special characters...................................................................................................12
Formatting a paragraph ........................................................................................................13
Creating bulleted and numbered lists........................................................................................13
Creating lists in AutoLayout text boxes...............................................................................13
Creating a new outline level.................................................................................................14
Changing the bullet type.......................................................................................................14
Changing from a bulleted list > numbered list or numbered list > bulleted list...................14
Changing the order or the outline level of bulleted or numbered lines................................15
Creating master slides...............................................................................................................16
Changing the slide background......................................................................................................17
Using the Stylist to change slide backgrounds..........................................................................17
Changing the background of an area.........................................................................................18
Creating charts...............................................................................................................................19
Inserting a chart.........................................................................................................................19
Creating a chart in AutoLayout............................................................................................19
Creating a chart using the Insert chart feature......................................................................20
Choosing a chart type................................................................................................................20
Entering chart data....................................................................................................................21
Opening a chart data window...............................................................................................21
Entering data.........................................................................................................................21
Formatting the chart..................................................................................................................22
Format menu.........................................................................................................................22
Resizing the chart.................................................................................................................23
Moving chart elements.........................................................................................................23
Changing the chart area background....................................................................................24
Changing the chart graphic background...............................................................................24
Importing graphics.........................................................................................................................25
Importing graphics from a file..................................................................................................25
Importing graphics from the Gallery.........................................................................................26
Gallery themes......................................................................................................................26
!#" $%'& ()*+,&-+/. 01)232546" $87:9;#<);>=?6" @
""
Adding graphics to the Gallery themes................................................................................27
Adding a new theme to the Gallery......................................................................................27
Formatting graphic images........................................................................................................28
Moving graphics...................................................................................................................28
Resizing graphics..................................................................................................................28
Deleting graphics .................................................................................................................28
Creating lines and shapes..........................................................................................................29
Inserting lines and shapes.....................................................................................................29
Formatting lines and shapes.................................................................................................30
Slide transitions and animations....................................................................................................31
Slide transitions.........................................................................................................................31
Applying a slide transition effect.........................................................................................32
Applying a slide transition to multiple slides.......................................................................33
Removing a transition...........................................................................................................33
Transition Extras..................................................................................................................33
Inserting a sound in a transition............................................................................................34
Animation effects......................................................................................................................34
Applying an animation effect...............................................................................................36
Removing animation effects.................................................................................................36
Printing a presentation...................................................................................................................37
Exporting to or saving in other formats.........................................................................................39
Exporting as a PDF file.............................................................................................................39
Exporting as a Flash file............................................................................................................41
Exporting as an HTML file.......................................................................................................41
Opening and saving a PowerPoint file......................................................................................43
Saving an Impress file as a PowerPoint file.........................................................................43
Opening a PowerPoint file in Impress..................................................................................43
Appendix A: Shortcut keys............................................................................................................44
Appendix B: Function keys...........................................................................................................45
Index..............................................................................................................................................46
!#" $%'& ()*+,&-+/. 01)232546" $87:9;#<);>=?6" @
"""
ACB:DEB%F 'G
HJIKLMINPO
The purpose of this guide is to teach OpenOffice.org users how to use Impress to design
professional-quality presentations. This quick-start approach provides an overview of the
capabilities of Impress. It is designed to quickly give Impress users the knowledge necessary
to create high-quality presentations suitable for a wide variety of contexts.
QSRUTWVSXY[Z]\_^`badce^fX `dcUgUhi`bXjkY8aWl>RUXhi`_^fY[RUa
The contents of this Documentation are subject to the Public Documentation License,
Version 1.0 (the "License"); you may only use this Documentation if you comply with the
terms
oft1this
mnon!prq sosot1
tvu wLicense.
pyx:z{w'|E|#}~xAu wcopy
'so}~x:ofzy[the
xs
License
1u #n| is available at:
The Original Documentation is “OpenOffice.org 1.1 Impress QuickStart Guide.” The Initial
Writer(s) of the Original Documentation is/are Tim Kampa, Charles Fannan, and Dana
Oliver. © 2003 All Rights Reserved. (Initial Writer contact(s): [email protected].)
Contributor(s): ______________________________________.
Portions created by Tim Kampa are Copyright © 2003. All Rights Reserved. (Contributor
contact(s): [email protected].)
All trademarks within this guide belong to legitimate owners.
ggc]`dvj
Please direct any comments or suggestions about this document to:
[email protected]
vjadRd[gcUZ]higUa_^
The authors would like to acknowledge the Technical and Professional Writing Program at
San Francisco State University for giving us the training and skills necessary to create
professional-level documents.
We would also like to thank Louis Suarez-Potts for his guidance and support in the
development of this document.
!#" $%'& ()*+,&-+/. 01)232546" $87:9;#<);>=?6" @
"
ACB:DEB%F 'G
Rc]YlCY[`_^fY[RUa`badcSTcU`_^Mg
C8 >¡#¢C£
¤¥¦8
¤§? ©¨{¡ª«¦:¡#¢C£¬¢M«®¯M¥M£M°
0.1
06/27/03
Initial edition issued for comment
0.3
07/07/03
TIF screen shots converted to PNGs
0.4
01/27/04
Mostly re-written and re-desktop published. Many new screen
shots. New sections on printing, text boxes, charts, lists,
Gallery themes, transitions, and animations.
Yet to come, new sections on the Navigator, the Stylist, and
Slide Show Settings.
0.5
03/02/04
Added “Inserting special characters” section; added bullets
tip; added Notes View tip on printing student books; added
general note on long-clicking main toolbar icons. Thanks to
Jim Tayor for his fine editorial input.
0.6
03/17/04
Applied new template formatting, using all Custom OOo
styles. Headings now Bitstream Vera Sans.
!#" $%'& ()*+,&-+/. 01)232546" $87:9;#<);>=?6" @
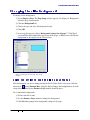
± oD²³´µ:oF ¶ ·LK¸º¹K»·N
Welcome to Impress–OpenOffice.org's slide show program. This easy-to-learn program,
which features user-friendly functions and standard toolbars and menus, allows users to
create a wide variety of slide layouts for visually attractive presentations. With Impress,
users can create slides that contain many different elements, including: text, bulleted and
numbered lists, tables, charts, clip art, and a wide array of graphic objects. It also comes with
spell check, a thesaurus, pre-set text styles, attractive
Selectingbackground
different output
styles, and a handy help
mediums
results
in
different
menu.
resolution qualities and file sizes.
This manual gives users the ability to create professional presentations in a short period of
time. It features instructions, screen shots, and helpful hints that guide users through the
Impress environment while designing presentations.
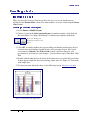
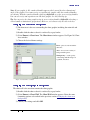
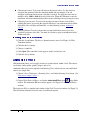
¼ X gUX g½¾SY3§YE^Mg
Figure 2: Autopilot Presentation
window 2the most from this guide, users should have a good working knowledge of basic
To receive
computer functions and should be familiar with standard software layouts and functions,
such as open, close, save, and print.
!#" $%'& ()*+,&-+/. 01)232546" $87:9;#<);>=?6" @
'"
¿D²À,oF ÁÂÀf''G§ÃD²8
:À,oF ÄLÆÅ·NÆÇ
Å
ÆPO
ÈLKÉÅ·N
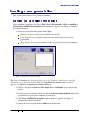
This section shows how to set up a new presentation.
Ê^M`bX^fY8adZe^f\dg
·^MR ¼ Y8[RW^ºTUX g1gUa_^M`_^fY[RUa
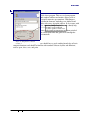
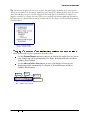
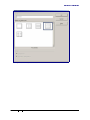
After launching OpenOffice.org, choose File > New > Presentation, or File > AutoPilot >
Presentation. AutoPilot Presentation window number 1 appears. See Figure 1: Autopilot
Presentation window.
1) Select one of the following options under Type:
Ë Empty Presentation creates a presentation from scratch.
Ë
From Template uses a template design already created as the base of a new
presentation.
Ë
Open Existing Presentation continues work on a previously created presentation.
Figure 1: Autopilot Presentation window
Tip: Leave the Preview box checked to allow you to view templates, slide designs, and slide
transitions as you choose them.Click Next. The AutoPilot Presentation window number 2
appears. See Figure 2: Autopilot Presentation window 2.
2) Choose a design under Select a slide design. Select <Original> for no slide design
(blank).
3) Select how the presentation will be used under Select an output medium. Most often,
presentations are created for computer screen display.
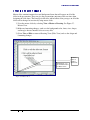
4) Click Next. AutoPilot Presentation window number 3 appears. See Figure 3:
Autopilot Presentation window 3.
5) Choose the desired option from the Effect drop-down menu.
!#" $%'& ()*+,&-+/. 01)232546" $87:9;#<);>=?6" @
+
¿D²À,oF ÁÂÀf''G§ÃD²8
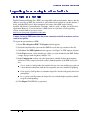
:À,oF Figure 3: Autopilot Presentation window 3
The Effect option creates
transitions between all the slides
in the presentation. Select No
Effect for no transition effect.
Transitions can be added and
changed later. For more
information, see Slide
transitions and animations.
6) Select the desired Speed for the transition between the different slides in the
presentation from the speed drop-down menu.
7) Click Create. A new presentation is created.
!#" $%'& ()*+,&-+/. 01)232546" $87:9;#<);>=?6" @
Ì
¿D²À,oF ÁÂÀf''G§ÃD²8
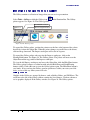
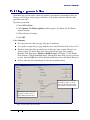
:À,oF ÍÎMÏfÐÑÓÒвÔ5Õ×Ö]Ø>Ù²ÐÏÚ]ÏfÛÜвÔ5վݧÛ?ÞÎßвÙoÎÞ
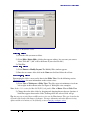
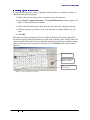
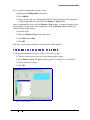
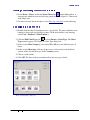
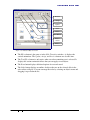
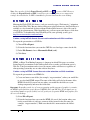
The Modify Slide window appears. See Figure 4: Modify Slide window. The Select an
AutoLayout section contains a wide variety of thumbnail slides to help you format a
presentation. Each thumbnail is a display of the visual layout of a slide. Clicking on a
thumbnail slide selects that layout. Notice how the description at the bottom of the
thumbnails frame changes to reflect the contents of each layout.
1) Type in a title for the slide in the area marked Name.
2) Click a thumbnail slide from the Select an AutoLayout section to select that layout.
3) Click OK.
Tip: It is always a good idea to save and name the presentation after it is initially created.
Remember also to save frequently while working on the presentation to prevent any loss of
information should something unexpected occur.
Thumbnail representations
of slide layouts.
Description of
layout contents.
Figure 4: Modify Slide window
!#" $%'& ()*+,&-+/. 01)232546" $87:9;#<);>=?6" @
à
¿D²À,oF ÁÂÀf''G§ÃD²8
:À,oF á a1gUX^fY8adZâadgd
§8Y[cUg
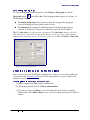
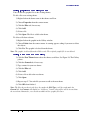
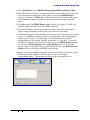
Inserting slides is easy, yet important—this is how you build a presentation. See Figure 5:
Insert Slide dialog box and Figure 6: Full screen with slide tabs. New slides are always
inserted after the active, or selected, slide. Do not worry about getting the order perfect the
first time—slides can be rearranged easily (see the following section, Rearranging slides).
1) Choose Insert > Slide. The Insert Slide window appears.
2) Enter a title for the slide in the Name field.
3) Choose a slide layout from the Select an AutoLayout section.
4) Click OK. The slide will be visible on the screen and ready for modifying.
Tip: Another way to insert a slide is to use the floating Presentation Palette. It makes the
general commands for slides easier to find. To access it, select View > Toolbars > Presentation.
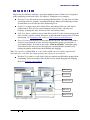
Figure 5: Insert Slide dialog box
A new slide tab appears at the
bottom of the workspace for each
inserted slide. Click on a slide tab
to select and display that slide.
Slide tabs display the slide name.
To rename a slide, see the
following section, Rename slides.
Figure 6: Full screen with slide tabs
!#" $%'& ()*+,&-+/. 01)232546" $87:9;#<);>=?6" @
ã
¿D²À,oF ÁÂÀf''G§ÃD²8
:À,oF RUXhi`_^?^fY8adZä`åT`dZUg
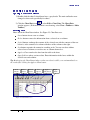
Select Format > Page to change the margins, size of the slides, and other settings. The Page
Setup window appears. See Figure 7: Page Setup window. Click the Page tab for options that
help create the desired layout.
Figure 7: Page Setup window
Click the Background tab for slide background options. See the section Changing the slide
background to learn more about this feature.
RUXhi`_^?^fY8adZæ§8Y[cUg
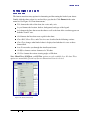
ÍÎMÏfÐÑÓÒвÔ5Õ¬Ø>Ù²ÐÏÚ5Ø
1) Select Format > Modify Layout. The Modify Slide window appears. See Figure 8:
Modify Slide window.
2) Modify the layout by choosing a new layout from the Select an AutoLayout section.
Tip: Another way to modify a slide is to use the Presentation Palette. It makes the general
commands for slides easier to find. To access it, select View > Toolbars > Presentation.
!#" $%'& ()*+,&-+/. 01)232546" $87:9;#<);>=?6" @
ç
¿D²À,oF ÁÂÀf''G§ÃD²8
:À,oF Figure 8: Modify Slide window
è/ÚÙoÚ?ÞвÔ5Õ¬Ø>Ù²ÐÏÚ5Ø
1) Select the slide you want to delete.
2) Select Edit > Delete Slide. A dialog box appears asking “Are you sure you want to
delete 'Slide ##'”? (“##” will be the name of your selected slide.)
3) Click Yes.
éÚÔCÖêвÔ5Õ¬Ø>Ù²ÐÏÚ5Ø
1) Select Format > Modify Layout. The Modify Slide window appears.
2) Enter the new name of the slide in the Name text field and delete the old one.
éÚCÖÜÜ:ÖÔ5ÕfвÔ5Õ¬Ø>Ù²ÐÏÚ5Ø
Rearranging the slides is most easily done in the Slides View. See the following section,
Workspace views, for more information on the various views.
1) Select View > Workspace > Slides View. The slides appear in miniature view from
left to right, in their current order See Figure 9: Workspace view examples.
Note: In the 1.0.3 version for Mac OS X (X11), the path is View > Master View > Slides View.
2) Change the order of the slides by dragging and dropping them to the new location. A
black line appears between the slides, showing where the selected slide will go.
Tip: An easy way to switch between different views is to use the View buttons. These are located on the
right side of the border of the Impress workspace. For more information about the different viewing
options and the view buttons, see the following section, Changing workspace views.
!#" $%'& ()*+,&-+/. 01)232546" $87:9;#<);>=?6" @
ë
¿D²À,oF ÁÂÀf''G§ÃD²8
:À,oF ì
RUXjv§T`dgiíUY[gd
Impress has five different workspace views from which to choose. Each view is designed to
make completing certain tasks easier. See Figure 9: Workspace view examples.
Ë Drawing View is the main view for creating individual slides. Use this view to format
and design, add text, graphics, and animation effects. Many of the following sections
describe how to create and edit slides in Drawing View.
Ë Outline View shows topic titles, bulleted lists, and numbered lists for each slide in
outline format. This view lets you rearrange the order of slides, edit titles and
headings, rearrange the order of items in a list, and add new slides.
Ë Slide View shows a small version of each slide in order. Use this view to rearrange the
order of slides, produce a timed slideshow, or add transitions between slides. For more
information, see Formatting slides; also see Slide transitions and animations.
Ë Notes View lets you add notes to each slide that are not seen when the presentation is
shown. You can print these notes and refer to them while giving a presentation—a
very helpful feature. Just click on the words “Click to add notes” and begin typing.
You can resize the notes text box using the green resizing handles and move it by
placing the pointer on the border, then clicking and dragging.
Note: You can also use Notes View to create student handbooks by including supplemental
information for each slide, then simply printing and copying the presentation.
Ë Handout View reduces several slides of the presentation and efficiently arranges them
for printing. You can rearrange slides in this view by simply dragging and dropping
them. See Printing a presentation.
Outline View
Notes View
Drawing View
Slide View
Handout View
Figure 9: Workspace view examples
!#" $%'& ()*+,&-+/. 01)232546" $87:9;#<);>=?6" @
î
¿D²À,oF ÁÂÀf''G§ÃD²8
:À,oF ï/ð ÖÔ5ÕfвÔ5Õ×ñÎòÜó©Ø>ôCÖCõöÚø÷ÐoÚCñØ
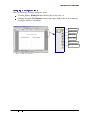
There are two ways to change workspace views:
Ë Selecting View > Workspace then choosing the desired view, or
Ë
Clicking one of the View Buttons located at the upper-right corner of the workspace.
See Figure 10:The View buttons.
Drawing View
Outline View
Slide View
Notes View
Handout View
Start Slide Show
Figure 10:The View buttons
!#" $%'& ()*+,&-+/. 01)232546" $87:9;#<);>=?6" @
ù
¿D²À,oF ÁÂÀf''G§ÃD²8
:À,oF ú SababY8adZe^f\dge§8Y[cUge§\dRd
1) Select Slide Show > Slide Show or click the Start Slide Show button to start slide
show. See Figure 10:The View buttons.
2) Use the arrow keys on the keyboard to go to the next slide or to go back to the
previous one. You can also click the mouse or press the spacebar on the keyboard to
advance to the next slide.
3) When the last slide appears, the message “Click to exit presentation” appears. Click
the mouse or press any key to exit the presentation.
!#" $%'& ()*+,&-+/. 01)232546" $87:9;#<);>=?6" @
û
¿D²À,oF ÁÂÀ'³/³F oF Áf
%ü F ³,8
ÄLÆÅ·NÆÇ
ÅƸ
ƸýN%·NÆÇ
¾þN¸K
á a1gUX^fY8adZe^MgWÿW^
There are two ways to insert text into presentation. One way is to use the AutoLayout as
described in the Format slides section. The other way is to type text in a text box you create
using the text tool.
#Ô5Ø{ÚÜÓÞÞ
Ú r޷вÔøÞ
Ú r
Þ C
Î Ú5ØõrÜ:ÚCÖ?ÞÚ5
Ï ?ÒSݧÛ?Þ
Î {Ö?ÒCÎòÛ?Þ
1. Click in the text box that reads “Click here to...”
2. Type your text in the text box.
ï Ü:ÚCÖ?ÞвÔ5Õ×ÖøÞÚrÞCÎ
In Drawing View:
1) Click on the Text icon
in the main toolbar. See Figure 11: Main toolbar. (If the
main toolbar is not visible, choose View > Toolbars > Main Toolbar.)
2) Click and drag to draw a box for the text on the slide. Do not worry about the size and
position—the text box will expand if needed as you type, and you can move the text
box with its text and resize it later if you want. See the following sections, Moving a
text box and Resizing a text box.
3) Release the mouse when finished. The cursor appears in the text box which is now in
edit mode (gray border with green resizing handles).
4) Type your text in the text box.
5) Click outside the text box to deselect it.
Text tool
Note: The small triangle in some
of the icons on the Main toolbar
indicates that there are other tools
you can use. To access these tools,
long-click (click and hold) on any
icon with a small triangle. The
icons for the other tools appear to
the right of the toolbar.
Figure 11: Main toolbar
!#" $%'& ()*+,&-+/. 01)232546" $87:9;#<);>=?6" @
+
¿D²À,oF ÁÂÀ'³/³F oF Áf
%ü F ³,8
ÍÎ÷вÔ5Õ×ÖøÞÚrÞCÎ
In Drawing View, notice how the pointer changes to an I-beam as you move it over the text
in a text box.
1) Click when the pointer becomes an I-beam. The text box is now in edit mode, with a
gray border and green resizing handles.
2) Drag the I-beam (or pointer) over the gray border. Notice how it changes to a fourheaded arrow.
3) When the four-headed arrow appears, click and drag to move the text box. An empty,
dashed-line box shows where your text box will be placed.
4) Release the mouse button when the text box is in the desired position.
éÚ5Ø>РвÔ5Õ×ÖøÞ
Ú rÞCÎ
In Drawing View, when the green resizing handles are displayed (see the instructions above),
drag the I-beam (or pointer) over any handle. Notice how the pointer changes to a twoheaded arrow, indicating in what direction the text box will be resized.
When the two-headed arrow is displayed, click and drag to resize the text box.
Tip: To maintain the proportions of a text box while resizing, press and hold Shift, then click
and drag. Make sure to release the mouse button before releasing the Shift key.
è/ÚÙoÚ?ÞвÔ5Õ×ÖøÞ
Ú r
Þ C
Î 1) Click the text once to display the gray border and green resizing handles, if necessary.
2) Position the pointer anywhere on the gray border so that it becomes either a fourheaded or two-headed arrow.
3) Click once. The gray border disappears, leaving only the green resizing handles.
4) Press Delete.
RUXhi`_^?^fY8adZe^MgWÿW^
Formatting text can give a presentation a consistent look and a dynamic feel. It can even
enhance the audience's understanding of your message by holding their interest.
ÚÙoÚCõ{ÞвÔ5Õ]ÞÚrÞ
The text must be selected before it can be formatted.
Ë To format all the text in a text box, click once on the text, then click once on the
border of the text box. Only the green resizing handles will be displayed. Now any
formatting changes will apply to all the text in the text box.
Ë To format only part of the text, click once on the text, then select the text to be
formatted by clicking and dragging (highlighting) over it. Formatting changes will
apply only to the selected text.
!#" $%'& ()*+,&-+/. 01)232546" $87:9;#<);>=?6" @
++
¿D²À,oF ÁÂÀ'³/³F oF Áf
%ü F ³,8
>ÎòÜêøÖ?ÞÞвÔ5Õ×õ ð ÖÜ:ÖCõ{ÞÚÜ8Ø
To view the Character Formatting options, select Format > Character or click the
Character button
on the Object Bar. The Character window appears. See Figure 12:
The Character window.
Ë The Font tab has options to change the font, typeface, and size of the text. You can
view what the text will look like in the preview box.
Ë The Font Effects tab has other options to enhance the text, such as underlining and
font color.
Ë The Position tab has advanced options that allow users to customize text spacing,
position, and scaling.
Tip: The Object Bar is an efficient way to format text. The Object Bar changes with each object
that is selected to show the options for that object. For text boxes, it shows buttons and menus for
formatting the text. To view the Object bar, select View > Toolbars > Object Bar.
Figure 12: The Character window
!#" $%'& ()*+,&-+/. 01)232546" $87:9;#<);>=?6" @
+Ì
¿D²À,oF ÁÂÀ'³/³F oF Áf
%ü F ³,8
#Ô5Ø{ÚÜÓÞвÔ5Õ¬Ø>ôCÚCõrÐoÖÙ?õ ð ÖÜ:ÖCõ{ÞÚÜ8Ø
To insert special characters, such as copyright, math, geometric, or monetary symbols, or
characters from another language:
1) Click in the place in the text where you want to insert the character.
2) Choose Insert > Special Character... The Special Characters window appears. See
Figure 13: Special Characters window.
3) Choose the font and character subset from the Font and Subset drop-down menus.
4) Click the character you want to insert. You may have to scroll to find the one you
want.
5) Click OK.
Selecting more than one character will insert all those characters. Characters that will be
inserted are displayed below the character section in the order they were selected. They also
will be inserted in this order. If you accidentally click the wrong character, clicking another
character will only add it to the one(s) being inserted. Click Delete, then click the correct
character.
Selected character
Display of currently
selected character.
Display of all characters
to be inserted.
Figure 13: Special Characters window
!#" $%'& ()*+,&-+/. 01)232546" $87:9;#<);>=?6" @
+à
¿D²À,oF ÁÂÀ'³/³F oF Áf
%ü F ³,8
>ÎòÜêøÖ?ÞÞвÔ5Õ×Ö¬ôCÖÜ:Ö5ÕfÜ:Öô ð
To view the Paragraph Formatting options, select Format > Paragraph or click the
Paragraph button
on the Object Bar. The Paragraph window appears. See Figure 14:
The Paragraph window.
Ë The Indents & Spacing tab has options to adjust the spacing of the paragraph
selected, including the spacing between lines of text.
Ë The Alignment tab contains the following options: left-aligned, right-aligned,
centered, or justified text. The preview shows how your text will be aligned.
Tip: The Object Bar is an efficient way to format text. The Object Bar changes with each
object that is selected to show the options for that object. For text boxes, it shows buttons
and menus for formatting the text. To view the toolbar, select View > Toolbars > Object Bar.
Figure 14: The Paragraph window
QX g`_^fY8adZâbS8[gW^Mgcä`badcâaÉShegUX gcâ8Y3f^
There are two ways to create bulleted or numbered lists. One way is to use the AutoLayout
as described in the Formatting slides section. The other method is to create a bulleted list
using the text tool.
ï Ü:ÚCÖ?ÞвÔ5ÕÆÙ²ÐØ¿Þ,ØbвÔSݧÛ?Þ
Î {Ö?ÒCÎòÛ?ÞÞ
Ú r
Þ C
Î Ú5Ø
1) Choose an AutoLayout that contains a bulleted list.
2) Click in the textbox that reads “Click to add an outline.”
3) Type the text, then press Enter to start a new bulleted line or the next sequential
numbered line. Press Shift + Enter to start a new line without creating a new bullet or
number.
!#" $%'& ()*+,&-+/. 01)232546" $87:9;#<);>=?6" @
+8ã
¿D²À,oF ÁÂÀ'³/³F oF Áf
%ü F ³,8
ï Ü:ÚCÖ?ÞвÔ5Õ×Ö¬ÔCÚCñÎòÛ?ÞٲвÔCÚ¬ÙoÚ?÷CÚÙ
1) If necessary, press Enter to begin a new line.
2) Press Tab. Each time you press Tab the line indents to the next outline level. Pressing
Enter creates a new line at the same level as the previous one.
ï ð ÖÔ5ÕfвÔ5Õ]Þ ð /
Ú ÛÙ²ÙoÚ?ÞÞÒôCÚ
For the entire list:
1) Click in the list, then click on the gray border of the text box so that just the green
resizing handles are displayed.
2) Select Format > Numbering/Bullets or click on the Numbering Symbols button.
3) If necessary, click the Bullets tab.
4) Click on a bullet style to choose it.
5) Click OK.
For a single line in the list:
1) Click anywhere in the line to place the cursor in it.
2) Follow steps 2-5 of the previous instruction set.
ï/ð ÖÔ5ÕfвÔ5Õ]ÑÜ:Îòê ÖÛÙ²ÙoÚ?ÞÚ5ÏÆÙ²ÐØ¿ÞÔÛêCÚÜ:Ú5ÏÆÙ²ÐØ¿Þ§ÎòܧÔÛêCÚÜ:Ú5ÏÆÙ²ÐØ¿Þ
ÛÙ²ÙoÚ?ÞÚ5ÏÆÙ²ÐØ¿Þ
For the entire list:
1) Click in the list, then click on the gray border of the text box so that just the green
resizing handles are displayed.
2) Select Format > Numbering/Bullets or click on the Numbering Symbols button.
3) Click the Numbering type tab if switching from bullets to numbers. Click the Bullets
tab if switching from numbers to bullets.
4) Click on the desired design for the numbers or bullets to select it.
5) Click OK.
!#" $%'& ()*+,&-+/. 01)232546" $87:9;#<);>=?6" @
+ç
¿D²À,oF ÁÂÀ'³/³F oF Áf
%ü F ³,8
Tip: Just as you can place the cursor in a single line and change the bullet style, you can also
change it to a number by choosing a numbering style instead of a different bullet style. You can
also click and drag to select several contiguous lines and change from bullets to numbers or
numbers to bullets, or change the styles. This is very useful if you want a numbered list under a
bulleted entry or a bulleted list nested in a numbered one. See Figure 15: Nested bullet points in
a numbered list.
Figure 15: Nested bullet
points in a numbered list
ï/ð ÖÔ5ÕfвÔ5Õ]Þ ð Ú¾ÎòÜ8ÏÚÜÎòÜÂÞ ð Ú¾ÎòÛ?ÞٲвÔCÚ¬ÙoÚ?÷CÚÙ?ÎÑÛÙ²ÙoÚ?ÞÚ5Ï×ÎòܧÔÛêCÚÜ:Ú5ÏÆٲвÔCÚ5Ø
Click once in a line of text to place the cursor in it, then:
Ë Use the Promote/Demote buttons to increase or decrease the outline level of a line in
a list. Numbering adjusts automatically. See Figure 16: Promote/Demote and Move
Up/Move Down buttons
Ë Use the Move up/Move down buttons to move a line higher or lower in a list.
Numbering adjusts automatically. See Figure 16: Promote/Demote and Move
Up/Move Down buttons.
Promote
Demote
Move Up
Move Down
Figure 16: Promote/Demote and
Move Up/Move Down buttons
!#" $%'& ()*+,&-+/. 01)232546" $87:9;#<);>=?6" @
+ë
¿D²À,oF ÁÂÀ'³/³F oF Áf
%ü F ³,8
QX g`_^fY8adZâhi`f^MgUXƧ8Y[cUg
Master slides contain formatted text and background items that will appear on all of the
slides in the presentation. They can give the presentation consistency and save time when
designing the slide show. The font type in the titles and/or bulleted text passages on all of the
slides can be changed at one time by using master slides.
1) View the master slides by selecting View > Master > Drawing. See Figure 17:
Master View.
2) Make any formatting changes, such as to the background color, fonts, sizes, shapes,
and images, that are intended to be on every slide.
3) Select View > Slide to return to Drawing View (Slide View) and see the design and
formatting changes.
Alternatively, you
can click this button
for Master View.
Click this
button to
return to
Slide View
Figure 17: Master View
!#" $%'& ()*+,&-+/. 01)232546" $87:9;#<);>=?6" @
+î
'ÀÁ,F Á1'ò
%ü F ³,'Àµ8Á,D²´'³
ÆÅÆÇýNÆÇ
Æ
¾þN¸
KÅÆ»¾ÇýL¹Æ¸
To change a slide background:
1) Select Format > Page. The Page Setup window appears. See Figure 18: Background
tab in the Page Setup window.
2) Click the Background tab.
3) Choose the type and style of background desired.
4) Click OK.
5) A message box appears asking “Background settings for all pages?” Click Yes if
you would like the background to appear on all the pages, or No if you would like the
background to only appear on the selected slide.
Figure 18: Background tab in the Page Setup
window.
§Y8adZe^f\dg
Ê^?VS8Y3f^
^MR
v\d`badZUge§8Y[cUgä`dvj§Z]X RbSadcS
Slide backgrounds can also be changed using the Stylist. If the Stylist is not open, click the
Stylist icon
on the Function Bar. Using the Stylist changes the background on all slides
except those modified by the Format > Page method described above.
To set individual backgrounds:
1) Select each slide in turn.
2) Use the Format > Page method to change the background.
3) Click No when prompted for background settings for all pages.
!#" $%'& ()*+,&-+/. 01)232546" $87:9;#<);>=?6" @
+ù
'ÀÁ,F Á1'ò
%ü F ³,'Àµ8Á,D²´'³
To set a common background using the Stylist:
1) Right-click on Background in the Stylist.
2) Select Modify.
3) Choose the type and style of background desired. This background will be applied to
all slide backgrounds not formatted by the Format > Page method.
Once a background has been set by the Format > Page method, it cannot be changed by the
Stylist method. To allow one of the backgrounds set by the Format > Page method to be
modified by the Stylist method:
1) Select the slide.
2) Follow the Format > Page instructions above.
3) Under Fill, choose None.
4) Click OK.
This slide is now included with those changed by the Stylist method.
Q\d`badZ]Y8adZe^f\dgä`dvj§Z]X RbSadcäR·lÆ`ba
`bX g`
To change the background of an area, such as a text box or a shape:
1) Click the desired area to select it. Green resizing handles appear.
2) Select Format > Area. The Area window appears. See Figure 19: Area window.
3) Choose the desired settings.
4) Click OK.
Figure 19: Area window
!#" $%'& ()*+,&-+/. 01)232546" $87:9;#<);>=?6" @
+û
¿D²À,oF Áµ'ÀD#
ÄLÆÅ·NÆÇ
»ÆÅL5
á a1gUX^fY8adZä`
v\d`bX^
There are two ways to insert a chart into a slide. One way is to use the AutoLayout as
described in the Format slides section. The other method is to create a chart using the Insert
Chart feature.
ï Ü:ÚCÖ?ÞвÔ5Õ×Ö¾õ ð ÖÜÓ޷вÔSݧÛ?Þ
Î {Ö?ÒCÎòÛ?Þ
1) Select Format > Modify Layout.
2) Choose a layout in the Select an AutoLayout section that contains a chart (look for
the vertical bars). See Figure 20: Examples of AutoLayout templates with charts .
Figure 20: Examples of
AutoLayout templates with
charts
3) Click OK. A warning window may appear telling you that this action deletes the list
of actions that can be undone. In other words, after you apply the new slide layout,
you cannot use Control + Z or Edit > Undo to undo a previous change to your
presentation. You do not lose your changes—you just cannot simply undo them. Click
Yes.
4) Double-click the chart icon in the center of the chart area to reveal the full-sized chart.
A chart appears which has been created using sample data. See Figure 21: Chart made
with sample data.
5) To enter your own data in the chart, see the following section, Entering chart data.
Figure 21: Chart made with sample data
!#" $%'& ()*+,&-+/. 01)232546" $87:9;#<);>=?6" @
Ì!
¿D²À,oF Áµ'ÀD#
ï Ü:ÚCÖ?ÞвÔ5Õ×Ö¾õ ð ÖÜÓÞ·Û5Ø>вÔ5Õ]Þ ð Ú#"£5 ©C¦ ¨{¯M¥M¦1Ñ:ÚCÖ?ÞÛÜ:Ú
1) Select Insert > Chart, or click the Insert Chart icon
on the Main toolbar. A
chart appears which has been created using sample data. See Figure 21: Chart made
with sample data.
2) To enter your own data in the chart, see the Entering chart data section following.
Q\dRR§Y8adZä`
v\d`bX^
^?VSTg
1) Double-click the chart. It should now have a gray border. The main toolbar has now
changed to show tools specifically for charts. (If the main toolbar is not showing,
select View > Toolbars > Main Toolbar.)
2) Click the Edit Chart Type tool
or select Format > Chart Type. The Chart
Type window appears. See Figure 22: Chart Type dialog box.
3) In the section Chart Category, select either 2D or 3D to see the different types of
charts.
4) In the section Chart type, click one of the icons to select it and see the different
variants of the selected chart type in the Variants section.
5) Choose a chart variant.
6) Click OK. The chart in the presentation reflects the new type selected.
Figure 22: Chart Type dialog box
!#" $%'& ()*+,&-+/. 01)232546" $87:9;#<);>=?6" @
Ì¿+
¿D²À,oF Áµ'ÀD#
$ a_^MgUXY8adZäv\d`bX^cU`_^M`
% ôCÚÔвÔ5Õ×Ö¾õ ð ÖÜÓÞvÏÖ?ÞÖ¾ñbвÔ5ÏÎ5ñ
1) Double-click the chart. It should now have a gray border. The main toolbar has now
changed to show tools specifically for charts.
2) Click the Chart Data icon
or select Edit > Chart Data. The Chart Data
window appears. (If the main toolbar is not showing, select View > Toolbars > Main
Toolbar.)
&Ô?ÞÚÜвÔ5Õ¬ÏÖ?ÞÖ
Enter data in the Chart Data window. See Figure 23: Chart Data area.
Ë Insert buttons insert a row or column.
Ë
Delete buttons remove the information from a selected row or column.
Ë
Switch buttons exchange the contents of the selected row with the contents of the row
below it, or the contents of a column with those of the column to the right.
Ë
Sort buttons organize the content in ascending order. You can sort data within a
selected row or column, or sort the rows or columns themselves.
Ë
Apply to Chart transfers the data from the table to the chart.
Ë
Input fields are where you insert data. Enter information in the boxes within the
desired rows and columns.
Tip: By dragging the Chart Data window so that your chart is visible, you can immediately see
the results after clicking the Apply to Chart button.
Insert
buttons
Delete
buttons
Switch
buttons
Sort
buttons
Apply to
Chart button
Input
fields
Figure 23: Chart Data area
!#" $%'& ()*+,&-+/. 01)232546" $87:9;#<);>=?6" @
ÌÌ
¿D²À,oF Áµ'ÀD#
RUXhi`_^?^fY8adZe^f\dg
v\d`bX^
>ÎòÜêøÖ?Þ·êøÚÔÛ
The format menu has many options for formatting and fine tuning the look of your charts.
Double-click the chart so that it is enclosed by a gray border. Click Format in the main
menu list. See Figure 24: Chart format menu.
Ë Title formats the titles of the chart, the x axis and y axis.
Ë
Legend formats the location, borders, background, and type of the legend.
Ë
Axis formats the lines that create the chart as well as the font of the text that appears on
both the X and Y axes.
Ë
Grid formats the lines that create a grid for the chart.
Ë
Chart Wall, Chart Floor, and Chart Area are described in the following sections.
Ë
Chart Type changes what kind of chart is displayed and whether it is two- or threedimensional.
Ë
Auto Format takes you through the AutoLayout feature.
Ë
3D Effects formats various elements of a 3D chart.
Ë
3D View formats the various viewing angles of 3D chart.
Note: Chart Floor, 3D Effects, and 3D View options are only available for a 3D chart. These
options are unavailable (grayed out) if a two-dimensional chart is selected.
Figure 24: Chart format menu
!#" $%'& ()*+,&-+/. 01)232546" $87:9;#<);>=?6" @
Ìà
¿D²À,oF Áµ'ÀD#
There are two main areas of the chart. These areas control different settings and attributes for
the chart. See Figure 25: The Chart wall and Chart area.
Ë Chart wall contains the graphic of the chart displaying the data.
Ë
Chart area is the area surrounding the chart graphic. The main title and the key are in
the chart area.
Note: Chart Floor from the Format menu is only available for 3D charts and has the same
formatting options as Chart Area and Chart Wall.
Knowing the difference between the chart wall and chart area is helpful when formatting a
chart.
The Chart wall.
The Chart area.
Figure 25: The Chart wall and Chart
area
éÚ5Ø>РвÔ5Õ]Þ ð Ú¾õ ð ÖÜÓÞ
1) Click on the chart.
2) Green sizing handles appear around the chart. To increase or decrease the size of the
chart, click and drag one of the markers in one of the four corners of the chart. To
maintain the correct ratio of the sides, hold the shift key down while you click and
drag.
ÍÎ÷вÔ5Õ×õ ð ÖÜÓÞ§ÚÙoÚêøÚÔ?Þ,Ø
1) Double-click the chart so that is enclosed by a gray border.
2) Click any of the elements—the title, the key, or the chart graphic—to select it. Green
resizing handles appear.
3) Move the pointer over the selected element. When it becomes a four-headed arrow,
click and drag to move the element.
4) Release the mouse button when the element is in the desired position.
!#" $%'& ()*+,&-+/. 01)232546" $87:9;#<);>=?6" @
Ìã
¿D²À,oF Áµ'ÀD#
Note: If your graphic is 3D, round red handles appear which control the three-dimensional
angle of the graphic. You cannot resize or reposition the graphic while the round red handles
are showing. With the round red handles showing, shift+click to get the green resizing handles.
You can now resize and reposition your 3D chart graphic. See the following tip.
Tip: You can resize the chart graphic using its green resizing handles (shift+click, then drag a
corner handle to maintain the proportions). However, you cannot resize the title or the key.
ï/ð ÖÔ5ÕfвÔ5Õ]Þ ð Ú¾õ ð ÖÜÓÞ§ÖÜ:ÚC
Ö CÖCõró©ÕfÜ:ÎòÛÔ5Ï
5) The chart area is the area surrounding the chart graphic, including the main title and
key.
1) Double-click the chart so that it is enclosed by a gray border.
2) Select Format > Chart Area. The Chart Area window appears. See Figure 26: Chart
Area window.
3) Choose the desired format settings.
Lines—place a border around the
chart area.
Area—choose from a variety of
background fill options.
Transparency—set the opacity
of the background fill and give it
a gradient, if desired.
Figure 26: Chart Area window
ï/ð ÖÔ5ÕfвÔ5Õ]Þ ð Ú¾õ ð ÖÜÓÞvÕfÜ:Öô ð Ðoõ'CÖCõró©ÕfÜ:ÎòÛÔ5Ï
The chart wall is the area that contains the chart graphic.
1) Double-click the chart so that it is enclosed by a gray border.
2) Select Format > Chart Wall. The Chart Wall window appears. It has the same
formatting options as described in the previous section, Changing the chart area
background.
3) Choose your settings and click OK.
!#" $%'& ()*+,&-+/. 01)232546" $87:9;#<);>=?6" @
Ìç
± ( ÿD#oF Á/Á,D²À:Ã)F µ[
¶+*
ÈKL5·NÆÇ
ÇýLÅÈ,N»b
There are many different types of graphics that can be placed in presentations. You can
import your own graphic files or choose ready-made graphics from the Impress Gallery.
á heTRUX^fY8adZäZ]X `bTU\bY[ ýlCX RUh
`ilCY8[g
1) Select Insert > Graphics. The Insert Graphics window appears. See Figure 27:
Insert Graphics window.
2) Browse to the file containing the desired graphic.
3) Select the file.
4) Click Open to place the graphic on the current (selected) slide. The graphic object
appears with green sizing handle.
Figure 27: Insert Graphics window
!#" $%'& ()*+,&-+/. 01)232546" $87:9;#<);>=?6" @
Ìë
± ( ÿD#oF Á/Á,D²À:Ã)F µ[
á heTRUX^fY8adZäZ]X `bTU\bY[ ýlCX RUh
^f\dg.-K`b8[gUXV
The Gallery contains a collection of images that you can use in a presentation.
Select Tools > Gallery or click the Gallery icon
palette appears. See Figure 28: The Gallery palette.
on the Function Bar. The Gallery
The Hide/Show button
Theme box
The Floating/Stick button
Figure 28: The Gallery palette
To expand the Gallery palette, position the pointer over the line at the bottom of the palette
that divides it from the Object Bar. When the pointer changes to parallel lines with arrows,
click and drag downward. The Impress workspace will resize in response.
To expand the Gallery palette and not resize the Impress workspace, click on the
Floating/Stick button. See Figure 28: The Gallery palette. The palette will now cover the
Object Bar and the top portion of the Impress workspace.
To view the full Impress workspace and access the Object Bar, click the Hide/Show button.
The Gallery palette collapses to a thin bar with only the Hide/Show and Stick/Floating
buttons visible. Click either one to view the Gallery palette again. The Hide/Show button is
very handy. It lets you keep the Gallery open for quick access while you create your slide
show, yet out of the way when you need it to be.
/ ÖÙ²ÙoÚÜÓÒøÞ ð ÚêøÚ5Ø
Graphics in the Gallery are grouped by themes, such as Bullets, Rulers, and 3D Effects. The
scroll box to the left of the gallery window contains the list of themes. Click on a theme to
see its graphics displayed in the Gallery window. See Figure 28: The Gallery palette.
!#" $%'& ()*+,&-+/. 01)232546" $87:9;#<);>=?6" @
Ì'î
± ( ÿD#oF Á/Á,D²À:Ã)F µ[
Ý ÏÏfвÔ5Õ¬ÕfÜ:Öô ð Ðoõ ØÞÎ Þ ð Ú / ÖÙ²ÙoÚÜÓÒøÞ ð ÚêøÚ5Ø
You can add new graphic files to the existing themes.
To add a file to an existing theme:
1) Right-click on the theme name in the theme scroll box.
2) Choose Properties from the context menu.
3) Click the Files tab, if necessary.
4) Click Add.
5) Select a file.
6) Click Open. The file is added to the theme.
To delete a file from a theme:
1) Right-click on the graphic in the Gallery window.
2) Choose Delete from the context menu. A warning appears asking if you want to delete
this object.
3) Click Yes. The graphic is deleted from the theme.
Note: The graphic is deleted from the Gallery only. The original graphic file is not deleted.
Ý ÏÏfвÔ5Õ×Ö¬ÔCÚCñÄÞ ð ÚêøÚøÞÎ Þ ð Ú / ÖÙ²ÙoÚÜÓÒ
1) Click the New Theme button above the themes scroll box. See Figure 28: The Gallery
palette.
2) Click the General tab, if necessary.
3) Type a name for your new theme.
4) Click the Files tab.
5) Click Add.
6) Select a file to add to the new theme.
7) Click Open.
8) Repeat steps 5-7 for each file you want to add to the new theme.
9) Click OK when finished.
Note: The files do not show in the large box under the File Type scroll box, and under the
General tab, the Contents will display as “0 Objects,” but the chosen files will be inserted into
the new theme. Remember, you can always add or delete graphic files later.
!#" $%'& ()*+,&-+/. 01)232546" $87:9;#<);>=?6" @
Ìù
± ( ÿD#oF Á/Á,D²À:Ã)F µ[
RUXhi`_^?^fY8adZäZ]X `bTU\bY[
Y8hi`dZUg
ÍÎ÷вÔ5Õ¬ÕfÜ:Öô ð Ðoõ Ø
1) Click the graphic, if necessary, to show the green resizing handles.
2) Move the pointer over the graphic until the pointer becomes a four-headed arrow.
3) Click and drag the graphic to the desired position.
4) Release the mouse button.
éÚ5Ø>РвÔ5Õ¬ÕfÜ:
Ö ô ð Ðoõ Ø
1) Click the graphic, if necessary, to show the green resizing handles.
2) Position the pointer over one of the green resizing handles until the pointer becomes a
two-headed arrow.
3) Click and drag to resize the graphic.
Tip: The corner handles resize the graphic both vertically and horizontally. To retain the
original proportions of the graphic, shift + click one of the corner handles, then drag. Be sure to
release the mouse button before the shift key.
è/ÚÙoÚ?ÞвÔ5Õ¬ÕfÜ:Öô ð Ðoõ Ø
1) Click the graphic, if necessary, to show the green resizing handles.
2) Press Delete.
Tip: Select Format > Position and Size .for advanced graphic formatting options.
!#" $%'& ()*+,&-+/. 01)232546" $87:9;#<);>=?6" @
Ì,û
± ( ÿD#oF Á/Á,D²À:Ã)F µ[
QX g`_^fY8adZâ8Y8adg`badcæ§\d`bTg
The main toolbar contains the tools used to create rectangles, circles, and other lines and
shapes to enhance the design of the presentation. If the main toolbar is not showing, select
View > Toolbars > Main Toolbar. For the different tools that can be used to edit lines and
shapes, see Figure 29: Line and shape tools.
A floating toolbar with additional tool choices appears after long-clicking (click and hold) on
an icon with a small triangle. This floating toolbar can be dragged to a convenient position. It
remains on the screen (if dragged away from the Main Toolbar) for easy access.
#Ô5Ø{ÚÜÓÞвÔ5ÕÆٲвÔCÚ5ØÖÔ5Ï¬Ø ð ÖôCÚ5Ø
To create shapes and lines:
1) Select the desired line or shape tool.
2) Click and drag to create the object on the slide. See Figure 30: Creating a shape.
Edit Points
Select
Zoom
Rectangle
Elipse
3-D Objects
Curve
Lines and Arrows
Connector
Rotate
Alignment
Arrange
Figure 29: Line and shape tools
!#" $%'& ()*+,&-+/. 01)232546" $87:9;#<);>=?6" @
Figure 30: Creating a shape
à0
± ( ÿD#oF Á/Á,D²À:Ã)F µ[
>ÎòÜêøÖ?ÞÞвÔ5ÕÆٲвÔCÚ5ØÖÔ5Ï¬Ø ð ÖôCÚ5Ø
Use the Format menu to modify lines and shapes. See Figure 31: Shape format menu.
To format lines and shapes:
1) Click on the shape or line to select it.
2) Click Format in the main menu list. Some of the options may not be available
(grayed out) because of the type of object selected. For example, if the object is a
simple line, the Area choice will be unavailable because a line does not have an area
to fill.
3) Select one of the formatting options:
Ë Line has options such as line style, line color, and width.
Ë Area allows users to format the fill, or interior, of an object. This includes color,
transparency, and pattern.
Ë Position and Size allows an object to be moved, rotated, and manipulated according to
specified measurements.
Figure 31: Shape format menu
!#" $%'& ()*+,&-+/. 01)232546" $87:9;#<);>=?6" @
à+
1'ü F ³,/oD²À
%F oF À'³/ÀF ( À,oF 2 þN¸
·LÅK¾N%·NK
ÅƸ
ÅN *
Å·NK
Slide transitions are the effects that take place when one slide gives way to the next one in
the presentation, like “Roll down from top” or “Fly in from left.” They add dynamic flair to a
slideshow, smoothing the transition between slides. You can apply a single type of transition
to all slides in the the presentation or apply a different transition to any single slide, even
having a different transition for every slide in the slideshow. While using many different
transitions may be fun to do, it may not give your show a professional appearance, if that is
your goal.
Animations are similar effects, but they are applied to individual elements within a single
slide, like a chart or graphic, or to individual bullet points. Animations can make a
presentation more lively and memorable. Just as with transitions, heavy use of animations
can be fun, but distracting and even annoying for an audience expecting a professional
presentation.
Êø8Y[cUgi^fX `ba§YE^fY[RUa
It is easiest to add transitions from Slide View. Choose View > Workspace > Slide View or
click the Slide View icon at the top right corner of the workspace (see Changing workspace
views for more information). All of your slides appear in the workspace; you may need to
scroll to see them all.
Whichever slide is displayed when you switch to Slide View will now be selected. It will
have a heavier black border around it.
Notice that the Object Bar has many options for choosing and controlling slide effects. See
Figure 32: Object Bar in Slide View.Once you are familiar with transitions, the Object Bar
options allow easy and fast application of transitions.
Figure 32: Object Bar in Slide View
For a better understanding of transitions, and more options, choose Slide Show > Slide
Transition. The Slide Transition window appears. See Figure 33: Slide Transition window.
Ë The Effects button displays the various transitions.
Ë
The Extras button displays the options for timing transitions and making them
automatic, semi-automatic, or manual.
Ë
The Update button displays the transition settings for the selected slide.
Ë
The Assign button applies the chosen effect to the selected slide.
Ë
The Preview button opens a handy window for viewing an applied transition.
!#" $%'& ()*+,&-+/. 01)232546" $87:9;#<);>=?6" @
à,Ì
1'ü F ³,/oD²À
%F oF À'³/ÀF ( À,oF Effects
Extras
Preview
Assign
Update
Effects
section
Speed
section
Figure 33: Slide Transition window
ݧôôÙÒвÔ5Õ×Ö]Ø>Ù²ÐÏÚøÞÜ:ÖÔ5Ø>ÐÞÐoÎòÔ¾Ú?ÑÓÑ:ÚCõ{Þ
1) From Slide View, click on a slide to select it. The transition you apply to this slide
will occur as the slide comes into view in the slide show.
2) Choose Slide Show > Slide Transition.
3) Choose an Effects category from the pop-up menu above the main Effects window.
Notice how the thumbnail images change with each category.
4) Click on a thumbnail image to select that transition. Notice that by moving the pointer
over a thumbnail image the transition name appears in a tooltip (if tooltips are
activated; to turn on tooltips, choose Help > Tips so that a check mark appears next to
Tips).
5) Choose a transition speed from the pop-up window below the main Effects window.
6) Click the Assign button.
7) Click the Preview button. The Preview window appears.
8) Click in the Preview window to view the transition effect. Repeat these steps as
needed for all slides.
9) Click the close button on the Preview window, or click the Preview button again to
close the Preview window.
!#" $%'& ()*+,&-+/. 01)232546" $87:9;#<);>=?6" @
à,à
1'ü F ³,/oD²À
%F oF À'³/ÀF ( À,oF ݧôôÙÒвÔ5Õ×Ö]Ø>Ù²ÐÏÚøÞÜ:ÖÔ5Ø>ÐÞÐoÎòÔøÞÎ êÛÙÞвôÙoÚ]Ø>Ù²ÐÏÚ5Ø
From slide View, Shift + click all the slides you want the transition applied to. Follow steps
2-9 above. Only the first selected slide will show in the Preview window.
éÚêøÎ÷вÔ5Õ×ÖøÞÜ:ÖÔ5Ø>ÐÞÐoÎòÔ
1) Select the desired slide(s).
2) Choose No Effect from the Effect box in the Object Bar. See Figure 32: Object Bar in
Slide View.
3«Ü:ÖÔ5Ø>ÐÞÐoÎò4
Ô &+rÞÜ:Ö5Ø
Use transition Extras to control how the transition effects between slides occur. Some
options are: on mouse click or spacebar press; at specified time intervals; or, with sound
effects.
Choose Slide > Slide Transition to open the Slide Transition window. Click the Extras
button. The Extras options appear in the Slide Transition window. See Figure 34: Slide
Transition window.
Automatic Transition
Semiautomatic Transition
Manual Transition
Duration
Browse ...
Sound Name
Sound
Figure 34: Slide Transition window
!#" $%'& ()*+,&-+/. 01)232546" $87:9;#<);>=?6" @
àã
1'ü F ³,/oD²À
%F oF À'³/ÀF ( À,oF Ë
Choosing Automatic Transition will activate the Duration box. Use the arrows to
designate the amount of time the transition should take to complete. You can
designate a different time between each slide, if desired. To apply the same time to
multiple slides, Shift + click the desired slides first. When the slideshow is run, the
transitions will occur automatically with no mouse-clicking or key-pressing necessary.
Ë
Choosing Semiautomatic Transition means that you must advance each slide by
clicking the mouse or pressing the spacebar. However, any animation effects within
individual slides will play automatically (see the following section, Animation
effects).
Ë
Choosing Manual Transition means that you must click the mouse or press the
spacebar to advance each slide. You must also do this to play each animation effect
within each slide.
#Ô5Ø{ÚÜÓÞвÔ5Õ×Ö]Ø{ÎòÛÔ5ÏÆвԾÖøÞÜ:ÖÔ5Ø>ÐÞÐoÎòÔ
1) Click the Sound button. The Browse button becomes active. See Figure 34: Slide
Transition window.
2) Click the Browse button.
3) Choose a sound file.
4) Click Open. The sound file's name appears in the Sound Name box.
5) Click the Assign button.
abY8hi`_^fY[RUa
g·lyl>g«^
With animation effects you can apply actions to specific objects within a slide. The objects
can be titles, bullet points, graphs, images, and so on.
Animation effects need to be applied from Drawing View so that you can select individual
objects on a single slide.
1) Choose View > Workspace > Drawing View, or click the Drawing View button. (See
Changing workspace views.)
2) Choose Slide Show > Effects, or click the Animation Effects icon
on the Main
toolbar. The Animation Effects window appears. See Figure 35: Animation Effects
window.
The Animation Effects window looks similar to the Slide Transition window (see Figure 33:
Slide Transition window) but it has some very different options.
!#" $%'& ()*+,&-+/. 01)232546" $87:9;#<);>=?6" @
à,ç
1'ü F ³,/oD²À
%F oF À'³/ÀF ( À,oF Preview
Assign
Update
Order
Extras
Text Effects
Effects
section
Effects
Figure 35: Animation Effects window
Ë
The Effects button is the same as in the Slide Transition window—it displays the
various animations. The Update, Assign, and Preview buttons are also the same.
Ë
The Text Effects button is only active when a text box containing text is selected. It
displays the various animation effects that you can apply to text objects.
Ë
The Extra button displays additional options for text and sound.
Ë
The Order button displays an outline of objects that are on the selected slide in the
order effects will play. You can rearrange the order by selecting an object's name and
dragging it up or down the list.
!#" $%'& ()*+,&-+/. 01)232546" $87:9;#<);>=?6" @
à,ë
1'ü F ³,/oD²À
%F oF À'³/ÀF ( À,oF ݧôôÙÒвÔ5Õ×ÖÔ¾ÖÔвêøÖ?ÞÐoÎòÔ¾Ú?ÑÓÑ:ÚCõ{Þ
1) From Drawing View, select the desired slide by clicking its tab at the bottom left
corner of the workspace. (See Figure 6: Full screen with slide tabs.)
2) Choose Slide Show > Effects, or click the Animations Effects icon on the Main
toolbar.
3) Choose an Effects category from the pop-up menu above the main Effects window.
Notice how the thumbnail images change with each category.
4) Click on a thumbnail image to select that animation. Notice that by moving the
pointer over a thumbnail image the animation name appears in a tooltip (if tooltips are
activated).
5) Choose an animation speed from the pop-up window below the main Effects window.
6) Click the Assign button.
7) Click the Preview button. The Preview window appears.
8) Click in the Preview window to view the animation effect.
9) Click the close button on the Preview window, or click the Preview button again to
close the Preview window.
Tip: To simply make each bulleted line appear one at a time on your click (no animated
movement), select the bulleted text. Next, click the Animation Effects icon. Click Text Effects,
then scroll down to the bottom of the list and select Other. Click the Appear icon
to select
it, then click Assign. Close the Animation Effects window. Now, when you reach this bulleted
list in your slide show, each bulleted line appears as you click.
To apply separate animation effects to each line in a bulleted or numbered list, or to apply an
effect, other than the one described above, to each line, each line of text must be in its own text
box. Select each text box and apply each animation effect separately. Do not worry about doing
this in order because you can change the order later. It takes some work, but the overall effect of
having each bullet point slide into view on your click, for example, is quite a nice one.
éÚêøÎ÷вÔ5Õ×ÖÔвêøÖ?ÞÐoÎòÔ¾Ú?ÑÓÑ:ÚCõ{Þ,Ø
1) With the Animation Effects window open, select the desired object.
2) Click the Effects button, if necessary.
3) Choose Favorites form the Effects categories box.
4) Click the No Effect thumbnail (the empty rectangle) to select it.
5) Click the Assign button.
!#" $%'& ()*+,&-+/. 01)232546" $87:9;#<);>=?6" @
àî
5 DF oF ÁÂÀÃD²8
:À,oF 6 LN·NÆÇ
Å
ÈLKÉÅ·N
OpenOffice.org provides many options for printing a presentation: with multiple slides on
one page, with a single slide per page, with notes, as an outline, with date and time, with
page name, and more.
To print a presentation:
1) Choose File > Print.
2) Click Options. The Printer Options window appears. See Figure 36: The Printer
Options window.
3) Choose the desired settings.
4) Click OK.
Under Contents:
Ë Drawing prints one slide per page, full page, in landscape.
Ë
Notes prints a single slide per page with any notes entered for that slide in Notes View.
Ë
Handouts prints the slides in reduced size on the page, from a single slide up to six
slides per page. To choose how many slides print on each page, first switch to
Handout View, then choose Format > Modify Layout. See Figure 37: The Modify
Slide window. Click the thumbnail image showing how many slide per page you want
to print, then click OK. Now follow the print instructions above and choose Handouts.
Ë
Outline prints the title and headings of each slide in outline format.
Checking this option will print
two slides per page so you can
print on both sides and fold the
page in half to make a brochure.
Checking this option will print
any pages you have set to not
display during the slide show.
Figure 36: The Printer Options window
!#" $%'& ()*+,&-+/. 01)232546" $87:9;#<);>=?6" @
à,ù
5 DF oF ÁÂÀÃD²8
:À,oF Figure 37: The Modify Slide window
!#" $%'& ()*+,&-+/. 01)232546" $87:9;#<);>=?6" @
àû
7
8 ÿD#oF Á1fD{
:ÀB%F Á/F 1'D:9 D ( À,
;#< ÈKL5·NÆÇ
$ ÿUTRUX^fY8adZä``
LÉÅ×INÆÇ
¼'?
N
×ÆL>=fL *
Å
lCY8[g
Portable Document Format files (PDFs) are compatible with most platforms. Impress has the
ability to save files as PDF (the extension is .pdf) which can be viewed by anyone who has a
freely available PDF viewer. Most computers now come with a PDF viewer already
installed, like Adobe's Acrobat Reader. On Linux, look for “xpdf”; on Mac, use the Preview
application. However, if you do not have a PDF viewer or if you have a Unix operating
system, visit this link to get a free viewer:
http://www.opengroup.org/public/acrobat.htm
Caution: Saving in PDF format does not retain animation and slide transitions and can
result in lost quality.
To export the presentation as a PDF:
1) Select File > Export as PDF. The Export window appears.
2) Select the location where you want the PDF file saved and type a name for the file.
3) Click Save. The PDF Options window appears. See Figure 38: PDF Options window.
4) In the Pages section, select which pages (slides) are to be included in the PDF. Define
a range of pages with a hyphen (example: 2-5).
5) In the Compression section, select the format most suitable for how the document
will be used. The compression choice affects both the quality of the PDF and its file
size.
Ë Screen optimized will produce the smallest file size (best for emailing to people on
a slow internet connection) with the lowest quality (not very suitable for printing).
Ë Print optimized will produce a somewhat larger file size but with greatly increased
print quality.
Ë Press optimized will produce the largest file size with the highest quality (suitable
for professional printing).
6) Click Export. The PDF file is generated.
!#" $%'& ()*+,&-+/. 01)232546" $87:9;#<);>=?6" @
ã@
7
8 ÿD#oF Á1fD{
:ÀB%F Á/F 1'D:9 D ( À,
Figure 38: PDF Options window
!#" $%'& ()*+,&-+/. 01)232546" $87:9;#<);>=?6" @
ã+
7
8 ÿD#oF Á1fD{
:ÀB%F Á/F 1'D:9 D ( À,
Note: You can also click the Export Directly as PDF icon
to create a PDF. However,
clicking the Export Directly as PDF icon will not give you the option to set compression
settings, described below. A PDF is immediately generated and saved to your desktop.
$ ÿUTRUX^fY8adZä``
[`§\ilCY8[g
Macromedia Flash (SWF) file format (.swf) was created to store “Flash movies,” animation
for the World Wide Web. Because almost all browsers play Flash movies (the Flash Player is
available as a free download for those without Flash-capable browsers), these files can be
viewed by just about anyone. With OpenOffice.org, you can export your Impress slide show
as a SWF file. To download the latest Flash Player for your operating system, go to:
http://www.macromedia.com/downloads/
Caution: saving in Flash format does not retain animation and slide transitions.
To export the presentation as a SWF file:
1) Choose File > Export.
2) Select the location where you want the SWF file saved and type a name for the file.
3) Under File Format, choose Macromedia Flash (.swf).
4) Click Save.
$ ÿUTRUX^fY8adZä``baBADC FE lCY8[g
HTML, or Hyper Text Markup Language, is language in which Web pages are written.
Saving Impress presentations in this format allows users to make a presentation part of a
Web site. Your presentation can be viewed by anyone with a web browser, regardless of
what operating system they use or what software they have.
Caution: saving in HTML format does not retain animation and slide transitions.
To export the presentation as an HTML file:
1) Create and name a new folder (for example, “mypresentation”) where you would like
to save the final HTML output. The name of the folder will also be the name of the
HTML file itself. If you are not sure where you would like the folder, use your
desktop temporarily and move the folder later.
Important: Depending on the size of your presentation and the amount of graphics it contains,
the HTML export function creates dozens of HTML, JPG, and GIF files. If you simply save to
your desktop (not in a specific folder) you will get dozens of separate HTML and graphics files
all over your desktop.
2) Select File > Export.
3) Select the location where you want the HTML file saved (the location where your
newly-created folder is) and type your new folder's name for the file name (for
example, “mypresentation”). Make sure that the file's name matches the folder's
name.
!#" $%'& ()*+,&-+/. 01)232546" $87:9;#<);>=?6" @
ã'Ì
7
8 ÿD#oF Á1fD{
:ÀB%F Á/F 1'D:9 D ( À,
4) Under File Format, choose HTML Document(OpenOffice.org Impress)(.htm).
5) Click Save. Your new folder is automatically chosen as the location. If your file name
does not match your folder name, at this point you will get the HTML Export
window. See Figure 39: HTML Export window. If you see this window at this point,
click Cancel, start again, and make sure that your file name matches your folder
name.
6) Click Save again. The HTML Export window appears (see Figure 38). This is an
AutoPilot (guide) that helps set up the HTML document.
7) Follow the AutoPilot. You can repeat these instructions and experiment with the
various settings. Remember to first create a new folder for each output.
8) Click Create at the end of the AutoPilot. A dialog box opens allowing you to save the
new file as an HTML design that you can can use again later. After experimenting
with the various settings, save the designs you like. Remember to give them
meaningful names (for example “black & gray buttons” or “text only”) so you will
remember later which one is which. Now when you get the HTML Export window,
you can choose Existing Designs under Assign Designs and see a list of all the
designs you have saved. Click one to select it. When selected, click Delete Selected
Design to delete it. See Figure 40: HTML export designs.
9) Finally, to view your HTML presentation, navigate to the folder you created, open it,
then double-click the .html file with the name you chose (for example,
“mypresentation.html”). The presentation will open in your default browser.
Figure 39: HTML Export window
!#" $%'& ()*+,&-+/. 01)232546" $87:9;#<);>=?6" @
ã'à
7
8 ÿD#oF Á1fD{
:ÀB%F Á/F 1'D:9 D ( À,
Figure 40: HTML export designs
G TgUabY8adZä`badcæ1`_íUY8adZä`
¼ Rd
gUX ¼ RUY8a_^
lCY8[g
OpenOffice.org's Impress file format is highly compatible with Microsoft's PowerPoint
format. You can open a PowerPoint presentation in Impress, edit it, then save it in its original
PowerPoint format or in Impress format. You can also create a new presentation in Impress
and save it as a PowerPoint file, for sharing your presentation with those who have yet to
discover the free OpenOffice.org office suite. What you cannot do is open an Impress file in
PowerPoint; Microsoft is just not playing nice—yet.
Ö?÷вÔ5Õ×Ö4
Ô #êôÜ:Ú5ØyØÑвÙoÚ¾Ö5ØÖ ßCÎ5ñÚÜ,ßCÎòвÔ?ÞÑвÙoÚ
1) Choose File > Save As.
2) Select the location where you want the PowerPoint file saved and type a name for the
file.
3) Under Save As Type choose Microsoft PowerPoint 97/2000/XP (.ppt; pps).
4) Click Save.
% ôCÚÔвÔ5Õ×Ö ßCÎ5ñÚÜ,ßCÎòвÔ?ÞÑвÙoڬвÔ4#êôÜ:Ú5ØyØ
1) Launch Impress.
2) Choose File > Open. Under Files of Type make sure that All files (*.*) is displayed.
If it is not, choose it from the drop-down menu.
3) Navigate to the PowerPoint file.
4) Select the file.
5) Click Open.
The PowerPoint file can now be edited and saved as an Impress or PowerPoint file. To save
the file as an OpenOffice.org file, follow the previous instructions in Saving an Impress file
as a PowerPoint file, but in Step 3, choose OpenOffice.org 1.0 Presentation (.sxi) as the
Save as Type.
Note: Sometimes there are inconsistencies that occur when a Microsoft document is translated
into Impress. However, these are usually easy to fix. Most often, the document is blurred or
displays inconsistent fonts. To fix these problems, highlight the type that needs to be corrected
and reformat the text to the desired format. These steps also work for most of the other problems
that occur. Select the item that needs to be corrected and then implement the correct settings.
!#" $%'& ()*+,&-+/. 01)232546" $87:9;#<);>=?6" @
ã,ã
7
8 ÿD#oF Á1fD{
:ÀB%F Á/F 1'D:9 D ( À,
!#" $%'& ()*+,&-+/. 01)232546" $87:9;#<);>=?6" @
ã'ç
H Ã,ÿ'³F 8IH:J 1K'D#µ:´,LNM
O
ÈÈKƸýN <PORQ
U ¯¢C¦8¨WVM¦YXCZ? [3[5¨y¦
Enter key
Esc
Spacebar
Cursor keys
Tab
Shift + Tab
Alt+Down Arrow
Activate the focused button in a dialog box.
Terminate the action or dialog box.
Toggle the focused check box in a dialog box.
Change the active control field in an option section of a dialog box.
Advance focus to the next section or element in a dialog box.
Move the focus to the previous section or element in a dialog box.
Open the list of the control field currently selected in a dialog. These
shortcut keys apply not only to combo boxes, but also to icon buttons with
pop-up menus. Close an opened list by pressing the Escape key.
Delete the selected item(s) into the recycle bin.
Deletes the selected item(s) without putting them in the recycle bin.
Go up one level (go back) when a folder is shown.
Go to the next document that is open (except when positioned at the start of
a header – instead a tab is inserted).
Go to the previous document that is open.
Open a document.
Save the current document.
Create a new document.
Open Templates and Documents dialog box.
Print a document.
Exit the application.
Cut the selected element(s).
Copy the selected item(s).
Paste from the clipboard.
Select all.
Undo the last action.
Open the Find & Replace dialog box.
Search for the least entered search term.
Toggle the view between Full screen mode/normal mode.
Re-create the document window.
Apply the italic attribute to the selected area. If the cursor is positioned in a
word, this word is also marked in italic.
Apply the bold attribute to the selected area. If the cursor is positioned in a
word, this word is also marked in bold.
Apply the underline attribute to the selected area. If the cursor is positioned
in a word, this word is also underlined.
Set the cursor on the Load URL field on the Function bar.
Transfer the word that was originally marked as unknown/incorrect
(original) to the input row (word).
Del
Shift+Del
Backspace
Control + Tab
Shift + Control + Tab
Control + O
Control + S
Control + N
Shift+Control+N
Control + P
Control + Q
Control + X
Control + C
Control + V
Control + A
Control + Z
Control + F
Control + Shift + F
Control + Shift + J
Control + Shift + R
Control + I
Control + B
Control + U
Control+Shift+O
Alt + O
O
2SÆL5» ¹×B¾T ÈÈKƸýN <
\]Q_^ ¹Æ»·N
!#" $%'& ()*+,&-+/. 01)232546" $87:9;#<);>=?6" @
¾T ã'ë
H Ã,ÿ'³F 8a`bJ!c ´'µ:oF dNM
efV5£¨y¦:¡#¢C£gXCZ? [3[5¨y¦
F1
Open the OpenOffice.org Help menu.
Shift + F1
Access Context Help.
Control+F4 or
Alt+F4
Close the current document (close OpenOffice.org when the last open
document is closed).
F6
Set focus in next subwindow (e.g. document/data source view).
Shift+F6
Set focus in previous subwindow.
Control + F7
Access the Thesaurus.
F8
Edit Points.
Shift+F10
Open the context menu.
Control + F12
Reveal Drawing View.
!#" $%'& ()*+,&-+/. 01)232546" $87:9;#<);>=?6" @
ãî
± '³, 8
¶ Ƹ <
!#" $%'& ()*+,&-+/. 01)232546" $87:9;#<);>=?6" @
ã'ù