1
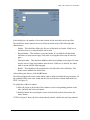
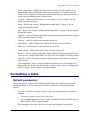
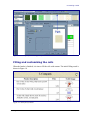
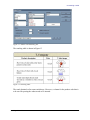
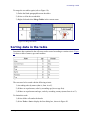
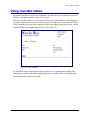
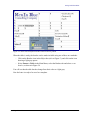
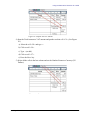
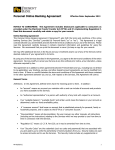
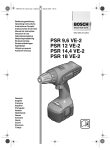
Working with Tables:
How to use tables in OpenOffice.org Writer
Title:
Version:
First edition:
First English
edition:
Working with Tables: How to use tables in OpenOffice.org Writer
1.0
January 2005
January 2005
Contents
Overview..........................................................................................................................................ii
Copyright and trademark information.........................................................................................ii
Feedback..................................................................................................................................... ii
Acknowledgments.......................................................................................................................ii
Modifications and updates.......................................................................................................... ii
Why use a table in a document........................................................................................................ 1
How to insert a table....................................................................................................................1
Object bar for the tables.............................................................................................................. 3
Formatting a table............................................................................................................................ 4
Default parameters...................................................................................................................... 4
Individual cells............................................................................................................................ 4
Formatting the header..................................................................................................................5
Merging cells and changing background.....................................................................................6
Adding a logo to the table header................................................................................................8
Filling and customizing the cells.................................................................................................9
Setting the number formats....................................................................................................... 10
Adding columns........................................................................................................................ 12
Splitting and merging tables......................................................................................................13
Sorting data in the table................................................................................................................. 14
Deleting, copying, or moving a table............................................................................................. 16
Deleting a table..........................................................................................................................16
Copying a table..........................................................................................................................16
Moving/cutting a table.............................................................................................................. 16
Splitting cells................................................................................................................................. 17
Using invisible tables..................................................................................................................... 18
Using mathematic functions in a table...........................................................................................20
Working with Tables
i
Overview
Overview
This document is intended for first-time users of OpenOffice.org. In it, you will learn how to
insert and personalize a table in a document using OpenOffice.org Writer.
You will find suggestions and examples of practical usage of tables in various document
types.
Copyright and trademark information
The contents of this Documentation are subject to the Public Documentation License,
Version 1.0 (the "License"); you may only use this Documentation if you comply with the
terms of this License. A copy of the License is available at:
http://www.openoffice.org/licenses/PDL.rtf.
The Initial Writer of the Original Documentation is Vincenzo Ponzi. All Rights Reserved.
(Initial Writer contact:[email protected].) Use the Initial Writer contacts to report errors
in the documentation. For questions regarding how to use the software, subscribe to the Users
Mail List and post your question there: http://support.openoffice.org/index.html.)
All trademarks within this guide belong to legitimate owners.
Feedback
Please direct any comments or suggestions about this document to:
[email protected].
Acknowledgments
Many thanks and congratulations to the developers who provided us with a great product!
Thanks to the community of authors, reviewers and support people for getting the project up
and running. This is a great contribution for open software freedom.
Modifications and updates
Version
Date
1.0
4 January 2005
Working with Tables
Description of Change
First published edition
ii
Why use a table in a document
Why use a table in a document
With OpenOffice.org Writer, a large variety of documents where tables may be useful can be
created; for example:
•
Technical, financial or statistical reports
•
Product catalogs showing descriptions, prices, characteristics and photography of
products
•
Bills or invoices
•
Lists of names with address, age, profession and other information
This list is just a sample of various document types where it is convenient to use tables to
organize the text in an ordered structure.
In some cases tables can be used to position text in areas of a document instead of using
several Tab characters. For example, a business may prepare a template of a letter with their
logo, the sender, receiver, date, and subject fields correctly positioned in a table with
invisible borders.
How to insert a table
Before inserting a table in a document, you should roughly define the number of rows and
columns required. However, this is just a starting point because you can change the number
of rows and columns as you edit the document.
To insert a table, position the cursor and click to define the insertion point, then open the
Insert Table dialog box using any of the following methods:
•
Press Control+F12.
•
From the main menu select Insert > Table.
•
Click on the Insert icon in the Main Toolbar (the first one on top of the bar).
Any of these methods displays the dialog box illustrated in Figure 1.
Working with Tables
1
Why use a table in a document
Figure 1. Dialog box to create a table
In this dialog box, the number of rows and columns for the new table can be specified.
The checkboxes in the Options area are used for the initial setup of the following table
characteristics:
•
Header – This checkbox defines the first row of the table as a header. If this box is
checked, the text is centered and the font is bold.
•
Repeat Header – This checkbox causes the header, if it is defined with the header
checkbox, to repeat on each page if the table is so long that it does not fit onto one
page.
•
Don't split table – This checkbox inhibits a table from splitting across pages if it starts
near the end of a page and continues onto the next. If this box is checked, the whole
table is moved onto the following page.
•
Border – This checkbox will surround each cell of the table with a black line. This
border can be modified or deleted later.
After making your choices, click the OK button.
The Writer program will create a table whose width is delimited within the page margins. All
the columns will have the same width, and the ruler will show the column separations (see
STEP 1 in Figure 2).
To modify the width of a column:
1) Move the cursor to the border of the column or to the corresponding position on the
ruler, and click the left mouse button.
2) Hold the button down and drag the cursor to the desired position, then release the
mouse button.
STEP 2 in Figure 2 shows the first column already reduced, and the last one being reduced.
Working with Tables
2
Why use a table in a document
Figure 2. How to modify column width
Object bar for tables
In addition to the commands already presented, it is also possible to create and customize a
table using the icons on the Object bar.
When a table is created or an existing table is selected, the Object bar is automatically
changed to display the icons affecting a table. Figure 3 illustrates the layout of the Object bar
and gives a concise explanation of the function of each button.
Figure 3. Object bar
•
Sum – Refer to the section “Using mathematical functions in a table“ on page 21 for
an example of using this button.
•
Fixed – Changes to column width only affect the adjacent cell, and not the entire table.
For example, if all the cells of a fixed table are 1 inch wide and the first cell is
increased to 1.5 inches, cell 2 will reduce to just 0.5 inch, while the others stay as they
were originally.
Working with Tables
3
Why use a table in a document
•
Fixed, proportional – Changes affect the entire table. However, the changes occur
proportionally and the width of the table remains constant. For example, when you
widen a cell, the adjacent cells become proportionally narrower, and in this scenario, a
wider cell will shrink more than a narrower one.
•
Variable – Changes affect the table size. For example, when you widen a cell, the
width of the table increases.
•
Merge – Refer to the section, “Splitting and merging tables” on page 14 for an
example of using this button.
•
Split – Refer to the section, “Splitting and merging tables” on page 14 for an example
of using this button.
•
Optimize – Opens a floating toolbar that contains functions for optimizing the spacing
of the rows and columns in a table.
•
Add row – Adds a row below the currently selected row.
•
Add column – Adds a column to the right of the currently selected column.
•
Delete row – Deletes the row of the currently selected cell.
•
Delete column – Deletes the column of the currently selected cell.
•
Borders – Opens a floating toolbar that contains options for displaying borders. Refer
to the section, “Using invisible tables” on page 19 for an example of using this button.
•
Line style – Opens a floating toolbar that contains options for the thickness and style
of the borders.
•
Text background – Opens a floating toolbar that contains colors you can apply as a
background color for the currently selected cell. Refer to the section, “Formatting the
header” on page 5 for an example of using this button.
Formatting a table
Default parameters
When a new table is created, it has default parameters that can be modified to satisfy the
needed specifications. When a table with a header is created, the following defaults are
applied:
•
•
The cells of the first row use the Table Heading style, which means, in the default
template:
•
The text is set with a bold or bold+italic font.
•
The paragraph alignment is Center, with an indentation of 0.64 cm before the text
and 0 cm after. The first letter is capital.
The remaining cells use the Table Contents style, which means, in the default
Working with Tables
4
Formatting a table
template:
•
The text font is the same as the Text Body style.
•
The paragraph alignment is Left, with an indentation of 0.64 cm before the text and
0 cm after. The first letter is capital.
•
When you write a long text in a cell, it wraps automatically to fit into the cell.
•
If you vary the width of a column, the text written in all the cells of that column is
automatically adjusted
Individual cells
Each cell can be considered as an individual document where you can set up many
parameters independently from other cells. For example it is possible to:
•
Format the Characters – You can change the font style and the font and and
background colors.
•
Set different indentation values – When you select a cell, the ruler shows the
indentation points with gray triangles. You can easily vary the indentation by clicking
and dragging these triangles (see Figure 4).
•
Change the text alignment – For example, a number can be aligned to the right, while
text is aligned to the left.
To change the setup of a cell:
1) Select the cell or range of cells to be modified.
2) Right-click with the mouse.
3) From the context menu that appears, select the property that you wish to modify.
Formatting the header
Normally the first thing to do after having inserted a table is to format the header. In the
example in Figure 4, a table that lists a catalog of T-Shirts is created with this structure:
•
1st column = description
•
2nd column = price
•
3rd column = image of the T-Shirt.
Figure 4 shows an initial setup of the table.
Working with Tables
5
Formatting a table
Figure 4. Initial set-up of the header
Now a second header, with a different background, needs to be added at the top of the table
to show the name of the factory.
Adding a row
1) Select one cell in the header and right-click with mouse.
Note: Do not click on the Add Row icon on the Object bar, because it adds a row below the
selected one.
2) On the context menu select Row > Insert.
3) This will display a window where you can select the number of rows to add after or
before the selected one. In Figure 5, the context menu and the row selection window
are shown together. However, they do not appear at the same time.
4) Set Amount to 1 and click the Before button.
Note: The new added row will have the same characteristics as the header row.
Working with Tables
6
Formatting a table
Figure 5. Adding a row before the header
Merging cells and changing background
The next steps are to merge the three cells of the first row into a single cell, change the
background color, and add the text.
1) Select the three cells in the first row.
2) Right-click and select Cell > Merge on the context menu.
3) Right-click in the first row, now a single cell, and select Table.
4) In the window that appears (shown in Figure 6), select a color for the cell background.
Working with Tables
7
Formatting a table
Figure 6. Select the background
In Figure 6, the selected color is a light green, and applies to that cell only.
To make the text in the header row larger:
1) Select the first cell and right-click.
2) From the context menu select Size > 18.
3) Type the text, T-Company.
The resulting header is illustrated in Figure 7.
Figure 7. Final header
Working with Tables
8
Formatting a table
Adding a logo to the table header
To insert a company logo, in the header:
1) Select the top header cell.
2) Select Insert > Graphics > From File and select the graphic file.
3) While the inserted graphic is selected, right-click and select Wrap > Page Wrap from
the context menu.
4) Drag the image to the rightmost side of the cell.
Note: Be careful not to drag the image outside of the header cell. If you do, it won't be separated
from the rest of the cells.
The final result is shown in Figure 8.
Figure 8. Header with logo
An alternative option to a plain colored background fill is to choose a graphic from the
gallery. This is achieved by following the same instructions as above, but by selecting
Graphic instead of color in the dialog box shown in Figure 6. This will enable you to browse
to the graphic of your choice.
If you are not sure where the graphic is stored, you can open the Gallery first and view the
path, as shown in Figure 9:
1) Click on the Gallery icon in the Function Bar.
2) Select Backgrounds in the left menu and find the desired image.
3) The text just above the background images shows the path for the file.
4) Click on the Browse button and specify the path.
Working with Tables
9
Formatting a table
Figure 9. Find the path for the background file
Filling and customizing the cells
When the header is finished, it is time to fill the cells with content. The initial filling result is
shown in Figure 10.
Figure 10. Table full of content
Working with Tables
10
Formatting a table
By default, text entered into table cells is aligned horizontally to the left and numbers are
aligned to the right. In addition, if more than one row of text is entered, or a graphic is used,
as in Figure 10, text aligns vertically to the top of the cell and numbers to the bottom.
As in the header, graphics are inserted with no wrap. It is wise to change the wrap style to
Page Wrap, so that they can be positioned where you want in the cell.
To vertically center align all of the text and numbers in the table:
1) Move the cursor to the upper left-hand cell under the header, click and drag to the
lower left hand cell.
Note: By selecting all of the cells, the images will also be aligned.
2) Right-click and select Cell > Center in the context menu as shown in Figure 11
Figure 11. Cell contents aligned to center
Setting the number formats
In the second column the numbers represent the cost of the product. These can be formatted
to display as currency as shown in Figure 12.
1) Select the cells in the second column.
2) Right click and select Number Format in the context menu or Format > Number
Format in the main menu
3) In the category box select Currency.
4) In the Format box choose the country and format.
5) You may need to select the checkbox next to either Thousands separator or Negative
numbers red.
Working with Tables
11
Formatting a table
Figure 12. Number Format dialog box
The resulting table is shown in Figure 13
Figure 13. Resulting table
The result obtained so far seems satisfactory. However, a column for the product code that is
to be used for posting the orders needs to be inserted.
Working with Tables
12
Formatting a table
Adding columns
To add a new column before the first one:
1) Select one or more cells in the first column.
2) Right click and select Column > Insert.
Note: Do not click on the Add Column icon in the Object bar because it adds a column after the
selected one.
3) In the dialog box that appears, specify the number and position of the columns to add,
as in Figure 14.
Figure 14. Insert Column dialog box
The unexpected result of this operation is shown in Figure 15.
Figure 15. Column added but.... wrong
This happened because the table is not symmetric: the first row has only one column, while
the remaining rows have three. That is why it is better to plan the definitive layout before
creating a table. However, the situation is not hopeless.
To solve this problem, undo the last operation and read the next section.
Working with Tables
13
Formatting a table
Splitting and merging tables
To resolve the issue, the following three things need to happen:
1) Split the table into two parts just below the first row.
2) Add a column to the lower part.
3) Merge the tables again.
To split the previous table just below the first row (refer to Figure 16):
1) Select a cell in the second row.
2) Right-click and select Split Table in the context menu.
3) A dialog will pop up regarding the header. Select no header.
The table is then split in two parts separated by a blank paragraph (note the paragraph symbol
between the first and the second row).
Figure 16. Table split in two parts
Now it is possible to add a column repeating the procedure described in “Adding columns”,
and adjust the width of the columns to obtain the result shown in Figure 17.
Figure 17. Column added before the left column
Working with Tables
14
Formatting a table
To merge the two tables again (refer to Figure 18):
1) Delete the blank paragraph between the tables.
2) Select a cell in the second table.
3) Right-click and select Merge Tables in the context menu.
Figure 18. Merge the tables
Sorting data in the table
Sometimes data contained in the cells may need to sorted according to certain criteria. Figure
19 shows a table of names, ages and countries.
Figure 19. Table with data to reorganize
The rows need to be sorted with the following criteria:
1) Ascending order by names (that is, from A to Z).
2) If there are equal names, order by ascending age (lowest age first).
3) If there are equal names and ages, order by ascending country (names from A to Z).
To obtain this result:
1) Select all the cells under the header.
2) Select Tools > Sort to display the Sort dialog box, shown in Figure 20.
Working with Tables
15
Sorting data in the table
3) In the Sort window, select the following as Sort criteria:
Key 1 – Column 1 – Ascending
Key 2 – Column 2 – Ascending
Key 3 – Column 3 – Ascending
4) Click the OK button.
Figure 20. Selection of Sort criteria
Note: If you select just the cells of the first column in the example, the sort affects the first
column only, while the others remain unchanged. In such a case, you risk mixing the data of the
rows.
Figure 21 shows the result of the Sort operation:
Figure 21. Results of Sort
Working with Tables
16
Deleting, copying, or moving a table
Deleting, copying, or moving a table
Deleting a table
There are two ways to delete a table from a document.
First method:
1) Click in the table.
2) Press Control+A to select all the cells.
3) Select Format > Row > Delete in the Main menu.
Second method:
1) Select from the end of the paragraph before the table to the start of the paragraph after
the table.
2) Press the Delete or Backspace key.
Copying a table
To copy a table from one part of the document and paste it in another part, use this method:
1) Select from the end of the paragraph before the table to the start of the paragraph after
the table, and then press Control+C or click on the Copy icon in the Function Bar.
2) Move the cursor to the target position and click on it to fix the insertion point.
3) Press Control+V or click on the Paste icon in the Function Bar to paste the table.
Moving/cutting a table
To move a table from one part of a document to another:
1) Select from the end of the paragraph before the table to the start of the paragraph after
the table, and then press Control+X or click on the Cut icon in the Function Bar.
2) Move the cursor to the target position and click on it to fix the insertion point.
3) Press Control+V or click on the Paste icon in the Function Bar.
Working with Tables
17
Splitting cells
Splitting cells
You may often need to create asymmetric tables, where some cells need to be split into two
or more parts either vertically or horizontally. In this case, you may start creating a normal
table, and then use the split cells function to subdivide the desired cells.
To create the asymmetric table illustrated in Figure 22, perform the following steps:
1) Create a simple table with one header and one content row, and adjust the column
widths as shown in Step 1 in the figure.
2) Select the third and fourth cells in the second row.
3) Click on the Split Cells icon in the Object bar (refer to Figure 3).
4) Select the number of cells, you require as shown in Step 2 in the figure.
Note: Use the same process for splitting cells vertically.
Figure 22. Making a simple asymmetric table
Working with Tables
18
Using invisible tables
Using invisible tables
Sometimes it might be useful to use asymmetric invisible tables just to position several text
fields in a document instead of using Tab or Spaces.
The term invisible, in this case, means that the table exists, but its borders are not displayed
or printed. Suppose that a business wants to prepare a letterhead to use for commercial mail.
In this letter they put a logo in the upper left corner, their address in the right corner, and the
other fields that one normally finds in a letter. (See Figure 23.)
Figure 23. Letter template
To obtain this result, create the table shown in Figure 24, by splitting and merging cells,
adjusting the column width, and modifying the position and style of the text. During these
operations the table borders are visible.
Working with Tables
19
Using invisible tables
Figure 24. Table with transparent borders that will not be printed
When the table is ready, the borders can be made invisible using one of these two methods:
•
Click on the Borders icon in the Object bar (refer to Figure 3), and click on the icon
showing a light gray square.
•
Select Format > Table in the Main Menu, select the Borders tab and select set no
borders, as shown in Figure 24.
You will see that the table borders change from their color to a light gray.
Now the letter is ready to be saved as a template.
Working with Tables
20
Using mathematical functions in a table
Using mathematical functions in a table
In a table in a Writer document, it is possible to use some of the mathematical functions
which are normally implemented by the OpenOffice.org Calc application. This facility is
useful when you need to write an invoice or a bill.
Figure 24 shows an example of an invoice containing a table where all the numeric values of
the last column have been computed using some simple math functions.
Figure 25. Example of an invoice
The upper part of the invoice is a transparent table containing text, image and date. The lower
part is a normal table with borders.
Each cell in a table is identified by a letter-number combination corresponding to its
coordinates. The letter identifies the column, the number the row.
The identifiers are used when you want to perform arithmetic operations with the numbers
contained in a cell. In Figure 26 you can see the identifiers for each cell in the table being
used.
Working with Tables
21
Using mathematical functions in a table
Figure 26. Cell identifiers
To fill the table:
1) Write the headings in each column.
2) Write the descriptions of the articles, their quantity and unitary prices.
3) Write Total Amount in cell <B6>, VAT 12% in cell <B7> and TOTAL in cell <B8>.
Then it is necessary to perform the following arithmetic operations:
1) Multiply the Quantity by Price for each product and put the result in the Amount
column.
a) Select cell <D2> and type =. The Object bar changes automatically, as you can see
in Figure 27. In the leftmost side of the bar you can see the coordinates of the
selected cell.
b) Click on cell <B2>. The identifiers of this cell are automatically displayed in the
Object bar, and inserted into cell <D2>.
c) Type * (to multiply).
d) Click on cell <C2>. You can see the final formula (<B2>*<C2>) displayed both in
the selected cell and in the Object bar.
e) Press the Enter key
f) Repeat steps a to e for the next row.
Working with Tables
22
Using mathematical functions in a table
Figure 27. Writing a formula in cell <D2>
2) Sum the contents of the cells in the Amount column and put the result in cell <C6>.
(See Figure 28.)
a) Select cell <C6>.
b) Click on the Sum icon “∑” in the Object bar. The Object bar changes and displays
the Sum function: sum(<D2>|<D3>!<D4>!<D5>). Press the Enter key.
Figure 28. Sum the column values in cell <C6>
3) Compute the Value Added Tax and put the result in cell <C7> (See Figure 29
a) Select the cell <C7> and type =.
b) Click on cell <C6>.
c) Type: *12% .
d) Press the Enter key.
Working with Tables
23
Using mathematical functions in a table
Figure 29. Compute the VAT amount
4) Sum the Total Amount to VAT amount and put the result in cell <C8>. (See Figure
30.)
a) Select the cell <C8> and type =.
b) Click on cell <C6>.
c) Type + (to add).
d) Click on cell <C7>.
e) Press the Enter key.
5) Select all the cells in the last column and set the Number Format as Currency (US
Dollars).
Figure 30. Compute the Total
Working with Tables
24
Using mathematical functions in a table
To display the list of the mathematical functions that you can use in a table:
1) Select a blank cell and type = to display the Object bar for the formula
2) Click on the Formula icon as shown in Figure 31.
Figure 31. Mathematical functions available in a table
Working with Tables
25