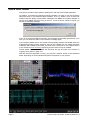
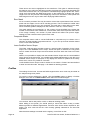
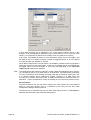
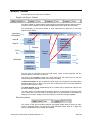
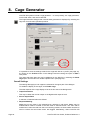
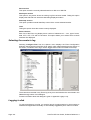
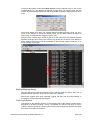
1
Advanced Measurement Technology
User Guide for
OmniTek XR
Software Version: 2.3
12th March 2008
© 2008 Image Processing Techniques Ltd. All rights reserved
This documentation contains proprietary information of Image Processing Techniques Ltd. No part of this
documentation may be reproduced, stored in a retrieval system or transmitted in any form or by any
means, electronic, mechanical, recorded or otherwise without the prior written permission of Image
Processing Techniques Ltd.
The information contained in this documentation was prepared by Image Processing Techniques Ltd. with
all reasonable care and is believed to be accurate. However Image Processing Techniques Ltd. does not
assume responsibility for loss or damage resulting from omissions, inaccuracies or errors contained
herein. The information contained in this document is subject to change and revisions hereto or new
additions may be issued to incorporate such changes.
Trademarks Please note that Windows, Windows Professional, and Windows XP, are all trademarks of
Microsoft Corporation
Page 2
OmniTek XR User Guide, Software Release 2.3
Table of Contents
1.
INTRODUCTION ..................................................................................................7
From Power-Up .............................................................................................................................................. 7
Quick Start Guide ....................................................................................................................................................... 8
Display Mode.................................................................................................................................................. 9
Video Setup .................................................................................................................................................... 9
Windows Layout........................................................................................................................................... 10
Status Bar...................................................................................................................................................... 10
Image Source Selection................................................................................................................................. 11
Program Shortcuts .................................................................................................................................................... 11
‘Shift’-Key Shortcuts .................................................................................................................................... 11
Presets ........................................................................................................................................................... 11
Window sizes................................................................................................................................................ 13
Size and Position Snap.................................................................................................................................. 13
2.
MENUS ...............................................................................................................14
File menu.................................................................................................................................................................... 14
Preferences.................................................................................................................................................... 14
Window Layouts and Snapshots ................................................................................................................... 15
Show Menu ................................................................................................................................................................ 15
Run Menu .................................................................................................................................................................. 16
Configuration Menu.................................................................................................................................................. 16
Analyzer Menu .......................................................................................................................................................... 17
Audio Menu ............................................................................................................................................................... 18
Output Menu ............................................................................................................................................................. 18
Full Screen Menu ...................................................................................................................................................... 19
Window Menu ........................................................................................................................................................... 19
Help Menu ................................................................................................................................................................. 19
About Menu ............................................................................................................................................................... 19
3.
ENGINEERING SETTINGS ................................................................................20
Video: General Settings ............................................................................................................................................ 20
Video: Generator Settings ........................................................................................................................................ 22
Video: Analyzer Settings .......................................................................................................................................... 23
Profiles.......................................................................................................................................................... 24
Video: Dual Link ....................................................................................................................................................... 25
Picture Settings.......................................................................................................................................................... 26
Time Code: Reader Settings..................................................................................................................................... 27
Video Index: Reader Settings................................................................................................................................... 28
OmniTek XR User Guide, Software Release 2.3
Page 3
Wide Screen Signalling: (Line 23) Reader Settings ................................................................................................28
Teletext/OP-47: Reader Settings ..............................................................................................................................29
Closed Caption: Reader Settings..............................................................................................................................30
4.
TOOLBARS........................................................................................................31
Closed Caption Log Toolbar ....................................................................................................................................31
Crosshair Toolbar .....................................................................................................................................................32
Cursors Toolbar.........................................................................................................................................................32
Region of Interest Toolbar........................................................................................................................................33
Run (Transport) Toolbar..........................................................................................................................................33
Source Toolbar...........................................................................................................................................................35
Video Standard Toolbar ...........................................................................................................................................36
Window Toolbar........................................................................................................................................................37
5.
APPLICATION WINDOWS.................................................................................39
Window Controls.......................................................................................................................................................39
Options menu ................................................................................................................................................39
Window menu ...............................................................................................................................................40
Audio PPM Window..................................................................................................................................................40
Audio Lissajous window ...........................................................................................................................................41
Options menu ................................................................................................................................................41
Audio Status window.................................................................................................................................................42
Options menu ................................................................................................................................................42
Cage Window .............................................................................................................................................................43
Closed Caption Window ...........................................................................................................................................44
Data View Window....................................................................................................................................................45
Extended View ..............................................................................................................................................46
Options menu ................................................................................................................................................46
Delay Measurement window.....................................................................................................................................47
Options menu ................................................................................................................................................47
Event Log window .....................................................................................................................................................48
Gamut Window..........................................................................................................................................................49
Options menu ................................................................................................................................................49
Generator window .....................................................................................................................................................50
Mini-Pic Window.......................................................................................................................................................50
Options menu ................................................................................................................................................51
Vector Scope Window ...............................................................................................................................................53
Panel Controls ...............................................................................................................................................54
Options & Window menus ............................................................................................................................54
Page 4
OmniTek XR User Guide, Software Release 2.3
Video Status window................................................................................................................................................. 55
Options menu................................................................................................................................................ 55
Waveform Window ................................................................................................................................................... 56
Area displayed .............................................................................................................................................. 57
Panel Controls............................................................................................................................................... 58
Options Menu ............................................................................................................................................... 59
Colour Mode menu ....................................................................................................................................... 61
Waveform Histogram Window ................................................................................................................................ 61
Options menu................................................................................................................................................ 62
Region of Interest toolbar......................................................................................................................................... 63
6.
FULL SCREEN MODE .......................................................................................65
Entering Full Screen Mode....................................................................................................................................... 66
Control Facilities in Full Screen Mode.................................................................................................................... 66
Defining Full Screen Views....................................................................................................................................... 67
Overall Characteristics.................................................................................................................................. 67
The Layout Builder....................................................................................................................................... 68
7.
GENERATOR FUNCTIONS ...............................................................................70
Generator Menus ...................................................................................................................................................... 70
File Menu...................................................................................................................................................... 70
View Menu ................................................................................................................................................... 72
Source Menu ................................................................................................................................................. 72
Pattern Menu................................................................................................................................................. 72
Window Menu .............................................................................................................................................. 73
Generator Toolbar .................................................................................................................................................... 73
Pattern Creation........................................................................................................................................................ 74
Frame-based patterns .................................................................................................................................... 74
Sequences (Motion-Capture option only) ..................................................................................................... 74
Grabbing Images (Motion-Capture option only) ................................................................................................... 75
Full Frame Record/Playback (Advanced option only)........................................................................................... 76
Folder Monitor .......................................................................................................................................................... 77
Playlists ...................................................................................................................................................................... 78
Playlist Display ............................................................................................................................................. 78
Playlist options.............................................................................................................................................. 79
Important Notes: ........................................................................................................................................... 81
8.
CAGE GENERATOR..........................................................................................82
9.
VIDEO CHECKING FEATURES ........................................................................84
Video Status Display ................................................................................................................................................. 84
Data Displayed.............................................................................................................................................. 85
Error Display Modes..................................................................................................................................... 87
Resetting Errors ............................................................................................................................................ 88
Options menu................................................................................................................................................ 88
OmniTek XR User Guide, Software Release 2.3
Page 5
10.
AUDIO CHECKING FEATURES ........................................................................89
Audio Level Displays (PPMs) ...................................................................................................................................89
Embedded Audio PPMs ................................................................................................................................89
Dolby-E Audio PPMs....................................................................................................................................94
AES/EBU Audio PPMs.................................................................................................................................96
Audio Status Display .................................................................................................................................................97
Embedded Audio status information .............................................................................................................98
Dolby-E information .....................................................................................................................................98
AES/EBU Status information........................................................................................................................98
Options menu ................................................................................................................................................98
Dolby Frame Data (where supported) .....................................................................................................................99
Display within the Audio Status Window ...................................................................................................100
Playback ...................................................................................................................................................................103
Lissajous Window....................................................................................................................................................103
11.
LOGGING .........................................................................................................104
Event Logging ..........................................................................................................................................................104
Event Log Window .....................................................................................................................................104
Selecting the events to log...........................................................................................................................106
Logging to disk ...........................................................................................................................................106
SNMP Configuration and use.................................................................................................................................109
SNMP Configuration Problems...................................................................................................................109
12.
MEASURING AUDIO/VIDEO DELAYS ............................................................110
Important: System requirements .................................................................................................................110
Supplied Test Sequences .........................................................................................................................................110
Playing the Test Sequence...........................................................................................................................111
Relative A/V Delay Testing .....................................................................................................................................113
Measurement using the Dolby-E (RVF-based) test sequence .....................................................................113
Measurement using the PCM-Only (YUV-based) test sequence ................................................................114
Reference Timing.....................................................................................................................................................115
Differences between inputs .....................................................................................................................................116
APPENDIX 1: FILE TYPES.........................................................................................117
Generic Files ...............................................................................................................................................117
OmniTek-specific Files ...............................................................................................................................117
Generator patterns .......................................................................................................................................118
APPENDIX 2: FILTERING ..........................................................................................119
Making the required selection .....................................................................................................................119
Saving and Re-using Filters ........................................................................................................................120
Page 6
OmniTek XR User Guide, Software Release 2.3
1. Introduction
This user guide describes the OmniTek XR product. This product consists of a PCI card
installed into a Windows PC together with OmniTek software. The product may be
supplied already installed and configured by OmniTek, or this may be done by the user.
Note however that the installation and configuration of the PCI card and the OmniTek
software are not covered here but in the separate PCI Card Installation Guide.
Also available are a ‘Motion-Capture’ module which permits storage and replay of images
and sequences, and an ‘Advanced’ module which provides a range of more advanced
features, such as Time-shift™ recording and Video Index insertion. The software may also
be used in conjunction with either a Standard Audio option that provides status and
metering information on up to 16 audio channels or an Advanced Audio option that also
adds phase meters, Lissajous figures, A/V delay measurement and audio playback. The
Advanced Audio option also provides the basis for an External Audio option that adds
support for the AES/EBU digital audio standard, and a Dolby-E option that adds support for
Dolby-E audio technology. Another possibility is offered by the 708 Decode option, which
adds support for EIA-708 closed captions. OmniTek XR may also be extended to support a
range of dual-link formats and the XYZ format. This guide attempts to make it clear what
options are required for each feature.
As a PC-based product, OmniTek XR is designed to be driven using the PC’s keyboard
and mouse. However, it also incorporates a number of features such as hot-keys, presets
and profiles that provide ways of selecting commonly-used set-ups and carrying out
commonly-used procedures with minimal keyboard use. Some of these shortcuts are
introduced on page 11.
This user guide assumes that you are familiar with basic Windows techniques, such as
using a mouse, manipulating window sizes and positions, scrolling etc.
Note:
The Advanced Audio option cannot be run at the same time as the Motion-Capture
option. So when you load a copy of OmniTek XR that includes the Advanced Audio
option, you will be asked to choose whether to run the Advanced Audio option or the
Motion-Capture option.
From Power-Up
When the operating system has finished booting, log in if prompted by the system.
After installation, the software will have been installed into c:\program files\omnitek\
omnitek xr. There will also be an OmniTek XR icon on the desktop, plus an entry in the
Start menu.
By default, the OmniTek XR application does not auto-start upon loading Windows, so to
start the application, either double click the ‘OmniTek XR’ icon on the desktop, or select
OmniTek XR from Start menu→Programs→OmniTek. (If required, OmniTek XR can be
set to start up automatically with Windows by selecting Preferences from the File menu,
and then selecting Start with Windows as described on page 14.)
The application offers a range of windows and toolbars. When you exit from the OmniTek
XR application, the status of windows and toolbars etc is automatically saved so that the
next time the application is opened, the same windows are active and in the same layout
as previously used.
User configurable settings are automatically saved in the same way. So for example if the
screen was displaying a Waveform window showing RGB data when you exit from the
application, OmniTek XR will open with a Waveform window showing RGB data the next
time it is run. (The details are stored as startup_nnn.ods, where nnn indicates the slot
and bus number of the OmniTek card.)
Note:
None of these settings will be saved if the machine on which OmniTek XR is being run is
simply turned off.
OmniTek XR User Guide, Software Release 2.3
Page 7
Quick Start Guide
This section provides a basic guide to starting work with the OmniTek XR application.
On starting, a message first appears enquiring whether you wish to use the program’s
Advanced Audio or the Motion-Capture facilities. Then, by default, since all OmniTek
systems have the ability to send status messages over SNMP, the system attempts to
connect to an SNMP service running on the PC. If such a service cannot be found, you
will see the following message.
If you do not need the SNMP functionality, this message can be safely ignored and, if you
wish, you can select the option not to show this message again.
If you need the SNMP service, this needs to be separately installed. The SNMP service is
a Microsoft operating system extension, and can be installed from the master Windows
installation disk created by Microsoft. OmniTek have a document on the support section
of our website at www.omnitek.tv explaining how this service may be installed.
Further details on the use of SNMP with OmniTek XR may be found in the section on
Logging, which starts on page 118.
With the OmniTek application running, you will see a window similar to that illustrated
below, depending on what modules and options are present on your system.
Page 8
OmniTek XR User Guide, Software Release 2.3
Display Mode
OmniTek XR offers two display modes referred to as ‘Normal’ mode and ‘Full Screen’ mode.
In Normal mode, the screen follows standard Windows conventions, offering multiple
windows, dialogues and toolbars. In this mode, there will be a menu bar at the top, with
some toolbars underneath. Below that is a large area where various windows may be
opened. At the bottom of the screen, there is a status bar.
In Full Screen mode, you see a user-definable selection of windows, tiled to fit the whole
window. These full screen views typically have a black background, which may make them
more suitable in a colorist type of environment. They also have the advantage over the normal
‘windows’ display of a less cluttered screen. Details of Full Screen mode start on page 65.
Full Screen mode offers control over major functions and keyboard presets can be
defined to give additional functionality, but complete control is only available in Normal
mode. However, unless the system has been locked in Full Screen mode, you can readily
toggle between Normal mode and Full Screen mode simply by pressing ESCape.
After installation, OmniTek XR defaults to running in Full Screen mode. If you don’t want
to start in Full Screen mode, you can change the default setting by selecting
Configuration… from the Full Screen menu and clearing the tick box marked Startup in
full-screen mode.
Note:
Settings made within dialogues typically only take effect when OK or Apply is clicked and
moreover can be abandoned either by clicking Cancel or by clicking on the dialogue’s
Close box (except where the settings have been applied). However, OmniTek XR also
includes a range of ‘control windows’ in which settings are made that take immediate effect.
The only way of abandoning settings made in these windows is by reversing the changes
made, though in some cases the window includes the option to revert to default settings.
Video Setup
The next thing to do is to set the video standard you will be working in. This can either be
selected from a drop down list, or it can be selected automatically by the system with a
high degree of accuracy by analysing the serial input signal that has been connected.
There are various ways to configure the video format. In Normal mode, there is normally
a Video Standard toolbar visible at the top of the screen. If not, this toolbar can be
selected from the Show menu, on the main application menu bar.
If a serial digital input is connected to the unit, the most convenient option is to tick the
Auto detect checkbox, which will match the format of the input to the video formats
supported by OmniTek XR.
Alternatively, you can select a specific standard from the drop down menu on the Video
Standard toolbar. Note however that different manufacturers use different terminology to
describe a given video format, so in some cases OmniTek XR may identify a video
standard with a slightly different name to the one you are expecting but still lock to the
video source correctly.
As well as the video standard, you also need to select the video lock (sync) reference.
Versions of OmniTek XR that include the Motion-Capture option contain a timing
generator in hardware. This can be configured for the product to free run, lock to a SD
reference signal (bi-level), lock to an HD reference signal (tri-level), or lock to the video
signal on the serial input.
Selecting Auto detect automatically switches the unit into Serial lock, i.e. the unit will use
the internal phase lock loop to lock to the applied digital input. In other cases, the
required lock should be set on the ‘General’ page of the ‘Video’ section of the
Engineering Settings dialogue, which may be called up either by clicking the Engineering
Settings icon on the main (Windows) toolbar or by taking the Engineering… option from
the Configuration menu.
OmniTek XR User Guide, Software Release 2.3
Page 9
The usual selection of the sync for a waveform monitor is Serial lock (as selected by
Auto detect).
For further details of video setup, please refer to page 21 of this guide.
Windows Layout
Normal mode generally opens with the choice of windows and toolbars that was last used
in that display mode. This selection of windows is not affected by any Full Screen layouts
that have been used.
If the selection of windows shown is not as you want, you can change which windows are
open, and their positions, using the usual click and drag techniques. A full list of the
available windows is on the ‘Window’ menu, although most windows have icon shortcuts.
You can also configure the contents of the windows to suit your requirements, even to the
extent of setting the colours used for the different traces (through Look & Feel options
associated with the individual windows). Particular layouts can also be saved for use later
by using the ‘Window layout’ options included in the File menu (see page 15).
Particular combinations of settings can be saved as system configurations that you can
subsequently call up again by taking Load system configuration from the
‘Configuration’ menu. Alternatively, you can opt to have the system prompt for the system
configuration to use when you run OmniTek XR by taking the option to prompt at start-up
for the system configuration to load from the ‘File’ Preferences menu (see page 14).
Note: No system configuration files are included with the original installation.
Status Bar
At the bottom of the main application window, there is a status bar.
The items displayed are:
Currently selected
video format
Status of the analog
reference
Serial input
Page n
Page 10
Note that this may not reflect the standard of the video
source connected to the unit.
}
}
}
}
These items are colour coded to indicate status.
Green indicates OK. Orange/Brown means the item listed
is incorrect in some fashion, but is not being used.
Red means it is incorrect and being used.
‘Work Surface’ buttons (see the description of the
‘Pages’ option on page 15).
OmniTek XR User Guide, Software Release 2.3
At the right-hand end of the Status Bar is a little field interrupt indicator. This spins during
normal operation, indicating field interrupts are being processed. It will stop during certain
operations, such as loading files from disk.
Note that the four Page buttons on the status bar are only fully available if your screen
resolution is set to a minimum of 1280 * 1024. For smaller resolutions, some of the
buttons will be off the edge of the display. We always recommend using 1280 * 1024 or
larger displays.
Image Source Selection
The choice of image source to work with is made through the Source toolbar.
The above toolbar will normally be visible at the top of the screen. (If not, it can be turned on
from the ‘Show’ menu.)
For normal use, you should select whichever of Link A or Link B that the serial input is
connected to and set the Analyzer source to be this Serial Input. Where the system
includes the Motion-Capture option, you also have the option to set this to ‘Generator’:
this is the setting to use to view data that has previously been captured.
The Monitor output and Serial output options may also be selected and set to either the
Serial Input or the Generator as required.
If you have an OmniTek XR system without the Motion-Capture option or a Dual-Link
system with the Dual-Link option currently selected, the toolbar you see will just require
you to set the Input A/Input B switch to show which input you have connected to. The
other items will be automatically selected to monitor whichever link is selected.
With the chosen source active, your OmniTek XR system is ready to use – as described
in the following sections.
Program Shortcuts
OmniTek XR contains a variety of minor features designed to make the product more
useful and easy to use. The main ones are described here.
‘Shift’-Key Shortcuts
At any time you may press and hold the ‘Shift’ key. A small menu appears providing
immediate access to some common functions. The menu disappears when either a
function is activated, or the Shift key is released.
Of particular use is Shift-E, which immediately opens the Engineering Settings control
window.
Presets
Another useful ‘Shift’ shortcut is Shift-P, which opens the Presets configuration dialogue.
OmniTek XR User Guide, Software Release 2.3
Page 11
Presets are individual macros that work both in the normal Windows environment and in
Full Screen mode. They can be freely assigned to the hot-keys Shift-F1 – Shift-F12.
The information recorded as a preset can be of two types: the first is a snapshot of all the
settings currently in place, the second records the effect of a set of changes made to the
settings currently in place.
•
To create a preset that records a snapshot of the all the settings currently in place,
simply click the Save button in the dialogue.
•
To create a preset that records the effect of a set of changes, click the Record button
in the dialogue, then perform the various changes you require to the current settings,
then return to the dialogue and click the Stop button. (The Record button is replaced
with a Stop button during Record mode).
After either of these actions, a dialogue will appear to let you assign a name to the preset,
as well as specify the author’s name and a description. These details are then added to
the list in the Preset dialogue.
Once the preset has been created, it should be assigned to one of the twelve Shiftfunction keys (using the dialogue that is called up by clicking the Hot-keys button).
Once a preset has been created, the essential control elements are distilled into a text
file. Selecting a given preset and clicking ‘Edit’ opens a text editor. With care, it is
possible to edit then re-save the associated text file.
Presets are particularly useful for changes such as switching from single line to multi-line
mode, and can be used independently of the full screen views, which are also assigned
to hot-keys.
Page 12
OmniTek XR User Guide, Software Release 2.3
Window Sizes
The size of all of the windows is related to the video standard. When you position and
size the windows in one standard, they may well turn out to be wrongly sized when you
switch to a different standard. However, right click on many of the windows and a menu
will appear that includes a ‘Resize to fit’ option. Select this, and the window will become
the minimum size to suit the data being displayed.
Size and Position Snap
By default, windows are set to ‘jump’ if they are sized or moved. This works as if the
windows are magnetic: one window placed near another one will jump to line up with the
edge of the other window. This is not a jump to grid function and its results can
sometimes be confusing. In particular, if you wish to position a window adjacent to two
others, it may be necessary to move one of these windows away whilst the move is
made, and put it back afterwards.
By right clicking on a window, you get an option to disable this magnetic jumping function,
so that windows can be moved to any position, regardless of what is nearby. If you
subsequently use the menu to enable the magnetic jumping, this feature will only take
effect next time you move/size the window – it won’t affect the current size and position.
OmniTek XR User Guide, Software Release 2.3
Page 13
2. Menus
This section describes the menus offered on the main application menu bar when Omnitek
XR is being run in Normal (Windows) mode. While this section is chiefly for reference, the
options offered by these menus provide a good overview of the facilities offered by
OmniTek XR.
Note:
The precise range of options offered depends on which additional packages are included
in the OmniTek XR system that is being used.
File menu
The File menu controls some overall aspects
of Omnitek XR. It also includes the option to
take a set of snapshots of the windows that
are currently open.
Selections made using the File menu affect all
software modules within OmniTek XR.
Preferences
System Configuration at Start-up
When the OmniTek application is started, it automatically loads the configuration that was
active when it was last closed. The first Preference choice lets the system prompt you for
a choice of configuration instead. This can be useful where different people use the
system, and have different requirements.
It should be noted that a System configuration contains 100% of your set-up data. This
includes which windows and toolbars are open, their sizes and positions, what video
format and locking reference are in use, what options have been set for error logging etc.
Start with Windows
This menu entry makes OmniTek XR load at the same time as you log into Windows.
This saves you having to start the application from the desktop or the Start menu.
Measurement Units
OmniTek XR always works with actual video data which, as a 10-bit value, will be a
number from 0 to 1023. However, it is sometimes easier to understand the operation of
OmniTek XR if these ranges are scaled to more familiar units.
The selections made affect all uses of the related measurement units. For example, by
selecting the amplitude measurement units to be milliVolts, then amplitude
measurements made using the cursors will be in milliVolts, the minimum and maximum
thresholds will be expressed in milliVolts, and all the waveform graticules will be shown in
milliVolts. Another option is to express the amplitude in terms of IRE units. Where values
are expressed as digital levels, this will be as a 10-bit number from 0 to 1023, which can
also be shown in hexadecimal.
Similarly the horizontal measurement can be shown as time in µs, or as pixel sample
number or in lines. Note that the horizontal axis on the waveform graticules will show a
different sample number range depending on the current video format.
Related to these global settings for measurement units, please note that two separate
waveform calibrations are available. These are the SMPTE range of 64 to 940/960, and
the full range of 0 to 1023. This selection is made by taking the ‘Graticule’ option from the
Option menu in the Waveform window, then choosing either ‘SMPTE range’ or ‘Full
range’. (Full details on the menus in the Waveform window are on page 59.)
Page 14
OmniTek XR User Guide, Software Release 2.3
Message Boxes
The Preferences menu also lets you control the display of message boxes in response to
error conditions. Message boxes that currently may be displayed are ticked. Clearing the
tick disables that particular message box. Ticking an option re-enables a message that
has been disabled.
Window Layouts and Snapshots
Window Layouts
It is possible to load and save window layouts used in Normal mode. These layouts only
save the size, position, and status of each window, so engineering settings like video
format are unchanged when a saved window layout is loaded.
Window Snapshots
Selecting the Save all snapshots option causes snapshots to be taken of the current
contents of every open window and saved on disk. The format in which each window is
saved depends on the type of information displayed. Waveform and Vector Scope
windows are saved as bitmap images, while the Data View window is saved as a text file.
Note: It is also possible to save individual windows using the Save snapshot selection
available in the Options menu on that window.
Note:
The snapshots are taken using standard Windows mechanisms and so cannot be
guaranteed to relate to the same frame.
Show Menu
The Show menu affects some general aspects of the OmniTek display when
operating in the Normal (Windows) mode. Note: Some of the toolbar options
are only present if certain modules are present.
Pages
The main desktop application offers four work surfaces, referred to as Pages 1
– 4. You may just use one – but, if preferred, you can split the various windows
amongst the four work surfaces, which may help to keep an uncluttered screen.
The Show menu gives access to the four different pages, although you can also
use the four buttons available on the bottom right-hand side of the Status Bar
(described on page 10).
For each work surface, you can define which toolbars are present, and which windows
are open. This is easily done by selecting a given page, and once on that page,
open/close windows and toolbars as required. This will not affect which toolbars and
windows are open on the other pages.
Toolbars
The Show menu also lets you individually enable or disable each toolbar associated with
the main application window. The available toolbars are
Window
The main controls for the OmniTek application. Icons on this
toolbar let you open/close the main operating windows, plus
provide controls for a few special-purpose features.
Run
Provides the transport controls for sequence playout (only
included if the Motion-Capture option is present)
Source
Displays the main router controls. Where the system includes
the Motion-Capture option, you can separately select the source
for the analyser, the source for the monitoring output, and the
source for the serial output.
Video-Standard
A small toolbar that lets you select a different video standard
without going into the main Engineering Settings control window.
OmniTek XR User Guide, Software Release 2.3
Page 15
Region Of Interest
This toolbar is a separate window that acts in conjunction with
the Waveform and Vector Scope windows, and provides fine
detail control over the part of the video frame that is used to
create waveforms etc. This is described in detail on page 63.
Crosshair
Gives position control and read-back of main cursor.
Cursors
Provides measurement cursors for time and amplitude.
Closed Caption Log
This enables closed caption data to be logged to an XML file.
Note: This facility is not available for dual-link format video.
As a standard ‘Windows’ feature, all toolbars can be moved around on the main toolbar
region, or can be undocked from this region. Toolbars can also be docked at either the
top of bottom of the main application window. It is not however possible to dock on the
left or right edge.
Status Bar
The Show menu also lets you enable and disable the Status Bar. This is displayed at
bottom of main window and provides information about the video input currently selected.
Further details of the Status Bar are given on page 10.
Run Menu
The Run menu is only available if the Motion-Capture option is being used. It
duplicates the transport controls included on the Run toolbar described on page 33.
The Run menu is provided so that automated keyboard macros may be used, as
menu items can always be selected by combinations of key presses. It is expected
however that these controls will normally be used from the toolbar as this provides
quicker access.
The actions available through the Run menu are all described in the section on the
Run toolbar, on page 33.
Note: The ‘Time Shift’ features are not offered for use with dual-link video and, in
any case, are part of the Advanced option.
Configuration Menu
Note: Configuration choices made here affect all sections of the OmniTek
XR product.
Import/Export ALL Settings
These options may be used to copy complete configurations from one
machine to another, or to completely backup your settings. The
information saved comprises not just system settings but also details of
full screen layouts, presets, analyzer range error profiles and cage safetitle profiles.
The information is stored in .oas files.
System Configuration Options
These options let you save and reload sets of system configuration
settings.
The current settings are saved when the application is closed (though not where the
machine is simply turned off), and by default will be loaded again when the application
restarts.
The system configuration is saved in an .ods file.
Page 16
OmniTek XR User Guide, Software Release 2.3
Engineering Options
The Engineering options allow the current Engineering Settings to be saved in .ode files
and to be subsequently re-loaded. The layout of the windows and toolbars is unaffected
by saving and loading Engineering settings.
SNMP Settings
This option controls the program’s configuration for SNMP. This is only required as part of
the logging package. Consequently details of SNMP configuration are given alongside
the description of the logging facility, which starts on page 104.
Look & Feel Options
The first of these options calls up a configuration dialogue that lets you specify the
colours in which certain display items are shown. These settings can then be saved and
loaded as ‘presets’, which can then be used to copy the user setup from one system to
another.
Analyzer Menu
The Analyzer menu provides control of OmniTek XR’s waveform monitor function.
Some features can only be controlled from this menu, however the most
commonly used functions are also accessed from icons on the toolbars.
Note: The precise range of options seen depends on the details of the system
being used.
Input to Analyzer
This option controls whether the Analyzer looks at the serial input or at the Generator
output. Note: This control is only available where the system includes the Motion-Capture
option. This control can also be changed from the ‘Source’ toolbar.
Interpolator
This option enables an interpolation filter that controls how the hardware samples and
displays the incoming data. It is usually left enabled but occasionally a clearer result can
be obtained by turning the interpolator off.
Low Pass
This turns on/off a low-pass filter. The frequency response is complaint with EBU
Technical Recommendation R103-2000 and changes depending on whether the current
video format is SD or HD.
TRS Pass
This control lets you enable the display of TRS data which, by default, is not displayed in
the Mini-Pic, Waveform or Vector Scope windows.
Note that the data shown in the Data View window will always contain the TRS data
present on the signal, regardless of the state of this control.
Closed Caption Source
Closed caption data and certain types of teletext subtitles can be detected within the
serial input, decoded and displayed in the Closed Caption window (see page 44). These
captions may also be displayed in the Mini-Pic window (see page 51) and written to an
XML log file (see page 31).
Line 21 and EIA-608 closed captions and OP-47 teletext subtitles are supported as
standard. Where OmniTek XR includes the 708 Decode option, EIA-708 captions can
also be displayed.
Note:
This option just selects the type of caption to be displayed. Additional information is
required where teletext is to be displayed and where ‘Line 21’ captions delivered in video
OmniTek XR User Guide, Software Release 2.3
Page 17
formats other than NTSC are also located on a line other than Line 21. These details are
recorded on the Teletext/OP-47 page or the Closed Caption page of the Engineering
Settings control window (see pages 29 and 30).
Reset Status and Logging
This option offers a way to simultaneously reset the video status, audio status and error
logging described elsewhere in this user guide.
Audio Menu
Note: This menu only appears in systems that include the Advanced Audio option.
Enable Playback
This option ‘connects’ audio from the serial input to the sound output selected within the
PC. The audio source is selected by clicking on the required channel in the appropriate
PPM display.
Output Menu
This menu contains options that affect the video sent to OmniTek XR’s analog
(monitor) output and SDI outputs. Note that the signal routing options are only
available where OmniTek XR includes the Motion-Capture module.
Input to Monitor-/Serial-out
In an appropriately configured system, the monitor output can be set to show either the
Serial Input or the output from the Generator window. The same choice is independently
available for the Serial Output.
These menu options are provided as alternatives to using the drop-down menus on the
Source toolbar. Ticking the options has the same effect as pointing the Serial Input to the
monitor and serial output on the Source toolbar, while clearing these options is equivalent
to setting these outputs to point to the Generator on the Source toolbar.
Show Crosshair
OmniTek XR can display a crosshair on the output marking the current point of interest
(the data for which is shown as the central sample in the Data View window). This menu
option allows the user to choose whether the crosshair appears on the monitor output, or
the serial digital output, or on both outputs.
Page 18
OmniTek XR User Guide, Software Release 2.3
Full Screen Menu
As well as operating within a conventional application
‘window’, OmniTek XR can also operate within a ‘Full Screen’
environment. This menu allows you both to define full screen
views and to select a specific view to launch in Full Screen
mode.
Full Screen mode is described starting on page 65.
Note: The precise range of options seen depend on the
details of the system being used and on what full screen
views have been defined.
Window Menu
This menu lets you select a given application window, and bring it to the front of the other
windows.
It also offers the option to reset all windows, to ensure that all windows are visible and to
close all windows.
Help Menu
This menu gives access to a Help file (where installed).
About Menu
The About menu shows you what software versions you are running, and shows your
licence key information. You may need some of this information when you make a
support call to your dealer.
Update Options
When you purchase additional options to enhance your OmniTek XR system, you will be
sent an update file facilitating the additional option you have purchased. To add these
options to your OmniTek XR system, click this Update Options button then select the
update file in the dialogue that is displayed.
OmniTek XR User Guide, Software Release 2.3
Page 19
3. Engineering Settings
When using OmniTek XR, perhaps the most important controls are the Engineering
settings. These determine the entire configuration of the system in terms of what video
format to use, the video lock reference, etc.
The Engineering settings are accessed either by clicking on the Engineering Settings icon
in the main (Windows) toolbar or by taking the Engineering… option from the
Configuration menu or by pressing Shift E. Any of these actions displays an ‘Engineering
Settings’ control window, the pages of which allow the different aspects of OmniTek XR
to be set.
Each section of the Engineering Settings control window will now be described in detail.
Note:
The precise range of options offered depends on which additional packages are included
in the OmniTek XR system that is being used. You should also note that settings made
within the Engineering Settings control window take effect immediately and that there is
no ‘undo’/‘cancel’ option associated with these changes.
Video: General Settings
Reprogram Flash
The main video processing on OmniTek products is carried out using a large FPGA.
Where necessary, the firmware for this FPGA may be updated remotely by the user, by
downloading a new version to the onboard Flash memory.
When a new software update is installed, the software should automatically detect the
presence of new firmware, and reprogram the flash. The Reprogram flash button lets
you carry out this process manually.
Note that it is necessary to close all OmniTek applications before reprogramming the
flash, so any grabbed images and sequences should be saved first.
Once you have pressed this button, you are prompted for the location of the binary file
that is to be used to program the flash. Each software release includes several different
binary files, which are always stored in c:\program files\omnitek\omnitek xr. The
correct file to use is firmware_cypress_xxx.bin where xxx reflects the version of the
OmniTek XR application that you are using. Once the file is loaded, the flash will be
reprogrammed. This operation takes a little over thirty seconds to complete.
Page 20
OmniTek XR User Guide, Software Release 2.3
Video Standard
The video standard currently selected is shown in the box.
The current standard can be changed by clicking the drop-down arrow, and selecting one
of the available choices. Alternatively, if you are monitoring external video, it may be
more convenient to select Auto detect. This causes the format of the input stream to be
identified by matching against the range of video standards supported by OmniTek XR.
Note: Selecting Auto detect also switches the video lock that is applied to Serial lock
(see below). You should also note that, when Dual Link operation is selected, the Auto
detect circuit only samples the link that is specified on the Video: Dual Link page as
providing the serial lock (see page 25).
Sync Type & Position
If OmniTek XR is to be locked to an external reference sync, select either (Analog) Sync
(SD), (Analog) Sync (HD) or Serial. SD sync signals are assumed to be bi-level, while
HD sync signals are assumed to be tri-level.
If OmniTek XR does not need to be locked to an external sync, then select Free Run.
It is perfectly valid to lock to an SD sync whilst working in HD, as long as the format has
the same update rates. This is particularly useful if you need an analog reference lock but
no HD SPG is available.
If the OmniTek system is used to look at a stored image from disk (using the MotionCapture module), then it is also possible to alter the relative position of the output video
with respect to the lock reference by using the horizontal (H) and vertical (V) offset
controls.
If the OmniTek system is being used to look at a live video source, the H and V offset
controls should both be left at zero, as no real timing control is possible for a live video
source.
If OmniTek XR is to be used to analyze incoming video, then we recommend that the unit
is synchronised to that incoming serial video.
Monitor Mode
OmniTek XR provides an analog non-broadcast grade monitoring output, on a 9-way mini
DIN socket. The unit can be supplied with an optional breakout cable, which will either
connect this socket to an SVGA connector, or to 5 BNCs, depending on configuration at
the time of purchase.
The video on this connector may be set to RGB or YUV, depending on the Monitor Mode
setting. Please note that if the monitor output is connected to an SVGA monitor, then it
will be necessary to use the RGB setting. Also note that, under some standards, there will
be HD video on this connector, which will probably exceed the bandwidth of some SVGA
monitors.
When the standard is set to NTSC or PAL, it is possible to opt for Composite output. With
the standard BNC cable, the composite signal will be on the green BNC connector. In this
mode, there is also an S-Video output. The luma channel is on the red BNC, and the
chroma channel is on the blue BNC. When running in an HD format, the green BNC will
have tri-level sync on it as well as the luma/green data.
Note that the analog output runs at the frame rate chosen for the video standard. It is
possible that some analog monitors will not be able to lock to some of the frame rates
that are available, in particular the very low rates used by the HDSL formats.
OmniTek XR User Guide, Software Release 2.3
Page 21
Video: Generator Settings
The controls on the Video: Generator page of the Engineering Settings control window all
relate to video generated by OmniTek XR. This page is not available when the OmniTek
XR system does not include the Motion-Capture option.
Power-On Defaults
The Power-On Defaults option may be used to force the analog and serial outputs from
OmniTek XR into a chosen video format, within half of one second from power up of the
system, and therefore before the operating system has had time to load. The settings will
remain in force until the OmniTek XR application has initialized, when the program
settings will overwrite the power-on settings.
To use this feature, just click the button, and the current settings will be written into the
reprogrammable hardware on the OmniTek card.
Panning
By selecting Enable and a speed from 1 to 31, it is possible to have the image/sequence
scroll sideways continuously. Selecting Reverse lets you change direction. If you keep
Enable selected and drop the speed to 0, the image will stop scrolling and remain at its
current position. To return the image to the normal position, clear Enable.
Please note that one side of the image will drop one line during panning, since the image
in effect wraps around from the right hand edge onto the start of the next line on the left
hand edge.
Blanking and Ancillary Data Playout
The blanking and ancillary data played out may either be taken directly from the source or
taken from the internal generator.
Selecting From Internal Generator removes all the ancillary data packets from the
original source material.
To play out data such as time codes and teletext subtitles from an .rvf file, the option to
use blanking and ancillary data from the Source file must be selected. This is described in
more detail on page 76.
Note
Page 22
The option to use blanking and ancillary data from the Source Image is only available if
the Advanced option is present. If this option is not included, the blanking and ancillary
data can only be generated from the internal generator.
OmniTek XR User Guide, Software Release 2.3
Video: Analyzer Settings
Range Errors
OmniTek XR can detect and count where the incoming video falls outside pre-defined
luma/chroma ranges. The levels that trigger an error are determined in this dialogue.
You specify the minimum and maximum IN RANGE values for each luma / chroma
component. Normally, the YCbCr Polarity Outside box is ticked and values less than the
minimum or greater than the maximum will be detected and reported. If however the
YCbCr Polarity Outside box is cleared, values within the specified ranges, rather than
outside the ranges, will be reported. The Error limit setting defines a further threshold for
reporting an error, based on the percentage of the frame for which the values are in error.
Many companies set the minimum value for both luma and chroma to 0%, which equates
to 64 as a digital video level. The maximum values would normally be set to 100%, which
equates to a digital video level of 940 for luma, and 960 for the two chroma components.
OmniTek XR similarly detects and counts RGB and XYZ range errors (where supported).
These are calculated by converting the data into RGB / XYZ colour space, and then
noting if any pixels are outside the specified RGB / XYZ colour cube. Many companies
set the minimum acceptable RGB value to be -5%, and the maximum to be +105%.
These provide the default values used in this dialogue.
OmniTek XR also counts the number of pixels for which the composite signal determined
from the incoming video falls outside the maximum and minimum values specified in this
dialogue for this composite signal.
The number of frames for which the signal lies outside the specified ranges is reported on
in the Video Status window (see page 84) and logged in the Event Log window (see
page 104).
Amplitude Measurement Units
Use this drop-down menu to select the units in which the above ranges are expressed.
Output
For each of the above errors, any erroneous pixels can be keyed out and replaced with a
flashing black and white signal. The Output section of this dialogue allows you to select
where the flashing pattern will be displayed. Each error condition can be independently
routed to the monitor output, or to the serial digital output, or for display on the Mini-Pic
on the VGA monitor.
OmniTek XR User Guide, Software Release 2.3
Page 23
These errors can also be highlighted on the waveforms. This option is selected through
the Options menu within the Waveform window (see page 59). The same thresholds are
used. Note however that it is not possible to simultaneously highlight pixels with YCbCr
range errors and pixels with RGB range errors on the waveforms, as pixels with YCbCr
range errors can only be seen when displaying YCbCr/YUV waveforms, while pixels with
RGB range errors can only be seen when displaying RGB waveforms.
Error Mask
An error mask is provided. This may be used to remove the top and bottom lines, and the
pixels near the edges, from the error checking process. This is intended to handle video
where the edges near the sync are corrupted. The mask has no other effect on the data,
which will still be grabbed, displayed on the waveform views etc, in their entirety.
The mask settings are symmetrical, i.e. the number of lines specified here causes that
number of active lines to be masked out, on both fields, both at the top and at the bottom
of the image. Similarly, the number of pixels entered will affect both picture edges,
starting from the outermost active pixel in each case.
Composite Matrix
The composite matrix used to convert RGB data to composite may be chosen from a
submenu of three standard composite matrices – or you can opt for auto-selection based
on the current video standard.
Luma Qualified Vector Scope
The Video: Analyzer page provides access to a special mode of operation for the Vector
Scope, the “Luma Qualified Vector Scope”. When this option is selected, the only pixels
used to create the Vector Scope are those whose luma lies within the luma error-check
range.
While it is not possible to display both the standard Vector Scope and the Luma Qualified
Vector Scope at the same time, it is possible (with suitable adjustments) to use the Luma
Qualified Vector Scope, for example, to only display the vectors for pixels that are nearly
black, which can be very useful for colourists.
Luma Qualified Vector Scope mode is easiest to use where a ‘Preset’ has been defined
to enter and exit this mode. See page 11 for details on defining presets.
Profiles
The settings for the luma, chroma and RGB ranges and the error mask may be saved as
an ‘analyzer range error profile’.
To save the current settings as a profile, click the Profiles button to display a Profiles
dialogue, then click on the Edit Profiles button within the Profiles dialogue.
You can then ‘add’ a new profile, or edit, or delete an existing profile.
When adding a new profile, you should specify a name that makes it easy to select
different profiles for different applications, and then enter all the values required for this
profile. The units used will be the units currently globally selected for the OmniTek
application.
Note that these settings are saved into the registry, not as files on disk.
Page 24
OmniTek XR User Guide, Software Release 2.3
Once multiple profiles have been created, it is possible to select between them from the
Profiles dialogue (called up as described above). When OmniTek XR is started, the last
used profile is automatically loaded but a new profile may be loaded at any time.
Note:
A ‘Preset’ is ideal for switching between different profiles. See page 11 for details on
defining presets.
Video: Dual Link
If your XR system includes the Dual Link option, there will be an additional page on the
Video section to control Dual Link specific settings.
Serial Lock/Ancillary Data
Since two coax cables are used for any dual-link connection, you can set the system to
lock off either input, and you can similarly choose to decode ancillary data from either
input.
Monitoring Colour Space
The output to the monitor can be either composite or XYZ format.
Input Format
Use this part of the dialogue to set whether the input is YUV, RGB or XYZ format.
Look-Up Table (LUT)
If your dual-link signal is in YUV format, the data values are not processed. However, if
you are using RGB data, the values may be processed through a look-up table before
display.
The Linear setting leaves data unchanged.
The Logarithmic setting applies a standard log lookup table to the data.
Selecting Custom uses your own lookup table. This needs to be loaded in using the
‘Browse’ button, but once it has been loaded, you can switch between it and the other
settings without having to reload. Custom lookup tables should be in CSV (comma
separated variable) format. LUTs are included with OmniTek XR for Sony SR, and
Thomson Viper cameras, which can be modified to create complete custom LUTs. The
supplied LUTs are located in c:program files\omnitek\omnitek xr.
A variable level of gamma correction may also be applied to the video.
OmniTek XR User Guide, Software Release 2.3
Page 25
Note that whilst the lookup table adjusts how the waveforms and the Vector Scope are
displayed, the data shown in the Data View window is always the exact data on the serial
inputs.
Output Format
Where OmniTek XR includes the Dual Link option, it is possible to produce either singlelink or dual-link output from either single-link or dual-link input. It is further possible to
produce this output in either YUV, RGB or XYZ format as required.
The key to the operation is the selection of the Dual-link option on the Video Standard
toolbar (see page 36). When this option is ticked, the facility to handle both dual-link input
and dual-link output is enabled. The Video Standard toolbar is also used to set the
system for the video standard of the input.
With Dual-link ticked on the Video Standard toolbar, it is then possible to control whether
the output is single-link or dual-link, and YUV, RGB or XYZ format, using the options
offered here in the Output section of the Video: Dual Link page of the Engineering
Settings control window.
Picture Settings
Picture State Errors
Where the Motion-Capture option is selected, OmniTek XR can detect whether the
picture is moving or frozen, or whether the picture has gone to black, or to black and
white. All three detectors have individual timeouts, with the condition not being detected
until that time interval has elapsed. The settings for the detectors are configured here.
• Motion Content
A level of filtering can be applied to the picture. This is designed to accommodate an
analog VTR that is parked on a single frame. While the picture is frozen, the varying
analog noise from the VTR will mean that each frame is actually slightly different. The
filter setting removes a certain amount of noise. What is tested is the filtered image.
The filtering is actually based on an equivalent noise level. Thus if you have a uniform
image, and add -36dB of noise to it, then setting this value to -36dB means that the
detector is on the threshold of noting the image as moving or not. Following on from this,
a setting of -6dB will filter out high levels of noise, and a setting of -54dB will only filter out
a very tiny amount of noise.
Page 26
OmniTek XR User Guide, Software Release 2.3
• Luminance Content
This control works in exactly the same way as the Motion Content control, and detects if
the picture is black.
• Chrominance Content
This control works in exactly the same way as the Motion Content control, and detects if
the picture is black and white.
The results of these detectors are displayed in the Video Status window, described on
page 84 of this manual. These same detectors may also be used in the logging or in
SNMP alerts, as described in the section starting on page 104.
Time Code: Reader Settings
OmniTek XR is able to read and display VITC, LTC and ATC time codes.
There are important differences between the three types of time code and hence in how
they are handled. LTC time codes use a dedicated feed. VITC time codes are embedded
in the video data stream (SD only). ATC time codes are packets in either SD or HD video
containing either LTC, VITC #1 or VITC #2 data.
To read ATC packets, the reader needs to know the type of time code contained within
the time code packets.
To read VITC time codes, the reader needs to know which lines the VITC time code data
is to be read from. The Link Fields option makes entering this data easier by
automatically setting the Field 2 value from the Field 1 value. The typical lines used for
PAL and NTSC are shown in the above screen dump.
To display LTC time codes, OmniTek XR needs to be fitted with an LTC reader. At the
time of writing, the only LTC reader to be supported is the Miranda “Little Red” which
feeds the LTC to an RS232 port (available from your OmniTek dealer). The presence of
the reader (when fitted) is detected automatically and shown in this dialogue.
OmniTek XR User Guide, Software Release 2.3
Page 27
Video Index: Reader Settings
OmniTek XR includes a Video Index reader, which is configured from this dialogue.
The lines normally used for the Video Index signal are indicated in the dialogue, but other
lines may be selected, for example for test purposes.
The Link Fields option makes setting the required line values easier by automatically
setting the Field 2 value from the Field 1 value.
Note:
Video Indexes can only be read in SD.
Wide Screen Signalling: (Line 23) Reader Settings
OmniTek XR can detect and decode the wide screen signalling data that is contained in
line 23 of a PAL/625 signal. The decoded information is displayed on the Video Status
window (see page 84).
Page 28
OmniTek XR User Guide, Software Release 2.3
This data can be interpreted either as per EN 300 294 or as modified by ARDSPEC. For
flexibility, it is possible to monitor other lines in addition to line 23.
Teletext/OP-47: Reader Settings
This page of the Engineering Settings control window is concerned with the additional
information needed when working with OP-47 or PAL teletext.
The main information needed to detect and display PAL or OP-47 teletext is the number
the page on which the data is provided. In the case of PAL, the number of a line that
contains teletext data also needs to be specified. The above illustration shows the pages
used for teletext subtitles in the UK.
Note:
This feature only applies to a limited range of SD video formats. You should also note
that the teletext detector simply looks for teletext packets in the specified location. It
doesn’t also check whether these packets contain any information.
OmniTek XR User Guide, Software Release 2.3
Page 29
Closed Caption: Reader Settings
This page of the Engineering Settings control window caters for ‘Line 21’ captions sent
within video formats other than NTSC. In NTSC, these captions are required to be
transmitted on Line 21. When delivered in a video format other than NTSC, the captions
can be on any line between 7 and 23.
Page 30
OmniTek XR User Guide, Software Release 2.3
4. Toolbars
This section describes the toolbars available when OmniTek XR is being used in Normal
(Windows) mode. These toolbars provide direct access to many of the functions
contained in the menus.
The above illustration shows just one possible arrangement of the toolbars. Windows
provides the ability to undock or move each toolbar individually, while the Show menu
allows the user to choose which toolbars are displayed. If a toolbar seems to have
disappeared, but is shown as active (ticked on the menu), turning it off and then back on
again may help to locate it.
The toolbars are described below in alphabetical order of name.
Note:
There are also some toolbars associated with specific application windows. These are
described alongside the description of those windows. You should also note that the
precise details of the toolbars offered depends on which additional packages are included
in the OmniTek XR system that is being used.
Closed Caption Log Toolbar
This toolbar enables closed caption data and teletext subtitles to be logged to an XML
file. The items on the toolbar are:
Calls up Closed Caption/Teletext Log Configuration dialogue (shown below). In particular,
this dialogue allows the user to specify the time stamps to record alongside the caption.
Starts the recording of captions.
Opens an existing log file.
Note:
The source of the captions must first be identified to OmniTek XR through the Analyzer
menu (see page 17).
OmniTek XR User Guide, Software Release 2.3
Page 31
Crosshair Toolbar
The Crosshair toolbar provides both information about and controls for the current point
of interest within the video display (as indicated by the crosshair on the Mini-Pic display).
Position
The toolbar shows the sample number and line number that the crosshair is positioned
over. Using the mouse, you can click in the Mini-Pic to position the crosshair roughly in
the required place, then use these boxes to make fine adjustments. For interlaced forms
of video, you can switch the crosshair between Field 1 and 2 using the F1 and F2 boxes.
For progressive forms of video, however, these buttons have no meaning and are greyed
out.
The sample number box may also be used to view horizontal blanking. Select the
required horizontal magnification, then increment the sample number such that the
sample is outside of active video. The Waveform windows will scroll to show the sample
position in the blanking area. This will let you view any audio or ancillary data that may be
present, if the ‘TRS Pass’ selection is on (as described on page 17).
↑↓←→
The 'top' and 'bottom' buttons position the cursor on the top active line, or bottom active
line of the field/frame.
The 'left' and 'right' buttons position the cursor on the first or last active pixel of the current
line.
Output
The drop-down menu enables the crosshair to be set to appear either in the monitor
output, or in the serial output, or in both outputs. This duplicates options included in the
Output menu.
Cursors Toolbar
Two cursors are available to be placed in the Waveform window and moved about to take
either time measurement or amplitude measurements.
The Function drop-down menu enables you to select the type of measurement that is
required.
The Cursor 1 and Cursor 2 boxes let you control which cursor you are affecting when
you subsequently click in the Waveform window. The active cursor appears as a solid
line, whilst the other cursor becomes dotted. (The colour of these cursors is determined
by the Look and Feel menu selection in the Waveform window – see page 58.)
To move the cursors as a pair, lock the cursors together by checking the Track box.
Time values are displayed in microseconds, whilst amplitude values are shown as a
relative difference between the two cursor positions.
Please note that, when either the time measurement or the amplitude measurement
cursors are active, it is not possible to control the crosshair just by clicking a new position
in the Mini-Pic window. The cursor function box must be set back to None to regain
mouse control over the crosshair. However, it is always possible to move the crosshair by
editing the pixel and line values in the Crosshair toolbar.
Page 32
OmniTek XR User Guide, Software Release 2.3
Region of Interest Toolbar
The Region of Interest toolbar is a control window that acts in conjunction with the
Waveform and Vector Scope windows, and provides fine detail control over the part of
the video frame that is used to create waveforms etc. It is described on page 63,
alongside the description of the Waveform and Vector Scope windows.
Run (Transport) Toolbar
The Run toolbar is available where OmniTek XR includes the Motion-Capture option.
However the transport options are only activated if either a sequence or the playlist is
active within the Generator window.
Transport Controls
Go to 1st frame of the Clip/Sequence
Step back in the clip by one frame
Play the clip in reverse. Note that this reverses the order of the frames, but not the fields.
Stop playing the sequence
Play the clip forwards
Step forwards in the clip by one frame
Go to the last frame of the clip
Enable Loop mode (for playing a sequence)
Frame
The Frame box lets you select an individual frame from the sequence for immediate
display.
Play Speed
The Play Speed box lets you choose a playback speed for the sequence. This can be
real time, quarter speed, half speed or double speed.
Time Shift (Not offered with dual-link format video)
The following two icons are concerned with the Time Shift feature, which is only active
where the system includes the Advanced Option package.
Time Shift provides the useful facility to trigger a video capture only if a specified error
condition occurs, and further to record the frames immediately before the event as well as
after the event. Captured video can then be reviewed or stored to disk for later review.
Enter Time Shift mode and wait for a trigger.
Time Shift Configuration. This brings up the Time Shift dialogue shown below.
OmniTek XR User Guide, Software Release 2.3
Page 33
A Time Shift recording can be triggered by any of the trigger conditions shown in this
dialogue. It can be triggered in response to any of several VITC, LTC or ATC time code
values, or in response to a specific error condition such as a CRC error occurring.
In all cases, it is possible to remain in Time Shift mode, waiting for the next trigger, until
the RAM is full; or to capture a specific number of triggered events; or to only capture
once then ask the user whether to continue.
Since data is captured into a circular buffer, it is possible to retrieve frames not just after a
trigger but also prior to the trigger event. In this way, a grabbed clip can be obtained with
the trigger frame at the start, middle, or end of the clip depending on the Time-shift
capture mode setting that is selected.
Note:
Time Shift triggers are based on changes in events, rather than absolute events. Hence if
you configure a grab to occur when there is an RGB error, and RGB errors are already
occurring continuously, then entering Time Shift mode will not cause an instant grab. This
is to prevent captures being continuously initiated. However, if no RGB errors are
occurring as you enter Time Shift mode, a capture will take place next time there is a
RGB error – even if the RGB error counter is showing an error count from previous errors.
Record Frames
The Record Frames box may be used to specify how many frames are to be captured
during a Time Shift capture. This is a duplicate of the control on the Time Shift
Configuration dialogue described above.
The frames can be captured with only the active video being stored or, if Full Frame is
selected, with the entire video raster also being stored.
Page 34
OmniTek XR User Guide, Software Release 2.3
Source Toolbar
OmniTek XR has two main Source toolbars.
Single Link Source Toolbar
The above toolbar is offered where OmniTek XR is used with the Motion-Capture option.
(A shorter version appears when the Advanced/External Audio option is being used.)
The functionality of the above toolbar is best understood by reference to the block
diagram shown below.
Analogue
Reference
Input B
Input A
A/B
Switch
•
•
•
•
Capture
I/O to
PC
Video Store
Source
Select
Zone Plate
Analyzer
Waveforms
Audio Status
Video Status
Data View
Monitor
Output
Generator
A
Color Bars
Serial Output
B
Audio +
Timecode
The first thing to consider is the input A/B switch, which chooses between the two
physical inputs on the OmniTek XR unit.
The input to the Analyzer module can come either from this serial input or from the
internal test pattern generator/video store (where included).
The Monitor Output can also be either the serial input or the output from the test pattern
generator/video store. In either case, both the crosshair and the out-of-range detectors
can be overlaid onto the output.
The Serial Output can be independently set in a similar way to the Monitor Output, with
the same markers overlaid.
The check boxes associated with the Analyzer, Monitor out and Serial out settings allow
you to switch two or more of these to the Serial input or to the Generator output simply by
changing one of them. Simply tick the items that you would like changed together.
Dual Link version
This version of the Source toolbar replaces the original toolbar when a Dual Link video
format is selected. When you switch the Video Standard toolbar back to a single link
source, the standard Source toolbar will reappear.
OmniTek XR User Guide, Software Release 2.3
Page 35
The functionality of this Source toolbar is shown through the following block diagram.
Input A
Dual Link
Input B
incorporating
A/B switch
Capture
SDI Monitor
Source
Analyzer
Select
• Waveforms
• Histogram
• Audio Status
• Video Status
• Data View
Monitor
Video Store
Output
Serial Output
A
&
Dual Link
B
Where the system includes the Motion-Capture option, the source to the Analyzer
module, the SDI monitor, the Monitor Output and the Serial Outputs can all be selected
between Serial Input and the output from the Generator (video store). However, when
operating in Dual Link mode, the source to the Analyzer module, the Monitor output and
the Serial Outputs all must be the same i.e. they must either all look at the Generator
output or all at the Serial Input.
Note:
This toolbar includes the facility to switch between full dual-link operation and a single-link
mode in which either Link A or Link B is used as the input. This facility exists purely to
provide a quick and easy way of switching between single- and dual-link modes
depending on the input that is being analysed. If single-link operation is required for an
extended period, you should select a single-link video format on the Video Standard
toolbar as this offers slightly more functionality.
Video Standard Toolbar
The Video Standard toolbar has one function, which is to select the appropriate video
standard.
The toolbar has two forms – one used for basic XR systems (shown here) and the other
used where the optional Dual Link module is present (see below).
The toolbar provides a shortcut to selecting the video format through the Engineering
Settings control window (see page 21). Using the drop down menu is identical to
selecting the video format from the Video: General section of the Engineering Settings
control window. The video lock is unchanged. (If required, the video lock can be set within
the Video: General section of the Engineering Settings control window.)
Ticking Auto detect causes the format of the input stream to be identified by matching
against the range of video standards supported by OmniTek XR. It also automatically
switches the video lock to Serial lock. Note: If Auto detect is subsequently cancelled, the
unit will remain in Serial lock until changed through the Engineering Settings control window.
Dual Link version
The version of the Video Standard toolbar displayed for Dual Link systems includes a
Dual-link tick box. Ticking this option enables the facility within OmniTek XR for handling
dual-link input/output as well as single-link.
Page 36
OmniTek XR User Guide, Software Release 2.3
The principal effect of ticking this option is to control the action of the Auto Detect circuit.
Ticking Dual-link forces the Auto Detect circuit to interpret whatever format it next finds
on Link A or Link B as a dual-link format.
Ticking Dual-link also extends the drop-down menu of supported video standards. All the
single link formats are listed as for the regular XR system, but underneath these is a list
of supported Dual Link formats, including 2K formats.
Note:
Ticking Dual-link does not of itself cause the unit to switch into, or out of, Dual Link
mode. You must check the video standard specified in the drop down box to see if the
current input stream is being interpreted as a single or a dual video format. You should
also note that, when Dual Link operation is selected, the Auto detect circuit only samples
the link selected on the Video: Dual Link page as providing the serial lock (see page 25).
Window Toolbar
This is the main toolbar. It contains controls to open the various windows used by the
application, plus quick access to some commonly required functions.
Generator window icon. This icon calls up the Generator window described on page
70. Note: This icon is only present if the system includes the Motion-Capture module.
Video Status icon. Opens a window giving details of the status of the video signals. The
Video Status information is described in the section on Video Checking Features, starting
on page 84.
Audio Status icon. Opens a window giving details of the status of the audio signals. The
Audio Status information is described in the section on Audio Checking Features, which
starts on page 89.
Mini-Pic icon. Opens the Mini-Pic window, where you can see a representation of the
video that is currently being analysed. This is especially useful with video formats with a
particularly low frame rate, which cannot normally be displayed on conventional HD
monitors. Refer to page 50 for details.
Waveform icon. Opens the Waveform window, where waveforms are displayed in the
form set using the extended control surface within the Waveform window – independent
of the actual format of the incoming video. The menus used to configure how the window
contents are displayed are detailed on page 39.
Waveform Histogram icon. Opens the Waveform Histogram window, which permits
detailed analysis of the colour information. See page 61 for details of the Waveform
Histogram window.
Gamut icon. Opens a window that displays the current range (minimum to maximum) of
YCbCr, RGB and Composite colour information, together with details of the percentage
of pixels that fall outside the required range. See page 49 for details.
Vector Scope icon. Enables/Disables the Vector Scope. Like the Waveform window, the
Vector Scope window contains menus to let you configure the display. See page 53 for
details.
Data View icon. Enables/Disables the Data View. See page 44 for details.
OmniTek XR User Guide, Software Release 2.3
Page 37
Audio PPMs icon. Enables the display of PPMs for either Embedded Audio, Dolby-E
Audio or AES/EBU Audio (where installed). See page 89 for details.
Audio Lissajous icon. Opens a window in which the phase relationship between a
selected channel pair is displayed as a Lissajous figure. See page 103 for details. Note:
This icon is only included on the toolbar when the Advanced Audio option is installed.
Event Log icon. Opens the Event Log window, which shows a live display of data that
can be logged. This is fully described in Section 11, together with other related material.
Cage Generator icon. Opens the cage generator dialogue. For a full description of this,
please see page 70 in this guide.
Closed Caption icon. Opens a window that displays details of the captions identified
within the video input. See page 44 for details.
Delay Measurement icon. Opens a display of audio/video delay information, as
described in the section on Measuring Audio/Video Delays which starts on page 110.
Engineering Settings icon. Opens the Engineering Settings control window – which is
described in full starting on page 20.
Full Screen Configuration icon. Shows/Hides the Full Screen Configuration menu,
described on page 67.
Region of Interest icon. Clicking this icon opens or closes the Region of Interest control
window, described on page 63.
Line Mode icon. Opens a drop down menu that lets you switch between single line view,
multi line view, and sweep mode. This control duplicates the drop down at the top of the
Region-Of-Interest control window, described on page 63.
Page 38
OmniTek XR User Guide, Software Release 2.3
5. Application Windows
OmniTek XR offers a range of windows within which to display different aspects of the
video that is being analysed. The various displays are generated in hardware in real time
from the video being processed. The displays are also fully integrated, with the different
windows showing information about the same frame of the video data stream.
The windows that can be displayed are called up by clicking icons on the Windows
toolbar.
The different windows are described below in alphabetical order of name. First, however,
a description of some window controls that are common to all the windows described in
this section.
Note:
The precise range of windows offered depends on which additional packages are
included in the OmniTek XR system that is being used.
Window Controls
The windows associated with OmniTek XR all have drop-down menus through which to
configure how the window contents are displayed or otherwise manipulate the window.
Not all windows have exactly the same controls, but the following section covers some
general features of the windows. Further specific details may be given alongside the
descriptions of the windows themselves, which start on page 40.
Options menu
The windows generally have an ‘Options’ menu. The following selections appear in
several of the windows.
Graticule
Calls up a sub-menu that allows the user to:
Enable/Disable the display of graticule
Show graticule labels
Specify the graticule as SMPTE range, or full range
Set the scale of the graticule at 75% or 100% (Vector Scope only)
Set the calibration for different PPM scales (Audio PPM windows)
Crosshair
Shows/Hides a crosshair indicating the current position of interest in
the window.
Look & Feel
Calls up a common Look & Feel dialogue through which aspects of the
window such as the colours used can be set. You can, for example,
select the colour of the crosshair, independently of the colour of the
cursor. The page that is active on opening depends on which window
you opened it from. (The selected colours may be saved as a preset
through the Configuration menu.)
Show Active Tooltips
Displays line and sample number of the point under cursor. For
interlaced video formats, the line number is based on the field selection
that has been made on the Crosshair toolbar, as described on page
31.
Save snapshot
Takes a snapshot of the current contents of the window, which is then
saved to a file in an appropriate format. For example, Waveform, MiniPic, Picture Quality and Vector Scope windows are saved as bitmap
images, while the Data View window is saved as a text file.
OmniTek XR User Guide, Software Release 2.3
Page 39
Window menu
The windows also all have a ‘Window’ menu that provides the following possibilities.
Full Screen
Select this to display the chosen window data in Full Screen mode,
without any windows artefacts present, such as toolbars, menus etc.
Press ESCape to return to the standard display.
Resize to fit
Select this to change the window size to the default minimum size to
suit the data being displayed.
Snap
When this option is enabled, windows snap to points on a grid as you
move them around, which sometimes makes them easier to align as
you require.
Audio PPM Window
This window comprises PPM meters displaying the audio levels on the different audio
channels.
Where the system includes the Advanced Audio option, different PPM displays are
available for embedded audio, Dolby-E audio and AES/EBU audio (where supported).
The type of audio being displayed is shown in the window title.
A highlighted channel pair in an Embedded or AES Audio PPM display indicates that this
channel is currently selected either for playback (see page 103) or for analysis in the
Audio Lissajous window (see below) or, where appropriate, as the channel on which
Dolby-E metadata is to be found. A different channel pair can be selected simply by
clicking on the required channel pair.
PPM displays are described in the section on OmniTek XR’s Audio Checking Features,
which starts on page 89.
Page 40
OmniTek XR User Guide, Software Release 2.3
Audio Lissajous window
This window is only included where OmniTek XR includes the Advanced Audio option. It
displays a Lissajous figure of the audio transmitted on the two channels of a particular
stereo pair.
The stereo pair from which the Lissajous figure is generated is selected by clicking on the
required channel pair in the appropriate Embedded or AES Audio PPM display.
Further information is given in the section describing OmniTek XR’s Audio Checking
facilities, starting on page 103.
Options menu
The Options menu includes the following:
Oversampling
Selects the level of oversampling applied in generating the Lissajous figure.
Show graticule
Allows you to enable and disable the grid over which the Lissajous figure is displayed.
OmniTek XR User Guide, Software Release 2.3
Page 41
Audio Status window
The Audio Status window is offered by all systems that include audio support. Where
included, it displays a selection of information about the audio content of the input being
processed.
The information is arranged in a collapsible hierarchy with sections of the display able to
be opened or hidden as required, allowing the user to select what is displayed according
to their particular needs.
Details of the audio information displayed are given in the section on OmniTek XR’s
Audio Checking Features (which starts on page 89).
Options menu
The Options menu in the Audio Status window includes the following options:
Flat View
Ticking this option selects the alternative ‘flat’ status display (see page 84).
Configure Timeline
This option allows you both to opt to display ‘timelines’ indicating the rate at
which different type of errors are occurring and to set the parameters of that
those timelines (as shown the following dialogue). See page 84.
Page 42
OmniTek XR User Guide, Software Release 2.3
Configure Filter
Calls up the dialogue through which items for display and/or logging are selected (see
page 119).
Look & Feel
Calls up the Look & Feel dialogue used to set display parameters across the whole
application (see page 59).
Reset options
These options reset different aspects of the Audio Status display.
Enable columns
This option displays a dialogue through which you can select which details are displayed
in the Audio Status window.
Cage Window
This window allows the definition of a safe action area and a safe title area within a video
field. For further information, see page 82.
OmniTek XR User Guide, Software Release 2.3
Page 43
Closed Caption Window
This window displays details of the closed captions or teletext subtitles detected in the
video being analysed.
The information shown comprises:
•
The type of caption/subtitle – OP-47, PAL, Line 21, EIA-608 or EIA-708 (where
supported)
•
The number of the service carrying the caption, together with any name that has
been associated with that service number
•
Whatever caption data has been set
•
Associated timing information (VITC, ATC, LTC, PC clock)
Where the system being used includes the 708 Decode option,
there is also the option (available through the Options menu) of
displaying the 708 windowing commands embedded in the video.
These commands are displayed in CEA-708-B standard format.
The source of the captions to be analysed may be set through the Closed Caption
source option in the Analyzer menu (see page 17).
Note:
Page 44
Some details of closed captions, for example their service names, are also recorded in
the Event Log (see page 104).
OmniTek XR User Guide, Software Release 2.3
Data View Window
This window displays data values associated with the image that is currently being
processed by the built-in analyzer, except in a Dual Link mode where it always shows
data from the serial input.
Data is shown for a specified sample number on the current line, plus samples earlier and
later in that same line. The data may be shown purely as numbers (as shown above) or
together with descriptions in the ‘Extended View’ version of the display (see below). The
total number of pixel pairs displayed is set from the Options menu within the Data View
window (see below). This value can be adjusted between 1 and 512 samples.
The line and sample numbers shown are determined by the position of the main cursor
(crosshair). This position may be changed by clicking in either the Mini-Pic or the
Waveform window, or by using the fine control buttons on the Crosshair toolbar.
The Data View window is scrollable, so you can check video data over a large portion of
a video line without moving the cursor. You can also check data within the blanking area.
Where a Single Link video format is being used, the Data View window displays three
columns of data. In Dual Link mode, the window displays six columns of data. The
column headings displayed reflect the data format selected in the Engineering Settings
control window. Dual Link data can be RGB or YUV.
The contents of the Data View window are colour coded. In all cases, the text remains
white, but the background colour changes to show the nature of the data.
Green
indicates pixel is within active video
Blue
indicates pixel is within a TRS packet
Purple
indicates pixel is within an ANC packet
Light grey
indicates pixel is within horizontal blanking
Black
indicates pixel is within vertical blanking for field 1
Dark grey
indicates pixel is within vertical blanking for field 2
Red
indicates a data range error (i.e. video data outside the range that has
been set in the Engineering Settings control window). It is important to
ensure that the data ranges specified in the Engineering Settings
control window reflect the type of data you are expecting.
OmniTek XR User Guide, Software Release 2.3
Page 45
Extended View
OmniTek XR offers an alternative ‘Extended View’ of the Data View window. When
Extended View is selected within the Options menu, the standard pixel value display is
enhanced through the addition of pixel colour data and descriptions of identifiable
structures such as VANC packets in the video signal.
The range of information that can be displayed depends on whether the video signal that
is being analysed is SD or HD or dual-link. For instance, combined Y/C information is
displayed for SD signals, but separate Y-type and C-type information is displayed for HD
signals. The range of additional information to display is selected through the submenu
associated with the Extended View menu option.
Within the active video, both a value and a set of pixel data are shown for each pixel. In
dual-link input formats, the RGB and XYZ colour space data is assembled into full pixel
values.
Within the blanking area, VANC packets are identified and interpreted by comparing the
signal received against information supplied alongside OmniTek XR as XML files. These
files enable the identification of a range of AES controls, SMPTE time codes and RP188
control codes. Users may also add their own packet definitions to install XML-format
descriptor files, for decoding custom VANC packets. If the VANC packet is not one of the
standard types ‘understood’ by OmniTek XR, the heading “Unknown VANC packet” will
be displayed together with the embedded ID to allow separate identification.
Options menu
The Options menu for the Data View window includes the following choices:
Save # samples
Sets the number of pixel pairs displayed in the Data View window (and saved when
a snapshot of the Data View is taken).
Base
Offers the choice of displaying the data as decimal, hexadecimal or binary values.
Viewing Format
Offers alternative ways of formatting the data that is displayed. Dual-link video signals
can be interpreted either as 10bit or as 12bit. 8:2 interprets 10bit data as 8 bits + 2 bits.
This has the advantage of making standard groupings such as those associated with
SAV and EAV easier to pick out.
Page 46
OmniTek XR User Guide, Software Release 2.3
Extended View
Offers the option of displaying descriptive information alongside the basic numerical data
(described above).
Save Snapshot
Allows the contents of the Data View window may be saved as a .txt file. The file created
will include all the data within the scrollable window, so if the window is set to contain 100
samples, then these 100 samples will be saved to that .txt file. Further, the data will be
stored in the file in whichever base they were being displayed i.e. the file will contain
decimal, hexadecimal or binary values as selected for the window.
Delay Measurement window
This window displays details of the different delays that it is possible to measure using
the OmniTek XR. The set-ups required to make the different measurements are
described in the section on Measuring Audio/Video Delays, which starts on page 110.
Options menu
The Options menu in the Delay measurement window may include the following options:
Display Status
When this option is ticked, additional information is displayed alongside the bar containing
the results of the delay measurement.
Embedded Audio
The menu associated with this option enables you to select the embedded audio channel
on which PCM delay measurements are made.
OmniTek XR User Guide, Software Release 2.3
Page 47
Dolby-E Audio
The menu associated with this option enables you to select the Dolby-E channel on which
Dolby-E delay measurements are made (where supported).
PCM Delay
This option controls whether the Delay Measurement window includes this item.
Dolby-E Delay
This option controls whether the Delay Measurement window includes this item.
Reference Timing
The menu associated with this option firstly controls whether the Delay Measurement
window includes this item. It also offers the option of switching between expressing the
advance/delay in terms of a number of lines plus a number of pixels, and the alternative
‘Line-based’ approach where the advance/delay is rounded to the nearest number of
lines, then an adjustment given in terms of an advance or delay relative to that number of
lines.
Event Log window
The window is principally used for a live display of data that can be logged. It can also be
used to see the results of particular logging sessions. It is fully described in Section 11
(page 104).
Page 48
OmniTek XR User Guide, Software Release 2.3
Gamut Window
The display in this window chiefly comprises a set of bar graphs showing the range of
values for the different possible colour components (YCbCr, RGB and Composite – or
XYZ when Dual Link mode is selected) in the video currently being analysed. The range
of colour components for which graphs are displayed is selected from the Control panel
which is displayed/hidden by clicking on a release catch similar to that on the Waveform
window (see page 55).
The individual graphs show the ranges encompassed by the current frame. Where the
values go outside the ranges specified on the Video: Analyzer page of the Engineering
Settings control window, the values in excess are shown in a different colour. (The
colours used are set on the Waveform and Gamut page of the Look & Feel dialogue,
which is called up by taking the Look and Feel option from the Options menu – see
below.)
Displayed at the bottom of the Gamut window are details of the percentage of pixels in
the current frame for which the value goes outside the specified ranges, together with
details of the peak value of this percentage since the last time the display was reset (by
clicking on the Reset button shown at the right-hand end of the bar at the bottom of the
window).
Options menu
The Options menu in the Gamut window includes the following options:
Graticule
The graticule lines can be displayed or hidden, along with graticule text labels. In
addition, amplitude markers may be overlaid onto the main graticules. These are
horizontal lines that can be used to mark out important levels. It is possible to define
multiple markers, and change which is displayed, or to display several at a time. It is also
possible to opt for minimal labelling on the various displays.
Note that the units for both axes of the graticules are customizable, using the global
selection on the File/Preferences menu selection. For example, this can switch between
decimal or hexadecimal values, or into a mV scale. See page 14 for details.
OmniTek XR User Guide, Software Release 2.3
Page 49
Graticule calibration can be based around the standard SMPTE range of 64 to 940/960
(expressed as decimal, in 10bit format), or alternatively around the full range of 0 to 1023
(again decimal, 10bit). Full range video formats are particularly useful when using RGB
signals in a Dual Link set-up. For example, Thomson Viper cameras generate RGB in the
range 0 to 1023. Other cameras generate RGB in the range 0 to 940. Having the variable
calibration means the waveform monitor can be set to suit.
Look & Feel
The ‘Look and feel’ menu selection opens a dialogue that allows the colours of various
items to be customized. The Gamut window uses the same colour selection as the
Waveform window. Details are given in the section on the Waveform window (page 59).
Generator window
Where the Motion/Caption option is included, OmniTek XR incorporates an ivideo store.
This window provides access to the video store. Its operation is described in the section
on Generator Functions, which starts on page 70.
Mini-Pic Window
The Mini-Pic window displays a representation of the video that is currently being
analysed, at full resolution in SD or at half (single field) resolution in HD.
Where the video being processed includes time codes or closed captions, these can be
displayed on the Mini-Pic by taking the appropriate options from the Options menu as
described below. The Safe Action and Safe Title areas defined in by the Cage Generator
(page 82) may also be displayed in this way.
Page 50
OmniTek XR User Guide, Software Release 2.3
Options menu
The Options menu in the Mini-Pic window includes the following options:
Pulse/cross
The Pulse/cross mode delays the video by half a frame both horizontally and
vertically, to emulate the HV delay mode of CRTs. This can give a clearer view of
data adjacent to blanking
Note: This mode can be more useful if the ‘TRS Pass’ mode is also enabled in the
Analyzer menu of the main application.
Colour options
The Mini-Pic display defaults to normal, full colour mode. When using OmniTek XR
in a colorist environment, where brightly coloured displays can be a distraction, it
may be helpful to switch the Mini-Pic into the monochrome mode.
The Mini-Pic can also be switched into a blue or green mode, whereby the blue (or
green) data is applied to all three channels. This can be very helpful in looking for
noise or for macroblocks, which tend to be more pronounced in chroma channels
than in luma channels, especially in HD.
Show Closed Captions
This option is for use where the incoming material (or test sequence) contains closed
captions or teletext subtitles in any of the supported formats. ‘Line 21’, EIA-608 and
OP-47 teletext are supported as standard. EIA-708 captions can be displayed on systems
that include the 708 Decode option.
Note:
The type of caption must first be selected either by taking the Closed Caption Source
option below or by using the equivalent option in the main Analyzer menu (see page 17).
For teletext subtitles, it is also essential to set the necessary page/line details on the
Teletext: Reader page of the Engineering Settings control window (page 29). Additional
settings are also required where ‘Line 21’ captions are delivered in a video format other
than NTSC and on a line other than Line 21 (see page 30).
OmniTek XR User Guide, Software Release 2.3
Page 51
Closed Captions Source
This option works in tandem with the similarly-named option within the Analyzer menu to
set the source for closed captions/teletext subtitles shown on the Mini-Pic.
EIA 708 Options
This option is used to select which service and font should be used for displaying EIA 708
closed captions (where supported). Note: EIA 708 must first be selected as the Closed
Captions Source (see above).
Show Cage
Selecting this option displays the Safe Action and Safe Title areas set in the Cage
Generator (page 82) on the Mini-Pic.
Time code
Where required, the Mini-Pic can also show the time code associated with the video,
positioned to the left, in the centre or to the right at the top, at the bottom or in the middle
of the display. This option calls up a submenu through which time code display is
selected and the type and position of the time code is set. Note: The time code reader
needs to be configured for the type of time code included in the video – as described on
page 27.
Page 52
OmniTek XR User Guide, Software Release 2.3
Aspect ratio
The aspect ratio of the Mini-Pic can be changed from its default settings to preset values,
or to a custom value, to the value specified in the Video Index or it may be forced to
follow the Wide Screen Signalling values that can be contained within PAL video.
Show Region of Interest
This option controls whether the area picked out as the Region of Interest (see page 63)
is displayed on the Mini-Pic.
Vector Scope Window
The Vector Scope window displays a vector representation of the incoming waveform.
In addition to Options and Window menus, the Vector Scope window has a set of controls
located in a panel that can be revealed and hidden by clicking on the ‘release catch’
alongside the right-hand scroll bar.
A particular version of this display is the Luma Qualified Vector Scope, which is created
solely from pixels whose luma lies within the luma error-check range. This is especially
useful for studying areas of a display that are nearly black. This form of display is
selected through the Video: Analyzer page of the Engineering Settings control window, as
described on page 24.)
OmniTek XR User Guide, Software Release 2.3
Page 53
Panel Controls
ROI Controls
The top set of controls let you zoom the Vector Scope in on any portion of the display.
Once zoomed in, you can adjust the horizontal and vertical position, allowing you to see
all areas, not just the centre of the Vector Scope.
You can also zoom into the selected area by clicking and dragging over the Vector Scope
(using the right mouse button) then return to the unzoomed display by double clicking the
right mouse button over the Vector Scope. Also the area selected is automatically
adjusted as the Region of Interest is changed (see page 63) so these manual controls will
only be needed very occasionally.
Note: The Vector Scope zoom works independently of the Waveform zoom controls.
Preview Window
The Preview window indicates the portion of the video field that you are zoomed in to.
Look & Feel
The Look and Feel controls adjust the filtering controls applied to the module creating the
Vector Scope display. The three aspects of the display that can be varied are the
brightness (Gain), the Gamma of the display and its persistence (adjusted using the
Decay control). Note: These parameters can readily be set back to their default values by
taking the Reset option offered in the Options menu (see below).
Options & Window menus
These menus provide additional controls. In particular:
The Graticule option within the Options menu lets you change between a 100%
graticule and a 75% graticule, or to hide the graticule, or separately hide the
graticule labels. There is also the option to allow the display to be interpreted in
terms of the YIQ colour space by additionally showing I/Q axes.
Reset gain/gamma/decay gives you a single menu option to select to reset
these aspects of the display to their default values.
Save snapshot will take the current Vector Scope data and write it to a named bitmap
file.
It is also worth noting a range of different resolutions that are supported, up to 1024 x
1024. The required resolution may be selected through the Window menu.
Further information about these window controls is given on page 39.
Page 54
OmniTek XR User Guide, Software Release 2.3
Video Status window
The Video Status window displays a selection of information about the video content of
the input being processed, and in particular about errors detected in that stream.
The information is arranged in a collapsible hierarchy with sections of the display able to
be opened or hidden as required, allowing the user to select what is displayed according
to their particular needs.
Details of the video information displayed are given in the section on OmniTek XR’s
Video Checking Features (starting on page 84).
Options menu
The Options menu in the Video Status window includes the following
options:
Flat View
Ticking this option selects the alternative ‘flat’ status display (see page 84).
Configure Timeline
This option allows you both to opt to display ‘timelines’ indicating the rate at
which different type of errors are occurring and to set the parameters of that
those timelines (as shown the following dialogue). See page 84.
OmniTek XR User Guide, Software Release 2.3
Page 55
Configure Filter
Calls up the dialogue through which items for display and/or logging are selected (see
page 119).
Look & Feel
Calls up the Look & Feel dialogue used to set display parameters across the whole
application (see page 59).
Reset options
These options reset different aspects of the Video Status display.
Enable columns
This option displays a dialogue through which you can select which details are displayed
in the Video Status window.
Waveform Window
OmniTek XR includes an extremely powerful and flexible waveform display. This
necessarily means that there are more controls over waveform display than in
conventional products. This section describes the full set of waveform controls that are
included as part of the Waveform window.
Associated with the Waveform window is a panel of controls that can be either visible or
hidden. An example window is shown below, first with the panel of controls hidden then
with these additional controls displayed. These controls are also available from the
Colour Mode and Options menus on the Waveform window.
The view above highlights the ‘release catch’ on which to click to reveal the panel of
controls. If you click in the highlighted section (and grow the window so that you can see
all of the details), you see the following window.
Page 56
OmniTek XR User Guide, Software Release 2.3
Clicking on the release catch this time will hide the waveform display controls, and revert
to the previous window.
The window also offers Options, Colour mode and Window menus.
Area displayed
TQ+XR
The part of the image for which waveforms are generated is referred to as the Region of
Interest. This may be selected by using the Region of Interest toolbar (see page 63).
Alternatively it can be picked out (and moved around) on the Mini-Pic as described on
page 63. The waveforms displayed are zoomed into the selected part of the image. To
revert to displaying waveforms for the whole image, double click with the right mouse key
over any portion of the Mini-Pic display.
The required part of the image can also be picked out on the Mini-Pic in exactly the same
way in Full Screen mode.
Note:
The Window menu includes the option to Resize to fit. This changes both the waveform
display and how the waveforms are generated.
The video processing hardware can generate waveforms in one of four resolutions. At the
highest resolution, a single LSB (out of 10 bits) will cause a viewable change in the
waveform. This provides the best possible quality to see maximum detail. However in
some applications, a lower resolution is quite sufficient. We recommend selecting the size
that gives waveforms of a screen size nearest to your requirements, then stretching the
window to the exact size.
OmniTek XR User Guide, Software Release 2.3
Page 57
Colour Modes
OmniTek XR can display the waveforms in a variety of modes, which may be selected
either from the Colour mode drop down in the panel or from the Colour mode menu.
The possible modes are:
YCbCr
Displays video in the original format as per the serial input
YUV (SD)
Displays video on graticules that match regular SD data
YCbCr + Composite
As YCbCr but also showing a composite waveform created
from the component data (see below)
YUV + Composite (SD)
As YUV (SD) but also including the composite waveform,
created as above
Y + RGB
Shows luma plus the RGB component data
RGB
Standard RGB display
RGB + Composite
RGB display together with a composite waveform created
from the component data (see below)
Composite
Only shows the composite waveform
Bowtie
Shows a standard Bowtie display
In all modes, selector boxes appear for each item included in the waveform display, so
that items not required need not be shown. The remaining items automatically stretch to
fill the space when an item is removed. The waveforms can all be displayed as full width,
with each different component stacked vertically, or in a standard parade form (selectable
via the separate Parade option).
Composite display
Where the colour mode specifies ‘Composite’, the waveforms shown include one showing
the Composite waveform corresponding to the luma and chroma data within the original
video datastream.
The composite waveform takes the form of a band of varying width around a central line
that follows the Y (luma) component of video data. The width of the band at any point of
the waveform is determined by the chroma components of the waveform, the magnitude
and phase of which determine an overall magnitude (M) for the colour component of the
signal. The outer limits of the composite waveform are given by Y + M and Y – M.
In the OmniTek XR display, the area between the Y + M and Y – M curves is filled in with
solid colour as there is no useful information to be obtained from this area.
The range of values between which the composite waveform runs is one of the aspects of
the video that OmniTek XR monitors. In particular, it monitors where these values go
outside the permitted range set on the Video: Analyzer page of the Engineering Settings
control window (see page 23). The proportion of the incoming video for which the
composite signal goes outside the specified range is reported on in the Video Status
window (see page 84) and logged in the Event Log window (see page 104).
Panel Controls
Colour mode
These controls allow the selection of the components to display, either stacked vertically
or in parade form.
Look & Feel
The ‘Look & Feel’ controls are provided to fine tune the gain, gamma curve and decay of
the waveform traces. However these controls are not normally used as these aspects of
the display are automatically adjusted to suit variable levels of gain etc.
Page 58
OmniTek XR User Guide, Software Release 2.3
Options Menu
The Options menu allows you to adjust some specifics about
how the waveform traces are displayed.
In particular:
Data
For RGB type displays, the components can optionally be reordered into the GBR order.
Graticule
The graticule lines can be displayed or hidden, along with graticule text labels. In
addition, amplitude markers may be overlaid onto the main graticules. These are
horizontal lines that can be used to mark out important levels. It is possible to define
multiple markers, and change which is displayed, or to display several at a time. It is also
possible to opt for minimal labelling on the various displays.
Note that the units for both axes of the graticules are customizable, using the global
selection on the File/Preferences menu selection. For example, this can switch between
decimal or hexadecimal values, or into a mV scale. See page 14 for details.
Lastly graticule calibration can be based around the standard SMPTE range of 64 to
940/960 (expressed as decimal, in 10 bit format), or alternatively around the full range of
0 to 1023 (again decimal, 10 bit). Full range video formats are particularly useful when
using RGB signals in a Dual Link set-up. For example, Thomson Viper cameras generate
RGB in the range 0 to 1023. Other cameras generate RGB in the range 0 to 940. Having
the variable calibration means the waveform monitor can be set to suit.
Crosshair
The visibility of the crosshair can be toggled. The crosshair appears as a cursor at a
given horizontal position on the waveform. If several components are displayed in the
waveform, then the cursor appears in the same place on each component.
The position of the cursor can be changed by clicking within the waveform window.
Look & Feel
The ‘Look and feel’ menu selection opens a dialogue that allows the colours of various
items to be customized (shown on the following page).
The colour of the graticule and of each supported waveform element can be individually
chosen. In addition ‘error colours’ can be specified uniquely for each different waveform
type for use when the waveforms breach the thresholds for valid video (specified in the
Engineering Settings control window, as described on page 22). It should however be
noted that the areas in error are not always clearly defined when the Interpolator is being
used to generate the display (see page 17).
The CRT emulation option applies a special filter to the waveform data to emulate the
look that is typical of analog CRT based waveform monitors.
The remaining options allow you to set the crosshair colour and the colour of the
measurement cursors, which can be used to measure time or amplitude between two
points as described on page 32.
OmniTek XR User Guide, Software Release 2.3
Page 59
Note: All of the look and feel choices here directly affect the waveforms displayed within
the Windows environment. They also affect waveforms displayed in Full Screen mode,
unless specific look and feel settings have been assigned to the chosen full screen view
as described on page 69.
Reset gain/gamma/decay
This gives you a single menu option to select to reset these aspects of the display to their
default values.
Split View
The ‘Split View’ controls allow you to split the waveform to simultaneously show an
unzoomed waveform and a zoomed waveform. The additional waveform can be
displayed either below the main waveform, or to the right, as determined by the ‘Split
Position’ control.
When the waveforms are split, the additional waveform display will mirror the original
waveform display. So if you have configured the unit to show Y+RGB, the extra section
will show Y+RGB. If you now use either the Region of Interest Window, or the right
mouse key, to select a portion of the main waveform, then the extra waveform display will
zoom in on the area you have just selected, while the original waveform will still show the
full display.
To return to the standard waveform display, unselect split view from the menu.
Note that the ‘split view’ item will have a check mark against it on the menu when the
function is activated.
Show Active Tooltips
Selecting Show active tooltips causes a small box to follow the mouse pointer
displaying the X and Y co-ordinates of the point under the pointer.
Save Snapshot
‘Save snapshot...’ takes the currently displayed waveform image, and writes it to disk as
a bitmap file. The user is prompted to enter a filename during the save operation.
Page 60
OmniTek XR User Guide, Software Release 2.3
Colour Mode menu
This lists the different forms of waveform display that exist. This duplicates the
Colour mode selection offered through the optional control panel. The controls are
duplicated for user convenience. Note however that although you can select any
mode from this menu, you will still need to access the control panel to select the
specific components for display.
Waveform Histogram Window
The Waveform Histogram window displays colour histograms of the video that is currently
being analysed. These provide a detailed and accurate method of assessing colour
gamut. Unlike traditional displays that simply indicate that a signal is out of gamut, these
histograms allow you to see to how far out of gamut the signal goes.
The histograms can be represented either through a line graph or as a bar graph.
The standard display typically just shows a section of each histogram, scaled to suit the
selected window size. Scroll bars allow the full extent of the histograms to be viewed.
There is however the option to show these sections alongside a representation of the full
histogram in a ‘Split view’ (see ‘Options menu’ below). The area selected for more
detailed display is then marked on the full histogram and can be adjusted by dragging the
sides of the marked area. The Options menu also provides control over the display of the
graticule, labels and the summary information shown to the right of each graph.
In common with the Waveform window, the Waveform Histogram window has a panel of
controls on the right hand side of the window, which can be displayed or hidden. Several
of these controls are also available in the Colour Mode menu offered within this window.
OmniTek XR User Guide, Software Release 2.3
Page 61
Control Panel Display Options
The controls in the panel enable the histograms to be displayed in different colour modes
and as either a line or as a bar chart. You can also set the vertical scaling used for the
histograms.
Colour Mode
The possible colour modes (selectable either from the Colour mode drop down in the
panel or from the Colour mode menu) are:
YCbCr
Histograms are generated in YCbCr space
YCbCr (SD)
As above but after conversion to true SD levels
RGB
Histograms are generated in RGB space
Composite
Histograms are generated in Composite colour space
Items may be displayed stacked vertically above each other (as shown here) or in parade
form. In addition, selector boxes are associated with each of the above modes so that a
subset of the items can be displayed if required.
Graph Type
The different graph types available are Bar, Line and Line (All). The last of these three
options shows a single combined histogram.
Vertical
The vertical range sets the scale of the graph, and can be adjusted to suit your exact
data. For most data, the best results will be obtained by ticking the Log button, which
applies a logarithmic scaling to the vertical axis. Clicking the Auto button (after ticking or
clearing Log) provides an easy way of selecting a suitable scale.
Options menu
The Options menu provides additional controls. In particular:
Data
This option switches RGB histograms between RGB and GBR ordering.
Graticule
The submenu associated with this option lets you toggle the visibility of the graticule,
the labels on the graph and the summary information shown to the right of each
graph.
Split options
These options allow you to select a Split view in which the section of each histogram that
is currently being shown in detail is displayed alongside a representation of the full
histogram with the currently-selected area marked out on it. The Split view position
option controls whether the current selection is shown below the full histogram or to its
right.
Page 62
OmniTek XR User Guide, Software Release 2.3
Region of Interest toolbar
The Region of Interest toolbar acts in conjunction with
the Waveform and Vector Scope windows to provide fine
detail control over the part of the video frame that is used
to create waveforms etc. Many of controls can also be
achieved by other means but some less-required
functions are only available through this toolbar.
The details of the section of the video frame picked out
for display are set through the Horizontal and Vertical
controls that form the major part of the ROI window
display (described below).
The Region of Interest controls are global in that they
have a parallel effect on the waveforms, the Vector
Scope view, and any histograms. The Data View display,
however, is unaffected by these controls, as it always
shows the incoming data around the current crosshair
position.
Line mode
The top control is crucial. It lets you select between
displaying the waveform of a single line, a waveform
based on multiple lines (the Multi option), and a Sweep
mode in which an arbitrary number of lines can be
displayed.
This control is also available by clicking on the Line
Mode icon on the Windows toolbar.
Horizontal/Vertical
The horizontal and vertical controls allow you to identify
a specific area of interest within the video frame, and to
set the scaling that is applied. These items can be
variously set by moving sliders, moving counters to
particular values, or clicking on buttons within the toolbar
that select certain specific values. Further details are
given below.
Horizontal position (Multi and Line modes only)
The default waveform position has pixel 1 at the left of
the display, and the last active pixel on the right of the
display. In Line and Multi mode, it is possible to scroll the
view of the waveform using the H pos slider. This
provides a useful means of examining blanking data. Additionally, it is possible to focus in
on the section of the waveform around the selected point of interest by magnifying the
image using either the H mag slider or numeric data entry, or by clicking on the provided
‘x10’, ‘x5’ or ‘x2’ buttons.
A full single line (including the blanking area) may be displayed by using the ‘1L’ button,
while the waveform associated with two full lines can be displayed by clicking the ‘2L’
button. (This ‘2L’ display is chiefly of value in Line mode.)
Vertical (line) position
It is similarly possible to select a vertical portion of the video image from which to create
waveforms, using the Y controls.
In Multi mode, the line at the centre of the region of interest is set using the Y pos
slider/counter, while the number of lines around that line from which the waveform is to
be generated is set using the Y range slider/counter. (The buttons allow quick selection
of the first and last lines of each field.)
OmniTek XR User Guide, Software Release 2.3
Page 63
In Sweep mode, the first line of the sweep is set as Y start, while the total number of
lines in the sweep is set as Y lines. There are also buttons selecting 2-line and 15-line
sweeps, full field sweeps (FL) and full frame sweeps (FR).
In Multi mode, the control also includes AV and FV buttons that switch the Waveform
display between being restricted to just the active portion (AV), or the full raster (FV).
Amplitude controls
All versions of the display include a similar set of V controls that allow a particular section
of the amplitude range to be examined.
Note:
The region of interest that you define may be shown on the Mini-Pic (see page 53). It can
also be selected by right clicking then dragging the mouse over the Mini-Pic display. The
magnification controls will then be automatically adjusted for the best display. Having
defined the display area in this way, you can then move it over the video by clicking and
dragging with the middle mouse button. Finally, double clicking the right mouse button
anywhere in the Mini-Pic window will revert to a full view over the entire frame.
Sync settings
The options at the bottom of the Region of Interest toolbar allow the area currently
defined as the Region of Interest to be used in other areas of the program.
Selecting Sync ROI to cursor causes the Region of Interest to be centred on the cursor
position. As the cursor position controls the part of the frame selected in the Data View,
this also has the effect of aligning the Region of Interest with the Data View.
When Sync ROI to cage safe-title is selected, the area currently defined as the Region
of Interest automatically becomes identified as the safe title area (see the description of
the Cage Generator on page 82).
Page 64
OmniTek XR User Guide, Software Release 2.3
6. Full Screen Mode
As well as displaying different aspects of the video input as multiple windows on a
standard Windows application display, OmniTek XR also offers the option of full screen
views each showing a selection of the different displays available in a simple rectangular
layout tailored to the requirements of the video format being analysed.
A typical full screen view is shown below.
The main portion of the display contains the panes defined for the selected layout.
Full screen views are customizable through the Full Screen Configuration dialogue, which
is displayed either by clicking the Full Screen Configuration icon on the Windows toolbar
or by taking the Configuration option from the Full Screen menu. As well as selecting
which displays are shown, the settings for each element can also be customized, and a
hot-key may be assigned to the final layout. It is even possible to have individual
engineering settings for each layout. This is described below.
OmniTek XR User Guide, Software Release 2.3
Page 65
Entering Full Screen Mode
Full Screen mode can be entered in a number of ways.
Some systems are set up to automatically enter Full Screen mode on Start-up. They can
also be configured to be ‘locked’ in Full Screen mode. Both these options may be
selected through the Full Screen Configuration dialogue (see page 67).
Full Screen mode can also be entered from Normal mode either by selecting the required
view from the Full Screen menu or by pressing the hot-key associated with the required
view (also customizable). A list of hot-keys for full screen views is given in the Full Screen
Configuration dialogue (see below) It is also possible to select the Full Screen display of
a particular application window by taking the Full Screen option from its Window menu.
Another option is press ESCape. From Normal mode, this selects the last full screen view
to be displayed. Once in Full Screen mode, you can press ESCape to return to the
normal view (unless the system has been configured to lock you into Full Screen mode).
Control Facilities in Full Screen Mode
In Full Screen mode, the displays are controlled through buttons shown at the bottom of
the screen. The buttons disappear after a period of inactivity, to keep the display
uncluttered in normal use. To make the buttons appear, click anywhere in the button area
with the left mouse button.
The buttons shown to the left provide specific control functions for different panes,
together with some additional options that are called up by clicking the Misc button. The
buttons on the right let you scroll left and right though the list of active full screen views. If
you define an additional view, it is automatically added to this list.
The actions associated with the buttons offered in Full Screen mode should be easy to
follow when used in conjunction with the description in this User Guide of similarly-named
options offered in Normal (Windows) mode.
Suppose you are viewing the above display, which features RGB waveforms. If you wish
to switch to YCbCr, click on the button labelled Waveform. The buttons on the left will
then be replaced with buttons relating to the waveforms. Click on Colour mode. The
buttons are now replaced with buttons showing the list of waveform display modes.
Click on YCbCr, and the waveform displayed switches to YCbCr. If you wish to keep this
change, click on the disk button in the right-hand set of buttons to save the new full
screen view setting.
Once you have called up a set of controls, the left-hand button changes to an arrow
button. Clicking on this arrow button switches back to the previous set of buttons, while
clicking on the Exit button (‘X’ button) in the right hand set of buttons returns you to the
standard Windows display. To return to the same full screen view, simply press the
ESCape button on the keyboard. Note: No ‘X’ button is offered where the system has
been locked in Full Screen mode.
Note:
Page 66
While the buttons shown in Full Screen mode provide the majority of the controls that are
offered for the equivalent windows in Normal (Windows) mode, they don’t cover the full
range of possible actions. There may therefore be occasions when you will need to leave
Full Screen mode in order to make the setting/selection you require.
OmniTek XR User Guide, Software Release 2.3
Defining Full Screen Views
Full screen views are defined through the Full Screen Configuration dialogue, which is
displayed either by clicking on the Full Screen Configuration icon or by taking the
Configuration option from the Full Screen menu.
The left-hand side of this window is concerned with some overall characteristics of full
screen views, while the right-hand side of the window is given over to a Layout Editor
through which the details of individual full screen views can be defined.
Overall Characteristics
Video Status Error Checking
The full screen views can include a global error detection display. This shows as
ERRORS followed by the logical AND of all of the conditions that are checked in the
‘Video status error checking’ section of the Full Screen Configuration dialogue.
HW Optimised Sizing
The Waveform, Vector Scope and the Mini-Pic image are all created by the hardware,
and are created at certain fixed sizes. These images can be scaled in software to the
largest size to fit a given window panel and indeed this beneficial where the display size
is small or the pane size is small. However, the best results will normally be obtained
without any software scaling.
These options force the use of the hardware-optimised sizes. If one of the three
hardware-optimized sizing check boxes is ticked, that relevant item will only be shown in
one of the sizes that the hardware generates. If the box is not ticked, then the item will be
scaled by the software to be as large as possible (while maintaining the aspect ratio).
OmniTek recommends always using hardware-optimized scaling for waveforms and for
the Vector Scope image. When running in SD, hardware-optimized scaling is also
recommended for the Mini-Pic but software scaling gives acceptable results for the MiniPic when running in HD.
OmniTek XR User Guide, Software Release 2.3
Page 67
Startup/Help Settings
It is possible to start up the application and directly start in Full Screen mode, by selecting
in the Startup in full-screen mode: box.
Ticking the Show help/information box enables the display of a small amount of Help
information. In addition, pressing ‘I’ toggles the display of the Help information while in
Full Screen mode.
Control Panel Timeout
Sets the length of time the Full Screen mode control panel remains displayed without
being actively used.
Exit Controls
These options provide the ability to lock the system in Full Screen mode and to change
the key combination that overrides this lock (detailed in the dialogue).
The Layout Builder
The Full Screen Layout Builder provides a host of powerful features in an easy to use
format. It allows the user to set up full screen views showing particular combinations of
windows, which can then be switched between simply by selecting entries from the Full
Screen menu described on page 19. Certain aspects of these windows – such as the
colours used, the region of interest selected, the sizing and colour space of the
waveforms shown and various Engineering Settings – can also be made part of the
chosen full screen view (see ‘Assigning Settings’ below). Anything not specifically set
simply adopts the current configuration.
Creating/Editing Full Screen Views
A new full screen view is normally created by creating an instance of one of the supplied
layout templates, then assigning the details of the required display to each pane in the
layout.
The layout templates that are available are shown in the ‘Layouts’ section at the top of
the Layout Editor display. If you wish, you can filter the range of screen layouts by ticking
the Only show layouts for current resolution option.
Start by scrolling through this and selecting the required template. (If there is not a
template suitable for your requirement, one can be created by making suitable changes
to a text .ini file. Please contact OmniTek to see if an alternative template can be
supplied, or for help on how to edit the .ini file.)
Once you have selected a template layout, the window below will show all currently
existing instances of the selected template layout. If the selected template hasn’t been
used before, the window will be empty.
Existing full screen views can be copied (using the Add instance copy button) and then
edited to create the required full screen view. Alternatively a new full screen view can be
created by selecting the Add new instance button. A new instance appears, with the
window panes unassigned and the whole thing highlighted in dark red, except for an
individual pane that is highlighted in a lighter red to show it is the current selection.
You can also delete full screen views that are no longer required.
To edit a new or existing full screen view, start by either double clicking on the required
pane within the instance or right clicking over the pane, and select Change pane type.
From the popup window that appears, select your choice of window to display in this
pane. Repeat this process for the other panes within the instance.
Initially the new instance will have a default name shown directly above it, of the form
layout n. Double click on this name, and a popup will appear that will let you rename the
instance.
Page 68
OmniTek XR User Guide, Software Release 2.3
Assigning Settings
By default, no specific settings are assigned to the various portions of the full screen
view. So when you enter a full screen view, each pane will adopt the current settings of
the related window within the normal environment.
For example, the waveforms in a given full screen view could be currently set to show
YUV. Go back to the normal (Windows display) mode, and change the waveform display
to RGB, and then go back into full screen display.
If no settings have been assigned, the waveforms will now be shown in RGB format. If,
however, for the given full screen view, the waveforms had been assigned to YUV, they
would always be shown as YUV, regardless of the setting within the normal Windows
display environment.
Pane settings
To assign settings to a pane, use the standard procedures to make the required settings
within the main part of the program, then select the pane in the Layout Builder, and click
Assign from the ‘Pane settings’ section. Applicable settings include the choice of YUV or
RGB or XYZ, and whether the waveforms are shown at normal size, or are stretched to a
larger size.
If at a later stage you wish to change settings that have been previously assigned, ‘Load’
the current pane settings, change them to suit your requirement in the Windows version
of the display, then re-Assign them within this Full Screen Configuration dialogue.
It is also possible to entirely ‘Remove’ the pane settings if required.
Engineering, ROI and Look & Feel settings
As well as assigning Pane settings, it is also possible to assign particular Engineering
settings, Region of Interest settings, and Look & Feel settings to individual layouts. The
settings concerned are those made through the Engineering Settings control window (see
page 20), the Region of Interest toolbar (see page 63) and the Look&Feel dialogue (see
page 39).
Assigning Hot-keys
Having chosen the full screen layout, chosen displays for each pane, and configured
each pane to suit your requirements, the last thing to do is to assign a hot-key to your
new full screen view.
Right click over the layout image, and select Assign hot-key from the menu that will
appear. When the hot-key dialogue appears, press the key or key combination that you
wish to use, and click on OK. (Do not press Enter on the keyboard, as otherwise that will
be picked as the hot-key assignment.) Note: Certain choices are not available, as these
are already assigned to the OmniTek application, or to the operating system environment.
Once a valid hot-key has been assigned, it will be indicated above the right-hand corner
of the layout image. Subsequent presses of the relevant hot-key will switch the
application directly into Full Screen mode with the chosen layout. The list of all assigned
hot-keys appears on the left of the Full Screen Configuration dialogue. Hot-key
assignments can also be deleted or changed here.
Be warned that certain assignments may remain in force after switching from a full
screen view with an assignment. For example, if a particular hot-key switches both to a
given arrangement of panes and to NTSC, then the whole unit will remain in NTSC until
you change this, or select a layout that has a different Engineering setting assigned to it.
In practice, Engineering settings should either never be assigned, or should be assigned
to every possible hot-key.
Whilst certain controls can be assigned to different full screen views, greater versatility
and greater ease of use is available through using Presets (see page 11) to control
simple functions like switching between single line and multi-line view.
OmniTek XR User Guide, Software Release 2.3
Page 69
7. Generator Functions
Where the system includes the Motion-Capture option, OmniTek XR includes a video
store, which is accessed via a Generator control window.
The Generator window is displayed by clicking the Generator icon on the main (Windows)
toolbar.
The Generator window provides access to a range of functions associated with saving
and loading data and with pattern creation. It has its own menu bar, and its own set of
icons, which should not be confused with the menu bar and toolbars for the main
application.
A particular feature of OmniTek XR’s Generator is that all the images and sequences are
played out from the memory on the OmniTek card as uncompressed video.
The contents and operation of this window are described below.
Generator Menus
File Menu
Configuration Options
These options let you load and save sets of images and sequences, referred to
here as ‘configurations’. These configurations are stored as .ogs files.
Note that you cannot use these choices to load individual images. That is done
from the Source menu.
Page 70
OmniTek XR User Guide, Software Release 2.3
Preferences
Default pattern fit type
Every time an image is loaded, its size is compared with the current video format. If it
exactly matches, the image is loaded. Default pattern fit type lets you specify a default
action to take when the image size doesn’t fit the current video format. One default action
is to always pop up a dialogue box asking for a resize choice. The other options specify a
default resize choice that the application will follow.
Load patterns once they are imported
When a configuration is loaded, a series of files are loaded into the control window. If this
box is ticked, the video data is also loaded into the OmniTek card video memory.
This is the normal option to choose. However if you frequently change configurations and
only use an occasional image or sequence from each configuration, it may be quicker to
clear this option and to load images instead by clicking on the corresponding thumbnail.
Re-load patterns once they have been saved
This option is included to cater for multiple file formats, in particular differences in the
format of video images and PC-based images. For example, if a frame of video is
captured, it is held in the frame buffer in the native YUV format. If you then save the
image to disk as a .BMP image, the data will be converted to RGB. The process of
conversion means the YUV frame being displayed will no longer accurately represent the
file that has been saved. Ticking this option will force the image to be reloaded. In our
example case, the RGB file would be loaded, converted into YUV and displayed. Note,
however, that although the image is back in YUV format, there will normally be significant
changes to the colour information with respect to the original YUV image that was
captured.
Rotate sequence thumbnails
This option refers to the thumbnail image that is displayed when a sequence is loaded.
By default just the first frame of the sequence is displayed. By selecting this choice, the
thumbnail changes from time to time to other frames within the sequence.
The number (minus 1) of the current frame to be displayed is shown in the adjacent box,
which also offers the option to manually change the current position in the sequence.
OmniTek XR User Guide, Software Release 2.3
Page 71
View Menu
The View menu lets you turn off the toolbar and the status line if not required, and
set the size of the image thumbnails. This menu can also be used to open or close
the Playlist window, and switch between the Thumbnail view shown above and a
text-based list.
Source Menu
The Source menu provides the controls used to load a previously saved
image/sequence (Import image – see Pattern Creation below), or to grab images from
the serial input (New input – see Grabbing Images below). These functions are also
available from icons on the toolbar (see page 73).
You can also specify a folder to be continuously monitored for new files, with each new
file being directly loaded once it appears.
Pattern Menu
The Pattern menu provides various options concerning how images and
sequences are manipulated.
Sort offers the choice of listing the loaded patterns in different ways.
Load loads the selected image into the Generator SDRAM, while Load All loads
all images into the SDRAM. This is useful if you have disabled automatic loading
of images as one of the Preferences set via the File menu.
Specify load sub-section is concerned with sequence loading (which is part of
the Motion-Capture facilities). This item is only available if the currently selected
thumbnail is a sequence. Selecting this option opens a dialogue that lets you
specify a frame other than Frame 1 (the default) as the first in the sequence. You
can also specify a frame other than the normal last frame as the end of the
sub-section.
This option is particularly useful with avi files, which can contain more frames
than the Generator frame buffer can hold. Access to the frames at the end of such .avi
files is only possible using this option.
Resize Output provides some choices as to how images are resized when the image is
not the same size as the currently selected resolution. The choices are the same as the
ones offered in the Preferences dialogue (described above).
Shell open opens a window showing the file(s) used to construct the currently displayed
image or sequence.
Save lets you save the current image. It is intended for use with an image that has been
grabbed from the live input.
Save As… lets you save the current image to a new filename, and/or in a new format.
For example, an image loaded as a BMP could be saved as a JPEG, or a sequence of
multiple individual frames can be saved as an AVI file. Please note that when an image is
saved, it is automatically reloaded afterwards. This is in case the image format has
changed, such as from BMP to JPEG, so you can immediately see that the new image
format is suitable.
Save Frame As… is a mode used with sequences, which lets you save an individual
frame from anywhere within the sequence.
Properties provides information about the current image.
Delete removes the selected image from the Generator window, and frees up the
SDRAM that was occupied. It does not affect the image stored on disk.
Page 72
OmniTek XR User Guide, Software Release 2.3
Window Menu
The Window menu offers the single option to enable/disable ‘snap to grid’ when moving
the window around.
Generator Toolbar
The Generator toolbar icons have the following functions.
New configuration
Open existing configuration
Save configuration
Import existing image or sequence
Grab image from serial input
Delete image or sequence from current configuration
Save current image or sequence to disk
Halt the import of patterns – useful if you start loading a sequence, then decide it is the
wrong one.
Reload a selected image or sequence – if, for example, loading was halted before it
could complete
Reload all images and sequences.
Start file monitoring (only available if folder specified – see next icon).
Configure the file monitoring function – see page 77 for details
Enlarge the size of the thumbnail images (several sizes available)
Reduce the size of the thumbnail images
Toggle between thumbnail view and text view.
Open/close the playlist window. See page 78 for details on this function.
OmniTek XR User Guide, Software Release 2.3
Page 73
At the bottom of the Generator window is a simple status display that displays the total
memory available to store images, plus the amount that is used, along with a bar that
gives a graphical indication of how much memory is used.
The numbers used are calibrated in frames, and hence will change depending on the
current video standard.
If the Advanced module is present, two sets of numbers are used, separated by a ‘slash’.
The number before the slash is the number of frames if the frames are video only, and
the number after the slash is the number if the frames also include all the blanking data
(as applies where the frames in the OmniTek RVF format).
Pattern Creation
Where OmniTek XR includes the Motion-Capture option, video can be generated from
‘patterns’ stored on disk. These may be frames or sequences.
Frame-based patterns
These patterns are stored as individual frames, so a picture captured with a digital
camera, or an image generated in a graphics application could be used.
The images can be in a variety of standard image formats (jpg, jpeg, gif, yuv, yuv10, bmp,
dpx and cineon).
Importing Frame patterns
Clicking on the Import icon on the toolbar or selecting Import Image from the Source
menu brings up the file selector dialogue. Simply navigate to find files in one of the
acceptable formats, and open the required file. The image will then be imported into the
display window and loaded.
Sequences (Motion-Capture option only)
The sequences of frame patterns considered here are intended to be sequences of
adjacent frames captured from a video source.
Once a sequence has been loaded, it can be replayed forwards or backwards, in real
time or faster or slower, in a loop. It is also possible to step through the clip frame by
frame. Depending on the video standard, it is possible to play up to about 40 seconds of
standard definition video.
Please note that the Generator window is a frame-based tool. This means that fieldbased formats may sometimes give incorrect results. For example, if you play a fieldbased sequence forwards, it will play correctly. However, if you try to play it backwards,
the field sequence will not change, so the fields will play in the wrong order. Similarly
image resizing is done on a frame basis. Hence if the images in a sequence consist of
field images, and the sequence is resized on loading, the result may not be exactly as
expected.
Importing Sequences
Two main sequence types may be loaded. The more usual choice is to load an .avi file.
Note, however, that .avi files can only be loaded if the relevant AVI codec is installed in
the Windows operating system. Codecs for common AVI file formats are included in the
standard Microsoft Windows installation.
It is also possible to load a sequence consisting of individual frames, as detailed below.
Importing a sequence of frames is fundamentally the same operation as importing a
single frame so the procedure is (again) to either click the Import icon on the toolbar or
select Import Image from the Source menu. However, instead of selecting a single frame
from the file selector, you select multiple frames (for example by using the Shift-click
technique). Click OK and the sequence will load into memory.
Page 74
OmniTek XR User Guide, Software Release 2.3
The frames used can be of any of image types that the Generator window accepts for
single frame images. However, the frames must be named in such a way that OmniTek
XR recognises them as a sequence – see the note below.
Once the sequence has been accessed, the first frame of the sequence will appear in the
Generator window. To load it into the output buffer, click on the image. Once the
sequence has loaded, the transport control icons on the Run toolbar can be used (as
described on page 33).
Note that a long sequence, particularly of high-resolution frames, will be slow to load.
Having loaded a sequence, you may use the Save As option (called up for example by
right-clicking on the image) to save it. Note however that OmniTek XR only supports
saving sequences as .avi files and they can only be saved to the local drive. Saving .avi
files over the network is not supported.
Note:
For frames to be recognised as a sequence, each filename must contain a fixed length
number i.e. smaller numbers must be padded to the same number of digits as the largest
number. The number can be anywhere within the filename, as long as the position of the
number within the file name does not change. The number must also increment contiguously.
Examples of incorrect filenames:
Test_7, Test_8, Test_9, Test_10, Test_11, Test_12 – The digits are not of fixed length.
Test_7, 8 and 9 need to be renamed as Test_07, 08, 09 etc.
Fred_08, Fred_09, Fred_11, Fred_12 – the numbers do not increment contiguously – file
Fred_10 is missing, so the sequence will not load.
Tmp_02, 03_Tmp, Tmp_04, Tmp_05 – the position of the digits varies.
Grabbing Images (Motion-Capture option only)
The basic procedure for grabbing images is either to click on the ‘Grab from image’ icon
or to select New Input from the Source menu. The following dialogue then appears.
OmniTek XR supports three grab modes:
OmniTek XR User Guide, Software Release 2.3
Page 75
Single – Grabs a single frame. Each time Grab is pressed, a new single image is
grabbed, over writing the image previously grabbed.
Repeated Frames – Grabs between 1 and 10 frames. Set the number of frames you
wish to grab. If you select 3, press Grab three times and each time an image will be
grabbed.
Sequence - Select a length for the sequence (the maximum length will be determined by
the standard you are in, and the amount of RAM fitted on your system). When you press
Grab, the unit will start recording a sequence of images of the selected duration. This
sequence may later be saved as an .avi file.
When you have finished grabbing your image(s), click OK. You will be returned to the
standard OmniTek desktop, with your grabbed images loaded into the Generator window.
Any images you wish to retain will need to be saved. This can be done by right clicking on
an image/sequence, and selecting Save As.
Note:
If your system includes the Advanced option, the dialogue will also offer the option to
‘Record Full Frame’ When this option is checked, grabbing an image/sequence also
grabs the ancillary data, including embedded audio, time code data, closed caption data
etc, and all of this data will be stored along with the image data. If this control is not
checked, then only the active portion of the video is grabbed. See below for more detail
on full frame images.
Full Frame Record/Playback (Advanced option only)
The Advanced option for OmniTek XR provides the ability to record video, including full
video raster, such that all embedded audio, ancillary data etc, is captured with the video
data. It also enables playback of this data.
Images and sequences grabbed as full raster are saved in the usual way but may only be
saved to disk in *.rvf (raster video file) format. Sequences are saved as multiple .rvf files,
all saved to the specified directory, with an incrementing number appended to the base
file name that you specify.
The RVF file format is an OmniTek file format that contains a header, followed by the raw
data from the serial bitstream. No processing is done on the video before it is stored, so
the original colour space is preserved intact. Details on the file format can be made
available to any interested parties.
It should be noted that images and sequences stored in RVF format can only be played in
their native video format. No scaling can be applied.
It should also be noted that the video data is not compressed in any way. This means that
the RAM on the OmniTek card can hold fewer frames of RVF video than standard video.
On the status line of the application, the number of free frames and number of frames
used has been updated to contain two sets of numbers, separated by a '/' character. One
number shows the number of standard video frames, whilst the other number shows the
number of frames in RVF format.
To load a RVF sequence for playback, simply select multiple rvf files with a contiguous,
incrementing number in the filename.
Important Note
When playing RVF files, it is important to note that some of the video insertion modes are
not compatible with the full raster playout.
For example, if a clip is grabbed, including the embedded audio, video index information,
VITC etc, then when the clip is replayed, you probably want this embedded data to be
replayed with the video. But in case you don’t, we have provided a control on the Video:
Generator page of the Engineering Settings control window.
Page 76
OmniTek XR User Guide, Software Release 2.3
Under Use blanking and ancillary data, select From Internal Generator to remove the
entire ancillary data packets from the original source material.
Alternatively select From Source Image (RVF) to use the actual data from the source
image.
Note:
A simple RVF editor is supplied free alongside the Advanced Option to let you view and
edit .rvf files. This editor can be run concurrently with any other OmniTek application. The
current release of this application lets you open files, check the status of ancillary data,
and edit the hex data anywhere within the file.
Folder Monitor
Where the Motion-Capture option is included, OmniTek XR also has the facility to monitor
particular file folders. Once configured, OmniTek XR will constantly look at the contents of
the specified folders, and as files appear, automatically load them.
This option is configured either by clicking on the File Monitor Configuration icon on the
toolbar or by taking the Monitor folder… option from the Source menu.
OmniTek XR User Guide, Software Release 2.3
Page 77
To configure the monitor, click Add to choose the location for the monitored folder(s).
Specify which file format(s) to monitor by ticking the appropriate boxes.
The actual monitoring process can be enabled either by clicking the Monitor button on
this dialogue or by clicking the ‘Start monitoring’ icon.
This function is very useful in conjunction with remote processes that are rendering
images to create clips. The images that are created can be loaded into the OmniTek XR
unit as they appear, compiled into a moving sequence, or checked out using the various
waveform-monitoring functions that are part of OmniTek XR.
Playlists
Where the system includes the Motion-Capture option, OmniTek XR has the ability to
create and manage playlists.
A playlist is, in effect, a scheduled playout running through a predetermined list of video
images and clips. Each item in the list can potentially have, to some degree, different
video engineering settings, and each can be displayed for a different duration.
The playlist can be opened and closed by clicking the ‘PL’ toolbar icon or taking the
Playlist Window option found under the ‘View’ menu. The Playlist window may be
thought of as a sub-window of the Generator window, as the Playlist window can only
be open when the Generator window is open.
The playlist is just like a sequence pattern: it can be played forward or backward, it
can be stepped through, and you can go directly to a specific frame. The playlist is
selected in the Generator window in the same way as any other pattern, at which point
you can use the Run toolbar to traverse the playlist in the same way as a normal
sequence.
Playlist Display
The playlist ‘is the blank thumbnail in the Generator window with the word ‘Playlist’ written
across it. It is visible at all times and is always the first ‘pattern’ in the configuration.
Please note that the playlist is software driven, so there will be some latency when
switching patterns within the playlist and when a playlist is stopped mid item, while the
software uses a number of internal factors to estimate which frame you have stopped at.
The playlist itself is typically created by dragging items from the Generator window into
the playlist window. These items can be dragged into the playlist as many times as
required, but it is not possible to drag and drop multiple selections. Since drag and drop
does not work with all PC configurations, it is also possible to right-click over an item in
the Generator window and select Add to Playlist… to achieve the same effect.
The Playlist window lists each item as a separate row entry. Each entry includes a
thumbnail preview of the source pattern, the path and type of that pattern, and the
duration in frames/seconds of that item. The currently ‘showing’ item is highlighted in
red/pink. An item in the playlist selected for editing is highlighted in black.
Page 78
OmniTek XR User Guide, Software Release 2.3
Edit selected item
Delete selected
item
Move selected
item up/down
Playlist
pattern
New playlist
Open
playlist
Save playlist
Showing
item (in
red/pink)
Playlist
it
Selected
item (in
black)
Playlist status
text (total number
of items, total
duration)
Generator
Item details
(path, type, and
duration)
Source pattern
details (path, type)
Thumbnail
preview
Item duration
(frames/second
Showing
item
Normal item
Selected
it
Playlist options
Adding/Editing items
As previously mentioned, items can be added to the playlist by dragging a source pattern
from the Generator window (or by taking Add to Playlist… from the context menu). On
doing so, a dialogue will appear which allows the user to specify the duration for this item.
It also provides the ability to edit various video generation features such as panning.
Note that these video/audio generator settings only apply to the specified item so that the
user can, for example, apply different panning speeds to different items in the playlist.
OmniTek XR User Guide, Software Release 2.3
Page 79
Source pattern path
and thumbnail preview
Duration for this item
in frames and seconds
Video generator
settings for this item
This window is displayed when a pattern is ‘drag and dropped’ from the
Generator window into the Playlist window. The window can also be accessed
for existing playlist items by double-clicking on the item, or by selecting the item
then taking the Selected pattern properties option from the ‘Pattern’ menu or
clicking on the ‘Selected pattern properties’ icon. Alternatively, the Edit context
menu entry may be used to edit an item (selected or otherwise).
The window allows the user to specify in frames or seconds (for the current
video-standard) how long the item should be displayed. For frame, patterns, the
same frame will be played out for the specified duration. Sequences however can be
played forwards or backwards in a loop for the entire duration.
The Use Current button can be used to set the video settings from the current
Engineering Settings.
The video generator settings work in the same way as the normal video generator
settings found in the Engineering Settings control window.
Item order
Playlist items can be ordered (moved up and down the list) either by using the up/down
arrow toolbar icons or by using the Move selected pattern down/Move selected
pattern up menu items in the main ‘Pattern’ menu.
These actions will only affect the selected item. You can also move an item up or down
the list by using the Move up and Move down context menu items; these will move any
item up or down the list (selected or otherwise).
Delete item
To delete an item in the playlist, either click on the Cross-shaped toolbar icon, take the
Remove selected pattern option included in the ‘Pattern’ menu, or press the Delete key.
Note: These actions will only affect the selected item. The context menu Remove item
may also be used to delete an item (selected or otherwise).
Page 80
OmniTek XR User Guide, Software Release 2.3
Playlist save/open/new
Playlists can be saved or opened using the ‘Save playlist’ or ‘Open playlist’ toolbar
icons or the Save playlist, Save playlist as, and Open Playlist menu items in the
‘File’ menu. Playlists are saved as .odp files. The last used playlist will be opened
automatically when OmniTek XR starts up.
Use the New playlist menu item in the ‘File’ menu to create a new blank playlist.
Note:
Since the playlist is only a set of ‘instances’ of patterns, it is important for the ‘source’
patterns to be fully available in the current configuration. If a playlist item is not found in
the current configuration, an error message will be displayed.
Important Notes:
1. When a playlist is playing, the video generator settings are changed to the ones specified
for the current item. If the user changes the video generator settings within the
Engineering Settings control window, these will not affect the current settings because
the playlist uses its own version of the settings for the current item. The normal
engineering settings will not have any effect until the playlist is exited.
2. There are a number of occasions where a playing playlist will be stopped:
•
An item is added, edited or deleted
•
The pattern in the Generator window is changed
•
The order of the items in the Playlist window are changed
•
A new Generator configuration is created, or a new configuration is loaded
•
A source pattern used in the playlist is deleted from the Generator configuration
•
A source pattern used in the playlist is loaded into SDRAM
•
A new playlist is created or a playlist is loaded
•
The video standard is changed.
OmniTek XR User Guide, Software Release 2.3
Page 81
8. Cage Generator
OmniTek XR systems include a cage generator – or more precisely, two cage generators,
one for safe action, and one for safe title.
The Cage Generator dialogue that controls these generators is displayed by selecting the
cage icon from the main (Windows) toolbar.
It is possible to save the settings made for the cage safe title as a ‘profile’ (see page 24),
by clicking on the Profiles button in this dialogue and then taking the option to Add a
new profile.
The cages that have been set may be displayed on the Mini-Pic by selecting the Show
Cage option from the Mini-Pic window Options menu (see page 52).
Overall Settings
The settings that apply to both cages are selected in the upper part of the dialogue.
To enable the display of the cages, click Enable Cage.
The other aspects of the cage display to be set in this area of the dialogue are:
• Output Destination
This may be either the monitor output or the digital serial output or both.
• Source Aspect Ratio
A selection of standard ratios are offered.
• Required Masking
Masks key out the video in the selected area, replacing it with black. Masks may be
enabled either inside or outside of the safe area or safe title boxes. The video that is
masked out is also removed from the error-checking module, so these masks can also be
used to reduce the area where errors are flagged. Alternatively, where OmniTek XR
Page 82
OmniTek XR User Guide, Software Release 2.3
includes the Motion-Capture option, clicking the Video button will cause the keyed-out
area to be replaced with the currently selected image or sequence in the Generator
window.
To enable masking, select the required mask type from the drop down box.
Note: The mask will only be shown if Enable Cage is selected.
Safe Action/Safe Title
The lower parts of the dialogue are principally used to set the dimensions of the cages
and to set whether the cages are fixed (selected from a selection of standard options) or
adjustable.
In addition, it is possible to have the size and position of the safe action box shown on the
main outputs by checking the relevant box. Furthermore, if you are displaying both safe
area and title together, you can distinguish between the two by selecting the option to
make the safe title lines dashed.
Note:
An adjustable safe title box can be positioned by adjusting the X and Y values or, more
easily, by clicking the Edit button. You can then click and drag over a representation of
the current image. The X & Y boxes may then be used to fine-tune the box position.
Note, however, that while you are using the 'Edit' feature, the Mini-Pic will be frozen. This
is because the Edit dialogue uses Mini-Pic code to create the image.
OmniTek XR User Guide, Software Release 2.3
Page 83
9. Video Checking Features
OmniTek XR has the ability to display real-time video status information and to detect and
count various types of error. This status information and associated error counts are
displayed in the Video Status window, which may be called up either from the Window
menu or by clicking on the Video Status icon on the main (Window) toolbar.
Note:
The aspects of the video that are checked depend both on the video format and on which
additional packages are included in the OmniTek XR system that is being used.
Video Status Display
The Status window shows a range of information about the video being analysed,
organised into a collapsible hierarchy that allows the user to select what is displayed
according to their particular requirements. Sections of this hierarchy can be opened (and
closed) by clicking on the +/- symbols displayed alongside the various headings that
define the sections of the hierarchy – in the same way that clicking in Window Explorer
opens or closes the folders within its file hierarchy.
Individual ‘leaves’ of the hierarchy (and sections) can also be hidden from display by
right-clicking on the item and taking the option to Hide item from the submenu that
appears. Moreover, if all the leaves within a particular segment of the hierarchy are
hidden, that segment will also be hidden. (The context menu that appears on rightclicking also includes options that allow sections of the menu to be re-‘expanded’ after
being hidden.)
There is also the option of a ‘Flat view’ (selectable from the Options menu) in which the
same selection of details are seen but with only the section headings to indicate the
presence of other parts to the hierarchy. In this view there are no +/- symbols on which to
click to expand or collapse parts of the hierarchy but the context menu remains available
to hide or re-expand parts of the display as required.
Another option is to show timelines that indicate graphically the rate at which different
types of error occur by showing the number of errors experienced in a chosen sample
time as a proportion of the total number of samples. These timelines are both selected
and configured from the Options menu (see page 88)
As shown in the example displays below, the ‘values’ associated with particular status
items are often shown coloured green, orange/brown or red to make it immediately clear
whether the value currently being reported is OK (green) or incorrect in some way but not
being used (orange/brown) or incorrect and being used (red). In addition, the heading line
of unexpanded sections (together with the main ‘Video’ heading) may be marked with a
cross in a red circle to indicate that at least one error has been detected among the items
of that section. This provides a simple and effective way of, firstly, alerting the user to the
fact that an error has occurred and, secondly, guiding the user to the relevant part of the
status display.
Note:
Page 84
In all, an extensive amount of information can be displayed. If simply opening and closing
sections of the hierarchy doesn’t give you the display you need, you can ‘filter’ the
information down to just those items you are interested in (and save the filtering you
select). This is described in the section starting on page 119.
OmniTek XR User Guide, Software Release 2.3
Data Displayed
Status Parameters
Format
Shows what video standard the unit has been set to (if standard has been manually set)
or what standard has been detected (if auto detect selected).
Digital input – OK, Missing or Wrong Format
Both the text of the status message and the colour of that text are used to provide status
information, as follows:
Serial input is good, and is being used as lock reference.
Serial input is good, but is not being used as lock reference.
Serial input is not connected, and is being used as lock reference.
Serial input is not connected, and is not being used as lock reference.
Serial input is connected, and is trying to use as lock reference, but is
failing – perhaps because it does not match the current standard.
Serial input is connected, but is either bad, or does not match the
current standard. The serial input is not being used as lock reference.
Picture : Motion content – Active/Frozen
The warning message can occur instantly, or after the condition has occurred for greater
than a set period. This can be adjusted in the Picture section of the Engineering Settings
control window.
OmniTek XR User Guide, Software Release 2.3
Page 85
Picture : Luminance content – Active/Chroma only
The warning message can occur instantly, or after the condition has occurred for greater
than a set period. This can be adjusted in the Picture section of the Engineering Settings
control window.
Picture : Chrominance content – Active/Monochrome
The warning message can occur instantly, or after the condition has occurred for greater
than a set period. This can be adjusted in the Picture section of the Engineering Settings
control window.
Analog Sync – OK, Missing or Wrong Format
Again text in two colours is used to indicate status in the same way as for the serial input.
Video Index parameters (SD only)
Valid/Invalid
Active format – ‘No information’ or description of actual format
Coded frame – ‘No information’ or description of actual format
Component set – ‘No information’ or description of actual format
Sample structure – ‘No information’ or description of actual format
Wide screen signalling parameters (PAL only)
Valid/Invalid
EN300294: Aspect Ratio – ‘No information’ or description of actual format
Enhanced services – ‘No information’ or description of actual format
Subtitles – ‘No information’ or description of actual format
Others – ‘No information’ or description of actual format
Closed Captions
Line 21 – present/not present
ANC 608 – present/not present
ANC 708 – present/not present. Where the system includes the 708 Decode option,
OmniTek XR also reports on the validity of the caption distribution packet and the service
names given.
OP 47 – present/not present
Where present, OmniTek XR also reports on the validity of the subtitle distribution packet
and the VBI packets it includes.
Teletext – present/not present (PAL only)
Error checking parameters
CRC(EDH)
OmniTek XR calculates a new CRC value (EDH in SD) from the incoming data, and
compares this value with the CRC (EDH) value embedded in the data. If there is a
difference, this is flagged as an error. The count shown reports the number of frames that
have been in error since the value was last reset.
RGB Range Check
Indicates whether the YUV data would be valid if converted into RGB space. The count
shown reports the number of frames since the count was last reset, in which the RGB
values fell outside the values set on the Video: Analyzer page of the Engineering Settings
control window. Both the minimum and maximum thresholds of the RGB valid range are
programmable.
YCbCr Range Check
Indicates the validity of the YUV data. The count shown reports the number of frames
since the count was last reset, in which the YCbCr values fell outside the values set on
Page 86
OmniTek XR User Guide, Software Release 2.3
the Video: Analyzer page of the Engineering Settings control window. There are
programmable minimum and maximum thresholds for each of Y, Cb and Cr.
Composite Range Check
Indicates the proportion of the incoming video for which the composite signal generated
from the YUV data fall outside the range specified on the Video: Analyzer page of the
Engineering Settings control window. The value shown is based on the number of errors
detected since it was last reset.
TRS Check
Check for valid TRS data. The count shown reports the number of errors since the last reset.
ANC Check
Check for valid checksums on the ancillary data. The count shown reports the number of
errors since the last reset.
LINE check (HD only)
Check that the line number specified in the TRS packet agrees with the line number
calculated internally. Note: Line numbers are not included in TRS packets in SD.
Time Code Checking
OmniTek XR also checks the time code data within the serial input. The time code reader
to be used is configured using the Time Code Reader page of the Engineering Settings
control window, as described on page 27 of this guide.
For SD, it is possible to display VITC, LTC and ATC. Only ATC and LTC are available in HD.
Where a time code is present, it is displayed alongside the corresponding time code type.
OmniTek XR also monitors the time code to ensure that it increments correctly from
frame to frame. Each time a time code value is duplicated in adjacent frames (a Stuck
Frame), or is discontinuous from frame to frame (a Skipped Frame), this is counted and
the count value is displayed in the Video Status window. There are separate counters for
VITC, LTC and ATC.
Note:
ATC is a time code packet, which can be loaded with LTC, VITC #1, or VITC #2. The type
of time code is also set on the Time Code Reader page of the Engineering Settings
control window. Note also that the time codes are completely independent so you may
see different values where one part of the display uses VITC #1 codes while another
uses VITC #2.
AFD
OmniTek XR also reports the presence and validity of any Active Format Description
conforming to AFD 2016 that is detected in the video input. Where such a description is
detected, the line numbers and pixel numbers specified for start and finish of the active
frame area are displayed on the screen.
Error Display Modes
Each error condition that OmniTek XR monitors can be reported in several different ways.
It may be reported as:
• The total number of frames with errors, accumulated since the counter was last reset.
This number will be displayed in green while the count is 0, switching to red when errors
are reported.
• The elapsed time since the last error. This time will be shown in green while the error
count is 0, but red otherwise
• The number of errors detected per second.
• The number of errors per frame
• The percentage of errors per frame.
You can set the type of error count used for a specific type of error by right-clicking on the
error count and selecting the required option from the submenu that is displayed.
OmniTek XR User Guide, Software Release 2.3
Page 87
Alternatively, the display of these errors can be cycled through
the possible options by clicking the Toggle type button at the
bottom of the Video Status display.
There is also the option of displaying ‘timelines’ indicating the
rate at which errors are occurring (see page 84).
Resetting Errors
The error counters within the Video Status display can be reset either individually or as a
whole group.
To reset a particular error counter, either right-click on the error count and take the option
to Reset error counter in the menu that appears, or take the option to Reset error
counters from the Options menu then select the error type that you want to reset from
the submenu that appears.
To reset all the error counters, either click on the Reset Error button on the bottom bar of
the display or select Reset error counters from the Options menu and take the All
option from the submenu that appears. Alternatively, if you want a simultaneous reset of
this status with the Audio status and the Error logging, take the Reset Status and
Logging option from the Analyzer menu of the main application (see page 18).
The numbers displayed in the Status window each represent the error count since the
error counter was last reset.
Options menu
The Options menu in the Video Status window includes the following options:
Flat View
Ticking this option selects the alternative ‘flat’ status display (see page 84).
Configure Timeline
This option allows you both to opt to display ‘timelines’ indicating the rate at
which different type of errors are occurring and to set the parameters of that
those timelines (as shown the following dialogue). See page 84.
Configure Filter
Calls up the dialogue through which items for display and/or logging are selected (see
page 119).
Look & Feel
Calls up the Look & Feel dialogue used to set display parameters across the whole
application (see page 59).
Reset options
These options reset different aspects of the Video Status display.
Enable columns
This option displays a dialogue through which you can select which details are displayed
in the Video Status window.
Page 88
OmniTek XR User Guide, Software Release 2.3
10. Audio Checking Features
The audio checking facilities offered by OmniTek XR depend on the system being run and
which extra options are installed. Very basic systems do not include any audio checking
facilities. Systems that include teither the Standard Audio or the Advanced Audio option,
however, provide status information and metering on up to 16 channels of embedded
audio. The Advanced Audio option also provides the basis for the AES/EBU support and
Dolby-E monitoring facilities offered by the External Audio and Dolby-E options.
The analysis of the audio data provides both audio level and status information. Where
Dolby-E encoded data is processed, the Dolby-E metadata is displayed alongside other
status information. However while it is possible to play back PCM audio on a system that
contains a sound card, it isn’t possible to play back Dolby encoded audio.
Audio Level Displays (PPMs)
On systems with either the Standard level or the Advanced level of audio support, PPM
metering is available for up to 16 channels of embedded audio, handled as 8 stereo pairs.
With the Advanced Audio option and the Dolby-E option, PPMs can also be displayed for
Dolby-encoded channels. Similarly, where the optional AES card is fitted (supplied as
part of the External Audio option), PPMs can also be displayed of AES/EBU format audio.
The results are displayed in an Audio PPM window.
The metering for the different types of audio is shown in separate PPM displays, one for
each type of audio (distinguished by the different descriptions in the title line to the
window). However, while there are differences between the displays, there are also a
number of common features to the windows and to the controls used with them. The
following therefore describes the Embedded Audio PPMs window and its controls in
some detail, then goes on to described the equivalent Dolby-E and AES/EBU windows in
terms of how they differ from the Embedded Audio PPMs window.
Embedded Audio PPMs
The Embedded Audio PPMs window may be called up either from the Window menu,
where the different PPMs windows each have a separate entry, or it may be called up by
clicking on the Audio PPMs icon on the main (Window) toolbar, then selecting
Embedded from the short menu that then appears.
The window that is displayed has the following features:
OmniTek XR User Guide, Software Release 2.3
Page 89
Audio Source
and Metering type
Group and
Pair labels
In-bar message
Permitted Maximum
reference level
Alignment
reference level
Peak Hold markers
Highlighting indicating
selection as pair
for playback/
Lissajous figure/
Dolby-E analysis
The display is created by comparing in real time the audio levels in the data stream
against a series of thresholds set in the Configuration dialogue (see below) The basic
Red, Yellow, Green colouration shows in traditional fashion how the output compares
with Permitted Maximum and Alignment reference levels (also set within the
Configuration dialogue), the level of which are indicated by diamonds alongside the
channel displays.
Further, if the output in any of the monitored channels exceeds the specified Clip level,
this is recorded by showing the word ‘CLIP’ as an in-bar message on the appropriate
channel of the display. Similarly if the output falls below the specified Mute level, the word
‘MUTE’ is added to the appropriate channel. Similar messages appear where the output
exceeds the Over level or falls below the Silence level.
Channels that don’t contain any audio are shown as grey.
As the input data stream is processed, Peak Hold lines may appear on the PPMs,
configurable to show either the maximum value attained over a period of 1 second or
over the whole test (see below). These maximum levels may also be recorded in the
Event Log (see page 104), together with details of the minimum and average audio
levels.
Another feature of the display is that one of the channel pairs may be shown highlighted
(as in the above illustration). This highlighting indicates that the pair is the one currently
selected as the source either for playback (see page 103) or for Lissajous figure display
(see page 103) or for Dolby-E analysis (see page 94). A different channel pair may be
selected simply by clicking on the required pair.
The display is readily configurable to emulate a range of meter formats in use across the
industry. These different meter formats are associated with particular graticules,
reference levels, alarm trigger points and meter ballistics. Again, this is an aspect of the
configuration carried out through the Configuration dialogue described below.
Page 90
OmniTek XR User Guide, Software Release 2.3
Options menu
The display is configured from the Options menu, which provides the following
options:
Configuration
This opens the Audio Configuration dialogue (see below).
Reset Peak And Hold
This re-starts the determination of the position of the Peak Hold markers. This is
particularly useful where Infinite Hold is selected in the Audio Configuration dialogue
(see page 94).
Alignment
This allows a choice of arrangements for the display.
Surround-Sound View
This provides an alternative to selecting a surround-sound view of the channels through
the Audio Configuration dialogue (see below).
Graticule
This provides an alternative to selecting the chosen metering format through the Audio
Configuration dialogue (see below).
Audio Configuration Dialogue
Note:
The Graticule Type that is selected affects the setting of a number of items within this
dialogue. This aspect of the dialogue is therefore described first.
OmniTek XR User Guide, Software Release 2.3
Page 91
Graticule Type
The graticule for the PPMs may be changed from DBFS to alternative calibrations
corresponding to different meter types (Nordic, BBC etc.). The required meter type is
selected from a drop-down list of Graticule options. Note: The settings for the reference
levels, alarm trigger points etc. automatically switch to the ones conventionally associated
with the selected meter type, though you can then make any adjustments to these levels
that you require. The range of the graticule and the meter ballistics are also automatically
adjusted to reflect those of the selected standard.
The scope of the different graticules supported is shown in the following diagram:
Error Detection
Four potential error levels are defined – Clip, Over, Silence and Mute. For each error
type, a level is defined at which the associated error will be logged (and an alarm
sounded if enabled) if this level is maintained for a particular length of time (also defined
within the dialogue).
The levels and the timeout set here also affect the logging and SNMP modules, which
used to record details of the errors encountered (see page 121).
The settings made may be stored as part of an overall system configuration file, and are
also saved when the application is closed and re-loaded on subsequent start-up.
Note:
The settings in this part of the dialogue automatically change to pre-defined standard
values when a different meter type is selected as the graticule type. It is therefore
important to ensure that the required graticule type is selected before making any
adjustments to these Error Detection settings.
Reference Levels
The two reference level settings control the position of the red and yellow markers
alongside the individual PPM meter displays and the points in those displays at which the
colour used for the meter bar changes from green to yellow and from yellow to red.
Note:
These levels are also automatically set to pre-defined standard values when a different
graticule type is selected, so again it is important to ensure that the required graticule
type is selected before making any adjustments to these reference levels.
Ballistics
The values set in this part of the dialogue control the speed at which the meters respond
to changes in meter level. The Integration value sets the time the PPM takes to rise to
within 2dB of the peak value, while the Decay Time setting controls the time the PPM
takes to fall by the specified percentage.
Page 92
OmniTek XR User Guide, Software Release 2.3
Note:
These values are also automatically set to pre-defined standard values when a different
graticule type is selected, so again it is important to ensure that the required graticule
type is selected before making any adjustments to these reference levels.
Group/Pair/Channel Labels
These sections allow each group/pair/channel that is displayed to be assigned a name,
which will appear at the top of that part of the display.
Decode Type
OmniTek XR is usually able to determine automatically whether a channel is handling
PCM audio or Dolby-E data. The default is Auto and there is generally no need to
change this. However the drop down menus can be used to specify with Embedded
(PCM) audio or Dolby-E audio if required.
Visible Groups
The Visible groups/pairs section controls which audio channels are shown in the Audio
window.
Surround Sound View
The Surround sound view check box switches the PPM display from showing pairs of
channels to showing the components as either a 5.1 or a 7.1 surround signal and
showing the conventional names for that display. In the first case, only the first six meters
will be active.
This view can also be enabled/disabled directly from the Options menu.
The labelling used in the Surround Sound View display and the allocation of channels to
Surround Sound channels are both configurable. They may both be defined by clicking
the Configure Surround Sound View button and making the required settings in the
dialogue that is displayed.
OmniTek XR User Guide, Software Release 2.3
Page 93
Show Phase Meters
Phase meters may be displayed below the PPMs, in both the standard view and the
surround sound view, to provide a quick visual report of the correlation between the audio
data in the two channels that make up the stereo pair.
Peak Hold
When selected, Peak Hold markers are included in the display. Note: These markers
normally show the highest value achieved over a period of 1 second. They can be
switched to show the highest value achieved overall by selecting the Infinite Hold option.
Dolby-E Audio PPMs
Dolby-E encoded audio and the associated metadata are typically carried on a pair of
embedded audio channels. The presence of Dolby-E audio therefore affects the display
seen in the Embedded Audio PPMs window, where the channels on which the Dolby data
is being transmitted are identified by the in-bar message ‘DATA’.
With the Advanced Audio and Dolby-E options, OmniTek XR includes a dedicated Dolby
Audio PPMs display, through which it shows the audio levels that will ultimately be
delivered on the different channels. This information is taken directly from the metering
information encoded within the Dolby data: the audio itself is not processed in any way.
This window may be called up either from the Window menu, where the different PPMs
windows each have a separate entry, or it may be called up by clicking on the Audio
PPMs icon on the main (Window) toolbar, then selecting Dolby-E from the short menu
that then appears.
The Dolby PPMs display is very similar to the Embedded PPMs display, except that
there is no option to select a surround-sound view as the presentation of the channels
as mono, stereo or surround-sound channels (or as a combination of these) is predetermined as part of the Dolby data. Also there is currently no facility to present phase
information about any channel pair.
Page 94
OmniTek XR User Guide, Software Release 2.3
Displaying the Dolby PPM window
As stated above, the Dolby-E audio and the associated metadata are encoded on a pair
of embedded audio channels, potentially alongside PCM audio. The first step is therefore
to identify which pair of channels is carrying the Dolby-E data.
The relevant pair of channels can readily be determined from the Embedded PPMs
display where the channels will be picked out by the in-bar message ‘DATA’. (The
channels will also typically be shown as ‘clipped’ in this display.)
The required channel pair may then be selected by clicking on it in the Embedded PPMs
display. The chosen pair will then be shown highlighted to indicate that it has been
selected. In addition, it is advisable to ensure that the Decode type for this channel pair is
specified as Dolby-E. This is done by checking that the Decode Type for the channel pair
is set to Dolby-E in the Audio Configuration dialogue for this PPMs window (see page
91).
The audio levels encoded within the Dolby-E data may then be displayed by calling up
the Audio Dolby-E PPMs window, either by selecting this from the main Window menu or
by clicking on the Audio PPMs icon and selecting the Dolby-E option from the short
menu that then appears.
Options menu
The Options menu associated with the Dolby Audio PPMs display includes the above
Configuration, Reset Peak and Hold and Graticule options, but does not include
any ‘Surround-sound view’ option as the appropriate view is automatically selected
based on the Dolby data encoded alongside the audio.
OmniTek XR User Guide, Software Release 2.3
Page 95
Audio Configuration Dialogue
The Audio Configuration Dialogue also features a more limited range of items than the
Embedded Audio version of this dialogue. Graticule, Error Detection and Reference
Level settings still appear, as does the option to display Peak Hold markers and to set
Pair labels, but the options to select a surround-sound view and to choose which groups
are visible do not appear as the channel configuration used is pre-defined by the
associated metadata.
It is also not currently possible to show the phase relationships between the channel pairs
in the same way as for Embedded Audio (though it is intended to add this feature in the
future).
AES/EBU Audio PPMs
Where OmniTek XR includes the External Audio option, PPMs may be displayed for AES
Audio. These are very similar to those provided for displaying Embedded Audio levels but
are displayed in a dedicated window. This window may be called up either from the
Window menu, where the different PPMs windows each have a separate entry, or it may
be called up by clicking on the Audio PPMs icon on the main (Window) toolbar, then
selecting AES from the short menu that then appears.
The dialogue used to configure the AES Audio PPMs display is also much the same as
that for Embedded Audio PPMs.
Page 96
OmniTek XR User Guide, Software Release 2.3
Audio Status Display
Where supported, information about the status of each audio group is displayed in a
dedicated Audio Status window, which may be displayed either by clicking on the Audio
Status icon on the main (Window) toolbar or by selecting this window from the main
Window menu.
This window is similar in operation to the Video Status window described on page 84.
The information is arranged in a collapsible hierarchy, sections of which can be opened
(and closed) by clicking on the +/- symbols displayed alongside the various headings that
define the sections of the hierarchy. The display also uses the same system of green,
orange/brown and red colouring and crosses in red circles to indicate where errors have
been detected, and again there is the option of displaying timelines to indicate the rate at
which different errors occur.
The range of items on which status information is given is able to be filtered in much the
same way as the Video Status window (see page 119).
In addition, right-clicking on an entry in the menu calls up a
submenu, offering the same range of ‘Expand’, ‘Collapse’,
‘Hide’, Error type and Reset options as the equivalent menu in
the Video Status window.
In this way, the user can readily arrange to display in detail
just those parts of the structure that are of importance to you.
There is also the option of a ‘Flat view’ (selectable from the
Options menu) in which the same selection of details are seen
but with only the section headings to indicate the presence of
other parts to the hierarchy.
The top of the hierarchy is divided into a section covering Embedded (PCM) audio, plus
optional Dolby-E and AES sections that are included where they are appropriate to the
audio being analysed.
OmniTek XR User Guide, Software Release 2.3
Page 97
Embedded Audio status information
The following status information is displayed for each stereo pair of channels, arranged
hierarchically according to the groups to which they are assigned.
OmniTek XR firstly detects whether each pair of channels is enabled or disabled. If it is
enabled, the following status information is displayed. If it is not enabled, none of the
following will be detailed.
Usage status
Professional/Consumer.
Audio sample
Audio/Data
Emphasis
None/50/15ms/CCITT J.17/Unknown
Lock status
Locked/Unlocked
Sample frequency
32 kHz, 44.1 kHz, 48 kHz, or unknown
Channel mode
Dual/Single/"Primary/Secondary"/Stereo/Unknown
Word length
Default/16 bits/18 bits/19 bits/20 bits/22 bits/23 bits/24
bits/user/unknown
Where the Dolby-E option is installed, the remainder of the display is used to show
information obtained from Dolby-E data where this is encoded in the embedded audio.
Similarly, where the system includes the External Audio option, the display may also
include information about the audio associated with AES/EBU format video passed to the
OmniTek XR via the AES card.
Note:
The range of information displayed may be filtered to reduce it to just those items you are
interested in. This is described in the section starting on page 119.
Dolby-E information
The Dolby-E information shown in the Audio Status window comprises the contents of the
Dolby Frame included alongside each video frame, together with information such as the
line of the video frame on which the Dolby Frame starts.
The information encoded within the Dolby Frame is very extensive and is described in
detail in the section on Dolby Frame Data below.
AES/EBU Status information
The status information displayed about AES/EBU format audio on External Audio
systems is much the same as that displayed about embedded audio.
Options menu
The Options menu in the Audio Status window includes the following options:
Flat View
Ticking this option selects the alternative ‘flat’ status display (see page 84).
Configure Timeline
This option allows you both to opt to display ‘timelines’ indicating the rate at
which different type of errors are occurring and to set the parameters of that
those timelines (as shown the following dialogue). See page 84.
Page 98
OmniTek XR User Guide, Software Release 2.3
Configure Filter
Calls up the dialogue through which items for display and/or logging are selected (see
page 119).
Look & Feel
Calls up the Look & Feel dialogue used to set display parameters across the whole
application (see page 59).
Reset options
These options reset different aspects of the Audio Status display.
Enable columns
This option displays a dialogue through which you can select which details are displayed
in the Audio Status window.
Dolby Frame Data (where supported)
The inclusion of Dolby-encoded audio within PCM channels takes advantage of the
facility of the AES3 serial digital audio interface to transport non-PCM data.
The Dolby-E data is made up of metadata detailing how the coded audio is to be handled
and metering information. It is delivered in bursts of ‘Dolby frames’. One Dolby frame is
associated with each video frame.
The format of the data is defined by the SMPTE 337M standard. This specifies a header
containing information about the data – in this case, defining the data both as non-PCM
data (as required by the AES3 interface specification) and as Dolby-E data. (The SMPTE
337M standard caters for a range of different non-PCM data types that could be added to
the audio channels.) This header is then followed by frames of Dolby-E data, each
starting with synchronization segment followed by metadata, coded audio data and
metering information. This gives rise to the following packet structure.
Dolby E Frame
Audio Segment
Metadata
Extension *
Metadata
Segment
Sync. Segment
SMPTE
Preamble
Dolby E Frame
Dolby E Frame
Audio Extension *
Meter
Segment
* Low frame rates only
This structure can be implemented at a bit depth of 16, 20 or 24 bits, depending on the
total amount of data that is to be transferred.
A key requirement on the transport of Dolby data is that it transported synchronously with
the video in order to provide exact matching between Dolby-E frames and video frames.
It is also necessary to be able to edit Dolby-E audio and to cross-fade between Dolby-E
streams without introducing any glitches or other artefacts.
Such switches and edits take a number of video lines to complete, so in order to prevent
such edits and switches interfering with the Dolby data, the Dolby standard defines a
reference position within a video frame after which the Dolby frame should start. This
provides a ‘guard band’ between successive Dolby Frames during which edits and
switches can occur without affecting the integrity of the Dolby data. The width of this
guard band is further extended by ensuring that there is a gap between the end of the
Dolby frame and the end of the video frame.
OmniTek XR User Guide, Software Release 2.3
Page 99
NTSC
Line Line
512 513
Line Line
525
1
Approx. end of
Dolby E Frame
PAL
Line Line
603 604
Line Line
625
1
Dolby E Frame
Dolby E Frame
Line
10
Line Line
13
14
Line Line
512 513
Switching
Area
Dolby E
Reference
Position
Approx. end of
Dolby E Frame
Line
6
Line Line
13
14
Line Line
603 604
Guard Band
Dolby E Frame
Video Frame
Guard Band
Video Frame
Guard Band
Video Frame
For NTSC format video (frame rate 29.97Hz), the reference line is line 14, while for PAL
(25Hz frame rate) the reference line is line 10. Current practice is for about 5% of the
available data space to be used as a guard band.
Where the Dolby-E option is installed, OmniTek XR displays the SMPTE Preamble and
the metadata part of the Dolby-E frame in the Dolby-E section of the Audio Status
display, while the metering information is used to generate the PPM display described on
page 94. (The coded audio itself is not interpreted.) The Audio Status display also shows
the line at which the Dolby frame commences to allow the user to verify that frames do
not encroach upon the guard band.
Display within the Audio Status Window
Where the Dolby-E option is installed, the Dolby-E section of the Audio Status window
displays the data included in the metadata segment of each Dolby frame, together with
data read from the SMPTE 337 Preamble that precedes the burst.
Page 100
OmniTek XR User Guide, Software Release 2.3
Note:
In all, an extensive amount of information can be displayed. If simply opening and closing
sections of the hierarchy doesn’t give you the display you need, you can ‘filter’ the
information down to just those items you are interested in (and save the filtering you
select). This is described in the section starting on page 119.
SMPTE 337 Preamble
The section relating to the SMPTE 337 Preamble displays the following information:
Sync word 1
For data burst containing 16-bit Dolby-E data, this should be 0xF872
For data burst containing 20-bit Dolby-E data, this should be 0x6F872
For data burst containing 24-bit Dolby-E data, this should be 0x96F872
Sync word 2
For data burst containing 16-bit Dolby-E data, this should be 0x4E1F
For data burst containing 20-bit Dolby-E data, this should be 0x54E1F
For data burst containing 24-bit Dolby-E data, this should be 0xA54E1F
Bit depth
16-, 20- or 24-bit
Burst
information
Data Type
28 (for Dolby-E)
Data mode
0 for 16-bit; 1 for 20-bit; 2 for 24-bit
Error flag
1 if the data may contain errors
Data type, Data stream number
Both 0 for Dolby-E
Unsigned integer giving the number of data bits burst payload. Limited to
65535 for 16-bit data; 1048575 for 20-bit data; 16777215 for 24-bit data
Length code
Guard Band Position
The video line at which the Dolby frame was found to start. This line number will be
shown in red if any frame since the last reset has been found to start outside the Guard
Band. (The frame(s) with this error can be found by studying the log.) With the “Errors”
showing the total number of Guard band Position errors since the last reset.
Dolby-E Frame
The remainder of the Dolby-E display comprises the data within the metadata section of
the Dolby frame, together with the results of some validity checks that can readily carried
out on this data. In particular, OmniTek XR reports discontinuities in frame count, invalid
time codes and CRC errors.
The range of information transmitted as Dolby-E Metadata is very extensive. However,
the names used for the items follows the naming used in the Dolby specification, so
detailed information about the individual elements shown within any section may obtained
by studying the Dolby specification. The following description just gives brief information
about the different sections of this data.
Sync Segment
This is the part of the Dolby-E frame that is used to establish synchronization. It includes
a sync word, together with details of the bit depth and a flag indicating whether bitstream
keys are used in the frame.
The following table shows the sync word that should be used in the different cases:
Bit Depth
Key Present
Sync Word
16
False
0x078E
True
0x078F
False
0x0788E
True
0x0788F
False
0x07888E
True
0x07888F
20
24
OmniTek XR User Guide, Software Release 2.3
Page 101
Metadata Segment
This is the part of the Dolby frame that carries (the majority of) the Dolby metadata. The
main items are:
Key
Bitstream key for the Metadata segment (where used)
Revision ID
Revision of Metadata segment syntax used
Segment size
Number of words allocated to the metadata segment
(not counting the CRC or the bitstream key)
Program configuration
Program/Channel Counts plus details of the program
and channel sequences specified for the audio data
Frame Rate
Frame rate type and value
Frame Count
Value, coloured red if there has been a discontinuity
SMPTE time code
Value where valid. Otherwise ‘Invalid’ and coloured red
Subsegment size(s)
Number of words allocated to the specified subsegment
Program, Channel data
Descriptions of the specified programs/channels
Subsegment data
Information about the following metadata subsegment
CRC and CRC errors
Transmitted CRC and count of CRC errors
Audio Segment
This is the part of the Dolby frame that carries the coded audio. The Status window just
reports:
Key
Bitstream key for the Audio segment (where used)
CRC and CRC errors
Transmitted CRC and count of CRC errors
Metadata Extension and Audio Extension segments
Optional extensions for the metadata and audio segments. The status window just
reports:
Key
Bitstream key for the Audio segment (where used)
CRC and CRC errors
Transmitted CRC and count of CRC errors
Meter Segment
This plus the following ‘Channels’ section carry the metering information for the audio
encoded in the frame. This part of the display reports:
Key
Bitstream key for the Meter segment (where used)
CRC and CRC errors
Transmitted CRC and count of CRC errors
Channels
This part of the display shows for each channel:
• The level of the current frame
• The number of frames since the display was last reset that have beyond the Clip,
Over, Silence and Mute levels specified for the channel
• The Peak level recorded since the display was last reset.
These details are deduced from information transmitted as part of the Meter Segment of
the Dolby-E Frame but is displayed in a separate Channels section to make this
information readily accessible.
Page 102
OmniTek XR User Guide, Software Release 2.3
Playback
Where the Advanced Audio option is installed, OmniTek XR has the ability to route any
stereo pair of PCM audio channels to the sound output of the system on which OmniTek
XR is currently being run. Where OmniTek XR also includes the External Audio option,
the sound can alternatively be played back from a pair of AES channels.
To select the stereo pair to play, click on the required pair in the Embedded Audio PPMs
display or the AES Audio PPMs display (as appropriate). The selected channel pair is
then highlighted to show that it has been selected. You also need to check in the Audio
Configuration dialogue associated with the selected PPM window that this channel pair is
not set to be decoded as Dolby-E.
The sound output used and the volume of this audio output are set by the controls built
into the system unit, i.e. under operating system control.
Lissajous Window
Where the Advanced/External Audio option is installed, the phase relationship between a
selected channel pair can be displayed as a Lissajous figure in the separate Audio
Lissajous window.
This window called up either from the Window menu or by clicking on the Lissajous icon
on the main toolbar.
The channel pair used to form the Lissajous figure is selected by clicking on the required
pair in the Embedded Audio PPMs display or the AES Audio PPMs display (where
appropriate).
OmniTek XR User Guide, Software Release 2.3
Page 103
11. Logging
OmniTek XR includes a comprehensive logging package. The system has the ability to
log events into an XML file whenever specific conditions occur. It can also transmit an
SNMP alert when certain conditions occur. These two functions work independently.
Both log entries and SNMP alerts can include VITC, ATC or LTC time codes where
present, and the current time.
Event Logging
Events are logged through the Event Log window, which may be displayed either by
selecting it from the Window menu or by clicking on the Event Log icon in the main
(Window) toolbar.
This window automatically carries a ‘Live’ logging display, listing events as they happen.
In addition, it can also display the results of one or more logging sessions, started and
stopped either manually or at specific points in the video being analysed, identified by
time codes or PC time. These logging sessions are started and stopped independently
and may run concurrently.
You can choose which types of event are logged and, after a session has been saved to
disk as an XML file, you can display a summary of the session that shows how many of
each type of event has occurred. Further, OmniTek XR uses a ‘traffic light’-type system to
indicate whether sessions are free from error or errors have occurred, either while the
session is running (‘Live’ session only) or after the session has terminated.
The various features of the system are described in more detail below.
Event Log Window
The Event Log window has two modes of display. One is as a single pane.
Page 104
OmniTek XR User Guide, Software Release 2.3
The other version of the window caters for multiple logging sessions and comprises a list
of the sessions on the left and the display of the selected session data on the right.
Further details of this version of the display are given on page 106.
Each line in the Event Log window starts with one of three icons. To reduce the number
of entries, events are shown as starting on a given frame, and then being continuous for
a period, and then stopping on a given frame, rather than each occurrence getting an
individual entry. So the three icons used have the following meanings.
The named event started and continued for every frame
The named event had been occurring on every frame, but stopped at this point.
The named event only occurred on this frame.
Toolbar
The icons on this toolbar offer the following facilities:
Note:
These icons duplicate menu selections within the Options menu.
Start new session (see page 106)
Open existing session (i.e. one that has previously been saved to disk)
Save selected session
Delete selected session
Open shell of selected session (i.e. XML file)
Edit session
Rename session
Start/Stop session (manual control)
If the toolbar is not displayed, it can be called up from the View menu.
Options menu
The options of interest are:
Configure filter
This option calls up the Event Configuration dialogue through you can set your
selection of events to log (see below).
Summary view
Selecting this option switches the display of a saved session from a list of events
in the order they happened to a count of the number of each type of event that
happened during the session.
New session
This option starts new session (see page 106).
Open session
This opens existing session i.e. one that has previously been saved to disk.
OmniTek XR User Guide, Software Release 2.3
Page 105
Save session
This option saves the currently selected session to disk as an XML file.
Shell-open session
This option is only active where an existing Log file has been loaded. Taking this option
displays the XML file from which the data being displayed is taken.
Start/stop session
This option provides manual Start/Stop control of the current selected session.
Clear
Taking this option clears the events currently displayed.
Select columns
Each line of the Event Log display has a number of elements to it – icon, type of event,
data, VITC, ATC, LTC and PC clock time. This option allows you to select which of these
elements are displayed.
Selecting the events to log
Selecting Configure filter from the Options menu displays the Event Configuration
dialogue used throughout OmniTek XR to specify which parameters/events are shown on
the screen, included in event logs, used to trigger alarms and/or as SNMP event traps.
The events that recorded in any Event log at any time are limited to the ones ticked in the
‘Show in Log’ column of this dialogue.
Further information about this dialogue is given in Appendix 2 (page 119).
Logging to disk
To write event data to a log file, you need to launch a logging session in which logging is
started and stopped either manually or automatically triggered by time codes or PC time.
Page 106
OmniTek XR User Guide, Software Release 2.3
To launch this session, either select New session from the Options menu or click on the
corresponding icon. This displays a dialogue through which you specify either that the
session is to be started/stopped manually or the details of the time triggers that are to be
used.
Once these details have been set, another dialogue appears through which you set a
name for the session (or accept the default name you are offered which will either be
‘Manual log’ or reflect the time triggers you have set).
Clicking on the ‘release catch’ shown to the left of the main Event Log window switches
between the single pane version of the Event Log window and a version of the display in
which sessions are listed on the left and details of the selected session are shown in an
‘Event’ window on the right.
Starting/Stopping the log
Where a Manual log has been selected, logging will start when the green ‘Start’ icon is
pressed and will stop again when the red ‘Stop’ icon is pressed.
Where time triggers have been specified, logging will start and stop automatically in
accordance with the specified time triggers.
Traffic Light System
The entries for the different sessions in the left-hand part of the display includes both a
description of its state (‘Pending’, ‘Active’, ‘Completed’ etc.) and an icon which is colourcoded to indicate whether any of the errors picked out to be logged by the filter (see page
have been found within that session.
OmniTek XR User Guide, Software Release 2.3
Page 107
The colour coding used is as follows:
Grey
Not reported yet (Note: Events in user-defined sessions can only be
reported once the session has been completed)
Green
No error event occurred
Red
One or more error events have occurred
These icons provide a simple green/red good/not good indication in analogy to traffic
lights, allowing it to be interpreted at a glance.
Guided by these lights, it should be a relatively straightforward operation to drill down into
the detail of a problematic log to find the source of the error.
Saving to disk
The log entries associated with any session are initially written to a temporary file. To
save data to disk, select Save session from the Option menu or click the Save session
icon. A dialogue box then opens for you to set the name for the log file.
Summary view
When a session completes, the events that occurred during the session are initially
shown in the ‘Event’ window as a historical list of events in the same format in which they
appear in the ‘Live’ log. However, this view can be switched to a summary showing a
count of the different events that occurred in a hierarchical arrangement similar to that
used in the Video Status and Audio Status windows.
To see this view, select Summary view from the Options menu.
The Frequency column of this display shows the number of events of the particular type
that occurred while the log was being created, while the ‘Data’ column (where shown)
indicates the last value or state recorded for that parameter.
Note:
Page 108
The summary view is only available for completed user-defined sessions. It is not
possible to show a summary of the Live log.
OmniTek XR User Guide, Software Release 2.3
SNMP Configuration and use
The SNMP configuration dialogue is accessed from the main Configuration menu.
When the OmniTek application starts up, it will always check to see if an SNMP service is
running on the host PC. The number of attempts to connect can be set here, as well as
an optional warning of connection fails.
You can also use this dialogue to specify which of the listed conditions should be used to
send SNMP traps. Clicking on the Configure Traps… button displays the same Event
Configuration dialogue as is described above under ‘Configuring Filters’.
Each item that is ticked in the SNMP Trap column of this dialogue will send a trap every
time the specified error condition occurs, or clears. For example, if Picture Quality is
selected, the application will transmit an SNMP trap when the picture quality drops below
the threshold, and again when the picture quality rises above the threshold.
SNMP Configuration Problems
The SNMP service is an optional Windows component, and is not installed if a standard
Windows installation was done. OmniTek has produced a short document describing how
to add the SNMP service onto a PC. This document is called 'SNMP installation
guide.pdf", and is available from our FTP site. It is also available in the user manuals
section of our website. Visit www.omnitek.tv, then select Support, and then click SNMP
Installation Guide, for use with Quality Auditor.
When the SNMP service is running, note that by default, Windows will send SNMP traps
only to the host machine - i.e. only to itself. To send the traps to other machines, you
need to configure the trap addresses. This is done by opening the Control Panel, then
selecting 'Administrative Tools', and then selecting 'Component Services'.
Select the Services (Local) item in the left hand pane, and then scroll down to the
'SNMP Service' item in the right hand pane. Double click the SNMP Service item, and
then go to the 'Traps' tab.
You can now add, delete or edit the IP addresses where traps are sent. You'll probably
see a single entry in the 'Trap Destinations' list box, called 'localhost'. 'localhost' is the IP
address of the 'local' machine, which means that traps are sent and received by the local
machine, and do not go to other machines. You can enter multiple IP addresses, so that
the traps are sent to multiple machines.
MIBs for OmniTek products are automatically loaded into c:\program files\omnitek\
omnitek xr, as part of the software installation.
OmniTek XR User Guide, Software Release 2.3
Page 109
12. Measuring Audio/Video Delays
Where the Advanced Audio option is installed, OmniTek XR can measure the relative
delay between the audio and video paths. In addition, all systems can measure the delay
between an SDI input and the analog reference (the Reference Timing – see page 115)
and use a variant of the Reference Timing measurement to determine the difference in
timing between different input channels or indeed different inputs (see page 116).
Note: When OmniTek XR is working with a dual-link input, it can measure differences
between the two inputs but it can’t measure the delay relative to an analog reference,
Measurement of audio/video delays relies on the use of a special full-motion video test
sequence, which contains precise embedded audio tones. Two test sequences are available.
One may be used to determine delays in video that includes uncompressed audio, the other
is a variant of that basic test sequence which allows delays to be determined both where the
audio is uncompressed and where the audio is Dolby-E encoded. These sequences are
available for all standard-definition and high-definition video formats.
The following sections describe the OmniTek test sequences, and show how they may be
used to determine relative (lip sync) delays.
Important: System requirements
Measuring the delay between an SDI input and the analog reference (the Reference
Timing) doesn’t place any special requirements on the OmniTek system that is used.
However, the various A/V Delay measurements that it is technically possible to make do
impose a range of requirements.
The first requirement is to play out the supplied test sequence on an installation of
OmniTek LAB, at least the first time this sequence is used. For subsequent occasions,
the output from OmniTek LAB may be recorded and then it may be played out simply
from a videotape machine or video file server.
Furthermore, where Dolby-E encoded audio is to be measured, the copy of OmniTek LAB
used must include the Advanced 0ption which allows the generation of video that
includes blanking and other ancillary data from the source RVF file.
Secondly, delay measurements will only possible on your OmniTek XR system if it
includes the Advanced Audio option
In addition, measurement of the relative delay between the audio and video paths where
the audio is Dolby-E encoded (either at source or in the user’s own equipment) will only
be possible if your OmniTek XR is also running the Dolby-E option.
Supplied Test Sequences
For A/V Delay testing, OmniTek has generated a special full-motion video sequence,
which is available in all video formats, both standard- and high-definition. Two versions of
the test sequence may be provided.
The first comprises 100 frames of video that includes an uncompressed PCM tone on
channels 1 and 2 of group 1 and a Dolby-E encoded tone on channels 3 and 4 of group
1. This is provided as sets of RVF files, one for each video standard that is supported,
provided in directories named TSE_DolbyE_<NumActiveLines>[i/p]_<FieldRate>Hz (For
example, the directory containing the test sequence for PAL is provided in
TSE_DolbyE_576i_50Hz.
This version of the test sequence may be used on an OmniTek TQ or an OmniTek XR
running the Advanced Audio and Dolby-E options to measure any of the following:
1. PCM delay affecting PCM source
2. PCM delay affecting Dolby-E source
3. Dolby-E delay affecting Dolby-E source
4. Dolby-E delay affecting PCM source.
Page 110
OmniTek XR User Guide, Software Release 2.3
(This last mode of operation is particularly useful where a PCM source is put through a
Dolby-E encoder as the operation of dis-embedding the audio and encoding it often
introduces an unknown delay.)
The other test sequence is a PCM-only version that may be used to determine just the
PCM delay affecting a PCM source. It is provided in addition to the Dolby-E test sequence
because it can be used with the copy of OmniTek LAB that doesn’t include the support for
RVF files. This test sequence comprises 192 frames and it is provided as sets of YUV files,
provided in directories with names of the form <NumActiveLines>[i/p]_[Field/Frame].
The test sequence contains many elements that are useful for testing and analysing the
performance of a video system, however for the purposes of the audio/video delay
measurement it has two characteristics that are of special importance – an embedded
audio tone (in the case of the PCM-only sequence this tone is added by OmniTek LAB
when the sequence is run) and a binary frame count displayed in the top left-hand corner
of each frame as a sequence of yellow squares.
This gives a binary count of
the test sequence
When the clock hand reaches the top (frame 0), an
audio pulse is generated for 1 frame duration
The Analyzer software extracts the binary frame count from the input video image. It also
detects the embedded audio tone. The relative timing of the audio tone to the first video
frame in the sequence indicates the delay between audio and video components.
Playing the Test Sequence
The supplied test sequences can only be played by the Generator of an OmniTek LAB
system. However, the output from the Generator can then be recorded on a recording
device that also records blanking – e.g. a tape or disk recorder – and that recording
subsequently used in place of OmniTek LAB.
Detailed instructions are given below.
Where the sequence is recorded to tape/disk, it is sensible to record at least a minute of
the repeating sequence to make operation and measurement easier.
1. Run OmniTek LAB and set it to the correct video format in the Video: General page of the
Engineering Settings control window.
2. Make sure no other images are loaded into the Generator.
3. Load all the frames of the special A/V Delay Test Sequence that is applicable to the video
format that is under test. If a message appears suggesting that the sequence be re-sized,
take the “No fit” option.
4. Play the sequence in an endless loop, by using the icons on the Run toolbar.
OmniTek XR User Guide, Software Release 2.3
Page 111
5. Where a TSE_DOLBYE (RVF) test sequence is used, make sure that the option to use
blanking and ancillary data From Source Image (RVF) is selected in the Video:
Generator page of the Engineering Settings control window. This setting is essential for
correct operation.
Where the PCM-only (YUV) test sequence is being used, use the Audio: Generator page
of the Engineering Settings control window to generate an audio tone on channel 1 is set
for 8kHz, -18dB, and present only on frame 1 of the sequence.
Also ensure that the option to use blanking and ancillary data From Internal Generator
is set on the Video: Generator page of the Engineering Settings.
These settings are essential for correct operation.
Page 112
OmniTek XR User Guide, Software Release 2.3
Relative A/V Delay Testing
When determining the relative delay between the transmission of the audio and video
components of the signal, the OmniTek A/V Delay Test Sequence is installed remotely to
the video analyzer, which means that it is possible to measure A/V delays in satellite,
cable, or terrestrial broadcast links.
Transmission Path
RVF source
(e.g. OmniTek LAB)
OmniTek Delay
Measurement System
With the test sequences supplied, it is possible to measure the delay introduced in either
PCM audio or Dolby-E encoded audio, but it should be noted that Dolby-E transmission
delays can only be determined using an OmniTek TQ or an OmniTek XR that includes
the Advanced Audio and Dolby-E options.
In this mode, the Analyzer software analyses the input video signal, looking for the first
frame in the sequence (identified by the binary code). When this is detected, an internal
timer counts the time delay before the audio input pulse is detected.
The system automatically detects whether the audio pulse is early or late with respect to
the video, and displays the results accordingly.
The delay range that the system is capable of measuring is:
50Hz Systems
60Hz Systems
Audio early with respect to video:
0 ~ 5760 ms
0 ~ 4800 ms
Video early with respect to audio:
0 ~ 1920 ms
0 ~ 1600 ms.
The relative time delay measurement is typically expressed in milliseconds, and the
accuracy is better than 1 ms.
Measurement using the Dolby-E (RVF-based) test sequence
1. The delay test sequence must be played out either from an OmniTek LAB system that
incorporates the Generator module or from a videotape machine or a video file server.
The steps used to play out this sequence are described on page 111.
2. Set the source routing such that the analyzer input is connected to the serial input. The
test sequence video should then be present in the Mini-Pic window while the audio
should be visible by displaying the Embedded PPMs
3. Use the Embedded PPMs display to identify which channel pair has the Dolby-E
information on it (usually pair 2).
4. Call up the Delay Measurement window, for example by clicking on its icon in the main
(Window) toolbar.
5. Use the Dolby-E Delay option in this window’s Options menu to ensure
that the Dolby-E Relative Delay is displayed, and the Dolby-E Audio
option in the same menu to select the audio channel containing the
Dolby-E data.
OmniTek XR User Guide, Software Release 2.3
Page 113
6. The required audio and video delay values will be displayed in the Dolby-E Audio/Video
Relative Delay slot in the Delay Measurement window, as illustrated below.
The figure given shows the timing of the audio channel (the label below the bar) relative
to the video (labelled above the bar). The label below the bar also moves in proportion to
the delay being measured (imperceptible where the difference is small).
Please note that the delay calculations are performed once for each loop around the
complete video sequence, so there is a latency of several seconds before new delay
readings are displayed.
Measurement using the PCM-Only (YUV-based) test sequence
1. The delay test sequence must be played out either from an OmniTek LAB system that
incorporates the Generator module or from a videotape machine or a video file server.
The steps used to play out this sequence are described on page 111.
2. Set the source routing such that analyzer input is connected to the serial input. The test
sequence video should then be present in the Mini-Pic window while the audio should be
visible by displaying the Embedded PPMs.
3. Call up the Delay Measurement window, for example by clicking on its icon in the main
(Window) toolbar.
4. Use the PCM Delay option in this window’s Options menu to ensure
that the PCM Relative Delay is displayed, and the Embedded Audio
option in the same menu to select the channel on which to run the test.
5. The required audio and video delay values will be displayed in the PCM
Audio/Video Relative Delay slot in the Delay Measurement window.
Page 114
OmniTek XR User Guide, Software Release 2.3
The figure given shows the timing of the audio channel (the label below the bar) relative
to the video (labelled above the bar). The label below the bar also moves in proportion to
the delay being measured (imperceptible where the difference is small).
Please note that the delay calculations are performed once for each loop around the
complete video sequence, so there is a latency of several seconds before new delay
readings are displayed.
Reference Timing
Where an external analog reference is used, the delay between this reference and the
SDI input can be determined as follows. Note: This measurement can’t be made when
OmniTek XR is working with dual-link input. Similar steps can however be used to
measure differences between the two inputs.
1. Provide the external analog reference to the system.
2. Use the Video: General page of the Engineering Settings control window to lock the
OmniTek XR to this reference (as described on page 21).
3. Set the A/B switch on the Source toolbar to select the required SDI input (see page 35).
4. Display the Delay Measurement window, for example by clicking on its icon in the main
(Window) toolbar.
5. Use the Reference Timing option in this window’s Options menu to
ensure that the Reference Timing is displayed, and to switch between
the standard and ‘line-based’ forms of delay reporting.
6. Use the Embedded Audio/Dolby-E Audio options within this menu to
select the audio channel that you want to include in the test.
7. The delay of the digital signal relative to the analog reference will be
displayed in the Reference Timing slot in the Delay Measurement
window.
OmniTek XR User Guide, Software Release 2.3
Page 115
Differences between inputs
Use of an external analog reference also allows differences between different input
channels or between channels on different SDI inputs to be determined – as follows.
1. Use the steps given in the previous section to determine the timing of one of the channels
of interest relative to the analog reference.
2. When that measurement has been made, click the Save Offset button.
3. Use the Source toolbar and the Options menu as described in the previous section to
switch the Delay Measurement window to working on the channel you want to compare
the above result with.
4. Click the Rel To Offset button to toggle between seeing the delay of this second channel
relative to the analog reference and its delay relative to the saved offset.
The timing of other channels can be determined relative to the first channel by repeating
Steps 3 and 4.
Page 116
OmniTek XR User Guide, Software Release 2.3
Appendix 1: File Types
OmniTek systems use some unique file types. This section explains what type of data is
held in each file type.
Generic Files
.ini (Initialization)
Used to store generic data.
OmniTek uses three .ini files, one for the full-screen-layout definitions (full_screen_
layouts.ini), one for analyzer range profiles (analyzer_range_error_profiles.ini), and one for
cage safe-title profiles (cage_safe_title_profiles.ini). All of these ini files are stored at the
same level as the OmniTek executable (usually at c:\program files\omnitek\omnitek xr).
.xml (Extensible Markup Language)
The main event log and the picture quality time-based log are stored as XML files.
OmniTek-specific Files
.oas (OmniAllSettings)
Used to store complete configurations, either to provide a complete back-up of your
settings or to allow these settings to be copied from one machine to another. Exported
and imported via the Export ALL settings and Import ALL settings options in the
Configuration menu.
.ode (OmniDesktop Engineering)
Stores all user configurable engineering settings (those settings configurable via the
Engineering Settings control window). Saved and loaded via the ‘Save Engineering
settings’ and ‘Load Engineering settings’ options in the Configuration menu.
.odl (OmniDesktop Layout)
Stores layout information for current page: Child window position, size, snap; Z-order of
child windows; Toolbar visibility, position; Layout name; Display selections for Status
window. Saved when ‘Assigned’ to a particular full screen view in the Full Screen
Configuration dialogue.
.ods (OmniDesktop Settings)
Stores everything: all user configurable engineering settings, the four layouts (pages),
and all other miscellaneous settings and preferences. Saved and loaded via the Save
system configuration and Load system configuration options in the Configuration menu.
Note that OmniTek saves a .ods file when it is closed down, and normally opens that
same file when it next starts up, ensuring the system is in the exact same state in was
last in (called startup.ods and is located in program files\omnitek\omnitek xr). The
user can however opt to load a selected .ods file at start-up by checking the 'At start-up
prompt to load system configuration' option in the File: Preferences menu.
.ogs (OmniGen Setup)
Stores Generator configuration data (default resize type, pattern path, resize type, and
load status), the selected pattern, and whether the Generator displays a list or
thumbnails.
.pre (Preset Definition)
Text file containing set Preset definitions (see page 11).
OmniTek XR User Guide, Software Release 2.3
Page 117
Generator patterns
Extension Input
bmp
x
jpg/jpeg
x
tif
x
gif
x
png
x
yuv
x
yuv10
x
Page 118
Output
x
x
x
x
x
x
x
Description
Bitmap
JPEG
TIF (Tagged Image File Format)
GIF (Graphics Interchange Format)
PNG (Portable Network Graphics)
YUV 8 bit-per-pixel (8 (U), 8 (Y), 8 (V), 8 (Y))
YUV 10 bit-per-pixel (10 (V), 10 (U), 10 (Y), 2 (padding))
dpx
x
DPX (Digital Moving-Picture Exchange)
cin
x
Cineon
rvf
x
x
raw
x
x
lpd
zpd
avi
x
x
x
x
x
x
wmv
x
Windows Media Video
asf
x
Microsoft Windows Media Advanced Systems Format
Raster Video Format, SINGLE-LINK ONLY, stores active
video AND blanking
Raw active video, DUAL-LINK ONLY, (V/R (10), U/B (10),
Y/G (10), 2 (padding)
Line pattern
Zoneplate
Microsoft Audio/Video Interleaved
OmniTek XR User Guide, Software Release 2.3
Appendix 2: Filtering
OmniTek XR is able to monitor and report on a very wide range of different data within
video streams. Not all of this data will be useful to monitor in any particular application, so
OmniTek XR includes a ‘filter’ mechanism through which you can specify precisely which
parameters you want:
•
Displayed in the GUI (i.e. in the Status displays)
•
Logged as part of the Event Log
•
Used as triggers for alarms
•
Used as SNMP traps
A key aspect of this feature is that, with the appropriate items selected for display on the
GUI, a session log can be run on a simple “red light / green light” basis.
(Further information on Logging, SNMP traps and the red-light/green-light scheme is
given in Section 11.)
Making the required selection
The filtering you require is defined through the following Event Configuration dialogue.
This dialogue may be displayed by selecting the Configure filter option from the Options
menu of either the Video Status window, the Audio Status window or Event Log window, or
by clicking on Configure traps… button in the SNMP Settings dialogue (see page 109).
This dialogue gives complete control over the monitoring and reporting of all the different
parameters that the system can respond to. Every parameter/event that can be monitored
is shown on this dialogue, together with check boxes representing the inclusion of the
parameter/event in displays on the screen (Show in UI), its inclusion in event logs (Show
in Log), whether this event happening will trigger an alarm, and whether the event is to
generate an SNMP trap.
The tick boxes indicate all the possible options for displaying and logging events or for
using these events to sound alarms etc. The user simply needs to indicate which events
they are interested in by ticking these (and clearing the ticks from events they do not wish
to monitor).
OmniTek XR User Guide, Software Release 2.3
Page 119
The hierarchy of the items does however mean that items can only be displayed and
logged if their ‘parent’ item is also selected. To indicate this, the boxes of items that
currently can’t be displayed because their parent isn’t displayed are shown as grey.
These boxes can still be ticked but the corresponding item will only be displayed and
logged if the parent item is also ticked (at which point both boxes will be shown in black).
Note:
Some parameters – specifically Wide Screen Signalling, Video Index and VITC – only
apply to SD video. In HD, these selections are ignored. It should also be noted that the
system supports two different specifications for Wide Screen Signalling, but only one
specification is supported at a time. To choose which specification, go to the Wide Screen
Signalling section of the Engineering Settings control window (see page 28).
Saving and Re-using Filters
Selections of items to monitor may be saved as presets for either re-selecting at a later
date or transferring to another system.
Options to save the current selection as a preset and to load existing selections are
offered at the top right-hand corner of the display.
Page 120
OmniTek XR User Guide, Software Release 2.3
Note:
The present release of OmniTek XR includes a preset file that arranges for an OmniTek
system with the Advanced Audio option to display the range of Dolby-E information you
would expect to see on an equivalent Tektronix or Linear Acoustics system. The range of
items covered is illustrated by the following screen shot of the Audio Status window.
OmniTek XR User Guide, Software Release 2.3
Page 121
Index
608/708 captions, 17, 31, 44, 51, 86
reset, 18, 43, 99
About menu, 19
toolbar icon, 37
Active Format Description, 87
Auto detect, 21, 36
Amplitude measurement, 32, 59, 64
Blanking data, 51
units, 14, 23
Analyzer
configuration, 17, 23, 35
checking, 32, 87
grabbing, 76
playing out, 22, 76
input, 17, 35
Bowtie display, 58
interpolator, 17
Cage
low pass filter, 17
Analyzer menu, 17
Ancillary data
checking, 32, 87
display on Mini-Pic, 52
sync to ROI, 64
Cage generator, 43, 82
toolbar icon, 38
dual link, 25
Chrominance, 58, 86
grabbing, 76
chroma range, 23
playing out, 22, 76
detection, 27
ATC, 27, 87
Audio
Closed captions, 44, 51
detection, 86
configuration, 18
line 21, 30
lissajous figures, 41, 103
source, 17
phase meters, 94
toolbar, 31
playback, 18, 103
toolbar icon, 38
PPM display, 40
Audio menu, 18
Audio PPM display, 89
Colour space
monitor output, 25
Composite, 58
AES/EBU audio, 96
composite matrix, 24
ballistics, 92
range, 23, 87
configuration, 91, 96
Configuration
Dolby E audio, 94
analyzer, 17, 23, 35
embedded audio, 89
audio, 18
graticule, 91, 92
audio PPM display, 91, 96
peak hold markers, 90, 94
closed caption reader, 30
surround sound view, 91, 93
dual link, 25, 35
toolbar icon, 38
engineering settings, 17, 20, 38
Audio Status, 42, 89, 97
full screen views, 38, 67, 68
AES/EBU audio, 98
generator, 70, 73
configure filter, 43, 99
graticule, 39
configure timeline, 42, 98
monitor output, 18, 21, 23, 32, 35
Dolby E audio, 98
output, 18
embedded audio, 98
picture state detectors, 26
enable columns, 43, 99
region of interest, 63
filtering, 119
SDI output, 18, 23, 32, 35
flat view, 42, 98
SNMP, 17, 109
look&feel, 43, 99
teletext reader, 29
Page 122
OmniTek XR User Guide, Software Release 2.3
time code readers, 27
teletext, 86
video index reader, 28
WSS, 86
video settings, 20
Dolby E
video source, 35
delay measurement, 48
video standard, 36
metadata, 99, 100
waveform window, 58
PPM configuration, 96
WSS reader, 28
PPM display, 94
Configuration menu, 16
Configure Filter
source, 90
Dual link
audio status, 43, 99
configuration, 35
event log, 105
data conversion, 25
video status, 56, 88
input format, 25
Configure Timeline
audio status, 42, 98
video status, 55, 88
CRC checks, 86
Crosshair
on output, 18, 32
show/hide, 39, 59
toolbar, 32
CRT emulation, 59
Cursors
crosshair, 18, 32, 39
measurement, 32
toolbar, 32
Data View, 45
extended view, 46
sync to ROI, 64
toolbar icon, 37
Delay measurement, 110
difference measurement, 116
Dolby E, 48
embedded audio, 47
PCM delay, 47
reference timing, 48, 115
relative A/V delay, 113
status information, 47
system requirements, 110
test sequence, 110
toolbar icon, 38
window, 47
Detection
chrominance, 27, 86
closed caption, 86
luminance, 27, 86
motion content, 26, 85
OmniTek XR User Guide, Software Release 2.3
output format, 26
video standard, 36
EDH checks, 86
Enable Columns
audio status, 43, 99
video status, 56, 88
Engineering settings, 17, 20
Closed Caption – Reader, 30
Picture, 26
Teletext – Reader, 29
Time Code – Reader, 27
toolbar icon, 38
Video – Analyzer, 23
Video – Dual Link, 25
Video – General, 20
Video – Generator, 22
Video Index – Reader, 28
WSS – Reader, 28
Errors
chrominance, 23, 27
display options, 87
error mask, 24
luminance, 23, 27
motion content, 26
range checks, 86
reset error count, 18, 88, 99
signalling on output, 23
timelines, 84
Event logging, 104
event selection, 106, 119
multiple log sessions, 106
saving to disk, 106
summary view, 105, 108
toolbar, 105
Page 123
toolbar icon, 38
window, 48, 104
Extended Data View, 46
File menu, 14, 70
File monitor, 73
Files
.oas files, 117
.ode files, 117
.odl files, 117
.ods files, 117
.ogs file, 117
.pre files, 117
Filtering, 119
supplied filter, 121
Flash (Reprogramming), 20
Flat View, 42, 55, 84, 88, 98
Graticule, 39
audio PPM window, 91, 92
calibration, 50, 59
gamut window, 49
measurement units, 14
picture quality window, 62
vector scope, 54
waveform window, 59
Help menu, 19
Histogram display, 61
toolbar icon, 37
Hot-keys, 11
full screen views, 69
Images
capturing, 73
file monitor, 73
fitting to video format, 71
Folder Monitor, 77
grabbing, 75
Full Screen mode, 9, 40, 65
loading, 71, 72, 73, 74
configuration, 38, 67
panning, 22
control panel timeout, 68
source files, 118
controls, 66
entry and exit, 66
exit controls, 68
full screen menu, 19
Import/Export settings, 16
Interpolator, 17
Licence key, 19
hot-keys, 69
Line 21 captions, 17, 30, 31, 44, 51, 86
HW optimized sizing, 67
Line patterns
layout builder, 68
show help/information, 68
start-up in full screen mode, 68
video status information, 67
Gamut window
graticule, 49
look&feel, 50
toolbar icon, 37
GBR ordering, 59
Generation
video, 22
Generator, 50, 70
folder monitor, 77
loading images/sequences, 71
menus, 70
playlists, 78
preferences, 71
toolbar, 73
toolbar icon, 37
Page 124
at start-up, 22
Line/Sweep mode, 63
toolbar icon, 38
Link Fields, 27, 28
Lissajous figures, 41, 103
source, 90
toolbar icon, 38
Loading images/sequences, 74
Logging, 104
closed caption logging, 31
event log window, 38, 48, 104
event logging, 104
Look&Feel, 17
audio status, 43, 99
dialogue, 39
full screen views, 69
gamut window, 50
vector scope, 54
OmniTek XR User Guide, Software Release 2.3
video status, 56, 88
Output menu, 18
waveform window, 58, 59
Pages, 10, 15
Low pass filter, 17
Panning, 22
LTC, 27, 87
Pattern menu (generator), 72
Luma Qualified Vector Scope, 24, 53
Patterns
Luminance, 58, 86
creating, 74
detection, 27
fitting to video format, 71
luma range, 23
frame-based patterns, 74
Measurement units, 14, 23
Message boxes, 15
Mini-Pic, 50
aspect ratio, 53
colour modes, 51
importing, 73
loading, 71, 72
PCM Delay
delay measurement, 47
Picture Quality
pulse/cross, 51
graticule, 62
toolbar icon, 37
window, 62
Monitor Mode, 21
Picture state, 26
Monitor output, 18, 21, 35
Play speed, 33
colour space, 25
Playback
error signalling, 23
audio, 18, 90, 103
including crosshair, 32
blanking/ancillary data, 22, 76
Motion content detection, 26, 85
ODE files, 117
ODL files, 117
ODS files, 117
OGS files, 117
OP-47 teletext, 17, 31, 44, 51, 86
Options menu
audio PPM display, 91
RVF files, 76
sequence, 33
Playlists, 73, 78
Power-on defaults, 22
PRE files, 117
Preferences, 14
generator, 71
Presets, 11, 17
audio status, 42, 98
Profiles, 24
delay measurement, 47
Reference Timing, 115, 116
event logging, 105
gamut window, 49
delay measurement, 48
Region of Interest (ROI), 57, 63
general, 39
selection on Mini-Pic, 64
mini-pic window, 51
toolbar, 33
vector scope, 54
toolbar icon, 38
video status, 55, 88
vector scope, 54
waveform window, 59
Output
including crosshair, 32
Relative delay, 113
Reset, 18
audio status, 18, 43, 99
error count, 18, 99
video status, 18, 56, 88
OmniTek XR User Guide, Software Release 2.3
Page 125
RGB polarity Outside, 23
delay measurement, 47
Run menu, 16
video, 55, 84
Run toolbar, 33
Stuck frames, 87
frame, 33
speed, 33
RVF capture, 76
RVF playback, 76
Safe action/title area, 52, 82
dialogue, 38, 43, 82
sync to ROI, 64
SDI input, 35
status, 85
SDI output, 18, 35
Sync, 21, 86
free run, 21
serial lock, 21
System configuration
at start-up, 14
files, 16
import/export settings, 16
Teletext, 29
detection, 86
Test pattern generator, 37
error signalling, 23
Thumbnails, 71, 73
including crosshair, 32
Time codes
Sequence playback, 33
speed, 33
Sequences, 74
fitting to video format, 71
loading, 71, 72, 73
thumbnails, 71, 73
Serial lock, 21
dual link, 25
Shortcuts
checking, 87
display on Mini-Pic, 52
readers, 27
Time measurement, 32
units, 14
Time Shift feature, 33
Timelines, 42, 55, 84, 88, 98
Toolbars, 15
Closed Caption toolbar, 31
hot-keys, 11, 69
Crosshair toolbar, 32
keyboard shortcuts, 11
Cursors toolbar, 32
presets, 11
Event Log toolbar, 105
window positioning, 13
Generator toolbar, 73
window resizing, 13
Region of Interest toolbar, 33, 63
Show menu, 15
Skipped frames, 87
Snapshots, 15, 39
SNMP, 109
configuration, 109
settings, 17
trap selection, 119
Run (transport) toolbar, 33
Source toolbar, 35
Video Standard toolbar, 36
Window toolbar, 37
Tooltips, 39
Transport controls, 33
TRS data, 17, 87
Source menu (generator), 72
Update Options, 19
Source toolbar, 35
Vector Scope, 53
dual link, 35
Start-up, 7, 14, 22
start-up in full screen mode, 68
Status bar, 10, 16
Status information
control panel, 54
graticule, 54
luma qualified, 24
region of interest, 54
resolution, 54
toolbar icon, 37
audio, 42, 89
Page 126
OmniTek XR User Guide, Software Release 2.3
Video
control panel, 56, 58
generation, 22
crosshair, 59
safe action/title area, 43
graticule, 59
source, 35
look&feel, 58, 59
Video capture, 75
parade view, 58
full frame (RVF), 76
resizing, 57
time shift feature, 33
split view, 60
Video Index, 28
reader, 28
Video standard, 21
toolbar icon, 37
Wide screen signalling, 28
Window menu, 19, 39, 73
auto detect, 36
Window toolbar, 37
dual link, 36
Windows, 39
toolbar, 36
Video Status, 55, 84
audio lissajous, 41
audio PPMs, 40, 89
configure filter, 56, 88
audio status, 42, 97
configure timeline, 55, 88
cage generator, 43, 82
enable columns, 56, 88
closed captions, 44
filtering, 119
control panel, 56
flat view, 55, 88
data view, 45
look&feel, 56, 88
delay measurement, 47
on full screen display, 67
event log, 48, 104
parameters, 85
full screen display, 65
reset, 18, 56, 88
gamut, 49
toolbar icon, 37
generator, 50, 70
window, 84
layout, 15
Video store, 37, 50, 70
mini-pic, 50
Video timing reference, 21
positioning, 13, 40
View menu, 72
VITC, 27, 87
Waveform
resizing, 13, 40, 57, 67
vector scope, 53
video status, 55, 84
waveform, 56
display mode, 63
waveform histogram, 61
full field, 64
window controls, 39
full frame, 64
region of interest, 57, 63
Waveform Histogram display, 61
colour modes, 62
graph type, 62
toolbar icon, 37
Windows mode, 9
layout, 10
YCbCr Polarity Outside, 23
Zoneplate patterns
at start-up, 22
Waveform window, 56
colour modes, 58, 61
OmniTek XR User Guide, Software Release 2.3
Page 127
Intec 2 Unit 3, Wade Road, Basingstoke, Hants RG24 8NE, UK
Tel: +44 (0)1256 345900
Fax: +44 (0)1256 345901
Email: [email protected]
Web: www.omnitek.tv