1
DSS Player 2000
INSTRUCTIONS
1
Contents
CONTENTS ______________________________________________________ 2
DSS PLAYER 2000 FEATURES ______________________________________ 4
SYSTEM REQUIREMENTS__________________________________________ 5
INSTALLING DSS PLAYER 2000 _____________________________________ 6
UNINSTALLING DSS PLAYER 2000 __________________________________ 8
CONNECTING THE DS-2000 DIGITAL RECORDER ______________________ 9
STARTING DSS PLAYER 2000 _____________________________________ 10
LET'S GET STARTED _____________________________________________ 11
Download DSS Files ...................................................................................................................... 11
Play Files ....................................................................................................................................... 12
Edit DSS Files................................................................................................................................ 12
[Download] Options ....................................................................................................................... 12
DSS PLAYER 2000 GUIDED TOUR __________________________________ 13
DSS Player 2000 Guided Tour ...................................................................................................... 13
DICTATION WINDOW _____________________________________________ 14
Dictation Window ........................................................................................................................... 14
Title Bar.......................................................................................................................................... 14
Menu Bar ....................................................................................................................................... 14
Tool Bar ......................................................................................................................................... 15
Playback Control Bar ..................................................................................................................... 18
Play Bar and Position Control........................................................................................................ 19
Time Axis and Time Axis Control Slider ........................................................................................ 19
Playback Position and Length ....................................................................................................... 19
Volume Control Slider .................................................................................................................... 20
Speed Control Slider...................................................................................................................... 20
Dictation TreeView......................................................................................................................... 21
Device TreeView............................................................................................................................ 23
Dictation ListView .......................................................................................................................... 27
Detail of Items That Are Displayed on the Header Bar ................................................................. 28
DICTATION WINDOW COMMANDS__________________________________ 30
File Menu ....................................................................................................................................... 30
Edit Menu....................................................................................................................................... 31
View Menu ..................................................................................................................................... 32
Tools Menu .................................................................................................................................... 33
Download Menu ............................................................................................................................. 35
2
Voice Recognition Menu................................................................................................................ 37
REMOTE DICTATION WINDOW_____________________________________ 38
Remote Dictation Window ............................................................................................................. 38
Title Bar.......................................................................................................................................... 38
Menu Bar ....................................................................................................................................... 38
Tool Bar ......................................................................................................................................... 39
Play Bar and Position Control........................................................................................................ 43
Time Axis and Time Axis Control Slider ........................................................................................ 44
Playback Position and Length ....................................................................................................... 44
Volume Control Slider .................................................................................................................... 45
REMOTE DICTATION COMMANDS __________________________________ 46
File Menu ....................................................................................................................................... 46
Edit Menu....................................................................................................................................... 46
Tools Menu .................................................................................................................................... 46
PLAYBACK CONTROL WINDOW ___________________________________ 48
Play Bar and Position Control........................................................................................................ 48
Time Axis and Time Axis Control Slider ........................................................................................ 48
Playback Position and Length ....................................................................................................... 49
Volume Control Slider .................................................................................................................... 49
Speed Control Slider...................................................................................................................... 49
TROUBLE SHOOTING ____________________________________________ 50
No Sound ....................................................................................................................................... 50
Cannot Connect to DS-2000.......................................................................................................... 51
Communication Driver Problem..................................................................................................... 52
Other Device Problems.................................................................................................................. 52
TECHNICAL ASSISTANCE AND SUPPORT ___________________________ 53
3
DSS Player 2000 Features
This product can be installed by using a license ID that is supplied with the product. Functions are
summarized below.
-
Allows speech recorded on the DS-2000 to be stored and managed as DSS audio files on a PC.
Plays audio files.
Converts DSS files to WAVE files.
Sends audio files as e-mail attachments.
Allows DSS files to be recorded directly from the DS-2000 to a PC.
Allows recorded speech to be converted to text when used in conjunction with speech recognition
software.
-
Olympus Optical Co., Ltd. holds the copyrights for the DSS Player 2000 software and the
instructions (this manual).
IBM and ViaVoice are registered trademarks of IBM Corporation.
Microsoft and Windows are registered trademarks of Microsoft Corporation.
Pentium is a registered trademark of Intel Corporation.
Adobe and Acrobat Reader are registered trademarks of Adobe Systems Incorporated.
Other company and product names are either registered trademarks or trademarks of their
respective owners.
-
4
System Requirements
- Operating system
Microsoft Windows 95(Internet Explorer 4.0 or later)/98/Me/NT Workstation 4.0 with Service
Pack 4(SP4) or later/ 2000 Professional (hereafter called Windows 2000)
- PC
IBM PC/AT compatible PC
- CPU
Intel Pentium 166MHz or faster, or AMD-K6
- RAM
32MB or more
- Hard drive space
10MB or more (plus space for sound data files)
- Sound card
Creative Labs Sound Blaster 16 or 100% compatible sound card
- Display
800x600 pixels or more, 256 colors or more
- CD-ROM drive
Double Speed CD-ROM
- USB port
One or more free ports
- Audio I/O terminals
Microphone input and earphone (or speaker) output
Notes
- USB ports are not available on PCs running Windows 95 or that have been upgraded from
Windows 95 to any other OS. An optional PC Card adapter or floppy disk adapter is needed to
download audio files to such PCs.
- Certain functions, such as remote and direct recording, do not work on PCs that don't have USB
ports.
5
Installing DSS Player 2000
You need to enter the license ID that is supplied with the product during installation to run this
software.
Notes
- If you intend to use speech recognition software, install it first. For instruction on installing the
speech recognition software, refer to the user's guide supplied with the speech recognition
software.
- If you are running Windows NT or 2000 on a network, you need to log in as an administrator or
use a user name that has administrators rights.
1
Insert the DSS Player 2000 CD-ROM into the CD-ROM drive.
The installer launches automatically.
Note
If the installer does not launch automatically, follow these steps:
It is assumed that the CD-ROM drive is assigned drive letter D:
(1) Click the "Start" button and choose "Run."
(2) Type "D:Setup.exe" in the "Open" field and click "OK."
2
The installation language selection dialog box opens.
Move the mouse or cursor to the desired language, and click to select.
Note
Except for DSS Player 2000, you cannot install using Italian or Spanish.
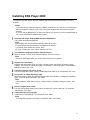
3
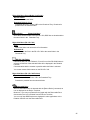
Register user information.
Register user information. Enter your name, company name, and license ID number (serial
number). The license ID number is printed on the license ID card. Click "Next." A confirmation
dialog box opens. Click "Yes."
4
5
Confirm acceptance of License Terms.
You must accept the License Terms to install DSS Player 2000. If you accept them click "Yes."
Select where to install DSS Player 2000.
Specify the folder in which to install DSS Player 2000. Click "Browse" to change the installation
folder. To accept the default folder, click "Next."
Note
If the installation folder does not exist, a folder creation confirmation dialog box opens. Click
"Yes."
6
Select a program menu folder.
You may change the program menu folder to another one, such as "Start Up". To accept the
default folder, click "Next."
7
Confirm the start of file copying.
Confirm all "Current Settings." To accept them, click "Next."
Note
To change the program menu folder or installation folder, click "Back."
6
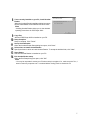
8
If not currently installed on your PC, Install Acrobat
Reader.
When the Acrobat Reader installation dialog box opens,
choose Install Adobe Acrobat Reader and click "Next."
Note
Installing Acrobat Reader allows you to view detailed
operating instructions for DSS Player 2000.
9
10
11
12
13
14
Copy files.
Wait until DSS Player 2000 is installed on your PC.
Setup Complete.
Setup is complete. Click "Finish."
Set up Acrobat Reader.
When the Acrobat Reader Setup dialog box opens, click "Next."
Select where to install Acrobat Reader.
Specify the folder in which to install Acrobat Reader. To accept the default folder, click "Next."
Setup Status.
Wait until Acrobat Reader is installed on your PC.
Exit Acrobat Reader setup.
When the Exit Setup dialog box opens, click "OK."
Note
- You may be requested to restart your PC when setup is complete. If so, make sure that "Yes, I
want to restart my computer now." is selected before clicking Finish to restart the PC.
7
Uninstalling DSS Player 2000
The process of removing software installed on your PC is called uninstalling. Uninstall DSS Player
2000 when it is no longer needed.
1
2
3
4
5
6
Click "Start," point to "Settings," and choose "Control Panel."
Double-click "Add/Remove Programs."
A list of applications that have been installed is displayed.
Choose "Olympus DSS Player 2000."
Click "Add/Remove (in Windows 2000, "Change/Remove")."
A file deletion confirmation dialog box opens. Click "Yes"
Now deleting.
DSS Player 2000 is being deleted. Please wait.
Note
An additional message may appear. If so, read it carefully and do as instructed.
7
Exit uninstall.
The program has been uninstalled. Click "Finish."
8
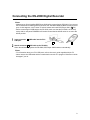
Connecting the DS-2000 Digital Recorder
Notes
- Make sure you finish installing DSS Player 2000 before connecting the DS-2000. If you connect
the DS-2000 before installing DSS Player 2000, the "Add New Hardware Wizard" dialog box will
open. In this happens, click "Cancel" to exit the wizard and install DSS Player 2000 ( P.6).
- Before connecting the USB cable to the DS-2000, make sure that the DS-2000 is in the stop
mode, with its rear-panel POWER/LOCK switch ON and that the HOLD switch is not set to the
HOLD position.
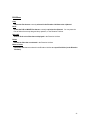
1
Insert connector A USB cable into the PC's
USB port.
A
2
B
Attach connector B USB cable to the DS-2000.
When the software recognizes the DS-2000, DSS Player 2000 launches automatically.
Notes
- For information about your PC's USB ports, refer to the user's guide supplied with the PC.
- Never remove the USB cable while a communication session is in progress. Data files could be
damaged if you do.
9
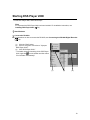
Starting DSS Player 2000
To start DSS Player 2000, follow these steps
Note
It is assumed that DSS Player 2000 has been installed. For installation instructions, see
Installing DSS Player 2000 ( P.6).
1 Start Windows.
the DS-2000.
2 Connect
For instructions on how to connect the DS-2000, see Connecting the DS-2000 Digital Recorder
(
P.9).
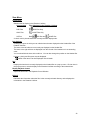
(1) Click the "Start" button.
(2) Point to "Programs" and choose "Olympus
DSS Player 2000."
(3) Click "DSS Player 2000."
- To disable automatic launching of the DSS Player
2000, right-click
on the taskbar and then select
"Do not detect automatically."
(1)
(2)
(3)
10
Let's Get Started
Download DSS Files
The method of downloading DSS files varies depending on the device used (storage media and the
DS-2000). Select the device that you are using from the following list:
DS-2000
Smart Media Card
Removable Drive
Download DS-2000
If you are using Windows 98/2000 or Windows NT 4.0, you can use DS-150 / 320 (USB) and
DS-2000 (USB). If the Dictation Window is open and you connect or remove these devices, the
Device TreeView information is immediately updated.
The download destination of files is the same folder as that of the DS-2000 in the Download Tray.
When files are being downloaded, a dialog appears showing the progress of the download process.
The DS-2000 files are downloaded to the PC in the following format:
"User ID (first four letters) +Serial Number (four digits)"
The downloaded DSS files can be played using a Windows compatible sound card. You can play
the DSS files by
pressing
(Play) or
selecting [Play] in the Tools menu.
Here, operations such as play, stop, fast forward, and rewind can be carried out just like a tape
recorder. You can also click the position that you wish to play on the Playbar or drag the position
control to quickly move the playback position.
Download Smart Media Card
If the Dictation Window is open and you connect or remove a Smart Media Card, the Device
TreeView information is immediately updated.
The download destination of files is the same folder as that of the Smart Media Card in the
Download Tray.
11
Download Removable Drive
Information about the Removable Drive in the Device TreeView is not updated when you connect or
disconnect the Removable drive, unless you choose [Detect Device] in the Tools menu or
click the
[Detect Device ] button on the toolbar.
The download destination of files depends on whether there is a folder on the Removable Drive. If
there is no folder on the Removable Drive, the files are downloaded to folder A of the Download
Tray. Otherwise, the files are downloaded to the same folder as that of the Removable Drive in the
Download Tray.
Play Files
In the Dictation Window, you can play and manage downloaded DSS files and WAVE files. You
can also double-click a DSS file in Window Explorer, for example, to open the Playback Control
Window and play the DSS file.
Edit DSS Files
If the DS-2000 is connected to the PC, you can edit a DSS file by opening the Remote Dictation
Window from the Dictation Window ([New DSS File] or [Edit DSS File] in the [File] menu or
or
) on the toolbar).
[Download] Options
A function will become active if a check is attached to the check box.
Delete
After downloading the files, delete the original file.
Change WAV
Convert to a WAV file as the file is being downloaded.
Download Folder
Here, the current download folder is displayed.
button is pushed, you can change the download folder.
Moreover, if
Auto Download
After detecting the device, download all data.
When you check Folder “A”, “B” or “C”, the files that are currently in these
respective folders will be attached to your email.
12
DSS Player 2000 Guided Tour
DSS Player 2000 Guided Tour
Application Overview
DSS Player 2000 consists of the following three windows:
Dictation Window,
Remote Dictation Window,
Playback Control Window
The Dictation Window
Enables you to perform functions such as play DSS files that have been downloaded from the
storage media (Removable Drive or Smart Media Card) or the Digital Voice Recorder to your PC
- Perform voice recognition between index marks (when IBM ViaVoice98 or ViaVoice Millennium
(sold separately) is installed),
- Embed DSS files into another application,
- Attach DSS files to e-mail messages and send them,
- Upload DSS files from the hard disk.
In addition, if auto start of the Dictation Window is selected, the Dictation Window will automatically
start when the Digital Voice Recorder is connected to your PC via USB or when a PCMCIA card is
inserted.
Remote Dictation Window
Enables you to use the DS-2000 for remote microphone of the DSS Player 2000 application on
your PC.
Playback Control Window
Opens and plays the DSS file when the file is double-clicked on Windows Explorer, for example.
The window also opens when playing DSS files that have been embedded into a document. The
Playback Control Window opens only when the selected file is a DSS file.
13
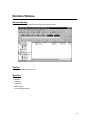
Dictation Window
Dictation Window
-
When you start DSS Player 2000, the Dictation Window opens.
Title Bar
Displays the path of the active file.
Menu Bar
File Menu
Edit Menu
View Menu
Tools Menu
Redirect Menu
Voice Recognition Menu
14
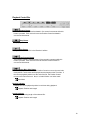
Tool Bar
[New DSS File]
Starts the Remote Dictation Window and opens a new DSS file. This command is valid only if
the DS-2000 is connected to the PC at this point.
[Edit DSS File]
Opens the file that is currently selected in the Dictation ListView (the active file if multiple files
are selected) in the Remote Dictation Window.
[Convert to WAV File]
Converts the files currently selected in the Dictation ListView (all selected files if multiple files
are selected) into WAVE Format and saves them to the specified folder. The names of the
WAVE files that are created are the same as those of the DSS files with the file extension changed
to .wav.
[Detect Device]
Updates the information about devices that cannot be automatically detected. If a new
device is detected, it is shown in the Device TreeView.
[Delete]
Deletes the files that are selected in the Dictation ListView.
[Intro Scan]
You can play the initial five seconds of the files in the selected folder. Scanning starts from
the first file and continues until all the DSS files in the selected folder are played. When all DSS
files have been scanned, a Beep is heard. For DSS files that are less than five seconds long, the
file is played to the end and the scanning continues to the next DSS file.
When the files in the selected folder are scanned, the DSS file that is being played is highlighted.
If you interrupt the scanning operation by stopping or changing the playback position, the scanning
stops at that point and the current file becomes the active file. In addition, if you execute intro scan
while scanning is in progress, the operation is aborted and the current file is played until the end of
the file or until it is stopped.
[Download All]
Downloads all DSS files in the recorders and cards that are currently detected in the Device
TreeView to the same folders in the Download Tray. However, if files are downloaded from a
Removable Drive that does not have a folder, they are downloaded only to Folder A. If multiple
devices are detected in the Device TreeView, a dialog box appears for you to select which devices
to download the DSS files from. In addition, even if the folder names are changed, the files are
downloaded to the original Folder A, B, and C of the Download Tray.
15
[Upload DSS Files]
Uploads the DSS files that are currently selected in the Dictation ListView to the same folder in
the recorder or card. You cannot upload files to a folder in the DS-150.
The DSS files chosen in the voice list window will be uploaded to the device detected in the device
window.
However, when two or more devices are detected, a dialog window will appear, and you will need to
choose a device.
[Send Author ID]
The dialog box named [Send Author ID] opens and allow you to send the Author ID,
Work Type ID and Priority Level of the device to the DS-2000 Digital Voice Recorder.
[Transfer The Date/Time]
Transfers the date/time data of the PC to the recorder.
[Start Voice Recognition]
This command is activated only when IBM's voice recognition application ViaVoice98 or ViaVoice
Millennium (sold separately) or later versions of these applications are installed. When this
command is active, SpeakPad is started and the file selected in the Dictation ListView is
automatically converted to text. This command is applicable only to DSS files that have been
recorded in the Standard mode. This command is disabled when a DSS file that has been recorded
in the Long mode is selected. It is also disabled while voice recognition is in progress.
If multiple DSS files are selected in the Dictation ListView, only those files that are recorded in the
Standard mode is extracted, and voice recognition is performed on the files one by one. You can
monitor the progress of the voice recognition operation with the [Voice Recognition View]
command.
[New Index Mark]
Index marks can be assigned to any position in the selected DSS file. By clicking the Index Mark
Skip Button, you can move to the index mark position of the file at any time. A total of 16 index
marks can be stored in each file. All index marks remains attached to the file until they are deleted.
To insert an index mark during playback, start playback, move to the desired position (play the file
or drag the Position Control to the appropriate position), and select New Index Mark on the Tool
bar.
To insert an index mark while playback is stopped, simply execute New Index Mark at the desired
position of the DSS file.
[Delete Index Mark]
(Index Mark Skip Button) or the [View All Index
To remove an index mark, first use the
Marks] command to move to the desired index mark. While playback is stopped, execute Delete
Index Mark at the desired position.
16
[View All Index Marks]
A dialog box opens. Double-click the time at the index mark or select the time and click the [Skip]
button to play the file from the selected time position.
In addition, you can delete the time of the index mark by selecting the time while playback is
stopped and clicking [Delete].
If an index mark is chosen and the [skip] button is pushed, a file is played back from the time
chosen. Moreover, if an index mark is chosen in the middle of the stop mode and [delete] is
pressed, the time of the index mark chosen can be deleted.
[Select File Type]
By pressing the button, the button and the displayed files change as follows.
Button display and displayed files
Display after the button is pressed
DSS Files Only
WAVE Files Only
WAVE Files Only
DSS Files and WAVE Files
DSS Files and WAVE Files
DSS Files Only
[Display Playback Control]
Opens the active file in the Playback Control Window.
17
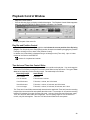
Playback Control Bar
Rewind Button
The Position Control is moved backward in five second increments while this
button is pressed. Each click will move the Position Control backward in
one-second increments.
Stop Button
Stops playback.
Play Button
Plays the current active file in the Dictation ListView.
Fast Forward Button
The Position Control is moved forward in five-second increments while this
button is pressed. Each click will move the Position Control forward in
one-second increments.
Index Mark Skip Button
Each time you press this button, the Position Control moves to the next index
mark position. Index marks are displayed as red triangles on the Time Axis. If
the current playback position is at the end of the file, the Position Control
moves to the first index mark. Also, it is invalid if there is no index mark.
Index Mark
Position Indicator
Displays the current playback position in real-time during playback.
Playback Position and Length
Length Indicator
Displays the recording length of the selected file.
Playback Position and Length
18
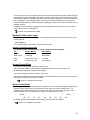
Play Bar and Position Control
[Play Bar] and [Position Control] are graphics that indicate the current position of the file being
played. You can quickly move the playback position forward or backward by dragging the [Position
Control] or clicking in front or back of the [Position Control].
In addition, the [Index Mark] is displayed using a red triangle on the [Time Axis]. Up to 16 index
marks can be used on each DSS file.
A motion of a keyboard and a slider
Time Axis and Time Axis Control Slider
Time Axis is displayed below the play bar with the same width as the play bar. You can change the
scale of the Time Axis by moving the Time Axis Control Slider knob up and down. The type of Time
Axis varies depending on the recording length. The relationship is as follows.
Recording Length
Scale Display
0 to 1 minute
Full scale
1 to 10 minutes
Full scale and 1 minute
10 to 30 minutes
Full scale, 1 minute, and 10 minutes
30 to 60 minutes
Full scale, 1 minute, 10 minutes, and 30 minutes
1 hour or longer
Full scale, 1 minute, 10 minutes, 30 minutes, and 1 hour
The Time Axis Control Slider automatically determines the applicable Time Axis from the recording
length of the current active file and updates the slider scale. For example, for a file with a recording
length of 50 minutes, four types of scales, full scale, 1 minute, 10 minutes, and 30 minutes, apply.
Thus, four levels of slider scale will be displayed. If the recording length of a file is less than 1
minute, only full scale applies. Thus the Time Axis Control Slider does not operate.
If the Time Axis is set to some scale other than full scale and the position control reaches the right
end of the play bar during playback, the position control instantly moves to the left end and the Time
Axis display is updated. The last scale mark of the Time Axis is displayed in red and the fractional
time is displayed. If you drag the position control to the left end or the right end of the play bar,
accelerated fast forward or rewind takes place, updating the scale of the Time Axis and the current
playback position.
In addition, the [Index Mark] is displayed using a red triangle on the [Time Axis]. Up to 16 index
marks can be used on each DSS file.
A motion of a keyboard and a slider
Playback Position and Length
The hours, minutes, and seconds of the current playback position of the voice file is shown in the
following format:
xx H xx M xx S
The recording length is also shown using the same format.
19
A motion of a keyboard and a slider
The position of the slide control can also be changed from the keyboard.
Key
Play bar Moves
Slider Moves
Up, Left
to the left
Upwards
Down, Right
to the right
Downwards
Home
to the head of a file
to the top
End
to the last of a file
to the bottom
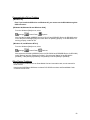
Volume Control Slider
If your sound card supports electronic volume control,
you can use the [Volume Control Slider] to adjust the output volume on the sound card.
By selecting (clicking) the [Volume Control Slider],
you can also adjust the volume using the arrow keys.
Note that some older sound cards only support a manual dial knob volume control, and in this case,
the [Volume Control] function cannot be used.
A motion of a keyboard and a slider
Speed Control Slider
By moving the [Speed Control Slider] knob up and down, you can control the playback speed of the
DSS file without affecting the voice pitch (this function cannot be used on WAVE files). The
playback speed is faster when the knob is above the center level and slower when the knob is
below the center level. The speed control range is as follows (The unit is %):
Below
50
<60
75
->
80
100
125
133
150
Above
200
By selecting (clicking) the [Speed Control Slider], you can adjust the playback speed using the left
and right arrow keys (left = slower and right = faster).
A motion of a keyboard and a slider
20
Dictation TreeView
-
The voice files are listed in a folder structure on your PC with Dictation Folder at the top as
shown in the following figure.
Drag and drop can be applied to Download Tray Folder, Message Tray, and Work Tray.
Dictation Folder
This is the root folder.
Double-click to open or close the tree.
Download Tray
This is the folder used to manage the DSS files that are downloaded from
the DS-2000 and the storage media.
Folder
This is the folder used to save the files downloaded from Folders A, B, and
C of the recorder and card.
Rename Folder can also be done here.
In addition, the folder accepts DSS or WAVE files that are dropped into it.
Name of the drop source directory
Other Application Import Files
Files in the Dictation ListView
Message Tray and Sent Items
Files within Device TreeView
Functions when files are dropped
Import Files
Import Files
Move to Folder
Download Folder A
Download Folder B
Download Folder C
Message Tray
This is the folder used to save DSS files created through remote operation.
In addition, the folder accepts DSS or WAVE files that are dropped into it.
21
Temp Tray
This folder can be used according to preference. For example, it can be used to archive important
DSS Files, to save WAV files, or to temporarily store unnecessary files. You can modify the folder
name.
22
Device TreeView
This is a list of devices that are currently connected to your PC.
If there is a connection or disconnection of USB devices or PCMCIA cards while the Dictation
Window is open, the Device TreeView is immediately updated with the names of those devices.
If devices are connected, and you double-click
( Device Manager ),
the connected device is shown below (Device Manager).
Conversely, if you double-click
(Device Manager)
but no device icons appear,
it indicates that no devices are connected to your PC.
DS-2000
Since there are three folders in the DS-2000,
DSS files are downloaded to the same folder in the Download Tray.
Right-Click Menu (DS-2000)
Open
Opens the folder and retrieves the file information.
Download All
Downloads all DSS files existing in DS-2000 to the same folders in the
Download Tray.
23
DS-2000 Folder
It shows the DS-2000 Folders A/B/C, and if one of the DS-2000 folders is
selected, all the files of the selected folder will be displayed in the Dictation
ListView.
This folder accepts DSS Files that are dragged and dropped into it from either
Windows Explorer or the Dictation ListView. DSS files that are dropped into
the DS-2000 folder are uploaded to the DS-2000.
Right-Click Menu (DS-2000 Folder)
Rename Folder
Renames the folder. You can enter up to 8 characters. If you do not
enter 8 characters, the rest is filled with spaces. In addition, the following
characters are not allowed:
# $ ' @ [ ] \ - | ^ { } Full-size character
Download Folder A / B / C
Downloads the files in Folder A/B/C to the Download Tray. Download is
possible from the selected folder.
Smart Media Card
Since there are three folders in the Smart Media Card, DSS files are downloaded to the same folder
in the Download Tray.
Right-Click Menu (Smart Media Card)
Open
Opens the Message Folder and displays information about the files located
in Folder A of the Smart Media Card in the Dictation ListView.
Download All
Downloads all files in the Smart Media Card to the Download Tray.
Smart Media Card Folder
You can display and rename the folder name.
You can drop DSS files from other applications and from the Dictation
ListView.
24
Right-Click Menu (Smart Media Card Folder)
Rename Folder
Rename the selected folder.
Download Folder A / B / C
Downloads the files in Folder A/B/C to the Download Tray. Download is
possible from the selected folder.
DS-150/320
Right-Click Menu
Since there are two folders in the DS-150 / 320, DSS files are downloaded to
the same folder in the Download Tray.
Right-Click Menu (DS-150 / 320)
Open
Opens the folder and retrieves the file information.
Download All
Downloads all the files in the DS-150 / 320 to the same folder in the
Download Tray.
DS-150 / 320 Folder
It shows the DS-150 / 320 Folders A / B, and if one of the DS-2000 folders is
selected, all the files of the selected folder will be displayed in the Dictation
ListView.
Communication with the recorder is possible while this folder is selected.
You cannot rename folder names on the DS-150 / 320.
Right-Click Menu (DS-150 / 320 Folders)
Download Folder A / B
Downloads the files in Folder A/B to the Download Tray.
Download is possible from the selected folder.
Removable Drive
When a Removable Drive is detected with the [Detect Device] command, an
icon is displayed in the Device TreeView.
Moreover, if you carry out [Detect Device] again with the Removable Drive
disconnected, the icon is deleted from the Device TreeView.
You can only drop DSS files that are displayed in other applications or the
Dictation ListView onto the Removable Drive.
25
Right-Click Menu (Removable Drive)
Download All
Downloads all files in the Removable Drive to the Download Tray.
Removable Drive Folder
Plus mark will be displayed to the left side of the removable drive when there
are folders in the removable drive.
For those removable drives where folders are indicated, you can only drop
DSS files that are displayed in other applications or the Dictation ListView
onto the folder.
Right-Click Menu (Removable Drive Folder)
Rename Folder
Rename the selected folder.
Download Folder A / B / C
Downloads the files in Folder A/B/C to the Download Tray.
Download is possible from the selected folder.
Header Bar
These are the items that are currently shown.
When you click an item, the files are sorted according to the clicked item in
ascending / descending order.
Detail of the Items That Are Displayed on the Header Bar
Setup of displayed items
Sort by Items
26
Dictation ListView
The Dictation ListView is the main interface for the DSS Player 2000.
The list view displays detailed information about folders and storage media that are selected
with Dictation TreeView or Dictation Device TreeView Device TreeView and all DSS and WAVE
files that are in the Digital Voice Recorder. However, for WAVE files, priority and comment
information are not displayed.
If you select one of the DSS files using the mouse or the up and down arrow keys, the file is
activated, displaying the current playback position, recording length, priority, etc., in appropriate
fields. You can also select multiple files by selecting the files while pressing the Shift or Ctrl key.
In addition, if the priority of the file is high, all the displayed information of the files are
displayed in red.
Double-click the DSS file to play.
Right-Click Menu
If you select and right-click a file in the Dictation ListView, the following
items are displayed in a pop-up menu.
Edit DSS Files
Convert to WAV Files…
Move to Folder…
Delete
Download All
Upload DSS Files…
Send
Edit Comments
Properties
27
Detail of Items That Are Displayed on the Header Bar
Displayed Items
File Name
Date
Date / Time
Recording Time
Comment
Recording mode
File Type
Details
Priority.
You can set a priority in the Remote Dictation Window.
DSS file:
For high priority files, the items are displayed in red.
WAVE file: Not displayed.
File name. In front of the file names, the corresponding icon for each file is
attached.
Date and time when the file was recorded.
DSS file: Date and time of when it was first created as a Windows file.
WAVE file: Same as the "date created."
Length of the file recorded.
DSS file: Notes attached by Edit Comments are displayed.
WAVE file: Not displayed
Recorded mode of the file.
DSS file:
Standard / Long
WAVE file:
Sample rate, Stereo / Mono
Type of file.
DSS file: DSS File
WAVE file: WAV File
28
Edit Item Name
You can edit which items are displayed using [Item Settings ] on the View
menu. The Dictation ListView shows the specified number of items. If the
items do not fit in the width of the Dictation ListView, a horizontal scroll bar is
displayed. You can also change the size of the Dictation Window, TreeView,
and List View in a similar fashion.
Details of the displayed items
Sort by items
Sort by Items
Click an item name on the Header Bar to sort the displayed files according to
the data of the clicked item name in ascending or descending order (click [File
Name] on the Header Bar to sort by file name, for example.) If files are sorted
in ascending order,
appears to the right of the item name used to sort the
appears.
files. If files are sorted in descending order,
You can also use Drag & Drop to move the position of the item.
Details of the displayed items
Edit item names
Status Bar
Displays the current status or a description of the menu command.
29
Dictation Window Commands
File Menu
New DSS File
Starts the Remote Dictation Window and opens a new DSS file. This command is invalid if the
DS-2000 is not connected to the PC.
Edit DSS File
Opens the files that are currently selected in the Dictation ListView (the active file if multiple
files are selected) in the Remote Dictation Window.
Convert to WAV File
Converts the files currently selected in the Dictation ListView (all selected files if multiple
files are selected) into WAVE Format and saves them to the specified folder. The names of
the WAVE files that are created are the same as those of the DSS files with the file extension
changed to .wav.
Rename Folder
You can rename the folder names of Folder A, B, and C in the Dictation TreeView. The folder
name can be 20 characters long. However, the following characters are not allowed:
\, /, :, *, ?, ", <, >, |
Import Files
Displays a dialog box and copies or moves the DSS or WAVE Files in a preexisting folder to
the Download Tray folder.
Export Files
Copies the files that are selected in the Dictation List View to a preexisting folder of your
choice.
This function can be used for backup.
Properties
The properties of a file is displayed.
Exit
Exits the DSS Player 2000.
30
Edit Menu
Copy
Copies the files that are currently selected in the Dictation ListView to the clipboard.
Paste
Pastes the DSS or WAVE files that are currently copied to the clipboard. You can paste the
files to folders that accept drag and drop operation, or the Dictation ListView.
Select All
Selects all the voice files that are displayed in the Dictation ListView.
Delete
Deletes the files that are selected in the Dictation ListView.
Move to Folder
Copies the files that are selected in the Dictation ListView to a specified folder (in the Dictation
TreeView).
31
View Menu
Current View
Switches the file display in the Dictation ListView.
Selected Item
Files Displayed in the Dictation ListView
DSS Files
DSS Files Only
WAV Files
WAVE Files Only
All Files
Both
DSS files and
WAVE files
A check mark is placed beside the currently selected display mode.
Item Settings
A Dialog box opens in which you can edit the items that are displayed on the Header Bar of the
Dictation ListView.
The items in the left edit box are currently not displayed on the Header Bar.
The items in the right edit box are displayed from the left end of the header bar in an ascending
order.
You can show/hide the items in the edit box. You can also change the position on the Header Bar.
However, priority and file name must be displayed.
Details of the Items That Are Displayed on the Header
Sort
Displays the item that is currently displayed on the Header Bar on a pop-up menu. Click an item in
the pop-up menu to sort the display on the Dictation ListView according to the selected item.
Display Playback Control
Opens the active file in the Playback Control Window.
Refresh
Refreshes the information about the files in the currently selected directory and redisplays the
information in the Dictation ListView.
32
Tools Menu
Detect Device
Updates the information about devices that cannot be automatically detected. If a new
device is detected, it is shown in the Device TreeView.
Rename DS-2000 Folder
You can rename the folder names of Folder A, B, and C in the DS-2000 Folder. The folder
name can be 8 characters long and spaces can be used.
However, the following characters are not allowed:
# $ ' @ [ ] \ ~ | ^ { }
Edit Comments
Edit the comments in a DSS file. You can enter up to 100 characters for the comment.
Play
Plays the current active voice file in the Dictation ListView on your PC. The playback start
position in this case is the current display position of the Position Control on the play bar. When the
end of the file (right end of the play bar) is reached, playback automatically stops. The Position
Control either rewinds or remains at the last position on the play bar until the next time playback is
executed. If you execute the playback command when the Position Control is at the end of the file,
the playback starts from the beginning of the file.
The playback of the files in the DS-150 are carried out on the DS-150, and the playback always
starts from the beginning of the file.
Stop
Stops playback, fast forward, or rewind.
Fast Forward
Fast-forwards the file.
Rewind
Rewinds the file.
Intro Scan
You can play the initial five seconds of the files in the selected folder. Scanning starts from
the first file and continues until all the DSS files in the selected folder are played. When all DSS
files have been scanned, a Beep is heard. For DSS files that are less than five seconds long, the
file is played to the end and the scanning continues to the next DSS file.
When the files in the selected folder are scanned, the DSS file that is being played is highlighted.
If you interrupt the scanning operation by stopping or changing the playback position, the scanning
stops at that point and the current file becomes the active file. In addition, if you execute scanning
while scanning is in progress, the operation is aborted and the current file is played until the end of
the file or until it is stopped.
OLE Setting
With this command, you can select whether the OLE Drag & Drop function embeds the object
(Embedded) or links the object (Linked). By placing a check mark on the desired operation, the
process that the application will use will be specified.
33
Because an embedded object actually becomes a part of the target file, the file size of the target file
will be larger than linked objects. However, since you do not have to worry about the link between
the target application and the DSS source file, embedded objects are convenient in file transfers
such as e-mail attachments. When a file is embedded into another application, a copy of the entire
DSS file is moved to the target client application and literally embedded into the executable file.
Linked objects are best suited for network environments where the link between the target
application and the DSS source file can easily be maintained. The actual DSS file is not copied to
the target application; only the path that defines the position of the DSS file is stored in the OLE
icon. If you open the OLE icon within the target application, the DSS file is linked using the path
definition. Then, playback is executed through the link.
Enable Function Keys
This is used to enable or disable the functions of the function keys. When a check mark appears
next to this command, the function keys are enabled.
Setting of Function Keys
A dialog box appears for you to assign the following functions to the F2 through F12 function keys
(you cannot use F5):
- FF
- REW
- PLAY / STOP
- Volume Up
- Speed Up
- Disable Function Keys
Options
Download options for download.
On the Download page, you can check an option for [downloads all data after device detection].
Set Auto Back Space
You can select the time for "Auto Back Space" from this menu. When playback is stopped, position
control determines time (Auto Back Space) to back up.
The times you can select are as follows.
0.0, 0.3, 0.5, 1.0, 2.0, 3.0, 5.0 sec
34
Download Menu
Download Folder A
Downloads the DSS files in Folder A of the DS-2000, DS-150/320, Smart Media Card, or
Removable Drive (with a displayed folder) to Folder A of the Download Tray. If multiple devices
(DS-2000, DS-150/320, Smart Media Card, and Removable Drive) are detected in the Device
TreeView, a dialog box appears for you to select which device to download from.
Download Folder B
Downloads the DSS files in Folder B of the DS-2000, DS-150/320, Smart Media Card, or
Removable Drive (with a displayed folder) to Folder B of the Download Tray. If multiple devices
(DS-2000, DS-150, Smart Media Card, and Removable Drive) are detected in the Device
TreeView, a dialog box appears for you to select which device to download from.
Download Folder C
Downloads the DSS files in Folder C of the DS-2000, DS-150/320, Smart Media Card, or
Removable Drive (with a displayed folder) to Folder C of the Download Tray. If multiple devices
(DS-2000, Smart Media Card, and Removable Drive) are detected in the Device TreeView, a dialog
box appears for you to select which device to download from.
Download Selected Files
Downloads the DSS files that are displayed in the Dictation ListView to the Download Tray folder.
The download destination folder is the same as the download source folder. However, if there are
no folders in the Removable Drive, the files in the drive are downloaded to Folder A.
Device Name
Folders Available
DS-2000
A, B, C
DS-150/320
A, B
Smart Media Card
A, B, C
Removable Drive
A, B, C
Download All
Downloads all DSS files in the recorders and cards that are currently detected in the Device
TreeView to the same folders in the Download Tray. However, if files are downloaded from a
Removable Drive that does not have a folder, they are downloaded only to Folder A. If multiple
devices are detected in the Device TreeView, a dialog box appears for you to select which devices
to download the DSS files from. In addition, even if the folder names are changed, the files are
downloaded to the original Folder A, B, and C of the Download Tray.
Upload DSS Files
Uploads the DSS files that are currently selected in the Dictation ListView to the device detected in
the device window. If multiple devices are detected in the Device TreeView, a dialog box appears
for you to select which devices to upload the DSS files to.
Transfer The Date/Time
Transfers the date/time data of the PC to the recorder.
Send Author ID
Use this to transfer "Author ID" to your recorder.
35
Author ID
It is possible to create and send up 10 different Author Id’s to the DS-2000. Here, the following
characters can be used.
Number
'0' – '9'
Alphabet 'A' – 'Z'
Underscore
'_'
Moreover, capital letters must be used. If you use small letters, they will be converted to capital
letters.
If you push [Save] button, the ID’s will be registered in your registry without being transmitted to
the DS-2000. If you push the [Send] button, ID’s will be transmitted to the DS-2000.
36
Voice Recognition Menu
Start Voice Recognition
This command is activated only when IBM's voice recognition application such as ViaVoice98,
ViaVoice Millennium, or later versions of these applications are installed. When this command is
active, SpeakPad starts and the file selected in the Dictation ListView is automatically
converted to text. This command is applicable only to DSS files that have been recorded in
Standard mode. This command is disabled when a DSS file that has been recorded in Long mode
is selected. It is also disabled while voice recognition is in progress.
If multiple DSS files are selected in the Dictation ListView, only those files that are recorded in
Standard mode are extracted, and voice recognition is performed on the files one by one. You can
monitor the progress of the voice recognition operation with the [Voice Recognition Progress ].
Range of Voice Recognition
This command is used to select the range of the file to be converted to text. Choose [Entire File] or
[Between Index Marks]. A check mark appears by the selected choice.
If you select the entire file, the voice data from the beginning to the end of the file is converted to
text. If you select Between Index Marks, the voice data between the first and second index marks is
converted to text. If only one index mark exists, the data between this index mark to the end of the
file is converted to text. If there are no index marks, the entire file is converted to text.
Automatic Playback
If this item is checked, the screen switches to the Playback Control Window immediately after
starting the voice recognition operation. If you exit the Playback Control Window, playback
continues on the Dictation Window.
In this case, if the range to perform voice recognition is between index marks, playback starts from
the first index mark position.
Display Voice Recognition Progress
A dialog box appears and the voice recognition progress for each file is shown.
The file that is file which is being transcribed by voice recognition is indicated as [Recognition
Processing].
Those files that are standing by are indicated as [Waiting].
The current voice recognition transcription can be canceled by pushing the [end of voice
recognition] button.
You can remove the files that are waiting on the list with the [Cancel] button.
37
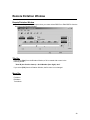
Remote Dictation Window
Remote Dictation Window
-
The Remote Dictation Window opens when you create a New DSS File or Edit DSS File from the
file menu in the Dictation Window.
Title Bar
If you select [New] from the Dictation Window, a file is created with a name in the
following format:
"User ID (the first four letters) + Serial Number (four digits) .dss"
If you select [Edit] from the Dictation Window, the file name is not changed.
Menu Bar
File Menu
Edit Menu
Tools Menu
38
Tool Bar
[New]
Creates a new DSS file in the Message Tray.
[Save]
Saves the file that is currently being edited in the Message Folder. If you open and edit a DSS
file from a folder other than the Message Tray folder in the Dictation Window, the edited data is
saved to the Message Tray with the same file name. If a file with the same name already exists, a
character is added to the end of the file name (xxxxxxxx_1.dss format) and saved.
[New Index Mark]
(Index
Index marks can be assigned to any position in the selected DSS file. By clicking
Mark Skip Button), you can move to the index mark position of the file at any time. According to the
DSS Specification, a total of 16 index marks can be stored in each file. All index marks remain
attached to the file until they are deleted.
To insert an index mark during playback, start playback, move to the desired position (play the file
or drag the Position Control to the appropriate position), and select "New Index Mark" on the Tool
bar.
To insert an index mark while playback is stopped, press "New Index Mark" at the desired position
in the DSS file.
[Delete Index Mark]
To remove an index mark, first use the [Index Mark Skip Button] or the [View All Index Marks]
command to move to the desired index mark. While playback is stopped, press Delete Index Mark
at the desired position.
[View All Index Marks]
A dialog box opens. Double-click the time at the index mark or select the time and click the [Skip]
button to move to the selected index marks. In addition, you can delete the selected index marks
by selecting the mark while playback is stopped and clicking [Delete].
[Start Partial Erase / Undo]
Begin choosing a section of the DSS file that is currently being edited from the current playback
position. When this operation starts, the command is replaced with an undo erase command
(toggle command).
[Execute partial erase]
Deletes the section between where the Start Partial Erase command was executed and the
position where the Execute Partial Erase was chosen.
39
[End]
Ends the editing of the DSS file and returns to the Dictation Window. If the file being edited is
not saved, a dialog box appears for you to select whether to save or discard the changes.
40
Position Indicator
Displays the time of the current position (HH:MM:SS Format) during
recording, playback, or while changing the playback position.
Length Indicator
While Playing Displays the recording length.
While Recording
Displays the available recording length of the file.
Insert Check Box
To insert recordings into previously recorded passages, select this check box.
If the check is not present, previously recorded information may be
overwritten.
Set Priority
If you select this check box, the DSS file that is being edited will be increased
in Priority. Consequently, all the displayed information of this file will be
displayed in red in the Dictation Window.
Record Button
Starts the recording of a DSS file using DS-2000.
If [Insert Record] is not checked, previously recorded information may be
overwritten.
Stop Button
Stops record or playback of the DSS file.
Play Button
Starts the playback of the DSS file.
Index Mark Skip Button
Each time you press this button, the Position Control moves to the next index
mark position. Index marks are displayed as red triangles on the Time Axis. If
the current playback position is at the end of the file, the Position Control
moves to the beginning index mark. Also, it is invalid if there is no index mark.
Index Mark
41
Recording Modes
Click to switch the quality of the recording between
SP (Standard Mode) and LP (Long Mode).
DSS Files whose recording mode is SP and sensitivity control is DICT can be
transcribed to text automatically by using the Voice Recognition option.
Sensitivity Control
Click to switch the quality of the recording between
CONF (Conference) and DICT (Dictation)
DSS Files whose recording mode is SP and sensitivity control is DICT can be
transcribed to text automatically by using the Voice Recognition option.
Skip to End
Skips to the end of the file.
Position Control
This knob used to change the current recording/playback.
If you drag the Position Control during playback, the playback stops while the
control is being dragged. When you release the control, playback resumes at
that position.
Play Bar and Position Control
Play Bar
Click on the play bar to instantly move the Position Control to the cursor
position. If index marks are present, they are displayed with red triangles
below the play bar.
Play Bar and Position Control
Skip to Start
Skips to the beginning of the file.
Time Control Slider
Enables switching of the Time Axis display up to five levels:
full scale, one minute, 10 minutes, 30 minutes, and one hour.
The displayed levels vary depending on the recording length.
Time Axis and Time Control Slider
42
Time Axis
The Time Axis has five display modes:
full scale, one minute, 10 minutes, 30 minutes, and one hour.
If index marks are present, they are displayed with red triangles.
Time Axis and Time Control Slider
Status Bar
Message Area
Displays a description of each command.
During recording, the volume of the recorded voice is displayed in real-time.
Status Bar
Current Status
Current playback / recording positions are displayed.
Status
Stopped
Playing
Recording
Pause Recording
Playing Pause
Rewinding
Play Speed 1.5 Times
Display of Status Bar
Stop
Playing
Recording
Stop Recording
Stop Playing
Rewinding
Play Speed 1.5 Times
Status Bar
Author
When [new DSS file] is chosen from a main screen
- The user ID of DS-2000 is displayed.
Send Author ID
Play Bar and Position Control
[Play Bar] and [Position Control] are graphics that indicate the current position of the file being
played. You can quickly move the playback position forward or backward by dragging the [Position
Control] or clicking in front or back of the [Position Control].
In addition, the [Index Mark] is displayed using a red triangle on the [Time Axis]. Up to 16 index
marks can be used on each DSS file.
A motion of a keyboard and a slider
43
Time Axis and Time Axis Control Slider
Time Axis is displayed below the play bar with the same width as the play bar. You can change the
scale of the Time Axis by moving the Time Axis Control Slider knob up and down. The type of Time
Axis varies depending on the recording length. The relationship is as follows.
Recording Length
Scale Display
0 to 1 minute
Full scale
1 to 10 minutes
Full scale and 1 minute
10 to 30 minutes
Full scale, 1 minute, and 10 minutes
30 to 60 minutes
Full scale, 1 minute, 10 minutes, and 30 minutes
1 hour or longer
Full scale, 1 minute, 10 minutes, 30 minutes, and 1 hour
The Time Axis Control Slider automatically determines the applicable Time Axis from the recording
length of the current active file and updates the slider scale. For example, for a file with a recording
length of 50 minutes, four types of scales, full scale, 1 minute, 10 minutes, and 30 minutes, apply.
Thus, four levels of slider scale will be displayed. If the recording length of a file is less than 1
minute, only full scale applies. Thus the Time Axis Control Slider does not operate.
If the Time Axis is set to some scale other than full scale and the position control reaches the right
end of the play bar during playback, the position control instantly moves to the left end and the Time
Axis display is updated. The last scale mark of the Time Axis is displayed in red and the fractional
time is displayed. If you drag the position control to the left end or the right end of the play bar,
accelerated fast forward or rewind takes place, updating the scale of the Time Axis and the current
playback position.
In addition, the [Index Mark] is displayed using a red triangle on the [Time Axis]. Up to 16 index
marks can be used on each DSS file.
A motion of a keyboard and a slider
Playback Position and Length
The hours, minutes, and seconds of the current playback position of the voice file is shown in the
following format:
xx H xx M xx S
The recording length is also shown using the same format.
A motion of a keyboard and a slider
The position of the slide control can also be changed from the keyboard.
Key
Play bar Moves
Slider Moves
Up, Left
to the left
Upwards
Down, Right
to the right
Downwards
Home
to the head of a file
to the top
End
to the last of a file
to the bottom
44
Volume Control Slider
If your sound card supports electronic volume control,
you can use the [Volume Control Slider] to adjust the output volume on the sound card.
By selecting (clicking) the [Volume Control Slider],
you can also adjust the volume using the arrow keys.
Note that some older sound cards only support a manual dial knob volume control, and in this case,
the [Volume Control] function cannot be used.
A motion of a keyboard and a slider
45
Remote Dictation Commands
File Menu
New
Creates a new DSS file in the Message Tray.
Save
Saves the file that is currently being edited in the Message Folder. If you open and edit a DSS
file from a folder other than the Message Tray folder in the Dictation Window, the edited data is
saved to the Message Tray with the same file name. If a file with the same name already exists, a
character is added to the end of the file name (xxxxxxxx_1.dss format) and saved.
Exit
Exits the editing of the DSS file and returns to the Dictation Window. If the file being edited is
not saved, a dialog box appears for you to select whether to save or discard the changes.
Edit Menu
[Start Partial Erase / Undo]
Begin choosing a section of the DSS file that is currently being edited from the current playback
position. When this operation starts, the command is replaced with an undo erase command
(toggle command).
Execute Partial Erase
Deletes the section between where the Start Partial Erase command was executed and the
position where the Execute Partial Erase was chosen.
Tools Menu
New Index Mark
Index marks can be assigned to any position in the selected DSS file. By clicking the Index Mark
Skip Button, you can move to the index mark position of the file at any time. A total of 16 index
marks can be stored in each file. All index marks remains attached to the file until they are deleted.
To insert an index mark during playback, start playback, move to the desired position (play the file
or drag the Position Control to the appropriate position), and select New Index Mark on the Tool
bar.
To insert an index mark while playback is stopped, simply execute New Index Mark at the desired
position of the DSS file.
Delete Index Mark
(Index Mark Skip Button) or the [View All Index
To remove an index mark, first use the
Marks] command to move to the desired index mark. While playback is stopped, press Delete
Index Mark at the desired position.
46
View All Index Marks
A dialog box opens. Double-click the time at the index mark or select the time and click the [Skip]
button to play the file from the selected time position.
In addition, you can delete the index mark by selecting the mark while playback is stopped and
clicking [Delete].
47
Playback Control Window
-
Playback Control Window
Click the following figure to display a detailed description. The Playback Control Window appears
when you choose a DSS file by double-clicking it in Explorer, for example.
Title Bar
Displays the path of the active file.
Play Bar and Position Control
[Play Bar] and [Position Control] are graphics that indicate the current position of the file being
played. You can quickly move the playback position forward or backward by dragging the [Position
Control] or clicking in front or back of the [Position Control].
In addition, the [Index Mark] is displayed using a red triangle on the [Time Axis]. Up to 16 index
marks can be used on each DSS file.
A motion of a keyboard and a slider
Time Axis and Time Axis Control Slider
Time Axis is displayed below the play bar with the same width as the play bar. You can change the
scale of the Time Axis by moving the Time Axis Control Slider knob up and down. The type of Time
Axis varies depending on the recording length. The relationship is as follows.
Recording Length
Scale Display
0 to 1 minute
Full scale
1 to 10 minutes
Full scale and 1 minute
10 to 30 minutes
Full scale, 1 minute, and 10 minutes
30 to 60 minutes
Full scale, 1 minute, 10 minutes, and 30 minutes
1 hour or longer
Full scale, 1 minute, 10 minutes, 30 minutes, and 1 hour
The Time Axis Control Slider automatically determines the applicable Time Axis from the recording
length of the current active file and updates the slider scale. For example, for a file with a recording
length of 50 minutes, four types of scales, full scale, 1 minute, 10 minutes, and 30 minutes, apply.
Thus, four levels of slider scale will be displayed. If the recording length of a file is less than 1
minute, only full scale applies. Thus the Time Axis Control Slider does not operate.
48
If the Time Axis is set to some scale other than full scale and the position control reaches the right
end of the play bar during playback, the position control instantly moves to the left end and the Time
Axis display is updated. The last scale mark of the Time Axis is displayed in red and the fractional
time is displayed. If you drag the position control to the left end or the right end of the play bar,
accelerated fast forward or rewind takes place, updating the scale of the Time Axis and the current
playback position.
In addition, the [Index Mark] is displayed using a red triangle on the [Time Axis]. Up to 16 index
marks can be used on each DSS file.
A motion of a keyboard and a slider
Playback Position and Length
The hours, minutes, and seconds of the current playback position of the voice file is shown in the
following format:
xx H xx M xx S
The recording length is also shown using the same format.
A motion of a keyboard and a slider
The position of the slide control can also be changed from the keyboard.
Key
Play bar Moves
Slider Moves
Up, Left
to the left
Upwards
Down, Right
to the right
Downwards
Home
to the head of a file
to the top
End
to the last of a file
to the bottom
Volume Control Slider
If your sound card supports electronic volume control,
you can use the [Volume Control Slider] to adjust the output volume on the sound card.
By selecting (clicking) the [Volume Control Slider],
you can also adjust the volume using the arrow keys.
Note that some older sound cards only support a manual dial knob volume control, and in this case,
the [Volume Control] function cannot be used.
A motion of a keyboard and a slider
Speed Control Slider
By moving the [Speed Control Slider] knob up and down, you can control the playback speed of the
DSS file without affecting the voice pitch (this function cannot be used on WAVE files). The
playback speed is faster when the knob is above the center level and slower when the knob is
below the center level. The speed control range is as follows (The unit is %):
Below <50
->
60
75
80
100
125
133
150
Above
200
By selecting (clicking) the [Speed Control Slider], you can adjust the playback.
A motion of a keyboard and a slider
49
Trouble Shooting
No Sound
Check the connection
Check that the device is connected to your PC and that the power is ON.
Check the speaker
Check that the speaker volume is not set to the minimum setting. If there is no problem,
continue.
Check the sound card
Check whether a manual dial knob volume control is present on your sound card. If there is,
adjust the volume using the knob.
Check the Playback Volume
[Windows 95 and Windows NT 4.0]]
From the Windows [Start] menu, select
Settings,
Control Panel,
Multimedia, Audio
Here, if the [Show volume control on the taskbar] check box is not selected, select it. Check that
[Volume] is not set to the minimum setting.
on the taskbar to start [Master Volume Control]. Check that the volume of
Double-click
[Master] and [Wave] are not set to the minimum setting and that [Mute] check box is not selected.
(
Play WAVE File )
[Windows 98]
From the Windows [Start] menu, select
Settings,
Control Panel,
Multimedia, Audio
Check that [Volume] is not set to the minimum setting.
Next click
to start [Master]. Check that the volume of [Master] and [Wave] are not set to
the minimum setting and that [Mute] check box is not selected.
(
Play WAVE File).
50
[Windows 2000]
From the Windows [Start] menu, select
Settings,
Control Panel,
Sound and MultiMedia, Audio, Master
Check that the volume of [Master] and [Wave] are not set to the minimum setting and that [Mute]
check box is not selected.
(
Play WAVE File).
Play WAVE File
From the Windows [Start] menu, select
Programs, Accessories,
(Windows 95/NT 4.0) Multimedia
(Windows 98/2000) Entertainment
Sound Recorder, File, Open
Then, open ":\Windows\Media\" and execute playback of any WAVE File (*.wave file).
If the WAVE file does not play or it is playing but the sound cannot be heard, consult your
sound card or PC vendor.
Cannot Connect to DS-2000
1. After connecting the DS-2000 to your PC using an USB cable, check that the LCD display of
the Digital Voice Recorder shows "REMOTE".
2. If "REMOTE" is not displayed, remove the communication cable from the DS-2000 and check
that the stop mode or the hold switch is not enabled.
3. Then, reconnect the communication cable to the DS-2000 and check that the LCD display
shows "REMOTE".
4. If the LCD display still does not show "REMOTE," the communication driver may not be
working properly. In such case, check the Communication Driver Problembelow.
51
Communication Driver Problem
[Windows 95]
Even if you install the USB driver on Windows 95, you cannot use the DS-2000 through the
USB connection.
[Windows 98,Windows Me and Windows 2000]
From the Windows [Start] menu, select
Settings,
Control Panel,
System
Next, find the DS-2000 (USBDSS Device for DS-150 and DSSUSB1 Device for DS-2000) at the
root of the [Device Manager] page and check that it is operating properly. If the DS-2000 is not
working properly, enable its use.
[Windows 95, and Windows NT 4.0]
From the Windows [Start] menu, select
Settings,
Control Panel,
Devices
Next, select the DS-2000 (USBDSS Device for DS-150/320 and DSSUSB1 Device for DS-2000)
under [Devices] and click [Hardware Profiles]. Check that the [Status] of the DS-2000 is
[Enabled]. If the [Status] is [Disabled], click [Enable] to set the [Status] to [Enabled].
Other Device Problems
For other device problems such as Smart Media Card and removable card, see the manual for
these devices.
Note that the DSS Player 2000 does not detect DS-150/320 recorders and SmartMedia Cards
connected via RS-232C.
52
Technical Assistance And Support
- Technical Hotline Number in the U.S. and Canada
1-888-553-4448
- User Support E-mail address in the U.S. and Canada
[email protected]
- Technical Hotline Number in Europe
Toll free number
00800 67 10 83 00
available for Austria, Belgium, Denmark, France, Germany, Netherlands, Norway,
Sweden, Switzerland, United Kingdom
Charged numbers
+49 180 5-67 1083
available for Finland, Italy, Luxemburg, Portugal, Spain and Czech Republic
+49 40 23773 899
available for Greece, Croatia, Hungary and the rest of Europe
- User Support E-mail address in Europe
[email protected]
- For technical questions and support about IBM ViaVoice.
http://www.ibm.com/software/speech/support/faqolympus.html
53
OLYMPUS OPTICAL CO., LTD.
San-ei Building, 22-2, Nishi Shinjuku 1-chome, shinjuku-ku, Tokyo, Japan.
Tel. 03-3340-2211
OLYMPUS AMERICA INC.
Two Corporate Center Drive, Melville, NY 11747-3157, U.S.A.
Tel. 1-800-622-6372
OLYMPUS OPTICAL CO (EUROPA) GMBH.
(Premises/Goods delivery) Wendenstrasse 14-18, 20097 Hamburg, Germany.
Tel. 040-237730
(Letters) Postfach 10 49 08. 20034 Hamburg. Germany.
OLYMPUS OPTICAL CO.(U.K.) LTD.
2-8 Honduras Street, London EC1Y OTX, United Kingdom
Tel. 020-7253-2772
http://www.olympus.com/
P2-2739-01
54