1
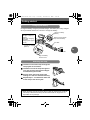
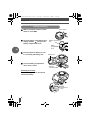
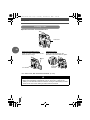
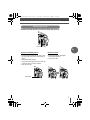
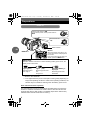
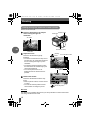
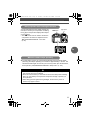
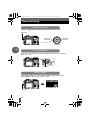
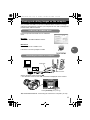
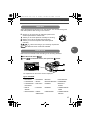
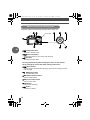
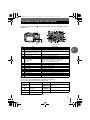
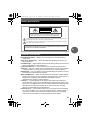
s003_En-Fr-Es-De.book Page 1 Tuesday, December 27, 2005 4:34 PM ENGLISH 2 FRANÇAIS 30 ESPAÑOL 58 DEUTSCH 86 s003_En-Fr-Es-De.book Page 2 Tuesday, December 27, 2005 4:34 PM Contents • Thank you for purchasing an Olympus digital camera. Before you start to use your new camera, please read these instructions carefully to enjoy optimum performance and a longer service life. • This manual explains shooting and playback basics. For details on functions, read the advanced manual. Keep this manual in a safe place for future reference. • We recommend that you take test shots to get accustomed to your camera before taking important photographs. • The screen and camera illustrations shown in this manual were produced during the development stages and may differ from the actual product. This manual explains shooting preparation and easy techniques for shooting and playback. This manual is only for quick reference and should be read first to learn basic camera operation. Getting started . . . . . . . . . . . . . . . . . . . . . . . . . . . . . . . . . . . . . . . . . . . . . . . . . . . . 3 Charging the battery........................................................................................... 3 Attaching the strap ............................................................................................. 3 Loading the battery............................................................................................. 4 Attaching a lens to the camera........................................................................... 5 Inserting a card................................................................................................... 6 Removing the card ............................................................................................. 7 Preparations . . . . . . . . . . . . . . . . . . . . . . . . . . . . . . . . . . . . . . . . . . . . . . . . . . . . . . 8 Power on ............................................................................................................ 8 Date/time setting ................................................................................................ 9 Shooting . . . . . . . . . . . . . . . . . . . . . . . . . . . . . . . . . . . . . . . . . . . . . . . . . . . . . . . . 10 Viewing through the viewfinder to take a picture .............................................. 10 Taking a picture while viewing the monitor....................................................... 11 When the camera stops operating ................................................................... 11 Playback/Erasing . . . . . . . . . . . . . . . . . . . . . . . . . . . . . . . . . . . . . . . . . . . . . . . . . 12 Playing back images ........................................................................................ 12 Close-up playback ............................................................................................ 12 Erasing images................................................................................................. 12 Viewing and editing images on the computer . . . . . . . . . . . . . . . . . . . . . . . . . . 13 Installing the OLYMPUS Master....................................................................... 13 Connecting the camera to a computer ............................................................. 13 Basic operation . . . . . . . . . . . . . . . . . . . . . . . . . . . . . . . . . . . . . . . . . . . . . . . . . . 14 Holding the camera .......................................................................................... 14 Adjusting the viewfinder’s diopter ..................................................................... 14 Adjusting the monitor’s angle ........................................................................... 14 Mode dial.......................................................................................................... 15 SCENE mode ................................................................................................... 15 Buttons used during shooting mode ................................................................. 16 Operations using the control panel . . . . . . . . . . . . . . . . . . . . . . . . . . . . . . . . . . 17 Menu function. . . . . . . . . . . . . . . . . . . . . . . . . . . . . . . . . . . . . . . . . . . . . . . . . . . . 18 Erasing all images ............................................................................................ 18 Selecting a language ........................................................................................ 18 OLYMPUS Master software . . . . . . . . . . . . . . . . . . . . . . . . . . . . . . . . . . . . . . . . . 19 Specifications . . . . . . . . . . . . . . . . . . . . . . . . . . . . . . . . . . . . . . . . . . . . . . . . . . . . 20 Camera specifications ...................................................................................... 20 Battery/charger specifications .......................................................................... 22 Safety precautions . . . . . . . . . . . . . . . . . . . . . . . . . . . . . . . . . . . . . . . . . . . . . . . . 23 En 2 s003_En-Fr-Es-De.book Page 3 Tuesday, December 27, 2005 4:34 PM Getting started Charging the battery Charge the battery using the provided charger. The battery is not fully charged when purchased. Before use, be sure to charge the battery. Lithium ion battery (BLM-1) Charging indicator Red light: Charging in progress Green light: Charging completed (Charging time: Approx. 5 hours) Remove the protection cap from the battery. 3 AC cable 1 Lithium ion charger (BCM-2) 2 En AC wall outlet Align the battery with the arrow Attaching the strap 1 Thread one end of the strap through the strap eyelet on the camera. 2 Thread the end of the strap through the ring, then thread it through the stopper as indicated by the arrows. 1 2 3 Pull the other side of the strap tight, making sure that it is fastened securely. 4 Repeat steps 1 - 3 to attach the other end of the strap to the other eyelet. 3 Notes • Attach the strap correctly as shown above so that the camera does not fall off. If the strap is attached incorrectly and the camera falls off, Olympus is not responsible for any damage. 3 s003_En-Fr-Es-De.book Page 4 Tuesday, December 27, 2005 4:34 PM Getting started Loading the battery 1 Make sure that the camera’s power Power switch switch is set to OFF. 2 Push the battery compartment lock slightly towards and open the battery compartment cover. Battery compartment lock Battery compartment cover En 2 3 Load and push the battery in until it is locked by the battery lock. Battery lock 3 4 Close the battery compartment until a click is heard. Direction indicating mark Unloading the battery Press the battery lock to unlock and remove the battery. 2 1 4 Battery compartment cover s003_En-Fr-Es-De.book Page 5 Tuesday, December 27, 2005 4:34 PM Getting started Attaching a lens to the camera 1 Remove the body cap from the camera and the rear cap from the lens. 2 2 1 Rear cap 1 Body cap 2 Align the lens attachment mark (red) on the camera with the alignment mark (red) on the lens, then insert the lens into the camera’s body. Rotate the lens clockwise until you hear it click. Lens attachment mark (Red) Alignment mark (Red) 2 1 3 Remove the lens cap. Removing the lens from the camera While pressing the lens release button, remove the lens from the camera by rotating it counterclockwise. Lens cap Lens release button 2 1 • For usable lenses, gADVANCED MANUAL (P. 187). 5 En s003_En-Fr-Es-De.book Page 6 Tuesday, December 27, 2005 4:34 PM Getting started Inserting a card Open the card cover and insert the card. Card cover En Compact Flash/Microdrive xD-Picture Card Insert the card’s contact area into the slot as far as it can go. Insert the card as shown in the illustration until it is locked into place. WMark xD-Picture Card slot CF card slot • For usable cards, gADVANCED MANUAL (P. 163). Notes • Do not push the card in with a pen or similar hard or pointed object. • Never open the battery compartment cover or card cover, or remove the battery or card while the camera is turned on. Doing so could destroy the data stored on the card. Once destroyed, data cannot be restored. 6 s003_En-Fr-Es-De.book Page 7 Tuesday, December 27, 2005 4:34 PM Getting started Removing the card Remove the card after the card access lamp light goes off. Card access lamp En Compact Flash/Microdrive xD-Picture Card • Press the eject button all the way in and let it pop out, then press it all the way in again. • The card will be ejected. • If you press the eject button too hard, the card may jump out of the camera. • Pull out the card. • Press the inserted card lightly and it will be ejected. • Pull out the card. Eject button 7 s003_En-Fr-Es-De.book Page 8 Tuesday, December 27, 2005 4:34 PM Preparations Power on Set the power switch to ON. To turn off the power, set the power switch to OFF. Set the mode dial to P. SSWF indicator En Monitor INFO button When the camera is turned on, the control panel screen is displayed on the monitor. If the control panel screen does not appear, press the INFO button. Battery check When the camera is turned on or when remaining battery power is low, the battery check mark varies. Lights (green) Lights *1 (red) Remaining power level: High. *2 Remaining power level: Low. Charge soon. [BATTERY EMPTY] is displayed. Remaining power level: Exhausted. *1 Blinks in the viewfinder. *2 Your digital camera’s power consumption varies greatly depending on usage and operating conditions. Under some operating conditions, the camera may turn off without warning when the battery power is low. Dust reduction function operation The dust reduction function is automatically activated when the camera is turned on. Ultrasonic vibrations are used to remove dust and dirt from the image pickup device’s filter surface. The SSWF (Super Sonic Wave Filter) indicator blinks while dust reduction is working. 8 s003_En-Fr-Es-De.book Page 9 Tuesday, December 27, 2005 4:34 PM Preparations Date/time setting Date and time information is recorded on the card together with the images. The file No. is also included with the date and time information. Be sure to set the correct date and time before using the camera. 1 Press the MENU button. 2 Use ac to select [ ] , then press d. Use ac to select [X], then press d. • The selected location will be displayed in green. 3 Use ac to select one of the following date formats: “Y-M-D”, “M- MENU button D-Y”, “D-M-Y”. Then press d. i button En • The following steps show the procedure used when the date and time settings are set to “Y-M-D”. 4 Use ac to set the year, then press d to move to the month setting. • To return to the previous setting, press b. • The first two digits of the year “Y” are fixed. 5 Repeat this procedure until the date and time are completely set. • The time is displayed in the 24-hour format. For example, 2 p.m. will be displayed as 14:00. 6 Press the i button. • For a more accurate setting, press i when the time signal hits 00 seconds. The clock starts when you press the button. Notes • The date and time settings will be returned to the factory default settings if the camera is left without the battery for approximately 1 day. The settings will be canceled more quickly if the battery was only loaded in the camera for a short time before being removed. 9 s003_En-Fr-Es-De.book Page 10 Tuesday, December 27, 2005 4:34 PM Shooting Viewing through the viewfinder to take a picture Set the mode dial to P. 1 Place the AF frame on the subject while viewing through the viewfinder. Mode dial Shutter button AF frame En Card access lamp Viewfinder 2 Adjust the focus. Press the shutter button gently (halfway). • The focus is locked when a beep tone is sounded. The AF confirmation mark and the AF focusing frame light up in the viewfinder. • The shutter speed and aperture value that have been set automatically by the camera are displayed. • The control panel screen is not displayed when the shutter button is pressed. Halfway AF confirmation mark down Shutter speed Aperture value 3 Release the shutter. Press the shutter button all the way (fully). • When a picture is taken, a shutter sound is output. • The card access lamp blinks and the camera starts recording the picture. All the way down Rec view This allows you to display the picture you have just taken on the monitor while it is being recorded to the card. 10 s003_En-Fr-Es-De.book Page 11 Tuesday, December 27, 2005 4:34 PM Shooting Taking a picture while viewing the monitor You can also take a picture while viewing the monitor to confirm your composition. Pressing the u (live view) button displays the subject on the monitor. • The A/B button can be used to confirm the composition as well as to adjust the focus. gADVANCED MANUAL “Live view” (P. 36) A/B button u button En When the camera stops operating z To save battery power, the camera automatically enters the sleep mode (stand-by) and stops operating if not used for approximately 1 minute. The camera activates again as soon as you touch any button (the shutter button, arrow pad etc.). gADVANCED MANUAL “Sleep timer” (P. 116) Notes • Press the shutter button gently. If it is pressed hard, the camera may move and pictures may come out blurred. • Never remove the battery or card while the card access lamp mark is blinking. Doing so could destroy stored pictures and prevent storage of pictures you have just taken. • When taking pictures against strong backlight, the area of the picture in shadow may appear colored. 11 s003_En-Fr-Es-De.book Page 12 Tuesday, December 27, 2005 4:34 PM Playback/Erasing Playing back images Pressing the q (playback) button displays the last picture taken. q button Displays the previous frame WB OK AF Displays the next frame ISO Arrow pad En Close-up playback Each time you rotate the control dial towards U, the image is enlarged in steps of 2x - 14x. Control dial Erasing images Playback the image you want to erase and press the S (erase) button. Select [YES] and press the i button to erase. S button 12 s003_En-Fr-Es-De.book Page 13 Tuesday, December 27, 2005 4:34 PM Viewing and editing images on the computer The provided CD-ROM includes the OLYMPUS Master software for image editing and management. Install on your computer to view, edit or manage the pictures taken with the camera. Installing the OLYMPUS Master Insert the provided CD-ROM into the CD-ROM drive. Windows Click on the “OLYMPUS Master” button. Macintosh Double click on the “Installer” icon. En Follow the on-screen prompts to install. Connecting the camera to a computer USB cable Multi-connector Set the camera’s power switch to ON. • The selection screen for the USB connection is displayed on the monitor. Select [STORAGE], then press i. gADVANCED MANUAL “Connecting the camera to a computer” (P. 136) 13 s003_En-Fr-Es-De.book Page 14 Tuesday, December 27, 2005 4:34 PM Basic operation Holding the camera Pictures can sometimes appear blurred as a result of moving the camera while the shutter button is being pressed. To prevent the camera from moving, hold the camera firmly with both hands while keeping your elbows at your sides. When taking pictures with the camera in the vertical position, hold the camera so that the flash is positioned above the lens. Keep your fingers and the strap away from the lens and the flash. En Vertical grip Horizontal grip Adjusting the viewfinder’s diopter Remove the lens cap, and while looking though the viewfinder, rotate the diopter adjustment dial little by little. Diopter adjustment dial AF frame When you can see the AF frame clearly, adjustment is complete. Viewfinder Adjusting the monitor’s angle The monitor’s angle can be changed to suit the environment for taking pictures. 1 3 2 The angle can be changed within the dotted lines’ range. Notes • Do not exert strong force on the monitor. When mounting the camera on a tripod, take care not to hit the bottom of the monitor on the pedestal. • Make sure not to damage the rear side of the monitor and the metal fitting area. 14 s003_En-Fr-Es-De.book Page 15 Tuesday, December 27, 2005 4:34 PM Basic operation Mode dial Set to the targeted mode and turn on the camera. You can also change the dial mode position after turning on the camera. P: Allows you to shoot using an optimum aperture and shutter speed that the camera sets. A: Allows you to set the aperture manually for shooting. S: Allows you to set the shutter speed manually. M: Allows you to set the aperture and shutter speed manually. il&j/: Select according to your shooting requirement. : 20 different scene modes are available. En SCENE mode Select from the SCENE mode according to the shooting situations. 1 Set the mode dial to . 2 Use ac to select the scene, then press the i button. 1 2 The explanation for each scene mode is displayed. Types of SCENE • PORTRAIT • CHILDREN • MACRO • LANDSCAPE • SPORT • DOCUMENTS • NATURE MACRO • PANORAMA • LANDSCAPE+ • HIGH KEY PORTRAIT • CANDLE • BEACH & SNOW • NIGHT SCENE • SUNSET • UNDER WATER WIDE • LOW KEY • NIGHT+PORTRAIT • D IMAGE • FIREWORKS STABILIZATION • UNDER WATER MACRO 15 s003_En-Fr-Es-De.book Page 16 Tuesday, December 27, 2005 4:34 PM Basic operation Buttons used during shooting mode Frequently used functions during shooting can be easily set. 2 3 Control dial 5 6 7 WB 1 OK AF ISO 4 En 8 9 1 q (Playback) button Switches to the play mode. 2 u (Live view) button Displays the subject on the monitor while shooting. 3 #UP button Activates the built-in flash. Pressing the following buttons display the menu on the monitor. Set by rotating the control dial while looking at the menu. 4 j (Drive) button Sets the single-frame/sequential shooting, remote control shooting and selftimer shooting. 5 (Metering) button Sets the metering mode. 6 WB (White balance) button Sets the white balance. 7 AF (Focus mode) button Sets the focus mode. 8 ISO button Sets the ISO sensitivity. 9 i button Confirms the setting. 16 s003_En-Fr-Es-De.book Page 17 Tuesday, December 27, 2005 4:34 PM Operations using the control panel Press the i button, use dial to set. to select the setting item, then rotate the control 1 2 3 4 5 7 8 9 11 i button No. 1 2 3 4 5 6 7 8 9 10 11 12 13 14 15 16 17 Flash mode *1 Record mode Card Flash intensity control Metering mode Number of storable still pictures Focus mode 10 17 16 12 Arrow pad Item Battery check Shutter speed Exposure compensation indicator Exposure level indicator Flash intensity level indicator Aperture value Exposure mode Exposure compensation value Date and time Auto bracketing Noise reduction Live view ISO sensitivity White balance Picture mode 6 15 13 14 Basic display Description Displays the remaining power level as icon. Displays the shutter speed. Displays the exposure compensation, exposure level and flash intensity level using indicators. Displays the aperture value. Displays the exposure mode as icon. Displays the exposure compensation value. Displays the current date and time. Displays when Auto bracketing has been set. Displays when noise reduction has been set. Displays the selected live view mode. Displays the ISO sensitivity. Displays the white balance as icon. Displays the picture mode. Displays the flash mode as icon. Displays the record mode. Displays the card being selected. Displays the flash intensity control. Displays the icon of the metering mode being set. Displays the number of storable still pictures. Displays the focus mode. Flash mode (*1) To use flash, press the #UP button to activate the built-in flash. You can set the flash mode using the control panel. Display AUTO ! Flash mode Auto-flash Auto-flash (red-eye reduction) # Fill-in flash $ Flash off Display !SLOW Flash mode Slow synchronization (red-eye reduction) #SLOW Slow synchronization (1st curtain) #SLOW2 Slow synchronization (2nd curtain) g ADVANCED MANUAL “Flash shooting” (P. 45) 17 En s003_En-Fr-Es-De.book Page 18 Tuesday, December 27, 2005 4:34 PM Menu function Pressing the MENU (menu) button displays the menu on the monitor. Use the arrow pad to select and set. Erasing all images Erase all the images taken. 1 Press the MENU button. 2 Use to select [ ]J[CARD SETUP], then press d. En 3 Use ac to select [ALL ERASE], then press the i button. Selecting a language Select the language to be displayed on the monitor. 1 Press the MENU button. 2 Use to select [ ]J[W], then press W d. 3 Use ac to select the language, then press the i button. 18 CANCEL MENU SELECT GO s003_En-Fr-Es-De.book Page 19 Tuesday, December 27, 2005 4:34 PM OLYMPUS Master software OLYMPUS Master is a software for editing and managing pictures taken with a digital camera. Pictures taken using a digital camera can be worked with on a computer via simple operations. For the various features of OLYMPUS Master and how to use them, install OLYMPUS Master and view “Help” or the manual (PDF file). z System requirements OS Windows 98SE/Me/2000 Professional/XP or Mac OS X (10.2 or later) CPU Pentium III 500 MHz or higher, or Power PC G3 500 MHz or higher RAM 128 MB or more (256 MB or more recommended) HD space 300 MB or more Interface USB port Monitor 1024 x 768 pixel or more, minimum 65,536 colors (Windows), minimum 32,000 colors (Macintosh) En For the latest information on compatible operating systems, visit the Olympus web site (http://www.olympus.com). z Upgrade (OLYMPUS Master Plus) You can upgrade your software to OLYMPUS Master Plus using the “upgrade” button on the “OLYMPUS Master” main menu. You need to have the OLYMPUS Master installed in a computer with an internet connection. User Registration Register your camera after installing the OLYMPUS Master. Doing so will enable you to receive information on software or firmware upgrades from Olympus. 19 s003_En-Fr-Es-De.book Page 20 Tuesday, December 27, 2005 4:34 PM Specifications Camera specifications Product type Product type : Single-lens reflex digital camera with interchangeable lens system : Zuiko Digital, Four Thirds System Lens : Four Thirds mount Lens Lens mount Equivalent focal length on a 35 mm film camera : Approx. twice the focal length of the lens Image pickup device Product type No. of effective pixels Screen size Aspect ratio : : : : 4/3 type Live MOS sensor Approx. 7,500,000 pixels 17.3 mm (H) x 13.0 mm (V) (0.7" x 0.5") 1.33 (4:3) Product type Field of view Viewfinder magnification Eye point Diopter adjustment range Optical path fraction Depth of field : : : : : : : Focusing Screen Eyecup Eyepiece shutter Eye-level single-lens reflex viewfinder Approx. 95 % (for field of view on recorded images) Approx. 0.92x (-1 m-1, 50 mm lens, infinity) 18 mm (0.7") from the cover glass (-1 m-1) -3.0 - +1.0 m -1 Quick return half mirror Can be checked with the j button (when PREVIEW registered) : Fixed : Interchangeable : Built-in Viewfinder En Live view A mode B mode : Full-time Live view Uses CCD exclusively for viewfinder Field of view of approx. 92 % TTL auto-exposure Automatic white balance Auto focus : Macro Live view Uses Live MOS sensor for shooting Field of view of 100 % TTL auto-exposure Automatic white balance Manual focus (MF) Monitor Product type Total no. of pixels : 2.5" TFT color LCD (Hyper crystal LCD)/vertically movable type : Approx. 215,000 pixels Shutter Product type Shutter 20 : Computerized focal-plane shutter : 1/4000 - 60 sec. Manual mode: Bulb (Limit: 8 min.) s003_En-Fr-Es-De.book Page 21 Tuesday, December 27, 2005 4:34 PM Specifications Auto focus Product type : Focusing point : AF luminance range : Selection of focusing point: AF illuminator : TTL phase-contrast detection system 3-point multiple AF (left, center, right) EV 0 - EV 19 Auto, Optional The built-in flash provides light. (light can also be provided by an external electronic flash.) Exposure control Metering system Metering range Exposure mode ISO sensitivity Exposure compensation : TTL full-aperture metering system (1) Digital ESP metering (2) Center weighted averaging metering (3) Spot metering (approx. 2 % for the viewfinder screen) : (1) EV 2 - 20 (Digital ESP metering, Center weighted average metering) (2) EV 3 - 17 (Spot metering) (At normal temperature, 50 mm F2, ISO 100) : (1) P: Program AE (Program shift can be performed) (2) A: Aperture priority AE (3) S: Shutter priority AE (4) M: Manual : 100 - 400 (High ISO values (400 - 1600) are available) : Exposure can be adjusted in 1/3, 1/2 or 1 EV step within a range of ± 5 EV White balance Product type Mode setting : Image pickup device : Auto, Preset WB (7 settings), Customized WB, Onetouch WB Recording Memory Recording system Applicable standards : CF card (Compatible with Type I and II) Microdrive (Compatible with FAT 16/32) xD-Picture Card : Digital recording, TIFF (non-compression), JPEG (in accordance with Design rule for Camera File system (DCF)), RAW Data : Exif 2.2, Digital Print Order Format (DPOF), PRINT Image Matching III, PictBridge Playback Playback mode Information display : Single-frame playback, Close-up playback, Index display, Image rotation, Slideshow, Light box display, Calendar display : Information display, Histogram display Drive Drive mode Sequential shooting Self-timer Optical remote control : Single-frame shooting, Sequential shooting, Self-timer, Remote control : 3 frames/sec. (Max. no. of storable sequential pictures: 4 frames in RAW/TIFF) : Operation time: 12 sec., 2 sec. : Operation time: 2 sec., 0 sec. (instantaneous shooting) (RM-1 Remote Control (optional)) 21 En s003_En-Fr-Es-De.book Page 22 Tuesday, December 27, 2005 4:34 PM Specifications Flash Synchronization : Synchronized with the camera at 1/180 sec. or less Flash control mode : TTL-AUTO (TTL pre-flash mode), AUTO, MANUAL External flash attachment : Hot shoe External connector USB connector/AV connector (Multi-connector) Power supply Battery : BLM-1 Li-ion Battery x1 Dimensions/weight Dimensions : 140 mm (W) x 87 mm (H) x 72 mm (D) (5.5" x 3.4" x 2.8") (excluding protrusions) : Approx. 550 g (1.2 Ib.) (without battery) Weight Operating environment Temperature : 0 - 40 °C (32°F - 104°F) (operation)/-20 - 60 °C (-4°F 104°F) (storage) : 30 - 90 % (operation)/10 - 90 % (storage) Humidity En Specifications Battery/charger specifications BLM-1 Li-ion battery MODEL NO. Product type Nominal voltage Nominal capacity No. of charge and discharge times Ambient temperature Dimensions Weight : : : : PS-BLM1 Rechargeable Lithium ion battery DC 7.2 V 1500 mAh : Approx. 500 times (vary with usage conditions) : 0 °C - 40 °C (charging) -10 °C - 60 °C (operation) -20 °C - 35 °C (storage) : Approx. 39 mm (W) x 55 mm (D) x 21.5 mm (H) : Approx. 75 g (without protection cap) BCM-2 Li-ion charger MODEL NO. Rated input Rated output Charging time Ambient temperature Dimensions Weight : : : : PS-BCM2 AC 100 V - 240 V (50/60 Hz) DC 8.35 V. 400 mA Approx. 300 mins. (approx. 5 hrs.) (room temperature: if using BLM-1) : 0 - 40 °C (32°F - 104°F) (operation)/-20 - 60 °C (-4°F 104°F) (storage) : Approx. 62 mm (W) x 83 mm (D) x 26 mm (H) : Approx. 72 g (without AC cable) SPECIFICATIONS ARE SUBJECT TO CHANGE WITHOUT ANY NOTICE OR OBLIGATION ON THE PART OF THE MANUFACTURER. 22 s003_En-Fr-Es-De.book Page 23 Tuesday, December 27, 2005 4:34 PM Safety precautions CAUTION RISK OF ELECTRIC SHOCK DO NOT OPEN CAUTION: TO REDUCE THE RISK OF ELECTRICAL SHOCK, DO NOT REMOVE COVER (OR BACK). NO USER-SERVICEABLE PARTS INSIDE. REFER SERVICING TO QUALIFIED OLYMPUS SERVICE PERSONNEL. Lightning flash with an arrowhead, enclosed in a triangle, alerts you to the presence of uninsulated voltage points inside the product which could cause a serious electrical shock. An exclamation mark enclosed in a triangle alerts you to important operating and maintenance instructions in the documentation provided with the product. WARNING! TO AVOID THE RISK OF FIRE OR ELECTRICAL SHOCK, NEVER EXPOSE THIS PRODUCT TO WATER OR OPERATE IN A HIGH HUMIDITY ENVIRONMENT. En General Precautions Read All Instructions — Before you use the product, read all operating instructions. Save These Instructions — Save all safety and operating instructions for future reference. Heed Warnings — Read carefully and follow all warning labels on the product and those described in the instructions. Follow Instructions — Follow all instructions provided with this product. Cleaning — Use only a damp cloth for cleaning. Never use any type of liquid or aerosol cleaner, or any type of organic solvent to clean this product. Attachments — For your safety, and to avoid damaging the product, use only accessories recommended by Olympus. Water and Moisture — Never use this product around water (near a bathtub, kitchen sink, laundry tub, wet basement, swimming pool or in the rain). For precautions on products with weatherproof designs, read the weatherproofing sections of their manuals. Location — To avoid damage to the product and prevent personal injury, never place this product on an unstable stand, tripod, bracket, table or cart. Mount only on a stable tripod, stand, or bracket. Follow the instructions that describe how to safely mount the product, and use only the mounting devices recommended by the manufacturer. Power Sources — Connect this product only to the power source described on the product label. If you are not sure about the type of power supply in your home, consult your local power company. Refer to your operating instructions for information on using the product with a battery. 23 s003_En-Fr-Es-De.book Page 24 Tuesday, December 27, 2005 4:34 PM Safety precautions En Foreign Objects, Liquid Spillage — To avoid personal injury caused by fire or electrical shock from contact with internal high voltage points, never insert a metal object into the product. Avoid using the product where there is a danger of spillage. Heat — Never use or store this product near any heat source such as a radiator, heat register, stove, or any type of equipment or appliance that generates heat, including stereo amplifiers. Servicing — Refer all servicing to qualified personnel. Attempting to remove the covers or disassemble the product, could expose you to dangerous high voltage points. Damage Requiring Service — If you notice any of the conditions described below, refer servicing to qualified service personnel: a) Liquid has been spilled onto the product or some other object has fallen into the product. b) The product has been exposed to water. c) The product does not operate normally despite following operating instructions. Adjust only the controls described in the operating instructions as improper adjustment of other controls could damage the product and require extensive repair work by a qualified technician. d) The product has been dropped or damaged in any way. e) The product exhibits a distinct change in performance. Replacement Parts — When replacement parts are required, make sure that the service center uses only parts with the same characteristics as the originals, as recommended by the manufacturer. Unauthorized substitution of parts could result in fire, electrical shock, or create other hazards. Safety Check — Upon completion of servicing or repairs, ask the service technician to perform safety checks to determine that the product is in good working order. Handling the Camera DANGER WARNING CAUTION If the product is used without observing the information given under this symbol, serious injury or death may result. If the product is used without observing the information given under this symbol, injury or death may result. If the product is used without observing the information given under this symbol, minor personal injury, damage to the equipment, or the loss of valuable data may result. WARNING z Do not use the camera in areas exposed to flammable or explosive gases. A fire or explosion may result. 24 s003_En-Fr-Es-De.book Page 25 Tuesday, December 27, 2005 4:34 PM Safety precautions z Do not use the flash on people (infants, small children, etc.) at close range. When you fire the flash, you must be at least 1 m (3 ft) away from the faces of your subjects. Firing the flash too close to the subject’s eyes could cause a momentary loss of vision. z Keep young children and infants away from the camera. If not, the following dangerous situations may occur: • Becoming entangled in the camera strap or power cords, causing strangulation. If this happens, follow the doctor’s instructions. • Accidentally swallowing the battery or other small parts. • Accidentally firing the flash into their own eyes or those of another child. • Accidentally being injured by the moving parts of the camera. z Do not use or store the camera in dusty or humid places. Using or storing the camera in dusty or humid places may result in a fire or electric shock. z Do not cover the flash with a hand while firing. Do not cover the flash or touch it after it has just been fired sequentially. It may be hot and cause minor burns. z Do not take apart or modify the camera. Never attempt to disassemble the camera. The internal circuits contain high voltage points which could cause serious burns or electrical shock. z Do not let water or foreign objects inside the camera. A fire or electric shock may result. If the camera is accidentally dropped in water, or if liquid is spilled into the camera, stop using it, allow it to dry, and then remove the battery. Contact the nearest authorized Olympus service center. z Do not touch the battery or the battery charger while battery charging is in progress. Wait until charging is complete and the battery has cooled. The battery and battery charger become hot while charging. At these times, they may cause minor burns. z Do not use a non-specified battery and/or charger. Use of a non-designated battery and/or re-charger may lead to camera or battery failure as well as other unexpected accidents. Any accidents resulting from use of non-designated equipment will not be compensated. CAUTION z Stop using the camera immediately if you notice any unusual odors, noise, or smoke around it. If you notice any unusual odors, noise, or smoke around the camera during operation, switch it off immediately — and remove the battery. Allow the camera to sit idle for a few minutes to cool. Take the camera outdoors, away from flammable objects, and carefully remove the battery. Never remove the battery with bare hands. Contact the nearest Olympus service center immediately. 25 En s003_En-Fr-Es-De.book Page 26 Tuesday, December 27, 2005 4:34 PM Safety precautions z Do not use the camera with wet hands. Damage or electric shock may result. Also, do not connect or disconnect the power plug with wet hands. z Be careful with the strap when you carry the camera. It could easily catch on stray objects — and cause serious damage. z Do not leave the camera in areas subject to extremely high temperature. Doing so may cause parts to deteriorate and, in some circumstances, cause the camera to catch fire. z When the camera contains metal parts, overheating can result in a low-temperature burn. Pay attention to the following: • When used for a long period, the camera will get hot. If you hold on to the camera in this state, a low-temperature burn may be caused. • In places subject to extremely cold temperatures, the temperature of the camera’s body may be lower than the environmental temperature. If possible, wear gloves when handling the camera in cold temperatures. En z Do not damage the power cable. Do not pull on the charger’s cable or add another cable to it. Be sure to connect or disconnect the charger’s cable while holding the power plug. If the following cases occur, stop using and contact an Olympus dealer or authorized customer support center. • The power plug or cable produces heat, burning smell, or smoke. • The power plug or cable is cracked or broken. The contact is bad on the power plug. Battery handling precautions Follow these important guidelines to prevent the battery from leaking, overheating, burning, exploding, or causing electrical shocks or burns. DANGER z Never heat or incinerate the battery. z Do not connect the (+) and (-) terminals to each other using metal objects. z Do not carry or store the battery where it may come into contact with metal objects such as jewelry, pins, fasteners, etc. z Never store the battery where it will be exposed to direct sunlight, or subjected to high temperatures in a hot vehicle, near a heat source, etc. z Never attempt to disassemble the battery or modify it in any way, such as by soldering. Doing so may break the terminals or cause battery fluid to splash, resulting in potential fire, explosion, battery leakage, overheating or other damage. z If battery fluid gets in your eyes, loss of eyesight may result. If battery fluid gets in your eyes, do not rub them. Flush them immediately with clear, cold running water and seek medical attention straight away. 26 s003_En-Fr-Es-De.book Page 27 Tuesday, December 27, 2005 4:34 PM Safety precautions WARNING z Keep the battery dry at all times. Never allow it to come into contact with fresh or salt water. z Do not touch or hold the battery with wet hands. z If the rechargeable battery does not recharge within the specified time, stop charging it and do not use it. If you do not, fire, explosion, ignition or overheating may result. z Do not use the battery if it is cracked or broken. Doing so may cause explosion or overheating. z Never subject the battery to strong shocks or continuous vibration. Doing so may cause explosion or overheating. z Never attempt to modify the battery compartment on the camera, never insert anything (other than the specified battery) into the compartment. z If the battery leaks, becomes discolored or deformed, or appears abnormal in any way during operation, stop using the camera immediately. Contact your dealer or an authorized Olympus service center. Continued use may result in fire or electric shock. z If the battery leaks fluid onto your clothing or skin, remove the clothing and flush the affected area with clean, running cold water immediately. If the fluid burns your skin, seek medical attention immediately. CAUTION z Do not remove the battery from the camera immediately after operating the camera on battery power for a long time. Doing so may cause burns. z Remove the battery from the camera if it is not going to be used for a long time. Otherwise, battery leakage or overheating may cause a fire or injury. 27 En s003_En-Fr-Es-De.book Page 28 Tuesday, December 27, 2005 4:34 PM Safety precautions Charger handling precautions DANGER En z Do not put the charger in water or use it when wet. Do not touch or hold it with wet hands. Doing so may cause malfunction or electric shock. z Do not use the charger if it is covered with cloth such as a blanket. Do not use the charger if something is covering it (such as a blanket). Heat may be kept in, causing the charger to deform. This may cause fire, ignition or overheating. z Do not disassemble or modify the charger. This may cause electric shock or injury. z Use a charger designed to operate on the AC voltage in the area where you are using the camera. Otherwise, fire, explosion, smoke, overheat, electric shock or burns may result. WARNING z Do not damage the charger’s cable. Do not pull on the charger’s cable or add another cable to it. Be sure to connect or disconnect the charger’s cable while holding the power plug. If the following cases occur, stop using and contact an Olympus dealer or authorized customer support center. • The power plug or cable produces heat, burning smell, or smoke. • The power plug or cable is cracked or broken. The contact is bad on the power plug. CAUTION z Unplug the AC adapter’s cable from the outlet before cleaning the camera. Otherwise, electric shock or injury may result. 28 s003_En-Fr-Es-De.book Page 29 Tuesday, December 27, 2005 4:34 PM Safety precautions For customers in Europe “CE” mark indicates that this product complies with the European requirements for safety, health, environment and customer protection. “CE” mark cameras are intended for sales in Europe. This symbol [crossed-out wheeled bin WEEE Annex IV] indicates separate collection of waste electrical and electronic equipment in the EU countries. Please do not throw the equipment into the domestic refuse. Please use the return and collection systems available in your country for the disposal of this product. This product and bundled accessories conform to WEEE standards. Trademarks • • • • • IBM is a registered trademark of International Business Machines Corporation. Microsoft and Windows are registered trademarks of Microsoft Corporation. Macintosh is a trademark of Apple Computer, Inc. xD-Picture Card™ is a trademark. All other company and product names are registered trademarks and/or trademarks of their respective owners. • The standards for camera file systems referred to in this manual are the “Design Rule for Camera File System/DCF” standards stipulated by the Japan Electronics and Information Technology Industries Association (JEITA). 29 En