1
CX1145 MFP
Operators Manual for Fax Function
59313901, Rev. 1.0
CONTENTS
Preface ....................................................................................................................................................3
Features of the GD-1201 .........................................................................................................................4
General Precautions ................................................................................................................................5
• .............................................................................................................................................................5
1. BEFORE USING
.............................................................................................................................7
1. Description of Each Component ........................................................................................................8
• Main components ............................................................................................................................8
• Configuration of options...................................................................................................................9
• Control panel .................................................................................................................................10
• Touch panel ...................................................................................................................................12
• Connecting cables .........................................................................................................................14
2. SENDING A FAX ..................................................................................................................................15
1. Transmission Mode..........................................................................................................................16
2. Preparation for Transmission...........................................................................................................18
3. About Originals ................................................................................................................................19
• Original size/Original scanning range ............................................................................................19
• Setting originals .............................................................................................................................20
4. Setting the Transmission Conditions ...............................................................................................23
• Variety of optional functions...........................................................................................................23
• Setting the transmission conditions ...............................................................................................25
• Sending different width originals....................................................................................................27
• Setting the scanning conditions for each page ..............................................................................29
5. Specifying the Remote Fax..............................................................................................................31
• Direct entry with digital keys ..........................................................................................................31
• Address book entry........................................................................................................................32
• Group entry....................................................................................................................................33
• Searching by ID number ................................................................................................................34
• Searching by address (Search address) .......................................................................................36
• Searching address using LDAP server..........................................................................................39
• Multi-address transmission ............................................................................................................41
• Confirming the destinations ...........................................................................................................42
6. Sending Originals.............................................................................................................................43
• Direct transmission ........................................................................................................................43
• Memory transmission.....................................................................................................................45
• Other transmissions.......................................................................................................................47
• Sending a Tone .............................................................................................................................49
3. RECEIVING A FAX ...............................................................................................................................51
1. Reception Modes .............................................................................................................................52
2. Reception Settings...........................................................................................................................53
3. Relationship between Original and Paper........................................................................................57
4. CHECKING AND CANCELING THE COMMUNICATIONS .................................................................61
1. Checking Transmission Result ........................................................................................................62
• Checking reserved transmissions..................................................................................................62
• Checking communication status (log)............................................................................................64
• Address registration from send/receive log ...................................................................................66
2. Canceling Transmissions.................................................................................................................68
5. ADVANCED FUNCTIONS ....................................................................................................................73
1. Transmitting 2-Sided Originals.........................................................................................................74
2. Priority Transmission .......................................................................................................................76
3. Polling Communication ....................................................................................................................77
4. Mailbox Communication...................................................................................................................80
5. Chain Dial Communication ............................................................................................................100
6. Delayed Transmission Reservation ...............................................................................................102
7. Recovery Transmission .................................................................................................................105
8. Onramp Gateway...........................................................................................................................107
9. Offramp Gateway...........................................................................................................................109
10. Save as File ...................................................................................................................................111
6. PRINTING LISTS AND REPORTS .....................................................................................................115
1. Manually Printing Lists & Reports ..................................................................................................116
2. Automatically Printing Lists & Reports ...........................................................................................120
• Automatically printing lists & reports............................................................................................120
• Setting the lists and reports output ..............................................................................................121
1
CONTENTS (Cont.)
3. Lists/Reports Samples ...................................................................................................................129
7. REGISTERING AND SETTING ITEMS...............................................................................................143
1. Setting the Initial Transmission Mode ............................................................................................144
2. Registering the Terminal ID ...........................................................................................................146
3. Setting the Reception Mode...........................................................................................................151
4. 2nd Line Board (optional) Installation ............................................................................................154
5. Setting RX Printing.........................................................................................................................160
• Setting RX printing.......................................................................................................................160
• Setting duplex printing .................................................................................................................163
• Setting the rotate sort (Alternation)..............................................................................................166
6. Setting Recovery Transmission .....................................................................................................168
8. TROUBLESHOOTING ........................................................................................................................171
1. When The Following Messages Appear ........................................................................................172
2. Transmission Trouble ....................................................................................................................173
3. Reception Trouble..........................................................................................................................174
9. SPECIFICATIONS ..............................................................................................................................175
1. Main Specifications ........................................................................................................................176
2
Preface
Thank you for purchasing the OKI fax unit GD-1201. This Operator’s Manual describes the following:
• How to use the Fax functions
• How to perform a Fax communication
• How to inspect this equipment and perform its maintenance
• How to remedy Fax communication problems
Before using this equipment, thoroughly read and understand this Operator’s Manual. To ensure that the
Fax functions are used in optimum working conditions, keep this Operator’s Manual in a handy place for
future reference.
Accessories Provided for Fax Function
• Modular cord: 1
• Operator’s Manual for Facsimile Functions: 1
To ensure correct and safe use of the functions of the GD-1201, this Operator’s Manual describes safety
precautions according to the level of warning.
Before reading this Operator’s Manual, you should fully understand the meaning and importance of the
signal words. These words are classified in the following three levels:
Warning:
Indicates a potentially hazardous situation which, if not avoided, could result in death, serious injury, serious damage, or fire in the equipment or surrounding assets.
Caution:
Indicates a potentially hazardous situation which, if not avoided, may result in minor or moderate injury,
partial damage of the equipment or surrounding assets, or loss of data.
Note:
Indicates information to which you should pay attention when operating the equipment.
Tip:
Describes handy information that is useful to know when operating the equipment.
The contents of this manual may change without notification.
Company or product name shown in this manual may be a brand name or a trademark of each company.
3
Features of the GD-1201
4
•
Super G3 High-Speed Communication
High-speed communication in the Super G3 mode is enabled.
* “Super G3 Fax” is an appellation of Fax machines with a modem compatible with ITU-T V.34,
which is a new high-speed modem standard.
•
JBIG Encoding System
This device uses a JBIG encoding system compatible with standard recommendations of ITU-T T.85.
•
Mailbox Communication
This equipment is compatible with mailbox communications (e.g. confidential communication, bulletin
board communication, multi-address relay mail communication).
•
Plain Paper Recording
Plain paper is used as the Fax output paper. This means that Faxes output from the digital copier can
be stored as business documents. You can also write on and sign them.
•
Address Book for 1000 Destinations
Destinations can be numbered from 001 to 1000 for the address book.
•
Dual Access
The following operations are enabled using the memory function:
- Reserving a memory transmission during another memory transmission
- Reserving a memory transmission during a reception
- Copying during a memory transmission
- Receiving data while copying
- Receiving data while printing other received data
- Receiving data while printing a list
- Transmitting data in the memory during printing a report
•
High-Resolution (U-FINE) Mode
Detailed technical drawings, fine text and photographs can be clearly reproduced in transmitted documents with a resolution of 16 dots/mm X 15.4 lines/mm.
•
Multi-Address Transmission
This function enables you to transmit a single document to maximum 400 destinations in one operation
by a direct dialing (using digital keys), or by specifying desired destinations in the address book (either
an individual destination or a registered group of destinations). The Internet Fax can be used in combination with this multi-address transmission.
•
A3-Size Data Transmission and Recording
A3/LD originals such as technical drawings can be transmitted without changing their size. The
received data is printed out at the receiver’s Fax machine in A3/LD size (if available).
•
2-Sided Transmission
The data of a 2-sided original can be transmitted in the exact page order of the original by scanning the
data with the Reversing Automatic Document Feeder (optional).
•
2-Sided Printing
You can reduce paper waste by printing received data on both sides of the recording paper.
•
2-Line Communication
Simultaneous communications in 2 lines, such as simultaneous transmission and reception, are
enabled with the 2nd Line Board (optional).
General Precautions
When power failure occurs
•
•
•
•
•
•
•
Neither Fax nor telephone functions of the device are available in the event of a power failure.
You can use the external telephone to dial a number to make a call or to receive a call. (See the operator’s manual of your telephone set for details.)
The originals stored in the memory might be deleted completely.
Settings or registration contents such as the date and time or the address book data will not be
deleted.
All data pertaining to time and destinations set in a certain function such as a delayed communication
or polling reception may be deleted.
If a power failure has occurred during the scanning of an original or while printing a list, the message
"POWER FAILURE" appears on the touch panel. In this case, the job in progress might have been
deleted due to the power failure. Check the communication status.
If the data of originals stored in a memory has been deleted due to the power failure, a power failure
list will be printed out when power is restored.
5
1. BEFORE USING
1
1. Description of Each Component ............................................................................................8
•
•
•
•
•
Main components................................................................................................................................8
Configuration of options ......................................................................................................................9
Control panel.....................................................................................................................................10
Touch panel.......................................................................................................................................12
Connecting cables.............................................................................................................................14
7
1. Description of Each Component
Main components
1
OKI CX1145 MFP
1.
2.
3.
4.
5.
6.
7.
8.
9.
Front cover
Drawers
Operator’s Manual pocket (Back side)
Power switch
Automatic duplexer
Bypass tray
Paper size indicator
Original scale
Scanning area
10. Receiving tray
11. Color toner (Cyan/Magenta/Yellow)
12. Original glass
13. Touch panel
14. Control panel
15. Black toner
16. Used toner bag
17. Touch panel contrast adjustment dial
*A and *B: Options
*B
3
4
1
5
2
6
*A
8
9
10
12
13
7
14
15
11
8
1.BEFORE USING FAX
16
(17)
Configuration of options
2
1
1
1. FAX Unit (GD-1201)
This unit enables you to transmit and receive FAX data.
2. 2nd Line Board (GD-1260)
This board enables the use of 2 lines.
9
1.Description of Each Component (Cont.)
Control panel
Use the buttons on the control panel for various operations and settings.
1
1. [HELP] button
Use this button to display a desired operation procedure.
2. [USER FUNCTIONS] button
Use this button for paper size or media type setting of drawers, and registration of the copy, scan and
FAX settings (including a default setting change.) See the User Functions Guide for the functions
enabled by this button.
3. [TEMPLATE] button
Use this button to register and recall frequently used copy, scan, and Fax settings as a template.
4. [EXTENSION] button
Any operation with this button is invalid at present. This button is to extend functions in the future.
5. [e-FILING] button
Use this button to access saved image data.
6. [SCAN] button
Use this button to use the scanning function.
7. [COPY] button
Use this button to use the copier function.
8. [FAX] button
Use this button to use the FAX / Internet FAX function.
9. PRINT DATA / MEMORY RX / FAX communication lamps
These lamps show the status of FAX data reception and FAX communication.
10. [INTERRUPT] button
Use this button to interrupt the copy job in process and perform another one. The interrupted job is
resumed by your pressing this button again.
10
1.BEFORE USING FAX
11. [JOB STATUS] button
Use this button to confirm the job status, printing status, and FAX transmission/reception status of a
print job, scan job and FAX job. ( P.62 “1.Checking Transmission Result”)
1
12. [ACCESS] button
Use this button when the equipment is managed under the department management or the user management. If this button is pressed after copying, the next user needs to key in the department code or
user information, otherwise the copier function cannot be used. For the department code or user management, see the User Functions Guide.
13. [ENERGY SAVER] button
Use this button when you want to shut down the equipment or when you want the equipment to enter
into the energy saving mode. When you press this button, the menu for the energy saving mode
appears. Press the [SLEEP] button on this menu to enter into the energy saving mode and press the
[SHUTDOWN] button to shut down the equipment.
14. [FUNCTION CLEAR] button
When this button is pressed, all selected functions are cleared and returned to the default settings. If
the default setting is changed on the control panel, and copying, scanning, Fax or similar is performed,
the [FUNCTION CLEAR] button blinks.
15. [STOP] button
Use this button to stop any scanning and copying operations in progress.
16. [START] button
Use this button to start copying, scanning and FAX operations.
17. [CLEAR] button
Use this button to correct numbers keyed in, such as the copy quantity.
18. ERROR lamp
This lamp lights when an error occurs and the equipment needs some actions to be taken.
19. [MONITOR/PAUSE] button
Use this button for on-hook transmission or pause entry. Pressing this button in the middle of direct
entry will display “-” as a “pause” on the screen.
20. Digital keys
Use these keys to enter the telephone and Fax numbers, ID numbers and password.
21. Touch panel
Use this panel for the various settings of each function of the copier, scanner and FAX. This panel also
indicates the status of the equipment, such as when you run out of paper or there is a paper jam.
11
1.Description of Each Component (Cont.)
Touch panel
1
When you press the [FAX] button on the control panel, the functions currently selected or used and the
status of the equipment are displayed on the touch panel.
When a graphic symbol indicating an erroneous status such as a paper jam is blinking, see Chapter 9
“BLINKING GRAPHIC SYMBOLS” in the Operator’s Manual for Basic Function to correct the error.
1
3
2
4
1. Message area
2. Touch-button area
3. Index buttons
4. Function setting area
Message area
The following information is shown here:
• Equipment status
• Operation instruction
• Cautionary messages
• Transmission resolution
• Number of destinations set
• Date and time
Touch-button area
The function fields shown here are selectable with a direct touch on the panel. Press the desired button
lightly with your finger.
• Index buttons
Press these buttons to switch each menu for the address book, destination confirmation, advanced
functions, and file saving.
• Function setting area
This area is to select and set various functions.
12
1.BEFORE USING FAX
Clearing and canceling function selected
When you press the selected button (highlighted or shaded) again, the function selected with this button is
cleared. To quit (cancel) the setting, press the [CANCEL] button at the bottom of the touch panel (or the
[ALL CLEAR] button on the address book menu).
1
Buttons on the touch panel which are grayed out denote that functions for these buttons are not selectable.
13
1.Description of Each Component (Cont.)
Connecting cables
Be sure that the power of the equipment is turned OFF before connecting the cables.
1
Do not connect this equipment and a telephone to a telephone connector in parallel.
OKI CX1145 MFP
1
2
3
1.
2.
3.
*
14
LINE2
Connect a telephone line when the 2nd Line Board (optional) is installed.
LINE
Connect a telephone line.
TEL
Connect an external telephone (for a remote reception)
An optional external telephone handset is not available for this version.
1.BEFORE USING FAX
2. SENDING A FAX
2
1. Transmission Mode..............................................................................................................16
2. Preparation for Transmission ...............................................................................................18
3. About Originals .................................................................................................................... 19
• Original size/Original scanning range ...............................................................................................19
• Setting originals.................................................................................................................................20
4. Setting the Transmission Conditions.................................................................................... 23
•
•
•
•
Variety of optional functions ..............................................................................................................23
Setting the transmission conditions...................................................................................................25
Sending different width originals .......................................................................................................27
Setting the scanning conditions for each page .................................................................................29
5. Specifying the Remote Fax ..................................................................................................31
•
•
•
•
•
•
•
•
Direct entry with digital keys..............................................................................................................31
Address book entry ...........................................................................................................................32
Group entry .......................................................................................................................................33
Searching by ID number ...................................................................................................................34
Searching by address (Search address)...........................................................................................36
Searching address using LDAP server .............................................................................................39
Multi-address transmission ...............................................................................................................41
Confirming the destinations...............................................................................................................42
6. Sending Originals................................................................................................................. 43
•
•
•
•
Direct transmission............................................................................................................................43
Memory transmission ........................................................................................................................45
Other transmissions ..........................................................................................................................47
Sending a Tone .................................................................................................................................49
15
1. Transmission Mode
2
16
•
Memory Transmission
The original is scanned into memory and automatically starts to be sent once a connection has been
made. Using this mode, you can send the same original to 2 or more remote Faxes (multi-address
transmission).
•
Direct Transmission
The remote Fax is dialed immediately, and the original will be sent as it is being scanned. This mode is
useful if you want to confirm connection to the remote Fax or when you want to send an urgent Fax
document. Originals are not stored in memory, and you can only specify one remote Fax at a time.
•
Direct Entry with digital keys
You can dial the telephone number of the remote Fax directly using the digital keys
•
Address Book Entry
You can specify a remote Fax that has been registered into the address book.
•
Multi-address Transmission
You can send the same original to 2 or more remote Faxes in a single operation.
•
Group Entry
Originals are sent to the destinations that have already been specified as a group.
•
Recovery Transmission
A document is held in the memory after the initially specified number of redial attempts have failed. You
can retransmit the documents held in memory by touching the screen.
•
On-hook Transmission
You can make a telephone call and then send the originals without picking up the handset of the external telephone. When the line is connected to the remote Fax and a dial tone (short high-pitched tone)
is heard, press the [START] button to send the original. You can also use keypad (digital keys) dialing
and address dialing.
•
Off-hook Transmission
* Only available if an external telephone is attached.
Pick up the external telephone, make a telephone call and then send the originals. When the line is
connected to the remote Fax and a response tone (short high-pitched tone) is heard, press the
[START] button to send the original. You can also use keypad (digital keys) dialing and address
dialing.
•
Priority Transmission
You can send a priority transmission and interrupt the current communication. This function allows you
to interrupt the current communication and send the Priority Transmission. Transmission is resumed
after completing the current communication.
•
Polling Transmission
You can store originals in memory, and wait for a request from a remote Fax to send the originals.
When the request arrives, the originals are automatically sent to the remote Fax that sent the request.
The remote Fax can receive originals at any convenient time. You can also inhibit remote Faxes which
do not have the corresponding password to receive the originals by appending the password to the
document.
•
Mailbox Transmission
You can have confidential, bulletin board and multi-address relay mail communication, transmission
box with remote Faxes that support the ITU-T Mailbox functions.
2.SENDING A FAX
•
Delayed Communications
You can send the original to a specified remote Fax at a specified time. This mode is useful when you
are making use of night-time discounts or sending originals overseas.
•
Chain Dial Communication
When using the Fax communication network, you can combine 2 or more dialing operations (by
address book and direct entry), input and send information such as service codes one after another.
•
Batch Transmission
The system will automatically send 2 or more reserved jobs to one remote Fax at a time.
This function can reduce the communication cost by sending multiple originals to the same destination
at one time.
This operation is automatically applied when more than one original is sent to one remote Fax with the
same transmission functions specified for each reserved TX job.
*
•
2
When the use of the equipment is managed under the department management or the user management, the batch transmission can be performed only in the same department and user.
Redialing
If the remote Fax is busy by using the Memory TX etc., this system will automatically redial the remote
Fax number. The default of the redialing intervals and counter is different for each country/region. It
can be changed by the service technician.
17
2. Preparation for Transmission
Switching to the Fax mode
the [FAX] button on the control
1 Press
panel to select the Fax function.
2
• Be sure to switch over to the Fax mode before carrying out Fax
operations.
• If you leave the equipment for about 45 seconds, it automatically
returns to the copy mode.
• You can also switch to the Fax mode when the equipment is in
the energy-saving mode.
When the use of the equipment is managed under certain functions such as department management
When the use of the equipment is managed under the department management or the user management,
each user needs to enter the department code, user ID, password, etc. To send more than one Fax, entering the department code, user ID and password, etc. is necessary for each transmission. For these operations, see the Operator's Manual for Basic Functions.
18
2.SENDING A FAX
3. About Originals
Original size/Original scanning range
Original size
The following table shows the size and thickness of originals that can be transmitted via this system.
Setting
Position
Original Type
Maximum
Number that
Can be Set
Original Size
Remarks
Original
Glass
Sheets
Three-dimensional objects
Books
Letter format
(North American version):
LD, LG, LT, LT-R, ST,
ST-R, COMP
A/B format
(European version):
A3, A4, A4-R, A5,
A5-R, B4, B5, B5-R,
FOLIO
-
Do not place any
heavy object
(8.8 lb. or 4 kg or
over) on the
glass
Reversing
Automatic
Document
Feeder
(Optional)
Plain paper, original with filing holes
(2-, 3- and 4-holes):
9.3 - 41.8 lb. 35 - 157 g/m2
(1-sided Original)
13.3 - 41.8 lb. 50 - 157 g/m2
(2-sided original)
Letter format
(North American version):
LD, LG, LT, LT-R, ST-R,
COMP
A/B format
(European version):
A3, A4, A4-R, A5-R, B4,
B5, B5-R, FOLIO
* ST/A5 is not available
100 originals
(9.3 - 20 lb.
35 - 80 g/m2)
or stacked
height of
originals 16
mm or less
Some of the
originals on the
left may not be
used depending
on paper quality.
2
Original scanning range
As shown in the figures below, even if the original that you are sending contains information in the shaded
section, this information is not printed at the remote Fax.
1. LD, LG, LT-R, ST-R, COMP, A3, A4-R, A5-R, B4, B5-R, FOLIO
2. LT, ST, A4, B5
1
2
5 mm
5 mm
4 mm
4 mm
5 mm
4 mm
4 mm
5 mm
ST-R, B5-R or A5-R originals are automatically rotated and sent as ST, B5 or A5-sized originals.
LT original is automatically rotated and sent as LT-R-sized original.
19
3.About Originals (Cont.)
Setting originals
When setting originals on the glass
Originals are sent in the order they are placed on the original glass in both memory TX and direct TX
modes.
2
the Original Cover (optional) or the
1 Raise
Reversing Automatic Document Feeder
(optional), and place the original A with
its face down on the glass.
A
• Raise it 60 degrees or more to detect the original.
the original against the left inner
2 Align
corner of the glass.
B
• Different size originals can also be sent in one transmission.
• When LD, LG, LT-R, ST, COMP, A3, A4-R, A5, B4, B5 or FOLIO
originals are placed as shown in the figure on the right, the preentered sender information is printed in the shaded position
shown B in the figure and sent to the remote Fax.
• Entering the sender information ( P.146 “2.Registering the Terminal ID”)
• When transmitting non-standard-sized originals, best results are
obtained by placing the originals horizontally on the glass.
• When LT, ST-R, A4, A5-R or B5-R originals are placed as shown
in the figure on the right, the pre-entered sender information is
printed in the shaded position shown C in the figure and sent to
the remote Fax.
C
the Original Cover (optional) or the Reversing Automatic Docu3 Lower
ment Feeder (optional) slowly.
20
2.SENDING A FAX
Precautions for using the Reversing Automatic Document Feeder
Do not use the following 1 to 8 type originals as they may misfeed or become damaged:
1:
Badly wrinkled or folded originals; in particular, originals whose leading edge is curled may fail to be
correctly fed.
2:
Originals with carbon paper
3:
Taped, pasted or clipped (cut out) originals
4:
Clipped or stapled originals
5:
Originals with holes or tears
6:
Damp originals
7:
OHP film originals
8:
Others: tracing paper, permeable paper, coating paper (coating with wax, etc.)
2
Also, the following 9 to 10 type originals should be handled carefully:
9:
Multiple originals, when pinched between 2 fingers, cannot be moved, or originals which are surface treated may fail to be separate properly.
10: Folded or curled originals should be smoothed out before being used.
1
2
4
7
6
5
8
3
9
10
21
3.About Originals (Cont.)
When using the Reversing Automatic Document Feeder (optional)
When the originals are placed on the Reversing Automatic Document Feeder, the uppermost page is the
first to be scanned and sent.
2
aligning the edges of originals,
1 After
place them with their face up and slide
the guides to the width of the originals.
• LT/A4 size originals are rotated 90 degrees so that they are sent
as LT-R/A4-R originals.
• If a mixture of LD and LT, A3 and A4, or B4 and B5 originals are
placed, they are sent in their original sizes.
• To set the originals with different width, see P.27 “Sending different width originals”.
• When LD, LG, LT-R, COMP, A3 and B4, A4-R, B5 originals are
placed as shown in the figure on the right, the pre-entered
sender information is printed in the shaded position shown A in
the figure and sent to the remote Fax.
• Entering the sender information ( P.146 “2.Registering the Terminal ID”)
• When LT, ST-R, A4, A5-R or B5-R originals are placed as shown
in the figure on the right, the pre-entered sender information is
printed in the shaded position shown B in the figure and sent to
the remote Fax.
22
2.SENDING A FAX
A
B
4. Setting the Transmission Conditions
Variety of optional functions
Originals can be sent using different transmission conditions (resolution, original mode, exposure, transmission mode, original size, ECM, quality TX, Line, SUB/SEP, SID/PWD, subject and body). Settings for
the subject and body are available only when you are using the Internet Fax function. If you change the
transmission conditions, the new settings are valid for one transmission only. They return to the default
settings after the transmission. The following describes the settings of each item.
•
Resolution:
Set the resolution before you scan the original to be sent.
STANDARD: Original with regular size text
FINE:
Original with small size text and fine illustrations
U-FINE:
Original with ultra-fine illustrations
* If the remote Fax cannot receive originals with the same resolution, the resolution of the sent
original is automatically converted and sent.
The finer the resolution is, the longer it takes to send an original.
•
Original Mode:
Set the original mode before you scan the original to be sent.
TEXT, TEXT/PHOTO, PHOTO
* Transmission time may be longer than usual when the TEXT/PHOTO mode or PHOTO mode is
selected.
•
Exposure:
Set the image density according to the contrast of the original to be sent.
AUTO, MANUAL (11 variations)
* In the automatic exposure mode, the equipment automatically judges the contrast of the original, and selects the ideal contrast.
In the manual exposure mode, you can adjust the contrast manually with 11 variations.
•
Transmission Type:
Set the transmission type.
MEMORY TX:
Send the original after it is scanned into memory.
DIRECT TX:
Send the original directly as it is being scanned.
•
Original Size:
Set the scan size of the original to be sent.
AUTO:
The size of the original is automatically determined before it is scanned.
SPECIFIED SIZE:
The original is scanned at the preset size regardless of its actual size.
Use this mode when you are using non-standard size paper or you want to limit the area of the
original to be sent.
DIFFERENT WIDTH:
Set this function to send the originals with different width at a time using Reversing Automatic
Document Feeder (optional). ( P.27 “Sending different width originals”)
•
ECM (Error Correction Mode):
ECM (Error Correction Mode) is an internationally standardized communication mode that automatically corrects errors that occur during Fax transmissions. Even when the transmitted data has been
affected by noise during communication, this mode allows good communication without image distortion by automatically resending the part that has been affected.
ON, OFF
* Both the transmitter and the receiver must have the ECM function to make ECM communication available. When affected by noise during communication, communication time takes longer
than usual.
2
23
4.Setting the Transmission Conditions (Cont.)
2
24
•
Quality TX:
Set whether or not to specify Quality TX. This function makes the communication less affected by line
condition when transmitting document to overseas. When this mode is set to “ON”, originals are sent at
a slower speed than normal.
ON, OFF
•
Line:
Specify the line to be used when you send the original. This option is only available when the 2nd line
option is installed.
( P.154 “4.2nd Line Board (optional) Installation”)
OFF, LINE1, LINE2
•
SUB/SEP, SID/PWD:
Input the sub-address when the remote Fax you are communicating with needs a sub-address. Subaddress is divided into the following categories.
SUB (sub-address):
Entering information
SEP (selective polling address):
Retrieving information
SID (sender identification):
Password for SUB
PWD (password):
Password for SEP
* Up to 20 digits of information can be stored for each of these sub-addresses.
When you send documents, you can specify a sub-address or password compatible with ITU-T
(International Telecommunications Union Telecommunications) standards.
* To use this function, the remote Fax must be capable of setting an ITU-T compatible subaddress or password. For details, contact your nearest Service Center.
•
Subject, Body:
Subject and body can be added when using the Internet Fax function.
* When originals are placed on the original glass, you can change the following scanning conditions
for each page. ( P.29 “Setting the scanning conditions for each page”)
Resolution Original mode
Exposure Original size
* Changing the default settings (HOME POSITION) when sending originals. ( P.144 “1.Setting the
Initial Transmission Mode”)
2.SENDING A FAX
Setting the transmission conditions
1 Place the original(s).
• P.20 “Setting originals”
2 Press the [FAX] button on the control panel.
3
Press the [ADDRESS] button to enter the address menu, and then
press the [OPTION] button.
2
the desired buttons to set the transmission conditions, and
4 Press
then press the [ENTER] button.
• Press the [Prev] or [Next] button to switch the screens.
25
4.Setting the Transmission Conditions (Cont.)
5 Specify the remote Fax and press the [START] button.
2
26
2.SENDING A FAX
Sending different width originals
When you select the [DIFFERENT WIDTH] button in the “ORIGINAL” of the transmission condition, the
originals with different width can be sent at a time using Reversing Automatic Document Feeder.
Available combinations of the original size are as follows. (Not available for the combination of LT format
and A/B format)
LT format:
LD, LT, COMP, LG, LT-R
A/B format: A3, A4, B4, B5, A4-R, FOLIO
the tray guide to the widest origi1 Adjust
nal size, and then align the original
2
against the front side.
2 Press the [FAX] button on the control panel.
the [ADDRESS] button to enter the address menu, and then
3 Press
press the [OPTION] button.
the [DIFFERENT WIDTH] button. And press the [ENTER] button
4 Press
to complete the setting.
• Set the other transmission condition as required. ( P.25 “Setting the transmission conditions”)
27
4.Setting the Transmission Conditions (Cont.)
5 Specify the remote Fax and press the [START] button.
2
28
2.SENDING A FAX
Setting the scanning conditions for each page
When you want to send multi-page originals by placing them on the original glass, you can change the following scanning conditions for each page:
Resolution
Exposure
Original mode
Original size
This function is convenient for newspapers and books can be placed on the original glass and sent.
1 Place the original on the glass.
2
• P.20 “When setting originals on the glass”
2 Press the [FAX] button on the control panel.
3 Press the [OPTION] button and set the transmission conditions.
And press the [ENTER] button to complete the setting.
• P.23 “4.Setting the Transmission Conditions”
4 Specify the remote Fax.
•
•
•
•
Specifying by digital keys ( P.31 “Direct entry with digital keys”)
Specifying by address book ( P.32 “Address book entry”)
Specifying by group ( P.33 “Group entry”)
Specifying by multi-address transmission ( P.41 “Multi-address transmission”)
5 Press the [START] button.
• The first original is scanned.
6 Place the next original.
the [OPTION] button and set the transmission conditions for
7 Select
the second original as required.
And press the [ENTER] button to complete the setting.
• The changeable scanning conditions for each page are the “RESOLUTION”, “MODE”, “EXPOSURE” and
“ORIGINAL”.
29
4.Setting the Transmission Conditions (Cont.)
8 Press the [START] button.
• The second original is scanned.
• If there is another original to be scanned, repeat steps 6 through 8.
2
Be sure to carry out the operations within 45 seconds after the “To continue place document on glass, and press
START” appears. If the equipment is inactive for 45 seconds, the scanned original is sent.
finished scanning of the last page, press the [JOB FINISH] but9 When
ton.
• The originals are sent.
30
2.SENDING A FAX
5. Specifying the Remote Fax
Direct entry with digital keys
Direct entry is the method for specifying remote Fax numbers using the digital keys.
1 Place the original(s).
• P.20 “Setting originals”
2 Press the [FAX] button on the control panel.
2
3 Key in the remote Fax number.
make a mistake, press the [CLEAR] button on the control panel
4 Iforyou
the [BACK SPACE] button in the address menu and correct the
mistake.
• [CLEAR] button: Press this button to clear all values you have entered.
• [BACK SPACE] button: Press this button to delete each value you have.
When you are dialing to an outside line via a PBX, there may be a pause before the connection is made, causing
a transmission error. To avoid this error, press the [MONITOR/PAUSE] button after the number that designates
an outside line to enter a pause. This automatically enters a thee-second pause before the remote Fax number is
dialed, which reduces transmission errors. (The mark “-” is displayed as a “pause” on the screen.)
5 Press the [START] button.
31
5.Specifying the Remote Fax (Cont.)
Address book entry
Address book entry is the method for specifying remote Fax numbers by pressing the remote Fax buttons
which have previously been registered. It is convenient if frequently used destinations are registered in the
address book.
• Registering the address book, see the [User Functions Guide] or the [TopAccess Guide].
2
1 Place the original(s).
• P.20 “Setting originals”
2 Press the [FAX] button on the control panel.
3 Press the [ADDRESS] button to enter the address menu.
• Each screen displays 8 destinations. To view destinations not displayed on the screen, press the [Prev] or
[Next] button to switch the screens.
the button designating the remote Fax to which you wish to
4 Press
send your transmission.
• You can search for remote Faxes by ID number and by address.
( P.34 “Searching by ID number”)
( P.36 “Searching by address (Search address)”)
5 Press the [START] button.
32
2.SENDING A FAX
Group entry
Group entry is the method of specifying remote Fax numbers by pressing the group button which has previously been entered. It is convenient if frequently used multiple destinations are entered into a group.
• Creating Groups, see the [User Functions Guide] or the [TopAccess Guide].
1 Place the original(s).
• P.20 “Setting originals”
2
2 Press the [FAX] button on the control panel.
the [ADDRESS] button to enter the address menu, then Press
3 Press
the [GROUP] button.
• Each screen displays 8 destinations. To view destinations not displayed on the screen, press the [Prev] or
[Next] button to switch the screens.
the remote Fax group to send originals. If you want to see the
4 Press
specified group members, press the [CONTENTS] button.
• You can search for groups by ID number and by group.
( P.34 “Searching by ID number”)
( P.36 “Searching by address (Search address)”)
The Remote Faxes in the group can be confirmed in the group number information. See the [User Functions
Guide].
5 Press the [START] button.
33
5.Specifying the Remote Fax (Cont.)
Searching by ID number
When selecting the remote Faxes registered in the address and group by searching by the ID number
immediately displays the screen including the searched-for ID number.
1 Place the original(s).
2
• P.20 “Setting originals”
2 Press the [FAX] button on the control panel.
the [ADDRESS] button to enter the address menu, then the
3 Press
[KNOWN ID] button.
4 Key in the desired ID number, and press the [ENTER] button.
• You can key in the number within the range of 1 to 1000.
34
2.SENDING A FAX
5 Press the button for the remote Fax that you want to send to.
• Each screen displays 8 destinations. To view destinations not displayed on the screen, press the [Prev] or
[Next] button to switch the screens.
2
• To continue searching by ID number, press the [KNOWN ID] button.
• To continue searching by address ( P.36 “Searching by address (Search address)”), press the [SEARCH
ADDRESS] button.
6 Press the [START] button.
35
5.Specifying the Remote Fax (Cont.)
Searching by address (Search address)
When selecting the remote Faxes registered in the address book and group, pressing a letter button leads
to display the remote Faxes whose names start with the letter and/or numbers, which makes it easy to
choose the desired remote Faxes.
2
1 Place the original(s).
• P.20 “Setting originals”
2 Press the [FAX] button on the control panel.
the [ADDRESS] button to enter the address menu. Press the
3 Press
[SEARCH ADDRESS] button.
4 Press the button you want to search.
36
2.SENDING A FAX
5 Enter the ideal button or number, and then press the [ENTER] button.
2
6 Press the [SEARCH] button.
37
5.Specifying the Remote Fax (Cont.)
the button for the remote Fax that you want to send to, and then
7 Press
press the [ENTER] button.
2
• If the remote FAX to be selected is one, the direct transmission (On-hook Transmission) can be performed.
• Each screen displays 8 destinations. To view destinations not displayed on the screen, press the [Prev] or
[Next] button to switch the screens.
• To continue searching by the address, press the [SEARCH ADDRESS] button.
• To continue searching by the ID number ( P.34 “Searching by ID number”), press the [KNOWN ID] button.
perform the memory transmission, press the [START] button to
8 To
complete the operation. To perform the direct transmission, follow the
procedure from step 9.
perform the On-hook transmission, press the [MONITOR/PAUSE]
9 To
button and the [DIAL] button.
you hear the answer tone (short high-pitched tone) through the
10 When
built-in speaker, press the [START] button.
38
2.SENDING A FAX
Searching address using LDAP server
Without using the address book in this equipment, you can select the remote Faxes registered in the
address book of the LDAP (Lightweight Directory Access Protocol) server via network. In this case, it is
required to register the directory search name using TopAccess via network beforehand. (You can also set
the default LDAP server that you want to select.) Ask your network administrator for details.
1 Place the original(s).
• P.20 “Setting originals”
2
2 Press the [FAX] button on the control panel.
the [ADDRESS] button to enter address menu, and then press
3 Press
the [SEARCH ADDRESS] button.
• If the LDAP server has already been set, go to step 6.
4 Press the [DIR SERVICE] button.
39
5.Specifying the Remote Fax (Cont.)
the directory search name that you want to search, and then
5 Press
press the [ENTER] button
2
6 Search the remote Fax, and then send it.
• Follow the procedure from step 4 in P.36 “Searching by address (Search address)”.
* Searching using the LDAP server is available for Fax number and E-mail.
40
2.SENDING A FAX
Multi-address transmission
The multi-address transmission function allows you to send the same document to 2 or more remote
Faxes in a single operation, which can be done by combining direct, address book and group entry. Combining with the Internet Fax function is also available. This eliminates the need of placing the original and
then dialing the number for each destination.
The following shows the number of destinations that can be entered according to how the remote Fax is
specified:
• By direct entry only: 400 destinations
• By address book entry only: 400 destinations
• By group entry only: 200 groups (400 destinations per a group, maximum 400 locations)
• By combining direct, address book and group entry: 400 destinations maximum
* Multi-address transmissions must be set in the memory TX mode. ( P.25 “Setting the transmission
conditions”)
2
1 Place the original(s).
• P.20 “Setting originals”
2 Press the [FAX] button on the control panel.
3 Press the [OPTION] button and set the transmission conditions.
• P.23 “4.Setting the Transmission Conditions”
4 Specify the remote Fax numbers.
• To continuously enter remote Fax numbers after having specified them by means of the digital keys, press the
[MULTI] button, then enter the next number. You do not need to press the [MULTI] button for the address book
or the group entry.
• The selected destinations can be confirmed by selecting the [DESTINATION] button. ( P.42 “Confirming the
destinations”)
• To cancel the remote Fax number entered with digital keys, press the [CLEAR] button on the control panel.
• To cancel a remote Fax specified with address book or group entry, press the highlighted button for the remote
Fax again. To cancel all specified remote Faxes, press the [ALL CLEAR] button.
• To cancel a remote Fax specified with direct entry, press the [DESTINATION] button to enter the destination
menu, and then cancel it. ( P.42 “Confirming the destinations”)
5 Specify all remote Faxes, then press the [START] button.
41
5.Specifying the Remote Fax (Cont.)
Confirming the destinations
After specifying multiple destinations by using multi-address transmitting, you can confirm the addresses
in the list by pressing the [DESTINATION] button. You can also delete the addresses by pressing the
[DELETE] button.
2
1 Press the [DESTINATION] button.
• Each screen displays 8 destinations. To view destinations which are not displayed on the screen, press the
[Prev] or [Next] button to switch the screens.
the destination that you wish to delete, and then press the
2 Select
[DELETE] button.
42
2.SENDING A FAX
6. Sending Originals
Direct transmission
In the direct transmission mode, the remote Fax is immediately dialed, and the originals are sent after a
successful connection with the remote Fax that has been completed.
• Users can check immediately if the original has been sent to the remote Fax.
• Once scanned, the originals are not stored in the memory.
• Users can specify only one remote Fax at one time.
• After a page has been sent, the next page is scanned. It takes longer to scan all pages.
• If an original is placed on the original glass, only one page can be sent.
* Memory transmission is set as the initial setting. Changing the initial setting to direct transmission
( P.144 “1.Setting the Initial Transmission Mode”)
2
Direct transmission by optional setting
1 Place the original(s).
• P.20 “Setting originals”
2 Press the [FAX] button on the control panel.
the [ADDRESS] button to enter the address menu, and then
3 Press
press the [OPTION] button.
the [DIRECT TX] button, set the other transmission conditions,
4 Press
then press the [ENTER] button.
• P.23 “4.Setting the Transmission Conditions”
43
6.Sending Originals (Cont.)
5 Specify the remote Fax.
• Specifying by digital keys ( P.31 “Direct entry with digital keys”)
• Specifying by address book ( P.32 “Address book entry”)
2
44
6 Press the [START] button.
• The remote Fax is dialed immediately and communication is initiated.
• Canceling the direct transmission ( P.72 “Canceling direct transmission (during scanning)”)
2.SENDING A FAX
Memory transmission
In the memory transmission mode, originals are scanned at high speed and temporarily stored in memory
before transmitting.
• Up to 100 transmissions can be reserved.
• Up to 1000 pages can be stored in 1 transmission.
• You can specify two or more remote Faxes at one time.
• If the original cannot be sent (the remote Fax is busy or otherwise unavailable), the remote Fax is automatically redialed repeatedly.
• If memory becomes full midway during scanning, the message "Will you enable stored originals?"
appears. Press the [YES] button to send the originals which have been scanned. Press the [NO] button
to delete the scanned originals. In this case, reduce the number of originals you are sending, or try
sending in the direct transmission mode. ( P.43 “Direct transmission”)
• If an original is placed on the original glass, the scanning conditions can be changed for each page.
( P.29 “Setting the scanning conditions for each page”)
2
1 Place the original(s).
• P.20 “Setting originals”
2 Press the [FAX] button on the control panel.
the [ADDRESS] button to enter the address menu, and then
3 Press
press the [OPTION] button.
the [MEMORY TX] button, set the other transmission condi4 Press
tions, then press the [ENTER] button.
• P.23 “4.Setting the Transmission Conditions”
45
6.Sending Originals (Cont.)
5 Specify the remote Fax.
•
•
•
•
2
Specifying by digital keys ( P.31 “Direct entry with digital keys”)
Specifying by address book ( P.32 “Address book entry”)
Specifying by group ( P.33 “Group entry”)
Specifying by multi-address transmission ( P.41 “Multi-address transmission”)
6 Press the [START] button.
• The original will be scanned and stored in memory.
• Canceling transmissions. ( P.68 “2.Canceling Transmissions”)
46
2.SENDING A FAX
Other transmissions
On-hook transmission
In this mode, you can confirm the answering tone from the remote FAX without picking up the handset of
the external telephone.
When the other party receives the call as a telephone call, you can talk by picking up the handset of the
external telephone.
• This operation is available when the Line 1 lamp is OFF.
2
1 Place the original(s).
• P.20 “Setting originals”
2 Press the [FAX] button on the control panel.
3 Press the [OPTION] button and set the transmission conditions.
• P.23 “4.Setting the Transmission Conditions”
4 Press the [MONITOR/PAUSE] button.
• You will hear the dial tone from the built-in speaker.
• To cancel the setting, press the [MONITOR/PAUSE] button
again.
5 Specify the remote Fax.
• Specifying by digital keys ( P.31 “Direct entry with digital keys”)
• Specifying by address book ( P.32 “Address book entry”)
Each press of a digital key dials a number. If you make a mistake when dialing the remote Fax number, press the
[MONITOR/PAUSE] button to cut the line, and then press the [MONITOR/PAUSE] button again to redial.
you hear the answer tone (short high-pitched tone) through the
6 When
built-in speaker indicating the connection has been made with the
remote Fax, press the [START] button.
When you hear the other party’s voice answering the call before pressing the [START] button, pick up the handset of the external telephone and press the [MONITOR/PAUSE] button. Then, ask him/her to operate their equipment for receiving a Fax.
47
6.Sending Originals (Cont.)
Off-hook transmission
This mode is available by picking up the handset of the external telephone to dial. When the other party
receives the call as a telephone call, you can talk with him/her.
• This operation is available when the Line 1 lamp is OFF.
2
•
•
An external telephone is required (not available for the European version).
You can specify the remote Fax only using the external telephone.
1 Place the original(s).
• P.20 “Setting originals”
2 Press the [FAX] button on the control panel.
3 Press the [OPTION] button and set the transmission conditions.
• P.23 “4.Setting the Transmission Conditions”
4 Pick up the handset of the external telephone.
5 Dial the remote FAX number with the external telephone.
Each press of a digital key dials a number. If you make a mistake when dialing the remote Fax number, put the
handset down to cut the line, and then pick up the handset again to redial.
you hear the answer tone (short high-pitched tone) through the
6 When
handset indicating the connection has been made with the remote
Fax, press the [START] button.
When the other party receives the call as a telephone call, ask him/her to operate their equipment for receiving a
Fax.
7 Replace the handset of the external telephone.
48
2.SENDING A FAX
Sending a Tone
Tone services can be used even on pulse dial lines.
receive a tone service, press the [#]
1 To
button of the digital key to switch over to
tone transmission.
• For details of services and how to receive Fax information services, contact your service provider.
2
This function can be used when a user uses “Pulse Dial” line.
49
2
50
2.SENDING A FAX
3. RECEIVING A FAX
1. Reception Modes ................................................................................................................. 52
3
2. Reception Settings ...............................................................................................................53
3. Relationship between Original and Paper............................................................................57
51
1. Reception Modes
•
Automatic Reception
Faxes are automatically received during the incoming call.
The line is designated for use exclusively by the Fax.
•
Manual Reception
Faxes are received when the user confirms the call on the telephone, press the [MANUAL RECEIVE]
button in the advanced menu and then the [START] button.
* An external telephone is required (not available for the European version).
•
Memory Reception
This equipment automatically stores received originals in memory if an error (e.g. a paper jam or out of
paper) occurs during reception and prevents the originals from being printed. After the trouble has
been cleared, printing is automatically resumed.
Memory Reception works in the following conditions.
- During copying
- During printing of received originals
- During printing of lists and reports
- When the equipment has run out of paper
- When a paper jam occurs
- When the equipment has run out of toner
•
Mailbox Reception
You can retrieve documents from mailbox hubs (confidential, bulletin board) that support the ITU-T
Mailbox functions.
•
Polling Reception
Users request transmission from a remote Fax, and receive the original that is stored in the remote
Fax’s memory. There are 2 types of polling RX: individual polling RX and multi-polling RX. A password
can be set.
3
52
3.RECEIVING A FAX
2. Reception Settings
There are 2 reception modes: auto reception and manual reception.
• AUTO reception
Set this mode when the phone line is used exclusively for Faxing. The Fax automatically receives
incoming originals.
The reception mode of line 2 is "Auto reception".
•
MANUAL reception
Set this mode when the Fax is connected to a line also used for voice telephone calls.
3
Setting of the reception mode
the [USER FUNCTIONS] button on
1 Press
the control panel.
2 Press the [ADMIN] button and then the [PASSWORD] button.
53
2.Reception Settings (Cont.)
the administrator password (6 to 10 digits), and then press the
3 Enter
[ENTER] button.
• Ask your administrator for the administrator password.
3
4 Press the [FAX] button.
5 Press the [INITIAL SETUP] button.
54
3.RECEIVING A FAX
the [AUTO] or [MANUAL] button to select the reception mode,
6 Press
and then press the [ENTER] button.
3
55
2.Reception Settings (Cont.)
Manual reception
*
An external telephone is required (not available for the European version).
1 When the bell rings, pick up the handset of the external telephone.
• If the incoming call is a telephone call, start talking with the other party.
3
you hear a tone (Fax signal), press the
2 If[FAX]
button on the control panel.
the [ADVANCED] button to enter the advanced menu, and then
3 Press
press the [MANUAL RECEIVE] button.
sure that “OFF HOOK RECEIVE” appears, press the [START]
4 Make
button and replace the handset.
56
3.RECEIVING A FAX
3. Relationship between Original and Paper
Acceptable size of paper
Originals received by Fax can be printed on LD, LG, LT, ST, A3, B4, A4, B5 and A5 size paper, and are
printed in the printing range of each size of paper. No printing will occur in the margins borders of the
received originals as indicated by the gray borders on the figures below.
•
•
Set the paper in the drawers, the Large Capacity Feeder (optional) or Paper Feed Pedestal (optional).
The paper set on the bypass tray is not available.
Regardless of the installation of the Finisher, the paper is output on the receiving tray.
3
Drawers can be set for Fax only. See the [Operator's Manual for Basic Function].
• If a specified drawer is set for Fax as a drawer by type, only the paper set in this drawer is used when
the equipment receives a Fax.
• The paper that can be set in the drawer for Fax is LD, LG, LT, LT-R, A3, A4, A4-R and B4 sizes.
* If you want to set ST-R, A5-R, B5 or B5-R size paper in the drawer for Fax, ask your service technician.
5 mm
5 mm
4 mm
5 mm
5 mm
4 mm
5 mm
5 mm
Setting RX printing during default setup
The received data are printed on paper which fits the incoming original size.
• When the incoming original is shorter or the same length as the paper printing area, it is printed in the
original size.
• When the incoming original is larger than the paper printing area, it is printed according to the following
priority: (Initial setting: Discard printing ON, Reduction printing ON) To change the configuration to
OFF, see P.160 “5.Setting RX Printing”.
1. When originals are up to 10 mm larger than the printing area; the part of the originals that exceeds the
paper printing area is discarded.
2. When originals are at least 10 mm larger than the printing area; If the original can fit on a single sheet
of paper by reducing it to 90%* of its original size, it is reduced and printed on a sheet of paper (Reduction printing). If the original cannot fit on a single sheet of paper, it is printed on 2 sheets of paper.
* LG size originals are reduced to 75% to fit onto LT or LT-R paper.
3. Originals are printed on larger size paper.
57
3.Relationship between Original and Paper (Cont.)
Paper priority when there is no same size paper
When RX reduction printing and discard printing are set to “ON”, paper is selected according to the following priority:
1. Paper of the same size and same orientation as the received original
2. Paper of the same size but with a different orientation to the received original
3. Paper of the same orientation but larger than the received original
•
3
American Size
Size of Original
being Received
Priority
Ledger
Legal
Letter
Letter
Statement
COMP
Ledger
Legal
Letter
Letter
Statement
COMP
Letter
Reduced to 75%
Letter
Letter
Letter
Ledger
Letter
Reduced to 75%
Ledger
Legal
Letter
COMP
Legal
COMP
Legal
Ledger
COMP
Ledger
COMP
1.
2.
3.
4.
5.
6.
Ledger
When the correct paper size is not available, the scanned original will be reduced by remote fax to fit an
available size paper (such as LD to LT) in addition to printing a received document on a larger size paper.
58
3.RECEIVING A FAX
•
European Size
Size of
Original
being
Received
Priority
1.
2.
A3
B4
A4
A4
A5
FOLIO
A3
B4
A4
A4
A5
FOLIO
A3
A4
A4
A4
B4
A3
FOLIO
A4
A3
FOLIO
B4
FOLIO
A4
Reduced to 75%
B4
A3
B5
A4
Reduced to 75%
3.
4.
5.
6.
7.
8.
3
B5
B4
A3
The paper priority varies according to the RX reduction printing and discard printing settings. For details,
contact your service technician.
59
3
60
3.RECEIVING A FAX
4. CHECKING AND CANCELING
THE COMMUNICATIONS
1. Checking Transmission Result.............................................................................................62
• Checking reserved transmissions .....................................................................................................62
• Checking communication status (log) ...............................................................................................64
• Address registration from send/receive log.......................................................................................66
2. Canceling Transmissions .....................................................................................................68
4
61
1. Checking Transmission Result
Checking reserved transmissions
You can check the following information of the transmission status (job) in the list on the touch panel.
4
•
•
•
•
•
File number
Receiver
Accepted date
Number of originals
Transmission status
Line1: Sending on line 1
Line2: Sending on line 2
Network: Sending via Internet Fax
Delayed: Sending via Delayed Transmission Reservation
Wait: Communication is in the standby queue.
Invalid: Under standby due to an invalid department code (N/W-Fax).
For N/W-Fax function, see the [Network Fax Guide].
4 jobs are listed on each screen (page). The job display for 100 jobs (25 pages) are available.
the [JOB STATUS] button on the
1 Press
control panel.
2 Press the [FAX] button.
• If the desired file columns are not displayed, press the [Prev] or [Next] button to switch the screens.
• Files are displayed in order beginning with the newest file.
• To output the list with the current reservation status, press the [RESERVATION LIST] button. ( P.118 “Printing reservation list”)
62
4.CHECKING AND CANCELING THE COMMUNICATIONS
Releasing the department code error
In the status column of “Fax/Internet FAX JOB” list, the job which is in “Invalid” status may appear.
In this case, release the invalid job as follows.
1. Enter user information required to use the equipment from the control panel.
2. Select the file with the invalid code, and press the [RELEASE] button on “Fax/Internet FAX JOB” list.
3. The “INVALID” job is sent as a job of the department which the user who performed user authentication
belongs to.
4
63
1.Checking Transmission Result (Cont.)
Checking communication status (log)
You can check the following information of the communication status (log) in the list on the touch panel.
4
•
•
•
•
•
File number
Receiver or sender
Accepted date
Number of originals
Communication result
OK: Transmission or reception succeeded.
4-digit error code: Transmission or reception failed. ( P.118 “Error code table”)
4 jobs are listed on each screen (page). The job display for 40 jobs (10 pages) are available.
The setting can be changed to display the list for 120 jobs (30 pages). ( P.121 “Setting the (transmission/reception) journal output and its number”)
1 Press the [JOB STATUS] button on the control panel.
the [LOG] button to enter the log menu, and then press the
2 Press
[SEND] or [RECEIVE] button.
64
4.CHECKING AND CANCELING THE COMMUNICATIONS
• If the desired file columns are not displayed, press the [Prev] or [Next] button to switch the screens.
• To output the list with the transmission or reception result, press the [JOURNAL] button. ( P.116 “1.Manually
Printing Lists & Reports”)
4
65
1.Checking Transmission Result (Cont.)
Address registration from send/receive log
You can register the information such as the remote Fax numbers and E-mail addresses in the address
book from the send/receive log screen.
* The following information can be registered from the Send log:
• Remote FAX number which was dialed by direct entry using the digital keys, or which was
searched for by the LDAP server
• E-mail address which was manually entered, or which was searched for by the LDAP server
* The following information can be registered from the Receive log:
• Remote FAX number which was dialed by direct entry using the digital keys, or which was
searched for by the LDAP server for a Polling Reception
• E-mail address of the sender
1 Press the [JOB STATUS] button on the control panel.
4
the [LOG] button to enter the log menu, and then press the
2 Press
[SEND] or [RECEIVE] button.
the remote Fax you want to register in the address book, and
3 Select
then press the [ENTRY] button.
66
4.CHECKING AND CANCELING THE COMMUNICATIONS
the item button you want to register, and then enter the recipi4 Select
ent's or sender's information.
• See the [Operator's Manual for Basic Function] for entering letters.
• ID number is automatically numbered.
• See the [User Functions Guide] for registering and correcting the address book.
4
5 Press the [ENTER] button.
67
2. Canceling Transmissions
Canceling transmissions (during scanning)
When an original is being scanned on the original glass:
1 When scanning of the original is finished, press the [JOB CANCEL].
• If you press the [JOB FINISH] button or do nothing for about 45 seconds after finishing the scanning, the
scanned data of the original start to be transmitted.
• To change the setting of the scanning conditions, press the [OPTION] button. ( P.29 “Setting the scanning
conditions for each page”)
4
2 Press the [Yes] button.
When originals are being scanned using the Reversing Automatic Document Feeder (optional):
the [STOP] button while the multi1 Press
ple originals are being scanned. Scanning (storing into memory) is paused.
68
4.CHECKING AND CANCELING THE COMMUNICATIONS
cancel the job, press the [JOB CANCEL] button while scanning is
2 To
paused.
• To resume scanning, press the [START] button on the control panel.
• When the [JOB FINISH] button is pressed, the scanned data of the original(s) start to be transmitted.
• To change the setting of the scanning conditions, press the [OPTION] button. ( P.29 “Setting the scanning
conditions for each page”)
• If you do nothing for about 45 seconds after the pause of the transmission, the transmission that is currently
being scanned is cleared from the memory.
4
3 Press the [YES] button.
69
2.Canceling Transmissions (Cont.)
Canceling reserved memory transmissions
This function allows you to cancel reserved memory transmissions that are currently stored in the memory
and waiting to be sent (including Delayed Transmission Reservation and Poling Transmission/Reception).
1 Press the [JOB STATUS] button on the control panel.
2 Press the [FAX] button.
3 Press the file to be canceled from memory.
4
4 Press the [DELETE] button.
5 When “Delete OK?” appears, press the [DELETE] button.
70
4.CHECKING AND CANCELING THE COMMUNICATIONS
Canceling transmissions (during memory transmission)
1 Press the [JOB STATUS] button on the control panel.
2 Press the [FAX] button.
3 Select the file that is currently being transmitted.
• Check that the status column indicates “Line1” (transmitting via line 1) or “Line2” (transmitting via line 2).
4 Press the [DELETE] button.
4
5 When “Delete OK?” appears, press the [DELETE] button.
71
2.Canceling Transmissions (Cont.)
Canceling direct transmission (during scanning)
the [STOP] button during transmis1 Press
sion (scanning).
• The transmission (scanning) operation is stopped.
Even if you cancel transmission in the direct TX mode, the part of
the original that was scanned before transmission was canceled
will be sent to the remote Fax.
4
72
4.CHECKING AND CANCELING THE COMMUNICATIONS
5. ADVANCED FUNCTIONS
1. Transmitting 2-Sided Originals.............................................................................................74
2. Priority Transmission............................................................................................................76
3. Polling Communication ........................................................................................................77
4. Mailbox Communication.......................................................................................................80
5. Chain Dial Communication ................................................................................................100
6. Delayed Transmission Reservation ...................................................................................102
7. Recovery Transmission......................................................................................................105
8. Onramp Gateway ...............................................................................................................107
5
9. Offramp Gateway ...............................................................................................................109
10.Save as File ....................................................................................................................... 111
73
1. Transmitting 2-Sided Originals
This function is used to scan and transmit 2-sided originals with the Reversing Automatic Document
Feeder (optional).
• Placing 2-sided A4/LT originals
When you place a 2-sided original on the Reversing Automatic Document Feeder (optional), change
the direction of the original depending on its bound position as follows:
1. Right-to-left (book-type) original
2. Top-to-bottom (tablet-type) original
1
•
5
2
Note that each setting will automatically return to its default setting when one transmission is completed.
1 Place the original(s).
• P.20 “Setting originals”
the [FAX] button on the control
2 Press
panel.
3 Press the [OPTION] button and set the transmission conditions.
• P.23 “4.Setting the Transmission Conditions”
74
5.ADVANCED FUNCTIONS
the [ADVANCED] button to enter the advanced menu, and then
4 Press
press the [2-SIDED SCAN] button.
the [BOOK] or [TABLET] button depending on the bound posi5 Press
tion of the original(s), and then press the [ENTER] button.
5
6 Specify the remote Fax
•
•
•
•
Entering the Fax number ( P.31 “Direct entry with digital keys”)
Selecting from address book ( P.32 “Address book entry”)
Selecting by group registration ( P.33 “Group entry”)
Selecting using multi-address transmission ( P.41 “Multi-address transmission”)
7 Press the [START] button.
75
2. Priority Transmission
Priority Transmission allows you to perform a transmission prior to other reserved transmissions (including
redial standby).
• For this function, only a direct dialing method (with digital keys) and an address book entry method are
available.
• Only one remote Fax can be specified per one transmission in this function.
1 Place the original(s).
• P.20 “Setting originals”
2 Press the [FAX] button on the control panel.
3 Press the [OPTION] button and set the transmission conditions.
• P.23 “4.Setting the Transmission Conditions”
5
the [ADVANCED] button to enter the advanced menu, and then
4 Press
press the [PRIORITY RESERVE] button.
5 Press the [ENTER] button.
6 Specify the remote Fax
• Entering the Fax number ( P.31 “Direct entry with digital keys”)
• Selecting from address book ( P.32 “Address book entry”)
7 Press the [START] button.
76
5.ADVANCED FUNCTIONS
3. Polling Communication
This function is used when you want to receive a Fax from a sender upon your request.
The receiver can receive the Fax whenever he or she wants. This function is set at the sender's side by
storing the data of an original into memory. This operation is called polling transmission. The polling reservation is valid for only 1 transmission; the data of the original will be cleared once it has been transmitted
upon the receiver's request. The sender can limit the receiver by attaching a password and the receiver's
Fax number so that any receiver not identified as the correct receiver with the password and Fax number
will not receive the Fax.
* Polling communication with a password can be used only with OKI Fax machines.
Polling transmission
1 Place the original(s).
• P.20 “Setting originals”
2 Press the [FAX] button on the control panel.
3
Press the [OPTION] button and set the transmission conditions.
5
• P.23 “4.Setting the Transmission Conditions”
the [ADVANCED] button to enter the advanced menu, and then
4 Press
press the [POLLING RESERVE] button.
in the password (4 digits) and/or Fax number (maximum 20 digits)
5 Key
if necessary and then press the [ENTER] button.
77
3.Polling Communication (Cont.)
6 Press the [START] button.
• Scanning starts and the scanned data will be stored in a memory.
• Canceling the polling transmission ( P.70 “Canceling reserved memory transmissions”)
5
78
5.ADVANCED FUNCTIONS
Polling reception
There are 2 types of polling reception as follows:
• Individual polling reception: Receiving a Fax from one sender
• Multi-polling reception: Receiving a Fax from 2 or more senders in a single operation. This function can
be used in combination with the direct dialing, address book entry and group entry.
1 Press the [FAX] button on the control panel.
the [ADVANCED] button to enter the advanced menu, and then
2 Press
press the [POLLING] button.
5
in the password (4 digits) if the password check is set for the
3 Key
remote Fax, and then press the [ENTER] button.
4 Specify the remote Fax
• Individual polling reception:
- Entering the Fax number ( P.31 “Direct entry with digital keys”)
- Selecting from address book ( P.32 “Address book entry”)
• Multi-polling reception:
Selecting by group registration ( P.33 “Group entry”)
Selecting using multi-address transmission ( P.41 “Multi-address transmission”)
5 Press the [START] button.
79
4. Mailbox Communication
This function is used to communicate between Fax machines compatible with a mailbox function (ITU-T
compatible). The owners of these Fax machines can input or retrieve the data of originals in the mailbox.
There are 3 types of mailbox; confidential mailbox, bulletin board mailbox and multi-address relay mailbox.
To perform mailbox communication, the mailboxes must be set in advance. Total 300 mailboxes can be set
for the 3 types listed below, and an individual password for each box can be set for security protection.
This equipment also supports the Inbound FAX routing by TSI function that designates a sender’s fax
number for a mailbox number. “Forward Mailbox” setting on TopAccess makes this function available, and
the received document is forwarded to the specified destination (file/Email/e-Filing) according to the
sender’s fax number. If a mailbox has been created as “Confidential”, “Bulletin Board” or “Relay”, the
received document is not forwarded even when the mailbox number matches the sender’s fax number. For
details, see the TopAccess Guide.
•
5
•
•
Confidential mailbox:
Once the data of an original is retrieved from this box, this data will be deleted. If a new data is input in
this box under the same box number where another data exists, the new data will be added to the
existing data.
Bulletin board mailbox:
Even if the data of an original is retrieved from this box, this data will not be deleted. If a new data is
input in this box under the same box number where another data exists, the new data will overwrite the
existing data.
Multi-address relay mailbox:
A Fax machine with mailbox function transmits a Fax specifying a certain mailbox as a relay mailbox,
and then the relay station forwards the Fax to the destination previously registered in the relay mailbox.
In this case, the Fax machine of the original sender is called a relay originator, the Fax machine which
forwards the Fax is called a relay station and the Fax machine which receives the Fax at the last stage
is called a relay destination. A relay station can send a report (relay destination transmission report) to
a specified Fax machine involved in the multi-address relay transmission after completing the transmission. A relay station can also print out the Fax from a relay originator always or only when the relay
transmission has failed.
Example of multi-address relay mailbox
If you want to transmit the same original to several offices in New York from Los Angeles office, you can
reduce the communication cost utilizing a multi-address relay mailbox function, by setting the New York
office "A" as a relay station (see the figures below).
<Procedure>
1. Set a relay mailbox in the New York office "A". ( P.83 “Setting up relay mailbox”)
2. Transmit the original from the Los Angeles office to the relay mailbox in the New York office "A".
( P.96 “Transmitting Fax to mailbox”)
VIA RELAY MAILBOX
NORMAL
LA office
(213)
NY office A
(212)
NY office B
(212)
NY office C NY office D
(212)
(212)
- 4 long-distance calls
80
5.ADVANCED FUNCTIONS
Relay Originator
Relay Station
Relay
Destination
LA office
(213)
NY office A
(Relay Mailbox)
(212)
NY office B
NY office C
NY office D
(local)
(local)
(local)
- 1 long-distance call to the NY office A
(relay mailbox) and 3 local calls between
the NY office A (relay mailbox) and each office.
Setting up mailbox for confidential and bulletin board communication
How to create a confidential mailbox or bulletin box mailbox on sender's side is explained here.
1 Press the [FAX] button on the control panel.
the [ADVANCED] button to enter the advanced menu, and then
2 Press
press the [ITU MAILBOX] button.
5
the [CONFIDENTIAL] (or [BULLETIN BD.]) button, and then
3 Press
press the [BOX SETUP] button.
4 Press the [ENTER] button.
81
4.Mailbox Communication (Cont.)
the [BOX NUMBER] button to enter the next menu, key in the
5 Press
box number(s) (maximum 20 digits), and then press the [ENTER] button.
• If you want to set up a password, press the [PASSWORD] button to enter the next menu, key in the password
(maximum 20 digits) and then press the [ENTER] button.
• The password being entered is indicated with "*".
5
• A password is required to Transmit to a Bulletin Board Mailbox from a remote fax.
• A password is required to Poll a Confidential Mailbox from a remote fax.
that the registered information is correct, and then press the
6 Confirm
[ENTER] button.
• If the entered box number has already been registered, "Already assigned" appears.
Press the [BOX NUMBER] button to enter the next menu, press the [Back Space] button to delete this box
number and key in a new box number.
The registered mailboxes can be confirmed in a mailbox list. ( P.119 “Printing ITU mailbox list”)
82
5.ADVANCED FUNCTIONS
Setting up relay mailbox
How to create a relay mailbox on sender's side is explained here.
1 Press the [FAX] button on the control panel.
the [ADVANCED] button to enter the advanced menu, and then
2 Press
press the [ITU MAILBOX] button.
5
3 Press the [RELAY] button, and then press the [BOX SETUP] button.
4 Press the [ENTER] button.
83
4.Mailbox Communication (Cont.)
the [BOX NUMBER] button to enter the next menu, key in the
5 Press
box number(s) (maximum 20 digits), and then press the [ENTER] button.
• If you want to set up a password, press the [PASSWORD] button to enter the next menu, key in the password
(maximum 20 digits) and then press the [ENTER] button.
• The password being entered is indicated with "*".
5
the relay destination to be registered from the address book
6 Specify
or the group list.
• Press the [GROUP] button to enter the group list menu.
• Press the [Prev] or [Next] button to scroll through the menus.
• You can search the desired destination by its ID number ( P.34 “Searching by ID number”) and address (
P.36 “Searching by address (Search address)”).
that the registered information is correct, and then press the
7 Confirm
[ENTER] button.
84
5.ADVANCED FUNCTIONS
want to send the relay destination transmission report, press
8 Iftheyou
[YES] button.
• If you press the [NO] button here, steps 9 and 10 are not necessary.
• For the relay destination transmission report, see P.120 “2.Automatically Printing Lists & Reports”.
The default operation of the relay destination transmission report is "On Error". For configuration of this operation, see P.123 “Setting the communication report output”.
5
Specify the remote Fax to receive the relay destination transmission
9 report
from the address book or by a direct dialing (with the digital
keys).
• Only one remote Fax can receive this report.
• To correct the selected remote Fax,
Specifying from the address book:
Press the [FAX] button of the selected remote Fax (the highlight will be cleared) and then press the [FAX] button of the correct remote Fax.
Specifying by a direct dialing:
Press the [Back Space] button to delete the wrong number and then key in the correct number.
that the registered information is correct, and then press the
10 Confirm
[ENTER] button.
The registered mailboxes can be confirmed in a mailbox list. ( P.119 “Printing ITU mailbox list”)
85
4.Mailbox Communication (Cont.)
the [ALWAYS] button to always print out the received Fax, or
11 Press
press the [ON ERROR] button to print it out only when the relay transmission has failed.
5
86
5.ADVANCED FUNCTIONS
Deleting mailbox
How to delete a mailbox no longer needed is explained here.
1 Press the [FAX] button on the control panel.
the [ADVANCED] button to enter the advanced menu, and then
2 Press
press the [ITU MAILBOX] button.
5
the [CONFIDENTIAL] (or [BULLETIN BD.] or [RELAY]) button,
3 Press
and then press the [BOX DELETE] button.
4 Press the [ENTER] button.
• If the selected mailbox has not been set, "No entry" appears.
87
4.Mailbox Communication (Cont.)
the [BOX NUMBER] button to enter the next menu, key in the
5 Press
box number(s) (maximum 20 digits), and then press the [ENTER] button.
• If a password has been set, press the [PASSWORD] button to enter the next menu, key in the password (maximum 20 digits) and then press the [ENTER] button.
* You can delete the mailbox with the administrator password. Ask the administrator about the administrator
password.
5
6 Press the [ENTER] button.
7 Press the [YES] button.
• In case of deleting a confidential mailbox or a bulletin board mailbox, "Not allowed now" appears if the [YES]
button is pressed while some data are still in these mailboxes.
• If the box number keyed in is not correct, "No entry" appears. If the password keyed in is not correct, "Invalid
number" appears. Key in the correct box number or password.
88
5.ADVANCED FUNCTIONS
Modifying relay mailbox
How to modify the content of a relay mailbox is explained here.
1 Press the [FAX] button on the control panel.
the [ADVANCED] button to enter the advanced menu, and then
2 Press
press the [ITU MAILBOX] button.
5
3 Press the [RELAY] button, and then press the [MODIFY] button.
4 Press the [ENTER] button.
• If the selected mailbox has not been set, "No entry" appears.
89
4.Mailbox Communication (Cont.)
the [BOX NUMBER] button to enter the next menu, key in the
5 Press
box number(s) (maximum 20 digits), and then press the [ENTER] button.
• If a password has been set, press the [PASSWORD] button to enter the next menu, key in the password (maximum 20 digits) and then press the [ENTER] button.
5
6 Press the [ENTER] button.
• If the box number keyed in is not correct, "No entry" appears. If the password keyed in is not correct, "Invalid
number" appears. Key in the correct box number or password.
the remote Fax. (The field of the remote Fax currently
7 Correct
selected is highlighted.)
•
•
•
•
•
You can add a remote Fax from the address book or the registered group.
To delete the remote Fax, press the [FAX] button of the highlighted field again.
Press the [GROUP] button to enter the group list menu.
Press the [Prev] or [Next] button to scroll through the menus.
You can search the desired destination by its ID number ( P.34) and address ( P.36).
that the registered information is correct, and then press the
8 Confirm
[ENTER] button.
90
5.ADVANCED FUNCTIONS
want to send the relay destination transmission report, press
9 Iftheyou
[YES] button.
• If you press the [NO] button here, steps 10 and 11 are not necessary.
• For the relay destination transmission report, see ( P.120 “2.Automatically Printing Lists & Reports”).
Specify the remote Fax to receive the relay destination transmission
10 report
from the address book or by a direct dialing (with the digital
keys).
5
• Only one remote Fax can receive this report.
• To change the selected remote Fax, delete it and specify a new one.
that the registered information is correct, and then press the
11 Confirm
[ENTER] button.
• The mailbox has been set.
the [ALWAYS] button to always print out the received Fax, or
12 Press
press the [ON ERROR] button to print it out only when the relay transmission has failed.
91
4.Mailbox Communication (Cont.)
Printing Fax out of mailbox
How to print a Fax out of a confidential mailbox or a bulletin board mailbox on the sender's side is
explained here.
1 Press the [FAX] button on the control panel.
the [ADVANCED] button to enter the advanced menu, and then
2 Press
press the [ITU MAILBOX] button.
5
the [CONFIDENTIAL] (or [BULLETIN BD.]) button, and then
3 Press
press the [PRINT] button.
4 Press the [ENTER] button.
• If the selected mailbox has not been set, "No entry" appears.
92
5.ADVANCED FUNCTIONS
the [BOX NUMBER] button to enter the next menu, key in the
5 Press
box number(s) (maximum 20 digits), and then press the [ENTER] button.
• If a password has been set, press the [PASSWORD] button to enter the next menu, key in the password (maximum 20 digits) and then press the [ENTER] button.
6 Press the [START] button.
• If there is no registered data or the box number keyed in is not correct, "No entry" appears. If the password
keyed in is not correct, "Invalid number" appears. Key in the correct box number or password.
5
Inputting data in confidential / bulletin board mailbox
How to input a Fax data into a confidential mailbox or a bulletin board mailbox on the sender's side is
explained here.
1 Place the original(s).
• P.20 “Setting originals”
2 Press the [FAX] button on the control panel.
3 Press the [OPTION] button and set the transmission conditions.
• P.23 “4.Setting the Transmission Conditions”
the [ADVANCED] button to enter the advanced menu, and then
4 Press
press the [ITU MAILBOX] button.
93
4.Mailbox Communication (Cont.)
the [CONFIDENTIAL] (or [BULLETIN BD.]) button, and then
5 Press
press the [INPUT] button.
6 Press the [ENTER] button.
• If the selected mailbox has not been set, "No entry" appears.
5
the [BOX NUMBER] button to enter the next menu, key in the
7 Press
box number(s) (maximum 20 digits), and then press the [ENTER] button.
• If a password has been set, press the [PASSWORD] button to enter the next menu, key in the password (maximum 20 digits) and then press the [ENTER] button.
8 Press the [ENTER] button.
• If the box number keyed in is not correct, "No entry" appears. If the password keyed in is not correct, "Invalid
number" appears. Key in the correct box number or password.
9 Press the [START] button.
• The original data is registered in the mailbox as it is scanned to memory.
• When you cancel the registration, press the [STOP] button and then press the [JOB CANCEL] button.
94
5.ADVANCED FUNCTIONS
Canceling data in mailbox
How to delete Fax data in a confidential mailbox or a bulletin board mailbox on the sender's side is
explained here.
1 Press the [FAX] button on the control panel.
the [ADVANCED] button to enter the advanced menu, and then
2 Press
press the [ITU MAILBOX] button.
5
the [CONFIDENTIAL] (or [BULLETIN BD.]) button, and then
3 Press
press the [CANCEL] button.
4 Press the [ENTER] button.
• If the selected mailbox has not been set, "No entry" appears.
the [BOX NUMBER] button to enter the next menu, key in the
5 Press
box number(s) (maximum 20 digits), and then press the [ENTER] button.
• If a password has been set, press the [PASSWORD] button to enter the next menu, key in the password (maximum 20 digits) and then press the [ENTER] button.
* You can delete a confidential mailbox or a bulletin board mailbox with the administrator password. Ask the
administrator about the administrator password.
6 Press the [ENTER] button.
95
4.Mailbox Communication (Cont.)
7 Press the [YES] button.
• The data has been deleted from the mailbox.
• If the box number keyed in is not correct, "No entry" appears. If the password keyed in is not correct, "Invalid
number" appears. Key in the correct box number or password.
5
Transmitting Fax to mailbox
How to transmit and register Fax data into mailbox on receiver's side (remote Fax) is explained here.
1 Place the original(s).
• P.20 “Setting originals”
2 Press the [FAX] button on the control panel.
3 Press the [OPTION] button and set the transmission conditions.
• P.23 “4.Setting the Transmission Conditions”
the [ADVANCED] button to enter the advanced menu, and then
4 Press
press the [ITU MAILBOX] button.
96
5.ADVANCED FUNCTIONS
the [CONFIDENTIAL] (or [BULLETIN BD.] or [RELAY]) button,
5 Press
and then press the [TRANSMIT] button.
6 Press the [ENTER] button.
the [BOX NUMBER] button to enter the next menu, key in the
7 Press
box number(s) (maximum 20 digits), and then press the [ENTER] but-
5
ton.
• If a password has been set, press the [PASSWORD] button to enter the next menu, key in the password (maximum 20 digits) and then press the [ENTER] button.
A password entry is necessary for the data transmission of a bulletin board mailbox.
8 Press the [ENTER] button.
9 Specify the remote Fax
•
•
•
•
Entering the Fax number ( P.31 “Direct entry with digital keys”)
Selecting from address book ( P.32 “Address book entry”)
Selecting by group registration ( P.33 “Group entry”)
Selecting using multi-address transmission ( P.41 “Multi-address transmission”)
10 Press the [START] button.
• The original data is transmitted to the remote mailbox after it is scanned to memory.
• If you want to cancel the transmission during scanning, press the [STOP] button and then press the [JOB CANCEL] button.
• If you want to cancel the transmission while underway, press [JOB STATUS], [FAX], select the correct entry,
and press [DELETE]. ( P.71 “Canceling transmissions (during memory transmission)”)
• The registered box number will be transmitted as a SUB address.
• The registered password will be transmitted as a SID.
97
4.Mailbox Communication (Cont.)
Polling data out of mailbox
How to poll (retrieve) Fax data out of a confidential mailbox or a bulletin board mailbox on receiver's side
(remote Fax) is explained here.
1 Press the [FAX] button on the control panel.
the [ADVANCED] button to enter the advanced menu, and then
2 Press
press the [ITU MAILBOX] button.
5
the [CONFIDENTIAL] (or [BULLETIN BD.]) button, and then
3 Press
press the [POLLING] button.
4 Press the [ENTER] button.
98
5.ADVANCED FUNCTIONS
the [BOX NUMBER] button to enter the next menu, key in the
5 Press
box number(s) (maximum 20 digits), and then press the [ENTER] button.
• If a password has been set, press the [PASSWORD] button to enter the next menu, key in the password (maximum 20 digits) and then press the [ENTER] button.
A password entry is necessary for the data polling out of a confidential mailbox.
5
6 Press the [ENTER] button.
7 Specify the remote Fax
•
•
•
•
Entering the Fax number ( P.31 “Direct entry with digital keys”)
Selecting from address book ( P.32 “Address book entry”)
Selecting by group registration ( P.33 “Group entry”)
Selecting using multi-address transmission ( P.41 “Multi-address transmission”)
8 Press the [START] button.
• The data is polled (retrieved) out of the mailbox and received as a Fax.
• The registered box number is transmitted as an SEP address.
• The registered password is transmitted as a PWD.
99
5. Chain Dial Communication
This function is used when you want to combine several numbers to select remote Fax machines using
long distance carriers and specialized access lines. You can combine sets of numbers (address book entry
and direct entry) by first pressing the [CHAIN DIAL COMM.] button.
* 128 digits of numbers in total can be set in this function.
1 Place the original(s).
• P.20 “Setting originals”
2 Press the [FAX] button on the control panel.
3 Press the [OPTION] button and set the transmission conditions.
• P.23 “4.Setting the Transmission Conditions”
5
the [ADVANCED] button to enter the advanced menu, and then
4 Press
press the [CHAIN DIAL COMM.] button.
the number to be dialed first either from the address book or
5 Specify
by direct dialing.
• e.g. Key in the dial out number (011 if calling from the U.S.A.).
100
5.ADVANCED FUNCTIONS
the number to be dialed next either from the address book or
6 Specify
by direct dialing.
• e.g. Press the [Italy 39] button in the address book as an international code, and then press the [Rome Office]
button in the address book.
5
7 Press the [START] button.
• The transmission will start in the order of the remote Fax machines entered.
101
6. Delayed Transmission Reservation
This function is used when you want to transmit a Fax at a specified date and time. It is useful when you
want to make use of off-peak discounts (e.g. nighttime) or you want to transmit a Fax to a country which
has a time difference.
• The acceptable range of reservation is up to one month later.
• The date, hour and minute of reception time can be set.
• The date and time of reception can also be set in a polling reception.
Using delayed transmission reservation
1 Place the original(s).
• P.20 “Setting originals”
2 Press the [FAX] button on the control panel.
5
3 Press the [OPTION] button and set the transmission conditions.
• P.23 “4.Setting the Transmission Conditions”
the [ADVANCED] button to enter the advanced menu, and then
4 Press
press the [DELAYED TX RESERVE] button.
5 Key in the date, hour, and minute.
• Press the [ ] and [ ] buttons to move the cursor.
• Key in the time using the 24-hour clock system.
• To correct the entry, press the [CLEAR] button, and then key in the correct number.
102
5.ADVANCED FUNCTIONS
6 Press the [ENTER] button.
7 Specify the remote Fax
•
•
•
•
Entering the Fax number ( P.31 “Direct entry with digital keys”)
Selecting from address book ( P.32 “Address book entry”)
Selecting by group registration ( P.33 “Group entry”)
Selecting using multi-address transmission ( P.41 “Multi-address transmission”)
8 Press the [START] button.
• Canceling delayed transmission reservation of which status is "Wait" ( P.70 “Canceling reserved memory
transmissions”)
• Canceling delayed transmission that is currently being transmitted ( P.71 “Canceling transmissions (during
memory transmission)”)
Releasing delayed transmission reservation
How to release a delayed transmission reservation and perform a memory transmission is explained here.
1
Press the [JOB STATUS] button on the
control panel.
5
2 Press the [FAX] button.
3 Select the data to be released.
• "Delayed" appears in the status field of the subject data.
103
6.Delayed Transmission Reservation (Cont.)
4 Press the [RELEASE] button.
• The reservation is canceled and the memory transmission is performed.
• Canceling the delayed transmission reservation of which status is "Wait" ( P.70 “Canceling reserved memory transmissions”)
• Canceling delayed transmission that is currently being transmitted ( P.71 “Canceling transmissions (during
memory transmission)”)
5
To cancel the delayed transmission reservation of which status is “Delayed”, press the [DELETE] button.
104
5.ADVANCED FUNCTIONS
7. Recovery Transmission
This function is used to transmit a Fax without placing an original again when the Fax was not transmitted
after the specified number of redial. The Fax data of the failed transmission will be retained in a memory,
and you can select and retrieve the data to transmit again in the operation on the touch panel.
The retention period of the data needs to be set in advance. ( P.168 “6.Setting Recovery Transmission”)
Using recovery transmission
1 Press the [FAX] button on the control panel.
the [ADVANCED] button to enter the advanced menu, and then
2 Press
press the [RECOVERY TX] button.
5
3 Select the data you want to retransmit.
• You can change the Fax number only when the first transmission is performed by a direct dialing. Press the
[BACK SPACE] button to delete it, and then key in a new number.
4 Press the [SEND] button.
105
7.Recovery Transmission (Cont.)
Canceling recovery transmission
1 Press the [FAX] button on the control panel.
the [ADVANCED] button to enter the advanced menu, and then
2 Press
press the [RECOVERY TX] button.
5
3 Select the data you want to cancel.
4 Press the [JOB CANCEL] button.
5 Press the [YES] button.
106
5.ADVANCED FUNCTIONS
8. Onramp Gateway
Onramp gateway overview
This function is used to transmit a Fax from a Fax machine with a mailbox function to an E-mail address
registered in the mailbox of a relay station through the relay station.
ITU-T compatible
G3 FAX
3. The facsimile is converted to
an E-mail and forward to a
mail server through the LAN.
OKI CX1145 MFP
Mail Server
Mail Server
Relay Box
2. The E-mail addresses are
assigned to the end stations
in the Relay Box.
1. A facsimile is sent to the Relay
Box of the machine through the
public switched telephone line.
4. The E-mail is delivered
through the Internet, and
transfered to the end station.
Internet FAX
machine
5
Internet
Mail Server
Personal Computer
107
8.Onramp Gateway (Cont.)
Setting relay mailbox
To use this equipment as a relay station for an onramp gateway transmission, set up a relay mailbox on
this equipment and then register an E-mail address as a relay destination. When the onramp gateway
function is used, all Fax machines with the mailbox function can transmit a Fax to this equipment (relay
station), and this equipment can forward the Fax to the specified E-mail address as an E-mail.
You can select an E-mail address as a relay destination from the address book or group list when you set
up a relay mailbox. Register the desired E-mail address into the address book before setting up the relay
mailbox.
Fax numbers, as well as E-mail addresses, can be registered as relay destinations in a relay mailbox.
See P.80 “4.Mailbox Communication”for the details of mailbox communication, how to register a Fax
number as a relay destination in a relay mailbox, or how to delete the mailbox. To assign an E-mail
address as a relay destination, see “Setup Flow for Onramp Gateway” of the Network Administration
Guide. To assign Internet FAX as a relay destination, see “Setup Flow for Internet Fax” of the Network
Administration Guide.
5
108
5.ADVANCED FUNCTIONS
9. Offramp Gateway
Offramp gateway overview
This function is used to convert an E-mail, received at this equipment as a relay station, into a Fax data
and forward it to another Fax machine through a public telephone line.
It is useful when you want to reduce communication cost by using both the Internet and public telephone
lines. For example, when you want to send a document out of your city or overseas, the document can be
sent as an E-mail to this equipment through the Internet, and then it will be forwarded to a target Fax
machine as a Fax data through a public telephone line.
2. The mail server (oki.com) retrieves the
E-mail.
NOTE: The mail server should be configured to
retrieve the E-mail with the forwarding
address of “host1.oki.com”.
1. The E-mail is sent to
“[email protected]”
from the Internet Fax machine or
client computer.
Internet FAX
machine
3. The mail server transfer the E-mail to
the machine in the SMTP transmission.
NOTE: The mail server should be
configured to retrieve the E-mail
with the forwarding address of
“host1.oki.com”.
OKI CX1145 MFP
(host1.oki.com)
[email protected]
5
Mail Server
E-mail
Internet
Intranet
Mail Server
(oki.com)
E-mail
Mail Server
Personal Computer
Subaddress
Destination
G3 FAX
ITU-T Mailbox
4. The E-mail is converted to a facsimile and sent to the G3 Fax through the
public switched telephone network.
5. If the username section of the E-mail address designates the fax number and
the subaddress, the facsimile is sent to the subaddress destination.
•
P.110 “Transmitting data in offramp gateway”
109
9.Offramp Gateway (Cont.)
To receive an E-mail using SMTP
This equipment receives E-mails using a Simple Mail Transfer Protocol (SMTP) to enable the offramp
gateway transmission. SMTP is a server protocol for sending E-mails from a client PC to a mail server or
between servers.
When the SMTP server setting is enabled in the network setting of this equipment, this equipment can
receive E-mails forwarded using SMTP.
To receive E-mails, this equipment is usually registered as a host machine. In this case, this equipment
receives E-mails using POP3 server as the other client PCs do. To enable offramp gateway function, however, this equipment must receive E-mails forwarded using SMTP. Therefore this equipment should be
registered as a mail server or some additional settings may be required depending on a mail server used.
See the TopAccess Guide for details.
•
5
Text data and TIFF format image data are the only file formats this equipment can receive. See the
Scanning Guide for details.
Transmitting data in offramp gateway
When you want to send an E-mail to this equipment with offramp gateway function or when you want to set
this equipment as a relay station to perform an offramp gateway transmission, advise the sender of how to
perform an offramp gateway transmission.
To set this equipment as a relay station to perform an offramp gateway transmission:
Send an E-mail to this equipment with an E-mail address including a Fax number of a relay destination.
You can also attach a subaddress (mailbox subaddress).
•
Sending to a Fax machine
FAX=xxxxxxxx@FQDN
The Fax number of a relay destination comes at "xxxxxxxx".
e.g.:
In case that the domain name (FQDN) of this equipment is "host1.oki.com" and the Fax number is
"1212121212", the Fax should be sent at "[email protected]".
•
Sending to a subaddress
FAX=xxxxxxxx/T33S=yyyy@FQDN
The Fax number of a relay destination comes at "xxxxxxxx".
e.g.:
In case that the domain name (FQDN) of this equipment is "host1.oki.com", the Fax number is
"1212121212", and the subaddress is "1234", the Fax should be sent at "FAX=1212121212/
[email protected]".
"T33S" in the above is a code which denotes a subaddress. When a Fax is transmitted at the subaddress
of the Fax machine in the offramp gateway function, the Fax number and the subaddress number should
be divided by a slash "/".
110
5.ADVANCED FUNCTIONS
10. Save as File
This function is used to save transmitted Fax data to the shared folder of this device or a network folder
you specify. Once the data is saved to the desired location, you can access the files using Windows
Explorer or My Network Places.
* To save a Fax data into a client PC, the network administrator has to make some settings in advance.
See the TopAccess Guide for details.
* The hard disk of this equipment may break down in rare cases. Be sure to back up the data in the
shared folder of this equipment.
1 Place the original(s).
• P.20 “Setting originals”
2 Press the [FAX] button on the control panel.
the [FILE] button to enter the file menu, and then press the
3 Press
[SAVE AS FILE] button.
5
111
10.Save as File (Cont.)
the [FILE NAME] button to enter the file name (maximum 45 let4 Press
ters) of the original to be saved, and then press the [ENTER] button.
• To enter letters, see the Operator's Manual for Basic Function.
5
5 Select the location where the data is saved.
• [MFP LOCAL]: Select it when the data should be saved in the hard disk of this equipment. The data will be
saved under the directory path shown on the menu.
• [REMOTE 1] and [REMOTE 2]: Select them when the data should be saved in the hard disk of a client PC
through a server. The administrator has to make some settings in advance using the TopAccess function to
select either of them. See the TopAccess Guide for details.
112
5.ADVANCED FUNCTIONS
6 Select the file format.
•
•
•
•
•
•
*
[PDF (MULTI)]: Select it when the data should be saved as a multiple-page PDF file.
[PDF (SINGLE)]: Select it when the data should be saved as a single-page PDF file.
[TIFF (MULTI)]: Select it when the data should be saved as a multiple-page TIFF file.
[TIFF (SINGLE)]: Select it when the data should be saved as a single-page TIFF file.
[XPS (MULTI)]: Select it when the data should be saved as a multiple-page XPS file.
[XPS (SINGLE)]: Select it when the data should be saved as a single-page XPS file.
When the data is being saved, a folder called TXFAX folder is automatically created and the data is saved in
this folder. When “TIFF (SINGLE)”, “PDF (SINGLE)”, or “XPS (SINGLE)” is selected, another folder with the file
name entered in step 4 is automatically created and each page of the data is saved in this folder. The client PC
can access the saved data by opening the shared folder in the hard disk of this equipment on the network.
5
7 Press the [ENTER] button after all the settings have been made.
8 Specify the remote Fax
•
•
•
•
Entering the Fax number ( P.31 “Direct entry with digital keys”)
Selecting from address book ( P.32 “Address book entry”)
Selecting by group registration ( P.33 “Group entry”)
Selecting using multi-address transmission ( P.41 “Multi-address transmission”)
9 Press the [START] button.
113
5
114
5.ADVANCED FUNCTIONS
6. PRINTING LISTS AND REPORTS
1. Manually Printing Lists & Reports ...................................................................................... 116
2. Automatically Printing Lists & Reports ...............................................................................120
• Automatically printing lists & reports ...............................................................................................120
• Setting the lists and reports output..................................................................................................121
3. Lists/Reports Samples .......................................................................................................129
6
115
1. Manually Printing Lists & Reports
You can print the following lists and reports.
* Lists and reports are printed on LT/A4-size paper.
If the equipment has run out of LT/A4-size paper, lists and reports will be printed on larger sized paper.
•
Transmission journal:
List of transmissions. Outputs the latest 40 (or 120) transmissions.
Switching the number of communications output ( P.121 “Setting the (transmission/reception) journal output and its number”)
•
Reception journal:
List of receptions. Outputs the latest 40 (or 120) receptions.
Switching the number of communications output ( P.121 “Setting the (transmission/reception) journal output and its number”)
•
Reservation list:
List of the files in memory that are standing by to be sent.
•
Address book information:
List of names, phone numbers of remote Faxes, E-mail address, SUB/SEP and SID/PWD entered in
the address book.
To print out the list, see the [User Functions Guide].
•
Group numbers information:
List of names and remote Faxes entered in a group. To print out the list, see the [User Functions
Guide].
•
Function list:
List of current system settings. To print out the list, see the [User Functions Guide].
•
ITU Mailbox list:
List of the current status of mailboxes.
6
Printing transmission/reception journals
the [JOB STATUS] button on the
1 Press
control panel.
116
6.PRINTING LISTS AND REPORTS
the [LOG] button to enter the log menu, and then press the
2 Press
[SEND] or [RECEIVE] button.
3 Press the [JOURNAL] button.
• The journals will be output.
• If the [JOURNAL] button is pressed with a file selected, the journal of the selected file for one transmission is
output.
6
117
1.Manually Printing Lists & Reports (Cont.)
Error code table
If an error occurs during communications, an error code is indicated in the transmission journal, reception
journal or memory transmission journal.
See the following table for the remedy.
Error Code
6
Description
Remedy
0012
Original jam
Clear the jammed original.
0013
Door open
Firmly close the open door.
0020
Power interruption
Check the power interruption report.
0030
Reset
Transmission is cancelled.
(The transmission is terminated by the jammed printing paper during the direct transmission.)
0033
Polling Error
Check polling options setup (Security code, etc.), and
check if the polling document exists.
0042
Memory full
Make sure that there is sufficient memory before making the call again.
0050
Line busy
Retry communications.
0053
Security mismatch in relay or
mail box transmission
Confirm the remote party’s security code, system
password, and your setup.
Communication Error
Retry communications.
00B0 - 00E8
If you encounter an error code not listed here, please repeat your communication. If this error recurs,
please contact your service technician.
Printing reservation list
1 Press the [JOB STATUS] button on the control panel.
the [FAX] button, and then press the [RESERVATION LIST] but2 Press
ton.
• The reservation list is output.
118
6.PRINTING LISTS AND REPORTS
Printing ITU mailbox list
the [FAX] button on the control
1 Press
panel.
the [ADVANCED] button to enter the advanced menu, and then
2 Press
press the [ITU MAILBOX LIST] button.
• The ITU mailbox list is output.
6
119
2. Automatically Printing Lists & Reports
Automatically printing lists & reports
Reports are automatically output if the conditions in the setting of the lists & reports output ( P.121 “Setting the lists and reports output”) are satisfied.
* Lists and reports are printed on LT/A4-size paper.
If LT/A4-size paper has run out, lists and reports will be printed on larger sized paper.
•
Transmission journal:
Printed after every 40 (or 120) transmissions.
•
Reception journal:
Printed after every 40 (or 120) receptions.
•
Memory transmission report
After memory transmission has ended, this report is output. The reduced transmission document can
be added by using “PRINT 1st PAGE IMAGE?”.
•
Direct transmission report:
After direct transmission has ended, this report is output.
•
Multi transmission report:
After multi-address transmission has ended, this report is output. The reduced transmission document
can be added by using “PRINT 1st PAGE IMAGE?”.
•
Polling report:
After multi-polling RX has ended, this report is output.
•
Relay transmission originator terminal report:
When this equipment is setup as a relay originator, a status report concerning the initial transmission to
the relay stations is output. The reduced transmission document can be added by using “PRINT 1st
PAGE IMAGE?”.
•
Relay transmission relay station report:
When this equipment is setup as a relay station, a status report of the transmission to the relay destinations is output. The reduced transmission document can be added by using “PRINT 1st PAGE
IMAGE?”
•
Relay transmission end terminal report:
When this equipment is setup as a relay station, a report providing the final outcome of the relay transmission is transmitted to the relay originator. The reduced transmission document can be added by
using “PRINT 1st PAGE IMAGE?”
•
Mailbox reception report:
Printed when an original is received in a confidential or bulletin board.
•
Relay station report:
Printed when an original is received in a relay mailbox.
•
Power failure list:
The list of the jobs which were erased will be output if there is something wrong with the contents of the
image memory when the main power switch is turned ON after a power failure during Fax communication.
6
120
6.PRINTING LISTS AND REPORTS
Setting the lists and reports output
Setting the (transmission/reception) journal output and its number
•
•
•
AUTO: ON, OFF
Setting whether the transmission/reception journal should be output automatically.
Transmission journal: 40,120
Setting the number of communications on the transmission journal as 40 or 120.
Reception journal: 40,120
Setting the number of communications on the reception journal as 40 or 120.
the [USER FUNCTIONS] button on
1 Press
the control panel.
2 Press the [ADMIN] button and then press the [PASSWORD] button.
6
the administrator password (6 to 10 digits), and then press the
3 Enter
[ENTER] button.
• Ask your administrator to the administrator password.
121
2.Automatically Printing Lists & Reports (Cont.)
4 Press the [LIST/REPORT] button.
5 Press the [REPORT SETTING] button.
6
6 Press the [JOURNAL] button.
122
6.PRINTING LISTS AND REPORTS
7 Press the [ON] or [OFF] button.
• The default setting is ON.
8 Select the desired number (either 40 or 120 communications).
• The default setting is 40.
9 Press the [ENTER] button.
6
Setting the communication report output
The following conditions of the communication report output can be set.
MEMORY TX:
OFF, ALWAYS, ON ERROR
DIRECT TX:
OFF, ALWAYS, ON ERROR
MULTI TX:
OFF, ALWAYS, ON ERROR
POLLING:
OFF, ALWAYS, ON ERROR
RELAY ORIGINATOR: OFF, ALWAYS, ON ERROR
RELAY STATION:
OFF, ALWAYS, ON ERROR
RELAY DESTINATION: OFF, ALWAYS, ON ERROR
If the [ALWAYS] button is selected: The report is output after every communication is completed.
If the [ON ERROR] button is selected: The report is output when a communication error has occurred.
If the OFF button is selected. The report is not output.
1 Press the [USER FUNCTIONS] button on the control panel.
123
2.Automatically Printing Lists & Reports (Cont.)
2 Press the [ADMIN] button and then press the [PASSWORD] button.
the administrator password (6 to 10 digits), and then press the
3 Enter
[ENTER] button.
• Ask your administrator to the administrator password.
6
4 Press the [LIST/REPORT] button.
124
6.PRINTING LISTS AND REPORTS
5 Press the [REPORT SETTING] button.
6 Press the [COMM. REPORT] button.
6
7 Press the desired buttons for each item.
• If the button for the desired function is not shown, press the [Next] button to switch screens.
• The icons highlighted in the screen below are the default settings. However, the [ALWAYS] buttons are
selected for all reports other than “RELAY DESTINATION” as a default setting for European versions.
• If you select the [ALWAYS] or [ON ERROR] button for the MEMORY TX, MULTI TX, RELAY ORIGINATOR,
RELAY STATION and RELAY DESTINATION, “PRINT 1st PAGE IMAGE?” appears. Press the [YES] or [NO]
button.
125
2.Automatically Printing Lists & Reports (Cont.)
8 Press the [ENTER] button.
Setting the reception list output
•
•
6
•
LOCAL: ON, OFF
Setting whether the mailbox reception report should be printed when the original is stored in the local
mailbox.
REMOTE: ON, OFF
Setting whether the mailbox reception report should be printed when the original is received from the
remote Fax to the local mailbox.
RELAY STATION: ON, OFF
Setting whether the mailbox reception report should be printed when the multi-address relay transmission is received from the multi-address relay originator.
1 Press the [USER FUNCTIONS] button on the control panel.
2 Press the [ADMIN] button and then press the [PASSWORD] button.
126
6.PRINTING LISTS AND REPORTS
the administrator password (6 to 10 digits), and then press the
3 Enter
[ENTER] button.
• Ask your administrator to the administrator password.
4 Press the [LIST/REPORT] button.
6
5 Press the [REPORT SETTING] button.
127
2.Automatically Printing Lists & Reports (Cont.)
6 Press the [RECEPTION LIST] button.
7 Press the desired buttons for each item.
• The icons highlighted in the screen below are the default settings.
However, the default setting for European versions is as follows:
RELAY STATION: ON
LOCAL: OFF
REMOTE: ON
6
8 Press the [ENTER] button.
128
6.PRINTING LISTS AND REPORTS
3. Lists/Reports Samples
Transmission journal (Manually and automatically output)
This is the list of the transmission-related information such as communication results and remote Fax
numbers.
• Output information for the last 40 or 120 communications can be confirmed. Switching the number of
communications output. ( P.121 “Setting the (transmission/reception) journal output and its number”)
• The mark
in the “TO” column is appended when the 2nd TEL NUMBER is used for transmission.
The mark
in the “MODE” column is appended when the 2nd line is used.
• If any errors occur during transmission, the error code is displayed under the “STATUS” column. (
P.118 “Error code table”)
6
129
3.Lists/Reports Samples (Cont.)
Terminal ID
Sender’s Fax number
(Line2: Optional)
Sender’s Fax number
(Line1)
Journal (or list)
outputting date and time
ROM version
TRANSMISSION JOURNAL
XXXXXXXXXXX
XXXX-XXX
TIME
: 07-10-'05 17:55
FAX NO.1
: 2131234567
FAX NO.2
: 2131235678
NAME
: Aaabbb L.A.
NO.
FILE NO.
DATE TIME
DURATION
PGS
TO
DEPT
001
002
002
010
07.10 16:59
07.10 17:33
00:23
00:00
1
0
Redfield HS
2123456789
MODE
STATUS
EC 603
OK
P
6
Serial number
for communication
Date and time
when starting
communication
File number of
communication
The number of
pages for the
communication
Communicating
period of time
Department code
(blank if not
controlled with
department code)
Fax name or
telephone number
Communication mode
EC: ECM communication
G3: G3 communication
ML: Internet Fax communication
1st
(bps)
0
1
2
3
4
5
6
8
B
D
130
2400
4800
7200
9600
12000
14400
V.34
6.PRINTING LISTS AND REPORTS
2nd
3rd
(Resolution) (Mode)
8x3.85
8x7.7
8x15.4
16x15.4
300 dpi
600 dpi
150 dpi
MH
MR
MMR
JBIG
Special communication mode
P:
Polling communication
SB: Mailbox communication
SR,R: Relay mailbox communication
SF,F: Forward mailbox communication
I:
N/W-Fax communication
O:
Offramp Gateway communication
Communication
result and
error code
OK: Succeeded
4-digit error code: Failed
(See page 124 )
00B5
Reception journal (Manually and automatically output)
This is the list of the reception-related information such as communication results and remote Fax numbers.
• Output information for the last 40 or 120 communications can be confirmed. Switching the number of
communications output. ( P.121 “Setting the (transmission/reception) journal output and its number”)
• The mark
on the “MODE” is appended when the 2nd line is used.
• If any errors occur during transmission, the error code is displayed under the “STATUS” column. (
P.118 “Error code table”)
RECEPTION JOURNAL
XXXXXXXXXXX
NO.
FILE NO.
DATE TIME
DURATION
PGS
001
002
003
007
07.10 14:23
07.10 17:20
00:00
00:32
0
1
XXXX-XXX
TIME
: 07-10-'05 17:55
FAX NO.1
: 2131234567
FAX NO.2
: 2131235678
NAME
: Aaabbb L.A.
FROM
Aaabbb USA HQ
3109998888
DEPT
MODE
STATUS
EC 603
NG 00B1
OK
6
131
3.Lists/Reports Samples (Cont.)
Reservation list (Manually output)
This is the list of the jobs that are standing by for transmission and recovery transmission.
• The mark
on the “TO” refers to a manually input telephone number.
• The mark G on the “TO” refers to a pre-programmed group.
RESERVATION LIST
TX/RX
FILE NO.
017
6
132
TIME
: 07-10-'05 18:41
FAX NO.1
: 2131234567
FAX NO.2
: 2131235678
NAME
: Aaabbb L.A.
DATE TIME
07.10 18:41
FUNCTION
MULTI TX
PGS
1
TO
G ABC EXPRESS
RECOVERY TX
FILE NO.
DATE TIME
013
07.10 18:01
FUNCTION
MULTI TX
PGS
1
TO
2153334444
PC JOB
FILE NO.
003
FUNCTION
MULTI TX
PGS
2
TO
Cccddd CORPORATION
DATE TIME
07.10 17:40
6.PRINTING LISTS AND REPORTS
DELAY TIME
DELAY TIME
Mailbox/relay box report (Manually output)
This is the report of the current status of the mailboxes.
MAILBOX/RELAY BOX REPORT
MAIL BOX
BOX NO.
11222
11231
RELAY
BOX NO.
12345
BOX TYPE
BULLETIN BD.
CONFIDENTIAL
END STATION
ADDRESS
GROUP
FORWARD/INBOUND FAX(TSI)
BOX NO.
AGENT
22222
E-MAIL
TIME
: 07-10-'05 18:00
FAX NO.1
: 2131234567
FAX NO.2
: 2131235678
NAME
: Aaabbb L.A.
PGS
FILE NO.
DATE TIME
FROM
1
008
07.10 17:24
LOCAL
001 002 003 004 005
001 002
DESTINATION
To: ADDRESS:
GROUP :
Cc: ADDRESS:
GROUP :
001
001
002
002
003
REPLY TO NUMBER
12345
6
133
3.Lists/Reports Samples (Cont.)
Memory transmission report (Automatically output)
After memory transmission has ended, this report is output. A reduced image of the first page of the document transmitted is appended on the report.
• This will be output "ON ERROR" or "ALWAYS". ( P.123 “Setting the communication report output”)
• The mark
on the “TO” is appended when the 2nd TEL NUMBER is used for transmission.
• The mark
on the “TO” refers to a manually input the telephone number.
• The (ITU MAILBOX: ) on the “FILE NO.” refers to a communication using a mailbox.
• The (STORED TIME: ) on the "END TIME" shows the data storing time of when the recovery transmission has been set.
• If an error occurs during memory transmission, the error code will be indicated on the “STATUS”. (
P.118 “Error code table”)
MEMORY TRANSMISSION REPORT
6
FILE NO.
DATE
TO
DOCUMENT PAGES
START TIME
END TIME
PAGES SENT
STATUS
:
:
:
:
:
:
:
:
004
07.10 17:11
ABC EXPRESS
1
07.10 17:13
07.10 17:14 (STORED TIME : 07.10 23:14)
0
0050
*** TX FAILURE NOTICE ***
FILE NO.
DATE
TO
DOCUMENT PAGES
START TIME
END TIME
PAGES SENT
STATUS
134
:
:
:
:
:
:
:
:
005
(ITU MAILBOX : 12345 )
07.10 17:25
2221234555
1
07.10 17:30
07.10 17:31 (STORED TIME : 07.10 23:31)
1
OK
6.PRINTING LISTS AND REPORTS
TIME
: 07-10-'05 17:48
FAX NO.1
: 2131234567
FAX NO.2
: 2131235678
NAME
: Aaabbb L.A.
Transmission report (Automatically output)
After direct transmission has ended, this report is output.
• This will be output "ON ERROR" or "ALWAYS". ( P.123 “Setting the communication report output”)
• If an error occurs during direct transmission, the error code will be indicated on the “STATUS”.
( P.118 “Error code table”)
TRANSMISSION REPORT
XXXXXXXXXXX
XXXX-XXX
TIME
: 07-10-'05 17:55
FAX NO.1
: 2131234567
FAX NO.2
: 2131235678
NAME
: Aaabbb L.A.
NO.
FILE NO.
DATE TIME
DURATION
PGS
TO
002
007
07.10 17:20
00:32
1
3109998888
DEPT
MODE
STATUS
EC 603
OK
6
135
3.Lists/Reports Samples (Cont.)
Multi transmission report (Automatically output)
After multi-address transmission has ended, this report is output. A reduced image of the first page of the
document transmitted is appended on the report.
• This will be output "ON ERROR" or "ALWAYS". ( P.123 “Setting the communication report output”)
• The mark
on the “TO” is appended when the 2nd TEL NUMBER is used for transmission.
• The mark
on the “FAX NUMBER” refers to a manually input telephone number.
• The (STORED TIME: ) next to the "END TIME" shows the data storing time of when the recovery transmission has been set.
MULTI TRANSMISSION REPORT
6
FILE NO.
DATE
DOCUMENT PAGES
START TIME
END TIME
SUCCESSFUL
ADDRESS BOOK
001
:
:
:
:
:
TIME
: 07-10-'05 18:17
FAX NO.1
: 2131234567
FAX NO.2
: 2131235678
NAME
: Aaabbb L.A.
013
07.10 18:01
1
07.10 18:01
07.10 18:17 (STORED TIME : 07.11 00:17)
Aaabbb ADMIN
UNSUCCESSFUL
FAX NUMBER
3109998888
136
6.PRINTING LISTS AND REPORTS
PAGES SENT
0
Polling report (Automatically output)
After multi-polling reception has ended, this report is output.
• This will be output "ON ERROR" or "ALWAYS". ( P.123 “Setting the communication report output”)
• The mark
on the “FAX NUMBER” refers to a manually input telephone number.
POLLING REPORT
FILE NO.
DATE
START TIME
END TIME
SUCCESSFUL
ADDRESS BOOK
001
:
:
:
:
TIME
: 07-10-'05 18:18
FAX NO.1
: 2131234567
FAX NO.2
: 2131235678
NAME
: Aaabbb L.A.
014
07.10 18:02
07.10 18:17
07.10 18:18
Cccddd ADMIN
UNSUCCESSFUL
FAX NUMBER
2139998888
6
NOT AVAILABLE
137
3.Lists/Reports Samples (Cont.)
Mailbox reception report (Automatically output)
This report is output when an original is received in a confidential or bulletin board.
MAILBOX RECEPTION REPORT
FILE NO.
DATE
BOX NUMBER
BOX TYPE
DOCUMENT PAGES
FROM
6
:
:
:
:
:
:
TIME
: 07-10-'05 18:22
FAX NO.1
: 2131234567
FAX NO.2
: 2131235678
NAME
: Aaabbb L.A.
016
07.10 18:22
12345
CONFIDENTIAL
1 (TOTAL 2 )
LOCAL
Relay station report (Automatically output)
This report is output when an original is received in a relay mailbox.
RELAY STATION REPORT
FILE NO.
DATE
RELAY BOX
DOCUMENT PAGES
FROM
138
:
:
:
:
:
734
07.10 13:33
777
1
214
6.PRINTING LISTS AND REPORTS
TIME
: 07-10-'05 13:33
FAX NO.1
NAME
: 2131234567
: Aaabbb L.A.
Relay transmission originator terminal report (Automatically output)
When this equipment is setup as a relay originator, the report of the transmission to the relay stations is
output.
• This will be output "ON ERROR" or "ALWAYS". ( P.123 “Setting the communication report output”)
• The mark
on the “TO” refers to a manually input telephone number.
RELAY TX ORIG. TERMINAL REPORT
FILE NO.
DATE
TO
RELAY BOX
DOCUMENT PAGES
START TIME
END TIME
PAGES SENT
STATUS
:
:
:
:
:
:
:
:
:
016
07.10 18:22
2139998888
12345
1
07.10 18:22
07.10 18:22
1
OK
TIME
: 07-10-'05 18:22
FAX NO.1
: 2131234567
FAX NO.2
: 2131235678
NAME
: Aaabbb L.A.
6
139
3.Lists/Reports Samples (Cont.)
Relay transmission relay station report (Automatically output)
When this equipment is setup as a relay station, the report of the transmission to the relay destinations is
output. A reduced image of the first page of the document transmitted is appended on the report.
• This will be output "ON ERROR" or "ALWAYS". ( P.123 “Setting the communication report output”)
• The mark
on the “TO” is appended when the 2nd TEL NUMBER is used for transmission.
RELAY TX RELAY STATION REPORT
6
FILE NO.
DATE
DOCUMENT PAGES
FROM
START TIME
END TIME
RELAY BOX
SUCCESSFUL
GROUP NUMBER
002
USA 1
005
ASIA 1
:
:
:
:
:
:
:
: 07-10-'05 14:46
FAX NO.1
: 2131234567
FAX NO.2
: 2131235678
NAME
: Aaabbb L.A.
013
07.10 14:45
3
7141234567
07.10 14:45
07.10 14:46
12345
ADDRESS BOOK
UNSUCCESSFUL
ADDRESS BOOK
001
Cccddd ADMIN
140
TIME
6.PRINTING LISTS AND REPORTS
001
PAGE SENT
0
Relay transmission end terminal report (Automatically output)
When this equipment is setup as a relay station, the report of the transmission to the relay destinations is
transferred to the destination registered. A reduced image of the first page of the document transmitted is
appended on the report.
• This will be output "ON ERROR" or "ALWAYS". ( P.123 “Setting the communication report output”)
RELAY TX END TERMINAL REPORT
TIME
: 07-10-'05 14:46
FAX NO.1
: 2131234567
FAX NO.2
: 2131235678
NAME
: Aaabbb L.A.
FILE NO.
: 013
DATE
: 07.10 14:45
DOCUMENT PAGES
: 3
FROM
: 7141234567
START TIME
: 07.10 14:45
END TIME
: 07.10 14:46
RELAY BOX
: 12345
SUCCESSFUL
ADDRESS BOOK
005
XYZ CORPORATION
UNSUCCESSFUL
ADDRESS BOOK
001
Cccddd ADMIN
6
PAGES SENT
0
141
3.Lists/Reports Samples (Cont.)
Power failure list (Automatically output)
A list of the jobs which were erased will be output if there is something wrong with the contents of the
image memory when the main power switch is turned ON after a power failure during Fax communication.
POWER FAILURE LIST
TX/RX
FILE NO.
044
045
FUNCTION
POLLING RX
MULTI TX
MEMORY RECEPTION
FILE NO.
029
6
142
PC JOB
FILE NO.
049
050
FUNCTION
SINGLE TX
MULTI TX
6.PRINTING LISTS AND REPORTS
TIME
: 07-10-'05 17:53
FAX NO.1
: 2131234567
FAX NO.2
: 2131235678
NAME
: Aaabbb L.A.
7. REGISTERING AND
SETTING ITEMS
1. Setting the Initial Transmission Mode ................................................................................144
2. Registering the Terminal ID................................................................................................146
3. Setting the Reception Mode...............................................................................................151
4. 2nd Line Board (optional) Installation.................................................................................154
5. Setting RX Printing.............................................................................................................160
• Setting RX printing ..........................................................................................................................160
• Setting duplex printing.....................................................................................................................163
• Setting the rotate sort (Alternation) .................................................................................................166
6. Setting Recovery Transmission .........................................................................................168
7
143
1. Setting the Initial Transmission Mode
Set the initial settings for the original transmission conditions and transmission type. When you send an
original without changing the original conditions and transmission mode settings, the original is sent with
the initial setting values.
• Resolution: STANDARD, FINE, U-FINE
• MODE (Original mode) TEXT, TEXT/PHOTO, PHOTO
• Exposure: AUTO, MANUAL (adjustable in 11 steps)
• Transmission type: MEMORY TX, DIRECT TX
• TTI recording (Setting is not available in all product markets): ON, OFF
You can send originals appended with a terminal ID preset to your equipment.
You can set this terminal ID in either of the memory TX or direct TX modes.
Entering the terminal ID "2.REGISTERING THE TERMINAL ID"
( P.146 “2.Registering the Terminal ID”)
• RTI recording: ON, OFF
You can print the received originals appended with time received and a remote Fax ID information (if
provided).
• ECM (Error Correction Mode): ON, OFF ( P.23 “4.Setting the Transmission Conditions”)
the [USER FUNCTIONS] button on
1 Press
the control panel.
7
the [USER] button to enter the user menu, and then press the
2 Press
[FAX] button.
144
7.REGISTERING AND SETTING ITEMS
3 Press the desired buttons for each item.
• The screen below shows the default setting.
• Press the [Next] or [Prev] button to switch the screens as required.
4 Press the [ENTER] button.
7
145
2. Registering the Terminal ID
If you register the ID name in advance, you can print sender information on the leading edge of originals
that are transmitted and receiver information on the trailing edge of originals that are received.
• Details to register:
ID name (max. 20 characters)
ID number (max. 20-digit number)
Printing of international code (ON/OFF)
In compliance with FCC regulations, this facsimile places your company‘s name, facsimile telephone number and date & time on the top of all transmitted documents. This feature enables remote parties to easily
identify your documents and the time of transmission.
(Example of how Sender Information is printed on originals received by the remote Fax)
07-10-’05 15:08
FROM-Aaabbb
1234567890
T-069
P001/001
F-049
File number
Date sent
Sender's ID name
(automatically attached)
Number of pages
Pages sent/Total pages
Sender’s
ID (Fax)
number
Communication
number
7
Sender information is printed about 5 mm from the top edge of the transmitted original.
(Example of how Receiver Information is printed on originals you receive)
RECEIVED 07-10-’05 15:08
FROM-Cccddd
TO-Aaabbb
P001/001
Receiver’s
ID name
Date received
(automatically attached)
Remote Fax ID information
Number of pages
Pages sent
Receiver information is printed about 5 mm from the bottom edge of the received original.
146
7.REGISTERING AND SETTING ITEMS
1 Press the [USER FUNCTIONS] button on the control panel.
2 Press the [ADMIN] button and then the [PASSWORD] button.
the administrator password (6 to 10 digits), and then press the
3 Enter
[ENTER] button.
• Ask your administrator for the administrator password.
7
4 Press the [FAX] button.
147
2.Registering the Terminal ID (Cont.)
5 Press the [TERMINAL ID] button.
the [ID NAME] button and enter the ID name in the letter entry
6 Press
screen (up to 20 characters). When you have finished entering the letters, press the [ENTER] button.
• Entering letters, see the [Operator's Manual for Basic Function].
7
7 Press the [FAX NUMBER] button.
148
7.REGISTERING AND SETTING ITEMS
either the [YES] or [NO] button for adding the international
8 Press
code.
If you add the international code (your country/region code) in advance, you can let the remote Fax know your
country/region when communicating overseas.
<Example> Registration by adding international code in the terminal ID (234-567-8901).
+12345678901
If the area code starts from "0", "0" will be omitted.
International code
If you press the [YES] button in step 7, "+" is added automatically.
7
9 Key in the terminal number, and then press the [ENTER] button.
To enter a pause “-”, press the [MONITOR/PAUSE] button.
the LINE 2 NUMBER in the same way in specifying the FAX
10 Specify
NUMBER (steps 6-8).
• The line 2 number can be set when the optional 2nd line board (optional) is installed.
149
2.Registering the Terminal ID (Cont.)
the settings. If they are correct, press the [ENTER] button to
11 Check
complete entry.
• To change the settings, press the [ID NAME], [FAX NUMBER] or [LINE2 NUMBER] button again.
7
150
7.REGISTERING AND SETTING ITEMS
3. Setting the Reception Mode
Set reception mode such as the volume settings and line-related items.
• Reception mode
AUTO, MANUAL
• Monitor tone volume
Adjustable 0-7 steps (0: tone OFF)
The “monitor tone” refers to the line monitor tone when the [MONITOR/PAUSE] button is pressed.
• Reception completion tone volume
Adjustable 0-7 steps (0: tone OFF)
The reception “completion tone” refers to the tone made by the equipment upon printing a Fax reception. It will be heard after each Fax reception has printed.
• Dial type (Line 1 /Line 2)
DP, MF (not available for the European version)
There are 2 types of telephone lines: Dial pulse lines (DP) and multi frequency lines (MF). Change the
telephone line setting to match the type of line you are using, when you first install the system or you
change the connected telephone line.
* The line 2 number can be set when the optional 2nd line board is installed.
1 Press the [USER FUNCTIONS] button on the control panel.
2 Press the [ADMIN] button and then the [PASSWORD] button.
7
the administrator password (6 to 10 digits), and then press the
3 Enter
[ENTER] button.
• Ask your administrator for the administrator password.
151
3.Setting the Reception Mode (Cont.)
4 Press the [FAX] button.
5 Press the [INITIAL SETUP] button.
7
6 Press the desired buttons for each item.
• Press the [Prev] or [Next] button to switch the screens.
• The screen below shows the default settings.
• With the monitor tone volume, you can adjust the volume level used when the [MONITOR/PAUSE] button on
the control panel is pressed.
• With the reception completion tone volume setting, you can adjust the volume level of the Fax reception end of
print tone.
• To adjust the volume, press the [ ] or [ ] buttons. Pressing the [ ] button raises the volume, while pressing
the [ ] button lowers it (When a tone is set to “0”, there is no sound).
152
7.REGISTERING AND SETTING ITEMS
7 Press the [ENTER] button.
• The registered items can be confirmed in the Administrator’s Function List. To print the list, see the [User Functions Guide].
There is no second screen to display the dial types for the European version.
7
153
4. 2nd Line Board (optional) Installation
Installing the 2nd line board (option) allows simultaneous dual communications of transmission/reception
like transmission during reception and reception during transmission. When the 2nd line is used, the following function setting and registration are required.
• Registering terminal ID ( P.146 “2.Registering the Terminal ID”)
• Dial type setting
• Line-2 setting
* The 1st line takes precedence in the initial setting (not including the case in which LINE 2 is selected
on the LINE SELECT when you register remote Fax numbers into the address [Operator’s Manual for
Basic Function]). If you want the 2nd line to have priority in the initial setting, ask your service technician.
The reception mode of line 2 is "Auto reception".
Dial type setting
1 Press the [USER FUNCTIONS] button on the control panel.
2 Press the [ADMIN] button and then the [PASSWORD] button.
7
the administrator password (6 to 10 digits), and then press the
3 Enter
[ENTER] button.
• Ask your administrator for the administrator password.
154
7.REGISTERING AND SETTING ITEMS
4 Press the [FAX] button.
5 Press the [INITIAL SETUP] button.
either of the [DP] or [MF] buttons for the dial type (line 2) set6 Select
ting
7
• Press the [Next] or [Prev] button to switch the screens as required.
• DP, MF. ( P.151 “3.Setting the Reception Mode”)
7 Press the [ENTER] button.
155
4.2nd Line Board (optional) Installation (Cont.)
2nd line setting
When the optional 2nd line board is installed, its operation can be selected using the following procedure:
• Transmission/Reception
Both transmission and reception are available all the time.
• Reception only (24 hours)
The 2nd line is always standing by for reception.
• Reception only (timer)
Only reception is available during the specified period of time.
* Even during reception only, the specified line performs transmission if any line has been specified by
the options or address menu.
1 Press the [USER FUNCTIONS] button on the control panel.
2 Press the [ADMIN] button and then the [PASSWORD] button.
7
the administrator password (6 to 10 digits), and then press the
3 Enter
[ENTER] button.
• Ask your administrator for the administrator password.
156
7.REGISTERING AND SETTING ITEMS
4 Press the [FAX] button.
5 Press the [LINE-2 MODE] button.
7
157
4.2nd Line Board (optional) Installation (Cont.)
Transmission and reception (TX/RX)
6 Press the [TX/RX] button.
7 Press the [ENTER] button.
Reception only (24HR)
6 Press the [RX ONLY (24HR)] button.
7
7 Press the [ENTER] button.
158
7.REGISTERING AND SETTING ITEMS
Reception only (TIMER)
6 Press the [RX ONLY (TIMER)] button.
• Key in the START time and END time.
• Press the [ ] or [ ] button to move the cursor.
• Time is displayed in the 24-hour system.
7 Press the [ENTER] button.
7
159
5. Setting RX Printing
Setting RX printing
Set print settings for originals received on the Fax that are to be printed. 2 print installations are available:
discard printing and RX reduction printing.
• Discard Printing
ON (default setting):
When originals are up to 10 mm larger than the printing area; the part of the originals that extends
beyond the paper printing area is discarded.
OFF:
The received original is printed on 2 sheets of paper if its length exceeds the paper printing area.
* For the detail of DISCARD setting, contact your service technician.
• RX reduction printing
ON (default setting):
If the received original is longer than the recording paper, it will be vertically reduced to 90%* to fit on
the installed receiving paper.
* LG size original is vertically reduced to 75% to fit on LT or LT-R paper.
OFF:
The received original is printed on 2 sheets of paper if its length exceeds the paper printing area.
* Drawers can be set for received Fax printing only. See the [Operator’s Manual for Basic Function].
Be sure to use LD, LG, LT, LT-R, A3, A4, A4-R or B4.
For the relationship between the received original and the output paper, see P.57 “3.Relationship
between Original and Paper”.
7
160
1 Press the [USER FUNCTIONS] button on the control panel.
2 Press the [ADMIN] button and then the [PASSWORD] button.
7.REGISTERING AND SETTING ITEMS
the administrator password (6 to 10 digits), and then press the
3 Enter
[ENTER] button.
• Ask your administrator for the administrator password.
4 Press the [FAX] button.
7
5 Press the [RX PRINT] button.
161
5.Setting RX Printing (Cont.)
the [ON] or [OFF] button of the [DISCARD] and/or [REDUC6 Press
TION], and then the [ENTER] button.
• The registered items can be confirmed in the Administrator’s Function List. To print the list, see the [User Functions Guide].
7
162
7.REGISTERING AND SETTING ITEMS
Setting duplex printing
This printer setting determines whether or not to print received Faxes on both sides of the paper available
for Fax reception.
• Duplex printing is available only if the received original sizes and resolution are the same.
• When the paper has run out during duplex printing, the rest of the document is printed on another size
paper.
• When the received original is printed on 2 sheets of paper because it exceeds the printing area, the
duplex printing is not available.
• Documents received using the batch transmission function are printed on both sides of the paper as
one continuous document. Pay attention to the separation of the individual documents particularly
those consisting of an odd number pages.
1 Press the [USER FUNCTIONS] button on the control panel.
2 Press the [ADMIN] button and then the [PASSWORD] button.
3
Enter the administrator password (6 to 10 digits), and then press the
[ENTER] button.
7
• Ask your administrator for the administrator password.
163
5.Setting RX Printing (Cont.)
4 Press the [FAX] button.
5 Press the [RX PRINT] button.
7
the [ON] button for the duplex print function, and then press the
6 Press
[ENTER] button.
• The registered items can be confirmed in the Administrator’s Function List. To print the list, see the [User Functions Guide].
164
7.REGISTERING AND SETTING ITEMS
Duplex printing direction differs depending on the received original size.
1. Received LD, LG, LT, A3, A4, or B4-sized originals are printed so that they can be bound along the long edge
of direction.
2. Received ST, A5 or B5-sized originals are printed so that they can be bound along the short edge of direction.
(1)
C
(2)
C
Even when “Duplex Printing” is selected, one-sided printing will be applied to the following two
items.
1. Received fax documents which are relay-transmitted
2. Received fax documents which are sent to forward mailboxes
See the TopAccess Guide for details.
7
165
5.Setting RX Printing (Cont.)
Setting the rotate sort (Alternation)
This printer setting determines whether or not to output each separate Fax job by rotated sort (90 degrees)
alternately.
* Rotate Sort is available only for LT/A4-sized paper. Set the LT and LT-R, or A4 and A4-R drawers.
* If paper becomes empty during Rotate Sort, the rest of the document is printed on the remaining paper.
1 Press the [USER FUNCTIONS] button on the control panel.
2 Press the [ADMIN] button and then the [PASSWORD] button.
the administrator password (6 to 10 digits), and then press the
3 Enter
[ENTER] button.
• Ask your administrator for the administrator password.
7
4 Press the [FAX] button.
166
7.REGISTERING AND SETTING ITEMS
5 Press the [RX PRINT] button.
the [ON] button for the rotate sort function, and then press the
6 Press
[ENTER] button.
• The registered items can be confirmed in the Administrator’s Function List. To print the list, see the [User Functions Guide].
7
167
6. Setting Recovery Transmission
Setting the document-holding-time for retaining a document in memory using the Recovery Transmission
function.
1 Press the [USER FUNCTIONS] button on the control panel.
2 Press the [ADMIN] button and then the [PASSWORD] button.
the administrator password (6 to 10 digits), and then press the
3 Enter
[ENTER] button.
• Ask your administrator for the administrator password.
7
4 Press the [FAX] button.
168
7.REGISTERING AND SETTING ITEMS
5 Press the [RECOVERY TX] button.
the document-stored time with the [
6 Change
and press the [ENTER] button.
1H] or [24H
] button,
• The document-holding time can be changed in 1 hour increments.
7
169
7
170
7.REGISTERING AND SETTING ITEMS
8. TROUBLESHOOTING
1. When The Following Messages Appear ............................................................................172
2. Transmission Trouble.........................................................................................................173
3. Reception Trouble..............................................................................................................174
8
171
1. When The Following Messages Appear
When the following messages appear on the touch panel, press the [FUNCTION CLEAR] button to clear
the error message and perform the appropriate remedy for the error.
For details of messages not listed below, see the [Operator’s Manual for Basic Functions].
Message
Remedy
Memory overflow
Memory overflowed when scanning
documents to the memory.
Either wait for memory to be cleared,
or check the jobs and delete reserved
jobs to clear memory.
Communication error
Communication error occurred during
direct TX.
Retry communications.
Job reservation full
The number of reserved jobs
exceeded 100.
Either wait for job reservations to be
completed, or check the jobs and
delete reserved jobs.
Job memory full
The total number of destinations for
outgoing call jobs exceeded 1,000.
Either wait for outgoing call jobs to be
completed, or check the jobs and
delete reserved jobs.
Sorry not possible
On-hook or direct TX was attempted
during communications.
Wait for communications to end and
retry communications.
Not allowed now
Further polling transmission reservation was attempted even though polling transmission was already
reserved.
Either wait for polling transmission
jobs to be completed, or check the
jobs and delete reserved jobs.
Too Many Tel # Digits
128 digits or more were registered for
a chain dial communication.
Confirm the number of digits dialed
and register the numbers again.
8
172
Cause
8.TROUBLESHOOTING
2. Transmission Trouble
Check the following points if you are having trouble sending documents.
If you cannot rectify the problem with the points below, or the problem is not listed below, call service for
assistance.
Trouble
“TRANSMIT” is not displayed
even if the [START] button is
pressed.
Check Point
•
•
•
•
•
Originals are fed diagonally.
•
•
2 originals are fed together.
•
Did you replace the handset before you pressed the [START] button? When you are making a call on the handset to send a Fax, do
not replace the handset until you press the [START] button.
Is the modular cord disconnected?
Is the power plug unplugged from the power outlet?
Can you receive telephone calls?
Is there any problem at the remote Fax? Check this with the party
trying to receive the original.
Are the document feeder slides adjusted to the width of the original
that you are sending?
Does the original that you are sending match the conditions of the
original that is available for sending?
•
Have you placed more than the maximum number of originals that
can be placed at one time?
Does the original that you are sending match the conditions of the
original that is available for sending?
Have you pushed the originals into the feeder too hard?
The original is not being printed
on the paper of the remote Fax
even though it has been sent.
•
Was the original placed correctly facing up?
Black lines are shown in the
image that was sent.
•
Is the scanning area of the Reversing Automatic Document Feeder
clean? Clean it with a soft cloth.
Originals are not sent even if
operations are carried out normally.
•
Is the remote Fax compatible with your system?
This system supports G3 communications but not G2 or G4 communications.
Originals cannot be sent overseas.
•
Specify Quality TX and resend. ( P.23 “4.Setting the Transmission Conditions”)
•
8
173
3. Reception Trouble
Check the following points if you are having trouble receiving documents.If you cannot rectify the problem
with the points below, or the problem not listed below, call service for assistance.
Trouble
Originals cannot be received
even if “RECEIVE” is displayed
and the [START] button is
pressed.
•
•
Did you replace the handset before you pressed the [START] button? When you answer a call on the handset to receive a Fax, do
not replace the handset until you press the [START] button.
Is the modular cord disconnected?
Is there a problem at the remote Fax? Check this with the party trying to send the original.
Paper is not output.
•
Is the equipment out of paper?
The received original is printed
dark and is illegible or black
stripes are printed on the original.
•
•
Make a local copy and confirm proper printing.
Is the original being sent a dirty copy? Check this with the party trying to send the original.
Is the trouble due to a problem or operation error at the remote
Fax? Check this with the party trying to send the original.
•
Paper is output but not printed.
•
•
Is there enough toner?
Is the original placed correctly on the remote Fax? Check this with
the party trying to send the original.
Paper often jams.
•
•
Is the paper drawer size setting correct?
Is the paper drawer properly inserted?
Is the specified paper type being use?
8
174
Check Point
•
8.TROUBLESHOOTING
9. SPECIFICATIONS
1. Main Specifications ............................................................................................................176
9
175
1. Main Specifications
Model Name
GD-1201 (For OKI CX1145 MFP)
Size of Original
(North America)
LD, LG, LT, LT-R, ST, ST-R, COMP
Size of Original
(European)
A3, A4, A4-R, A5, A5-R, B4, B5, B5-R, FOLIO
Recording Paper
Size
(North America)
11” x 17” (LD), 8.5” x 14” (LG), 8.5” x 11” (LT), 5.5” x 8.5” (ST), 10. 1/8” x 14”
(COMP)
Recording Paper
Size (European)
297 mm x 420 mm (A3), 210 mm x 297 mm (A4), 148 mm x 210 mm (A5),
257 mm x 364 mm (B4), 182 mm x 257 mm (B5), 210 mm x 330 mm (FOLIO)
Compatibility Communication Modes
Exclusive Mode, ECM, G3
Communication
Resolution
Horizontal: 8 dots/mm, 16 dots/mm, 300 dots/inch
Transmission Rate
33,600/31,200/28,800/26,400/24,000/21,600/19,200/16,800/14,400/12,000/
9,600/7,200/4,800/2,400 bps
Encoding Systems
JBIG/MMR/MR/MH
Printing Method
Laser electronic printing
Memory Capacity
Transmission/Mailbox: 500 MB (HDD) Reception: 120 MB (HDD) *1
Unit Type
Desktop type, transmitting/receiving dual type
Applicable Network
Public Switched Telephone Network (PSTN)
Vertical: 3.85 lines/mm, 7.7 lines/mm, 15.4 lines/mm, 300 dots/inch
*1 For hard drives, MB means 1 million bytes. (Total hard drive accessible capacity may vary depending
on operating environment.)
When the total time that the power is turned off for 12 hours a day becomes about 5 years, the battery will
be dead. If the battery is run down, ask your service technician. (Repair and replacement will be charged.)
*
*
9
176
Specifications and appearance are subject to change without notice in the interest of product improvement.
If trouble occurs, call service for assistance.
Options
• 2nd line board
- GD-1260NA (North America)
9.SPECIFICATIONS


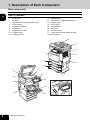


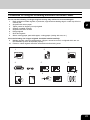
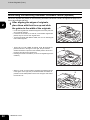
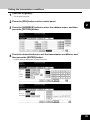
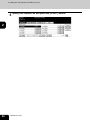


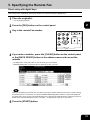
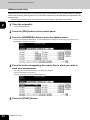

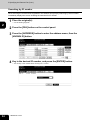
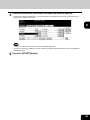
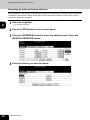

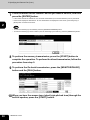
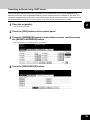

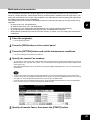
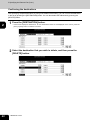


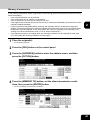


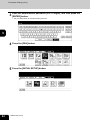
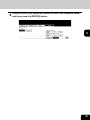
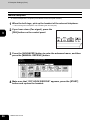


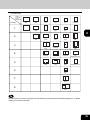

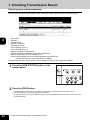
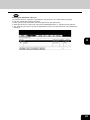
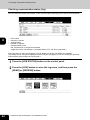


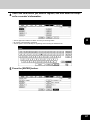
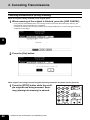
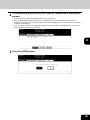

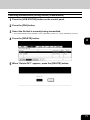
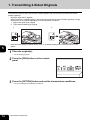

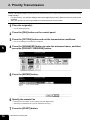
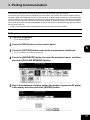


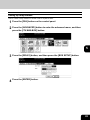
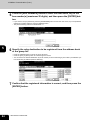

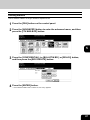
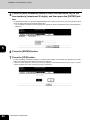
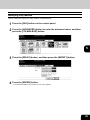
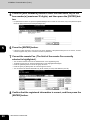
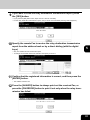
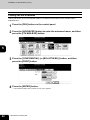
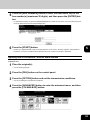
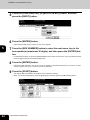
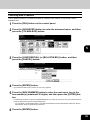

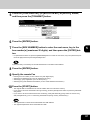
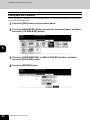

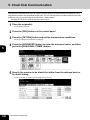
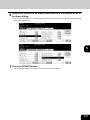
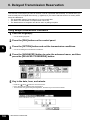
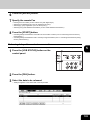
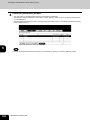
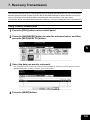

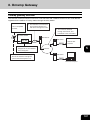
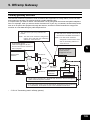
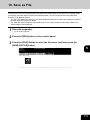

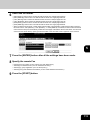

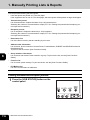

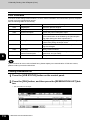
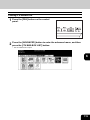

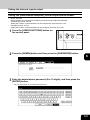
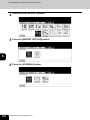

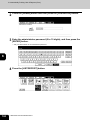

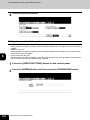

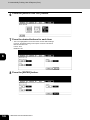
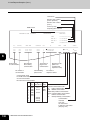
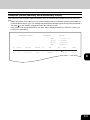


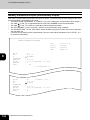

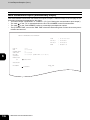
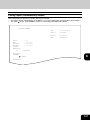
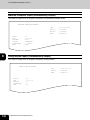
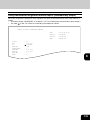
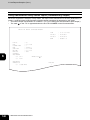

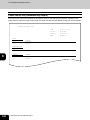
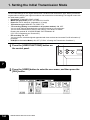

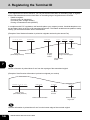
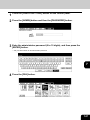
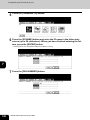

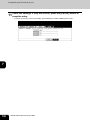
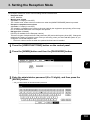
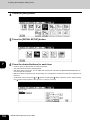
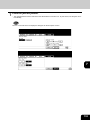

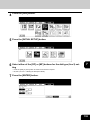
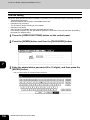

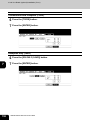
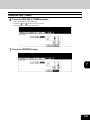

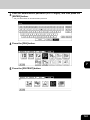
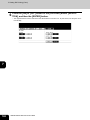

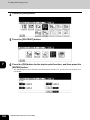
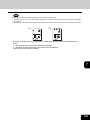
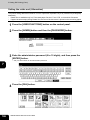
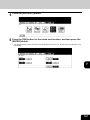


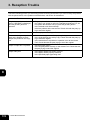

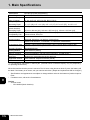


![2 Appuyez sur la touche [FAX] du tableau de bord.](http://vs1.manualzilla.com/store/data/006377769_1-cb8366605658d2e9e5d72496d9b1e196-150x150.png)