1
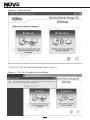
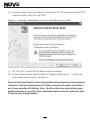
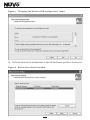
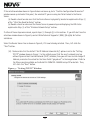
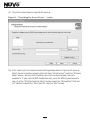
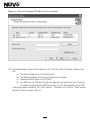
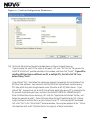
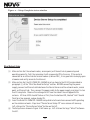
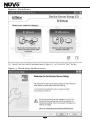
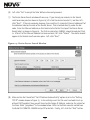
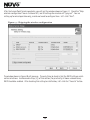
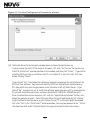
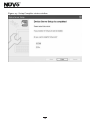
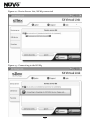
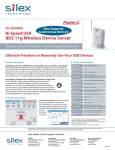
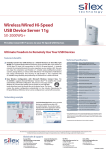
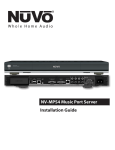
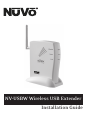
NV-USBW Wireless USB Extender
Installation Guide
FCC Radio Frequency Interference Statement Warning
This equipment has been tested and found to comply with the limits for a Class B digital
device, pursuant to Part 15 of the FCC Rules. These limits are designed to provide reasonable
protection against harmful interference in a residential installation. This equipment generates,
uses, and can radiate radio frequency energy and, if not installed and used in accordance
with the instructions, it may cause harmful interference to radio communications. However,
there is no guarantee that interference will not occur in a particular installation. If this equipment
does cause harmful interference to radio or television reception, which can be determined by
turning the equipment off and on, the user is encouraged to try to correct the interference by
one or more of the following measures:
- Reorient or relocate the receiving antenna.
- Increase the separation between the equipment and receiver.
- Connect the equipment into an outlet on a circuit different from that to which the receiver
is connected.
- Consult the dealer or an experienced radio/TV technician for assistance.
This device complies with Part 15 of the FCC Rules. Operation is subject to the following two
conditions: (1) This device may not cause harmful interference, and (2) this device must accept
any interference received, including interference that may cause undesired operation.
EN55022 Class-B
EN55024
IC Statement
This Class B digital apparatus complies with Canadian ICES-003.
Introduction
Congratulations on your purchase of the NuVo NV-M3 audio server and the new NV-USBW wireless USB
extender from Silex. The M3 is unique in its ability to easily sync with Window’s Media Player with a
single USB connection. The new NV-USBW is a wonderful tool for enabling multiple computers to sync
with Media Player over a wireless home network. Enjoying the entire family’s music from a single M3,
triple output audio server is now easier and more affordable than ever before.
Table of Contents
NV-USBW/SX-2000WG Compatibility
What You Need for Setup and Use of Your NV-USBW/SX-2000WG
Wireless Network Setup
Wired Network Setup
Virtual Link Operation with an NV-M3 Music Server
Page 3
Page 3
Page 4
Page 12
Page 19
NV-USBW Package Contents
Silex NV-USBW/SX-2000WG Wireless USB Device Server-NV-M3 Enabled
NV-USBW/SX-2000WG Setup disc for NuVo
10-watt power supply
NuVo NV-USBW Wireless USB Extender Installation Guide
NV-USBW/SX-2000WG Compatibility
Before proceeding with setup, please verify that your NV-USBW/SX-2000WG USB Extender, or “Device
Server” has an adhesive label on it that says “NuVo NV-M3 Enabled”. Compatibility with the NV-M3
requires a special firmware available only on the NV-USBW/SX-2000WG units sold through NuVo, and
not on the mass-market Silex NV-USBW/SX-2000WG units.
If you have installed Sync Mate for NV-M3 USB connectivity, you must uninstall it. The NV-USBW/SX2000WG virtual link replaces the Sync Mate functionality.
What you Need for Setup and Use of your NV-USBW/SX-2000WG
(1) The unpacked NV-USBW/SX-2000WG Device Server unit, and its power supply, along with the
AC cord that connects to the power supply. The Device Server unit should be set up at the top
of the equipment rack containing the NV-M3 unit (if it is rack-mounted), or in a location
within two meters of the NV-M3's USB jack. The Device Server's antenna should extend above
the rest of the music system gear in this location.
(2) An operational wireless broadband router that is connected to the host PC containing the
user's music library, either via a wireless connection, or a wired Ethernet connection from the
PC to the router. Alternately, for wired operation, you may use an operational network wired
access point, broadband router, or Ethernet hub.
(3) If the host PC with the music library is going to be permanently set up with a wired connection
to the home network router, then for wireless operation with the NV-M3, you will need a wireless equipped notebook PC set up to operate on that home network.
(4) If the home network is set up with Wired Equivalent Privacy (WEP) security, you will need the
WEP key permanently programmed into the router. If your user does not already have this
key available, follow the router manufacturer's instructions to log into the set functions on a
web browser. After logging in, navigate the setup pages to find the working key(s) following
the router manufacturer's instructions to access this information. Figure 1 shows the wireless
security screen and the screen's position in the menu headings for a popular Linksys router.
Note that you select the “Wireless Security” page under the Wireless menu heading. If the
user's router has been set up with WEP security (as it should to prevent outsider from using
their Internet access service), then four alpha-numeric keys will show up in the Key1 to Key4
fields as shown. Record one of the keys for use later in this setup procedure. You will need
this key for setting up the NV-USBW/SX-2000WG on the network as explained in the next
section.
(5) Finally, you will need the NuVo NV-USBW/SX-2000WG setup CD.
There are two options for network setup – wireless and wired. The setup instructions are covered in
separate sections.
3
Figure 1- Linksys router Wireless Security Setup Screen
Wireless Network Setup
(1) Make certain that the Wireless G router is powered up and operating correctly. You can test
this by accessing the wireless connection with a wireless-equipped PC in the area. If the
router is connected to an active Internet access modem (cable or DSL), then once the wireless
icon in the lower right of the task bar shows a wireless connection, it is a good idea to simply
open a browser and verify access to the Internet.
(2) Make certain that the NV-USBW/SX-2000WG is set up close to the NV-M3 as described in
paragraph (1) of the previous section. Connect the power supply to the NV-USBW/SX2000WG. Connect the power cable to the power supply, and then plug it in to a live AC
receptacle. Observe the rectangular LED's on the side of the unit opposite the antenna. All
three LED's should flash on at first, then the bottom LED, labeled “Link” should flash for a few
seconds. Finally the Link LED should go out, and the top “Wireless” LED should begin to
flash.
(3) Insert the NuVo NV-USBW/SX-2000WG setup disk into the wireless-connected PC operating
on the wireless network. A top-level “Device Server Setup CD” menu screen will come up.
Left-click on the “Device Server Setup” button on the left.
(4) The Setup Screen shown in Figure 2 will come up. Left-click on the large “Wireless” button on
the right.
4
Figure 2: – Setup Screen
(5) Left-click “yes” on the decision window shown in Figure 3.
Figure 3 – “Yes” to Exceptions List addition
5
(6) The screen shown in Figure 4 will come up. Make certain that “Setup device server from PC” is
the default setting. Then, left-click “Next”.
Figure 4 – Selecting “Setup Device Server from PC by wireless LAN”
(7) Left-click “Yes” to accept the Silex Software License Agreement.
(8) A status window will come up which indicates, “Stopping the WZC service …”, and then the
status window shown in Figure 5 will come up.
Please note that because the Device Server Setup application does not know the network parameters
at this point, it must necessarily disconnect the PC you are using from the network, and establish a
peer-to-peer connection with the Device Server. You will see the wireless status indicator in your
desktop taskbar show a “connecting” status (animated dot sequence under the wireless icon) while
the peer-to-peer link setup completes.
6
Figure 5 – “Changing the Wireless LAN configuration” status
(9) The Device Server Search window shown in Figure 6 should come up within a few minutes.
Figure 6 – Device Server Search window
7
If the selection window shown in Figure 6 does not come up, but a “Confirm Configuration Parameters”
window comes up instead at this point, the wireless PC you are using has failed to locate the Device
Server.
(a) Double-check to make sure that the Device Server is physically located as explained in Step (1)
of the “What You Need for Setup” section.
(b) Double-check to make sure the Device Server is powered up and displaying the LED status
explained in Step (1) of this “Wireless Network Setup” section.
If either of these steps was missed, repeat steps (1) through (9) in this section. If you still don't see the
selection window shown in Figure 6, contact NuVo Technical Support at (866) 796-4904 for further
assistance.
Select the Device Server line as shown in figure 6, if it is not already selected. Then, left-click the
“Next” button.
(10) Make certain that the default “Get IP Address Automatically” option is set in the “Setting
TCP/IP” window shown in Figure 7. In the unlikely event that the user's network is set up
without Dynamic Host Control Protocol (DHCP) enabled, then you will have to click Assign IP
Address, and enter the values for the three fields “grayed out” in the image below. Refer to
the Silex manuals available on the NuVo NV-USBW/SX-2000WG setup CD for details. Then,
left-click the “Next” button.
Figure 7 – “Setting TCP/IP” Window
8
(11) The status screen shown in Figure 8 will come up.
Figure 8 – “Searching for Access Point …” status
(12) After a short wait, the wireless network setting window shown in Figure 9 will come up.
Select the user's wireless network, which will show “Infrastructure” under the “Wireless
Mode” column. Be very careful to select your user's wireless network, and not a
neighbor's! If your user has WEP-enabled security, enter the WEP key determined in
step (4) of the “What You Need for Setup” section in both the “Network Key” field and
the “Confirm Network Key” field, then left-click the “Next” button.
9
Figure 9 – Wireless Network (SSID) selection window
(13) The window shown in Figure 10 will come up. Left-click the “Execute” button. Make certain
that:
(a) The Wireless Mode is set to “Infrastructure”
(b) The SSID corresponds with the name of your user's network
(c) Network Authentication is set to “Open”
(d) Use WEP is set to “OFF” only if your user does not have security set up. If security
is in place and you entered a WEP key in step (12), this field should be set to “ON”.
If everything above checks out, left-click “Execute”. Otherwise, left-click the “<Back” button
and correct the entry errors (step 12).
10
Figure 10 – Confirm Configuration Parameters
(14) The Device Server Setup Complete window shown in Figure 11 should come up.
If you are using the user's PC for setup at this point, left-click “Yes” for the “Do you want to
install SX Virtual Link” question decision in the window, and then click “Finish”. If you will be
installing SX Virtual Link on a different user PC, or multiple PC's, then left-click “No” here
before clicking “Finish”.
If you clicked “Yes”, then follow the subsequent prompts to complete the installation of the
SX Virtual Link software. Your users will need the SX Virtual Link software installed on any
PC's from which they wish to synchronize music files onto an NV-M3 Music Server. If you
clicked “No”, and you have yet to install this software application on any PC's, proceed to the
PC you wish to setup for your user, and insert the NuVo NV-USBW/SX-2000WG setup CD.
When the Main Menu screen comes up, left-click the “Application Installation” button, and
follow the prompts to install. Close the Device Server Setup CD application by left-clicking
the Quit button in the Main Menu, or just clicking the red “X” in the top right of the window.
Left-click “Yes” in the “OK to finish?” decision window. You may now proceed to the “Virtual
Link Operation with an NV-M3 Music Server” on page 19 of these instructions.
11
Figure 11 – Setup Complete status window
Wired Network Setup
(1) Make certain that the network router, access point, or Ethernet hub is powered up and
operating correctly. Test it by accessing it with a connected PC in the area. If the router is
connected to an active Internet access modem (cable or DSL), it is a good idea to simply open
a browser and verify access to the Internet.
(2) Make certain that the NV-USBW/SX-2000WG is set up close to the NV-M3 as described in
paragraph (1) of the “What You Need for Setup” section. BEFORE connecting the power
supply, connect an Ethernet cable between the Device Server and the network router, access
point, or Ethernet hub. Then, connect the power cable to the power supply, and plug it in to a
live AC receptacle. Observe the rectangular LED's on the side of the unit opposite the
antenna. All three LED's should flash on at first, then the bottom LED, labeled “Link” should
flash for a few seconds, and go steady ON.
(3) Insert the NuVo NV-USBW/SX-2000WG setup disk into the wireless-connected PC operating
on the wireless network. A top-level “Device Server Setup CD” menu screen will come up.
Left-click on the “Device Server Setup” button on the left.
(4) The Setup Screen shown in Figure 12 will come up. Left-click on the large “Wired” button on
the left.
12
Figure 12 – Setup Screen
(5) You will see the checklist window shown in Figure 13. Left-click the “Next” button.
Figure 13 – Wired setup checklist screen
13
(6) Left-click “Yes” to accept the Silex Software License Agreement.
(7) The Device Server Search window will come up. If you already see a device in the Search
result overview panel as shown in Figure 14, left-click the device to select it, and then leftclick “Next”. If there is no device showing, then read the 12-character Ethernet address off of
the adhesive label on the side of the Device Server. This is located directly under the bar
code. Enter the Ethernet address on this label into the field at the top of the Device Server
Search label, as shown in Figure 14. The first six characters, 008092, should already be filled
in. After all of the Ethernet Address has been entered, left-click “Search”. The device should
appear in the Search result overview pane. Left-click “Next”.
Figure 14 – Device Server Search Window
(8) Make certain that the default “Get IP Address Automatically” option is set in the “Setting
TCP/IP” window shown in Figure 15. In the unlikely event that the user's network is set up
without DHCP enabled, then you will have to click Assign IP Address, and enter the values for
the three fields “grayed out” in the window below. Refer to the Silex manuals available on
the NuVo NV-USBW/SX-2000WG setup CD for details. Finally, left-click the “Next” button.
14
Figure 15 - “Setting TCP/IP” Window
(9) The status window shown in Figure 16 will come up.
Figure 16 – “Searching for Access Point …” status
15
After the Access Point Search completes, you will get the window shown in Figure 17. Check the “Skip
wireless configuration” box in the lower left, and all settings for wireless will “gray out”. You are
setting up for wired operation only, and do not need to configure them. Left-click “Next”.
Figure 17 – Skipping the wireless configuration
The window shown in Figure 18 will come up. The only thing to check is that the DHCP settings match
earlier selections. As discussed in Step (15) of this section, for practically all home network cases,
DHCP should be enabled. After checking this setting to satisfaction, Left-click the “Execute” button.
16
Figure 18 - Confirm Configuration Parameters window
(10) The Device Server Setup Complete window shown in Figure 19 should come up.
If you are using the user's PC for setup at this point, left-click “Yes” for the “Do you want to
install SX Virtual Link” question decision in the window, and then click “Finish”. If you will be
installing SX Virtual Link on a different user PC, or multiple PC's, then left-click “No” here
before clicking “Finish”.
If you clicked “Yes”, then follow the subsequent prompts to complete the installation of the
SX Virtual Link software. Your users will need the SX Virtual Link software installed on any
PC's from which they wish to synchronize music files onto an NV-M3 Music Server. If you
clicked “No”, and you have yet to install this software application on any PC's, proceed to the
PC you wish to setup for your user, and insert the NuVo NV-USBW/SX-2000WG setup CD.
When the Main Menu screen comes up, left-click the “Application Installation” button, and
follow the prompts to install. Close the Device Server Setup CD application by left-clicking
the Quit button in the Main Menu, or just clicking the red “X” in the right top of the window.
Left-click “Yes” in the “OK to finish?” decision window. You may now proceed to the “Virtual
Link Operation with an NV-M3 Music Server” on page 19 section of these instructions.
17
Figure 19 – Setup Complete status window
18
Virtual Link Operation with an NV-M3 Music Server
This section covers operation with the NV-M3 Music Server. After successfully testing the wireless
connection to the NV-M3, you will want to go over the instructions here with your user.
(1) Launch the installed SX Virtual Link application. Click on the Device Server tab if it is not
already selected in the window as shown in Figure 20. Left-Click the “Search” button.
Figure 20 – SX Virtual Link opening window
(2) After a short wait, a device server should appear on the Device Server List as shown in Figure
21.
19
Figure 21 – Device Server List, no NV-M3 connected
(3) Make sure that the NuVo NV-M3 is plugged into an AC outlet and blue STANDBY LED is lit.
Connect the NV-M3 to the device server using the supplied USB cable. A “+” icon should
appear in the box to the left of the Device Server list entry. Left-click the “+” icon to the left
to expand the view, showing the connected device, as shown in Figure 22.
(4) Select the “Freescale Inc MCF5251 Device” (representing the NV-M3's Main Processor). Leftclick the “Connect” button. You should see the “Connecting” status window as shown in
Figure 23.
20
Figure 22 – Device Server List, NV-M3 connected
Figure 23 – Connecting to the NV-M3
21
(5) A “Portable Device” decision window as shown in Figure 24 should pop up if you do not have
Windows Media Player open already. Select the “Sync” icon as shown in the Figure, and leftclick “OK”. Windows Media Player will open and search for the device for a few moments, and
then you should see the “NuVo NV-M3” label alongside the portable device icon in the top of
the right-hand pane. If you already had Windows Media Player open, then the NV-M3 device
will appear immediately.
Figure 24 – Portable Device handling decision window
(6) You can now synchronize your music library as detailed in the main portion of the NV-M3
manual. When you are done with synchronization, select the “Freescale Inc MCF5251 Device”
in the Device Server list, and then click the “Disconnect” button. The first time you
disconnect, you will see a decision window as shown in Figure 25.
22
Figure 25 – Disconnect confirmation
(7) Select the box next to the “Do not display a confirmation message before disconnecting”, so
this won't occur anymore, and then left-click the “Yes” button. You will see a disconnect
status message as shown in Figure 26, which will go away.
(8) Now, if you drag the mouse over the device in Virtual Link, you will see a status pop-up that
says:
“Name: Freescale Inc MCF5251 Device”
“Status: Not Connected”
The NV-M3 is free for multi-zone playback at this point. Close SX Virtual Link. Instruct the
user that, unless it is placed in the system startup of the PC and left up routinely, he will have
to launch it, and then proceed from Step 3 whenever he wishes to synchronize. Multiple PC's
on the network may access the Device Server coupled to the NV-M3, but only one may
connect at a time. If a user launches SX Virtual Link on a second PC on the network while it is
previously connected on another PC, the second instance will show a “Connected PC Name”
status as shown in Figure 27. Virtual Link will not allow the second user to connect at this
point until the first user disconnects.
23
Figure 26 – Disconnecting from the NV-M3
Figure 27 – “Connected PC Name” status
24
NuVo Technologies
3015 Kustom Dr., Hebron, KY 41048
859-817-7200
www.nuvotechnologies.com
USBW0745