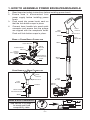
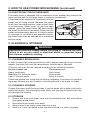
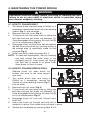
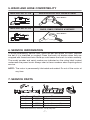
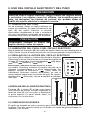
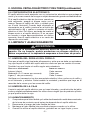
1
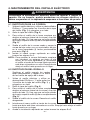
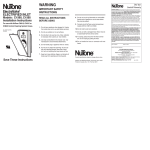
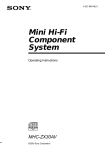
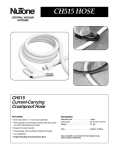
DELUXE ELECTRIC
POWER BRUSH
MODEL: CT700
! HOUSEHOLD TYPE !
AB0008
HOMEOWNERS OPERATING INSTRUCTIONS
READ AND SAVE THESE INSTRUCTIONS
Broan-NuTone LLC
Hartford, Wisconsin
www.nutone.com
888-336-3948
To register this product, visit www.nutone.com
The instructions given in this booklet serve as a guide to routine maintenance. To
obtain the most satisfying years of service, read through these instructions and
keep them handy for future reference.
IMPORTANT SAFETY INSTRUCTIONS
When using an electric appliance, basic precautions should always be followed,
including the following:
READ ALL INSTRUCTIONS BEFORE USING THE POWER BRUSH.
WARNING
TO
!
REDUCE THE RISK OF FIRE, ELECTRIC SHOCK, OR PERSONAL INJURY:
1.
Always turn power off and unplug before cleaning or servicing the power brush.
2.
Do not pick up the following items: sharp objects, flammable liquids, hot
ashes, burning matches, cigarettes, etc.
3.
Never use, connect or disconnect the power brush with wet hands.
4.
Do not use with damaged power plug or plug pins. If the power brush is not
working properly, contact your local supplier or service agent. The problem
may be covered under the warranty.
5.
Do not put objects into the brush opening.
6.
Do not use with brush opening or air channel blocked. Keep free of dust, hair, etc.
7.
Keep hair, loose clothing, fingers or any other parts of the body away from
moving parts.
8.
Never leave electric power brush unattended while it is plugged in.
9.
This is not a toy. Do not let children play with power brush. Children should
be supervised when near the power brush.
10. Use only manufacturer’s recommended attachments.
11. Do not use outdoors or on wet surfaces.
12. Do not use to pick up water.
13. Use extra care when cleaning stairs.
14. Always check underside of product for any obstructions prior to use.
15. Do not use without dust bag or cyclonic filter in place in power unit.
16. Motor shaft can become hot during normal use. To prevent burns, avoid
touching the motor shaft when servicing the drive belt.
17. Keep your work area well lighted.
18. Store your cleaner indoors in a clean, dry area.
-2-
1. HOW TO ASSEMBLE POWER BRUSH/WAND/HANDLE
1.
Read important safety instructions before installing power brush.
2.
Ensure hose is disconnected from
power supply before installing power
brush.
3.
Push wand into power brush neck so
that the lock button snaps in place.
4.
Connect hose handle into wand quick
connector and ensure that the prongs
are aligned with the receptacle holes.
Push until lock button snaps in place.
LOCK
BUTTON
HOSE
HANDLE
RECEPTACLE
PRONGS
QUICK
CONNECTOR
WAND TO POWER BRUSH CONNECTION
WAND
LOCK BUTTON
WAND
RELEASE
PEDAL
POWER BRUSH
NECK
HEIGHT
ADJUSTMENT
PEDAL
POWER BRUSH
NECK RELEASE
PEDAL
WAND
GRIP
HOSE HANDLE TO WAND CONNECTION
HOSE
HANDLE
LOCK
BUTTON
RECEPTACLE
LOCK
BUTTON
POWER
BRUSH
PRONGS
HOSE HANDLE
RELEASE BUTTON
WAND
WAND & HOSE COMPATIBILITY
See section 5 on page 7
for wand and hose
compatibility table.
?
-3-
2. HOW TO USE POWER BRUSH/WAND
CAUTION
Always pick up hard or sharp objects by hand before using your
power brush. Items such as pins, hairpins, tacks, crayons, etc., may
damage the brush roll or may break the belt.
2.1 WAND RELEASE
The power brush is not recommended for use
on bare floors. Wand release pedal (A) on power
brush allows you to quickly disconnect wand
and switch to combination floor/rug tool for use
on bare floors.
C
A
2.2 POWER BRUSH NECK RELEASE
B
CAUTION
Always unlock brush neck before use.
Push down power brush neck release pedal (B)
to unlock brush neck. Return the neck to the
upright position for storage.
2.3 POWER BRUSH HEIGHT ADJUSTMENT
The icons (D) refer to the carpet pile height. Select height
by depressing height adjustment pedal (C) to desired position:
(Extra-Low),
(Low),
(Medium) or
(High).
HEIGHT
FLOOR HEIGHT
D
ADJUSTMENT LED INDICATORS
The LEDs show the carpet pile covered by the selected
height, e.g.: when
(High) is selected, all LEDs will be
lit, since this height covers all pile heights. So if
(Extra-Low) is selected, only the lowest LED will be lit.
E
2.4 WAND LENGTH ADJUSTMENT
Extend (E) or shorten (F) the wand to comfortable
work position by holding the wand grip (G) in
one hand and sliding the upper section (the one
with the prongs) with the other hand.
F
G
2.5 EDGE CLEANER
Brush extends full width for effective edge cleaning along both sides of nozzle. To
operate, simply run cleaner along edge board. Rubber bumper protects furniture
and baseboards.
-4-
2. HOW TO USE POWER BRUSH/WAND (continued)
2.6 ELECTRONIC CIRCUIT BREAKER
The power brush is equipped with an electronic circuit breaker that protects the
motor and the belt if a too large object is picked up accidentally.
If the power brush stops while vacuuming, turn the
power unit off using handle. Release the power
brush from the wand and turn it over to see if there
is an obstruction. When brush roll jam has been
cleared, press the reset button (H) and connect
the power brush back to the wand. Finally, turn the
power unit/power brush back on. If it fails to restart
or continues to trip without any apparent reason,
the power brush must be serviced by an authorized
service center.
AD0030
H
3. CLEANING & STORAGE
! WARNING
Disconnect electrical supply before servicing or cleaning the unit.
Failure to do so can result in electrical shock or personal injury
from cleaner suddenly starting.
3.1 CLEANING BRUSH ROLL
In order to keep high cleaning efficiency and to prevent damage to your vacuum
cleaner, the brush roll must be cleaned every time the belt is changed.
The brush roll must also be cleaned according to the following schedule:
CLEAN BRUSH ROLL
Every week
Every month
Every 2 months
VACUUM CLEANER USE
Heavy (used daily)
Moderate (2-3 times per week)
Light (1 time per week)
Check and remove hair, string and lint build-up frequently in the brush roll and end
cap areas. Remove any dirt or debris in the belt path and in the brush roll areas.
3.2 CLEANING HOUSING
To keep the power brush housing clean, it can be wiped with a damp cloth and a
mild soap solution, then thoroughly dried. Never use any type of chemical as they
can damage the housing.
3.3 STORAGE
1.
2.
3.
4.
Ensure that hose and power cord are disconnected from wall inlet before
unplugging power brush.
Disconnect hose handle from wand.
Always keep hose neatly coiled when not in use.
When not in use, the power brush should be stored in a clean, dry place.
-5-
4. MAINTAINING THE POWER BRUSH
! WARNING
Disconnect electrical supply before servicing or cleaning the unit.
Failure to do so can result in electrical shock or personal injury
from cleaner suddenly starting.
4.1 HOW TO CHANGE BELT
Fig. 1
Turn power brush over and using a Phillips no. 2
screwdriver, remove the 3 brush roll cover retaining
screws (Fig. 1) and set aside.
2. Remove brush roll cover (Fig. 2).
3. To free brush roll from base, start by sliding the
belt side end and pull brush roll sideways (1).
Once disengaged from housing, lift brush roll (2)
out of its compartment (Fig. 3).
4. Disengage brush roll from worn belt and extract Fig. 2
the belt from motor shaft by a twisting motion in
the enlarge area (I) specifically made for that
purpose (Fig. 4).
5. Install new belt by reversing steps 4 to 1.
NOTE: To ease belt replacement, start by inserting
one end around the motor shaft in the
enlarged area (I). Insert brush roll through
belt until belt is seated in its place. Push
BELT
AB0011
down brush roll back in place.
1.
4.2 HOW TO CHANGE BRUSH ROLL
Replace brush roll when brush roll
brissles are worn to the base support
bars level.
1.
2.
3.
4.
5.
6.
SCREWS
BRUSH
ROLL
Fig. 3
2
Turn power brush over and using a
Phillips no. 2 screwdriver, remove the
3 brush roll cover retaining screws (Fig. 1)
1
and set aside.
Remove brush roll cover (Fig. 2).
To free brush roll from base, start by sliding the Fig. 4
belt side end and pull brush roll sideways (1).
I
Once disengaged from housing, lift brush roll (2)
out of its compartment (Fig. 3).
Disengage brush roll from belt. Discard worn
brush roll.
Insert new brush roll through belt until belt is
seated in its place. Push down brush roll back in place.
Finalise the installation by reversing steps 2 to 1.
-6-
RETAINING
2
5. WAND AND HOSE COMPATIBILITY
WAND PART NO. CT170
VACUUM HOSE PART NOS. CH520 & CH620
HOSE HANDLE
VACUUM HOSE PART NOS.
CH515, CH615, VXCH515 & VXCH615
WAND PART NO. CT175
HOSE HANDLE
6. SERVICE INFORMATION
To avoid unnecessary service calls, check the belt and brush roll often. Replace
the belt if it is stretched or cracked. Clean the brush roll bristles when they are
wrapped with thread and hairs. Build-up could cause the brush to rotate unevenly.
The model number and serial number are indicated on the rating label located
underneath the power brush. Always refer to these numbers when inquiring about
service.
NOTE: The motor is permanently lubricated and sealed. Do not oil the motor at
any time.
7. SERVICE PARTS
3
1
4
2
KEY NO.
1
2
3
4
PART NO.
09234
09233
09236
09235
DESCRIPTION
Belt
Brush roll
Brush roll cover with screws
Wand release pedal
Order Service Parts by “Part No.”, not by “Key No.”
-7-
ONE YEAR LIMITED WARRANTY
WARRANTY OWNER: NuTone warrants to the original consumer purchaser of its products that
such products will be free from defects in materials or workmanship for a period of one (1) year from
the date of original purchase. THERE ARE NO OTHER WARRANTIES, EXPRESS OR IMPLIED,
INCLUDING, BUT NOT LIMITED TO, IMPLIED WARRANTIES OF MERCHANTABILITY OR
FITNESS FOR A PARTICULAR PURPOSE.
During this one year period, NuTone will, at its option, repair or replace, without charge, any
product or part which is found to be defective under normal use and service. THIS WARRANTY
DOES NOT APPLY TO CONSUMABLES SUCH AS BELTS. This warranty does not cover (a) normal
maintenance and service or (b) any products or parts which have been subject to misuse,
negligence, accident, improper maintenance or repair (other than by NuTone), faulty installation or
installation contrary to recommended installation instructions.
The duration of any implied warranty is limited to the one year period as specified for the express
warranty. Some states do not allow limitation on how long an implied warranty lasts, so the above
limitation may not apply to you.
NUTONE’S OBLIGATION TO REPAIR OR REPLACE, AT NUTONE’S OPTION, SHALL BE THE
PURCHASER’S SOLE AND EXCLUSIVE REMEDY UNDER THIS WARRANTY. NUTONE SHALL
NOT BE LIABLE FOR INCIDENTAL, CONSEQUENTIAL OR SPECIAL DAMAGES ARISING OUT
OF OR IN CONNECTION WITH PRODUCT USE OR PERFORMANCE. Some states do not allow
the exclusion or limitation of incidental or consequential damages, so the above limitation or
exclusion may not apply to you. This warranty gives you specific legal rights, and you may also have
other rights, which vary from state to state. This warranty supersedes all prior warranties.
WARRANTY SERVICE: To qualify for warranty service, you must (a) notify NuTone at the address
stated below or following telephone number 1-888-336-6151, (b) give the model number and part
identification and (c) describe the nature of any defect in the product or part. At the time of
requesting warranty service, you must present evidence of the original purchase date.
Date of Installation Builder or Installer
Model No. and Product Description
IF YOU NEED ASSISTANCE OR SERVICE:
For the location of your nearest NuTone Independent Authorized Service Center:
Residents of the contiguous United States Dial Free 1-888-336-3948
Please be prepared to provide:
Product model number • Date and Proof of purchase • The nature of the difficulty
Residents of Alaska or Hawaii should write to: Broan-NuTone LLC
Attn: Technical Services, 9825 Kenwood Road Suite 301, Cincinnati, Ohio 45242
Residents of Canada should write to: Broan-NuTone Canada,
1140 Tristar Drive, Mississauga, Ontario, Canada L5T 1H9
www.nutone.com
Rev. 09/2009
Product specifications subject to change without notice.
CEPILLO ELÉCTRICO
DE CALIDAD SUPERIOR
MODELO: CT700
! TIPO DOMÉSTICO !
AB0008
INSTRUCCIONES DE FUNCIONAMIENTO
LEA Y CONSERVE ESTAS INSTRUCCIONES
Broan-NuTone LLC
Hartford, Wisconsin
www.nutone.com
888-336-3948
Para registrar este producto vaya a www.nutone.com
Las instrucciones que vienen en este folleto sirven de guía para el mantenimiento
normal. Léalas atentamente y consérvelas a mano para que el producto funcione
satisfactoriamente durante años.
INSTRUCCIONES DE SEGURIDAD IMPORTANTES
Al usar un aparato eléctrico siempre hay que tomar ciertas precauciones de
seguridad, entre ellas las siguientes:
LEA TODAS LAS INSTRUCCIONES ANTES DE USAR EL CEPILLO ELÉCTRICO.
ADVERTENCIA
PARA
!
REDUCIR EL RIESGO DE INCENDIO, CHOQUE ELÉCTRICO O DAÑOS CORPORALES:
1.
Apague el aparato y desenchúfelo antes de repararlo o limpiarlo.
2.
No recoja con el cepillo eléctrico los siguientes objetos: objetos cortantes,
líquidos inflamables, cenizas calientes, cerillas ardiendo, cigarrillos, etc.
3.
No use, conecte o desconecte nunca el cepillo eléctrico con las manos
mojadas.
4.
No use el cepillo eléctrico cuando el enchufe o las patillas del enchufe estén
dañados. Si el cepillo eléctrico no funciona bien, consulte con su proveedor
o agente de servicio local. El problema quizás esté cubierto por la garantía.
5.
No ponga ningún objeto en la apertura del cepillo.
6.
No lo utilice cuando la apertura o el tubo de aire estén bloqueados.
Manténgalo limpio de polvo, pelo, etc.
7.
Mantenga el pelo, la ropa suelta, los dedos u otras partes del cuerpo lejos
de las piezas móviles.
8.
No deje nunca el cepillo eléctrico solo mientras esté enchufado.
9.
El cepillo eléctrico no es un juguete. No permita que los niños jueguen con
él. Vigílelos cuando estén cerca del cepillo eléctrico.
10. Use sólo los accesorios aconsejados por el fabricante.
11. No lo utilice en el exterior ni sobre superficies mojadas.
12. No lo utilice para recoger agua.
13. Tenga mucho cuidado al limpiar escaleras.
14. Antes de usarlo, verifique siempre la parte inferior del cepillo para ver si hay
obstrucciones.
15. No lo utilice sin la bolsa para el polvo o sin el filtro ciclónico debidamente
colocados en el bloque motor.
16. El eje motor puede calentarse durante el uso normal. Para evitar
quemaduras, no lo toque al reparar o limpiar la correa de transmisión.
17. Procure que su zona de trabajo esté bien iluminada.
18. Guarde su aspiradora en un lugar interior limpio y seco.
-2-
1. ENSAMBLAJE DEL CEPILLO ELÉCTRICO, TUBO Y PUÑO
1.
Las instrucciones de seguridad son importantes. Léalas antes de instalar el
cepillo eléctrico.
2.
Compruebe que el tubo flexible está
desconectado de la fuente de alimentación
antes de instalar el cepillo eléctrico.
3.
Introduzca el tubo en el cuello del cepillo
eléctrico de forma que el botón de
bloqueo encaje en su sitio.
4.
Conecte el mango del tubo flexible con
el conector rápido del tubo y
compruebe que los contactos estén
alineados con los orificios de la caja de
contacto. Empuje hasta que el botón de
bloqueo encaje en su sitio.
CONEXIÓN DEL TUBO CON EL CEPILLO ELÉCTRICO
BOTÓN
BOTÓN
DE
BLOQUEO
CONECTOR
RÁPIDO
TUBO
PEDAL DE
LIBERACIÓN
DEL TUBO
DEL
CEPILLO ELÉCTRICO
PEDAL DE
REGULACIÓN
DE ALTURA
PEDAL DE
LIBERACIÓN
DEL CUELLO
DEL CEPILLO
ELÉCTRICO
RETÉN
DEL TUBO
CONEXIÓN DEL MANGO DELTUBO FLEXIBLE CON ELTUBO
MANGO
DEL
TUBO FLEXIBLE
CAJA
DE CONTACTO
BOTÓN
DE
BLOQUEO
BOTÓN
DE
BLOQUEO
CONTACTOS
BOTÓN DE LIBERACIÓN
DEL MANGO DEL
TUBO FLEXIBLE
TUBO
COMPATIBILIDAD
DEL TUBO
Y DEL TUBO FLEXIBLE
Consulte la tabla de la sección 5
(pág. 7) para conocer la
compatibilidad entre el tubo
y el tubo flexible
?
-3-
CAJA DE
CONTACTO
CONTACTOS
DE BLOQUEO
CUELLO
MANGO DEL
TUBO FLEXIBLE
CEPILLO
ELÉCTRICO
2. USO DEL CEPILLO ELÉCTRICO Y DEL TUBO
PRECAUCIÓN
Antes de usar el cepillo eléctrico, recoja a mano los objetos duros
o cortantes. Los objetos como los alfileres, las horquillas para el
pelo, las tachuelas, los lápices de colores, etc. pueden dañar el
rodillo del cepillo eléctrico o romper la correa.
2.1 LIBERACIÓN DEL TUBO
No se aconseja utilizar el cepillo eléctrico en
suelos sin alfombrar. El pedal de liberación del
tubo (A) del cepillo eléctrico le permite
desconectar rápidamente el tubo y conectarlo
con una herramienta combinada para suelos y
alfombras para utilizar en suelos sin alfombrar.
C
A
B
PRECAUCIÓN
Desbloquee siempre el cuello del
cepillo eléctrico antes de usarlo.
2.2 LIBERACIÓN DEL CUELLO DEL CEPILLO ELÉCTRICO
Baje el pedal de liberación (B) del cuello del cepillo eléctrico para desbloquear el
cuello. Vuelva a poner el cuello en posición vertical para guardar el cepillo eléctrico.
2.3 REGLAJE DE LA ALTURA DEL CEPILLO ELÉCTRICO
Los iconos (D) se refieren a la altura del pelo de la alfombra.
Seleccione la altura presionando en el pedal de reglaje de
la altura (C) hasta lograr la posición deseada:
(Muy baja),
(Baja),
(Mediana) o
(Alta).
INDICADORES LUMINOSOS DE REGLAJE DE LA ALTURA
Los diodos luminosos muestran el tamaño del pelo de la
alfombra correspondiente a la altura seleccionada. Por
ejemplo, cuando se selecciona
(Alta), todos los
indicadores luminosos estarán encendidos, ya que la
opción elegida cubre todas las alturas del pelo. En cambio,
al seleccionar (Muy baja), sólo se encenderá el indicador
más bajo.
E
FLOOR HEIGHT
D
2.4 REGLAJE DE LA LONGITUD DEL TUBO
Extienda (E) o acorte (F) el tubo para lograr
una posición de trabajo cómoda sujetando el
retén del tubo (G) con una mano y deslizando
la parte superior (la parte donde están los
contactos) con la otra mano.
F
G
2.5 LIMPIADOR DE BORDES
El cepillo se extiende en toda su anchura para limpiar los bordes por los lados de
la tobera. Para ello, pase el cepillo por un borde. Los topes de goma protegen los
muebles y los zócalos.
-4-
2. USO DEL CEPILLO ELÉCTRICO Y DEL TUBO (continuación)
2.6 CORTACIRCUITOS ELECTRÓNICO
El cepillo eléctrico está equipado con un cortacircuitos electrónico que protege el
motor y la correa cuando se recoge un objeto demasiado grande accidentalmente.
Si el cepillo eléctrico deja de funcionar cuando se
está aspirando, apague el bloque motor con el
mango. Saque el cepillo del tubo y voltéelo para
ver si está obstruido. Cuando haya eliminado el
atoramiento en el rodillo, presione en el botón de
reinicialización (H) y vuelva a conectar el cepillo
eléctrico al tubo. Por último, encienda de nuevo el
bloque motor o el cepillo eléctrico. Si no se pone
en marcha o sigue desconectándose sin motivo AD0030
aparente, lleve el cepillo eléctrico a un centro de
H
reparación autorizado.
3. LIMPIEZA Y ALMACENAMIENTO
! ADVERTENCIA
Desconecte la alimentación eléctrica antes de reparar o limpiar el
aparato. De no hacerlo, podría producirse un choque eléctrico o
daños corporales si la aspiradora empezara a funcionar de pronto.
3.1 LIMPIEZA DEL RODILLO DEL CEPILLO
Para que el cepillo siga limpiando eficazmente y evitar que se dañe su aspiradora,
hay que limpiar el rodillo del cepillo eléctrico cada vez que se cambia la correa.
También hay que limpiar el rodillo según este calendario:
LIMPIE EL RODILLO
Cada semana
Cada mes
Cada 2 meses
USO DE LA ASPIRADORA
Intenso (diario)
Moderado (2 o 3 veces por semana)
Ligero (1 vez por semana)
Verifique con frecuencia si se han acumulado cabellos, hilos o polvo en el rodillo y
en el obturador y retírelos. Quite también la suciedad y residuos que haya en el
recorrido de la correa y en las zonas del rodillo.
3.2 LIMPIEZA DE LA CAJA
Limpie la caja del cepillo eléctrico con un trapo húmedo y una disolución de jabón
suave y séquela cuidadosamente. No utilice nunca ningún tipo de producto químico
ya que podría dañar la caja.
3.3 ALMACENAMIENTO
1.
2.
3.
4.
Compruebe que el tubo flexible y el cable de alimentación están desconectados
de la toma de corriente mural antes de desenchufar el cepillo eléctrico.
Desconecte el mango del tubo flexible del tubo.
Mantenga el tubo flexible bien enrollado siempre cuando no lo utilice.
Cuando no utilice el cepillo eléctrico, guárdelo en un lugar limpio y seco.
-5-
4. MANTENIMIENTO DEL CEPILLO ELÉCTRICO
! ADVERTENCIA
Desconecte la alimentación eléctrica antes de reparar o limpiar el
aparato. De no hacerlo, podría producirse un choque eléctrico o
daños corporales si la aspiradora empezara a funcionar de pronto.
4.1 SUSTITUCIÓN DE LA CORREA
Fig. 1
Voltee el cepillo eléctrico y utilice un destornillador
Phillips n.° 2 para quitar los 3 tornillos de la tapa
del rodillo (Fig. 1) y póngalos a un lado.
2. Quite la tapa del rodillo (Fig. 2).
3. Para soltar el rodillo de la base, empiece por
deslizar el extremo lateral de la correa y tirar del
rodillo de lado (1). Una vez que se haya soltado
de la caja, saque el rodillo (2) de su compartimento
(Fig. 3).
4. Suelte el rodillo de la correa usada y saque la Fig. 2
correa del eje motor con un movimiento de giro
en la zona agrandada (I) hecha precisamente
para esto (Fig. 4).
5. Instale la nueva correa repitiendo en orden
inverso las etapas 4 a 1.
NOTA: Para cambiar la correa fácilmente, empiece
por introducir un extremo en torno al eje
motor, en la zona agrandada (I). Introduzca
CORREA
el rodillo a través de la correa hasta que ésta AB0011
esté bien colocada en su sitio. Empuje hacia
abajo el rodillo hasta ponerlo en su lugar.
1.
4.2 SUSTITUCIÓN DEL RODILLO
1.
2.
3.
4.
5.
6.
TORNILLOS
DE
RETENCIÓN
RODILLO
Fig. 3
Sustituya el rodillo cuando las cerdas
estén desgastadas y lleguen a la altura
de las barras de apoyo de la base.
2
2
Voltee el cepillo eléctrico y utilice un
destornillador Phillips n.° 2 para quitar los
3 tornillos de la tapa del rodillo (Fig. 1) y
1
póngalos a un lado.
Quite la tapa del rodillo (Fig. 2).
Para soltar el rodillo de la base, empiece por
deslizar el extremo lateral de la correa y tirar del Fig. 4
rodillo de lado (1). Una vez que se haya soltado
I
de la caja, saque el rodillo (2) de su compartimento
(Fig. 3).
Suelte el rodillo de la correa. Deseche el rodillo
desgastado.
Introduzca el nuevo rodillo a través de la correa
hasta que ésta esté bien colocada en su sitio. Empuje hacia abajo el rodillo
hasta ponerlo en su lugar.
Acabe la instalación repitiendo en orden inverso las etapas 2 a 1.
-6-
5. COMPATIBILIDAD DEL TUBO Y DEL TUBO FLEXIBLE
N.°
DE PIEZA DEL TUBO:
N.° DE PIEZA DEL TUBO FLEXIBLE DE LA ASPIRADORA:
CH520 Y CH620
CT170
MANGO
DEL
TUBO FLEXIBLE
N.°
DE PIEZA DEL TUBO:
N.° DE PIEZA DEL TUBO FLEXIBLE DE LA ASPIRADORA:
CH515, CH615, VXCH515 Y VXCH615
CT175
MANGO
DEL
TUBO FLEXIBLE
6. INFORMACIÓN PRÁCTICA PARA REPARACIONES
Para evitar las llamadas innecesarias en caso de problema, verifique con
frecuencia la correa y el rodillo del cepillo. Sustituya la correa si está destensada
o agrietada. Limpie las cerdas del rodillo cuando estén cubiertas con hilos y
cabellos. La acumulación de suciedad puede provocar que el cepillo gire de
manera irregular.
El número de modelo y el de serie vienen en la etiqueta situada en la parte
inferior del cepillo eléctrico. Al informarse sobre una reparación, necesitará estos
dos números.
NOTA: El motor está lubricado y sellado de forma permanente. No engrase el
motor nunca.
7. PIEZAS DE RECAMBIO
3
1
4
2
N.°
DE REF.
1
2
3
4
N.° DE PIEZA
DESCRIPCIÓN
09234
Correa
09233
Rodillo
09236
Tapa del rodillo con tornillos
09235
Pedal de liberación del tubo
Pida las piezas de recambio con el n.° de pieza, no con el n.° de referencia.
-7-
GARANTÍA LIMITADA DE UN AÑO
PROPIETARIO DE LA GARANTÍA: NuTone garantiza al cliente original que adquiere sus productos
que dichos productos están exentos de cualquier defecto en los materiales y de mano de obra
durante un periodo de un (1) año a partir de la fecha de compra original. NO EXISTE NINGUNA
OTRA GARANTÍA, EXPRESA O IMPLÍCITA, INCLUYENDO —AUNQUE SIN LIMITARSE A
ELLAS— LAS GARANTÍAS IMPLÍCITAS DE COMERCIABILIDAD O IDONEIDAD PARA UNA
FINALIDAD CONCRETA.
Durante el periodo señalado de un año, NuTone reparará o sustituirá, según considere
necesario, sin costo alguno, cualquier producto o pieza que resulte defectuosa en condiciones
normales de uso y mantenimiento. ESTA GARANTÍA NO SE APLICA A LOS BIENES CONSUMIBLES,
COMO LAS CORREAS. Esta garantía no cubre a) el mantenimiento y el servicio normales, o
b) ningún producto ni ninguna pieza que haya sido objeto de una mala utilización, negligencia,
accidente, mantenimiento o reparaciones inadecuados (no realizados por NuTone), instalación
defectuosa o instalación contraria a las instrucciones de instalación recomendadas.
La duración de cualquier garantía implícita se limita al periodo de 1 año especificado en la garantía
expresa. Algunos estados no permiten la limitación de la duración de una garantía implícita, de
modo que en ellos no se aplicará dicha limitación.
LA OBLIGACIÓN DE NUTONE DE REPARACIÓN O SUSTITUCIÓN, SEGÚN CONSIDERE
OPORTUNO NUTONE, SERÁ EL ÚNICO RECURSO DEL COMPRADOR CONFORME A ESTA
GARANTÍA. NUTONE NO SERÁ RESPONSABLE DE DAÑOS INDIRECTOS, CONSECUENCIALES
O ESPECIALES DEBIDOS O RELACIONADOS CON LA UTILIZACIÓN O EL FUNCIONAMIENTO
DEL PRODUCTO. Algunos estados no permiten la exclusión o limitación de los daños indirectos o
consecuenciales, de modo que la limitación o exclusión anterior no se aplicará a ellos. Esta garantía
le otorga derechos legales específicos y es posible que también goce de otros derechos, dependiendo
del estado. Esta garantía sustituye a cualquier otra garantía anterior.
SERVICIO DE GARANTÍA: Para tener derecho al servicio cubierto por la garantía, debe usted:
a) avisar a NuTone en la dirección que se indica abajo o por teléfono en el número 1-888-336-6151;
b) dar el número de modelo y el número de identificación de la pieza, y c) describir el tipo de
defecto en el producto o pieza. Al solicitar el servicio cubierto por la garantía, deberá
presentar una prueba de la fecha de compra original.
Fecha de instalación (constructor o instalador)
N.° de modelo y descripción del producto
SI NECESITA ASISTENCIA O EFECTUAR UNA REPARACIÓN:
Para saber dónde se encuentra el centro independiente de servicio autorizado por NuTone más
próximo a usted:
Residentes de los Estados Unidos contiguos, línea gratuita: 1-888-336-3948
Prepárense a dar la siguiente información:
Número de modelo del producto – Fecha y comprobante de compra – Tipo de problema
Los residentes de Alaska o Hawai deben escribir a: Broan-NuTone LLC
Attn: Technical Services, 9825 Kenwood Road Suite 301, Cincinnati, Ohio 45242
Los residentes de Canadá deben escribir a: Broan-NuTone Canada,
1140 Tristar Drive, Mississauga, Ontario, Canada L5T 1H9
www.nutone.com
Rev 09/2009
Las especificaciones del producto pueden cambiar sin aviso previo.