1
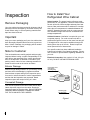
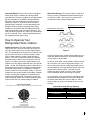
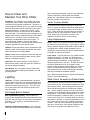
Connoisseur Collection
®
by NORTHLAND
Refrigerated Wine Storage
Use and Care Guide
Northland Kitchen Appliance
P.O. Box 400 Greenville, Michigan 48838-0400
1-800-223-3900 Fax: 616-754-0970
www.northlandnka.com
For your convenience, please record the following information for future reference:
Date of purchase:
Dealers Phone #:
Dealers Name & Address:
Model #:
Date Warranty Card Sent:
Serial #:
Note:
•
•
Model # & Serial # can be located on the serial plate of the product. Serial plates are located on
the lower front cabinet flange or on the top of the inside compartment liner, dependent on model.
It is recommended that you attach the original sales receipt to this Use & Care Guide.
Inspection
Remove Packaging
Your wine cabinet has been packed for shipment with all
parts that could be damaged by movement securely fastened. Before using, be sure all packing materials and
tape have been removed.
Important
Keep your carton packaging until your wine cabinet has
been thoroughly inspected and found to be in good condition. If there is damage, the packaging will be needed
as proof of damage in transit.
Note to Customer
This merchandise was carefully packed and thoroughly
inspected before leaving our plant. Responsibility for its
safe delivery was assumed by the carrier upon acceptance of the shipment. As directed on the side of your
packing carton, claims for loss or damage sustained in
transit must be made on the carrier as follows:
Exterior Damage
Make thorough damage notation on your delivery receipt
and have driver acknowledge by signature and date.
Send a written request asking for an inspection report
from carrier. Include the name of carrier representative
and the date the inspection was requested. Retain
inspection report and receipt for filing of a claim.
How to Install Your
Refrigerated Wine Cabinet
Select Location: The proper location will ensure peak
performance of your appliance. Choose a location where
the unit will be out of direct sunlight and away from heat
sources. Best performance will be achieved in a location
where the room temperature is maintained between 65º
and 90ºF. Operating the wine cooler in a room temperature outside this range could result in inconsistent wine
storage temperatures.
Cabinet Clearance: Ventilation is required for your unit
to operate properly. For under counter units this is
achieved through the louvers on the lower front toe-grill.
Full-height built-in units require ventilation through the
fascia grille at the top of the unit. Please keep these
areas open and free of obstructions.
Your specific model may have additional installation
instructions included in your literature package. Please
refer to these for specific details regarding installation of
your unit.
Electrical Connection: Use nominal 115 volt, 60 cycle
AC only. DO NOT USE AN EXTENSION CORD
Power Supply Cord
with 3-Prong
Grounding Plug*
Concealed Damage
This must be reported to the carrier within fifteen days.
Obtain inspection report from the carrier. Retain the
inspection report for filing the claim. DO NOT RETURN
DAMAGED MERCHANDISE TO MANUFACTURER FILE THE CLAIM WITH THE CARRIER.
Grounding Type
Wall Receptacle
Figure 1
1
Grounding Method: This product is factory equipped
with a power supply cord that has a three-pronged
grounded plug. It must be plugged into a mating grounding type receptacle in accordance with the National
Electrical Code and applicable local codes and ordinances (see figure 1). If the circuit does not have a
grounding type receptacle, it is the responsibility and
obligation of the customer to exchange the existing
receptacle in accordance with the National Electrical
Code and applicable local codes and ordinances. The
third ground prong should not, under any circumstances,
be cut or removed. All U.L. listed refrigerated products
are equipped with this type of plug.
Wine Bottle Storage: The slide-out shelves each hold
four(4) to seven(7) standard size bottles depending on
your specific model. See Figure 3 for typical recommended wine bottle storage configuration.
Rear Bottles (Necks Facing Front)
Front Bottles (Necks Facing Rear)
How to Operate Your
Refrigerated Wine Cabinet
Setting the Control: The total available temperature
range of the unit is from the low forties to the mid sixties. The middle range on the control is approximately
55°F. The temperature can be lowered or raised by turning the control clockwise or counterclockwise, respectively. A higher number is colder, a lower number is
warmer. The "OFF" position shuts-down the refrigeration system only, it does not turn-off power to the unit.
Figure 2 is a typical control knob representation; your
graphics may vary slightly dependent upon your specific
model. As with any refrigeration product, there will be a
slight temperature variance at different locations within
the storage compartment. Your appliance is shipped
with the control set to the mid-point setting. It is recommended you wait 48-hours after initial loading of bottles
to allow compartment temperature to stabilize prior to
making control adjustments. If changes to control settings are desired, please wait 24-hours between adjustments to allow the new control settings to stabilize.
Typical Control Knob
(Your graphics and colors may vary slightly depending on your specific model.)
Figure 2
Figure 3
On the full-height built-in models shelf locations are provided with additional spacing to accommodate storage
of large magnum style bottles.
On the 24" wide under counter model a cradle is provided on the floor of the unit for large bottle storage. For
the 15" wide under counter model, large bottles can be
accommodated by removing the shelf directly above the
desired shelf storage location. This shelf removal
method can also be used on the 24" under counter
model if additional large bottle storage is required.
For convenience, keep your frequently used wines positioned with bottoms towards the door so the labels will
be readily visible when the racks are slid-out. Place
wines for aging or longer term storage in the rear rack
positions.
Typical Wine Bottle Storage Capacity
15” Wide Under Counter
24” Wide Under Counter
24 Bottles
54 Bottles
18” Wide Built-In
24” Wide Built-In
75 Bottles
105 Bottles
Set-Point Indicator
1 = warmest setting.
4 = mid-point setting.
7 = Coldest setting.
OFF = Refrigeration / cooling "only" turned-off.
(Unplug unit before servicing electrical components.)
2
How to Clean and
Maintain Your Wine Chiller
Condenser: The condenser is an integral part of the
refrigeration system used to expel heat that has been
removed from the storage compartment. Therefore, to
maintain optimal efficiency of your unit, periodic cleaning
should be performed, and the condenser must receive
adequate ventilation. At least once or twice a year,
brush and/or vacuum lint and dirt from the condenser
heat exchanger. The condenser heat exchanger on fullheight built-in models is located behind the fascia panel
above the unit. On under counter models the heat
exchanger is located behind the lower toe-grille. To
assure adequate ventilation, be sure that nothing
obstructs the openings in and around the fascia panel or
toe-grille, dependent on your specific model.
Cabinet: The painted cabinet can be washed with mild
soap and water and thoroughly rinsed with clear water.
Never use abrasive scouring powders.
Interior: Wash interior compartment with mild soap and
water. Do not use an abrasive powder, solvent, polish
cleaner or undiluted detergent.
Under Counter Models
Compartmental and aesthetic lighting is provided via
one(1) or two(2) low wattage lamp tubes, dependent on
your specific model, located at the top of the compartment. These lamps are activated whenever the door is
opened or can be "user selected" to remain on at all
times, (please see "Light Switch Function" in the
"Appliance Features" section of this manual).
Lamp Replacement
Bulbs: Please use equivalent size bulbs with wattage
per bulb not to exceed 40 watts. If you prefer to use the
factory specified daylight filtered bulbs, and have difficulty locating them, please contact the dealer you purchased your unit from with your specific model and serial number for ordering information.
Door Gasket: The vinyl gasket may be cleaned with
mild soap and water, a baking soda solution or a mild
scouring powder.
Lamp Tubes: The lamp tubes are very reliable and are
designed for long life. However, if a lamp tube ever
requires replacement, you must use the original factory
specified lamp tube assembly, as they have been
designed specifically for your unit. To order the correct
lamp tube replacement kit for your specific model,
please contact the dealer you purchased your unit from
with your model and serial number available. Lamp
tube replacement kits include replacement instructions
and any miscellaneous hardware required.
Lighting
Note: Bulbs and lamp tubes not covered under product
Seven(7) year limited warranty.
Glass Door: Use a glass cleaner or mild soap and
water and soft cloth to clean the glass door model. Do
not use any abrasive powders.
Warning! It is highly recommended that you disconnect the power cord to the unit before attempting lamp
replacement. Failure to do so could result in electrical
shock that could severely injure you. The "OFF" position on the control does not disconnect power to the
lamp assemblies.
Full-Height Built-In Models
Main Compartment Lighting: These models use
two(2) 40 watt daylight filtered incandescent bulbs located at the "top-front-center" as the primary compartment
illumination. This lighting is activated whenever the
door is opened.
Aesthetic / Supplemental Lighting: Your unit is provided with five(5) low wattage lamp tubes for aesthetic
3
and/or supplemental lighting. Various "user selectable"
modes of activation for these lights are available,
(please see "Light Switch Function" in the "Appliance
Features" section of this manual).
What to do in the event of a Power Failure
Power failures of duration less than 2-hours will have
minimal effect on the compartmental temperatures if the
door remains closed. Door openings during the power
failure will adversely affect the compartment temperature. Power outages in excess of 2-hours will result in
a gradual rise in temperature above proper wine storage
temperatures. If the outage exceeds 8-hours, or if the
ambient temperature is extremely warm, you may want
to move your wines to the coolest location you can find
until power is restored. It is recommended that you turn
your control setting to the "OFF" position until power is
restored. This is to prevent electrical component damage due to "brown-outs", (low-voltage conditions), that
may occur as the power is brought back on-line.
Appliance Features
Temperature Control: The temperature control provided with your unit allows "user selectable" adjustment
within a range of approximately 41ºF at the coldest setting, to approximately 63ºF at the warmest setting. This
range allows the flexibility to select your ideal temperature preference for wine storage and aging. Please
refer to the "How to Operate Your Refrigerated Wine
Cabinet", "Setting the Control" section of this manual for
the specifics of setting the temperature control.
Lighting: Interior lighting on all models is activated
when the door is opened to facilitate viewing of your
wine collection. In addition, a "user selectable" switch is
provided to allow selection of supplemental and/or aesthetic lighting options as follows.
Full-Height Built-In Models - A three(3) position rocker
switch is provided.
Under Counter Models - A two(2) position rocker
switch is provided.
•
"ON" Position - Interior lights are on continuously.
This setting is used to enhance the display of your wine
collection when the door is closed.
•
"OFF" Position - Interior lights are only activated
when the door is opened.
Note: When the "ON" position is selected, bottles on the
upper shelf, in close proximity to the aesthetic lighting,
will experience slightly higher temperatures due to the
wattage dissipation of the lamps. Therefore, it is recommended that the "OFF" position be used when display of
your wine collection is not required.
Door Lock: All models are supplied with a keyed lock
to prevent unauthorized access to your wine collection.
•
Position "I" - Provides supplemental lighting upon
door opening only. This is accomplished by having the
upper and side-mounted aesthetic lamp tube lights activate in conjunction with the main compartment light.
•
Position "0" - De-activates all aesthetic lighting. In
this switch position only the main compartment light will
activate when the door is opened.
•
Position "II" - This setting activates the aesthetic
lamp tube lights at all times. This setting is used to
enhance the display of your wine collection when the
door is closed. In addition, upon door opening, the main
compartment light will still activate providing additional
illumination to assist viewing of wine bottle labels.
Slide-Out Shelving: All models provide "slide-out"
shelving to facilitate access and allow bottle identification with minimal disturbance to the wine bottles. Taking
care to pull-out the shelving gently will minimize "unsettling" your wine collection. Do not lean or press down
heavily on the wine shelves to prevent damaging the
shelves and possibly the wine bottles stored on them.
Avoid pulling out more than one(1) rack at a time to
avoid instability.
All shelving is designed for single-level bottle storage to
facilitate viewing and accessing your wine collection with
minimal disturbance to other bottles.
Note: When "Position "II" is selected, bottles in close
proximity to the aesthetic lighting will experience slightly
higher temperatures due to the wattage dissipation of
the lamps. Therefore, it is recommended that positions
"0" & "I" be used when display of your wine collection is
not required.
4
Before Calling for Service
If You Need Service
Before calling for service, check the trouble shooting
table on this page. This table lists possible problems
that you can remedy without difficulty to avoid an unnecessary service call.
In the event that you do need service, contact your dealer
or the manufacturer to locate a service representative near
you. In any correspondence, you will need to refer to the
model number and serial number of your unit to assure
proper service. Proof-of-purchase may also be required to
determine your warranty status. For your convenience, a
location on the front cover of this manual has been provided
for recording this information.
Troubleshooting
5
Problem
Possible
Causes/Solutions
Odor in cabinet
•Interior needs cleaning
Noisy operation
•Cabinet not level
•Weak floor
Cabinet vibrates
•Cabinet not level
•Weak floor
Cabinet light not working
•Lamp(s) burned out.
•No power at outlet
Appliance will not run
•Temperature control turned
to “OFF”
•Line cord not plugged in
•No power at electrical outlet
•House fuse blown
Appliance runs too long
•Prolonged door openings
•Control set too cold
•Condenser needs cleaning
•Too many door openings
Moisture collects inside
•Too many door openings
•Prolonged door openings
•Hot, humid weather
increases condensation
•Door not closed or
obstructed
Moisture collects on outside
surface
•Hot, humid weather
increases condensation. As
humidity decreases,
moisture will disappear.
•Control improperly set.
Interior too hot/too cold
•Control improperly set
•Faulty thermometer
•Relocate thermometer to
center of cabinet and
recheck
•Condenser needs cleaning
In the unlikely event you are in an area where there is no
service representative, call or write the manufacturer directly, (contact information located on the front cover of this
manual).
Warranty
Your new Northland Kitchen Appliance product is provided with a Seven(7) year limited warranty. This limited
warranty is given by the manufacturer, (herein after
referred to as Northland), to the original purchaser of
the equipment supplied by Northland as long as the
equipment remains in the possession of the original purchaser.
Please locate your Northland Kitchen Appliance
"Product Warranty" certificate in the documentation
package supplied with your unit, and retain in a safe
location. This certificate details the warranty coverage
provided.
It is important that you register your wine storage unit by
sending in the warranty card immediately after taking
delivery of your wine storage unit. Failure to do so
could result in delays to warranty service coverage, if
ever required.
Help prevent tragedies
Each year children die because they climb inside a discarded refrigeration product, get trapped inside and suffocate. Take precautions to prevent such tragedies by
having the door removed before discarding.
6
44000406