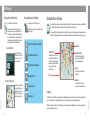
1
MAB-RVK-S-USZ-CO
Wii Operations Manual
Channels and Settings
To protect your health and safety, and for correct use of the Wii system, please read and follow the
instructions in the Wii Operations Manual - System Setup.
This product contains browser technology (“Opera Browser”) licensed from Opera Software ASA (www.opera.com). (Opera® Browser from
Opera Software ASA. Copyright 1995-2008 Opera Software ASA. All rights reserved.) The Opera Browser includes the Zlib compression library,
developed by Jean-loup Gailly and Mark Adler. Copyright © 1995-2004 Jean-loup Gailly and Mark Adler.
The Opera Browser includes software developed by the OpenSSL Project for use in the OpenSSL Toolkit. Copyright © 1998-2001 The OpenSSL
Project. All rights reserved.
Redistribution and use in source and binary forms, with or without modification, are permitted provided that the following conditions
are met:
THIS SOFTWARE IS PROVIDED BY ERIC YOUNG “AS IS” AND ANY EXPRESS OR IMPLIED WARRANTIES, INCLUDING, BUT NOT LIMITED TO,
THE IMPLIED WARRANTIES OF MERCHANTABILITY AND FITNESS FOR A PARTICULAR PURPOSE ARE DISCLAIMED. IN NO EVENT SHALL THE
AUTHOR OR CONTRIBUTORS BE LIABLE FOR ANY DIRECT, INDIRECT, INCIDENTAL, SPECIAL, EXEMPLARY, OR CONSEQUENTIAL DAMAGES
(INCLUDING, BUT NOT LIMITED TO, PROCUREMENT OF SUBSTITUTE GOODS OR SERVICES; LOSS OF USE, DATA, OR PROFITS; OR BUSINESS
INTERRUPTION) HOWEVER CAUSED AND ON ANY THEORY OF LIABILITY, WHETHER IN CONTRACT, STRICT LIABILITY, OR TORT (INCLUDING
NEGLIGENCE OR OTHERWISE) ARISING IN ANY WAY OUT OF THE USE OF THIS SOFTWARE, EVEN IF ADVISED OF THE POSSIBILITY OF
SUCH DAMAGE.
1. Redistributions of source code must retain the above copyright notice, this list of conditions and the following disclaimer.
The licence and distribution terms for any publically available version or derivative of this code cannot be changed. i.e. this code cannot
simply be copied and put under another distribution licence [including the GNU Public Licence.]
2. Redistributions in binary form must reproduce the above copyright notice, this list of conditions and the following disclaimer in the
documentation and/or other materials provided with the distribution.
Number-to-string and string-to-number conversions are covered by the following notice: The author of this software is David M. Gay.
Copyright © 1991, 2000, 2001 by Lucent Technologies.
3. All advertising materials mentioning features or use of this software must display the following acknowledgment: “This product includes
software developed by the OpenSSL Project for use in the OpenSSL Toolkit. (http://www.openssl.org/)”
Permission to use, copy, modify, and distribute this software for any purpose without fee is hereby granted, provided that this entire
notice is included in all copies of any software which is or includes a copy or modification of this software and in all copies of the supporting documentation for such software.
4. The names “OpenSSL Toolkit” and “OpenSSL Project” must not be used to endorse or promote products derived from this software
without prior written permission. For written permission, please contact [email protected].
5. Products derived from this software may not be called “OpenSSL” nor may “OpenSSL” appear in their names without prior written
permission of the OpenSSL Project.
6. Redistributions of any form whatsoever must retain the following acknowledgment: “This product includes software developed by the
OpenSSL Project for use in the OpenSSL Toolkit (http://www.openssl.org/)”
THIS SOFTWARE IS PROVIDED BY THE OpenSSL PROJECT “AS IS” AND ANY EXPRESSED OR IMPLIED WARRANTIES, INCLUDING, BUT NOT LIMITED
TO, THE IMPLIED WARRANTIES OF MERCHANTABILITY AND FITNESS FOR A PARTICULAR PURPOSE ARE DISCLAIMED. IN NO EVENT SHALL THE
OpenSSL PROJECT OR ITS CONTRIBUTORS BE LIABLE FOR ANY DIRECT, INDIRECT, INCIDENTAL, SPECIAL, EXEMPLARY, OR CONSEQUENTIAL DAMAGES (INCLUDING, BUT NOT LIMITED TO, PROCUREMENT OF SUBSTITUTE GOODS OR SERVICES; LOSS OF USE, DATA, OR PROFITS; OR BUSINESS
INTERRUPTION) HOWEVER CAUSED AND ON ANY THEORY OF LIABILITY, WHETHER IN CONTRACT, STRICT LIABILITY, OR TORT (INCLUDING NEGLIGENCE OR OTHERWISE) ARISING IN ANY WAY OUT OF THE USE OF THIS SOFTWARE, EVEN IF ADVISED OF THE POSSIBILITY OF SUCH DAMAGE.
The Opera Browser contains cryptographic software written by Eric Young. Copyright © 1995-1998 Eric Young ([email protected]). All rights
reserved.
This package is an SSL implementation written by Eric Young ([email protected]). The implementation was written so as to conform with
Netscapes SSL. This library is free for commercial and non-commercial use as long as the following conditions are aheared to. The following
conditions apply to all code found in this distribution, be it the RC4, RSA, lhash, DES, etc., code; not just the SSL code. The SSL documentation
included with this distribution is covered by the same copyright terms except that the holder is Tim Hudson ([email protected]).
Copyright remains Eric Young’s, and as such any Copyright notices in the code are not to be removed. If this package is used in a product,
Eric Young should be given attribution as the author of the parts of the library used. This can be in the form of a textual message at program
startup or in documentation (online or textual) provided with the package.
Redistribution and use in source and binary forms, with or without modification, are permitted provided that the following conditions
are met:
THIS SOFTWARE IS BEING PROVIDED “AS IS”, WITHOUT ANY EXPRESS OR IMPLIED WARRANTY. IN PARTICULAR, NEITHER THE AUTHOR NOR
LUCENT MAKES ANY REPRESENTATION OR WARRANTY OF ANY KIND CONCERNING THE MERCHANTABILITY OF THIS SOFTWARE OR ITS
FITNESS FOR ANY PARTICULAR PURPOSE.
Portions of this software are copyright © 2006 The FreeType Project (www.freetype.org). All rights reserved.
The Nuance logo is a trademark of Nuance Communications, Inc.
“
” and AOSS™ are the trademarks of BUFFALO INC.
Windows and Windows Vista are trademarks of the Microsoft group of companies.
Dolby, Pro Logic, and the double-D symbol are trademarks of Dolby Laboratories.
This product contains PrFILE®2 FAT file system, PrMAIL mail client library, and PrUSB/Host USB host stack of eSOL Co.,Ltd. Copyright ©
2006 eSOL Co., Ltd. PrFILE®2 is a registered trademark of eSOL Co., Ltd. in Japan. PrMAIL and PrUSB/Host are trademarks of eSOL Co.,
Ltd. in Japan.
The Wii console includes RSA BSAFE Cryptographic software from RSA Security Inc. RSA is a registered trademark of RSA Security Inc.
BSAFE is a registered trademark of RSA Security Inc. in the United States and/or other countries. © 2005 RSA Security Inc. All Rights
Reserved.
Wii uses certain fonts provided by Fontworks Inc.
Although an IBM logo appears on the Wii packaging, IBM is not responsible for warranty support of the Wii system.
SDHC Logo is a trademark of SD-3C, LLC.
TM, ® and the Wii logo are trademarks of Nintendo. © 2011 Nintendo. All Rights Reserved. Nintendo of Canada Ltd., Authorized User in
Canada. Elements of the Wii console and the Wii Network Services are patent pending, both in the United States and internationally.
Contents
Français – Page 79
Español – Página 159
Wii Menu
2–3
Channels
Disc Channel
4–5
Mii™ Channel
6 – 13
Photo Channel
14 – 23
Wii Shop Channel
24 – 25
Virtual Console™
26 – 27
WiiWare™
28 – 29
Wii Message Board
30 – 39
Wii Settings and Data Management
40 – 63
HOME Menu
64 – 65
SD Card Menu
66 – 69
Wii Keyboard
70 – 71
USB Keyboard
72
Troubleshooting
72 – 77
1. Redistributions of source code must retain the copyright notice, this list of conditions and the following disclaimer.
2. Redistributions in binary form must reproduce the above copyright notice, this list of conditions and the following disclaimer in the
documentation and/or other materials provided with the distribution.
3. All advertising materials mentioning features or use of this software must display the following acknowledgement: “This product
includes cryptographic software written by Eric Young ([email protected])” The word ‘cryptographic’ can be left out if the rouines from
the library being used are not cryptographic related :-).
4. If you include any Windows specific code (or a derivative thereof) from the apps directory (application code) you must include an
acknowledgement:“This product includes software written by Tim Hudson ([email protected])”
1
Wii Menu
Wii Channels
When the Wii console power is turned on, the first screen you will see is the
Wii Menu. From this screen, you can do several activities:
• Play a Game Disc
• Use one of the built-in software programs (Channels)
included with the Wii console
• Change Wii console settings
• Access the SD Card Menu screen
Play a Wii Game Disc, start one of the built-in software programs included with
the Wii console, or start other software programs downloaded to your console
from the Wii Shop Channel. You can also select the Wii + Internet icon to view
the Get Connected video about connecting your Wii system to the Internet.
The Wii Menu can have up to 48 Channels at one time. If you have more
Channels than can be shown on the screen at one time, these can be accessed
by selecting the blue scroll arrows.
Get Connected Video
These are the current Channels available:
Select the Wii + Internet icon from the Wii Menu to watch a video showing the
many advantages of connecting your Wii system to the Internet.
To select any of these activities, simply point at one with the Wii Remote™ Plus
and press the A Button.
Current Time
Wii Settings and Data Management
Wii Menu
SD Card Menu
Open the SD Card Menu (see page 66).
Wii Message Board
Open the Wii Message Board (see page 30).
• Blinks when you have received a message.
2
If this program is deleted, it cannot be recovered. It will also be permanently
deleted if you format the Wii system memory (see page 63).
WiiConnect24™
Wii Shop Channel
The Wii console can communicate with the Internet even when the power is turned off.
The WiiConnect24 service can deliver game updates or other information even if the
system is idle. (Broadband Internet connection required.)
(Broadband Internet connection required.)
Download new Channels, or use Wii Points™ to download Virtual Console
supported games and other Wii programs such as WiiWare titles, or purchase
goods (when available) offered on the Wii Shop Channel.
News Channel (Broadband Internet connection required.)
See page 62 for more information on WiiConnect24.
View news from around the world.
Once you have connected your Wii system to the Internet, if you select this icon again,
you will be asked if you would like to keep the video or delete it. Deleting the video
will free up Wii system memory.
View digital photos and videos from SD Cards.
Forecast Channel (Broadband Internet connection required.)
Check the weather conditions in different locations.
Current
Date
Photo Channel
Change console settings or organize the
contents of an SD Card (see page 40).
Mii Channel
Create characters that can be used in Mii-compatible software programs.
Interact with the Wii Message Board
Disc Channel
Play Wii games.
(To use this menu item, an SD Card [sold separately] must be inserted into the
SD Card slot. The icon will appear gray if there is no SD Card inserted.)
•
Wii Channels
Shortcut Channels (Broadband Internet connection required.)
Some channels are not installed on the Wii system, but can be downloaded for
free from the Wii Shop Channel. Select a channel icon from the Wii Menu to find
out more information about the Channel and to connect to the Wii Shop Channel
to download it.
NOTE: Formatting your Wii System Memory (see page 63) will permanently
delete Shortcut Channels from your system. However, these Channels can be
downloaded again free from the Wii Shop Channel.
Wii Menu
Using the Wii Menu
3
Disc Channel
On the Disc Channel, you can play your Wii Game Discs.
Starting the Game
1. Using the Wii Remote Plus, select the Disc Channel on the Wii Menu.
2. Select Start on the game’s Channel Preview screen to begin the game.
• Review the instruction booklet for the game you are playing for specific game control information.
Disc Channel
•
•
Before Inserting a Game Disc
• Do not insert anything into the Game Disc slot except Wii Game Discs.
• Do not move the Wii console during use.
2. Turn the power off by pressing the Power Button on the front of the console, or by pressing the Power Button on the Wii Remote Plus for one second.
Power
Button
Inserting a Game Disc
Insert your Game Disc into the Disc Slot on the front of the Wii console. The console will
turn on automatically and the Wii Menu will appear (the disc label will face upwards).
Make sure that your TV and any audio equipment that is connected to your Wii console is turned on.
Choose the correct input setting for your TV (see page 18 in the Wii Operations Manual - System Setup).
IMPORTANT: To avoid damage to your Wii console or game discs:
1. Press the Eject Button to remove the Game Disc if you are finished playing
the game.
Power
Button
Front View of
Wii console
Eject
Button
Channel Preview screen
Label faces
upwards
Disc Channel
Disc Channel
When You’re Done Playing
To select an on-screen option, simply point at it
with the Wii Remote Plus and press the A Button.
Wii Menu
Playing a Wii Game Disc
Dolby, Pro Logic and the double-D symbol are trademarks of Dolby Laboratories.
4
5
Mii Channel
Put yourself into your Wii console by making a Mii™... or many Mii
characters! You can see Mii characters in your games, carry them in
your Wii Remote Plus, and let them hang out with friends’ Mii
characters, whether they’re across the street or around the world!
Mii Channel
Wii Menu
Fine-tune your Mii characters’ face.
Change its eyes, brows, nose, and mouth,
and even add glasses and accessories.
You’ve designed your first Mii! After you give it a few personal profile
details like a Nickname (see page 10), you’re completely finished!
Design an endless
variety of Mii characters!
To select an on-screen option, simply point at it
with the Wii Remote Plus and press the A Button.
Making Your First Mii
Selecting the Mii Channel from the Wii Menu
Use the Wii Remote Plus to select the Mii Channel, then select START to begin creating your first
Mii. (This Channel is controlled by one remote at a time. )
Creating Your Mii
Change your Mii characters’ face shape,
hair color, and skin tone.
Finally, tailor your Mii characters’ proportions however you like.
First select Male or Female. You’ll then see a starter face that you can change, along with a style
menu. Go through the following steps to make your Mii.
Select a gender.
Mii Channel
6
•
•
•
•
What Are Mii characters For?
You can choose one of your Mii characters to be “you” in Mii-compatible games.
You can store up to 100 Mii characters in your Mii Plaza (see page 11).
You can carry Mii characters in your Wii Remote Plus to exchange them with Mii characters in friends’ Wii consoles (see page 12). Yours will then appear in their
games. And vice versa!
You can also exchange Mii characters with friends around the world via
WiiConnect24™ and the Mii Parade (see page 13).
7
Mii Channel
Mii Channel
Creating More Mii characters
Selecting the Mii Channel from the Wii Menu
Use the Wii Remote Plus to select the Mii Channel,
then select Start to enter Mii Plaza (see page 11).
Changing Mii Features
Use the style menu when changing your Mii characters’ face and body. As you select categories from the top Feature menu, you’ll see the Feature style menu below fill with
variations that you can choose for your Mii characters’ look.
Feature Edit screen
Select the New Mii icon on the left side of the screen:
Select Male or Female. Then if you’ve created a Mii
previously, you’ll see two Mii start-up options: “Start
from scratch” or “Choose a look-alike.”
Edit Mii profile
Mii Channel
Starting from Scratch
If you select “Start from scratch,” you’ll instantly be given a basic starter face, then you’ll fine-tune all of its features,
just as you did with your first Mii.
Choosing a Look-alike
Change facial features
See page 10.
Select feature type to see variations
appear below.
Change body type
See page 10.
Change color
You can select a color for many
features.
Spin your Mii
Move feature up or down
Select your Mii to see it whirl
around and show you what it
looks like from all sides.
Make feature larger
or smaller
Rotate feature
Select “Choose a look-alike” if you want to get a Mii designed very quickly. You’ll be shown a wide variety of starter
faces that show a spectrum of Mii looks.
When you find a face you like, select “Use this face” to move onto the Feature Edit screen, where you can fine-tune the
face if you prefer.
Mii Channel
If you find one that’s close but not quite right, select it and you’ll see many variations on the face. You can use this
method repeatedly to get closer and closer to the exact face that you want (as shown to the right). Select “Use this
face” when you see the exact Mii face you want.
8
Change feature spacing
Stop modifying
When you quit styling your
Mii, you can choose whether
to save your changes, and
then you’ll go to the Mii Plaza,
where you’ll see your Mii
walking around (see page 11).
Feature style menu
Scroll buttons will appear if
there are more
options available:
Feature adjustment menu
You can tighten and broaden the
spaces between dual features such
as eyes and brows.
Right/Left Part
This option will appear when
modifying the hairstyle.
9
Mii Channel
Modifying a Mii
Mii Channel
Changing Mii Features (continued)
Creating a Profile For Your Mii
Select the Body Type choice from the Feature Edit screen.
Select the Edit Mii Profile choice from the Feature Edit screen.
You can then adjust the height and weight of your Mii using two sliders.
You can then give your Mii personal details. Select a detail
you want to edit, then enter the information.
Seeing Your Mii characters in Mii Plaza
Mii characters that you create walk around in Mii Plaza. You can go to Mii Plaza to check out your Mii characters, edit and create Mii characters, prepare Mii characters for going to
other Wii consoles, and do other useful things with your home Mii crowd. Up to 100 Mii characters can stay in Mii Plaza, and they’ll all appear in any Mii-compatible games you
play on your Wii console.
Return to Wii Menu
Go to Mii Parade
Drag and release a Mii over this icon to send
it to the Mii Parade. See page 13.
• Once moved to the Mii Parade, a Mii
characters’ birthday and creator
information will be deleted.
• If a different game uses a Mii from the Mii Parade, that Mii will be removed from the current game and that game’s save data may be affected.
Edit a Mii
Drag and release a Mii over this icon to
send it to Feature Edit. (You can’t edit
Mii characters from other Wii users.)
Create a new Mii
Erase a Mii
Drag and release a Mii over this
icon to delete it.
“Grab” a slider and move the Wii Remote Plus
to change the setting.
Store a Mii in a Wii Remote Plus
See page 12.
Consult Help
Get information on Mii Channel controls.
Profile settings
• Selecting some of the options will bring up a virtual keyboard to enter letters or numbers (see page 70 for information on using the keyboard).
• Make the Mii one of your Favorites if you want to give this Mii preference for showing up in Mii-compatible games.
Mii Channel
• Turn a Mii characters’ Mingle setting on if you want it to appear in the Mii Parade found on other Wii consoles (see page 13). Turn the Mii’s Mingle off if you want to restrict it to your own home Wii console only.
10
• Hold down the B Button
and move the cursor to
move the screen view.
• Press the + or – Buttons
to zoom in and out on
the screen.
• Select a Mii to display your
Mii characters’ label and
change its Favorite status:
•
Grab and move a Mii by selecting it
with the Wii Remote Plus and
holding down the A and B Buttons.
You can then drop it into menu
options by dragging it onto the
corresponding icon, then releasing
the buttons.
Send a Mii to a Wii Friend
(requires an Internet connection)
Arrange your Mii characters
See page 12.
Mii Channel
NOTE: A Mii that is dragged onto the Erase icon
can’t be recovered.
11
Mii Channel
Storing a Mii in Your Wii Remote Plus
Arranging Mii characters in the Mii Plaza
Select the Wii Remote icon from the Mii Plaza.
Select the Organize icon from the Portrait Plaza screen.
If you store a Mii on your Wii Remote Plus, you can take it to a
friend’s house and give a copy of your Mii to another Wii console.
Your Mii can then be used in your friend’s Mii-compatible games or
put in your friend’s Mii Parade. (You can also use your Wii Remote
Plus to grab Mii characters from your friend’s Wii system and later
add it to your Mii Parade or your Mii-compatible game.)
This will bring up new icons that let you organize your Mii characters
by different categories:
Checking Out Visitors in Mii Parade
Any of your friends’ Mii characters that are set to Mingle will enter your Wii system first via the Mii Parade. You can see if any have arrived by selecting the Mii Parade
icon in the Mii Plaza. (You can also bring Mii characters in to the Mii Parade from the Mii Plaza, as described on page 11.)
Each incoming Mii will stay in the Mii Parade until you transfer it to your Mii Plaza, where only then will it start showing up in your Mii-compatible games. Likewise,
friends will first see any Mingle-approved Mii characters in their own Mii Parades and must transfer them to their Mii Plaza to see them appear in their own games.
Lists the number of Mii characters in the Mii Plaza.
Go to Mii Plaza
Choose a Wii Remote Plus
If more than one Wii Remote or
Wii Remote Plus is in use with the
console, you can choose which
remote to save the Mii to.
Causes the Mii characters to scatter.
Arrange the Mii characters alphabetically.
Arrange by Favorite status.
Send Mii to Mii Plaza
Grab and drop a Mii on this icon to move it
from the Mii Parade to the Mii Plaza, which
allows it to appear in your Mii-compatible
games and lets you perform most Mii Plaza
functions on it. (You can’t edit your
friends’ Mii characters.)
Erase a Mii
Change Mingle Setting
Your Mii Parade will accept incoming Mii
characters only if you turn on this Mingle
option (see About Mingling below).
Mii Speed
Select to adjust the speed at which the Mii
characters move.
Mii Number
Move a Mii to a Wii Remote Plus
Each Wii Remote or Wii Remote Plus
can hold up to ten Mii characters. To
copy a Mii to the remote, grab and
drag the Mii to an open spot. Select
Save & Quit when you’re finished.
Lists the number of Mii characters on the
screen and the total number of Mii characters.
Arrange by Favorite Color.
About Mingling
Arrange by gender.
Mii Channel
Your Mii characters will enter friends’ Mii Parades only if your Mii characters’ individual Mingle settings are turned on. There are then two ways to send those Mii characters to their
consoles. You can transfer Mii characters via your Wii Remote Plus (see page 12), or you can let them travel on their own via WiiConnect24 (see page 62).
NOTE: Mii characters will travel to other Wii consoles via WiiConnect24 only if you’ve registered your friends in your Wii address book (requires an Internet connection), and if you and your friends have Mingle options turned on.
12
13
Mii Channel
Photo Channel
On the Photo Channel, you can view and play with any photos
and videos you’ve saved onto an SD or SDHC Card.
View your photos as a slide show.
Draw on your photos.
Save your photos to the Wii System Memory in the console using the Wii Message Board (see page 30).
Send your pictures to anyone on your list of Wii Friends.
Selecting Your Photo Source
• Videos will appear as the first frame from the file, with a film
icon in one corner.
• If the photo or video is in a format that is not supported by the
Photo Channel, it will appear as a question mark icon.
See page 23 for supported formats.
• If you have a large number of photos, or if they are very large in size,
it may take a moment to open them all.
1. Using the Wii Remote Plus, select the Photo Channel on the Wii Menu. (More than one remote can be used with the Photo Channel at one time.)
2. Select either Digital Camera/Cell Phone or View Wii Message Board photos to view your photo album.
Scroll forward and
backward through
list of photos
NOTE: Photos will appear on the Wii Message Board (see pages 32 and 36) only if
you have posted them there in a previous Photo Channel session.
• The Photo Channel can display a maximum of approximately 1,000 photos.
If your SD Card has more than 1,000 photos, remove the card from the Wii console and remove or reorganize your photos in your camera, cell phone, or computer.
Inserting an SD or SDHC Card
Insert an SD Card into the SD Card Slot on the
front of the console (32 GB maximum size).
Photo Channel
NOTE: You can also use miniSD Cards and
microSD Cards if you have an SD Card adapter,
which can be found at most retail stores that sell
SD Cards. See page 22 for more information on
SD Cards.
14
Increase size of
photo views
• Your photos will appear on the TV screen in the order they were taken. If this data
is not available with the photo, the date that you update the photo in the Photo
Channel will be used.
View photos from the Wii
Message Board
Label faces
upwards
Return to Photo
Channel start screen
View your photos
in a slide show
(see page 17)
Photo Channel
•
•
•
•
This on-screen menu will disappear temporarily if you move the cursor off the screen
or stop moving the cursor for a moment.
To select an on-screen option, simply point at it
with the Wii Remote Plus and press the A Button.
Wii Menu
You can do any of the following things using the Photo Channel:
Viewing Your Photos and Videos
Decrease size of
photo views
Photo Channel
Using the Photo Channel
View photos from an SD Card
15
Photo Channel
Viewing a Photo Full Screen
Viewing Photos in a Slide Show
Select the slide show option using the Wii Remote Plus. The photos will
automatically be displayed in the order they appear on the screen.
Use the Wii Remote Plus to select the photo you would like to view full screen.
A new on-screen menu will appear with additional choices.
Press the A Button during a slide show to open an on-screen menu with
additional choices.
Scroll forward and backward
through list of photos
Resume slide show
Rotate photo 90º clockwise
Resume slide show
Adjust settings
Zoom in or out
If part of the photo is off-screen, a scroll panel will appear:
Move the cursor over an arrow and press the A Button to change the area of
the photo that is viewed.
End slide show
Choose display order
Choose your photos randomly or in the order in which they were taken.
Change transition effects between photos
Change music played during slide show
Select from the songs included in the Photo Channel, or use any AAC format
music saved on your SD Card.
Scroll left
Scroll up
Photo Channel
Return to list
of photos
16
Post photo to
Play with
Message Board your photos
See page 21.
See page 18.
View a slide show
of your photos
See page 17.
Photo Channel
Scroll right
Scroll down
Song Menu screen
17
Photo Channel
Mood
Having Fun With Your Photos
Select the Fun! option to open a new menu with additional options for playing
with your photos or frames from your videos.
Doodle
Zoom out
Select color for sketch pen
Erase tool
Zoom in
Eyedropper tool: Copy a color from the photo
1. Select the eyedropper icon and press the A Button.
2. Move the eyedropper icon over a part of the photo where you want to copy the color and press the A Button.
3. The cursor will change to the selected color.
Scissors tool: Cut and paste a piece of the photo
Mood Menu Screen Options
Draw, cut and paste, and
add text and stamps
Photo Channel
Create a puzzle out of a
photo for others to reassemble
18
1. Select the scissors icon and press the A Button.
2. Move the scissors icon over a part of the photo where you want to
cut and paste and press the A Button. A cut frame will appear.
3. Press the A Button to cut the area and again to paste it.
Brighten: Brighten the photo. Select repeatedly to increase effect.
Black and White: Convert photo to gray scale monochrome.
Zap!: Invert the photo.
Hard-boiled: Convert the photo to stark black and white. Select repeatedly to increase effect.
•
•
•
•
Erase all doodles and restore the photo to its
original appearance
Stamp selection
NOTE: Move the Wii Remote Plus closer to the TV to increase the size
of the sketch pen or stamp. Move the Wii Remote Plus away from the
TV to reduce the size of the pen or stamp. Twist the Wii Remote Plus
to rotate the pen or stamp.
19
Photo Channel
Adjust the overall
appearance of your photo
Photo Channel
Puzzle
When you select this option, your photo will be divided into pieces.
To reassemble the pieces, move the cursor over a piece and press and hold the
A Button. Move the piece into place and drop it by releasing the A Button.
Changes made to your photos can only be saved by posting your photo to the
Wii Message Board (see page 21).
You cannot save or overwrite photos or videos on the SD Card.
•
Move pieces
Saving Mood and Doodle Changes
You can make Doodle changes to
only one photo at a time. If you
select another photo while you
have a modified photo open, you
will see the following warning
screen, shown at right.
Viewing Your Videos
Select a video from the photo album to begin playing it.
• Hold down the 1 Button on the Wii Remote Plus to rewind the video.
• Hold down the 2 Button on the Wii Remote Plus to advance the video.
Tap these buttons to rewind or advance the video a little.
Posting Photos to the Wii Message Board or Wii Menu
You can save your photos or single frames from videos from an SD Card to the Wii
System Memory by posting them to the Wii Message Board or Wii Menu.
When you display a photo or video frame in full-screen mode, you will have the
option to post that photo to the Wii Message Board or Wii Menu. If you select Post
you will see the following confirmation screen:
NOTE: Any of the options available in the Fun! mode can be applied to
individual frames of a video.
NOTE: Erased doodles cannot be
recovered.
Get a hint
View the original image.
The puzzle starts with six pieces. After
completing that level, you can choose
the number of pieces to start with.
Photo Channel
View records for shortest
completion time
20
When you return to the Photo
Channel start screen, any Mood or
Doodle changes will be erased
unless you post your modified
photos to the Wii Message Board.
You will be notified by this screen:
•
•
Images that have been modified by Mood or Doodle changes also can be saved to the Wii Message Board or Wii Menu.
You can use the Wii Message Board to send photos to anyone on your list of Wii Friends (see page 36).
NOTE: See page 32 for information on deleting messages from the Wii
Message Board. When deleting images posted to the Wii Message Board, you
must delete the entire message.
21
Photo Channel
Number of puzzle pieces
•
Photo Channel
SD Card Information
Supported File Formats
SD Cards are used in many digital cameras and cell phones and for data storage on
PCs. Refer to the instruction manuals for these devices for information on how to
store data on the SD Cards.
The Photo Channel can display or play files in the following formats:
The Wii console accepts only SD or SDHC Cards (32 GB maximum), including
miniSD, miniSDHC, microSD, or microSDHC Cards when used with their respective
adapters. To use the Photo Channel, you must have an SD or SDHC Card with
compatible image data stored on it.
Format: JPEG, baseline only.
Size: Up to 8192 x 8192.
Some Channels or software may be incompatible with SDHC-type memory
cards. Additionally, though any SD Card with the above specifications may work,
Nintendo has licensed specific SD Cards for use with the Wii console. Additional
information on software compatibility issues, or compatible SD Cards can be found in
the Wii – System and Accessory Set Up section at http://support.nintendo.com.
Format: QuickTime (motion JPEG), (.avi files).
Size: Up to 848 x 480.
Image Files
Video Files
SD Card
Audio Files
Format: AAC
(MP4 format files with “.m4a” file extension that have been AAC encoded.)
See the SD Card Menu section (page 66) in this manual for more information
on using SD Cards with the Wii system.
miniSD Card
and Adapter
SDHC Card
microSD Card
and Adapter
PLEASE NOTE THE FOLLOWING:
• Some files in the above formats may not work with the Photo Channel.
• The audio components of some video files may not be playable.
• Using an SD Card with slow transfer speed may result in longer load times or irregular video playback.
The Wii console also accepts mini- and microSDHC Cards (32 GB maximum), when
used with their respective adapters.
Photo Channel
Photo Channel
22
23
Wii Shop Channel
The Wii Shop Channel allows you to download new Channels,
o r t o u s e W i i Po i n t s t o d o w n l o a d V i r t u a l Co n s o l e g a m e s a n d
o t h e r p r o g r a m s s u c h a s W i i Wa r e t i t l e s , o r p u r c h a s e o t h e r
g o o d s o ff e r e d ( w h e n a v a i l a b l e ) o n t h e W i i S h o p C h a n n e l .
Wii Menu
To select an on-screen option, simply point at it
with the Wii Remote Plus and press the A Button.
Using the Wii Shop Channel
An existing broadband Internet connection
NO VALUE UNTIL ACTIVATED AT REGISTER / SANS AUCUNE VALEUR AVANT D’ÊTRE ACTIVÉE À LA CAISSE
See pages 53-61 for information on connecting your Wii console to the Internet.
Wii Points
Wii Shop Channel
24
NOTE: Some Virtual Console games can only be played with a Classic
Controller™ (sold separately).
• A maximum number of unused points can be stored on one Wii console.
While browsing the catalog of available content in the Wii Shop Channel, you can
select a game from the list to view detailed information, including details about the
number of points needed to download the game. If you have enough points in your
account, download the game and it will be added as a channel on the Wii Menu.
• To buy Wii Points with a credit card, select this option from the menu, enter your
credit card information, and choose the amount of points you would like to buy.
Once you confirm your purchase, the points will be added to your account.
• Additional hardware accessories may be required to use Wii software downloaded from the Wii Shop Channel and are sold separately.
• Software downloaded from the Wii Shop Channel is licensed to you, not sold.
• Wii Points are subject to a User Agreement, which may be viewed at
http://support.nintendo.com.
• Wii Points are only redeemable for downloading software or purchasing goods
offered on the Wii Shop Channel.
• If your Parental Controls are set to restrict use of points, you will be able to purchase
Wii Points using a credit card, or redeem a Wii Points Card, but use of these points will be restricted by your Parental Controls setting.
• Please visit http://support.nintendo.com for more information.
TM
You can purchase a Wii Points Card™ at many retailers that carry Nintendo products,
which can be redeemed for Wii Points on the Wii Shop Channel. You can also purchase
Wii Points through the Wii Shop Channel using a credit card.
NOTE: Your use of the Wii Shop Channel is subject to your acceptance of the Wii Users Agreement, the Wii Privacy
Policy and the Wii Code of Conduct. Copies of the most updated versions of these agreements may be found at
support.nintendo.com.
• Points have no monetary value and cannot be redeemed for cash. All points and software downloads are only for use on a single Wii console and are non-refundable and non-transferable.
NOTE: In some countries, you may not be able to purchase points with a credit card
and this option will not be available from the menu. To add points to your account, you
will have to purchase a Wii Points Card.
Wii Points Card
Important Notes about the Wii Shop Channel and the use of Wii Points
In the Wii Shop Channel you can use Wii Points to download additional features and
items—including selected titles of your favorite classic NES, Super NES, Nintendo 64,
Sega Genesis, and TurboGrafx16 systems, and more (subject to availability).
If you need to add points to your account, you can either buy points with a credit card,
or redeem a Wii Points Card (sold separately) for Wii Points. To add points, go to the
Add Wii Points menu.
You will need the following to use this Channel:
Going shopping
Wii Shop Channel
2000
• To redeem a Wii Points Card, select this option from the menu. Scratch off the silver
area on the back of the card to reveal the Points Card activation number. Enter the
activation number into the appropriate field on the screen. After you submit the
number, the number of points printed on the front of the card will be added to your
account.
Wii Shop Channel
Wii Shop Channel
Wii Points
TM
25
Virtual Console
Download Virtual Console games from the Wii Shop Channel
and play games from the NES™, Super NES™, Nintendo 64™,
S e g a G e n e s i s , Tu r b o G r a f x 1 6 , V i r t u a l C o n s o l e A r c a d e , a n d m o r e
(subject to availability). After downloading, a Virtual Console
game will appear as its own channel in the Wii Menu.
Note: An Internet connection is required
to download Virtual Console games.
Example of Virtual Console Channel Preview screen
Virtual Console Games
Virtual Console Game Manuals
To view a manual for a Virtual Console game that you have downloaded, follow
these steps:
1. Press the Home Button on the Wii Remote Plus or Classic Controller.
2. Select Operations Guide from the Home Menu.
Wii Remote Plus
Virtual Console game titles are saved in the Wii console memory.
• A Virtual Console title can be copied onto a SD Card but cannot be played on a
different Wii console. It must be played on the original console it was downloaded to.
Saving Game Save Data
NOTE: Similar manuals will be available
for new channels that are downloaded.
• Save data can be copied to an SD Card
For more information on using SD Cards, see page 32 in the Operations Manual System Setup, and pages 40-41 in the Operations Manual - Channels and Settings.
•
•
•
Saving Virtual Console game titles
Save data for Virtual Console games is saved in the Wii console memory. Note that
some games do not have a save feature or allow data to be copied to an SD Card.
The Classic Controller/Classic
Controller Pro can be used with
this game.
Select “View compatible controllers” on the Details screen to see the type of
controllers that can be used with each Virtual Console title on the Wii Shop Channel
(see image at right). The illustrations show one possible way of holding the controllers
during game play.
3. A contents menu will appear:
The Wii Remote Plus can be
used with this game.
Virtual Console Game Controllers
The controllers used for Virtual Console games may vary depending on the
game. Be sure to check the information on the Wii Shop Channel to see which
controllers are needed to play specific games before redeeming your Wii Points for
downloadable software.
A scroll bar will appear if there is more information than can fit on one screen.
Use the + Control Pad to scroll through the menu, then press the A Button to view your choice.
Press the Home Button again to close the menu.
Classic Controller Pro
Suspending Your Game
Some Virtual Console games allow you to suspend your game and return to it at a later
time. When you suspend play, a Suspend Point is created and saved in the Wii console
memory.
• A Suspend Point is deleted when you resume the game.
• You cannot copy a Suspend Point to an SD Card, even if you move the Virtual
Console game title to an SD Card.
NOTE: If you accidentally press RESET or turn off the power of the Wii Remote
Plus or console, you may lose the Suspend Point.
(sold separately)
Virtual Console
Virtual Console
• Some games use a USB keyboard. See page 68, or the Software Download screen
on the Wii Shop Channel for more information.
NOTE: Your download and use of Virtual Console games is subject to your acceptance of the Wii Users Agreement, the
Wii Privacy Policy, and the Wii Code of Conduct. Copies of the most updated versions of these agreements may be
found at support.nintendo.com.
26
27
WiiWare
Example of WiiWare game Start screen
WiiWare Games
WiiWare Game Manuals
WiiWare game manuals can be viewed both from the Details screen in Wii Shop
Channel, or from the game after you have downloaded it.
WiiWare Game Controllers
Select the “View compatible controllers” button on the Details screen to see the type
of controllers that can be used with each WiiWare title for each game on the Wii Shop
Channel (see image below). These may be different from game to game.
The Wii Remote Plus can
be used with this game.
The Classic Controller/
Classic Controller Pro can
be used with this game.
WiiWare
28
3. Use the following controls to navigate through the manual:
Up/Down – Scroll the screen
up or down.
Left/Right – Go to the
previous or next page.
• A WiiWare title can be moved, copied, or saved onto a SD Card, but cannot be
played on a different Wii console. It must be played on the original console it was downloaded to.
Sample WiiWare Game Manual
Contents menu
Return to Table of Contents page.
• Save data can be moved or copied to an SD Card
Close the Online manual.
NOTE: Be sure to move the data back to the Wii system memory before starting the game again using the Data Management tool (see page 40).
1. Select the More Details option
from the game Details screen on
the Wii Shop Channel.
2. Select Operations Guide from the HOME Menu to see controller instructions.
* IMPORTANT: Selecting View Detailed
Instructions will end the game. Be sure
to save your game data before choosing
this option, or review these instructions
before gameplay.
Saving Game Save Data
Save data for WiiWare game titles is saved in the Wii console memory. Note that some
games do not have a save feature or allow data to be moved or copied to an SD Card.
1. From either the game title screen or during a game*, press the HOME Button on
the Wii Remote Plus or Classic Controller.
More Details option
View instruction for selected item.
Viewing a manual from a downloaded WiiWare game:
3. Select View Detailed Instructions to go to the table of contents.
Saving WiiWare game titles
WiiWare game titles are saved in the Wii console memory or on an SD Card.
Viewing a manual from Wii Shop Channel:
The Nunchuk can be
used with this game.
Sample WiiWare game Details screen
Note: An Internet connection is required
to download WiiWare games.
2. Select the category of information from the table of contents. A scroll bar will appear if there is more information then will fit on one screen.
For more information on using SD Cards, see pages 22 and 66.
Add-on Content
Additional levels, maps, items, and other content can be downloaded for some titles.
This content is saved in the Wii console memory.
•
•
•
Additional Wii Points may be necessary to download add-on content.
Most add-on content can be moved or copied to an SD Card, although some add-on
content cannot be moved or copied.
Although add-on content can be moved or copied onto a SD Card, it cannot be used
on a different Wii console. It must be used on the original console it was
downloaded to.
NOTE: Your download and use of WiiWare games is subject to your acceptance of the Wii Users Agreement, the Wii
Privacy Policy and the Wii Code of Conduct. Copies of the most updated versions of these agreements may be found
at support.nintendo.com.
29
WiiWare
Download original Wii game titles available only from the
Wii Shop Channel. After downloading, a WiiWare game will
appear as its own channel in the Wii Menu.
Wii Message Board
Keep in touch with friends and family through the Wii Message
Board. Exchange messages and pictures with family members.
If you have a broadband Internet connection, you can also
exchange messages with your Wii Friends and receive news on
upcoming games, events, and more.
To select an on-screen option, simply point at it
with the Wii Remote Plus and press the A Button.
Message Board Icon
Wii Menu
Wii Message Board
From the Message Board, you can see if you have any messages posted for you. From this screen, you can also:
• Reply to messages.
• Open the Calendar.
• Create a message.
• Cancel message service from Channels (see page 39).
• Return to the Wii Menu.
Read or reply
Photo icon
Select and hold the A and B Buttons
to grab and move this icon.
This icon will appear on messages
that have photos attached.
Using the Wii Message Board
• Exchange messages with friends and family members.
• Add photos or Mii characters (see Mii Channel, page 6) to your messages.
• Check your console’s unique Wii Number.
Your Wii Number is a 16-digit number assigned to your console. Use your Wii Number
to register Wii Friends. (See page 38 to learn how to register a Wii Friend).
Change days
Opening the Message Board
Select the Message Board icon from the Wii Menu.
• This icon will blink if you have a message waiting for you.
Message
(More than 6
hours old.)
The pin will light on newly attached messages.
Message Board
Open the calendar
See page 33.
Wii Message Board
• Send messages to your Wii friends’ consoles or e-mail addresses.
• Register Wii Friends in the Message Board Address Book.
You can only exchange messages or use other Internet–based communication with
your Wii Friends.
30
(Less than 6
hours old.)
The Message Board will appear:
The following features require an Internet connection (see Wii Settings and Data
Management, pages 53-61, for more information on Internet connections).
NOTE: Your ability to send and receive messages on you Wii console is subject to your acceptance of the Wii Users
Agreement, the Wii Privacy Policy and the Wii Code of Conduct. Copies of the most updated versions of these agreements may be found at support.nintendo.com.
New message
Move forward or back a day. If you
receive more than ten messages a day,
select these to display any messages
beyond ten.
Date
Return to the Wii Menu
Create message
See page 34.
Message Board
Wii Message Board
Use the Wii Message Board to:
• Today’s Accomplishments
Each time you play a game (Wii games only) or a Wii Channel, the Wii records how long you spent playing it, and then sends you a message
titled “Today’s Accomplishments.” This also records your sent message history from the Message Board. This message cannot be deleted.
31
Wii Message Board
Reading Messages
Select the Calendar icon to open the Calendar. Select a date on the calendar to open the Message Board for that day.
To read a message, move the cursor over a message and press the A Button. The sender’s name and message text
will appear, along with information like any attached photos or Miis.
Sender’s name
Here is a sample Calendar. The appearance varies depending on how many messages you receive.
Photo
Select the photo to view a larger image.
You can also send attached photos to other
recipients (see page 36).
Delete message
Calendar
Open date
Open the Message Board
for a particular date.
Deleted messages cannot be
recovered.
Message icon
Appears on days with
messages.
This only appears if the
sender has attached a Mii to
the message (see page 35).
Back
Return to the Message
Back
Return to the Message
Message
Board.
Wii Message Board
Message text
Board.
Reply
Reply to a message (see page 36).
Change months
Move forward or back a month.
You can also do this by pressing
the Plus (+) or Minus (-) Buttons
on the remote.
Calendar screen
Month and year of
displayed calendar page.
Wii Message Board
Mii
NOTE: The Calendar displays dates from January 2000 to December 2035.
32
33
Wii Message Board
Creating Messages
Creating and Posting a Memo to the Message Board
Creating and Sending a Message to a Wii Friend
From the Message Board, select the Create Message icon. From here, you can open the Address Book, write a memo to post to the Message Board, or
write a message to send to a Wii Friend.
1. Open a blank memo by selecting the Create Memo icon from the Create
Message screen.
NOTE: To use this feature, you must have an Internet connection and
register your Wii Friend in the Address Book (see page 38).
NOTE: Before sending messages to Wii Friends, you must first register them in your Address Book (see page 38).
2. Move the cursor over the text area of the memo and press the A Button to open the virtual keyboard. See page 70 for more information on the virtual keyboard.
1. Select the Create Message icon on the Create Message screen.
3. Enter text by moving the cursor over the desired letter and pressing the A Button.
Address Book
Create message
Check your console’s Wii
Number or register a Wii Friend.
Create a message to send to
a Wii Friend (see page 35).
2. Select a Wii Friend to send a message to from the address book, and then press the A Button.
4. To attach a Mii, select the Mii icon, then select the Mii you would like to use.
5. Select Post to post your memo.
Create memo
Create a memo to post to the
Message Board (see page 35).
Mii icon
Text area
Back
Address Book sample page
Create Message screen
Current date
3. Move the cursor over the text area of the message and press the A Button to open the virtual keyboard. See page 66 for more information on the virtual keyboard.
4. Enter text by moving the cursor over the desired letter and pressing the A Button.
Wii Message Board
5. To attach a Mii, select the Mii icon, then select the Mii you would like to use. This option only works when sending your message to another Wii console.
6. Select Send to send your message.
34
35
Wii Message Board
Return to the Message Board.
Wii Message Board
Replying to a Message
1. From the Message screen, select Reply.
Sending a Photo
2. Move the cursor over the body of the memo and press the A Button to open the virtual keyboard. See page 70 for more information on the virtual keyboard.
You can send a photo that was posted to the Message Board from the Photo
Channel program, or that was attached to an incoming message. Begin by selecting
a message from the Message Board that has a photo icon on it. (See page 21 for
information on posting photos to the Message Board.)
3. Enter text by moving the cursor over the desired letter and pressing the A Button.
1. From the Message screen, select the photo, then select Send.
Using the Address Book
To open the Address Book, select the Address Book from the Create Message screen. From here, you can:
• Confirm your Wii Number.
• Register a Wii Friend (up to a maximum of 100).
• Edit registration details.
• Send a message.
Wii Friend entry
4. To attach a Mii, select the Mii icon, then select the Mii you would like to use. This option only works when sending your message to another Wii console.
Select to send a message
or edit information.
5. Select Send to send your message.
Mii
Assign a Mii to a Wii
Friend.
Photo icon
This icon appears
if a photo has
been attached to
the message.
Change pages
Move forward or back a page.
Open entry space
Select to register a Wii Friend.
2. Select a Wii Friend to send a message to from the address book, and then press the A Button.
Back
Return to previous screen.
Register
Select to register a new Wii Friend.
3. Enter text by moving the cursor over the desired letter and pressing the A Button.
5. Select Send to send your message.
36
Page display
Current and total pages.
Editing the order of your Address Book:
You can rearrange the order of your entries by using the A and B Buttons simultaneously and dragging the entry up or down the list. Drag the entry over a scroll button to move to
another page.
37
Wii Message Board
Wii Message Board
4. To attach a Mii, select the Mii icon, then select the Mii you would like to attach to the message. This option only works when sending your message to a Wii Friend on another Wii console.
Wii Message Board
Registering a Wii Friend
NOTE: To register a Wii Friend, your Wii console must be connected to the Internet with
a broadband Internet connection.
1. Select the Address Book option from the Create Message screen (page 32).
2. Select the Register option from the Address Book screen.
3. Select the Wii option to register another
Wii console or select the Others option to
register an e-mail address.
4. For a Wii console, enter the Wii Number
for that Wii console. For a PC or
cell–phone user, enter an e-mail address
(cannot contain over 100 characters).
5. Enter a nickname for your friend.
6. To attach a Mii, select the Mii icon, then select the Mii you would like to use.
This option works only when registering a Wii console user.
7. Select OK to confirm the information and register your Wii Friend.
Editing or Deleting Wii Friends
1. Move the cursor over the Wii Friend
nickname in the Address Book and press
the A Button.
Wii Message Board
2. Select from Change Nickname or Erase.
NOTE: If you erase a Wii Friend entry, it
will be permanently deleted from your
Address Book.
38
Exchanging Messages or Data with WiiConnect24
•
If both parties are Wii users, you
must register each other as Wii
Friends to exchange messages
or data.
•
If one party is a Wii user and the
other is a PC or cell–phone user,
a registration e-mail will be
sent to the PC/cell–phone user
during the Wii Friend registration process. The PC/cell phone user
will need to respond and accept in
order to complete the registration.
NOTE: You will not be able to send photos from your Wii console to the PC/cell
phone user.
Canceling Wii Channel Message Service
An option to “opt-out” or stop delivery
may appear for some messages sent to
you from certain Wii Channels. You can
stop the delivery of these messages by
selecting this icon
and choosing
one of two settings:
1. Choose “This message service” to
stop messages from this Channel
only.
2. Choose “All message services” to
stop messages from all Channels.
1. Select Address Book from the
Create Message screen.
Transferring Data to an SD Card
If the Wii System Memory is full, you can save data to an SD Card. For more
information on using SD Cards in the Wii console, see pages 22 and 66.
1. If you get a message on the Wii
console that there is no more room
for additional Message Board data,
insert an SD Card into the SD Card
Slot on the front of the Wii console.
If there is already an SD Card in the
SD Card Slot when you run out of
space in the console memory, you
will be asked if you want to save to
the SD Card.
2. Confirm that you want to save data to the SD Card.
3. A set number of messages will be saved to the SD Card, starting with the
oldest messages.
Viewing Your Wii Number
The Wii Number is a 16 digit number
assigned to each Wii console. By
exchanging Wii Numbers with other
Wii users, you can register your Wii
system to a Wii Friend.
CAUTION: Do not remove the SD Card or turn the power off while transferring
data. This can damage the data or the SD Card.
When you download a new channel, you will have the same opportunity as
described above to decide whether or not to receive messages from channels.
4. If you do not insert an SD Card after the memory–full message, the oldest
messages will be deleted automatically.
NOTE: You will still receive messages from your Wii friends.
Wii Message Board
2. Your console’s Wii number will be
displayed.
39
Wii Settings and Data Ma n a g e m e n t
In Wii Settings and Data Management, you can manage data saved in
your Wii console as well as in your external memory media. You can
also adjust settings that affect many aspects of your console, such as
the Sensor Bar, the Internet connection, WiiConnect24, time settings,
and other functions.
Wii Menu
Data Management
To reach Wii Settings and Data Management, select the Wii icon on the bottom left of
the Wii Menu screen. (If more than one remote is connected, use Player 1.)
Select Data Management from the Wii Options screen to see a choice of two kinds of
data you can manage: Save Data and Channels. Select one to proceed.
•
•
•
•
When there’s not an SD Card inserted in the SD Card Slot.
When there’s not enough space in the Wii System Memory or SD Card that you’re
trying to move or copy a file to.
When you’re trying to move or copy a file that you’re not allowed to move or copy.
When the SD Card is write-protected.
Nintendo GameCube
Wii
Channels
Lets you delete specific Channels or save them
to an SD Card (see page 42).
Wii Settings and Data Management
Configure your time settings, Internet
configuration, WiiConnect24, and
other system options.
NOTE: You cannot move or copy data files in the following cases:
Select Save Data from the Data Management screen to see two kinds of data
management: Select Wii to proceed (Nintendo GameCube data management is unavailable on this model of Wii system).
To select an on-screen option, simply point at it
with the Wii Remote Plus and press the A Button.
Getting Started
Wii Settings
Save Data
Save Data
Lets you organize and delete the save data in
Wii System Memory and SD Cards.
Data Management
Manage data in the Wii System
Memory and SD Cards.
Wii
You can move, copy, and delete data found in the Wii System Memory and SD Cards.
First select the Wii option to look at all data
saved in the console’s internal memory, or
select the SD Card option to view the data
saved on an SD Card inserted in the SD
Card Slot.
Wii Settings and Data Management
Wii Icon
Select the data you want to manage, then
select Copy or Delete.
IMPORTANT: If you are trying to completely remove data to free up space on your system, data may need to be deleted or moved to an SD card from both the Save Data
and Channel areas. For more information on managing your Wii console available memory space, visit http://support.nintendo.com/wiimemory. If you accidentally
delete downloaded content from your Wii system memory, you can download it again using the Wii Shop Channel. (This service may be discontinued without notice.)
40
41
Channels
When you enter the Channels management screen, you’ll see all of the individual
Channels currently on your Wii console. Select a specific Channel to see three
options appear: Delete, Copy or Move.
Select the Delete option if you want to erase a Channel.
Select the Copy or Move option if you want to copy or move the Channel to an
SD Card.
NOTE: You cannot copy or move Channels in the following cases:
• When there’s no SD Card in the SD Card Slot.
• When there’s not enough space in the SD Card.
• The kind of SD Card you’re using is incompatible with the Wii console (see page 22).
Wii Settings
Select Wii Settings from the Wii Options screen to see the wide variety of system
settings that you can change. To scroll to a different options page, use the Wii Remote
Plus to point at a left/right arrow to scroll to a different selection page. (If more than
one remote is connected, use Player 1.)
Select the Wii system option that you wish to change. Consult the next page to see all
of the options.
Wii Settings and Data Management
Console Nickname
Give your Wii console a unique nickname.
page 44
Calendar
Set the date and time.
page 44
Screen
Configure your screen output settings.
page 45
Sound
Configure your sound output settings.
page 47
Parental Controls
Restrict use of Wii software, Channels, and purchasing functions
page 48
Sensor Bar
Configure your Sensor Bar sensitivity and placement settings.
page 52
Internet
Configure your internet connection settings.
page 53
WiiConnect24™
Change your WiiConnect24 and Standby Connection settings.
page 62
Language
Select the language display.
page 63
Country
Select the country where your Wii console will be used.
page 63
Wii System Update
Check for Wii system updates.
page 63
Format Wii System Memory
Delete ALL Channels and Save Data in Wii System Memory.*
page 63
Wii Settings and Data Management
Wii Settings and Data Ma n a g e m e n t
*Additional steps are required to delete your Wii Shop Channel account activity and rights to play previously downloaded Virtual Console games. Please see page 63 for
instructions on how to delete this information.
42
43
Wii Settings and Data Ma n a g e m e n t
Console Nickname
You can give your Wii console a Console Nickname to distinguish your Wii console
from others when you are connecting with other Wii consoles. To change the current
nickname, select the text area, then use the Wii keyboard (see page 70) for entering
the new Console Nickname. Confirm your change once it’s complete.
Calendar
You can change your Wii console’s Calendar settings by selecting the Date or Time
options.
Date Setting
Change the date by pointing at the
up/down arrow that corresponds to
the year, month, or day, then pressing
A until you see the correct number.
Confirm your Date changes once
they’re complete.
Time Setting
Wii Settings and Data Management
Change the time by pointing at the
up/down arrow that corresponds to
the hours or minutes, then pressing
A until you see the correct number.
Confirm your Time changes once
they’re complete.
NOTE: The Wii console uses a 24
hour clock. For example, 1:00 pm is
displayed as 13:00.
44
Screen
You can change your Wii screen output settings by selecting the Screen Position,
Widescreen Settings, TV Resolution, and Screen Burn-in options.
Widescreen Settings
You can change the screen format for your Wii display by selecting the Standard (4:3)
or Widescreen (16:9) options. Confirm your selection once it’s complete.
Screen Position
Change the horizontal screen position by pointing at the left/right arrows, then
pressing A until you see the horizontal shift you want. (The range is – 8 to + 8.)
Confirm your position change once it’s complete.
Standard
(4:3)
Standard (4:3)
Select when you’re using a television that supports only standard
4:3 screen aspect ratio.
Widescreen
(16:9)
Widescreen (16:9)
Select when you’re using a widescreen television or a television
that supports a 16:9 widescreen aspect ratio.
NOTES:
• If set to 4:3, set the television screen size to ”standard” or “normal”, to display video without altering the vertical and horizontal ratios. This term may be different
depending on the manufacturer of your television.
• In addition to using Wii’s widescreen setting, you must also adjust your television’s
options to take advantage of its own widescreen mode(s).
• Some television sets will not change to widescreen display even when receiving wide screen input from the Wii console.
45
Wii Settings and Data Management
Wii Settings and Data Ma n a g e m e n t
Screen (continued)
TV Resolution
Some Wii software supports a 480p progressive output that displays at a higher
resolution than the Standard 480i resolution. To view Wii display output in 480p, you
must change the Wii’s TV Resolution setting from Standard TV (480i) to EDTV/HDTV
(480p). Confirm your selection once it’s complete. (Games that do not support 480p
will be displayed in 480i.)
Your television must be a high-definition TV (HDTV) or enhanced-definition TV (EDTV)
to view 480p output.
In addition, you’ll also need the
separately-sold Wii Component Video
Cable to connect your Wii to your HDTV
or EDTV television. (You cannot see Wii
progressive display output when the
console is connected to a television
using any other kind of cable.)
Wii Settings and Data Management
EDTV or HDTV (480p)
Standard TV (480i)
46
Select this display output when using the Wii Component Video Cable to connect with your HDTV or EDTV.
Screen Burn-in Reduction
When images are displayed in the same spots for long periods of time, some television screens can suffer “screen burn-in.” (See page 12 in the Wii Operations Manual
- System Setup, for more information on TV screen damage.) The Wii console has a
Screen Burn-in Reduction feature. When activated, the Wii console will fade the screen
when Wii software is paused for five or more minutes. (You can revert the screen to its
original brightness by simply pressing any button on the Wii Remote Plus other than
the Power Button.)
Sound
You can change the sound setting for your Wii output by selecting the Mono, Stereo, or
Surround options. Confirm your selection once it’s complete.
You can turn Screen Burn-in Reduction
on or off by making your selection, then
confirming it.
Mono
•
•
•
Your TV may also have its own screen burn-in reduction function that may fade back the screen imagery or darken it entirely.
The Wii system’s Screen Burn-in Reduction does not work for all types of software, so
it is recommended that the television be turned off when not playing.
Please follow your TV manufacturer’s recommendations to avoid screen burn-in.
Stereo
Surround
Select when you want Wii sound output to come equally out of the
left and right TV speakers. Some games may include only Mono
sound.
Select when using software that provides different sounds for the left
and right TV speakers to create a fuller audio effect.
Select when using software that provides different sounds for the
left, right, and other TV speakers to create an even-fuller audio effect.
Your game and TV must be compatible with surround sound to
take advantage of this feature.
Wii Settings and Data Management
Select this display output when using any other kind
of cable to connect with your television, such as the
Wii AV Cable.
47
Wii Parental Controls
The Wii Parental Controls settings offer you a means to manage what Wii content is
accessible to the console users. If you apply Parental Controls, you will be prompted
to set a 4-digit PIN which will allow you to adjust the Parental Controls settings in
the future and also allow you to access content that may be restricted by the Parental
Controls settings. The Parental Controls default setting is “OFF” which means that the
console will allow all content unless you change the settings. There is one Parental
Controls setting per console so you should tailor the settings to lowest common
denominator and share the PIN with users who may be allowed access to blocked
content.
To customize the settings, click the Wii icon from the Wii Menu and select Wii Settings,
then select Parental Controls. These are the features that are offered within Parental
Controls:
•
Access to Wii software and Related Content
Setting is based on the Entertainment Software Rating Board (“ESRB”) game rating categories. Please see page 50 for information on the various ratings. Note that this setting controls Wii, Virtual Console and WiiWare games and related content.
If you connect to the Internet, you will be able to select these additional
Parental Controls options:
Important Privacy Information
• Internet Channel
Controls access to the browser and viewing of certain content which is not subject to game rating.
Through your Wii console you will be able to participate in a variety of games
and activities, some of which will be online. In order to protect your privacy
and that of your family when using your Wii console, we strongly
recommend the following:
• News Channel
Controls access to the News Channel.
•
Online Communication and User Created Content
Controls sending and receiving of messages from the Wii console and in online games where open text and/or verbal communication is available. Also controls exchange of user created content in compatible games. Note that system updates will be delivered regardless of this setting.
•
Use of Wii Points
Controls use of Wii Points. If this setting is on, users will be required to enter the Parental Controls PIN when using Wii Points to download content from the Wii Shop Channel.
Wii Settings and Data Management
If Parental Controls are applied and a user attempts to play or download content that
exceeds the Parental Controls setting, the user will be prompted to enter the Parental
Controls PIN to temporarily disable the Parental Controls. The PIN will be necessary
each time a user tries to access restricted content. If your settings only apply to certain
members of your household, share the Parental Controls PIN with users who may have
unrestricted use of the system.
•
Before allowing your children to use the Wii console, we highly recommend that
you educate them on the importance of not sharing any personal information
about themselves with strangers. Please carefully review the next section titled
“Protecting the Privacy of Your Personal Information When Using the Wii Console”
and discuss it with your children to help them understand steps they can take to
protect the privacy of their personal information. Explain to them the danger of
receiving messages from, or communicating with, strangers.
•
You should supervise your children’s use of the Wii console at all times and assist
them with the setup of the Wii console. If at any time you want to stop your
children’s use of online or interactive features of the Wii console, you can simply
disconnect your Wii console from the Wii online services as explained on page 48.
Selecting allowable video
game content.
48
Confirming settings.
You will be prompted to select and answer a secret question that will allow you to
retrieve a forgotten Parental Controls PIN. If you forget your PIN, please follow the
prompts on screen to answer your secret question. If you are unable to retrieve your
PIN by answering your secret question, please call Nintendo Consumer Service:
USA/Canada 1-800-255-3700
Latin America 1-425-558-7078
NOTE: Even with Parental Controls set, purchasing Wii Points, and the downloading of
programs that do not require Wii Points will not be restricted.
PARENTS PLEASE READ: PROTECTING YOUR
CHILDREN’S PRIVACY
PROTECTING THE PRIVACY OF YOUR PERSONAL INFORMATION WHEN USING THE Wii CONSOLE
• Never give out personal information about yourself such as your first or last name, phone number, birth date, age, school, e-mail or home address when communicating with strangers or using any services offered on your Wii console.
•
You may have the option of linking your Wii Shop Channel account to your My
Nintendo account. By linking your accounts, you will be able to register
downloaded content and have such registrations reflected in both of your accounts.
In addition, Nintendo will be able to connect your activity on your Wii Shop
Channel and other online features of the Wii console to your My Nintendo Account
and send you offers, surveys and promotions for games or other items you are
interested in. If you do not want Nintendo to be able to do this, do not link your
accounts.
•
If you use the messaging features of the Wii console, you need to understand
that Nintendo may monitor your use and share certain information (i) as required
by law, (ii) where necessary to protect the company, its customers or employees, or
(iii) as necessary to provide the services.
•
If you decide to provide personal information to any third party website, the
sharing of such information will be subject to the privacy policy of that company,
not Nintendo’s privacy policy. Be cautious before providing any personal
information to any third party through the online services offered on your Wii
console.
•
Your Wii console may store certain personal information on your Wii Remote Plus
so please note that by using your Wii Remote Plus on a Wii console other than your
own, it is possible that certain personal information about you could be shared
with that other Wii console.
•
For your protection, prior to selling or transferring your Wii console, please be sure
to clean and securely remove all of your personal information including any
pictures or messages on the message board and all other stored sensitive
information on the Wii console hard drive. For information on how to wipe your Wii
console clean of all such information, see page 63.
• Do not use any personal information for nicknames on the Wii Console, user
names in chat rooms or interactive games, names for Miis or for any other services
offered through the Wii Console.
49
Wii Settings and Data Management
Wii Settings and Data Ma n a g e m e n t
Wii Settings and Data Ma n a g e m e n t
Video and Computer Game Software Rating Information
ESRB RATING SYMBOLS FOR VIDEO GAMES & PC SOFTWARE
The Entertainment Software Rating Board (ESRB) ratings are designed to provide information about video and computer game content, so you can make informed purchasing
decisions. ESRB ratings have two parts: rating symbols suggest age appropriateness for the game, and content descriptors indicate elements in a game that may have
triggered a particular rating and/or may be of interest or concern.
To take full advantage of the ESRB rating system, it’s important to check both the rating symbol (found on the front of the game box) and the content descriptor (found on
the back of the game box). Go to www.esrb.org for a complete list of these content descriptors.
The ESRB rating system is designed to provide information about a computer or video game. The ratings are not meant to recommend which games consumers should buy or
rent or to serve as the only basis for choosing a product. Rather, individuals should use the ESRB ratings together with personal tastes and standards when deciding what is best
to purchase.
For more information on the ESRB and video game ratings, go to the ESRB web site at www.esrb.org.
Titles rated EC (Early
Childhood) have content that may be suitable
for ages 3 and older.
Contains no material
that parents would find
inappropriate.
Titles rated E (Everyone) have content that
may be suitable for ages
6 and older. Titles in this
category may contain
minimal cartoon, fantasy
or mild violence and/or
infrequent use of mild
language.
Titles rated E10+
(Everyone 10 and
older) have content
that may be suitable for
ages 10 and older. Titles
in this category may
contain more cartoon,
fantasy or mild violence,
mild language and/
or minimal suggestive
themes.
Titles rated T (Teen)
have content that may
be suitable for ages 13
and older. Titles in this
category may contain
violence, suggestive
themes, crude humor,
minimal blood, simulated gambling, and/or
infrequent use of strong
language.
Titles rated M (Mature)
have content that may
be suitable for ages 17
and older. Titles in this
category may contain
intense violence, blood
and gore, sexual content
and/or strong language.
Titles rated AO (Adults
Only) have content that
should only be played
by persons 18 years
and older. Titles in this
category may include
prolonged scenes of
intense violence and/or
graphic sexual content
and nudity.
Titles rated RP (Rating
Pending) have been
submitted to the ESRB
and are awaiting final
rating. (This symbol appears only in advertising
prior to a game’s release.
Wii Settings and Data Management
Wii Settings and Data Management
50
51
Wii Settings and Data Ma n a g e m e n t
Sensor Bar
When positioning the Sensor Bar, you may need to adjust two key settings. Select
Sensor Bar Position or Sensitivity, then proceed with the following instructions.
Sensor Bar Position
You’ll want to adjust this setting to match where you’ve placed your Wii’s Sensor Bar:
above or below your TV screen. Confirm your selection once it’s complete.
Sensitivity
Internet
Use this feature to adjust the sensitivity of the Pointer function of the Wii Remote
Plus. If you find that you’re not getting an optimal pointing experience with the Wii
Remote Plus, you may want to adjust this setting.
You’ll want to set up your Wii’s Internet settings to work well with your home’s
Internet connection, whether you have a wireless broadband network or want to
connect directly to your wired LAN network.
After you select Sensitivity from the Sensor Bar settings screen, you’ll see an
explanation screen that further details the Sensitivity setting. Select OK to begin the
adjustment test.
NOTE: When you connect the Wii to the Internet, the console’s internal files will
sometimes be automatically updated.
In the test, you’ll use the Wii Remote Plus
Pointer to move a cursor into view within
the test field. If you see two blinking
dots, your current Sensitivity setting is
working fine. If you don’t see two blinking dots, adjust the Sensitivity with the +
and - Buttons until you do, then press the
A Button to confirm your new setting.
• If you see three or more dots, the Wii Remote Plus may be sensing an extra light source. See Wii Remote Plus troubleshooting, page 34, in the Wii Operations
Manual - System Setup.
Wii Settings and Data Management
NOTE: The initial recommended distance for using the Wii Remote Plus Pointer is 3
to 10 feet from the Sensor Bar. By increasing the Sensitivity setting, you’ll increase
the distance at which you can use the Pointer. Also note that the influence of direct
sunlight and various light sources can make the Pointer operation less optimal.
When you select Internet from the Wii Settings screen, you’ll go straight to the
Internet Setup screen. Before you proceed with setup selections, consult the
following flowchart to determine what settings and equipment would work well
with your home Internet environment.
Do you have a high-speed
(broadband) Internet
connection, such as cable
or DSL?
YES
NO
p. 61
Is your network
environment WIRED?
YES
Is your network
environment WIRELESS?
YES
You must use Internet Setup to
search for your wireless access point.
p. 58
AOSS access point - p. 60
NO
You can’t yet connect
your Wii to the Internet.
Find out what you need
to get started.
pp 54-55
52
If you don’t have a wireless network but
instead have a wired local-area network, you
can connect Wii to the network with a Wii LAN
Adapter. (Sold separately, may be ordered
through Nintendo’s web site at
www.nintendo.com (USA/Canada only) or by
calling Customer Service at 1-800-255-3700.)
NO
Do you have a PC
running Windows® XP
or Windows Vista®
directly connected to
your high-speed
Internet connection?
YES
You can easily connect the Wii system
to the Internet if you already own a
Nintendo Wi-Fi USB Connector.
p. 56
53
Wii Settings and Data Management
Wii Settings and Data Ma n a g e m e n t
What You Need for a Wireless Wii Environment
1. Wii System
3. The following three methods provide the easiest,
quickest way to create a wireless networking
environment for Wii connection.
What You Need for a Wired Home Network
3. Wii LAN Adapter (Ethernet)
1. Wii System
Wii LAN Adapter
• Wireless Router (Access Point)
See page 58.
Access Point
• AOSS™ Wireless Router (Access Point)
See page 60.
• Manually Connecting an Access Point
See page 59.
2. Broadband Internet connection
NOTE:
There may be various ways to get broadband Internet connection to your home.
Cable, DSL, and optical-fiber networks are among the most common. Check with
your local broadband providers for more information.
• The term Access Point is used throughout this manual to mean “wireless LAN access points.”
• Use an 802.11 compatible Access Point.
Wii LAN
Adapter
If you rely on a wired high-speed local-area network
(LAN) instead of a wireless network, you can connect
Wii directly to your wired LAN with a Wii LAN Adapter.
(Sold separately, may be ordered through Nintendo’s
web site at www.nintendo.com (USA/Canada only) or
by calling Customer Service at 1-800-255-3700.)
See page 61 for easy Internet Setup details for using
the Wii LAN Adapter.
2. Broadband Internet connection
There may be various ways to get broadband connection to your home. Cable,
DSL, and optical-fiber networks are among the most common. Check with your
local broadband providers for more information.
Nintendo Wi-Fi USB Connector – See page 56.
Broadband
Internet line
Wireless
router
NOTE: Connecting to the Internet is subject to your acceptance of the Wii Users Agreement, the Wii Privacy
Policy and the Wii Code of Conduct. Copies of the most updated versions of these agreements may be found at
support.nintendo.com.
54
+
Broadband
Internet line
+
Cable/DSL
modem
Wii Settings and Data Management
Wii Settings and Data Management
+
If you already own a Nintendo Wi-Fi USB Connector, but don’t
have a wireless network , you can still set up a wireless
connection for your Wii. If you have a PC running Windows®
XP or Windows Vista® directly connected to your broadband
Internet access, you can use the Nintendo Wi-Fi USB Connector
in an open USB port on the PC. Once you install the software
that’s included with the Nintendo Wi-Fi USB Connector,
wirelessly connecting your Wii is easy.
Nintendo Wi-Fi
(Check support.nintendo.com for the latest PC driver
USB Connector
versions.)
NOTE: Your PC must be ON when using this USB connector to connect to
the Internet or WiiConnect24.
Broadband
router
55
Wii Settings and Data Ma n a g e m e n t
Internet Setup Selections When Using the Nintendo Wi-Fi USB Connector
Before using the following Internet Setup procedure,
ensure that you’ve installed the Nintendo Wi-Fi USB
Connector Registration Tool software on the PC you’re
using with the connector. Consult the manual included
with the Nintendo Wi-Fi USB Connector for more details
on correct installation.
Step 5 - Wii
Broadband
Internet line
Step 1
Step 2
Wired
router
PC + Nintendo
Wi-Fi USB Connector
Step 3
Step 6
Wii system
Step 4
After again confirming that the
Nintendo Wi-Fi USB Connector is
ready, select the Next option.
Step 7
When you see this screen,
continue with setup on the
PC-side described below.
Step 5 - PC
Select the Connection Settings
option.
56
Select an open connection indicated
by “None”.
After confirming that the Nintendo
Wi-Fi USB Connector is ready, select
Wireless Connection.
Select Nintendo Wi-Fi USB
Connector.
You should see an icon in your Windows XP task bar for the Nintendo Wi-Fi USB
Connector Registration Tool. Double-click on the icon to launch the tool. It should
show all Wii consoles in wireless range, listing each by its Nickname. Select the Wii
that you want to establish a wireless connection for, then click “Grant permission to
connect” from the menu that appears.
Select OK to test the connection.
If the test succeeds, you’ve completed
Internet Setup and your Wii is
wirelessly connected. If the test fails,
consult the Troubleshooting section
in this manual.
57
Wii Settings and Data Management
Wii Settings and Data Management
Nintendo Wi-Fi USB
Connector Registration
tool icon
After you’ve established the Wii
connection with the PC, you’ll see
a Next option appear in the Wii
console’s Internet Setup.
Select Next.
Wii Settings and Data Ma n a g e m e n t
Internet Setup Selections for Searching for an Access Point
Select the Connections Settings
option.
Step 2
Step 3
Select an open connection indicated
by “None”.
Step 5
Step 6
(Before trying to manually connect to your Access Point, try to search for it first using the instructions on the previous page.)
Step 4
Select Wireless Connection.
Step 1
Select Search for Access Point.
Step 7
Wii Settings and Data Management
If the test succeeds,
you’ve completed
Internet Setup and
your Wii is wirelessly
connected. If the test
fails, consult the
Troubleshooting
section of the
manual.
The Wii console will search for any identifiable wireless
Access Points nearby. Select your Access Point from the list.
Enter security information if applicable. See Troubleshooting
for Internet connections if problems occur, page 73.
58
Select OK.
Select OK to test the connection.
To manually connect, first select the
Connection Settings option. Select the
Console Information option if you need to
check the MAC address. This information
may be needed for manual setup.
Step 2
Step 3
Select an open connection indicated
by “None”.
Select Wireless Connection.
WEP
WPA(TKIP)
WPA(AES)
Select Manual Setup.
If the test succeeds,
you’ve completed
Internet Setup and
your Wii is wirelessly
connected. If the test
fails, consult the
Troubleshooting
section of the manual.
IP Address
Do
Don't
These screens require you to input
settings from your PC or router to
establish a connection.
See support.nintendo.com for
additional help on how to complete
these screens.
Step 4
Wii Settings and Data Management
Step 1
Internet Setup Selections for Manually Connecting an Access Point
Select OK to test the connection.
59
Wii Settings and Data Ma n a g e m e n t
Internet Setup Selections
for an AOSS™ Access Point
Step 1
Step 2
Step 3
If you have a wired local-area network instead of a wireless network, you can
connect your Wii directly to the network with a Wii LAN Adapter (subject to
availability). Consult your adapter manual for details on how to connect a Wii
LAN Adapter. (The Wii LAN Adapter does not support PPPoE.)
When it’s ready, step through the following Internet Setup process.
If the access point you are using
supports AOSS (Buffalo Corporation)
you can easily configure your Internet
settings with this feature. For details,
refer to the instruction manual for your
access point.
NOTE: If you are already using
other wireless devices, using AOSS may
change the settings of your access point.
Internet Setup Selections for a Wii LAN Adapter
Select the Connection Settings
option.
Select an open connection indicated
by “None”.
Select Wireless Connection.
Step 1
Step 2
Broadband
Internet line
Cable/DSL
modem
Step 3
Wired
router
Wii LAN
Adapter
Wii
console
Step 4
Step 7
Step 4
Step 5
Step 6
Wii Console:
Wii Settings and Data Management
Select the Connection Settings
option.
AOSS Access Point:
Select the “AOSS” option.
Press the AOSS button (the SET switch),
holding it down until each of the corresponding LEDs light up.
• If this procedure fails repeatedly, wait 3 minutes and try again.
60
Select an open connection indicated
by “None”.
Select Wired Connection.
Select OK to test the connection.
Wii Settings and Data Management
Follow the instructions on the TV screen.
Select OK to test the connection.
Select OK.
If the test succeeds, you’ve completed
Internet Setup and your Wii is wirelessly
connected. If the test fails, consult the
Troubleshooting section in this manual.
NOTE: Select the Console Information option if you need to check the MAC address.
This information may be needed for manual setup of an Internet connection.
If the test succeeds, you’ve completed Internet Setup
and your Wii is connected. If the test fails, consult the
Troubleshooting section of the manual.
61
Wii Settings and Data Ma n a g e m e n t
WiiConnect24™
WiiConnect24 allows your Wii console to receive a wide variety of data automatically.
Use the WiiConnect24 settings to turn WiiConnect24 on and off, and to enable its
Standby mode to receive data automatically 24 hours each day, even when the system
isn’t in active use. (Modem or router must be on to receive information automatically.)
On/Off
When WiiConnect24 is turned on, your
Wii console will automatically use its
high-speed Internet connection to accept
data for a variety of services, including
posting messages on the Wii Message
Board and receiving messages about
new Wii features. Turn WiiConnect24
off if you don’t want to receive this
information. Confirm your selection once
it’s complete.
Standby Connection
Wii Settings and Data Management
If you’ve turned your WiiConnect24 on
(see above), you can additionally set
WiiConnect24 to operate in Standby mode.
This allows your Wii to automatically receive
WiiConnect24 messages and information
even when your system isn’t in active use.
Turn the Standby option ON if you want
WiiConnect24 to operate 24 hours each
day. Turn it OFF if you want it to accept
data only when you’re actively using your Wii console. Confirm your selection once
it’s complete.
62
To prevent operational errors or damage to stored data, be sure to turn off
both WiiConnect24 and the Wii console before unplugging the AC Adapter.
The Power LED lights red when both the power and WiiConnect24 are off.
Slot Illumination
Language
You can change the language setting for your
Wii console menus and screens by selecting
English, French, or Spanish. Confirm your
selection once it’s complete.
Dim
The Wii’s Disc Slot will blink a dim blue when WiiConnect24 has
received new data.
OFF
The Wii’s Disc Slot will not blink when WiiConnect24 has received
new data.
Format Wii System Memory
This system option is used to permanently delete
ALL Channels and ALL save data, including the Wii
+ Internet icon and video, that have been added
to the Wii console and will re-initialize your Wii
console.
Select the Format option if you wish to delete
ALL Channels and save data, then select Delete to
confirm your intention.
WiiConnect24 can let you know when it has received data by making the Wii console’s
Disc Slot blink. Select the option that you want, then confirm your selection.
Bright The Wii’s Disc Slot will blink bright blue when WiiConnect24 has
received new data.
Country
You can change the country setting for your
Wii console. Confirm your selection once it’s
complete.
NOTE: Programs that have been copied or stored on SD Cards before the format
procedure will not operate after you have formatted the system memory.
This Format Wii System Memory option only removes Channels and save data from
the Wii console. Information stored in the Wii Shop Channel, including records of
your transactions and rights to downloaded software, will not be cleared by this
option. To clear information stored in the Wii Shop Channel, please follow the
format Wii Shop Channel instructions.
Remove Wii Shop Channel Account
Wii System Update
Select this option to connect to the internet
and check for new features, updates to
channels or system updates.
NOTE: Requires a broadband Internet
connection.
All activity on the Wii Shop Channel is tied to your Wii console. This includes records
of your transactions, downloaded software, Wii Points and other information you
provide via the Wii Shop Channel.
To clear information from the Wii Shop Channel, including records of your
transactions and rights to downloaded software, access the Wii Shop Channel, select
the Settings option and then select Remove Wii Shop Channel Account.
IMPORTANT: You should format your Wii Shop Channel first, then your Wii
system memory, prior to selling, recycling, or otherwise transferring your
Wii console to any third party. For more information about privacy and the
protection of your personal information, see page 49.
63
Wii Settings and Data Management
Home Menu
This menu appears when you press the HOME Button on t h e
Wii Remote Plus. From this menu you can stop or reset Wii
programs, v iew operations guides for certain downloaded
programs, and adjust Wii Remote Plus settings.
Wii Remote Plus Settings
Adjust the remote speaker volume.
You can also use the + or – Buttons on the remote.
To select an on-screen option, simply point at it
with the Wii Remote Plus and press the A Button.
Turn the Rumble Feature on or off.
(See NOTE below.)
Reconnect the Wii Remote Plus.
Close and return to previous screen.
Stop Wii software or programs that
are currently in play and return to the
Wii Menu.
Display the battery life for any remotes
currently connected to the console.
Reset Wii software and programs and
return to the program title screen.
View downloaded guides for certain
software or programs. (Only available if
you have downloaded content.)
Home Menu
Select to go to the Wii Remote Plus
Settings screen.
NOTE: Selecting Wii Menu or Reset will permanently lose any unsaved information from the program you are currently running.
64
Displays the battery life for
any Wii Remote Plus currently
connected to the console.
Close the Settings menu and return to the Home Menu.
Synchronizing a Wii Remote or Wii Remote Plus — for each remote, use the following steps (also see pages
22-23 in the Wii Operations Manual - System Setup):
1. Select the Reconnect option.
2. Press the 1 and 2 Buttons simultaneously on the remote.
3. The Player LEDs will blink until a connection is established.
4. Press any button to return to the Home Menu.
NOTE: The order that you synchronize remotes will set the player number order.
Home Menu
HOME Menu
Use this to change the Wii Remote or Wii Remote
Plus you are using or to change the player number
order (see below). Also see pages 22-23 in the
Wii Operations Manual - System Setup for more
information.
NOTE: Adjusting the Volume and Rumble settings will affect all remotes currently connected to the Wii console.
65
SD Card Menu
From the SD Card Menu, you can easily start up programs y o u
have saved to the SD Card, such as WiiWare, Wii Channels , a n d
Virtual Console games.
NOTE: SD Cards are sold separately.
SD Card Menu Icon
Wii Menu
Starting a program from an SD Card
1. Open the SD Card slot on the front of the Wii console. Insert the SD Card. Push it firmly into to the slot until
it clicks into place.
Label faces
upwards
To select an on-screen option, simply point at it
with the Wii Remote Plus and press the A Button.
2. Select the SD Card Menu icon on the Wii
Menu to see the contents of the SD Card.
Using the SD Card Menu
3. Select an item from the SD Card menu and
press the A Button to open the Start screen.
4. Select “Start” to run the Channel, game, or
other program. See the appropriate
sections of this manual to find additional
information for Channels, WiiWare, or
Virtual Console titles.
When you select the SD Card Menu icon from the Wii Menu, you will see a display of the contents of the SD Card. (If the icon is gray, there is no SD Card inserted into the
SD Card slot.)
To edit the contents of the SD Card, see Settings and Data
Management, page 40.
Wii Channels, WiiWare, or Virtual
Console games stored on the SD Card.
(The images of some Channels may
vary from the Wii Menu.)
Sample SD Card Menu
Sd Card Menu
Return to the Wii Menu
Scroll icon
Current and total page numbers
66
You can rearrange the contents of the SD Card by using the Wii Remote Plus. Point
at the item you want to move, and then hold down the A and B Buttons and drag the
item to the new location. Release the buttons to place the item in the new location.
The SD Card Menu can hold a maximum of 240 items,
but can only show 12 items at one time. Select the scroll
icon to scroll to next page if you have more than 12 items
stored. (You can also press the + or – Buttons on the Wii
Remote Plus.)
View SD Card Menu instructions
Rearranging the contents of the SD Card
SD Card Menu
SD Card contents
Sample SD Card Menu
67
SD Card Menu
Guidelines when using SD Cards
• Game Save data and add-on content will not be displayed on the SD Card Menu.
To move or copy this type of content, use Data Management in the Wii Settings and
Data Management option available from the Wii Menu screen. See the Wii Settings
and Data Management section of this manual for more information.
Insufficient Wii System Memory
The SD Card Menu temporarily uses Wii system memory to startup a program. If there
is insufficient Wii system memory to start a program, a screen will appear that will
give you options for freeing up memory.
Freeing memory using Auto Manage
Freeing memory using Data Management Screen
Choose from one of four possible ways to
automatically move programs from the Wii
system memory to the SD Card to increase the
amount of unused memory.
Choose “Continue” to switch to the Data
Management tool in the Wii Settings and
Data Management option normally available
from the Wii Menu screen.
From the Data Management tool, you can
manually pick unused programs to move to
the SD Card or delete them.
• Some features of WiiConnect24 will not work with Channels when they are started
from an SD Card. These features will only work with the Channels when they are
moved or copied back into Wii system memory.
• Not Launched Recently Move
• Do not remove the SD Card or turn the power off when moving or saving data as
this may cause the loss of data or damage to the Wii system or SD Card.
• If you re-purchase or re-download an updated version of a channel from the Wii
Shop Channel, the older version of the channel saved to the SD Card may not run
from the SD Card Menu.
Auto Manage
Automatically move programs
Data Management Screen
Manually move programs
programs to the SD Card starting with those that haven’t been used for the
longest amount of time.
NOTE: The “Not Launched Recently” option will not appear if there are a small
number of programs in the Wii Menu.
NOTE: If the SD Card has the same programs that are stored in the Wii system
memory, the programs on the SD Card will be over-written by the programs being
moved from the system memory.
• From Right most Wii Menu Page
Move programs to the SD Card starting with those on the right side of the
Wii Menu.
• Lots of Blocks
Move programs to the SD Card starting with those that use up the most
memory blocks.
68
SD Card Menu
Sd Card Menu
• A Few Blocks
Move programs to the SD Card starting with those that use up the fewest
memory blocks.
69
Wii Keyboard
Using the Keyboards
Cell Phone–Style Keyboard
Shows characters that have been
entered. Use the +Control Pad to
move the cursor. To insert a space,
press right on the +Control Pad or
press 0 (zero) if you aren’t using the
numerical keys.
The keyboard screen will appear in certain programs when you need to enter text. Examples include creating text for messages in the
Wii Message Board or editing a Mii in the Mii Channel.
QWERTY Keyboard
Shows characters that have been entered.
Use the +Control Pad to move the cursor.
Scroll up and down through
characters that have been entered.
Select the character you want to
enter. Use the A and B Buttons to
change which character to use from
each key.
Scroll up and down through
characters that have been entered.
Turn the predicted word feature on
or off.
Enter first character in uppercase.
Shows predicted words. Scroll
through available words using
the symbol.
This feature is only available in
the Wii Message Board.
Turn the predicted word feature on
or off.
Enter lowercase character.
Delete character.
Enter uppercase character.
Select the character you want to enter.
(You can also use the Minus Button on
the Wii Remote Plus.)
Change from uppercase to lowercase.
Insert carriage return.
Enter numerical character.
Change from letters to symbols.
(You can also hold down the B Button on
the Wii Remote Plus to shift characters.)
Select additional symbols from list.
Change the predicted word
feature between English, French,
and Spanish.
Wii Keyboard
Return to previous
screen.
70
Select keyboard
styles.
Insert space.
Confirm character.
NOTE: Many functions on the QWERTY and cell phone–style keyboards are the same. Items with the same
function are described on the QWERTY instruction page.
ghi
def
Select the key that
includes “h”.
Select the key that
includes “e”.
jkl
Select the key that
includes “l”.
hello
Select the “hello” from
the predicted word list.
71
Wii Keyboard
Example of using the predicted word feature on the Cell Phone keyboard for the word “hello.”
Tro u b l e s h o o t i n g
Using a USB keyboard with your Wii Console.
You can enter text using a commercially available USB keyboard.
Please go to support.nintendo.com for a list of keyboards that have been confirmed to
work with the Wii console.
USB
Ports
Wii Console
(back view)
Before seeking assistance, review the following problems and solutions.
•
•
•
Make sure the memory card is fully inserted into the slot. Try removing and reinserting the memory card.
Check the memory card on a PC or cell phone to verify its contents and
readability.
Make sure the data is in a readable format and 32GB or smaller in size. See page 23 for format information.
Wii Remote Plus doesn’t vibrate
• Go to the HOME menu and check to see if the Rumble feature is turned on.
(Page 65)
• Make sure that the game you are playing includes the Rumble feature.
USB Keyboard
Can’t read the SD Card from Photo Channel or the
SD Card Menu
No sound from the Wii Remote Plus speaker
• Go to the HOME menu and check to see if the Sound feature is turned on.(Page 65)
• Make sure that the game you are playing includes sound from the
Wii Remote Plus speaker.
NOTE: USB keyboards do not work with the Mii Channel or the Everybody
Votes Channel.
Can’t download games in the Wii Shop Channel
• Make sure you have Wii Points to redeem for products on the Wii Shop Channel.
• Check to see if you have restrictions on using points.
• Check to see status of Parental Controls.
USB Keyboard
Downloading games and updates from the Wii Shop Channel is very slow.
• Switch the channel of your router to channel 1 or channel 11.
72
•
•
•
Make sure your access point is powered on.
Move closer to the access point if possible or re-orient the console so there is
nothing between it and the access point.
Your access point may not be broadcasting its SSID. Check your router settings
through your computer and either set your router to broadcast SSID, or manually
enter the SSID in Manually Connecting an Access Point, page 59.
•
•
•
•
•
•
Your Access Point is not listed when “Search for Access Point” is selected
Connection test unsuccessful or unable to connect to
the service
Check the signal strength and move closer to the access point if possible or
re-orient the console so there is nothing between it and the access point.
Make sure you have the latest Firmware Update for your router. Check with the
router manufacturer or the Internet service provider that supplied the router.
You may have to adjust the transmission rate of your router. Some routers have
settings like “Turbo Boost” or “G-Nitro”. These may have to be turned off.
Your access point may have Mac Filtering enabled. Check your router settings
through your computer. You may need to enter your Wii console MAC address.
This can be found in Console Information in the Internet settings choice.
Your access point may not be broadcasting its SSID. Check your router settings
through your computer and either set your router to broadcast SSID, or manually
enter the SSID in Manually Connecting an Access Point, page 59.
Try assigning the Wii a static IP address. Access your router’s settings and find the available range of IP addresses (This is typically found within the DHCP information.). When you find this information, select one of the available IP addresses and enter
this in Manually Connecting an Access Point, page 59.
•
•
•
•
•
•
•
The power shuts off suddenly
Unplug the AC Adapter and check the vents for blockage by dust or debris. Clean if necessary, reconnect the AC Adapter and try powering on the Wii Console again.
Make sure there is proper ventilation around the Wii Console and that it is not close to other heat sources.
Controllers don’t work with Wii games, Virtual
Console games or WiiWare games.
Make sure you are using the correct controller. Both the game packaging and the Instruction booklet included with the game supply this information.
If you are playing a game you have downloaded from the Wii Shop Channel, be sure to check the Details screen on the Wii Shop Channel to determine what controllers are used for each game.
If using the Classic Controller or Classic Controller Pro, make sure it is securely connected to the Wii Remote Plus.
If using the Wii Remote Plus, make sure no other accessories are plugged into the External Extension connector unless required by the game you are playing.
Make sure the Wii Remote Plus is synchronized with the Wii console.
More troubleshooting is available at support.nintendo.com, including more
detailed setup help for getting connected online.
If your Wii system still does not operate correctly after trying
the troubleshooting steps, DO NOT return the console to the
store. You will lose saved game data and all Wii Shop
Channel downloads and Wii Points.
Visit support.nintendo.com for assistance and additional
troubleshooting and repair options or call 1-800-255-3700.
73
Troubleshooting
USB Keyboard
Error Messages
If an error occurs, a message like the following may appear on the TV screen. Proceed according to the following table.
Error Occurred. Press the Eject button and remove the
disc. Turn the power off and follow the instructions in
the console manual.
Wii Remote error. For details read the console manual.
Could not read the disc. For details read the console
manual.
Error Messages
Insufficient free space in Wii console save memory. Use
the File Edit Screen and move file to SD card or delete
file.
74
Try This
First turn the Wii console power OFF, and remove the AC adapter’s AC plug from the power socket. Next, check
whether the disc is dirty or scratched. If it is dirty, gently wipe with a soft cloth from the center to the outside. Wait
about 5 minutes. Then plug the AC adapter’s AC plug back into the power socket and turn the console power on. If
the same message still appears, the Wii console may be damaged. Turn the Wii console off immediately. Remove
the AC adapter’s AC plug from the plug, and visit support.nintendo.com for additional troubleshooting or call
1-800-255-3700.
Try This
Insufficient number of free files in Wii console save
memory. Use the Data Management option and move
file to SD card or delete file.
Use the Data Management options and move file to SD memory card or delete file. See the Settings section in
the Operations manual, Data Wii console save memory is corrupted. Visit support.nintendo.com for additional
troubleshooting or call 1-800-255-3700. Management, page 40.
Wii console save memory is corrupted. For details read
the Wii console manual.
Wii console save memory is corrupted. Visit support.nintendo.com for additional troubleshooting or
call 1-800-255-3700.
Abnormal free space in Wii console save memory. For
details read the Wii console manual.
Delete the save data for the channel that is running. If the same error message still appears, visit support.nintendo.
com for additional troubleshooting or call 1-800-255-3700.
Abnormal number of files in Wii console save memory.
For details read the Wii console manual.
Delete the save data for the channel that is running. If the same error message still appears, visit
support.nintendo.com for additional troubleshooting or call 1-800-255-3700.
The device inserted in the SD Card slot cannot be used.
1. If you are using an SD Card
Check the content of the SD Card on a PC. If you cannot see your file, the SD Card may be damaged.
See Wii Remote Plus troubleshooting in the Wii Operations Manual - System Setup, page 34.
There may be dirt or scratches on the disc or internal lens.
First remove the disc and gently wipe from the center to the outside with a soft cloth. You can also try using the Wii
Lens Cleaning Kit (sold separately) to clean the internal lens. Then re-insert the disc in the Wii console and turn the
power on again. If the same error message still appears, visit support.nintendo.com for additional troubleshooting
or call 1-800-255-3700.
Use the Data Management options and move file to SD memory card or delete file. See the Settings section in the
Operations manual, Data Management, page 40.
2. If you are using an SDHC Card
The way an SDHC Card is used depends on the Wii software you are using. Refer to the packaging or manual for the software you are using to see if SDHC Cards are supported.
•
•
If using Wii software that supports SDHC Cards – try removing the SDHC Card and re-inserting it. If the same message is still displayed, check the content of the SDHC Card on a PC. If you cannot see your file, the SDHC Card may be damaged.
If using Wii software that does not support SDHC Cards – You cannot use SDHC Cards with the software, try using an SD Card.
75
Error Messages
Error Message
Error Message
Error Codes
If an error code appears during operation of the Wii system, please review the following tables and try the recommended solutions.
Error Code
110210
110211
110212
110213
205926
205927
205928
51300 – 51399
209600, 209601
Try This
These errors indicate a hardware issue. Please contact Nintendo Consumer Service at 1-800-255-3700 for
assistance.
These errors generally indicate the inability to get a good connection due to wireless interference. Try the
following:
•
•
•
•
•
Check the location of your router. Move your router away from walls and off the floor and try to place it in a central location in your home. Also, keep it away from metal objects such as metal filing cabinets which can cause interference.
Do not use other wireless or cordless devices when trying to get online with your Wii. Also, avoid electronics that use the 2.4GHz frequency, instead look for devices that use the 5.8GHz or 900MHz frequencies.
Change the channel on your router. By default most routers broadcast on channel 6. Change the channel setting to 1 or 11, as they do not overlap with other channels.
If you have security on your router, verify that the WEP or WPA key that was entered into your Wii matches the router’s information exactly.
Change the mode on the router to “mixed” or “b/g” mode. This is generally found in the “Wireless” section of your router’s settings.
Error Code
52200-52235
32004
Try This
These errors generally indicate a firewall on your PC or router is preventing the Wii from connecting to the
internet. Try the following:
•
•
Disable your firewall. If you are using a Netgear router, disable the “SPI Firewall” under the “WAN Setup” of your router.
Some Internet Service Providers (ISPs) prevent systems from connecting. Check with your ISP to see if they are compatible.
52240-52245
Errors in this range generally indicate the router in your setup has a default IP address of either 192.168.0.1 or
192.168.1.1. This will need to be changed to 192.168.2.1.
220602
32002
These errors indicate a problem with the Internet Settings entered into the Wii. Try the following:
• Use the Manual Settings (rather than Search for an Access Point) to set up your Internet Settings on the Wii. Manually enter the DNS settings of your PC or Router into your Wii when requested.
Error Codes
Error Codes
76
77