1
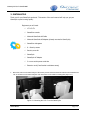
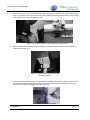
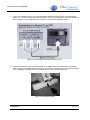
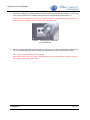
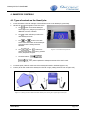
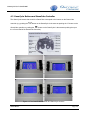
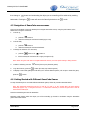
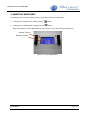
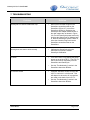
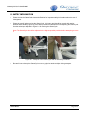
GameCycle User’s Guide 2005
GameCycle User’s Guide
2005
Three Rivers Holdings, LLC
1826 W. Broadway Rd Ste 43
Mesa, Arizona 85202
Three Rivers
Page 1-1
GameCycle User’s Guide 2005
TABLE OF CONTENTS
1
SUPPORT--------------------------------------------------------------------------------------------------------1-1
2
COMPONENTS ------------------------------------------------------------------------------------------------2-2
3
SYSTEM SETUP -----------------------------------------------------------------------------------------------3-3
4
GAMECYCLE CONTROLS ----------------------------------------------------------------------------------4-7
4.1
4.2
4.3
4.4
4.5
4.6
4.7
TYPES OF CONTROLS ON THE GAMECYCLE: ----------------------------------------------------------------4-7
GAMECYCLE BUTTONS AND GAMECUBE CONTROLLER ----------------------------------------------------4-8
SETTING THE CONTROL TYPE -------------------------------------------------------------------------------4-9
SETTING THE CRANK DIRECTION ---------------------------------------------------------------------------4-9
NAVIGATION OF GAMECUBE MENU SCREENS ------------------------------------------------------------- 4-10
GETTING STARTED WITH DIFFERENT GAMECUBE GAMES----------------------------------------------- 4-10
CONTROL OF AN OBJECT (E.G. A CAR) DURING GAME PLAY --------------------------------------------- 4-11
5
GAMECYCLE RESISTANCE ----------------------------------------------------------------------------- 5-12
6
GAMECYCLE CALIBRATION --------------------------------------------------------------------------- 6-13
7
TROUBLESHOOTING ------------------------------------------------------------------------------------- 7-14
8
SAFTEY INFORMATION --------------------------------------------------------------------------------- 8-15
Three Rivers
Page 1-2
GameCycle User’s Guide 2005
1 SUPPORT
Three Rivers is dedicated to providing friendly and comprehensive support for this and all our products.
The objective of this User’s Guide is to include all of the necessary information for the successful start up
and operation of your GameCycle. If you have any suggestions on how we might improve this document
or if you have any problems or questions, please contact us at the number below.
Three Rivers Holdings LLC
1826 W. Broadway Rd.
Suite 43
Mesa AZ, 85202
CUSTOMER SUPPORT: (480) 833-1834
Fax: (480) 833-1837
Web Site: www.3rivers.com
Email: [email protected]
Three Rivers
Page 1-1
GameCycle User’s Guide 2005
2 COMPONENTS
Equipment included with your GameCycle:
1 – 17” LCD TV
1 – GameCube console
1 – Nintendo GameCube AV Cable
1 – Nintendo GameCube AC Adapter (already mounted to GameCycle)
1 – GameCube videogame
1 – GameCube Memory Card
1 – GameCube Extension Cable
6 – Security screws
1 – Screwdriver
1 – Security screw bit
1 – GameCycle AC Adapter
Three Rivers
Page 2-2
GameCycle User’s Guide 2005
3 SYSTEM SETUP
Thank you for your GameCycle purchase! This section of the user’s manual will help you get your
GameCycle up and running quickly.
Equipment you will need:
1.
9
17” LCD TV
9
GameCube console
9
Nintendo GameCube AV Cable
9
Nintendo GameCube AC Adapter (already mounted to GameCycle)
9
GameCube videogame
9
6 – Security screws
9
Security screw bit
9
GameCycle
9
GameCycle AC Adapter
9
3 or more outlet power-outlet bar
9
Extension cord (if wall socket is a distance away)
Mount the LCD TV to the stand using 4 of the security screws and screw driver bit located in the GameCube box.
The TV will mount to the stand using the outer most holes on the stand’s mounting plate (Figure 3.1).
Figure 3.1: Mounting the LCD TV to the GameCycle.
Three Rivers
Page 3-3
GameCycle User’s Guide 2005
2.
Connect the LCD TV power by inserting the power jack protruding out of the hole in the top of the stand into the
outlet on the bottom of the LCD TV (Figure 3.2a) and by inserting the 3-prong jack protruding out of the bottom
of the stand into the power outlet bar(Figure 3.2b).
Figure 3.2: a) LCD TV power and b) the back of the GameCycle.
3.
Mount the GameCube to the stand using the remaining 2 security screws and screw driver bit located in the
GameCube box (Figure 3.3).
Figure 3.3: Mounting the GameCube to the
GameCycle stand.
4.
Connect the GameCube power (Figure 3.4) by inserting the GameCube DC jack protruding out of the top of the
stand into the DC input connector (DC 12V IN) on back of the GameCube and by inserting the 2-prong jack
attached to the bottom of the stand into the power outlet bar.
Figure 3.4: GameCube power.
Three Rivers
Page 3-4
GameCycle User’s Guide 2005
5.
Connect the GameCube to the LCD TV using the Nintendo GameCube AV Cable found in the GameCube box
(Figure 3.5). The red, white and yellow connectors plug-in to the “AV1 IN” connectors on the LCD TV while the
other side plugs in to the “ANALOG AV OUT” connector on the back of the GameCube console.
Figure 3.5: Connecting the GameCube to the LCD TV.
6.
Connect the GameCycle power by using the GameCycle AC Adapter found in the GameCube box by inserting
small round plug of the adapter into the connector on the end of the right support arm of the GameCycle (Figure
3.6). and plugging the 2-prong outlet on the adapter into the power outlet bar (Figure 3.2b). .
Figure 3.6: GameCycle power.
Three Rivers
Page 3-5
GameCycle User’s Guide 2005
7.
Connect the GameCycle to the GameCube by inserting the GameCycle controller plug protruding out of the hole
at the top of the stand into the Controller Socket on the front of the GameCube console (Figure 3.7).
Note: Make sure the GameCycle controller cable leaving the back of the right support arm is connected to the
GameCube extension cable found at the bottom of the stand (Figure 3.2b).
Figure 3.7: Connecting the GameCycle
to the GameCube.
8.
Once all the above connections have been made, you are free to turn on the power outlet bar, GameCube, and
LCD TV. If the GameCycle LCD screen is blank, follow the instructions in the “Troubleshooting” section.
Note: The LCD TV and GameCube turn on separately.
Note: Make sure the TV is in “AV1” mode. If nothing shows on the TV at startup, push the “Source” button on
top of the TV until it is in the “AV1” mode.
Three Rivers
Page 3-6
GameCycle User’s Guide 2005
4 GAMECYCLE CONTROLS
4.1 Types of controls on the GameCycle:
1.
2.
To use the buttons to the left and right of the small blue screen on the GameCycle, press firmly.
The label for each button appears on the blue screen.
a.
button on the main GameCycle
The
screen (Figure 4.1) will give you access to an
additional 3 screens of buttons.
b.
button will take you back to the
The
main GameCycle screen.
c.
The
and
arrows on the main
screen control the tension of the GameCycle
crank arms when cranking forward or
backward.
d.
The
,
, and
buttons are
commonly used select menu items, go back a
screen, and pause the game.
e.
The other buttons (
,
3.
4.
,
,
Figure 4.1: The main GameCycle Screen.
,
) will be explained in subsequent sections of the User’s Guide.
To control speed, rotate the crank arms of the GameCycle forward or backward (Figure 4.2a).
To steer, tilt the arm cranks of the GameCycle to the left or right (a tilting motion as seen in Figure 4.2b).
a.
b.
Figure 4.2: a) Moving forward or backward with the GameCycle b) moving left or right using the GameCycle
Three Rivers
Page 4-7
GameCycle User’s Guide 2005
4.2 GameCycle Buttons and GameCube Controller
The GameCycle buttons that control the GameCube correspond to the buttons on the GameCube
controller (e.g. pushing the
button on the GameCycle is the same as pushing the “A” button on the
button on the GameCycle is the same as pushing the up on
GameCube controller or pushing the
the +Control Pad of the GameCube Controller).
Figure 4.3: The GameCube Controller and GameCycle screens.
Three Rivers
Page 4-8
GameCycle User’s Guide 2005
The function of each GameCycle button that corresponds to the GameCube controller varies with each
GameCube videogame you play, so please use the instruction booklet for the particular game you are
playing. In most cases, the GameCube screen will tell you which button to press. If the GameCube
screen does not indicate which button to push, the “A” button generally selects an option on the
GameCube game and the “B” button generally goes back a GameCube screen. If the button indicated on
the GameCube screen is not visible, push the
button on the GameCycle to scroll through the other
buttons.
4.3 Setting the Control Type
There are two different control types:
1. R/L – This is used for games in which the R GameCube button accelerates and the L GameCube
button decelerates the object you are controlling during game play (e.g. Need for Speed
Underground, Monsters of Metal, Racing Evolution).
2. A/B – This is used for games in which the A GameCube button accelerates and the B GameCube
button decelerates the object you are controlling during game play (e.g. Need for Speed Hot Pursuit
2).
button or the
Pushing the
button toggle between the two different control types and are
located on the third GameCycle screen. You navigate to this screen by pushing the
see the appropriate button on the left of the GameCycle LCD (Figure 4.3).
button until you
4.4 Setting the Crank Direction
In the
mode, accelerating the object you are controlling is achieved by turning the crank arms in the
manner shown below in Figure 4.4. This can be changed by pushing the
button. The button will
Figure 4.4: Forward turning of the
GameCycle crank arms.
Three Rivers
Page 4-9
GameCycle User’s Guide 2005
then change to
button and accelerating the object you are controlling will be achieved by cranking
button will return the GameCycle back to the
backwards. Pushing the
mode.
4.5 Navigation of GameCube menu screens
There are two methods of using the GameCycle to navigate GameCube screens, using the push buttons on the
GameCube or using the crank arms.
1.
2.
3.
To scroll up,
a.
push the
b.
rotate the GameCycle crank arms forward (Figure 4.2a).
button or
To scroll down,
button or
a.
push the
b.
rotate the GameCycle crank arms backward.
To change the selection on a menu item,
button or the
button or
a.
push the
b.
tilt the GameCycle crank arms left or right (see Figure 4.2b)
Note: When using the crank arms to navigate GameCube screens, use short quick rotating or tilting motions.
4.
To make a selection, press the
button (this may vary between games)
5.
To go back a menu, press the
6.
To display a menu while gaming that will allow you to choose different options, such as quit or restart the game,
press the
button (this may vary between games)
button
4.6 Getting Started with Different GameCube Games
To setup the GameCycle to work with different GameCube games, follow the procedure described below.
Note: Only GameCube games that use the “A” and “B”, “R” and “L”, or the “Control Stick” will work with the
GameCycle (Figure 4.3). If the game uses the “+ Control Pad” exclusively to control the game then it will not
work with the GameCycle.
Insert the GameCube game into the GameCube.
Determine which button makes the object you will be controlling go forward or accelerate using the GameCube
game’s instruction booklet.
Three Rivers
Page 4-10
GameCycle User’s Guide 2005
If “A” on the GameCube controller causes the object to go forward or accelerate then press the “Control Type”
button until
is displayed. If not, go to the next step.
If “R” or the “Control Stick” (Figure 4.3) on the GameCube controller causes the object to go forward or accelerate
then press the “Control Type” button until
is displayed. If not, go to the next step.
4.7 Control of an object (e.g. a car) during game play
1.
2.
3.
To move forward, rotate the GameCycle crank arms forward
To move in reverse, rotate the GameCycle crank arms backward
To move left or right, tilt the GameCycle crank arms left or right
Note: The key to good game play and smooth exercise is to tilt and rotate the crank arms at the same time.
Three Rivers
Page 4-11
GameCycle User’s Guide 2005
5 GAMECYCLE RESISTANCE
The GameCycle has 10 levels of resistance where 0 is the easiest level and 9 is the hardest.
1.
To increase the resistance when cranking, press the
button
2.
To decrease the resistance when cranking, press the
button
Note: These buttons are on the Main GameCycle Screen (Figure 5.1) for easy access during game play.
Increase Tension
Decrease Tension
Figure 5.1: Tension adjustment.
Three Rivers
Page 5-12
GameCycle User’s Guide 2005
6 GAMECYCLE CALIBRATION
To calibrate the GameCycle:
button until you see the
button
1. Push the
on the right side of the GameCycle LCD (Figure 6.1)
2. Push the
button
3. Follow the instructions on the GameCycle LCD (Figure
6.2).
a. Turn the crank arms forward at the rate that
you want to be max forward speed. Stop
turning and push the
Figure 6.1: The button used to start the
calibration process.
button.
b. Turn the crank arms backward at the rate that
you want to be max reverse speed. Stop
turning and push the
c.
button.
First tilt the crank arms as far to the left as the
user can, then tilt the crank arms as far to the
right as the user can. Push the
button.
d. Let the crank arms center by letting go and
pushing the
button.
Note: The GameCycle can be calibrated to fit a
particular user’s ability to turn and steer the GameCycle
crank arms by turning the crank arms faster or slower
and by tilting to the left and right to different degrees
during calibrations. For example, if you are only able to
turn the crank arms at a slow pace, then on the first
calibration screen, turn the crank arms slowly.
Figure 6.2: The calibrations screens.
Three Rivers
Page 6-13
GameCycle User’s Guide 2005
7 TROUBLESHOOTING
Problem
Solution
GameCycle LCD screen is blank but lit up
•
Remove the Controller Plug from the
GameCube controller socket on the
GameCube (Figure 3.7), turn off the
GameCycle power by unplugging the
GameCycle AC Adapter from the back of
the right support arm as shown in Figure
3.6, turn the GameCycle power back on by
plugging the GameCycle AC Adapter back
in, once the GameCycle power is back on,
insert the Controller Plug back into the
GameCube controller socket on the
GameCube.
Steering does not seem to work correctly
•
Calibrate the GameCycle using the
instructions in section 6 entitled
GameCycle Calibration.
TV Blank
•
Turn on the LCD TV by pushing the power
button on top of the LCD TV. The LCD TV
has to be turned on separately from the
GameCube and GameCycle.
•
See the “Troubleshooting” section in the
GameCube Instruction Booklet.
•
Press the “SOURCE” button on top of the
LCD TV until in AV1 or AV2 mode. This
will depend on where the AV connections
are made on the back of the LCD TV.
•
See the “Troubleshooting” section in the
GameCube Instruction Booklet.
TV has blue screen
Three Rivers
Page 7-14
GameCycle User’s Guide 2005
8 SAFTEY INFORMATION
•
Please review the GameCube Instruction Booklet for important safety information about the use of
videogames.
•
Please be careful when moving the GameCycle. It is heavy and should be moved with caution.
Wheels and a handle (Figure 8.1) have been provided for assistance in transporting the GameCycle.
Use the technique depicted in Figure 8.1 for moving the GameCycle.
Note: The GameCycle should be adjusted to the highest possible position before attempting to move
it.
Figure 8.1: Transport of the GameCycle and the GameCycle handle.
•
Be careful not to bump the GameCycle cover or grips into another object during transport.
Three Rivers
Page 8-15