1
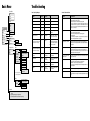
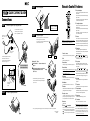
Step 3
Remote Control Features
Turn on the projector.
1
S
Quick Connect Guide
2
O
U
R
OFF
C
ON
E
4
U
TO
NU
5
6
7
A
ME
A
D
E
JU
S
S
LE
T
C
T
TA
P
TU
RGB
AUTO ADJ.
8
MENU
9
E
W
S
O
ENTER
S
Connections
3
POWER
VIDEO S-VIDEO
R
CA
NC E L
10
O
SELECT
11
/S
N
Enter (Left click) Button
When you are in the Computer mode, this button works as the
mouse left button.
When you are in the Projector mode, which is indicated by lighting the PJ button:
Use this button to enter your menu selection. It works the same
way as the “Enter” button on the cabinet.
TA
D
B
Connect the supplied 15pin-15pin signal cable.
NOTE: To turn off the projector,
press and hold the POWER button
for a minimum of two seconds.
Power button
For older Macintosh computers, use a
commercially available pin adapter to
connect to your Macintosh’s video port.
E
Y
Step 1
NT
L
N
11
ER
CA
NC
E
12
PJ
13
PICTURE
ASPECT
15
14
16
19
HELP
FREEZE PIC-MUTE
MAGNIFY
18
17
VOLUME
Step 4
Connecting the remote
mouse receiver to your
computer.
20
Set up the Projector.
NOTE: If you are using a Macintosh computer, you can click either
the right-click or left-click button to activate the mouse.
RG
INP B
UT
To Mouse(PS/2)
port of PC
AU
D
OU
UT
IN
OU
T
TR
OL
S-V
IDE
O
VID
RG
INP B
UT
RG
BI
AU
OU
PC
You can use the supplied wireless remote
control and remote mouse receiver
to operate your PC mouse wirelessly from
across the room. See page E-14.
-CO
NT
TP
UT
IN
OU
RO
L
S-V
1
NP
DIO
RG
T
UT
T
IN
IDE
O
VID
Zoom lever
BO
OU
EO
UT
Focus ring
PU
T
3
Power ON Button
If the main power is applied, you can use this button to turn your projector on.
4
Power OFF Button
If the main power is applied, you can use this button to turn your projector off.
TU
R
TA
E
S
W
S
O
E NTE R
N
/O
FF
CA
S
E
LE
C
S
T
NC EL
O
U
R
E
E
C
M
NU
A
U
TO
A
D
JU
S
T
7m
projector .
2 Lift the front edge of the projector to the desired
height, and release the button to lock the
able T ilt Foot.
LED
Flashes when any button is pressed.
O
Power down all equipment
before making connections.
Infrared T ransmitter
Direct the remote control toward the remote sensor on the projector cabinet.
2
P
Adjusting the T ilt Foot
1 Press and hold the T
ilt button on the front of the
Adjust-
NOTE: To turn off the projector, press and hold the POWER OFF
button for a minimum of two seconds.
RG
INP B
UT
AU
D
30˚
OU
TP
UT
PC
-CO
NT
RO
L
IN
OU
T
2
S-V
IDE
O
VID
1
30˚
M
E
NU
A
U
TO
A
D
JU
S
T
Monitor
AU
OU
-CO
NT
TP
UT
L
S-V
IDE
T
O
7
RGB Button
Press this button to select an RGB source from computer or component equipment connected to your RGB port.
NC EL
M
E
8
NU
S
TA
P TU
O
W S
E
R
E NTE R
O
N
/O
FF
CA
S
E
LE
C
T
S
O
U
R
C
E
VID
Connect the supplied power cable.
S-VIDEO Button
Press this button to select an S-Video source from a VCR.
D
IN
OU
RO
VIDEO Button
Press this button to select a video source from a VCR, DVD player,
laser disc player or document camera.
6
RG
INP B
UT
PC
P
Auto Adjust Button
Use this button to adjust Position-H/V and Pixel Clock/Phase for an
optimal picture. Some signals may not be displayed correctly, or in some
cases it may take some time for a source to switch between sources.
O
TU
R
TA
E
S
W
S
O
9
E NTE R
N
/S
TA
N
B
Y
CA
D
S
E
LE
C
S
T
NC EL
O
U
R
E
E
C
M
NU
Step 2
5
S
O
U
R
C
E
EL
Remote sensor on the
remote mouse
receiver
LE
C
T
• To fine-tune the image’s position vertically on the screen,
rotate the foot. Each of the rear feet height can be changed
up to 0.6” (4mm).
A
U
TO
A
D
JU
S
T
Menu Button
Displays the menu.
10
RG
INP B
UT
AU
D
OU
TP
UT
PC
-CO
NT
RO
L
IN
OU
T
PJ Button
Press this button to switch the Select, Cancel, and Enter buttons
between the Projector mode (lit red)and the Computer mode. Press
this button or any one of the Power ON/OFF, Menu, Help and Magnify buttons to switch to the Projector mode and the PJ button lights
red. To switch back to the Computer mode, press the PJ button again.
14
TP
PC
-CO
N
Attach the supplied
PS/2 Adapter
Cancel (Right click) Button
When you are in the Computer mode, this button works as the
mouse right button.
When you are in the Projector mode, which is indicated by lighting the PJ button:
Press this button to exit “Menus”. It works the same way as the
“Cancel “ button on the cabinet.
13
To adjust the projector’s focus or to zoom in and out use
the Focus ring or Zoom lever on the lens.
To optimize image, press the AUTO ADJUST button on
the cabinet or the remote control.
To USB port of
PC or Macintosh
12
• If the projected image does not appear square to the screen then use keystone correction for proper adjustment.
S-V
IDE
O
VID
Printed in China
7N8P1131
Select (
) / (mouse) Buttons
When you are in the Computer mode, these buttons work as a computer mouse.
When you are in the Projector mode, which is indicated by lighting the PJ button:
: Use these buttons to select the menu of the item you wish to adjust.
: Use these buttons to change the level of a selected menu item.
Picture Button
Press this button to display the Picture adjustment window.
Each time this button is pressed, the current picture adjustment
item will change as follows:
Brightness
Contrast
Color
Hue
Sharpness
Unavailable items will be skipped.
15
Aspect Button
Press this button to display the Aspect Ratio select window.
Each time this button is pressed, the current aspect ratio will
change as follows:
Normal
Zoom
Wide Zoom
Cinema
You can also select the aspect ratio by using the Select or
button. If no adustments are performed within 3 seconds, the Aspect Ratio select window will disappear. (See also page E-32.)
16
Help Button
Provides information about the current signai and the status of
the projector.
17
Freeze Button
This button will freeze a picture. Press again to resume motion.
18
Picture Mute Button
This button turns off the image and sound for a short period of
time. Press again to restore the image and sound.
19
Magnify Button
Use this button to adjust the image size up to 400%.
20
V olume Button
Press (+) to increase the volume and (–) to decrease it.
NOTE: The default is the Computer mode, which allows you to use
the Select, Cancel, and Enter buttons as your computer mouse.
When the POWER ON/OFF, MENU, HELP or MAGNIFY button is
pressed, the PJ button lights red to indicate that you are in the Projector mode. If no buttons are pressed within 10 seconds, the light
goes out and the Projector mode is canceled.
Basic Menu
Troubleshooting
Source Select
Power/ Status Light Messages
RGB
Video
Condition
Status Indicator
Note
S-Video
Standby
Steady orange
–
–
Cooling down
Blinking green
–
Blinks green for 60 seconds.
Lamp in Nomal mode
Steady green
–
–
Lamp in Eco mode
Steady green
Steady green
–
One minute after lamp is turned on
Blinking green
Depending Lamp mode
Do not turn off the projector during
this condition.
Retrying to turn on lamp
Steady green
Blinking orange
The projector retries 3 times at an
interval of 15 sec for max. 45 sec).
Lamp has reached its end of life
(2000 hours or over : Normal mode)
(3000 hours or over : Eco mode)
Steady green
Steady red
Message appears on screen during
this condition. The projector reaches
its end of life. Please replace the
lamp as soon as possible.
Lamp life has reached its end of life
(2100 hours or over : Normal mode)
(3100 hours or over : Eco mode)
Steady orange
Steady red
Basic/Advanced
The projector is in standby mode and
cannot be turned on.
English/German/French/
Italian/Spanish/Swedish/
Japanese
Lamp or filter cover error
(3 locations)
Steady orange
Blinking red
(1 sec interval)
The projector is in standby mode and
cannot be turned on.
On/Off
Temperature error
Steady orange
Blinking red
(4 sec interval)
The projector is in standby mode and
cannot be turned on.
Picture
Source Select
Brghtness
Contrast
Color
Hue
Sharpness
Picture
Volume
Basic Menu
Volume
Image Options
Projector Options
Information
Common Problems & Solutions
Image Options
Power Indicator
Problem
Check These Items
Does not turn on
• Check that the power cable is plugged in and that the power button on the
projector cabinet or the remote control is on.
• Ensure that the lamp cover is installed correctly. See page E-38.
• Check to see if the projector has overheated or the lamp usage exceeds 2100
hours (3100 hours in Eco mode). If there is insufficient ventilation around the
projector or if the room where you’re presenting is particularly warm, move the
projector to a cooler location.
No picture
•
•
•
•
•
Image isn’t square to the screen
• Reposition the projector to improve its angle to the screen. See page E-28.
• Use the Keystone on the Image Options Menu to correct the trapezoid distortion.
See page E-31.
Picture is blurred
• Adjust the focus. See page E-27.
• Reposition the projector to improve its angle to the screen. See page E-28.
• Ensure that the distance between the projector and screen is within the
adjustment range of the lens. See page E-17.
Image is scrolling vertically,
horizontally or both
• Use menus or Source button on the remote control or the cabinet to select the
source you want to input.
Remote control does not work
•
•
•
•
Status indicator is lit or blinking
• See the Power/ Status Light messages.
Cross color in RGB mode
• If Auto Adjust is off, turn it on. If Auto Adjust is on, turn it off and balance the image
with the Position and Clock Adjust on the Advanced Options Menu. See page
E-33.
Keystone
Lamp Mode
Normal/Eco
Factory Default
All Data/Current Signal
Projector Options
Menu
Setup
Menu
Menu Mode
Language
Source Display
No Input Display
Volume Bar
Keystone Bar *
Filter Clean Message
Menu Display Time
On/Off
On/Off
Fan error
Steady orange
Blinking red
(8 sec interval)
The projector is in standby mode and
cannot be turned on.
Lamp error
Steady orange
Blinking red
(12 sec interval)
The projector is in standby mode and
cannot be turned on.
On/Off
On/Off
Manual/Auto 5 sec/Auto 15
sec/Auto 45 sec
* This setting is optional. you need the optional presentation
remote control (PR51KIT).
Setup
Orientation
Cinema Position
Background
Desktop Front/Ceiling Rear/
Desktop Rear/Ceiling Front
Top/Center/Bottom
Blue/Black/Logo
Information
Page 1 (Source Index/Input Terminal/Horizontal Frequency/Vertical Frequency/Sync
Polarity)
Page 2 (Signal Type/Video Type/Sync Type/Interlace)
Page 3 (Remaining Lamp Time/Lamp Hour Meter/Projector Usage)
Use the menu to select your source (Video, S-Video or RGB). See page E-31.
Ensure your cables are connected properly.
Use menus to adjust the brightness and contrast. See page E-31.
Remove the lens cap.
Reset the settings or adjustments to factory preset levels using the Factory
Default on the Image Options Menu. See page E-33.
Install new batteries. See page E-13.
Make sure there are no obstacles between you and the projector.
Stand within 22 feet (7 m) of the projector. See page E-13.
Make sure that you are in the Projector mode or the PJ button lights in red. If not,
press the PJ button.