1
·INSTRUCTION MANUAL
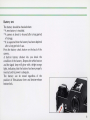
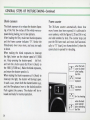
Foreword
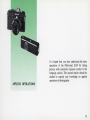
The Nikomat ELW is Nikon's new 35 mm SLR with automatic exposure control, which is thorough-going in its accuracy, durability and is easy to operate.
This new camera has made automatic film winding possible with use of the
Auto Winder AW-l, a new exclusive accessory.
To take pictures of good quality, it is most important that you fully understand
the functions of a camera, and learn to operate the controls with ease and
confid ence. If you are a beginner, please read the section on basic operations of
this instruction manual. Keep this manual handy for ready reference. The time
you spend familiarizing yourself with the camera will guarantee you the best
results and increase your picture-taking enjoyment many times over.
About the Nikon Warranty
The Nikon Worldwide Service Warranty Registration Card, which identifies
your Nikomat ELW by its serial number, is your guarantee that the camera
you buy is a new one. When you return this card to a Nikon distributor you will
receive your Nikon Worldwide Service Warranty Certificate, which entitles you
to a one-year warranty anywhere throughout the world, subject to the
conditions listed in the certificate.
Only an authorized Nikon dealer can provide you with a Nikon Warranty
Registration Card. We cannot guarantee any camera or lens sold to you by an
unauthorized dealer without a Warranty Registration Card, since it may be
second-hand equipment.
CONTENTS
NOMENC LATUR E . . . . • .. .. . . . .. . .. . .. .
F EATUR ES ... . . . . .. . . . . . . . . . . . . . . . .
SPECI FICATIONS . . . . . . . . . . . . . . . . . . ...
BASIC OPERATIONS . . . . . . . . . . . . . . . . . . .
Battery ca re . . . . . . . .. . . . . . . . . . . . . . .
Installing t he bat te ry . . . . . . . . . . . . . . . .
Battery t est . . . . . . . ... .. . .. . . . . . .
Repl aci ng th e bat te ry . .. . .. . . . . . . . ...
Notes o n batt ery ca re. . . . . . . .
. . ..
Mounting th e lens. . . . . . . . . . . . . . . . . . ..
Removi ng th e lens . . . . . . . .. . . . . . . . ...
Attaching & remo ving th e Nikon Au to
Wind er AW -l . . . . . . . . .. . . . . . . . . . . . .
GEN E RAL STEPS OF PICTURE -TAKING . . . . . . .
Lo ading a f ilm . . . . . . . . . . . . .. . . . . . . . .
Settin g th e ASA fi lm speed . . . . . . . . . . . ...
Setting shutter-s pee d di al at A (Auto) . ... . . . .
Winding t he f ilm . . ... . . . . . . . . . . . . . ..
Blank ex posure ... .. .. . . . . . . . . . . ... .
Frame counter.. . . .. . .. . . . . . . . . . . . . .
Setting the aperture rin g .. . . . . .. . . . . . . . .
Holding th e ca mera ... . . . . . . . . . . . . . . ..
Focusing . . . . . . . . . . . . . . . . . . . . .. ...
Vi ewfinder f rame coverage.. . .
. ...
Releasing th e shutte r . . . . . . . . . . . . .. ... .
Rewinding and unloading f ilm . .. . . . . . . . . . .
Pho tograph y of auto mati c ex posure co ntrol. . . . .
2
6
8
11
12
12
13
14
15
16
17
18
19
20
22
22
23
24
24
25
26
26
27
28
29
30
Reminder checklist . . . . . . . . . . . . . . . . . . .
APPLIED OPERATIONS . . ... . . .. ... . .. . .
TTL EX POSURE METER .. . .. .. . . . . . . ..
EV range chart .. . . . . . . . . . . . . . . . . .
EXPOSURE CONTROL ... . . . . . . . . . . . ..
The shutter spee d di al and the use ... . .. . .
Automatic ex posure control . . . . . . . . . . . .
Manual ex po sure control . . . . . . . . . . . . ..
Lens aperture diaphrag m . . . . . . . . . . . . . .
Depth -of-fie ld previ ew button . .. . . . . . . . .
Stop·do wn exposure measurement . . . . . . . .
COMPENSATION OF EXPOSU RE. ... . . . .. .
How to use memory lock . . . . . . . . . . . . .
Repro-copy in g, slid e-copy ing and
photomi crography . . . . . . . . . . . . . . ...
DEPTH OF FIELD . . . . . ... . . . . . ... ...
SELF -TIMER .. . . .. . . . . . . .. . . .. . .. .
MIRROR LOCK ... .. . . . . . . . ... . ... .
INFRARED PHOTOGRAPHY . . . . . . . . . . . .
FLASH SYNCHRONIZATION . .. .. . . . . . . .
ACCESSORIES .. . . . . . . . . .. . . . . . . .. . . .
NIKON AUTO WINDER AW-l . . . . . . ... ...
FILTERS . . ... . . . . . . . . . . . . . . . . . . .
LENS FOOD . . . . . . . . . . . . . . . . . . . . . .
OTHER ACCESSORIES . . . . . . . . . . . . . . . .
CAMERA CARE CAUTIONS . . . . . . . . .. . . . . .
32
33
34
36
40
40
40
41
42
42
43
44
45
46
47
48
49
49
50
53
54
55
56
57
58
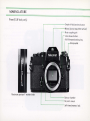
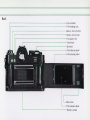
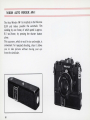
NOMENCLATURE
Front (ELW body only)
r - - - - - - - - - - - - Depth-of-field
preview button
. - - - - - - - -Mirror (do not touch the surface)
Meter co uplin g pin
Lens-release bu tton
ASA film-speed sett ing ring
trap eyelet
L-_ _ _ _ _ _ _
L-_ _ _ _ _ _ _ _ _
L-_ _ _ _ _ _ _ _ _ _ _ _
Battery chamber
Ba yo net mount
Self-timer/memory lock
NOM ENCLATURE
Top (With 50 mm Fl.4 lens installed)
Shutter speed indi
Film-advance lever / meter on-off <witdh- - - Film-plane indicator - - -..,.
Meter ON mark
Synch indicator window
Shutter speed dial
Shutter speed dial lock
Strap eyelet
Frame cou ntf"----":..::s.I
Meter ON
Shutter-release b JtVon· - - - - - - - 1
Aperture ring - - - - - - - - - - '
Aperture scale - - - - - - - - - Depth -of-field scale - - - - - - - - - -
. . . - - - - - - - - - - - - Hot-shoe contact
1 , . . . . - - - - - - - - - - - Meter coupling pin
~---,=-=::------ Accessory shoe (Hot-shoe)
1..-.:'--_ _ _
Rewind knob
ASA film-speed setting ring
Synch termin al (with cap)
Back cover lock
ASA film-speed index
Rewind crank
' - - - - - - - Mirror-lock lever
' - - - - - - - ASA film-speed dial lock
~_ _ _ _ _ _ Meter coupling pron g
'---== ==' - - - - - - - Aperture
indicator / Distance index
. . . . - - - - - - - Distance scale
Focusing ring
r-------
Bottom (Camera body only)
to-winder connecting terminal
Coupler for Auto Winder
Rewind button - - - - -
3
Tripod socket/Auto Winder
attaching screw socket
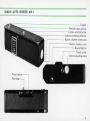
Back
. - - - - - - - - - - - - - - - - - - - - - - - - - - - - - - - - - - Film chamber
. - - - - - - - - - - - - - - - - - - - - - - - - - - - - - - - - - Film holding fork
r - - - - - - - - - - - - - - - - - - - - - - - - - - - - - - - Battery check button
r - - - - - - - - - - - - - - - - - - - - - - - - - - - - - - Battery check lamp
r - - - - - - - - - - - - - - - - - - - - - - - - - - - - - Film guide rails
, - - - - - - - - - - - - - - - - - - - - - - - - Viewfinder
. - - - - - - - - - - - - - - - - - - Sprocket
r - - - - - - - - - - - - - - - Fi l m take-up spool
~------
Film press ing ro ll er
Back cover
L -_ _ _ _ _ _ _ _ _ _ _ _ _ _ _ _ _ _ _ _ _ _ _ _
Film pressure plate
Shutter curtain
NIKON AUTO WINDER AW-l
;;;;;::: - - - - - - - - - - - - - - - - - - - - - - - - - - - - - - - - - Coupl er
Rewind button spindl e
=-- - - - - - - - - - - - - - - - - - Camera attaching screw
=-- - - - - - - - - - - - Camera co nnecting terminal
Battery chamber co ver screw
r - - - - - - - - - - - Battery chamber cover
r - - - - - - - - - - - - Rewind button
,..------- Tripod soc ket
Camera attaching screw
Power switch -----,
Pil ot lam
5
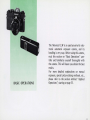
FEATURES
1. When used with the Auto Winder AW-1, the
Nikomat ELW will automatically wind the
film after releasing the shutter-release button.
2. It is an auto matic exposure control camera
with an aperture-priority automatic electro nic
shutter speed control system . A manual
shutter-speed-priority system can also be
employed.
3. It is equipped with an exposure memory lock,
convenient when taking pictures with severe
brightness differences between subject and
background.
4. At the automatic setting, the shutter speed
can be set from 1/1000 to a full 4 seconds,
and all speeds in between, and the shutter
speed can be visually confirmed in the viewfinder.
5. At a manual setting, exposure can be set usi ng
the match needle manu al system.
The shutter speed can be set from 1/1 000 to a
full 4 seconds, using precalibrated settings
plus B.
6
6. The Nikomat ELW has a built-i n TTL centerweighted exposure meter. The meter, coupled
with any Ni kkor interchangeable lens with
the Nikon bayonet mounting system, can
perform not only at full aperture but also
stop-down measurement as well, using the
depth-of-field preview button.
7. The reliability of the meter is insured by the
adoption of monolithic Integrated Circuit
and Functional Resistance Element(FRE}
in its electronic circuitry .
8. Even if the exposure meter battery is depleted, the shutter will operate at 1/90 sec.
mechanically.
9. The shutter can be synchronized with an
electronic flash up to the high speed of 1/125
sec.
10. To avoid accidental or improper operation,
the following safety locks have been provided :
Refer to the nomenclature page for the location of each of these items.
11. All parts, including the built-in battery
checker, hot shoe, synch terminal with screw
connector, etc., have been designed with convenience in mind.
(1) To lock the shutter-release button and
the exposure meter power source, set
the shutter-release button lock and the
film -advance lever at their locked position (flush against the camera).
(2) The sh~tter speed dial locks when it has
been set on automatic (A). For manual
exposure control, release the lock by
pressing the silver button at the center of
the shutter speed dial, and set the dial to
the desired speed .
(3) The rewind crank cannot be raised unless
you slide back the back cover lock. This
prevents accidental opening of the back
cover.
(4) The ASA setting ring cannot be turned
without pressing the ASA dial release lock.
7
SPECIFICATIONS
Type ........................................
Picture area ..............................
Film used ................................ .
Lens mount .............................
Viewfinder ...... .........................
Viewfinder screen .................. ..
35 mm Single lens Reflex Camera
24 mm x 36 mm
Various types of 35 mm film
Nikon F bayonet mount
Eye-level pentaprism type
Split micro system (K type)
Central portion- split system (3 mm in diameter)
Outer ring- microprism system (1 mm width)
Viewfinder frame coverage ....... Approx. 92% of final picture area
Mirror ................. ............ ......... Quick return type with mirror lock system
Shutter ... ............. .................... Electromagnetic-controlled focal -plane shutter with downward-vertical movement
Shutter speed ....... ..... ......... ... ... * Stepless speed variations from 4 ~ 1/l 000 sec. on auto
control
* Speed variations same on manual control plus 8, except
that they are stepped
In either case, the shutter speed can be confirmed by the
indicator needl e inside the viewfinder
* When power source exhausted, speed mechanically fixed
at 1/90 sec.
Exposure meter ................ .... .... * TTL CdS meter with center-weighted metering at full
aperture with Nikkor auto lenses.
* Maximum aperture range: f/1 .2 ~ f/5.6
* ASA range: 25 ~ 1600 (19 settings)
8
*
Full aperture F number scale ....
Film winding ..... ........... ... .... .. ..
Frame counter .... .. .... .. ...... .......
Self-timer .... ....... ..... ..... ............
Film rewind .. ...... ... ............... ...
Accessory shoe .... ........... ..... .... .
Synch terminal ... ......................
Synch contact ....... ......... ... ... ....
Battery ...... ....... ....... ............ .... .
Battery checker .. ...... ...... .... ......
Dimensions ..............................
Weight .............. ...... .......... ........
Metering range : EVl ~ EV18 with ASA 100 and Fl.4
lens (e.g., f/1.4, 1 sec. ~ f/16, 1/1000 sec. at ASA 100 with
50 mm Fl.4 lens)
1.2 - 2.8 - 5.6
A single stroke with the film-advance lever winds film 135°,
clearance ang le 30°
Automatic winding of approx. 2 frames/sec. is possible by
the use of the Nikon Auto Winder AW-l
Additive, automatic resetting
Can be set for 8- to 10-sec. delay. Also serves as memory
lock
Crank system . Rewind button returns automatically
Contains hot-shoe contact
Inner thread accepts Nikon synch cords for positive
connection
Flash lamp (6 mark) and electronic flash (~mark)
switch-over system
The electronic units can be synchronized up to 1/125 sec.
One 6 V silver-oxide battery
Glows to indicate battery is good
145 mm (width) x 54.5 mm (depth) x 93.5 mm (height)
(body only)
Approx. 790 grams (body on ly)
9
BASIC OPERATIONS
The Nikomat ELW is an aperture-priority electronic automatic exposure camera, and its
handling is very easy. Before using this camera,
read this section on "Basic Operations" carefully and familiarize yourself thoroughly with
the camera. This will insure you obtain the best
resul ts.
For more detailed explanations on manual
exposure, special picture-taking methods, etc.,
please refer to the section entitled "Applied
OperatioAS", starti ng o n page 33 .
II
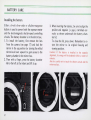
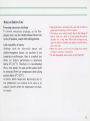
BATTERY CARE
Install ing the battery
Eith er a 6-volt silver-oxide or alka line-manganese
battery is used to power both the exposure meter
and the electromagnetic shutter-speed controlling
circuits. The battery chamber is in the mirror box.
1. To install the battery, first remove the lens
from the camera (see page 17) and lock the
mirror in the up position by turning the milled
mirror-lock lever upward to gain access to the
battery chamber in the mirror box.
2. Then with a finger, press the battery chamber
lid to the left at the indent and lift it up.
12
3. Wh en inserting the battery, be sure to align the
positive and negative (+ and -) terminals correctly as shown underneath the battery chamber lid.
To close the lid, press down. Remember to return the mirror to its original focusing and
viewing position.
Caution : If the battery is installed in the opposite
alignment , its energy will be depleted within a matter of
minutes.
Also be careful not to touch the shutter curtain and the
mirror surface.
Battery test
The battery should be checked when:
* A new battery is install ed.
* A camera is about to be used after a long period
of storage.
* It is suspected that the battery has been depl eted
after a lo ng period of use .
Press the battery check button o n the back of the
camera.
A built-in battery checker lets you check the
condition of the battery. Depress the white button
an d the signal lamp will glow with a bright orange
light, indi cati ng that the battery has been properly
in serted and its power is adequate.
Th e battery can be tested regardless of the
position of film-advance lever and shutter-release
button lock.
13
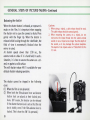
BATTERY CARE-Continued
Replacing the battery
When the battery check lamp does not glow when
pressi ng the battery check button, replace t he
battery with a new o ne.
(1) Remove t he lens, and lock t he mirror in the
up positio n.
14
(2) Open the battery chamber lid.
(3) Ho ld the camera upsid e down, and pu sh t he
battery chamb er lid . Th e battery will roll o ut
of the chamber.
Notes on Battery Care
Preve nting unnecessary di sc harge
To prevent unnecessary discharge, set th e filmadvance lever and the shutter-release button lock
in the off position, except when taking pictures.
Cold resistability of battery
Although both th e si lver-oxide battery and
alka line-manganese battery are exce ll ent in low
temperature performance, there is a marked tendency for battery performance to deteriorate
below O°C (32° F) . Therefore, it is recommended
that a new battery be used and the camera itself
be protected from low temperatures when taking
pictures below O°C (32° F) .
A battery which temporari ly deteriorates due to
low temperature ca n cont inue to be used, as its
capacity recovers wh en the temperature rises back
to normal.
* Wipe both battery
terminals with a soft and dry cloth or
paper before inserting it into the camera.
* The battery may conduct poorly due to the leakage of
battery fluid, etc. when it is kept inside the battery
chamber for a long time. When such leakage occurs,
clean the battery chamber and replace the poor battery
with a new one.
* When the camera is not in use for a long time, remove
the battery and store it separately.
Do not disassemble, short-circui t , or burn batteries.
*
15
MOUNTING THE LENS
To mount a lens, first push the camera's meter
coupling pin to the right as far as it will go. Set
the lens diaphragm at f/5 .6 and insert the lens into
thIY bayonet mount, making sure that the coupling
pin fits into the slotted prong on the lens. Twist
the lens counterclockwise until it locks into place
with a sharp click.
In lenses having no slotted prong, mounting is
done at a position where its aperture indicator
aligns with the coupling pin of the camera.
16
Maximum aperture indicator
In order to measure light at full aperture with
lenses of different maximum apertures, the
Nikomat ELW's meter must be adjusted for the
maximum aperture of the lens in use. This must be
done each time a lens is mounted. Turn the
aperture ring all the way to the minimum aperture
setting (largest f/number), then all the way in the
opposite direct ion . This step automatically adjusts
the meter to the maximum aperture of the lens.
REMOVING THE LENS
Maximum aperture scale
The above adjustment can be co nfirm ed by looking at the maximum aperture scale on the ring
with the coupling pin. The scale has a range of
f/l.2 to f/5.6. For example, if the 50 mm F1.4
lens is mounted on the camera, the red index mark
should fall opposite the 1.4.
To remove the lens from the camera, press the
lens-release button and tw ist the lens to the rig ht
as far as it will go. Th e lens will come loose and
can be lifted ou t.
* Please do not try to remount the lens while In
the process of removal. The slotted prong of the
lens must be disconnected from the coupling pin
of the camera once, and the coupl ing pin turned
to the right as far as it will go, before the lens
can be remounted .
17
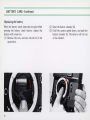
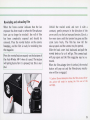
ATTACHING & REMOVING THE NIKON AUTO WINDER AW-1
To attach the AW-1
Align the spindle of the coupling portion of the
Auto Winder AW-l with the slot of the coupling
portion on the bottom of the ELW, and turn the
camera attaching screw of the AW-l clockwise
with a coin, and tighten securely. For details consult the manual for the AW-l.
* Be careful not to leave a gap between the EL W
and AW-l . Such a gap may disturb the proper
operation of the automatic winding system and
could be the cause of trouble.
~'
~ _
<L
[]
18
,
To remove the AW-1
Before removing the Auto Winder AW-l, be sure
to turn the power switch off first. Then, remove
the AW-l from the Camera by turning the camera
attaching screw counterclockwise.
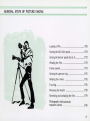
GENERAL STEPS OF PICTURE-TAKING
Loading a film ..... ........ .... .. ...... .... ............. ........ P20
Setting t he ASA film speed ... .... ... ........ ..... ...... P22
Setting the shutter speed dial at A .... .... .. ... ... ... P22
Winding the film .. ... ......... ... ............................ P23
Frame counter ....... ...... .... ..... .... ......... ............ ... P24
Setting the aperture-ring ..... ... ... ... ...... ... .. .. ...... P25
Holding t he camera ... .... ... .. ..... ... .. ...... ....... ... .. P26
Focusing ... ...... .... .... .. ...... ...... ................... ....... P26
Releasing t he shutter ...... .... .. ..... ... ... ...... ... .... .. P28
Rewinding and unloading the fi lm .... .............. P29
Photography with automatic
exposure control .. . . ... .. . . .. . . . .... P30
19
GENERAL STEPS OF PICTURE-TAKING
Loading a film
(1) To open the camera back, slide the safety lock
backward and lift up the film rewind knob as
far as it goes, and the hinged camera back will
pop open.
20
(2) Drop a film magaz ine into the film chamber
with the film leader pointing toward the takeup spool. Push the rewind knob down to hold
the cartridge in pl ace and insert the end of the
fi lm leader into anyone of the three slots in
the take-up spool. Stroke the film-advance
lever (or turn the take-up speol clockwise)
slowly to make sure that the film perfo rations
mesh with the sprockets and that the edges of
the film run parallel to the film guide rails.
Close the camera by pressing the back until it
snaps into place.
Fold out the rew ind crank on the film rewind
knob and turn it gently in the direction of the
arrow until you feel a slight resistance. This
takes up any slack in the film cartridge. Then
fold back the rewind crank.
* Do
not load the camera in bright sunlight. If no other
shade is available, shade the camera from the sun with
your body while loading. This will reduce any chance
ot spoiling your t irst exposures due to fogging.
Make two blank exposures to dispose of the first
few inches of film which were exposed during
loading. When advancing the film , make sure that
the rewind knob rotates in the direction opposite
the arrow. This indicates that the film has been
loaded correctly and is being advanced. The
frame counter should now indicate " 0" exposure.
Advance the film one more frame and you are
ready to take the first picture.
*At the end of a film, the film-winding may stop
half-way between frames. The AW-l may not
function furthermore. In such a case, turn the
AW-l power switch off. Take the film out and
load a new film. Advance the film manually one
frame. The AW-l should then function normally.
On " bl ank ex posure", refer to Page 24 for detail ed
inform ation.
21
GENERAL STEPS OF PICTURE-TAKING-Continued
Setting the ASA film speed
Setting shutter-speed dial at A (Auto)
The ASA film-speed dial has a scale calibrated
from ASA 25 to 1600 with two dots between
numbers to indicate intermediate settings, such as
32 and 40. Press th e film-speed dial lock inward
and turn the milled ring around the film-speed
sca le until the red dot appears opposite the speed
of the loaded film, and the exposure control
system automatically adjusts itself to match the
selected film speed.
The shutter-speed dial sets the Nikomat . ELW for
either automatic or manual exposure control. To
set the dial at A (Auto), turn the shutter-speed
dial clockwise until the" A" is opposite the dot.
The automatic exposure control locks the shutterspeed dial to prevent accidental shifting of the
setting.
For shooting under manual exposure control,
please refer to page 41 .
:I~~~~m
22
Winding the film
When advancing the film manually, keep the filmadvance lever pulled out at a 30° clearance angle
so that the red dot is visible while pictures are
being taken. This turns the exposure meter on.
The shutter button lock shou ld be set at its locked
position . (Where the red dot cannot be seen.)
Apply the right thumb to the film advance lever
and swing it clockwise to the right until it stops.
This advances the film one frame and cocks the
shutter. Always swing the lever . with one stroke,
otherwise it may spring back to its original position without fully advancing the film.
* When the roll of film has been exposed and the
film-advance lever resists, do not attempt to
force the advance lever. It will tear the film out
of the magazine.
When the film is being advanced automa tically by
the AW-l turn the shutter button lock to the k:ft
(counterclockwise) until it comes to a stop so the
red dot is visible. This turns the exposure meter
on.
In this case, set the film-advance lever at its locked
position, flush against the camera body.
After that, the film is automatically advanced by
one frame every time the shutter is released.
23
GENERAL STEPS OF PICTURE-TAKING-Continued
Blank exposure
The blank exposure is to release the shutter disposing of the first few inches of film which were exposed during loading, not to take pictures.
After loading the film, make two blank exposures
and the frame counter indicates "0". Stroke the
film-advance lever once more, and you are ready
to shoot .
When making the blank exposures to intercept
the light, better use the shutter speed of 1/1000
sec . Keep pressing the shutter-speed
dial lock
and turn the shutter-speed dial from A (Auto) to
the 1000 (1/1000 sec.) . Make the blank exposures,
and return the shutter speed to A.
When making the blank exposures at A (Auto) to
intercept the light, the shutter will be kept open.
In such a case, return both the shutter-button lock
and the film-advance lever to the locked position
flush against the camera. The shutter will be released and ready for normal operation.
Frame counter
The 36-frame counter automatically shows how
many frames have been exposed. It is calibrated in
even numbers, with the figures 0, 20 and 36 in red,
and odd numbers by dots. The counter stops just
past the 36-frame mark and resets itself automatically to "S" (start), two frames before 0, when the
camera back is opened for reloading.
~
o
)
,
24
~
when the back
cover is closed
after loading
the film
lstblank
~ exposure
.
~
.s r
_.J
.......
·5
,
~ 2nd blank
~ exposure
~
for 1 st shooting
when the back
:
cover opened
~ after rewinding
~ the film
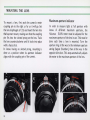
Setting the aperture ring
When shooting with the camera set at A(Auto),
once the film speed (ASA) dial is set, the only exposure control you must do is set the len.s aperture.
Turn the aperture ring on the lens barrel until the
desired f/number is opposite the black line (aperture indicator) . The aperture diaphragm can be set
at intermediate openings between click-stop settings for more precise exposures.
Guide to aperture setting using automatic exposure
control
(Outdoor picture taking in daytime)
ASA 25
ASA 80
ASA100
ASA400
Sunny
Cloudy
f/8
fIll
fIll
f/2.8
f/2
f/5.6
f/4
f/4
f/8t
f/22 t
f15.6
f/l1t
Heavy overcast
The available shutter speed is approx. 1/125 sec.
t The available shutter speed is approx. 1/250 sel;.
25
GEN E RAL STEPS OF PICTU RE-T AKI NG - Continued
Holding the camera
Steady camera holding is important since even the
slightest camera shake at the moment of exposure
can result in an appreciable loss of sharpness, especially at slow shutter speeds. Wrap the fingers
of the righ-t hand around the camera body so that
the index finger rests comfortably on the shutterrelease button and the thumb fits between the
body and film-advance lever, and press the camera
against your forehead. This way when winding the
film manually you can stroke the film-advance
lever without removing your eye from the viewfinder. Cradle the camera in the left hand for additional support, with the left thumb and index
finger grasping the focusing ring. The camera may
be switched from the horizontal to the vertical
format in this position.
26
Focusing
Focusing is always done at full aperture with
Nikkor lenses (auto). This gives the brightest
possible image on the focusing screen and also
minimizes the depth of field so that the image
snaps in or out of focus distinctly . The , Nikomat
ELW's focusing screen consists of a matte Fresnel
field with a central 3mm¢ split-image range-finder
spot surrounded by a doughnut-shaped 1 mm-wide
microprism. It makes for fast, accurate focusing.
Look through the viewfinder and turn the focusing
ring until the two halves of the central rangefinder
image coincide to form a single, sharp image- or
until the image in the microprism appears sharp
and crisp. The focusing screen is suitable for
subjects with straight outlines or ill-defined contours. In close-up photography, the rangefinder
spot is likely to darken. This is also true when
you're using a lens with a maximum aperture
sma ller than f/4.5. You should then focus on the
surrounding matte field.
out of focus
The range surrounded by the broken line is the approximate frame area seen through the viewfinder, and
the outer area is the actual printed picture _
in focus
Prefocusing
The lens can also be prefocused using the distance
scale engraved in both feet and meters on the lens
barrel. Line up the bl ack indicator line on top of
the lens opposite the camera-to-subject distance as
measured or estimated. This technique is useful for
candid shots of elusive ,subjects when time does
not permit through-the-Iens focusing.
The
mark on the top deck shows the exact
position of the film plane. This is an aid when
measuring the film-to-subject distance in closeups and macrophotography.
Viewfinder frame coverage
The ratio of the area seen through the 'viewfinder
to the actual area of the printed picture (viewfinder frame coverage) is approx. 92%. In planning a shot, you can include more than actually
appears in the viewfinder.
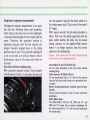
Eyepiece correction lenses
Nikon eyepiece correction lenses are availab'le for
near-sighted and far-sighted users to assist in
sharper focusing. Refer to Page 57.
27
GENERAL STEPS OF PICTURE-TAKING-Continued
Releasing the shutter
When the shutter button is released, an exposure is
made on the film. It is important when snapping
the shutter not to cause the camera to shake. Press
gently with the finger tip. When the shutter is
released while looking through the viewfinder, the
field of view is momentarily blocked since the
mirror is raised.
At shutter speeds slower than 1/30 sec ., the
camera tends to shake if it is hand held. In such a
situation, it is best to secure the camera on a tripod , or against a solid surface.
The soft shutter release AR-1 is available for your
delicate shutter releasing operation.
The shutter cannot be tripped in the following
cases:
(1) When the film is not advanced.
(2) Whe n both the film-advance lever a nd shutter
butto n lock a re pl aced at their locked posi tions . (Of course, the shutter can be released
if the shutter button lock is set so that the red
dot is visible, eve n if the film-advance lever is
locked. This is how the AW-1 is operated.)
28
Cautions:
1. When using a tripod, a cable release should be used.
The cable release should be pressed gently.
2. When mounting the camera on a tripod, do not
over-screw the tripod thread into the camera tripod
socket or use a tripod screw longer than the depth of
the socket, as it may damage the camera baseplate.
The depth of the tripod socket of N ikomat ELW is
5.7 mm.
Rewinding and unloading film
When the frame counter indicates that the last
exposure has been made or when the fi lm-advance
lever can no longer be stroked *, the roll of film
has been completely exposed and should be
removed. Press the rewind button on the camera
baseplate, and the film is ready for rewinding into
the magazine.
Press the rewind button securely on the bottom of
the Auto Winder AW-l when it is used . The button
will spring back after it is pressed, but this is normal.
Unfold the rewind crank and turn it with a
constant, gent le pressure in the direction of the
arrow until yo u fee l an increased tension. Give it a
few more turns until t he tension has gone and the
crank turns freely. The film has now left the
take-up spool and the camera may be opened.
Slide the back cover lock backward and pull the
rewind knob as far as it will go. The comera back
will pop open and the film magazine may be removed.
When the film-adva4'lce Lever is stroked, the rewind
button will pop out and the film-advance mechanism will be re-engaged.
* Cautio n: Do not attempt to force the film advance lever[his action will result in tearing the film out of the
cartridge.
29
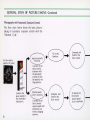
GENERAL STEPS OF PICTURE -TAKING- Continu ed
Photography with Automatic Exposure Contro l
Th e f low chart below shows the basic pi cturetaking of auto matic ex posure co ntro l with the
Nikomat ELW.
Apertu re-priority
Shooting
A system to obtai n a correct
expos ure w ith
the automatic
contro l of sh utter speed by setting a pert ure.
Co nfirm the
gree n need le in
the viewfi nd er
indicates A.
30
Shutter-speedpriority shooting
A system to obtain a desi red
shutter-s pee d w ith
autom at ic co ntrol by cha ngi ng
aperture.
.
To set the
Aperture
Co mpose and
Co nfirm the
black needle
-+
Compose and
Co nfirm the
black needle
-
-+
T o obtain the
the des ired
shu tter-speed
in the viewfinder'
-
You can obtain a picture of correct exposure by
simply snapping the shutter.
....
You can obtain a picture of correct exposure;
only that the shutter speed is slow, you are advised
to obtain a faster shutter speed by changing the ~
aperture or to secure the camera with a tripod
or something solid.
You will obtain a picture of incorrect exposure;
to obtain a picture of correct exposure, change
the aperture to keep away the black needle in the ~
viewfinder from the warning zone of either A or B
side.
Snap the shutter when the black needle indicates . . . .
__~_ your desired shutter-speed .
31
Before you start shooting, double-check to make
sure you have done the follow ing:
1) Installed the battery in the battery chamber
correctly.
2) Checked the battery checker to see that the
lamp glows with a bright orange light.
3) Returned the mirror to the origi nal viewing
position.
4) Loaded the film and made two blank exposures
while watching the rewind knob to see if the
film is loaded correctly.
32
5) Set the ASA fi lm-speed dial for the correct
speed of the film loaded in the camera.
6) Mounted the lens correct ly and adjusted the
meter for the maximum aperture of the lens
(check the maximum aperture indicator).
7) Set the shutter speed dial to A (in case of
automatic exposure control).
8) When using the AW-l, both the shutter button
lock of the EL Wand the power switch of the
AW-l ' must be turned to the ON position. The
film-advance lever should be in locked position.
It is hoped "that you have understood the basic
operations of the Nikkormat ELW for taking
pictures with automatic exposure control in the
foregoing section. This second section should be
studied to expand your knowledge on applied
operations of photography.
APPLI ED OPERATIONS
33
TTL EXPOSURE METER
Center-weighted exposure meter
The exposure meter adopts the TTL center-weighted light metering system.
The meter reads light over the entire focusing
screen, but its light sensitivity is concentrated in
the center, which corresponds to the central
12mm diameter spot of the screen. For best
results, always place the main subject in this
central area when metering. The meter takes
advantage of the automatic diaphragm feature of
the Nikkor lenses (auto) to measure light at the
maximum aperture of the lens. This insures the
brightest possible image on the focusing screen for
viewing and focusing and minimizes the influence
of light entering through the finder eyepiece.
34
To turn on exposure meter
When the film is manually advanced, the exposure
meter is turned on by pulling the film-advance
lever out to uncover the red dot (an angle of about
30°). In this case, the shutter button lock is to be
placed in its locked position.
When using the Auto Winder AW-1, the exposure
meter is turned on by turning the shutter button
lock so as to uncover the red dot. In this case, the
film-advance lever is to be placed in its locked
position, flush against the camera body.
In automatic exposure control, it is sufficient to
simply release the shutter after setting the lens
aperture and focusing the subject. However, it is
recommended that the position of the exposure
meter needle (shutter speed value in the finder) be
confirmed without fail before taking pictures.
Since photographs may be blurred if the camera is
held by hand at speeds of 1/30 sec. or slower, adjust the lens aperture to obtain a shutter speed
faster than 1/60 sec. When you wish to use slower
shutter speeds stabilize the camera by means of a
tripod or something solid.
Caution :
To prevent battery drain, keep both the film-advance
lever and the shutter-release button in the locked position
to switch off the meter whenever the camera is not in use .
Also note that if the black needle indicates A or B
(the warning zones) - i.e. the subject is too bright
or too dark, change the aperture to keep away the
black needle from A or B.
Confirm the shutter speed indicator
Under the automatic exposure control, confirm
the black needle (indicating the shutter speed) in
the viewtinder if it is indicating the proper shutter
speed.
With shutter speeds slower than 1/30 sec., secure
the camera With a tripod to avoid blurred pictures.
When the black needle is out of the range of the
correct exposure with the first set aperture
Subject is too bright
Subject is too dark
Warning zone
- - The range of correct exposu re
When the black needle is with in this range secure the
} - camera with a tripod to avoid
blur.
Warning zone
reduce the aperture
oes
not come in the range
even with the minimum
(smallest) aperture , use
NO filters, etc. to reduce
the luminOSity.
open the aperture
not come in the range
even with the maximum
(full) aperture, use flash
lights, etc. to increase
the luminosity.
35
TTL EXPOSURE METER-Continued
Extreme-high or low light situations
If the black needle remains in "A" or "B" after all
possible aperture settings have been tried, then the
available light is too bright or too dim to cover the
meter's EV range. Switch to a new film that
matches the available light or mount a neutral
density (NO) filter onto the lens to cut down on
the amount of light or use artificial light to
increase luminosity, whichever is appropriate.
36
Operable shutter speed
The camera's meter may be used only within the
shutter speed range covered by the exposure value
(EV) range of the meter, which varies with the
aperture and ASA setting.
The chart on page 39 shows the relationships
between the f-stop, shutter speed and film speed,
indicating the slowest functioning shutter speed
(for metering purposes) with any film speed/f-stop
combination.
Careful attention to the following instructions will
assure precise exposure, automatically, over the
complete exposure control and meter range capability of your Nikomat ELW.
• Auto exposure control at full aperture
For example, with an f/1.4 lens and ASA 100 film,
the ELW's automatic shutter will function down
to one second with the lens set at 1.4, and proportionately slower as the aperture is closed.
Using a standard of ASA 25 film, you may be
assured of at least a four second speed regardless
of the aperture of the lens used as long as the lens
is set at full aperture (refer to Table).
Using ASA 400 at f/l.4, the slowest speed is 1/4
second; however, as the aperture is closed, the
functioning shutter speed becomes progressively
slower until we reach f/5.6 when the slowest speed
of four seconds is functioning.
reproduction (twice life-size) the effective f/number is f/5.6. When used at f/8, the effective
f/number is f/22.
When pictures are taken under minimal light levels,
it is desirable to use a high-speed film (ASA 160 or
higher) . Using Tri-X at film speed 400 with
stop-down metering, with an effective f/number of
f/8, the shutter speed range would be from 1/4
second to 1/1000. Should the light level drop
below EV6, it would be out of the shutter speed
range of the meter.
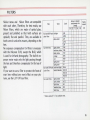
Table
•
Auto exposure control with stop-down metering
When using a bellows or other extension equipment, which disengages the meter coupling device,
it is necessary to revert to stop-down metering.
Certain limitations are imposed in this mode.
As lens-to-film distance is increased, the metering
range (EV range) changes proportionately. For
example, when an f/2
lens is used at 2:1
Slowest shutter speed at full
aperture with any lens
ASA speed
Slowest shutter speed
(sec.)
1600
800
400
200 (160)
100 ( 80)
50 ( 64)
25
1/15
1/8
1/4
1/2
1
2
4
37
TTL EXPOSURE METER-Continued
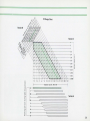
• How to read the EV range chart
The chart indicates the EV (for ASA 100) vs.
shutter speed range.
To determine the shutter speed range, note that
the bars in section A indicate the responsive range
of the ELW's photosensitive CdS element (i .e. , f/8
covers EV6-22, f/16 covers EV8-22) for the f-stop
in use.
In Section 8, note the f-stop being used on the
appropriate ASA scale. For example, at ASA 25
with the lens set at f/8, we follow the line
diagonally and find that it intersects EV6 at four
seconds, and at EV18 runs off the scale at 1/1000
second. ASA 100 at f/8 runs from EV4 at four
seconds to EV 16 at 1/1000 second.
In any case, it is generally the low end which
requires a careful check. The wide exposure (EV)
range of the Nikomat EL W will encompass most
lighting situations. It is only under dim-light or
rare bright-light situations that any special attention need be paid.
38
Full-aperture metering
The metering range is determined by the bars
(Section A), fl number range in appropriate ASA
scale (Section 8) and shutter speed (4- 1/1000
sec., Section C). For example, the green area
encompassed by the heavy lines demonstrate a
.combination of an filA lens and ASA 100 film.
Stop-down metering
The metering range is determined by the bars
(Section A), flnumber in appropriate ASA scale
(Section 8) which corresponds to the stoppeddown aperture in operation, and shutter speed
(4- 1/ 1000 sec., Section C). The green line
demonstrates stop-down measurement in the case
of an f/8 lens combined with ASA 100 film,
indicating a range from 1 sec. to 1/1000 sec.
EV Range Chart
Section B
Section C
1/2
1/4
- 1/8
i
~
1/15
1/30
1/60
1/ 125
~
~
1/2 50
1/500
1/1000
1
2
3
4
5
6
7
8
~
10
11
12 13 14 15 16 17 18 19 20 21 22
f - -- - - - - -IE xposure value for ASA 100 - - - - - - --1
1.4--1
2---1
2.8------t
Section A
11
16
22
32
39
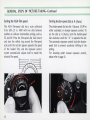
EXPOSURE CONTROL
The shutter speed dial and the use
Th e manu al shutter speeds ra nge f ro m 4 to 1/1000
sec., plus B. Th e orange numbers on the dial
represent full seco nds whil e those in white represent fractions of a second . The red 125 stands for
1/125 sec. , the highest shutter speed which can be
used to synchronize with a speedlight. Do not set
the dial at an intermediate position between clickstop settings. At the B setting, the shutter remains
open as long as the shutter-release button is held
down. If you have forgotten to install the battery
or in the event of battery failure, the shutter gives
a mechanically fixed 1/90 sec. speed regardless of
the setting.
Auto
Bulb - -- -
4sec. - -- 2sec. - - - 1 sec.- - - 1/2 sec. - - - 1/4 sec. - - -----'
1/1000 sec.
1/500 sec.
1/250 sec.
1/125 sec.
1/60 sec.
1/30 sec.
1/15 sec.
' - - - - 1/8 sec.
Automatic exposure control
When the shutter speed di a l is set at A, the green
shutter needle in the viewfinder is positioned at A.
40
This automatically controlls the shutter speed, and
the black needle (exposure metering needle) in the
viewfinder will indicate the correct shutter speed.
The shutter speed varies in response to the lens
aperture and the brightness of the subject, as long
as ASA of the loaded film has been set.
When the camera is set on A (auto), the camera
operates at intermediate shutter speeds when the
needle is at an intermediate position between
graduations on the scale. When the exposure meter
needle falls into either upper or lower warning
zones in orange, the brightness of the subject is
outside the range of automatic shutter speed
control to be indicated on the scale.
Manual exposure control
Manual expos ure is used in the fo ll ow ing situations:
1. Wh en a photograph is to be taken at a certain
shutter speed, regard less of the ex pos ure meter
needle indication.
2. When the shutter speed is set by making a
stop-down measurement.
3. Wh en Bulb(B) ex pos ure is being used for time
exposures.
4. When a flashlight is used.
5. When a special photographic technique is to be
employed, such as repro-copy photography and
macro photography.
To make manual control, press the shutter speed
dial lock in the center of the shutter speed dial, and
turn the dial and align the desired shutter speed
graduation to the indicator mark . In manual exposure control, intermediate speeds between
graduations cannot be used .
Be sure to set the dial at click-stopped positions. At this time, the green shutter needle
in the viewfinder indicates the set shutter speed,
and the shutter operates at the indicated
sh utter speed when released.
In case of manual exposure control, the black
needl e in the viewfinder, indicates the shutter
speed which results in the correct exposure in
relation to the aperture setting at the time.
Thus, when the two needles meet by adjusting
either the aperture ring or the shutter speed,
a correct exposure will be obtained.
41
EXPOSURE CONTROL-Continued
Lens aperture diaphragm
Depth-of-field preview button
The Nikomat ELW can be used with any Nikkor
interchangeable lens with a Nikon F bayonet
mount. Except the reflex lens, these lenses are
eq uipped with aperture diaphragms, and graduated
with a stop by stop scale from full aperture to the
minimum stop number.
When a Nikkor lens is mounted on to the camera,
it is designed to stay open at full aperture even
when the aperture ring is turned down . The aperture diaphragm is set only when the shutter button
is snapped and the shutter curtain is opened. This
is called the automatic diaphragm mechanism. The
diaphragm regulates the amount of light reaching
the film, while stopping down the aperture by one
graduation (from F5.6 to F8), cuts the amount of
available light in half. Diaphragm openings also
have a direct bearing on the depth of field. (Refer
to page 47.)
The depth-of-field preview button lets you check
the depth of field before shooting to make any
desired adjustments. Press the button and the lens
stops down to the preselected aperture to allow
you to see how much background or foreground is
in or out of focus.
42
*
In full ·aperture measurement, if the shutter is released
while simultaneously pressing the depth-of-field
preview button, the correct exposure will not be
obtained. Also, do not operate the film advance lever
while pressing the button.
* When using the Auto Winder A W-l do not snap the
shutter while pressing this button . If you do so by accident, switch the A W-l power off and then on again to
restore normal operation.
For detailed operation, refer to page 47.
Stop-down exposure measurement
Full-aperture exposure measurement is not possible with the following lenses and accessories.
either beca use the lenses nave no auto diaphragms
or because the diaphragms will not couple with the
meter. Therefore, the stop-down method of
measuring exposure with the lens aperture diaphrag m manually stopped down to the taking
aperture must be user! . First, push the coupling pin
as far to the right as it will go. Mount a lens or
lens/accessory setup to the camera and switch on
the meter.
Auto lenses without coupling prong
With automatic exposure control: Use the depthof-fiekl preview button to stop down the lens and
turn the aperture ring until the black needle is in
the shutter-speed scale (Take note of the meter's
EV range).
With manual override: Use the same procedure as
above. Then turn the shutter-speed dial until the
green needle matches the black one. At manual
setting, pressure on the depth-of-field preview
button is no longer necessary since the correct
exposure is set mechanically.
Caution: Never advance the fi lm with the depth-of-field
preview button in the depressed position .
Micro-Nikkor SS mm f/3:S· with M2 ring
Use the same procedures as the auto lenses without
coupling prong.
Preset lenses (e .g. PC-Nikkor 28 mm)
Set the shutter-speed dial at " A" and turn the aperture
ring until the black needle swings to an appropriate shutter speed .
Bellows focusing attachments, extension rings and focusing units
Using the same procedure as that for lenses with preset
diaphragms .
Reflex-Nikkor lenses
The Reflex-Nikkor 500 mm f18, 1000 mm fIll and
2000 mm fIll lenses have no aperture diaphragm. Set
the shutter-speed dial at " A" and the black needle gives
the shutter speed_
43
COMPENSATION OF EXPOSURE
Due to special lighting conditions, or in situations
of high contrast such as occur in repro-copying, it
may not be desirable to take the picture as is.
The amount of exposure the film receives is determined
by a combination of the lens aperture and the shutter
speed. Since the two are interrelated, different combina·
tions will give the same amount of exposure. The best
combination depends on the results desired . Use fast
shutter speeds to freeze motion or slow ones to create
deliberate blur. Sma ll apertures give greater depth of
field ; large ones let the subject stand out against an
out-of-focus background.
) ust as with automatic operation, care must be taken to
be sure the ASA/f-stop/shutter speed combinations are
within the EV range of the meter .
To compensate exposures, the following three
methods are used :
1. Compensation by manual exposure control
{M anual override)
If you want deliberate underexposure or over-
44
exposure, reset the green needle to a numb er
higher or lower than the number indicated by
the black needl e in the shutter-speed scale.
2. Resetting the ASA dial temporarily
The picture is taken after resetting the ASA dial
by the amount of compensation, with other
factors left unchanged.
For instance, when a film of ASA 100 is used: And a
compe nsation by one stop increase is desired, adjust
the index to 50.
And a compensation by one and 1/3 stops decrease is
desired, adjust the index to the dot following 200.
Remember to return the ASA dial to its origina l
position upon comp letion of picture-taking
under the adjusted setting.
3. Using the exposure memory lock
When there are severe brightness differences between the subject and the background, you will
often obta in better results using the ELW's
center-weighted metering system and
memory lock, which
is integrated into the
se lf-t im er.
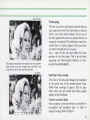
How to Use Memory Lock
First place the subject in the central part of the
viewfinder, or better still, if the subject is accessible, move in on it to make a close-up reading of
that particular portion you wish to emphasize.
Then press the self-timer/memory lock to the left;
the light based o n the main subject is now frozen.
With the memory lock lever still pressed to the
left, move back to get your desired composition
and shoot. The shutter has been released at the
speed on the memorized reading. The memory
"hold" disconnects upon releasing the finger from
the memory lock .
For landscapes including an expanSe of sky, tilt
the camera downward during measurement and
lock the reading to prevent underexposure caused
by the brightness of the sky. For backlit subjects,
move up close and include dark areas of the
subject and freeze the reading with the memory
lock. Even when the lever has locked the memory
system, the black needle insid e th e viewfinder
conti nues to deflect accordi ng to the brightness of
the scene, providing a convenient reference for
contrast ratios.
-I
Compose
I
I
I
I
I
--------~
Place the subject in the center of the viewfinder and lock 5
the reading and re·compose, and shoot.
4
COMPENSATION OF EXPOSURE - Continued
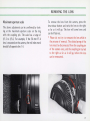
Repro-copying, slide-copy ing and
photom icrography
Some exposure compensation may be necessary
depending on the type of film and t he subject, or
the original slide. The numbers in the tab le be low
show the exposure compensatio ns in sh utter-speed
~
Repro·copying & slide-copying
Type
of film
B&Wor
color photo
Panchromatic
film
for general use
No
compensation
necessary'
Letters or figures
on
light background
Exa mpl e 1. If the automatic shutter-speed setting is
1/125 sec. and the tab le indicates a one-step increase,
reset the shutter-speed dial at 1/60 sec.
Example 2. If the automatic shutter-speed sett ing is
1/125 sec. and the table indicates a one-step increase,
move the camera until the black needle of the shutterspeed sca le swings to 1/60 sec. Depress the memory-lock
46
steps. Readjust the shutter speed according to the
numbers indicated or reset the fi lm speed . T hree
marks on the film-speed dial are equiva lent to one
step.
+1
1
2
ste ps
Letters or figures
on
dark background
1
- Tstep
Photomicrography
+ I step
lever to the left, and the exposure reading will be frozen
while the camera is moved back for shooting.
Example 3. If a film of ASA 100 rating is. loaded in the
camera and the table indicates a one-step increase, reset
the film-speed dial so that the red dot appears opposite
50.
DEPTH OF FIELD
Depth of field refers to a zone within which blur (or lack of
definition) will be negligible and everything can be accepted as
being in sharp focus. Depth of field extends a greater distance
behind the subject in focus than in front. It depends on two
factors- reproduction ratio and aperture. The smaller the
aperture and the greater the reproduction ratio, the greater
the depth of field. By carefully considering the desired perspective and reproduction ratio, as well as available f-stops, full
control of the depth of field is achievable.
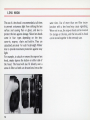
Depth-of-field scale
The depth of field can be read from the color-coded scale
engraved on the lens. The pairs of colored lines correspond to
f/numbers of the same color. To find the depth of field at a
particular aperture, first focus on the subject. Then check
the numbers on the distance scale opposite the colored lines
which correspond to the color of aperture 10 find the depth
of field at that aperture.
Lens at f/2 small depth of field
For example, f/16 on the aperture ring of the 50 mm f/l.4 lens is blue.
With the lens prefocused at 17 feet (5 m) the numbers on the distance
scale opposite the blue lines show that the depth of field extends from
9 feet to infinity (00).
Remember that smaller apertures, although rendering a greater
depth of field," require slower shutter speeds. Consider both
factors carefully before shooting, and always focus accurately.
Lens at f/11 larger depth of field
47
SELF-TIMER
The built-in self-timer, usable for both automatic
and manual-override shutter-speed settings, allows
delayed exposures of approximately 10 sec. It
activates when the lever is turned downward
(counterclockwise) as far as it will go. When the
shutter-release button is pressed, the timer starts.
I ndependent of the shutter mechanism, the timer
can be set either before or after the shutter is
wound. Do not use at "B" setting.
* Do
not operate the self-timer when making a time
exposure.
48
The exposure meter measures the brightness of the
subject immediately before the shutter is released .
When the shutter is released with the viewfinder
eyepiece uncovered, light may enter through it,
and the correct exposure may not be obtained.
Therefore, when the self-timer is being used with
automatic exposure control, it is recommended
that the eyepiece be covered. When the shutter is
released while standing in front of the camera, the
exposure meter measures only the portion of one's
body in front of the camera .
Be careful to avoid such erroneous exposures.
It is not necessary to give consideration to the
above matters when taking pictures at manual
control. First, confirm the proper shutter speed
with the camera set at autom atic, th en set th e
shutter speed manually, then trip the shutter.
MIRROR LOCK
The reflex mirror must be locked in the up
position when the battery is replaced, or during
microsco pi c photography, where even the minutest shake mu st be preve nted. Th e mi rro r must
also be locked when using the Fisheye-Nikkor
6 mm f/5.6 or the OP Fisheye-Nikkor 10 mm f/5.6
lenses since their rear elements protrud e into the
ca mera body and interfe re with mirror move ment.
To lock the mirror, turn the mill ed mirror-lock
lever upward. Th e mirror will remain locked in the
up pos itio n until the lever is returned to its
or igi nal pos iti on.
Caution: When releasing the shutter with the mirror in the
locked up position, use the se lf-timer instead of the
shutter release button. This will give adequate time for
the lens diaphragm to respond. Failure to observe this
precaution may resu lt in incorrect exposure, although
there is no danger of camera damage.
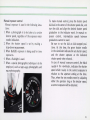
INFRARED PHOTOGRAPHY
In infrared photograph y, the pl ane of foc us I S
slightly fart her than the o ne produ ced by visible
Iight an d seen by the naked eye t hrough the
view-finder. To co mpensate for the shift in focus,
Nik kor lenses have a red dot or lin e on the lens
bar rel near the depth-of-field index sca le.
After focusing the image sharpl.y, turn the focusing
ring to the left until the red dot lines up with the
prefoc used distance.
I n the exa mpl e below, a 50 mm f/1.4 lens has been
focused at infinity (00). The foc using ring is turned
to the left so that the mark (00) appears in lin e
with the red dot. Wh en lenses having a focal length
of 50 mm or less arc sto pped dow n to f/8 or
smaller, no adjustment is necessary . For the lenses
without red dot (e.g. ED lenses and Reflex Nikkor
lenses), no adjustment is necessary.
.•
I I
--
10 6
CO
•i
I II
-
- --
11 8 5.6 4 2.8
--
49
FLASH SYNCHRONIZATION
The Nikomat ELW is designed to synchronize
with various types of flashbulbs at almost all shutter speeds and with the speedlights at speeds up to
1/125 sec.
Either a bulb or speedlight flash unit slides over
the accessory shoe on top of the pentaprism
housing. For units with a hot shoe, the accesso ry
shoe has a hot-shoe contact which eliminates the
need for a synch cord. For flash units without a
hot shoe, use a synch cord and connect the synch
terminal on the side of the camera with the synch
socket on the flash unit. The synch terminal on
the camera is threaded for positive connection. To
prevent an accidental electric shock, the accessory
50
shoe turns on only when the flash unit is in place.
Nikon speedlight units 58-3 and 58-4 can be
directly attached to the Niko mat ELW. For
mounting the Nikon speedlight unit 58-2 or flash
unit 8C-7, use of the flash unit coupler A5-2 is
necessary. To use the Nikon 5peedlight 58-5
(Grip type), connect the synch cord 5C-5 attached
with the 58-5 to the synch terminal of the camera.
For details, refer to the instruction manual provided with each unit.
Remember that the camera's auto exposure control works only with constant light sources such as
sunlight or photo floods and not with an instantaneous source such as a flashbulb or an electronic
flash.
Caution : Flash units without a hot shoe may fire
accidentally when being slipped into place or when a
flashbulb is inserted. Although not recommended, accidental firing may be prevented by covering the hot-shoe
contact on the camera body with electrical tape.
Setting the synch selector
To set the camera for flashbulb, lift up the milled
synch selector ring around the shutter-speed dial
and turn it until the bulb symbol appears in the
selector window. For speedlight, follow the same
procedure until the lightning-bolt symbol appears.
The table below shows which shutter speeds are
acceptable with different types of flashbulbs and
speedlights.
Shutter speed (sec.)
Flashbulb
Symbol
1/1000
M
FP
MF
a
(Speed light)
~
x
1/500
1/250
1/125
1/60
1/30
1/15
1/8
1/4
1/2
1
2
4
B
'--__-'I = Synchronized '--__--'I = Cannot be used
51
ACCESSORIES
53
NIKON AUTO WINDER AW-l
The Auto Winder AW-l is installed on the Nikomat
ELW and makes possible the automatic film
winding by one frame, of which speed is approx.
0.5 sec./frame, by pressing the shutter button
alone.
This accessory, which is small in size and weight, is
convenient for repeated shooting, since it allows
you to take pictures without moving your eye
from the viewfinder.
54
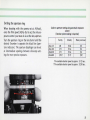
FIL TERS
Nikkor lenses and Nikon filters are compatible
with each other, Therefore, for best results, use
Nikon filters, which are made of optical glass,
ground and polished so that both surfaces are
optically flat and parallel. They are available in
both screw-in and series mounts, depending on the
lens.
No exposure compensation for filters is necessary
with the Nikomat ELW, except the R-60, which
is used for infrared photography. The built-in exposure meter reads only the light passing through
the lens and therefore compensates for the loss of
light.
If you want to use a filter to protect the front of
your lens without any overt effect on your pictures, use the L-3 7 UV haze filter.
Fi lm
Type
Code
L1B
L1 BC
L37
L37C
L39
Y44
light ye llow
for B/W films
medium yellow Y48
Y52
dark ye llow
056
orange
R60
red
XO
light gree n
Xl
dark green
for both B/ W and polarized light Polar
neutral density NO 2X
color films
NO 4X
NO 8X
A2
light amber
for color films
dark amber
A12
B2
light blu e
medium blue
B8
B12
dark blue
for both B/W and sky light
color films
ultra-violet
*
Screw·in mount
attachment size
(mmq,)
39 52 72 95 122
Series
mount
IX
(
0
0
0
0
0
0
0
0
0
0
0
0
0
0
0
0
0
0
C
0
0
0
0
0
0
0
0
0
0
0
0
0
0
0
0
0
0
0
0
0
0
0
0
0
0
0
0
0
0
0
(
Fil ters markedH Q "are available ones.
55
LENS HOOD
The use of a lens hood is recommended at all times
to prevent extraneous light from striking the lens
surface and causing flare or ghost, and also to
protect the lens against damage . Nikon lens hoods
come in four types depending on the lens:
screw-in, snap-on, slip-in and built-in. They are
calculated precisely fo r each focal-length Nikkor
lens to provide maximum protection against stray
light.
For example, to attach or remove the snap-on lens
hood, simply depress the button on either side of
the hood. The hood will also fit directly over a
screw-in filter so both can be used on a lens at the
56
same time. Use of more than one filter inconjunction with a lens hood may cause vignetting.
When not in use, the snap-o n hood can be reversed
for sto rage on the lens, and the lens and its hood
can be stored together in the eveready case.
OTHER ACCESSORIES
Eyepiece correction lenses
The nine eyepiece correction lenses are designed to
perm it nearsighted or farsighted users to view and
focus without t heir glasses. Available in - 5, -4,
- 3, - 2, 0 +0.5, +1, +2 and +3 diopters, each
representing the combined dioptry of the lens an d
the finder .
These lenses are screwed into the place from where
the eyepiece window has been removed.
Finder eyecup
For the following situations, a finder eyecup is
recommended:
o When the camera IS In the sunlight and the
subject is in the shade.
o When the stop-down method is used at small
apertures.
o When a shaft of sun light fal ls between the eye
and the eyepiece.
This is used to prevent light from entering through
the eyepiece, making it easy to view the image,
and reduces errors in making I ight measurements.
The viewfinder eyepiece is removed, and th is
eyecup is fitted on to the eyepiece frame. The
combined unit is then screwed into the origina l
position for use.
Right angle viewing attachment
With the use of this unit, the field of view of the
finder can be seen from above, and copying,
close-up picture taking, photomicrography, etc,
can be done in more comfortab le positions.
Remove t he viewfinder eyepiece, and install this
attachment where the eyepiece was.
Flash unit coupler A5-2
Flash unit 8C-7 can be installed without a cord.
5peedlight 5B-3 5B-4
These use the light sensor system and can be
installed without a synch cord.
Cable release AR-3
Camera cases
* for Nikomat ELWonly
CH-3 Hard Case
CH-8 Hard Ca se (stored with Zoom-Nikkor
43 ~ 86 mm F3.5 mounted)
* for Nikomat ELW attached with Nikon Auto
Winder AW-1
CH-9 Hard Case
CH-10 (stored with Zoom-Nikkor 43 ~ 86 mm
F3.5 mounted)
In addition to these accessories, most of the accessory group for the Nikon F2 are available for
your Nikomat ELW.
57
Good camera care is common-sense care. Treat
your Nikomat ELW as you would any valuable
precision instrument. Although ruggedly constructed to stand the rigors of normal use, it may still
be damaged by shock, heat, water or misuse . Here
are some basic tips for keeping your camera in top
condition:
Extreme temperature changes
The Nikomat ELW functions fau!tlessly in a
temperature range of 55° to - 15°C. Even within
this range however, avoid suddenly exposing the
camera to temperature extremes- i.e. , taking it
from the cold outdoors to the warm indoors or
vice versa. The sudden, extreme temperature
change is apt to form deposits of atmospheric
moisture such as sweat beads or frost on the surfaces of the camera body (much like pipes sweating on a hot summer day or winter frost accumulating on the inside of a window during the dead
of winter) which will develop into rust and damage
the camera's tiny components and electrical contacts. A good precautionary measure is to pack
the camera in a moisture-proof bag or a polyethylene bag, along with a silica gel dessicatorand unpack only when the temperature inside
the bag has risen or fallen to the ambient level.
58
Storage
Keep the camera in an eveready or compartment
case when not in use to protect it from dust.
Avoid storing the camera in excessively hot, co ld
or damp places. Always attach a body cap when
the camera body is stored separately. Do not leave
film in the camera for a long period of time . Never
leave the shutter or self-timer cocked if the camera
is to be stored overnight or longer.
Camera body
Clean the inside of the camera periodically using
a soft brush . Do not exert pressure on the shutter
curtain as this may damage the curtain . Keep the
mirror free from fingerprints and dust; it should be
cleaned only by a qualified serviceman. Special
care must also be taken when changing batteries to
avoid damaging the battery chamber and other
parts of the mirror box.
Keep the camera away from water
Avoid excessive moisture. When using the camera
near water , guard against splashes, especially saltwater spray.
Never oil any part of the camera
Lubrication should be left to an authorized serviceman.
(Nikon)
NIPPON KOGAKU K.K.
No reproduction in any form of this booklet, in
whole or in part (except for brief quotation in
critical articles or reviewsl, may be made without
written authorization from the publishers.
Printed in Japan (77.3.Al L·4