1
Nikon
~~~~
~;;
ut~o~
(J :cus Speedli9:r;b.~t~~~~~
Instruction Manual
CONTENTS------------------------------------~
FOREWORD ... ....... ... .. ... ..... ....... ................... ..... ....... .... .......... 4
USABLE TTL AUTO FLASH ACCORDING TO
NOTES ............ ..... .... ..... .... ....... ............... ... .... .... ....... ... ........... 5
LENS/EXPOSURE MODE/METERING SYSTEM
NOMENCLATURE ................. ......................... ....... .. ........ .... 6 -8
COMBINATION ... ............................................................ 29
USABLE FLASH MODES WITH YOUR CAMERA ........ ... . 9-11
MATRIX BALANCED FILL-FLASH OPERATION .............. 30-45
TTL AUTO iII] ............................... ........... .... ................... 9
In Programmed Auto Exposure Mode ........................ 32-34
USABLE TTL FLASH MODES ....... .... _.... ... ......... ...... .. ..... _... 10
In Shutter-Priority Auto Exposure Mode ..................... 35-38
NON-TTL AUTO r.i.1 ...................................... ....... .. ........... . 11
In Aperture -Priority Exposure Mode .. ......................... 39 -42
MANUAL ~ ... ... .. .... ....... ... ................ ................... ............. 11
In Manual Exposure Mode .............................. ... ........ 43 -45
FLASH EXPOSURE COMPENSATION ........................... 46-47
REPEATING FLASH Iilll .... ....... ....................... _............ 11
REAR-CURTAIN SYNC FLASHFLASH SYNC MODE SELECTOR ................ _.................... 11
READY·L1GHT INDICATIONS .......................................... 12-13
For Natural Light Flows .. ................ ...... .......................... 48
READY-LIGHT WARNING FUNCTIONS ...................... . 12-13
SHUTTER SPEED/APERTURE FOR
SETTING POWER SWITCH ................................... .............. 14
EACH EXPOSURE MODE .... .. .. ........ .......... .... ................. 49
EXPOSURE COMPENSATION ............ .. ........................ ... 15-16
TTL AUTO FLASH WITH NIKON F·401s/N4004s ......... 50-56
FLASH SIDE COMPENSATION ........................................... 15
SHOOTING BRIGHT AND DARK SUBJECTS ................. 50-55
CAMERA SIDE COMPENSATION ........................................ 16
Programmed TTL Auto Flash-In Program or
LIGHTING MANIPULATION .. _................................... .. ........ 16
Shutter-Priority Auto Exposure Mode .. ........................ 51-53
SETTING BEFORE SHOOTING ..................................... 17-24 .
TTL Auto Flash-In Aperture Priority Auto or
INSTALLING BATTERIES ........................... ........................ 17
Manual Exposure Mode ............................................. 54-55
ATTACHING FLASH UNIT TO
AUTOMATIC BALANCED FILL-FLASH .. _....................... .. .... 56
CAMERA ACCESSORY SHOE ................................... 18-19
TTL AUTO FLASH WITH OTHER CAMERAS
ADJUSTING FLASH HEAD .............................................. 20
(with Nikon F-S01/N2020, F-301/N2000, FA, FE2
SETTING ISO FILM SPEED ........................................... 20-21
or FG) ............. .............................................................. 57-63
SETTING ANGLE OF COVERAGE .. .. " .......................... 22-24
PROGRAMMED TTL AUTO FLASH (with Nikon F-501/N2020
TTL AUTO FLASH WITH
or F-301/N2000 in Programmed or Shutter-Priority
Auto Exposure Mode) ............................ ........ .. .......... 57-59
NIKON F4 OR F·811/N8008 ...................................... 25-49
TTL AUTO FLASH .......................................... ........ ...... . 60 -61
FI LL-FLASH PHOTOGRAPHy ...... ........ ........ ... ........ ........ .. .. 26
EXPOSURE COMPENSATION WITH CAMERA'S
MATRIX BALANCED FILL-FLASH ....................................... 27
CENTER-WEIGHTED FILL-FLASH ...................................... 28
EXPOSURE DIAL ... .. .... ......... .. ..... .... .. ......................... .. .. 62
STANDARD TTL FLASH ............ .. ................. ............ .. ... .... . 28
FILL-FLASH IN TTL FLASH MODE ............. ....................... 63
2
AUTOFOCUS FLASH PHOTOGRAPHY (with Nikon F4,
F·801/N8008, F·501/N2020 or F·401s/N4004s) " ... ". 64·65
NON·TTL AUTO FLASHFor Shooting with Varied Lens Apertures ................. 66-68
EXPOSURE COMPENSATION IN NON-TTL
AUTO HASH MODE .................. .. .... ..... ...... ..... ... ..... ...... 68
USABLE APERTURES/SHOOTING DISTANCE RANGE
IN TTL AND NON·TTL AUTO FLASH MODES ............ .. . 69
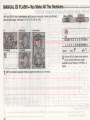
MANUAL FLASH-You Make All The Decisions .... ...... 70-76
SYNCHRONIZATION IN CONTINUOUS SHOOTING ........... 73
MANUAL FILL-FLASH ................................................... 74-76
REPEATING FLASH-For Multiple Exposure .... .. ... .. .... 77-80
GUIDE NUMBER ..... ................................................. ............ . 81
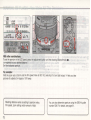
DIFFUSING LIGHT .................. .. ...................................... 82-85
BOUNCE FLASH PHOTOGRAPHY PROCEDURE .......... 83-85
USING A DIFFUSER .................. .. ................ .. .... .. .............. 85
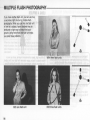
MULTIPLE FLASH PHOTOGRAPHY .............................. 86-91
TTL MULTIPLE FLASH PHOTOGRAPHY .. .......................... 87
SYSTEM CHART FOR TTL MULTIPLE FLASH ............... 88-89
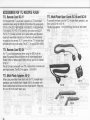
ACCESSORIES FOR TTL MULTIPLE FLASH .. ..................... 90
TTL Remote Cord SC-17 .................. .... ........ .. ................. 90
TTL Remote Cord SC-24 .............. .. .......... .. .......... ,.......... 90
TTL Multi-Flash Adapter AS-10 ...... .. .. .. .. .. .. .. ...... .... .. .... .. .. 90
TTL Multi-Flash Sync Cords SC-18 and SC-19 .. ..... .. ........ 90
MANUAL MULTIPLE FLASH PHOTOGRAPHY .. .................. 91
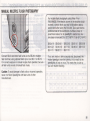
CLOSE·UP FLASH PHOTOGRAPHY IN
TTL AUTO FLASH MODE ............ ................ .. .. .. .............. 92
TIPS ON SPEEDLIGHT CARE .... ......................... ........... 93-94
ABOUT BATTERIES .. .. .................... .. .......... .. ............ .. ......... 95
GLOSSARY .. .... ........... ............ ........ .. ......... . ~.................... 96-97
SPECiFiCATIONS ................. .............. ... .. .. ..... .... ... .. .... .... 98-99
3
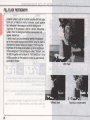
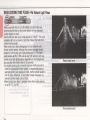
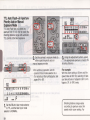
FOREWORDI~~~~~-------------------------Thank you for purchasing the Nikon Autofocus 8peedlight
88-24. Used together with Nikon's newest 8LR models (F4,
F-801/N8008, F-401s/N4004s), it offers you the most advanced
and complete system for automatic flash photography available.
Used with any earlier Nikon 8LR model, it lets you take advantage of TTL auto control and creative features such as Strobo effect multiple flash exposures, and more.
To get the maximum performance from your new 88-24, be
sure to take time to read the instruction manual completely. It
includes a great deal of important information, including
explanations on how to use the newest, most advanced
features . Even the most experienced photographers should
thoroughly read this manual. Although the 88-24 controls may
seem familiar, much of its operation is different from ordinary
flash units.
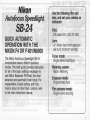
We know you 're anxious to get started, so if you are in a real
hurry, read the separate "QUICK AUTOMATIC OPERATION
WITH THE NIKON F4 OR F-B01INBOOB." This explains what you
need to know to use the 88-24 and the newest Nikon 8LRs in
the most automaitc mode. You 'll be surprised how easy that
portion is, and you'll get balanced fill-flash pictures, as easy as
point-and-shoot.
4
Then , to learn about all the 88-24's other great features , take
time to read the complete manual. Your reward will be better
flash pictures, with more variety than you ever imagined
pOSSible, and all done easily.
One additional point. Throughout the manual you will see
technical terms or photo expressions with which you may not
be familiar. To help you learn these terms, we 've included a
Glossary. 80 if you come upon an unfamiliar term, check the
glossary on pages 96-97.
The Nikon N800a and N4004s are sold exclusively in the
U.S.A. The Nikon N2020 and N2000 are sold exclusively
in the U.S.A. and Canada.
•
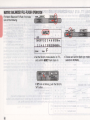
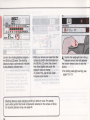
NOTES-------------------------------=~~~~~·
Do not fire flash near the eyes; doing so may injure the
retina. Do not touch the flash head when firing the S8-24;
it may be hot due to normal operation. Also, be sure to
keep plastics and other delicate materials away from the
flash head when hot.
Nikon cannot be responsible for malfunctions or other
problems resulting from the use of other manufacturers'
flash units, cameras or accessories, including external
power sources.
In certain cases , due to normal characteristics of the builtin microcomputer, the speedlight may not operate or an
abnormal display may appear, even with fresh, properly
installed batteries. If such a case occurs, turn off the flash
and remove the batteries, then reinstall batteries and turn
the power on. This should properly reset the computer.
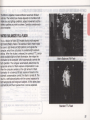
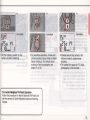
The appearance of red-eye is also based on the angle at
which the light flashes on the subject and is reflected back
to the camera's lens. If the angle is 2 to 2.5 degrees or
narrower, the red-eye will occur. As you move closer to a
subject, the angle becomes wider, and the likelihood of
red-eye effect decreases. As you move farther from a
subject, the angle narrows and the incidence of red-eye
increases. When you get very far from a subject, the size
of the eye in the picture may become so small that red-eye
is not apparent, but when you switch to a lens with a
longer focal length, the subject becomes bigger and redeye may become apparent.
With an angle exceeding 2.5 degrees, red-eye is not likely
to occur. For example, with a 35-55mm range lens and
when standing about 1.4m (4.5 ft) or closer to the subject,
the angle between the flash and lens exceeds 2.5 degrees
and red-eye effect will most likely not be visible.
" Red eye " is a common problem in flash photography.
Normally, flash pictures are taken when the surrounding
light is dim, and under such conditions the subject's eye
pupils will be dilated (open very wide). Red-eye effect
occurs when light from the camera's flash reflects off the
interior of the eye and back into the camera's lens. The
wide-open pupil allows much light to enter, and as a result,
the center portions of a subject's eyes can appear bright
red (white in a black and white picture). It is interesting to
note that the intenSity of the red-eye effect varies among
individuals, and with two people in the same photograph,
one may have red-eye and the other may not.
5
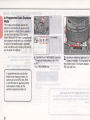
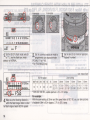
NOMENCLATURE----------------------------~~~
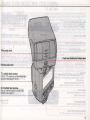
Flash head
Locks at the front position ; tilts up to 90° and down to
- 7° ; rotates 90° to right and 180° to left. For bounce
flash photography, see pages 83 to 85.
Autolocus assist illuminator LED
Enables autofocus operation in dim light and
total darkness.
•
•
Light sensor lor non·TTL auto flash operation
In non·TTL auto flash operation , be careful not to
cover or otherwise obstruct the sensor.
External power source terminal
Accepts power cord of Nikon DC Unit
SD-7.
Battery chamber lid
Slide and lift to
Flash head tilting lock release
lever
Meter/Feet select lever
(Inside battery chamber)
Battery chamber
Accepts four 1.5 V AA·type penlight batteries , either
1.5V alkaline·manganese or 1.2V NiCd batteries
(voltage varies depending on manufacturer ; maximum
permitted is 1.25V).
6
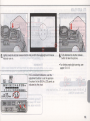
Mounting loot
Hot-shoe contacts
Tilting angle scale
Flash head rotating lock release lever
Rotating angle scale
TTL multiple flash terminal
Used for TIL-exposure-control multiple flash
operation (see pages 87 to 90).
Sync/multiple flash terminal
Used for manual-exposure multiple flash
operation (see page 91).
7
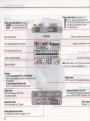
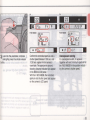
Flash mode selector (see pages 9 to 11)
[j]] for TTL auto flash exposure control
for non-TTL auto flash exposure control
Ii'iI for manual flash exposure control
IillI for repeating flash
a
Flash sync mode selector (see page 11)
NORMAL for front-curtain sync flash
REAR
for rear-curtain sync flash
Flash mode indicator
Film speed/Repeating flash indicator
LCD panel
Exposure compensation indicator
Exposure compensation scalE
Flash shooting distance scale
Angle of coverage indicator
Aperture indicator
M button
In TTL auto mode with F4 or F-S01/NSOOS:
Push to cancel/activate automatic flash output level
compensation.
In manual/repeating-flash mode
Push to manually select flash output power.
Light amount indicator
Note: Some marks on the LCD panel may blink ;
in this manual , blinking is indicated by _; : ~
Select button
Controls use (on/off) of adjustment buttons.
Zoom button
Push to manually set zoom head
focal length position.
Adjustment buttons (& and T )
For adjusting flash output level, aperture
value , number of flashes, frequency, etc .
Illuminator button
Push to illuminate the LCD panel.
Power switch
See page 14.
Ready-light/open-flash button
For ready-light indication , see pages 12 to 13.
8
USABLE FLASH MODES WITH YOUR CAMERA-...,....,.-----------:
TTL AUTO
1 1.5 2 3 4 6 9 1318 m
ZOOM
mm
F
The S8-24's flash mode selector lets you select from four flash
modes-TTL Auto i1ll , Non-TTL Auto f!1 , Manual Ii!iI or
Repeating-Flash IillJ . When the power switch is on, the flash
mode indicator confirms your selection in the LCD panel.
[I]]
In this mode, the camera's TTL flash sensor measures all the
light which passes through the camera's lens and reflects off
the film surface. This includes both ambient light and light from
the S8-24 flash . The flash shuts off at the moment the sensor
detects the correct exposure. 8ecause the sensor detects light
passing through the lens, it automatically adjusts for most flash
shooting situations, including bounce flash , diffusion filters and
colored or neutral-density filters used on the lens or on the flash
head.
The S8-24's automatic flash operation depends on the Nikon
SLR model used. The chart on the following page indicates the
automatic modes available for each SLR model shown.
Subsequent sections of this instruction manual explain each of
the different automatic modes.
Available flash features also vary depending upon the type of
Nikon lens used and camera on which it is used. The newest AF
Nikkor lenses include built-in computers , and used with the
newest Nikon SLR models (F4, F-801/N8008, F-401s/N4004s)which incorporate a computer and mUlti-segment light meterprovide the most advanced flash operation , known as Matrix
8alanced Fill-Flash.
9
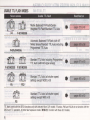
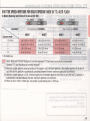
USABLE TTL FLASH MODES
Nlkon camera
Usable TTL flash
~tD
F4
F-501/N2020
. . (......--,p_a.::..ge_s_2_5_to_4_9___
F-801/N8008
F-401s/N4004s
m
Matrix Balanced Fill-Flash/CenterWeighted Fill-Flash/Standard TTL Auto
Described on
ffB1J
Automatic Balanced Fill-Flash (with AF
Nikkor lenses/Standard TTL Auto including
Programmed TTL Auto
Standard TTL Auto including Programmed
TTL Auto (with AI-S-type lenses)
..
Standard TTL Auto (all shutter speed
settings except M250 or B)
. . (.....__
pa_g_e_s_60_t_o_6_3___
Standard TTL Auto (all shutter speed
settings except M90 or B)
..
('-----.:p~a..::.ge_s_5_7_tO_6_3_...J
F-301/N2000
~ ~
FE2
FA
(,-_p_a...:..ge_s_6_0_tO_6_3_~
FG
TTL flash control with the S8-24 functions only with selected Nikon SLR models. F3 series, FM2 and FG-20 do not function with the
S8-24 and TTL operation. All other flash exposure modes ( r.:.1 Ii'llIillJ ) function with these SLR models.
10
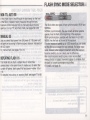
FLASH SYNC MODE SEl.!ECTORNON-TTL AUTO f!1
In this mode, light is read through the light sensor on the front
of the S8-24, instead of being measured through the lens.
Exposure control requires that you manually adjust the lens
aperture. For non-TTL auto flash mode, see pages 66 to 68.
MANUALli!il
Lets you select flash power from full power of 1/16 power and
set aperture according to flash-to-subject distance. Indicated on
the LCD panel.
For manual flash , see pages 70 to 76.
REPEATING FLASH lillI
This mode lets you flash a subject two or more times
consecutively in the same frame. It enables you to select the
number of flashes, flash speed (Hz) and power-either 1/8 or
1/16.
For detailed instructions on repeating flash , see pages 77 to 80.
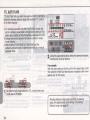
The S8-24 offers two types of flash synchronization, REAR and
NORMAL.
NORMAL synchronization, the way virtually all other systems
operate, fires the flash at the beginning of the exposure.
REAR synchronization, available with the Nikon F4 or F-8011
N8008, fires the flash at the end of the exposure.
For short exposure (speeds up to 1/250 second) you can barely
tell the difference between the two methods. For longer exposures, however, when subject movement during the exposure
becomes evident, you can clearly see the difference.
Rear synchronization tends to give a more natural effect,
making the blur of subject movement appear to emanate from
the back for a more comfortable visual effect.
For details, see page 48.
11
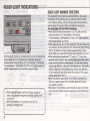
READY·lIGHT
INDICATI0NS--==~=------------~-----,
READY·L1GHT WARNING FUNCTIONS
The ready-light in the camera viewfinder blinks in the cases
listed below. When blinking occurs, check the 58-24's flash
mode selector setting, camera's shutter speed/mode selector
setting and/or film speed setling and adjust as necessary.
The ready-light will blink before shooting:
With the 58-24 turned on, its ready-light turns on to indicate the
flash is ready to fire . To activate the viewfinder ready-light
function when using the Nikon F4, F-801/N8008, F-501/N2020,
F-401s/N4004s, F-301/N2000, FA, FE2, or FG, lightly press the
shutter release button to turn on the camera's meter.
- If the ready-light takes more than 30 sec. to light up
when using alkaline-manganese batteries, replace with
a fresh set.
- With NiCd batteries, if recycling time is over 10
seconds, recharge them.
12
- When 58 -24's flash mode selector is at TTL with cameras
other than Nikon F4, F-801/N8008, F-501lN2020,
F-401s/N4004s, F-301lN2000, FA, FE2, or FG. Reset 58-24's
flash mode selector to A or M.
- When using the FA, FE2, or FG to perform TTL auto flash with
the camera's shutter speed dial at a mechanical setting (M250,
M90 or 8). Reset to another shutter speed setting. To use
M250, M90 or 8 , reset 58-24 's flash mode selector to A or M.
- When performing programmed TTL auto or TTL auto flash
operation with a camera film speed setting beyond the usable
range. Use film within the appropriate TTL auto flash photography range (ISO 25-1000 with F-501/N2020 or F-301/N2000 ;
ISO 25-400 with F-401s/N4004s, FA, FE2 or FG). With the
FA, the ready-light also blinks when the camera's film speed
setting approaches ISO 12.
- When the shutter speed of the FE or FM2 is not within the
flash sync speed range. Set the shutter speed to the flash
sync speed or slower.
- With Nikon F-401s/N4004s, when the S8-24 and built-in flash
are turned off, and the camera's computer recommends flash
use.
After shooting:
With the S8-24 in TTL auto or non-TTL auto flash mode, if both
viewfinder ready-light and S8-24 ready-light blink for a few
seconds after shooting, the flash has operated at maximum
power. Check the S8-24 's LCD to determine whether you were
standing at a distance beyond the indicated maximum range.
Depending on conditions, choose a wider aperture for maximum
flash range (switch exposure mode to A or M if it is set at P or
S), or move closer to the subject.
F4
F·801lN8008
13
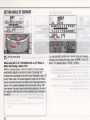
SETTING POWER SWITCH--'--"---------------J
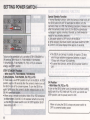
Special Standby Function
In normal 8tandby function , when the camera 's meter turns off,
the 8B-24 also turns off. To reactivate the 8B-24, turn the
camera 's meter on. With the following procedure, however, even
after the camera's meter turns off, the 8B-24 automatically
recharges in approx. one-hour intervals, so it will always be
ready for long shooting sessions.
1_ 8et power switch to OFF to turn off the 8B-24.
2. While pressing illuminator button, set power switch to 8TBY.
3. Confirm LCD panel display blinks approx. 8 seconds.
To turn on the speedlight unit, use either 8TBY (8TANDBY) or
ON settings. With Nikon F4, F-801/N8008, F-501/N2020,
F-401s/N4004s, F-301/N2000, FA, FE2, or FG, to conserve
energy, use 8TBY position.
STBY (STANDBY) Position
···With Nikon F4, F·801/N8008, F·501/N2020,
F·401s/N4004s, F·301/N2000, FA, FE2, or FG
In most cases, use 8TBY position to turn on the 8B-24. In 8TBY
position, approx. 80 seconds after the camera's meter turns off,
the 8B-24 turns off to conserve power. To turn the 8B-24 on
again, lightly press the camera's shutter release button or the
8B-24 's open-flash button.
• When using a remote cord with a Nikon FA or FE2 connected
to Nikon Motor Drive MD-12, the camera remains on as long
as the MD-12's power switch is on. (At STBY position SB-24
does not turn off.)
14
• The SB-24 can be kept in standby for approx. 20 days
with AA-type alkaline-manganese batteries or approx.
10 days with AMype NiCd batteries.
• To cancel this function, set the SB-24 's power switch to
OFF.
ON Position
···With Nikon FA, FE2 or FG:
To turn on the 8B-24 when using a mechanical shutter setting
(M250 with FA or FE2 , MOO with FG, or B), you cannot use
8TBY position : set the power switch to ON .
When not using the 8B-24, always set power switch to
OFF to conserve battery power.
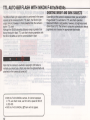
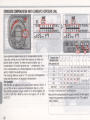
EXPOSURE COMPENSATION-'---------------==---=------=-=
FLASH SIDE COMPENSATION
"Correct" exposure is a value based on combinations of
film sensitivity, aperture and shutter settings necessary to
produce a "technically correct" exposure result. In practical photography, we often want to vary the exposure
results to create different versions of the same picture.
This is accomplished by using exposure compensation.
Exposure compensation can be accomplished in many
ways. The accompanying chart indicates controls that
enable compensation with the Nikon S8-24 and the latest
Nikon SLR models. In addition to changing the exposure,
we can also modify a scene's lighting by manipulating
the light source, thus creating different lighting effects.
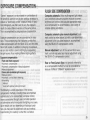
Exposure compensation
Flash side (fiash exposure)
• Automatic compensation
• Automatic compensation + Manual adjustment
• Manual adjustment
Computer, automatic: Nikon mUlti-segment light meters
using advanced computer programs evaluate a scene's
brightness and contrast and calculate appropriate exposure compensation to accommodate a wide variety of
complex lighting conditions.
Computer, automatic plus manual adjustment: automatic control as noted above, but with a user-determined
adjustment to the calculated exposure; accomplished
using the S8-24's EV compensation control.
Manual adjustment: turn off the camera/S8-24 automatic controls and select any manual adjustment using
the S8-24's EV compensation control.
Rear- or Front-Curtain Sync: not generally referred to
as a compensation method, but can be considered so
because it offers a "different" exposure result.
Camera side (available-light exposure)
• Manual control
• Automatic control (Matrix Metering)
• Bracketing
~Manual
LAuto (with optional multi-control back)
The following is a brief explanation of the various
compensation methods, including those accomplished
automatically by the camera/flash computer control,
those accomplished through user-controlled operation
and alternatives which manipulate the lighting on a scene.
As the results can vary depending on individual conditions , you may want to experiment with each method.
Experimenting for creativity is what this is all about.
15
CAMERA SIDE COMPENSATION
Manual control: adjustment made via the camera's EV
compensation control; affects the entire exposure, both
available light and light from the flash .
LIGHTING MANIPULATION
Bounce flash: can be considered a compensation
For available compensation range with each film speed, see the
table below.
method since it offers variation to the exposure and
augments available light; light may be bounced off
various surfaces to create different results.
Multiple flash: using more than one flash to create
specific lighting patterns on the subject. May be used
either with available light, or to obscure (overpower) the
effects of available light.
Automatic control: accomplished via the camera's
mUlti-segment metering system; preprogrammed at the
factory according to extensive testing.
Bracketing: results in a variety of different exposures,
both under- and overexposed; can be accomplished
either by using manual adjustments or by using an
optional multi-control accessory back.
16
Diffusers: devices placed in front of a camera lens to
soften a lighting effect or placed over each flash unit to
modify the quality of the light source.
Indirect flash: removing the flash from the camera and
holding it to the side, above or from below the subject to
create distinctly different lighting effects. This requires a
special extension cord which allows you to maintain
automatic control.
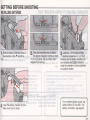
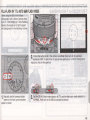
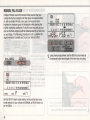
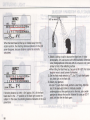
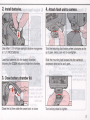
SETTI NG BEFOR E SHOOTI NG~--'-====-----=.=---..;=--:..:..==-------=-=-==-=---=..;==-=
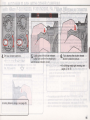
INSTALLING BATTERIES
1 Slide the battery chamber cover in
• the direction of the 'Y and lift to
open.
4 Close the battery chamber lid, then
• slide cover back to close.
2
Slide the meter/feet lever to select
• the desired indication (meters or feet)
on the LCD panel. (Set at meters when
shipped from factory.)
3
Load four 1.5V AA-type penlight
• alkaline-manganese or 1.2V NiCd
batteries into the battery chamber. Be
sure to follow the EllEI> indicators
inside the chamber to ensure batteries
are properly loaded.
For an external power source, use
optional Nikon DC Unit SO-7. For
battery information, see page 95.
17
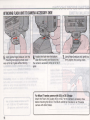
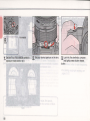
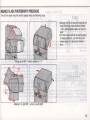
ATTACHING FLASH UNIT TO CAMERA ACCESSORY SHOE
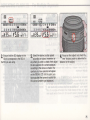
5
Using gentle finger pressure, turn the
• mounting foot locking wheel clockwise as far as it goes without forcing .
6
Holding the flash near the bottom ,
• slide the mounting foot forward into
the camera 's accessory shoe as far as it
goes.
7.
Using finger pressure only, gently but
• firmly tighten the locking wheel.
For Nikon F3·series camera with DE·2 or DE·3 finder:
Attach the Flash Unit Coupler AS -4 or AS-? to the camera's accessory shoe
before mounting the S8-24. The S8-24 cannot be mounted on an F3-series
camera with other finders .
18
I'
I
ISO
~
~
Inn
IUU
(0.60.8 1 1.5 2 3 4 6 9 1318
ZOOM
3Smm
F·-:
m
J
ISO
Inn
IUU
-,
_(2 3 4 5 7 1015 20 304060 ft )
ZOOM
3Smm
F--:
a~"'u ~
_ ~ ;D'"~t~1'
""
~lI
JMi
~
{ ,~
S'$1"• .tI\;tj;;~
~+
(,
""
~\t.t~'j:
/:1I*'ti
;;;:;; _::-1
,,_
: ~ .r'. }\t~
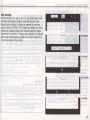
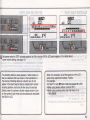
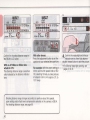
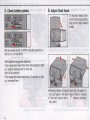
8 Set power switch to STBY (standby position) or ON to turn on 88·24. LCD panel appears. (For details about
• power switch setting, see page 14).
The shooting distance scale appears in either meters or
feet, as selected. Both are shown in the illustrations in
this manual. Shooting distance indicator bars do not
appear if the flash head is tilted or rotated from normal
shooting position, and turns off after about 8 seconds.
Gently press the camera's shutter release button to turn
on the camera's light meter and simultaneously reactivate
the S8-24's LCD.
When it is necessary to set the aperture on the LCD
panel using adjustment buttons. F blinks.
For example :
-In Non-TTL Auto a flash mode (see pages 66 to 68).
- When using lenses without a built·in CPU .
- When using cameras other than the Nikon F4 or
F-801/NBOOB.
19
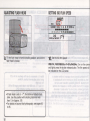
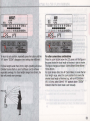
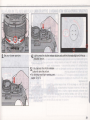
ADJUSTING FLASH HEAD
SETTING ISO FILM SPEED
UU~;:'I
Gf'-U-' )
ILILI
ISO
O.60.811~
------=·C
3 4 6 91318m
2 345 7101520304060ft
ZOOM _, ~mm
9
Tilt the flash head to normal shooting poSition, and confirm
• flash head is locked.
F--:
10. Set the ISO film speed.
With F4, F·801/N8008 or F·401s/N4004s: Turn on the camen
and lightly press the shutter release button . The film speed will
be indicated on the LCD panel.
- If flash head is set at - YO, the distance indicator bars
blink. Use this position with shooting distances less
than 1.5m (approx. Sit) .
• For details on bounce flash photography, see pages 83
to 85.
20
(Ill
-~l~
:DD
(Ill
SET
ISO
_.'!-J
'.-'1-'
------F-·:
O. 0.811.52 346 91318m
IUU
0.60.8 1 1.5 2 3 4 6 9 1318 m
2 345 7101520304060ft
2 345 7101520304060ft
-------
zoo?:1 3~
~mm
-
fl~~1~~_~~~~~1
L!. ,
~',.(~._~.". """.>:jjlll'"
,~
With other cameras:
(1) Push select button so " ISO" starts blinking in the LCD panel.
(2) While " ISO" is blinking, press the adjustment button T or •
to set the film speed in use.
elf you do not press the adjustment button for approx. 8
seconds or more, "ISO" automatically stops blinking. To
reactivate "ISO," press the select button again.
(3) When the desired film speed appears, press select button
again to cancel blinking.
elf "ISO" stops blinking automatically, you do not need to
press the select button again.
Except in Non-TTL Auto r.:.1 flash mode, the film speed is
essentially just a number displayed in the LCD panel. This
means that, even if the displayed ISO number is incorrect,
as long all other camera and speedlight settings are
correct, the subject will be correctly exposed, Therefore,
the ISO setting cannot be used as an exposure compensation control. A separate exposure compensation control
provides that opportunity.
21
SETTING ANGLE OF COVERAGE
ISO
,~
......
-------
0.60.811.5234691318m
2
ZOOM
[I]!~
IUU
45 71015203040601t
5
m
F"f
ISO
:DOHz
------:J.... F ••'
0.60.811.52 3 4 6 91318m
2 3 4 5 7 1015 20 304060 ft
'm
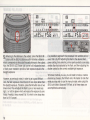
11. Set the zoom head.
When using the F4 or F·801/N8008 with an AF Nikkor or
Nlkkor lens having a bullt·ln CPU:
Within a covering power of 24mm to 85mm, the zoom head
automatically adjusts to provide an angle of coverage that
matches the focal length of the lens in use (indicated in the LCD
panel). When used in automatic selection mode with AF Nikkor
lenses of .fixed focal length, the S8·24 zoom head automatically
adjusts to the closest available wider focal length setting. With
zoom lenses, the zoom head automatically adjusts as the zoom
lens adjusts, within the limits of the available zoom coverage of
the S8·24.
22
,
It is also possible to select your desired angle of coverage
manually, by pressing the zoom bu~on [ZOOM]. In the LCD
panel, " M" appears above "ZOOM " indicator.
~
ISO
.nn
------IUU
SET
ISO
1m
• .-••-.
II..IU
-------
0.60.811.52 346 91318m
0.60.811.52 3 4 6 91318m
2 3 4 5 7101520304060ft
3 4 5 7101520304060ft
To return to auto position, repeatedly press the button until the
"M" above "ZOOM " disappears (next setting after M85mm).
For focal lengths wider than 24mm, slight vignetting will occur.
Consider bounce flash or use of a diffuser card to achieve
expanded coverage. For focal lengths longer than 85mm, the
Hash will provide over-coverage.
H~
j
m F~'•
For other camerallens combinations
Press the zoom button below the LCD panel until the figure in
the panel shows the focal length 01 the lens in use or shorter.
The figure changes as follows: -24mm-28mm-35mm-50mm70mm-85mmFor zoom lenses other than AF Zoom Nikkor, to cover the full
focal length range, select the zoom position that covers the
shortest focal length of the lens (e.g., with an AF28·85mm
1/3.5-4.5 lens, select 28mm). " M" appears above " ZOOM "
indicator when the zoom head is set manually.
23
The guide number changes according to the angle of
coverage. See page 81 .
F4
F-801/NaOO8
pages 25 to 49
If the shooting distance is less than 1.5m (approx. 5 tt), or
for close-up photography when S8-24 is separate from
the camera body, select the zoom position that is shorter
than the focal length of the lens in use. To help ensure
full flash coverage, be sure to aim the flash properly.
24
TTL AUTO iIll flASH WITH NIKON F4 OR F·801/N8008----The 58-24 takes full advantage of the F4 and F-801/NSOOS's
built-in computer, which automatically synchronizes the
camera's shutter speed and lens aperture to provide precisely
controlled exposures. The capability to handle wider brightness
ranges and use fill-flash under more complex conditions varies
from automatic operation to more advanced user-controlled
options.
With the Nikon F4 or F-801/NSOOS, by setting the 58-24 to TTL
auto flash mode, you will achieve advanced yet simplified fillflash photography.
You can choose any of the following flash categories-Matrix
Balanced Fill-Flash, Center-Weighted Fill-Flash or standard TTL
flash, according to the 58-24 's TTL mode (with or without automatic flash output level compensation) and camera's metering
system (Matrix or Center-Weighted).
1\
58-24
Camera
,~
metering system
With automatic flash
output level
compensation
Without automatic flash
output level
compensation
WW
~-
Matrix Metering
Matrix Balanced
Fill-Flash
Center-Weighted
Metering
Center-Weighted
Fill-Flash
~
I
ISO
0.60.811.52 346 91318m
ISO
~
0.6 0.811.5 2 3 4 6 9 1318 m
2 3 4 5 710 15203040601t
ZOOM
mm
F
To cancellactivate automatic flash output level compensE.tion,
(to select either iIlW or ~-), use the 58-24's "M" button.
II
To select either Matrix Metering or Center-Weighted Metering,
use the F-801/NSOOS's metering system selection button, or for
the F4, selection dial.
Standard TTL flash
• When the F4 is set for Spot Metering, only standard TTL flash
is available and will be selected automatically.
• The SB-24 takes full advantage of a special photographic
technique called rear-curtain sync flash. For details see page
48.
25
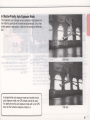
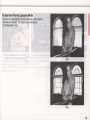
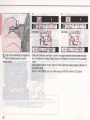
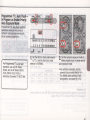
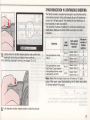
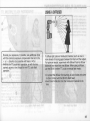
FILL-FLASH PHOTOGRAPHY
A backlit subject, such as a person outside with their back
to the sun, or indoors in front of a window, usually appears
as a silhouette if the exposure is set for background
brightness. If the exposure is set for a darker, silhouetted
subject, then the background will be overexposed and
appear washed out.
A better result can be achieved by leaving the exposure
set for the brighter background and then using the flash to
illuminate the darker foreground subject. This brings the
brightness of the foreground subject up to the brightness
of the background. This technique is called " fill-flash ", and
the 88-24 together with a Nikon F4, F-801/N8008 or F·401 sl
N4004s provides all the exposure control to automatically
accomplish fill-flash.
With flash
Exposure compensated
26
The 88-24 is capable of several different automatic fill-flash
methods. The method you choose depends on the Nikon 8LR
model you use, lighting conditions, subject movement and the
esthetic qualities you wish to achieve. Carefully consider each
picture situation.
MATRIX BALANCED FILL-FLASH
This is a feature of Nikon 8LR models having mUlti-segment
light meters (Matrix meter). The camera 's Matrix meter reads
the scene's light levels and light patterns, and signals the
computer, which then calculates the available-light exposure
settings. When the shutter is released, the camera's TTL sensor
senses available light and flash illumination, then relays the
information to the computer, which automatically controls the
flash operation . The computer automatically determines the
appropriate amount of flash exposure compensation to use.
When the computer senses just the right amount of flash
illumination for a balanced fill-flash exposure (based on the
automatic compensation control), the flash is turned off. The
result is a well-balanced photo with the correct exposure for
both background and foreground subjects. All this takes place
automatically and much quicker than it can be explained.
Standard TTL Flash
27
~
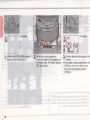
CENTER-WEIGHTED FILL-FLASH
STANDARD TTL FLASH
While the Matrix meter can automatically measure up to five
different segments of the scene's brightness, the CenterWeighted meter measures the entire scene and emphasizes its
reading on the center area. 8y pointing the center-weighted area
at different parts of the picture, you can choose which brightness level you want for the basic available·light exposure, as
compared to the Matrix system which uses computer evaluation
to determine the brightness/contrast levels upon which exposure
will be based.
This mode may be used with either the Matrix Meter or Center·
Weighted Meter. It differs from balanced fill-flash operation by
allowing you to manually select the amount of flash compensa- 1
tion instead of having the computer select it automatically. You
select the amount of compensation, from EV +1 to EV -3,
using the S8·24's EV compensation scale.
If the brightness value you have selected is within the controlled
shutter/aperture range possible, the flash output compensation
will be automatically set for a natural fill-flash effect. The amount
of computer selected automatic compensation available varies
with each Nikon SLR model. For details, check your camera
instruction manual. If you select a brightness value beyond the
controlled shutter/aperture range, the flash output will be set
without compensation, as with standard TTL flash operation.
80th Matrix and C-enter-Weighted modes always incorporate
some form of computer compensation, even if you make
adjustments manually. In Standard TTL mode, only your
manually selected compen~ation amount is used.
For manual flash output compensation, see pages 46 to
47.
28
-
--
-----
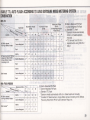
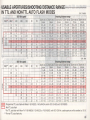
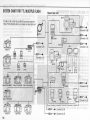
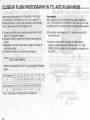
USABLE TTL AUTO FLASH ACCORDING TO LENS/EXPOSURE MODE/METERING SYSTEM
COMBINATION
With F4
~
~'
Metering EXPosure m Lenses
SYStem
Ode
AF Nikkor lenses
AI·P·type Nlkkor lenses
AF TeleconverlerlAF Nlkkor
lenses for Nlkon F3AFI
AI·type Nlkkor lenses
(including AI-S)
Other lenses
Multl·Meter Finder
DP-20
P
PH
S
AE Action Finder
DA-20
A
M
P
PH
S
A
M
Walst·Level Finder
DW·201
6X High-Magnification
Finder DW-21
P
A
M
S
PH
Matrix
0
0
0
0
-
-
-
-
-
-
-
-
Center·Welghted
0
0
0
0
0
0
0
0
-
-
-
-
Spot
r,.
r,.
r,.
r,.
r,.
r,.
r,.
r,.
r,.
r,.
r,.
r,.
0
0
-
-
-
-
O·
0
0
-
-
-
-
r,.
r,.
r,.
r,.
r,.
r,.
r,.
Matrix
O·
O·
Center-Weighted
O·
O·
0
0
O·
Spot
r,.
r,.
r,.
r,.
r,.
Matrix
r,.
r,.
r,.
r,.
-
-
-
-
Center-Weighted
r,.
r,.
r,.
r,.
r,.
r,.
r,.
r,.
-
-
-
-
Spot
r,.
r,.
r,.
r,.
r,.
r,.
r,.
r,.
r,.
r,.
r,.
r,.
Ystem
Po
P
PH
S
A
M
Matrix
0
0
0
0
o Matrix Balanced Fill·Flash
o CenterWeighted Fill-Flash
C. Standard TTL flash
• Exposure mode automatically
shifts to A. Select aperture
manually.
• TTL Remote Cord SC-24 is
required when using DW-20 or
DW-21 .
With F·801/N8008
~
Metering Z
s :::de
Lenses
AF Nlkkor lensesl
AI-P-type Nlkkor lenses
Other lenses 4.
© Matrix Balanced Fill-Flash
o Center-Weighted Fill-Flash
c.
Center-Weighted
0
0
0
0
Matrix
O·
O·
0
0
Center-Weighted
O·
O·
0
0
Standard TTL flash
• Exposure mode automatically shifts to A. Select aperture manually.
•• Includes AF Teleconverters, AI -type Nikkor lenses (including AI -S), Bellows
Focusing Attachment PB-6, Auto Extension Rings, etc .
,
29
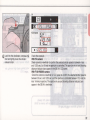
MATRIX BALANCED FILL-FLASH OPERATION
For Matrix 8alanced Fill-Flash, first make
sure of the following :
Ctm~)
ISO
0.6 0.8 1 1.5 2 3 4 6 91318m
2 3 4 5 7 1015 20304060ft
ZOOM
mm
F
* Set the S8-24's mode selector to TTL,
and confirm iID:Jl mark stays on .
If 11:!!! mark is blinking, push the S8-24's
"M " button.
30
* Choose and set the flash sync mode
selector to NORMAL.
F4
F4
F-SOllNSOOS
F-S011 NSOOS
• Set the metering system on the
camera to Matrix Metering.
* For autofocus operation, choose and
set the camera's focus mode to Single
Servo Autofocus. (For details about
autofocus flash photography, see
pages 64 to 65.)
* Choose and set the camera's film
advance mode to single-frame
shooting.
• The usable film speed for TTL flash
photography is ISO 25-1000.
For Center-Weighted Fill-Flash Operation
Follow the procedure for Matrix Balanced Fill-Flash, but
set the camera to Center-Weighted exposure metering
instead.
31
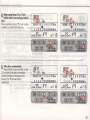
In Programmed Auto Exposure
Mode
This mode automatically selects the
optimum combination of aperture and
shutter speed to match the film speed in
use and the brightness of the scene.
Matrix Balanced Fill-Flash in programmed
auto exposure mode lets you concentrate
on picture composition and is desirable
when conditions are changing too fast for
you to pause for settings.
F4
F-801/N8008
1. Set the F4 or F-801/N8008 camera 's
exposure mode selector to P, PH
or PD".
"For F-801IN8008 only.
In programmed auto and shutterpriority auto exposure mode, you
cannot use a non-CPU lens. With
a non-CPU lens in aperture-priority
auto exposure mode, set the
camera's exposure mode to A.
32
2
Set lens to minimum aperture (i.e.
• highest f-number). If not properly set,
the shutter locks. (F4 shutter displays
FEE, but will fire.)
F4
L-.~P~QtD_
:,-F2_2____~1I
3
Look into the viewfinder, compose
• and lightly press the shutter release
button.
Confirm the controlled aperture and a
shutter speed between 1/60 sec. and
1/250 sec. appear in the camera's
viewfinder. The aperture-in-use and
shooting distance indicator bars appear
in the S8-24's LCD panel.
With the F-801/N8008, the controlled
aperture and shutter speed also appear
on the camera 's LCD panel.
Overexposure warning
For overexposure alert, HI appears
(together with lens' minimum aperture for
the F-801/N8008) in the position indicating the camera's shutter speed.
33
ISO
F4
~
Inn
'uu
O.60.~~~+:;;!)318 m
2 3
~
4060ft
-,~
:.mm ~D
-,
ZOOM.l
Confirm the shooting distance range in
the 58-24 's LCD panel. The shooting
distance range is automatically indicated
by the distance indicator bars.
• When you remove your eyes from the
camera to confirm the information on
the Sa·24 's LCD panel, the camera
may move slightly and cause the
exposure value to change.
To prevent this, use the AEL (Auto
Exposure Lock) button.
Shooting distance range changes according to aperture value , film speeds,
zoom setting andlor flash level compensation selected on the camera or 58-24.
For shooting distance range, see page 69.
34
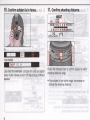
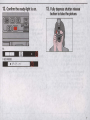
4
Confirm the ready-light and in-focus
• indicator are on, then fully depress
the shutter release button to take the
picture.
• For blinking ready·light warning, see
pages 12 to 13.
In Shutter· Priority Auto Exposure Mode
This mode lets you manually set your desired shutter speed and
the matching aperture will be selected automatically. Use a fast
shutter speed to stop action, a slow one to produce a deliberate
blur.
In programmed auto exposure mode and shutter-priority
auto exposure mode, non-CPU lenses cannot be used.
For aperture·priority auto exposure mode with a non·CPU
lens, set the camera's exposure mode to A.
1/30 sec.
35
1
F4
F4
F·801/N8008
F·801/N8008
Set the F4 or F·80i/N8008 camera's
• exposure mode selector to S.
36
2
Set lens to minimum aperture
• (highest f·number). If not properly set,
the shutter locks. (F4 shutter displays
FEE, but will fire.)
3. Set your desired shutter speed on the
camera.
elf you select a shutter speed faster than
11250 sec. and turn the flash unit on,
the camera automatically shifts to
11250 sec.
~_.~S~C~:2_S__F_5_.b~)____~1II
4
Look into the viewfinder, compose the
• shot and lightly press the shutter
release button.
Check the exposure .
With F4 camera:
Check camera's viewfinder to confirm the selected shutter speed is between 4 sec.
and 1/250 sec., (or X) and the aperture is controlled. The aperture-in-use and shooting
distance indicator bars appear in the S8 -24's LCD panel.
With F-801/N8008 camera:
Check the camera's viewfinder or LCD panel to confirm the selected shutter speed is
between 30 sec. and 1/250 sec. and the aperture is controlled between f/2.8 and the
lens' minimum aperture. The aperture·in-use and shooting distance indicator bars
appear in the S8·24's viewfinder.
37
F4
-------
ISO
0.6
2
liD
~
•
S
8
.-,
<:l._J
F4
~
Inn
IUU
:,.:
ZOOM _I _Imm
91318m
304060ft
C.
([])U""iY··,··2-
•
Overexposure warning
For overexposure alert, HI appears in the
position indicating the camera's aperture.
Confirm the shooting distance range in
the S8-24's LCD panel. The shooting
distance range is automatically indicated
by the distance indicator bars.
( @
S : 25
F 5_0
•
~.
5
Confirm the ready-light and in-focus
• indicator are on, then fully depress
shutter release button to take the picture.
• For blinking ready-light warning, see
pages 12-13.
Shooting distance range changes according to aperture value, film speeds,
zoom setting andlor flash level compensation selected on the camera or S8-24.
For shooting distance range, see page 69.
38
In Aperture·Priority Exposure Mode
You select the lens aperture and the matching shutter speed is
automatically selected. This mode is recommended for
controlling depth of field.
fl5.6
39
F4
'-I
BJ
'
F-801/N8008
1. Set the F4 or F-801/N8008 camera's
exposure mode selector to A
40
2. Set your desired aperture on the lens. 3
Look into the viewfinder, compose
• and lightly press shutter release
button.
F4
•
•
•
F-801lN8008
LA
IDJ
~
Check the exposure.
Check the camera's viewfinder to confirm the selected aperture and a controlled
shutter speed between 1160 and 1/250 sec. appear. The aperture·in·use and shooting
distance indicator bars appear in the S8·24's LCD panel.
With the F·801/N8008 camera, the selected aperture and controlled shutter speed also
appear on the camera's LCD panel.
r,' .?t ..'I• .. nr ..•.
-1 .-?t
1111
BJr;j"j\
•
\£L.J,I
-,-,
F:•. :.
Elr_J :J
Overexposure warning:
For overexposure alert, HI appears in the
position indicating the camera's shutter
speed. Select a smaller aperture.
41
i.ill~
F4
11-11-1
ISO
1'-I '-I
------Rtf)
8f~.!.~~t 4 6 9 1318 m
1 ° .60.811.52 3 4 6 91318m
;>20 304060 ft
2 3 4 5 7 1015 120304060 ft
3 4
-, :'..-mm
J
ZOOM:'
-1'-
ZOOM :, :, mm
C.
~!~!~loilljq~J
Confirm the shooting distance range in
the S8 -24's LCD panel.
With an AF Nikkor or Nikkor lens
w/built-in CPU :
The shooting distance range is automatically indicated by the distance indicator
bars.
With other lenses:
Press the adjustment button to set the
aperture to your selected lens aperture.
For example: With the zoom setting at
35mm and the film speed index at ISO
100, selecting fl8 lets you take pictures
of subjects 0.6m to 4m (approx. 2ft. to
15ft.) away
Shooting distance range changes according to aperture value, film speeds,
zoom setting andlor flash level compensation selected on the camera or S8-24.
For shooting distance range , see page 69.
42
F-801/N8008
I ® :9
fo e.
FE:
•
~
4
Confirm the ready-light and in-focus
• indicator are on, then fu lly depress
shutter release button to take the picture.
• For blinking ready-light warning, see
pages 12 to 13.
F·801fN8008
In Manual Exposure Mode
I"~ I
In this mode, you set both the shutter speed and aperture
manually according to the desired effect.
W
1. Set the F4 or F·80lIN8008 camera's exposure mode
selector to M.
2
Set your desired shutter speed within the sync range and
• set your desired aperture on the lens.
43
F4
1:_:
m
(.:II:II:~ c
F-801 /N8008
3
Look into the viewfir]der, compose the
• shot and lightly press the shutter
release button.
44
·
'C! .. :) = I
F-801/N8008
Check the camera's viewfinder to confirm manually selected shutter speed and aperture. The Electronic Analog Display shows the difference in value from the controlled
range.
Adjust aperture and/or shutter speed until the Electronic Analog Display indicates 0 or
the desired value_
With the F-801/N8008, you can check exposure with the camera's LCD panel.
2
Confirm the shooting distance range in
the S8-24's LCD panel.
With an AF Nikkor or Nikkor lens
w/built·in CPU:
The shooting distance range is automatically indicated by the distance indicator
bars.
060ft
I
<;) :'i 2 S"
F S.c
+2 .. 1..
y.. l .. 2-
•
=:f""J~
With other lenses:
Press the adjustment button to set
aperture to your selected lens aperture.
For example : With zoom setting at 35mm
and films speed index at ISO 100, selecting f/4 lets you take pictures of subjects
1m to 9m (approx. 4 ft. to 30ft.) away.
4
Confirm the ready-light and in-focus
• indicator are on, then fully depress
shutter release button to take the picture.
• For blinking ready-light warning, see
pages 12 to 13.
Shooting distance range changes according to aperture value , film speeds,
zoom setting andlor flash level compensation selected on the camera or S8-24.
For shooting distance range, see page 69.
45
FLASH EXPOSURE COMPENSATION
Varying the amount of flash, in relation to the available-light exposure, creates different
fill-flash effects. We say the fill-flash effect is balanced when the flash illumination is
sufficient to brighten the subject to "almost" the brightness of the background. Sometimes we want to use a little more or less flash to make the subject a little brighter or
not quite so bright. Your choice may be based on desired esthetic qualities, or may be
forced by extremes in lighting.
Generally speaking, you don't want to make the subject too bright, you just want to
brighten shadows. To achieve a subtle fill-flash effect, you may want to use some
manually selected "minus" compensation. However, when the background is extremely bright, and the subject is in deep shadows, you will probably want to use some
"plus" compensation. While the 58-24 is quite powerful, whenever using it for fill-flash ,
it is competing with the sun's brightness-very strong competition.
With standard TTL flash (with ~ blinking) you can manually compensate exposure by
adjusting flash output level. You can also adjust flash output level for Matrix 8alanced
Fill-Flash or Center-Weighted Fill-Flash, in combination with the computer's automatic
compensation.
46
ISO
..
~ 1~+1 0L-1-2-3
....... j
0.60.811.52 3 4 6 91318m
2 3 4 5 7 1015 20 304060 ft
ZOOM
1
mm
F
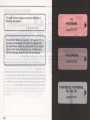
Press the 58-24's select button , and
• confirm the compensation scale
appears and Ii! indicator starts blinking
in the LCD panel.
ISO
...bn..•...,J
illl~ l~+1
0 -1-2-3
0.60.8 11.5 2 3 4 6 9 1318 m
2 3 4 5 7 10 1520304060 ft
ZOOM
2
While indicator is blinking, press " 'Y"
• button to increase the value or " . "
button to decrease it. The shooting distance range changes accordingly.
mm
F
3
Press the select button again, then
• confirm IB indicator stops blinking .
Setting is complete.
elf you do not press the select button
within approx. 8 sec., the IB indicator
e
also stops blinking.
The exposure compensation value
remains in the LCD panel after setting.
(ff exposure compensation value is 0,
the indication disappears.)
You can make additional compensation by using the camera's
exposure compensation dial. For
example, with compensation of
- 2 on the S8-24 and -1 on the
camera body, the total compensated value for flash output level is
-3, and the compensated value
for the background will be - 1.
Note that the LCD panel shows
only the compensated value on
the S8-24.
47
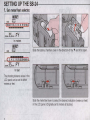
REAR-CURTAIN SYNC FLASH-For Natural Light Flows
When used with the F4 or F-801/N8008, the S8-24 lets you
synchronize the flash to the instant before the rear (second)
curtain begins to close.
Set the S8-24's flash sync mode selector to "REAR." This turns
available light into a stream of light that follows the flash-illuminated moving subject.
Rear-curtain sync flash photography is most effective with
slower shutter speeds. Although the slowest possible shutter
speed for front-curtain sync flash photography in TTL mode
(with camera at PO, P, PH or A) is only 1/60 second, with rearcurtain sync flash photography, depending on the background,
you can slow the shutter down to 30 seconds.
eln shutter-priority auto or manual exposure mode, be sure to
select an appropriate shutter speed. In programmed auto or
aperture-priority auto exposure mode, confirm shutter speed is
not too slow. Otherwise, it could affect image sharpness. To
prevent camera shake, use a tripod.
e Rear-curtain sync flash is available when flash mode selector
is set to TTL, A or M.
Front-curtain sync
48
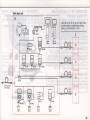
SHUTTER SPEED/APERTURE FOR EACH EXPOSURE MODE IN TTL AUTO FLASH
In Matrix Metering (with 50mm fl1.4 lens at ISO 100)
( (.ai!!!»
::::;::'
Exposure mode
REAR
«
)
Front-curtain sync (NORMAL)
wm
~-
INORMALi
(~
)
I:.
(~
)
)
Rear-curtain sync (REAR)
'-
, ~
~
~"
PO*/P/PH
1/60-1/2501/4-1/16 (1)
1/60-1/2501/4-1/16 (1)
30-1/250 114-1116 (1 )
30-1/2501/4-1/16 (1)
S
As set (3) 1/2.8-1/16 (2)
1/60-1/250 As set
As set (3) As set
As set (3) 1/2.8-1/16 (2)
As set (3) 112.8-1116 (2)
As set (3) 1/2.8-1/16 (2)
1/60-1/250 As set
30-1/250 As set
As set (3) As set
As set (3) As set
A
M
As set (3) As set
30-1/250 As set
* F-BOI INBOO8 only.
D: Matrix Balanced Fill-Flash (background correctly exposed ; TTL flash level automatically compensated)
D : Standard TTL flash (background correctly exposed)
(1) Maximum usable aperture varies according to film speed in use ; minimum aperture is the smallest aperture of the lens in
use. With the F4, aperture is automatically controlled between the lens' maximum aperture to its minimum.
(2) Maximum usable aperture is f/2.8 ; minimum aperture is the smallest aperture of the lens in use. With the F4, aperture is
automatically controlled between the lens' maximum aperture to its minimum.
(3) When set from 1/500 to 1/8000 sec., the shutter is automatically set to 1/250 sec.
49
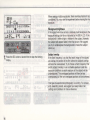
TTL AUTO lIn FLASH WITH NIKON F·401s/N4004s-----SHOOTING BRIGHT AND DARK SUBJECTS
The S8-24's flash light output control is performed in the same
manner as the camera's built-in TTL flash. The S8-24's light
output amount, however, is more powerful than the camera's
built-in TTL flash .
Although the S8-24's shooting distance range is greater than
that of the built-in flash , TTL auto flash shooting operation with
the S8-24 is same as with the camera 's built-in flash .
Note that the camera's viewfinder ready-light LED blinks to
indicate you should use a flash only when the optional flash unit
attached on the camera is turned off.
-With the F-401s/N4004s camera, for correct exposure
in TTL auto flash mode, use film with a speed of ISO 25
to ISO 400.
-With the F-401s/N4004s, ~ mark will not appear.
50
Depending on the camera's exposure mode, you can perform
Programmed TTL auto flash or TTL auto flash operation.
8alanced fill-flash is not possible, however, at brightness levels
darker than EV10. The camera's computer automatically detects
brightness and chooses the appropriate flash mode.
Programmed TTL Auto FlashIn Program or Shutter· Priority
Auto Exposure Mode
Programmed TTL auto flash simplifies
operations, because the camera's
computer automatically selects both
shutter speed and aperture.
SET
ISO
CWD
0.60.8 1 1.5 2 3 4 6 91318 m
2 3 4 5 7 10 1520304060 ft
zoo~
mm
F
1. Set the S8-24's flash mode selector
For Programmed TTL auto flash
"
operation, use only AF Nikkor
.:.
lenses, but not AF Nikkor 80mm
fI2.8, 200mm f/3 .5 IF-ED or
Autofocus Converter TC-16/TC-16A.
to TTL, and the flash sync mode
selector to NORMAL.
2
Set the camera's exposure mode to
• either program auto or shutter-priority
auto exposure mode.
• For autofocus operation, set the
camera focus mode selector to A.
( For details about autofocus flash
photography, see pages 64 to 65).
s
51
SET
ISO
-------
1318m
0.60_811.5 2 3 4 6 9 1318 m
4060ft
2 3 4 5 7 1015 0304060ft
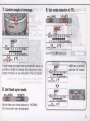
3
Make sure the shooting distance is within the Ilash range. Refer to the chart for the
• flash range lor each ISO film speed.
Unit : meters (feet)
Zoom setting
ISO film speed
400
11
200
8
100
5.6
50
4
iIll
.nn
IUU
25
24mm
28mm
35mm
50mm
70mm
85mm
2.8
0.7-5.3
(2.2-17)
0.7-5.6
(2.4 -18)
0.8-6.3
(2.7-20)
1.0-7.4
(3 .1-24)
1.1-8.3
(2 .5-27)
1.1-8.8
(3 .7-29)
For example:
With the zoom setting at 35mm and film speed index at ISO 100, you can take pictures
01 subjects 0.8m to 6.3m (approx. 2.7ft. to 20ft.) away.
For a convenient reference , use the
adjustment buttons to set the aperture
(I-number) in the 58-24's LCD panel, as
indicated by the chart.
4
Lightly press the shutter release button and confirm the
• ready-light and in-focus indicator are on.
5. Fully depress shutter release button to take the picture .
• For blinking ready-light warning. see pages 12 to 13.
53
TTL Auto Flash-In AperturePriority Auto or Manual
Exposure Mode
TTL Auto Flash lets you select any
aperture from f/1 .4 to f/32 to match the
shooting distance range with automatic
TTL control of the flash exposure.
2
Set the camera 's exposure mode to
• either aperture-priority auto or
manual exposure mode.
SET
ISO
<DID
• For autofocus operation, set the
camera's focus mode selector to A.
(For autofocus flash photography, see
pages 64 to 65).
3
Using the adjustment buttons, select
• the appropriate aperture to match the
shooting distance.
For example:
With the zoom setting at 35mm and film
speed index at ISO 100, selecting f/8 lets
you take pictures of subjects O.6m to 4m
(approx. 2ft. to 15ft.) away.
0.6 0.8 1 1.5 2 3 4 6 91318m
2 3 4 5 7 1015 20304060ft
zoo':t1
mm
F
1. Set the S8-24's flash mode selector
to TTL, and the flash sync mode
selector to NORMAL.
54
Shooting distance range varies
according to aperture value, film
speed andlor zoom setting. For
4. Set your chosen aperture.
5
Lightly press tthe shutter release
• button and confirm the ready-light
and in-focus indicator are on.
6
Fully depress the shutter release
• button to take the picture.
• For blinking ready-light warning, see
pages 12 to 13.
shooting distance range, see page 69.
55
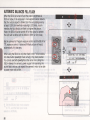
AUTOMATIC BALANCED FILL-FLASH
When the S8-24 is turned off and the scene's brightness is
EV10 or higher, if the computer's multi-segment sensor detects
that the central subject is darker than the surrounding area by
at least 1.5EV, the viewfinder ready-light LED blinks, recommending that you should use flash to brighten the picture.
(Note: the S8-24 must be turned off for this signal to operate.
The LED will not blink with the S8-24 in ST8Y or ON mode.)
Set the camera for Program exposure control and the S8-24 for
TTL exposure control. A balanced fill-flash picture will result,
automatically. It's that easy.
When using the S8-24 or any other flash in the F-401 s/N4004s
hot shoe, built-in speedlight must remain in the down position.
You cannot use both speedlights at the same time. Using the
S8-24 relieves the camera's power supply from operating the
built-in flash, and you can expect the camera's motor to be able
to power more rolls of film .
56
Fd'J
®
0.60.811.52 346 91318m
2 3 4 5 7 1015 20 304060 ft
zoo'l:1
mm
F
I
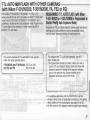
TTL AUTO iIll FLASH WITH OTHER CAMERAS--------
(with Nikon F-501/N2020, F-301/N2000, FA, FE2 or FG)
With a Nikon F-501/N2020, F-301/N2000, FA, FE2 or FG
camera, the S8-24 set at TTL provides standard TTL flash light
output control. With the F-501/N2020, F-301/N2000 in programmed or shutter-priority auto exposure mode, Programmed
TTL au10 flash will be selected. In other cases, the S8-24
performs TTL auto flash .
PROGRAMMED TTL AUTO FLASH (with Nikon
F-501/N2020 or F-301/N2000 in Programmed or
Shutter Priority Auto Exposure Mode)
Programmed TTL auto flash simplifies cameralflash operations,
allowing you to concentrate on picture composition without
worrying about exposure settings, including aperture.
For programmed TTL auto flash operation, use AI -S
type< lenses only.
For correct exposure in TTL auto flash mode, use film
within the range specified below:
* AI-S type lenses include AF Nikkor, Nikkor lens with a
built-in CPU and Series E lenses. Each lens shows the
minimum aperture in orange at the aperture indexing
post on the aperture ring. Lenses modified for AI
operation cannot be used for this mode.
F-501/N2020 and F-301/N2000 ISO 25 to 1000
FA, FE2 and FG
ISO 25 to 400
* For autofocus operation with the F-501lN2020, set the
*
camera's focus mode to Single Servo Autofocus. (For details
about autofocus flash photography, see pages 64 to 65).
Set the camera's film advance mode to single-frame shooting.
57
F·501/N2020
(
SET
ISO
...
))
"
0.6 0.8 1 1.5 2 3 4 6 91318m
m~
2 3 4 5 7 1015 20304060ft
ZOO';a
mm
F
1. Set the S8·24's flash mode selector
to TTL, and the flash sync mode
selector to NORMAL.
2. Set the camera's exposure mode to
3
Set the lens to its minimum aperture
• (highest f-number).
programmed auto exposure mode
(p DUAL', P, or PHI).
'For F-501/N2020 only.
Unit: meters (feet)
ISO film speed
800
16
400 200
11
8
100
5.6
Zoom setting
50
4
25
24 mm
28 mm
35mm
50mm
70mm
85mm
2.8
0.7·5.3
(2.2·17)
0.7·5.6
(2.4-18)
0.8·6.3
(2.7·20)
1.0·7.4
(3.1·24)
1.1·8.3
(2.5·27)
1.1·8.8
(3.7·29)
'With ISO 1000 film , usable aperture
4
Make sure the shooting distance is
• within the flash range. Refer to chart
for flash range at each ISO film speed.
58
IS
16+ 1/3 f/stops.
For example:
With the zoom setting at 35mm and film speed index at ISO 100, you can take pictures
of subjects 0.8m to 6.3m (approx. 2.7ft. to 20ft.) away.
,
0
L.
...
5. Lightly press the shutter release button and confirm the ready-light and in-focus
Indicator are on .
6
Fully depress the shutter release
• button to take the pictu re .
• For blinking ready-light warning, see
pages 12 to 13.
SET
ISO
im
• ,-.,-.
11..11..1
------M:0:
0.60.811.52 346 91318m
2 3 4 5 7 10
ZOOM
For a convenient reference, use the
adjustment buttons to set the aperture
(f-number) in the 88-24's LCD panel, as
indicated by the chart.
o304060 ft
_I _Imm
59
TTL AUTO FLASH
TTL Auto Flash lets you select any aperture from f/1.4 to f/32 to
match the shooting distance range with automatic TTL control
of the flash exposure.
* For autofocus operation with the F-501lN2020, choose and
set the camera's focus mode to Single Servo Autofocus. (For
details about autofocus flash photography, see pages 64 to 65).
* Choose and set the camera 's film advance mode to singleframe shooting.
* With the Nikon F-501/N2020 or F-301/N2000, set the
camera's exposure mode to aperture-priority auto or manual
expousre mode.
2
Using the adjustment buttons, select the aperture that best
• matches the shooting distance.
For example:
With the zoom setting at 35mm and the film speed index at ISO
100, selecting fl8 lets you take pictures of subjects 0.6m to 4m
(approx. 2ft. to 15ft.) away.
1. Set S8-24's flash mode selector to TTL, and the flash sync
mode selector NORMAL.
Shooting distance range varies according to aperture
value, film speed andlor zoom setting. For shooting
distance range, see page 69.
60
.
,
0
L..
3. Set your chosen aperture.
4
..I
Lightly press the shutter release button and confirm the ready-light and in-focus
• indicator are on.
5. Fully depress the s~utter release
button to take the picture .
• For blinking ready-light warning, see
pages 12 to 13.
61
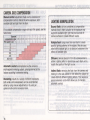
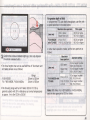
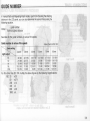
EXPOSURE COMPENSATION WITH CAMERA'S EXPOSURE DIAL
0304060ft
M-'~
ZOOM
.l ':'mm
Some camera models include an EV compensation control.
Using this control you can modify the exposure to make your
picture lighter or darker. To make the picture lighter, use +
compensation . For darker pictures use - compensation . How
much compensation you choose depends on how much you
want to modify the resulting picture.
The shooting distance range for TTL automatic flash operation
varies with the amount of exposure compensation .
For example:
With ISO film , an aperture of f/4, and a zoom setting of 35mm, if
you set the camera's exposure compensation dial at + 2, the
flash shooting distance range-which is 1m to 9m (approx. 4ft.
to 30ft.) at ISO 100-shifts to O.6m to 4m (approx. 2ft. to 15ft.)
at ISO 25.
62
1\
F--',
Exposure com·
pensatlon value +3 +2 + 1 0
-1
Film speed In use\
25 50
25
- 50
- - 25 50 100
100
25 50 100 200
200
25 50 100 200 400
50 100 200 400 800
400
800/1000'
100 200 400 800' ' For Nikon F·501 /N2020 and F·301/N2000 only.
-2
-3
-4
-5
100 200 400 800
200 400 800 400 800 800 -
-
-
-
-
-
-
• Be sure the compensated film speed is within the film speed
range that guarantees correct exposure in the TTL mode of
each camera.
FILL-FLASH IN TTL AUTO iIll FLASH MODE
When using the S8-24 for fill-flash
photography with a Nikon camera other
than F4, F-801/N8008 or F-401s/N4004s,
balance the exposure for both subject
and background in the following manner.
.
,
0
L.
...
2
Frame the background in the camera viewfinder, then turn on the camera's
• exposure meter to determine the appropriate aperture for a correct background
exposure, and set the aperture.
1
Manually set the camera shutter
• speed to the flash synchronization
speed or slower.
3
Set the S8-24's flash mode selector to TTL and the flash sync mode selector to
• NORMAL, then turn on the S8-24 and take the picture .
63
AUTOFOCUS FLASH PHOTOGRAPHY (with Nikon F4, F-801/N8008,F-501/N2020 or F-401s/N4004s)
When combined with the Nikon F4, F-801/N8008, F-501/N2020
or F-401s/N4004s camera, the S8-24's AF illuminator enables
you to perform autofocus operation in dim light and total
darkness.
F4
F·501/N2020
O
F-401s/N4004s
~~~
~
F·801/N8008
1
Set the Nikon F4, F-801lN8008 or F-501/N2020 focus mode
• selector to S for Single Servo Autofocus mode, or set the
F-401s/N4004s to A for autofocus mode.
Set the camera 's exposure mode and metering system selector
and the S8-24's flash mode selector as desired.
64
- -~
2
Lightly press the camera shutter release button and confirm
• that the viewfinder ready-light comes on.
When ambient light is insufficient for
autofocus operation, the AF illuminator automatically turns on to start
operation. If ambient light is sufficient,
the AF illuminator does not light up .
For greater depth of field
In programmed TTL auto flash photography, use film with
a speed specified in the table below'
Maximum lens aperture
3. Confirm the in·foeus indicator lights up, then fully depress
Lens only
ISO 50 or higher
ISO 100 or higher
F·501/N2020
with TC·16AS
1/1.4 or 1/1 .2
1/1.B, 1/2, 1/2.5 or 1/2.B
ISO 50 or higher
ISO 100 or higher
In other flash operation modes, set the lens aperture as
follows :
Maximum
lens aperture
the shutter release button.
• The foeallengths that can be used with the AF illuminator and
AF Nikkor lenses are as follows :
F·501IN2020:
F4, F·B01INBOO8, F·401sIN4004s :
Range
35mm to 105mm
24mm to 105mm
• The focusing range with an AF Nikkor 50mm f11 .B for a
general subject with 35% reflectance at normal temperatures
is approx. 1m to Bm (3.2ft to 26.2ft).
Film speed
1/2.B or laster
Slower than 1/2.B
fl2 .B laster
Lens only
F·501/N2020 with
TC·16AS
Slower than
1/2.B
1/1.4 or 1/1 .2
1/1 .B, 1/2, 1/2.5
or 1/2.B
Aperture setting
1/2.B or larger I·number
(fJ2 .B, 1/4, 1/5.6, etc.)
1/5.6 or larger I·number
(1/5.6, fiB, 1111 , etc.)
1/2 or larger I·number
(1/2, 112.B, 1/4, etc .)
fl4 or larger I·number
(1/4,1/5.6, liB etc.)
Note: With Nikon F4, F·B01INBOOB or F·401sIN4004s,
sets the lens aperture to (12.B or slower.
65
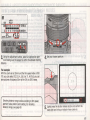
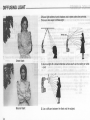
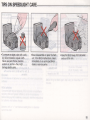
NON·TTl AUTO B FLASH-for Shooting with Varied Lens AperturesTo use various lens apertures for the same subject or when your camerallens
combination is incompatible with TTL auto flash mode, set the S8-24's flash mode
selector to A for non-TTL auto flash operation.
In non-TTL auto flash shooting, light output varies automatically to match the flash-tosubject distance, but instead of light being measured through the lens, it is measured
by the light sensor on the front of the S8-24.
The S8-24 can be used in non-TTL auto flash mode with any Nikon camera liens
combination.
~
ISO
0.6 0.8 1 1.5 2 3 4 6 91318m
2 3 4 5 7101520304060ft
ZOOM
F4
F·501/N2020
I]
F-BOllNBOOB
F-301 /N2000
LJI]~
1. Set the camera's exposure mode to aperture-priority auto or manual exposure
mode.
66
mm
F·-:
2. Set the S8-24's flash mode selector
to A, and the flash sync mode
selector to your choice of NORMAL or
REAR.
3
Using the adjustment buttons, select an appropriate aper• ture making sure the subject is within the allowed shooting
distance.
4. Set your chosen aperture.
For example:
With the zoom set at 35mm and the film speed index at ISO
100, you can select f/2, 2.8, 4, 5.6, 8 or 11 . At f/5 .6, you can
take pictures of subjects 0.8m to 6m (3ft. to 20ft.) away.
Shooting distance range varies according to film speed,
aperture value andlor zoom setting. For shooting
distance range, see page 69.
5
Lightly press the shutter release button and confirm the
• ready-light and in-focus indicator have come on.
67
EXPOSURE COMPENSATION IN NON-TTL AUTO
FLASH·MODE
6. Fully depress the shutler release button to take the picture.
• For blinking ready-light warning, see pages 12 to 13.
Test Firing for Non-TTL Auto Flash
Push the open-flash button. If the ready-light blinks,
select a wider aperture or move closer to the subject.
68
The Non-TTL Auto Flash mode works best for subjects of
average (18% gray) reflectance. For very dark subjects, we
recommend closing the aperture about 1/2 to 1 stop smaller
than indicated on the S8-24 LCD. For very bright (almost white)
subjects, it is just the opposite. Open the aperture about 1/2 to
1 stop. Similarly, the automatic system operates best under
average indoor conditions in the home-an average-size room
having white ceilings approx. 2.5 to 3 meter (8 to 10 feet) high.
In a very large room , or in one with very high ceilings, such as
an auditorium, if you are more than about 4.5 to 6 meters (15 to
20 feet) from the subject, you should experiment by opening the
aperture 1 to 2 stops wider than the LCD indicates. Since there
is no way to anticipate any specific condition, you may want to
take a few pictures using exposure bracketing .
USABLE APERTURES/SHOOTING DISTANCE RANGE~~~..:.:.....:...:~.:........:
IN TTL AND NON·TTL AUTO FLASH MODES
Unit : meters
ISO film speed
t600"
a.
0
~
8
11
16
22
32
800·
400
2
2.8
4
5.6
8
11
16
22
32
1.4
2
2.8
4
5.6
8
11
16
22
32
800·
400
2
2.8
4
5.6
8
11
16
22
32
1.4
2
2.8
4
5.6
8
11
16
22
32
200
1.4
2
2.8
4
5.6
-8
11
16
22
32
100
50
25
1.4
2
2.8
4
5.6
8
11
16
22
32
1.4
2
2.8
4
5.6
8
11
16
22
1.4
2
2.8
4
5.6
8
11
16
50
25
ISO film speed
1600··
200
1.4
2
2.8
4
5.6
8
11
16
22
32
100
Shooting distance range
Zoom set at Zoom set at Zoom set at Zoom set at Zoom set at Zoom set at
70mm
85mm
35mm
50mm
24mm
28mm
6.4-20
7.5-20
8.4-20
8.9-20
5.2-20
5.7-20
4.5-20
5.2-20
5.9-20
6.3 -20
3.7-20
4.0-20
4.4-20
2.9-20
3.2-20
3.7-20
4.2-20
2.6-20
3. -20
;J.2 ·2C
2. - 16
2.3-18
2.6-20
1.8-15
2.3- 17
1.6-12
1.8- 14
2.1-16
1.3-10
1.5-11
1.6-12
1.3-10
1.5-11
1.0-7.5
1.0-8.0
1.2-9.0
0.8--6.3
1.0-7.4
0.7-5.3
0.7-5.6
11:-8.3
1.l ."'!.a.8
0.8-6.2
0.6-4.0
0.6-4.5
0.7-5.2
0.8-5.8
0.6-3.7
1.6-2.6
.6-3.1
0.6-3.7
0.6-4.1
0.6-4.4
0.6-2.8
0.6-3.1
0.6-2.6
0.6-2.9
0.6-2.2
0.6-1 .8
0.6-2.0
0.6-2.2
0.6-2.0
0.6-1 .5
0.6-1.8
0.6-1 .3
0.6-1.4
0.6-1.1
0.6-1.3
0.6-1.4
0.6-1 .5
0.6-0.9
0.6-1.0
Unit : feet
Shooting distance range
Zoom set at Zoom set at Zoom set at Zoom set at Zoom set at Zoom set at
70 mm
85 mm
24mm
28mm
35mm
50mm
21-66
25-66
28-66
29-66
17-66
19-66
15-66
17-66
20-66
21-66
12-66
14-66
8.6-66
9.3 -66
11-66
12-66
14-66
15-66
6. -49
9. ·66
-66
6.6 ·52
7.4 ·59
8.6 ·66
5.3 -41
6.0-48
6.9 - 54
4.7-37
7.3-58
4.4 - 34
3.1-24
3.3-26
3.7-29
4.3-34
4.9-38
5.2-41
2.4-18
2.7 -20
3.1-24
3.7-29
3.5-27
2.2-17
2.0-12
2.0-13
2.0-14
2.2-17
2.5-19
2.6-20
2. -8.
2. -9.2
2. -1
2. -12
2. -13
2. -14
2.0-10
2.0-6.1
2.0-6.5
2.0- 7.3
2.0-8.6
2.0-9.6
2.0-4.3
2.0-4.6
2.0-5.2
2.0-6.0
2.0-6.8
2.0-7.2
2.0-4.3
2.0-4.8
2.0-5.1
2.0-3.0
2.0-3.3
2.0-3.6
1.4
1.4
2
2.8
2
1.4
4
a.
2.8
2
.9
4
56
2.8
~
5.6
4
8
11
8
5.6
16
11
8
11
22
16
32
22
16
c::J : Programmed TTL auto flash with Nikon F-501/N2020. F-401s/N4004s (within ISO 25-400) and F-301/N2000.
c:::::J: Non·TTL auto flash
• For TTL auto flash with Nikon F4. F-801/N8008. F·501/N2020 or F·301/N2000; with ISO 1000 film . usable apertures will be smaller by 1/3 EV.
•• For non·TTL auto flash only.
8
11
16
22
32
69
MANUAL [i!i] FLASH - You Make All The
Decisions-----:7~~~~~~:7_
With the S8-24's flash mode selector at M, you can manually choose your desired
level of flash power : full power (111), 1/2, 1/4, 1/8, or 1/16.
F4
F·301/N2000
1. Set the camera's exposure mode to aperture·priority auto or manual.
70
INORMALI~.
F·501/N2020
~~
D~
F·801/N8008
REAR • •
3 4 6 91318 m
2 3 4 5 7 1015 20304060ft
ZOOM
2
mm
F
M:/ :
Set the S8·24's flash mode selector
• to M, and the flash sync mode
selector to your choice of NORMAL or
REAR.
~
1"11-1
ISO
0.6 0.8 1 1.5 2 3 4 6 91318m
0.60.8 1 1.5 2 3 4 6 9 1318 m
2 3 4 5 7 1015 20304060ft
ZOOM
3
mm
F
( MIII-D
Press the "M" button to control the
• amount of light. The light output
changes as follows , and is shown in the
LCD panel.
-111 -1/2 -1/4 -1/8 -1/16-
IUU
-
ISO
23457
-,.-
zooM~~mm
4. Set an appropriate aperture, according to subject distance .
When using the Nikon F4 or F-S01/NSOOS with a lens having a built-in CPU:
S8-24's LCD panel automatically indicates your chosen apertu re and the shooting
distance mark _ appears on the distance scale. Set the camera 's aperture to match
your desired shooting distance.
71
Ii'lI
SET
ISO
,.-,.-,
,/..,
/..,
;-~:
0.6 0.8 1 1.5 ~(~ \4 6 91318 m
2 3 4 5 7 10 h520304060 f t
M:0:_'mm
ZOOM _,
FC-_'.0Ci) M,'/"1
With other combinations:
To set the aperture in the LCD panel, press the adjustment button until the shooting distance mark _
corresponds to your desi red distance.
Set the indicated aperture.
For example:
With the zoom set at 35mm and the film speed index at ISO 100, selecting f/5 .6 and light output 1/4 lets you take
pictures of subjects 3m (approx. 10ft) away.
Shooting distance varies according to aperture value,
fi lm speed, zoom setting and/or amount of light.
72
You can also determine aperture using the S8-24's guide
number (GN). For details, see page 81 .
SYNCHRONIZATION IN CONTINUOUS SHOOTING
0
-
~
5
Lightly press the shutter release button and confirm the
• ready-light and in-focus indicator have come on.
• For blinking ready-light warning, see pages 12 to 13.
The 8B-24 is able to recycle fast enough to synchronize with a
motor-driven camera firing continuously at up to 6 frames per
second at 1/16 light output. This means you can take up to 8
flash pictures in rapid succession.
The maximum number of flashes for continuous shooting are
listed below. Batteries must be fresh to achieve the rates
indicated.
Batteries
AA-type batteries inside
SB-24
AA-type batteries inside
SB-24 plus C-type alkalinemanganese batteries inside
optional DC Unit SO-7
Maximum
number of
flashes
(approx_)
Light
output
Sync speed
(frames per
second)
M1/16
Slower than 6
Slower than 3.3
M1/8
Slower than 6
Slower than 3.3
4
M1/16
Slower than 6
Slower than 3.3
10
30
M1 /8
Slower than 6
Slower than 3.3
5
9
8
10
5
Note: Never fire the flash more than 40 times at 1/8 light
output. After each major flash shooting, let the flash rest at least
10 minutes before firing again .
6. Fully depress shutter release button to take the picture.
73
MANUAL FILL-FLASH
Outdoor fill-flash used witll manual mode requires that you
choose the flash-to-daylight ratio that gives the desired effect.
As with automatic fill-flash, your goal is to have the flash
brighten the shadowy areas of the picture, while leaving the
brighter highlights unaffected. To do this you must set up your
shot so the flash exposure will be underexposed by at least one
or two f/stops . The following procedure is just a guideline for
experimentation to enable you to get your desired effect.
REAR ••
~
( « ii'Ii"»
~
ISO
4t2)
)
~ = __ . .
=
<
0.60.811.52 3 4 6 91318 m
2 3 4 5 7101520304060ft
ZOOM
mm
F
M:I:
Set the SB-24's flash mode selector to M and the flash sync
mode selector to your choise of NORMAL or REAR, then turn
on the SB-24.
74
ISO
,.....,
lULl
-
0.60.811.52 346 91318m
57101520304060ft
m
Fe c
_,.~,
'/',
M'
1. Using manual adjustment, set the SB-24's zoom head to
correspond to the focal length of the lens you are using.
6'iI
ISO
CiliD)
-
.r'I-'
IUU
-
0.60.811.52 3 4 6 91318m
0.6 0.8 1 1.5 2 3 4 6 91318m
2 3 4 5 7101520304060ft
2 345 7101520304060ft
M :0ZOOM
2
6'iI
ISO
_I
-=- mm
.- C
F:e.LI MIl:
Ensure that the ISO display on the
• S8-24 corresponds to the ISO of
the film you are using.
M
-n:_Imm (F e
6 ) 1M'II .
_I.t..
ZOOM.:t
3
I
Select the desired shutter speed
• according to subject movement or
any effect you wish to create, then adjust
the lens aperture for correct exposure,
according to the camera's meter. The
aperture you have selected will appear
on the S8-24's LCD. (At this point, you
have adjusted the camera's control for
the correct ambient light exposure.)
4
Focus on the subject and check the
• lens' focusing scale to determine the
distance to the subject.
75
~
ISO
~
Irll-I
.to.u
ISO
0.60.811.52 3 ~f~t1318 m
2 3 4 5 7 101520
-0-
zoo';;:1:t .Jmm
5
-=
F-:_M_I
Referring to the distance to the subject, press the SB-24 M
• button until the SB-24's distance scale indicates a distance
which corresponds to the actual focused distance to the subject.
Now, the SB-24's LCD (lower right corner) will indicate the level
of flash power needed to provide a flash exposure equal to the
daylight exposure.
However, as previously noted, in order to get a good fill-flash
ratio, the flash exposure should be one to two stops darker than
the daylight exposure. Therefore, press the M button one or two
times more. This will adjust the flash to one or two levels less
light. (i.e. half the power which will reduce the exposure by one
f/stop . Pressing it twice moves it to 1/4, which is two stops less
than full (111) power.)
76
4060ft
MIl:
Irll-I
.to.u
6
0.60.811j~1~ 4
91318 m
2 345 7 01520304060ft
-0-
zoo';;:1:UJmm
F-:_'.LI
-: (M.liB),
It is possible to approach this procedure from another point of
view; that is by first adjusting the flash to the desired flash
power setting, then selecting a lens aperture which is one stop
smaller than that indicated by the flash , and then adjusting the
shutter control for the correct available-light exposure.
Whichever method you use, you will need to make a creative
decision by chOOSing the fill-flash ratio. We hasten to note that
while you may wish to use the manual mode, when using the
SB-24 with Matrix Balanced Fill-Flash, all of these steps are
accomplished automatically.
REPEATING FLASH [ill] -For Multiple Exposure--------------,
For multiple flash exposures on one frame, use the S8-24 in the
IillI mode. The flash can be fired up to eight times on one frame,
and if used in conjunction w ith the camera body's multiple exposure control , many more flashes can be achieved on the same
frame . Note that this feature operates only in manual exposure
control mode for both the flash and the camera.
AEAR • • INORMALI
( (nM,)
!ml fillD
-,Sf"l- Si{-
:Hz
0.6 0.8 1 1.5 2 3 4 6 91318 m
2 3 4 5 7101520304060ft
ZOOM
mm
F
'/ I'6
MI
1. Set the flash mode selector to m .
2. Set the flash sync mode selector to NORMAL.
77
3
..
Choose B (bulb) setting or a shutter speed long enough to
• accommodate all of the flashes you will fire. For example:
10Hz will fire the flash 10 times in one second. Firing the flash 5
times at 10Hz takes 1/2 second to occur, so you should set the
shutter to a speed at least as slow as 1/2 second.
-
0.60.811.52 3 4 6 91318m
2 345 7101520304060ft
Firing the flash 6 times at 8Hz takes 6/8 second to occur.
However, because your camera does not have a shutter speed
of 6/8 (0.75) second, you should set it to the closest slower
shutter speed, which is one second.
As you may have noted: to calculate the speed necessary for
the combination of number of flashes and speed of flashes, you
should divide the number of flashes by the speed of the flashes
(Hz), then convert the fraction to a decimal number and set the
shutter speed that corresponds to the calculated value.
4. Set the ambient light exposure using the manual exposure
control mode.
4 6 91318m
1520304060ft
-,
I •
5
Press the M button to choose the required flash power level,
• either 1/16 or 1/8 power. The lower 1/16 power will permit
more flashes per firing. The maximum number of flashes will be
indicated by the LCD when you perform the next step.
Alternately choosing 1/8 or 1/16 also allows you to vary the
distance to the subject, which will be indicated on the LCD
distance scale.
You rnay also adjust for subject distance by adjusting the zoom
head position. The LCD distance scale will also indicate this
adjustment. Always be sure that the zoom head position is at a
setting that is at least as wide as the focal length of the lens you
are using. Otherwise vignetting may occur.
78
6
When using Nikon F4 or F·8011
• N8008 with a lens having a built·in
CPU:
Press adjustment button ~ to set number
of flashes , and • to set frequency,
t
,
~cm;
-s
"t' U
,
-F·-:
J~J~J~(f:.Th;
, . ' Q;j , "_I Z
:Hz
0,60.8 1 1.5 2 3 4 6 91318m
2 345 7101520304060 ft
-0ZOOM:'
:'mm
MU :5
-
0.60.811.~
3 4 6 91318m
2 3 4 5 7 1015 20304060 f t
F·-:
MIla
M_I:0:
F ._',
_Imm
MIla
-0ZOOM:'
.Jmm
'I ,,-
~oillCiJJ
~ C1J
~!IIIIII
6
With other combinations:
• Press the SEL button (the SEL on the
LCD will blink) and select the desired
number of flashes and frequency by
pressing the ~ and • buttons,
respectively.
-1W-~
,., "'"
I
1Hz
0.60.8 1 1.5 2 3 4 6 9 1318 m
2 345 710 1520304060ft
-'1F._,'
ZOOM:' :'mm
MU :5
ZOOM
'I ''''
79
~m
SET
B-
-
When making multiple exposures, there are many factors to be
considered. You may want to experiment before making the final
exposure.
u-'
IU H z
0.60.8 1 1.5 2 3 4 6 9 1318 m
2 3 4 5 7 1015 20 304060 ft
M -I~
zooM
~ ;'mm
7,
F~',
'/ 'U
'e
MI
Press the 8EL button a second time to stop the blinking
• display.
Background brightness
If the subject will move across a relatively dark background, the
exposure settings can be as indicated by the 88-24 LCD. If the
background is rather bright in relation to the subject, however,
the subject will appear faded in the final picture. We suggest
you try to underexpose the background to make the subject
stand out.
Subject overlap
If the flash frequency is so fast that each image of the subject
will overlap, the portion of the film where the subjects overlap
will become overexposed. Try to choose a flash frequency that
avoids subject overlap or use a smaller aperture to set the
exposure conditions so each exposure of the subject will be
underexposed. The overlapped portions will then be less
overexposed, but the non-overlapped portions will be darkened.
This type of experimental photography is exciting. For consistently rewarding results, we suggest you keep notes of all
settings and conditions for future reference.
80
GUIDENUMBER------------~~~~~~~~~~~
In manual flash and Repeating-Flash modes, apart from checking the shooting
distance in the LCD panel , you can also determine the correct flstop using the
following equation.
fl t _
guide number
s op - flash-to-subject-distance
See table for the guide numbers at various film speeds.
Guide number at various film speeds
~
Light output
1/1
1/2
1/4
1/8
1/16
meters (feet) at ISO 100
24mm
28mm
35mm
50mm
30(98)
21 (69)
15 (49)
10.5 (34)
7.5(25)
32(105)
22 (72)
16 (52)
11 (36)
8 (26)
36(118)
25 (82)
18 (59)
12.5 (41)
9(29)
42 (138)
30 (98)
21 (69)
15 (49)
10.5 (34)
70mm
47
33
23
16.5
11 .5
(154)
(108)
(75)
(54)
(38)
85mm
50 (164)
36 (118)
25 (82)
18 (59)
12.5 (41)
..
For film other than ISO 100, multiply the above figures by the follOWing magnifications:
ISO 25
xO.5
50
200
400
800
1600
xO.71
x1.4
x2
x2.8
x4
81
DIFFUSING
LlGHT------------~~~__:__:_:_:~'-Diffused light softens harsh shadows and creates attractive portraits.
There are two ways to diffuse light:
White card
I~~:.:.~::~~_-_----
Direct flash:
1. Bounce light off a broad reflective surface such as the ceiling or white
card.
Bounce flash:
82
2. Use a diffuser between the flash and the subject.
BOUNCE FLASH PHOTOGRAPHY PROCEDURE
The 88-24's flash head tilts andlor rotates within the following range.
• Although the S8-24 has click stops at the
most commonly used positions (except
- 30°), intermediate angles can also be
used.
• The flash head locks at the front position.
To release the lock, use the tilting lock
release lever or rotating lock release
lever.
Rotation: to right 90 0 -front-to left 1800
83
iID~
11-11-1
ISO
• Lit••
0.6 O.IJ.L L5..2. ..J..4..8...9..~ 18 m
2 3"'~~- "lo1!;"2b~4'o 60ft
-.~
ZOOM:; ~mm
F·-:
When the flash head is tilted up or rotated away from the
original position, the shooting distance indicators in the LCD
panel disappear, because distance cannot be correctly
calculated.
1. Select a ceiling or wall to bounce the flash from. In color
iID~
0-"-1
ISO
IL.Lt
0.6 O.~"\.51.aJ.:'~J.P 18 m
2 3' ~ ~' 1 1b '5'2!i3t>~060ft
-0ZOOM~ ~mm
F·-:
If shooting distance is within 1.5m (approx. 5ft.), tilt the flash
head down to the - r position so the flash light covers the
subject. In this case, the shooting distance indicators in the LCD
panel blink.
84
photography, only use bounce with white surfacel). Otherwise,
color photographs will come out with an unnatural color cast
similar to that of the reflecting surface.
- When tilting the flash head up, be sure to tilt it 60· (first clickstop) or more to avoid uneven illumination.
2. Set the flash mode selector to TTL for TTL auto flash operation, then tum on the flash unit.
3. Select your aperture.
-In non-TTL auto flash mode, perform a test firing. After the
test, if the ready-light blinks to indicate possible
underexposure at the aperture set on the lens, use a wider
aperture or reduce the bounce distance (by using an SC-t7
cord), and test fire the flash again.
USING A DIFFUSER
Bracket your exposures. If possible, take additional shots
with the camera's exposure compensation dial set in the
+ or - direction (not possible with Nikon F-401sl
N4004s) for TTL auto flash operation, or with the lens
opened up one or two f/stops for non-TTL auto flash
operation.
I
To diffuse light, place a translucent material, such as one or
more sheets of tracing paper between the flash and the subject.
For optimum results , experiment with different flash-to-diffuser
distances and more than one diffuser. When using a diffuser,
use the 5B-24 in either TTL auto or manual flash mode.
• To protect the diffuser from burning, be sure it does not come
in direct contact with the S8-24 s flash head.
• Avoid direct reflection from the translucent material to the
lens.
85
MULTIPLE FLASH
,
PHOTOGRAPHY-----------~
If you have another flash unit, you can use it as
a secondary light source for multiple flash
photography. When you use only one flash unit
in front of a subject, harsh shadows may be
produced or light may not reach the background. Using more than one flash unit helps
you solve these problems.
With one flash unit
86
/
With three flash units
. ~.
TTL MULTIPLE FLASH PHOTOGRAPHY
As the master flash unit, use Nikon Speedlight S8-24, S8-23,
S8-22, S8-218, S8-20, S8-18, S8-168 or S8-15 connected to an
F4, F-801/N8008, F-501/N2020, F-401s/N4004s, F-301/N2000,
FA, FE2 or FG camera, and for the slave flash unit(s), use the
S8-24, S8-22, S8-218, S8-20, S8-18, S8-17, S8-16A, S8-168
andlor S8-15. Up to 5 flash units can be used.
For TTL multiple flash photography, connect the flash units via
the speedlight's TTL multiple flash terminal using optional TTL
Multi-Flash Sync Cord SC-18 (1 .5m) andlor SC-19 (3m).
Because S8-23, S8-22, S8-218, S8-20, S8-18 and S8-15 do not
have a TTL multiple flash terminal, it is necessary to use TTL
Remote Cord SC-17 or SC-24* when using these flash units as a
master flash unit. To use S8-22, S8-218, S8-20, S8-18 andlor
S8-15 as slave flash units, use TTL Multi-Flash Adapter AS-l0.
When using S8-140, S8-14 andlor S8-11 for TTL multiple flash
photography, you should also use TTL Remote Cord SC-23.
* Used for F4 with DW-20 or DW-21 attached.
TTL auto flash is not possible when using Nikon F-401s/N4004s
with S8-11/14/140 (even with SC-23) or S8-218. These speedlights cannot be used for TTL multiple flash either, even as slave
flash units.
See system chart on the following pages.
• Set the power switch of slave flash units at ON position, not at
ST8Y. When using S8-24, S8-22 or S8-20 as a slave unit with
the power switch at ST8Y position, lightly pressing the shutter
release button does not activate them. The same thing also
happens when you set S8-23 to TTL (ST8Y); do not use S8-23
as a slave flash unit.
87
SYSTEM CHART FOR TTL MULTIPLE FLASH
Master flash unit
r---------~~-----------~
,
'The 88-11 , 88-14, 88-140 and 88-218 cannot be used with
Nikon F-401s/N4004s either as a master or slave flash unit
0
I
(I[D---+
Connect to ®
Connect to ®
~-----------+~~~+
, Connect to ®
~.I
Connect to ®
58·141
58·140
SC·17
Nlkon F·301IN2000
'---GlI~-+ Connect to
Nlkon FA
88
'----4lII~~+ Connect to
®
®
I
Slave flash unit
r----------- ------- ---- --- ----- ---- --- -----..
II ®
Using SC-18 or SC-19, up to 5 flash units
can be used for multiple flash photography, at a total length of 10m_
I
I
I
I
~
r-----.,
I
I
I
sc-,a
I
SC-'9
:
tt:~~--~-----------------+~[w~~~~lD~,
I
I
@
I
:
:
I
L. _____ .I
,..---- -,
~sc-'a
~\....J! SC-,9
I
I
I
I
I
~1I-------------------~(EEan,~,,~~~mmlDlD~
I
I
@:
I
I
I
'---- --~
sc-,a
SC-,g
r-----'I
I
I
r---~~::::::::::~::::~::::::::::::::::::::::::::::~-t~[m~~~~~~-l
+®
I
AS-'O
I
@
I
:
I
I
I'- _____ JI
El
AS-',
~------
~,~ ~
~
AS-,O
L'I
AS-"
SC.1a
r----- 1
SC.19
I
L-~~~~~~~~'I
@
I
I
IL.
:
I
I
I
I
_____
JI
AS-'O
____________________________________ J
89
ACCESSORIES FOR TTL MULTIPLE FLASH
TTL Remote Cord SC·17
TTL Multi·Flash Sync Cords SC·18 and SC·19
For Programmed TTL auto flash operation or TTL auto flash
operation when using the S8-24 off the Nikon F4-Series (with
DP-20 or DA-20) , F-801/N8008, F-501/N2020, F-401s/N4004s,
F-301/N2000, FA, FE2 or FG camera, use coiled cord SC-17.
The SC-17 provides automatic sync speed setting and the same
ready-light view-finder indication as if the flash unit were directly
mounted on the camera. SC-17 comes with two TIL multiple flash
terminals and one tripod socket. The SC-17 is approx 1.5m (4.9 tt).
To connect the flash units for TTL multiple flash operation, use
Sync Cord SC-18 or SC-19.
The SC-18 is approx. 1.5m (4.9ft) long ; the SC-19, 3m (9.8ft)
long.
TTL Remote Cord SC·24
For TTL auto flash operation when using the S8-24 off the
Nikon F4 camera fitted with either the 6X High-Magnification
Finder DW-21 or Waist-Level Finder DW-20, use SC-24 instead
of SC-17.
The SC-24 also comes with two TTL multiple flash terminals and
one tripod socket. The SC-24 is approx. 1.5m(4.9ft).
TTL Multi·Flash Adapter AS·10
When using more than three flash units for TTL multiple flash
operation, use the Multi-Flash Adapter AS-10, an adapter with
three multiple flash terminals and one tripod socket. (Requires
SC-18 or SC-19 for each flash use.)
SC-24
SC-19
SC-18
90
MANUAL MULTIPLE FLASH PHOTOGRAPHY
For multiple flash photography using Nikon F4 or
F-801/N8008, if the electric current in the synchro circuit
exceeds a certain level , you may not be able to take a
second shot after taking the first shot. Take care that the
combined total of the coefficients (numbers shown in
parenthesis below) for all speedlight's used at anyone
time does not exceed 20 at 20°C/68°F (13 at 40°C/104°F).
S8-24 (1)
S8-19 (2)
S8-14 (1)
Connect S8-24 and other flash units via the S8-24's multiple
flash terminal, using optional Nikon Sync Cord SC-11 or SC-15.
For correct exposure in manual multiple flash operation, be sure
all flash units are set at manual flash mode.
S8-23 (4)
S8-18 (16)
S8-12 (1)
S8-22 (6)
S8-17 (4)
S8-11 (1)
S8-21 (4)
S8-16 (4)
S8-20 (9)
S8-15 (4)
If you are unable to take a second shot, disconnect the
master speedlight from the camera, or turn each of the
speedlights off and on once. This resets the circuits so
you can resume shooting.
Caution: To avoid damage to flash units or incorrect operation,
never mix Nikon Speedlights with flash units of other
manufacturers.
91
CLOSE·UP FLASH PHOTOGRAPHY IN TTL AUTO FLASH MODE-When used with the Nikon F4, F-B01/NBOOB, F-501/N2020,
F-401s/N4004s, F-301/N2000, FA, FE2 or FG, optional TTL
Remote Cord SC-17 or SC-24, lets you perform flash shooting
with a subject closer than 0.6m (approx. 2ftJ
For example:
When using ISO 100 film and the flash-to-subject distance Is
0.5m (1 .6ft), divide 4 by 0.5 to get fiB . That means you can use
an aperture of fiB or smaller. Use the smallest aperture possible.
1_ Connect the S8-24 to the camera using Remote Cord SC-17.
(See SC-17 instruction manual.)
2. Position the S8-24 so light from the flash head covers the
subject.
3. Regardless of the lens in use, set the angle of coverage at
the 24mm position.
4. To determine aperture, use the following equation:
5. Set the flash mode selector to TTL, then turn 'on the S8-24
and take the shot.
A
flstop
= flash-to-subject-distance
Where A corresponds to the film in use according to the table
below:
92
-Exposure compensation is possible with the camera 's
exposure compensation dial. With the Nikon F4 or F-801/
N8008, it is also possible to make exposure compensation on
the S8-24.
TIPS ON SPEEDLIGHT CARE- - - - - - - - - - --
• To remove smudges, wipe with a soft,
dry silicon-treated or regular cloth.
Never use paint thinner, benzine,
acetone or alcohol-they might
damage plastic parts.
• Never disassemble or repair the flash
unit ; if the S8-24 malfunctions, take it
immediately to an authorized Nikon
dealer or service center.
-----\
• Keep the S8-24 away from salt-water
and out of the rain .
93
• Keep the 88-24 away from high temperatures and never store in a damp place.
94
• When not using the 88-24, remove
batteries to avoid damage due to
battery leakage. If leakage occurs, take
the 88-24 to your nearest authorized
Nikon dealer.
When not using the 88-24, perform the
following once a month :
1. Install batteries, then turn on the
88-24.
2. Wait until the ready-light comes on.
3. Turn off the 88-24, then remove the
batteries.
ABOUT
BATTERIES---------------~
New batteries
DC Unit 50·7
Purchase the newest (freshest) batteries possible.
Nikon DC Unit SO-7 can be used as an optional external power
sou rce for more flash capacity and faster recycling . To use it,
connect the SO·Ts power cord SC-16 to the SB-24's external
power terminal. Even when powered with the SO-7, the SB-24
still requires batteries inside the flash unit. Do not remove the
batteries.
Temperature
Battery life ratings are based on operation at 20°C (68°F). At
other temperatures, battery life is shortened. For low-temperature operation, keep spare batteries and if possible, use NiCd
batteries.
Continuous use
Batteries are drained more quickly by continuous use than by
intermittent use.
Storage
In continuous shooting using the external power source DC Unit
SO-7, to prevent flash head deterioration caused by heat, do not
exceed the maximum number of flashes as listed below.
Flash mode
Store batteries in a cool, dry place below 20°C (68°F).
15
Manualli'il
15 (at full or 1/2 power)
40 (at 1/4 power or less)
Battery brand
Do not mix battery brands or models, or new and old batteries.
Repeating flash
Disposal
Do not dispose of batteries by burning, and never disassemble
batteries.
Max_ number of flashes
TTL auto iII]
Non-TTL auto B
Iilll
~
10
Before firing the flash again, stop using for more than 10
minutes.
NiCd batteries
Compared with regular batteries, NiCd batteries provide faster
recycling time and greater efficiency at low temperatures.
Before charging NiCd batteries, thoroughly read the instructions
for batteries and battery charger.
Batteries with a
cannot be used.
.. + .. terminal exceeding 6mm
in diameter
95
GLOSSARY------------------------~~~~~~~~
Balanced fill-flash operation
Exposure control for available light
A method of flash photography which combines flash illumination and ambient light, and keeps flash brightness in balance
with the ambient light.
·Programmed: the automatic exposure system controlling both
the camera 's shutter and the lens' aperture.
Center-Weighted Metering
An SLR light meter, orginated by Nikon, which concentrates its
sensitivity on the center portion of the camera's viewing area.
CPU
Central Processing Unit: the electronic component which
controls equipment functions.
Shutter priority : user selects shutter speed and automatic
system chooses aperture for correct exposure.
Aperture priority : user selects aperture and automatic system
chooses shutter speed for correct exposure.
Manual: user follows the meter's recommendations for shutter
and aperture settings.
Exposure compensation
Fill-flash
For flash: exposure compensation refers to an adjustment,
either automatically or manually set, that enables the user to
vary the flash output from standard TTL operation.
A method of flash photography which combines flash illumination and ambient light, but does not necessarily attempt to
balance the two types of illumination .
For available light: exposure compensation refers to any
adjustment of either shutter or aperture which results in an
exposure change from the normal measured exposure settings.
Flash synchronization
The timing of the flash so it fires coincident with the operation of
the camera's shutter. There are two types of synchronization :
NORMAL, which fires the flash at the start of the exposure, and
REAR synchronization, which fires the flash at the end of the
exposure.
Guide number
A calculated number which indicates the relative power of a
flash unit.
96
Hertz
SLR
Abbreviated Hz, a unit of measurement equalling one cycle per
second.
Single Lens Reflex : a type of camera in which you look through
the camera 's lens as you view through the camera finder. Other
camera functions, such as light meter and flash control, also
operate viewing through the camera's lens.
LCD
Liquid Crystal Display: the visible display which shows
information on the back of the 88-24 and in some camera
finders.
Matrix Metering System
An advanced camera light metering system using a mUltisegment sensor and computer ; available in Nikon 8LR models
F4 and F-801/N8008. A basic version is used with the Nikon
F-401/N4004 and F-401s/N4OO4s models. Matrix Metering is an
exclusive Nikon feature.
Standard TTL flash operation
The flash output achieved when using TTL flash control for
automatic flash exposure operation. This system predates
balanced fill· flash systems and does not have any special
provision for balancing flash and ambient light.
TTL Auto
Camera's light meter system measures illumination viewing
through the camera 's taking lens.
Non-TTL Auto
A sensor measures illumination without viewing through the
camera's lens.
Red-eye
A phenomena caused by the reflection of light off the inside of
the eye, resulting in red spots appearing in a subject's eye in
color photographs. This effect is not caused by equipment, but
rather by the relative position of the flash in relation to the
subject and the camera 's lens. Red-eye is not always
predictable.
97
SPECIFICATIONS--------:----:-- ---=-- - - - - - - All performance data are for normal-temperature operation
(20°C [68°F]).
Electronic
construction:
Guide number:
Automatic silicon-controlled rectifier
and series circuitry
m (tt) at ISO 100
'{'oom setting
24mm
Bounce capability:
28mm
35mm
50mm
70mm
85mm
Power source:
Light output\
1/1
30(98)
32(105)
36(118)
42(138)
47(154)
50(164)
1/2
21 (69)
22(72)
25(82)
30(98)
33(108)
36(118)
21 (69)
23(75)
25(82)
15(49) 16.5(54)
18(59)
1/4
15(49)
16(52)
18(59)
1/8
10.5(34)
11 (36)
12.5(41)
1/16
7.5(25)
8(26)
Zoom capability:
9(29) 10.5(34)
11 .5 (38) 12.5(41)
F-501/N2020, F-401s/N4004s , F-301 1
Six settings-24mm , 28mm, 35mm ,
50mm, 70mm , 85mm ; auto power
zoom with the Nikon F-801/N8008;
manually set with other cameras
Angle of coverage:
98
Power switch:
Zoom setting
Horizontal
Vertical
24mm
78°
60°
28mm
70°
53°
35mm
60°
45°
50mm
46 °
34°
70mm
36°
26°
85mm
31°
23°
Flash head tilts down to - 7° or up
to 90° with click stops; flash head
rotates through an arc of 270° , 90°
clockwise and 180° counterclockwise with click stops; at front position for both vertical and horizontal
angle, flash head can be locked
Four 1.5 AA-type penlight alkalinemanganese, or 1.2V NiCd batteries;
optional Battery Pack SO-7 holding
six C-type batteries is available as
an external power source
Three positions are provided-OFF.
STBY (for standby) and ON; at STBY
position with Nikon F4, F-801/N8008,
Flash duration
(approx.):
N2000, FA, FE2 or FG, SB-24 turns
off automatically whe n flash unit is
not used for one or two minutes,
and turns on when camera exposure
meter is on
At 1/1 (full) output 1/1000 sec.
At 1/2 output
1/1100 sec.
At 1/4 output
1/2700 sec.
At 1/8 output
1/5500 sec .
At 1/16 output
1/11000 sec.
Number of flashes and recycling time at manual full
light output:
Recycling time
(approx .)
Battery type
Number of flashes
(approx .)"
AA-type
alkaline-manganese
100 times
AA-type NICd
40 times
5 sec.
Up to 200 times
Up to 300 times
Up to 400 times
6 sec.
10 sec .
30 sec.
C-type alkalinemanganese inside
the optional SO-7"
7 sec.
A mode:
Usable apertures in
A mode:
Shooting distance
range in A mode:
M mode:
AF assist LED:
For AF illuminator-assisted autofocus operation . less number of
flashes available.
With four AA-type penlight alkaline-manganese batteries installed
In the S8-24 .
Flash exposure
control:
TTL mode:
Four flash modes are providedTTL, A, M and Repeating Flash
Use with Nikon F4, F-801/N8008,
F-S01/N2020, F-401s/N4004s,
F·301/N2000, FA, FE2 or FG ; light is
measured through the lens
Usable film speed
ISO 2S to 1000 with Nikon F4,
range in TTL mode: F-801/N8008 , F-S01/N2020 and
F-301 /N2000; ISO 2S to 400 with
Nikon F-401 s/N4004s , FA, FE2 and
FG
Usable aperture range f/l.4 to f/22 (at ISO 100)
in TTL mode:
Shooting distance
0.6-20m (2-66ft)
range in TTL mode:
Other features:
Dimensions
(W x H x D):
Weight (without
batteries):
Accessory provided:
For non-TTL auto flash operation,
light is measured via light sensor in
front of the flash unit
f/2 , 1/2.8, f/4, f/S.6, f/8 and f/ll (at
ISO 100)
0.6-20m (2-66ft)
For manual flash operation, amount
of light output can be varied in five
steps
Automatically fires LED beam toward
subject when performing autofocus
with Nikon F4, F-801 / N8008,
F-S01 /N2020 (Single Servo) or
F-401sN4004s camera in insufficient
light
Rear-curtain sync flash photography
(with F4 or F-801 /N8008 only) and repeating flash photogrpahy are possible
Approx. 80 x 131 x 100mm
(3.1 xS.2x3.9 in .)
Approx. 390g (13.7 oz.)
Soft Case SS-24
Specifications and designs are subject to change without
notice.
99
No reproduction in any form of this manual, in
whole or in part (except for brief quotation in critical
artictes or reviews), may be made without written
authorization from NtKON CORPORATION.
Nikon
NIKON CORPORATION
FUJI BLDG., 2-3, MARUNOUCHI 3-CHOME, CHIYODA-KU, TOKYO 100, JAPAN
PHONE : 81-3-3214-5311 TELEX: NIKON J22601 FAX: 81-3-3201-5856
Printed in Japan 9&172-A09 (S486)
Nikon
Autofocus Speedlight
88-24
QUICK AUTOMATIC
OPERATION WITH THE
NIKON F4 OR F·801/N8008
The Nikon Autofocus Speedlight SB-24
incorporates several distinct operation
modes. This brief guide provides instruction
for all of the basic settings necessary to
use Matrix Balanced Fill-Flash, the most
advanced and automatic flash mode. For
explanations of each setting and information about all other flash controls, refer
to the main instruction manual.
Use the following film and
lens, and set your camera as
indicated:
Film:
DX-coded film, ISO 25-1000
Lens:
AF Nikkor lens (with aperture
set to its minimum setting)
Focus mode:
Single Servo Autofocus
Metering system:
Matrix Metering
Exposure mode:
Programmed Auto
Film advance mode:
Single-frame shooting
SETTING UP THE 5 8 · 2 4 - - - - - - - - - - - 1. Set meterlfeet selector.
ISO
~
.,..n
'uu
-------Ft-:
(0.60.811.5234691318m
ZOOM
:u:
_I Jmm
In meters
im~
ISO
."'~4
Slide the battery chamber cover in the direction of the
'I..'U
~
and lift to open.
(2 3 4 5 7 1015 20 304060 ft
:u:
zooM_I Jmm
Ft-:
In feet
The shooting distance scale in the
LCD panel can be set to either
meters or feet.
Slide the meter/feet lever to select the desired indication (meters or feet)
in the LCD panel. (Originally set to meters at factory.)
2
Use either 1.5V AA-type penlight alkaline-manganese
or 1.2V NiCd batteries.
Turn the mounting foot locking wheel clockwise as far
as it goes, taking care not to overtighten.
Load four batteries into the battery chamber,
following the 1- 1.5V ." indicators inside the chamber.
Slide the mounting foot forward into the camera 's
accessory shoe as far as it goes.
3. Close battery chamber lid.
mJ
Close the lid, then slide the cover back to close.
Turn locking wheel to tighten.
3
5. Check battery power.
6.
Adjust flash head.
Tilt the flash head to the
normal shooting position,
and confirm flash head is
locked.
Set the power switch to STBY (standby position) or
ON to turn on the SB-24.
With alkaline-manganese batteries :
If the ready-light takes more than 30 seconds to light
up, replace batteries with a fresh set.
With NiCd batteries :
If the ready-light takes more than 10 seconds to light
up, recharge them.
- Shooting distance indicator bars do not appear in
the LCD panel if the flash head is ti lted or rotated.
- If the flash head is set at - r , distance indicator
bars blink.
4
7.
Confirm angle of coverage.
9.
Set mode selector to TTL.
(~ )
iNN
IUU
ISO
-------
0.60.811.52 3 4 6 91318m
~
ISO
''-f .'"
11.11.1
-------
0.60.811.52 346 91318m
2 3 4 5 7 101520304060ft
2 3 4 5 7 101520304060ft
-,.-:l mm F 1_',
ZOO M :,
Confirm TTL
~
mark is on.
FI-:
ZOOM~~:' ~,m
In auto mode, the zoom head automatically adjusts to
provide an angle of coverage that matches the focal
length of the lens in use (indicated in the LCD panel).
-:'"
ISO
Inn',"
------F'i
tUU
If ~ mark is blinking ,
push the " M" button.
0.6 0.S1 1.5 2 3 4 6 9 131Sm
23 4 57101S20304060h
zooM 3Smm
8.
Set flash sync mode.
ISO
~
onn
.uu
-------
0.60.S1 1.5 234 6 9131S m
23457101S203040SOft
Set the flash sync mode selector to " NORMAL"
(for front-curtain sync photography).
ZOOM
35mm F'-I
5
10. Confirm subject is in focus.
11. Confirm shooting distance.
..-......
[jj]~
'uu
O.60~r1.52 346 9:1~18m
ISO
-------
2 3 4 5 710152030 060 ft
:.C
ZOOM _, -Imm Ft-:
F4
-- m
F-801/N8008
·
"'~<~
~~P~
: 2~
5 -F~ -----"'"
Look into the viewfinder, compose the shot and lightly
press shutter release button until the in-focus indicator
appears.
6
Check the indicator bars to confirm subject is within
shooting distance range.
• If the subject is not within range, recompose or
change the shooting distance.
12. Confirm the ready·light is on.
13. Fully depress shutter release
button to take the picture.
F4
-- m
F-B01/N,..;..BO,;...O,;...B_ _ _ _ _----,
. . . PIC'S F'1
_
·
7
Troubleshooting:-------------------...
If any of ·the following conditions occur, check
each of the points indicated and refer to the
numbered instruction.
REFER TO:
LCD panel display does not appear:
Are batteries properly installed? ......................... 2
Are batteries fresh? .. .......... ........ .. .. ................... 5
Is battery chamber lid firmly closed? ................. 3
Is the power switch set to STBY or ON? ............ 5
Incorrect display appears:
Is the unit correctly mounted on the camera? .... 4
Are all camera settings correct? ........................ 1
Flash does not fire when shutter is released:
Was the ready-light on when you took
the picture? ... ... .. ... ..... ..... .... ......... .. .... ... ....... 12
Flash does not fire and shutter cannot be
released even with the ready-light on:
With the F4 : Is the film advance mode selector
set to S?
With the F-801/N8008 : Is the power switch set
to ON?
Flash does not fire even with the ready-light on:
Is the unit correctly mounted on the camera? .... 4
Ready-light blinks after shooting:
Ready-light does not light up:
Are batteries properly installed? ......................... 2
Are batteries fresh? .................................... .. .... . 5
Is the battery chamber lid firmly closed? .. .... .. .. . 3
Is the power switch set to STBY or ON? ........ .. .. 5
Is subject within the shooting distance range
indicated on the SB-24's LCD? .................... 11